15
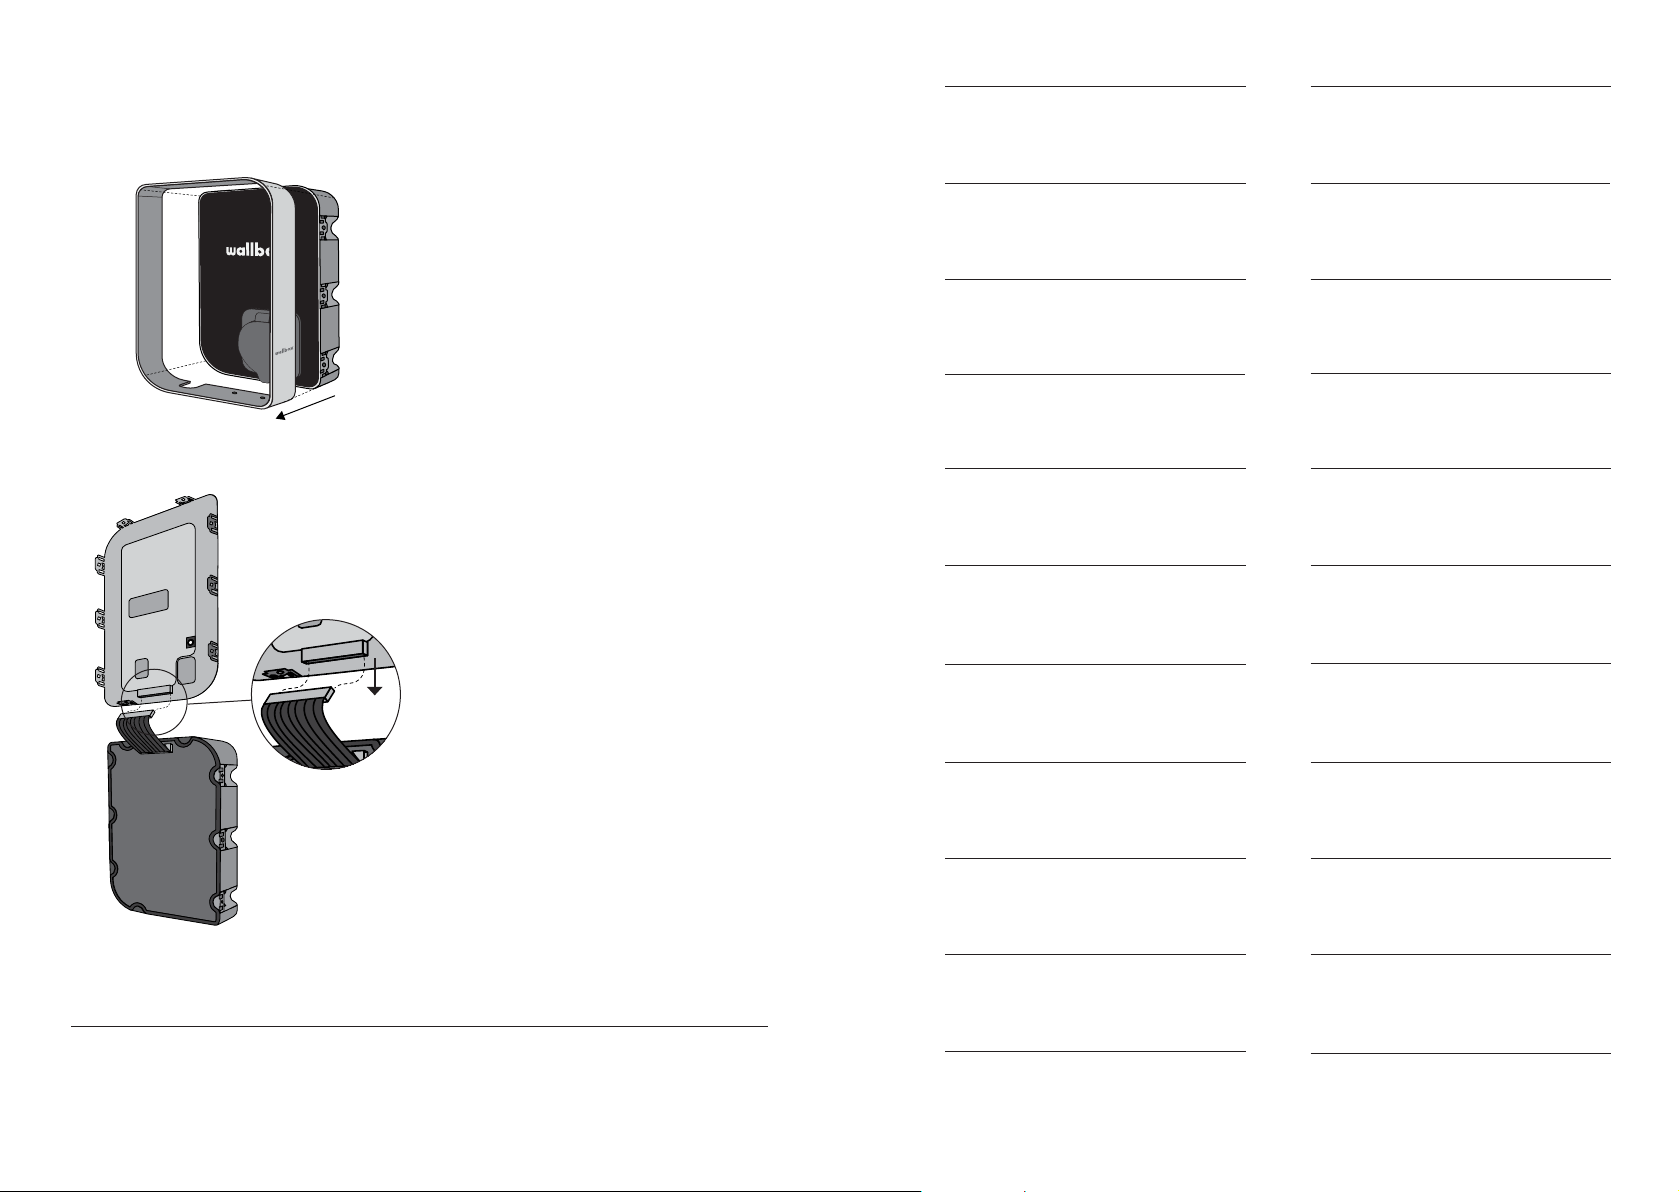
2 - Opening the Co
A.
B. Open the nine clips manually to
carefully unclip the cover. Next,
disconnect the communications cable
from the cover.
Keep in mind that the use of any kind
of tool for opening the clips is neither
recommended nor acceptable.
Remove the frame from the char
starting from the top by unclipping
it. Then pull the rest of the frame.
FR
2 - Ouverture du couv
A. Enlevez le cadre du chargeur en détachant la partie supérieure de
celui-ci. Retirez ensuite le reste du cadre.
B. Ouvrezlesneufattachesmanuellementande
le couvercle. Déconnectez ensuite le câble de communication du
couvercle. Notez que l’utilisation d’outils pour ouvrir les a
ni recommandée, ni acceptable.
DE
2 - Abdeckung önen
A. Entferne den Rahmen vom Ladegerät, von oben beginnend, indem
du ihn ausklinkst. Ziehe dann den Rest des Rahmens ab.
B. ÖnedieneunClipsvonHand,umdieAbdeckungvorsichtigzu
lösen. Trenne anschließend das Kommunikationskabel von der
Abdeckung. Denke daran, dass die Verwendung von Werkzeugen
zumÖnenderClipswederempfohlenwirdnochzulässigist.
DA
2 - Åbning af dækslet
A. Fjernrammenfraopladerenvedførstatløsnedenitoppen.
Træk så i resten af rammen.
B. Åbn de ni klips manuelt så dækslet forsigtigt kan løsnes. Frakobl
derefter kommunikationskablet fra dækslet. Vær opmærksom på, a
det hverken anbefales eller accepteres, at der bruges noget form for
værktøjforatåbneklipsene.
CS
2 - Otevření krytu
A. Odstraňterámečekznabíječky.Začnětenahornístraněuvolněním
rámečku.Potévytáhnětezbytekrámečku.
B. Ručněotevřetedevětsvorekaopatrněuvolnětekryt.Jakodalší
odpojtezkrytukomunikačníkabel.
Pamatujte,žekotevřenísvoreknenídoporučenoanipovoleno
používatžádnénástroje.
FI
2 - Kannen a
A. Poista runko laturista ylhäältä alkaen avaamalla kiinnikkeet. Vedä
sitten loput rungosta irti.
B. Avaayhdeksänkiinnikettäkäsinjairrot
Seuraavaksi irrot
Huomaa, että kiinnikkeiden avaamista minkäänlaisella työkalulla ei
suositella eikä sallita.
ET
2 - Kaane a
A. Eemaldagelaadijaltraam,avadesklambrijaalust
Seejäreltõmmakeäraülejäänudraam.
B. Kaane klambrite ettevaatlikuk
klambritkäsitsi.Seejärelühendagekaaneküljestlahtisidekaabel.
Pidage meeles, et mis tahes tööriistade kasutamine klambrite
avamiseks ei ole soovitat
HU
2 - A fedél kinyitása
A. Távolítsaelakeretetatöltőrőlatetejétőlkezdvekipattintvaazt.
Ezután húzza le a keret többi részét.
B. Nyissa ki kézzel a kilenc kapcsot a fedél óvatos kioldásához. Ezután
válasszaleakommunikációskábeltafedélről.
Nefeledje,hogyakapcsokkinyitásáhozsemmilyeneszköz
használatanemajánlottésnemelfogadható.
EL
2 - Άν
A.
Αφαιρέστετοπλαίσιοαπότονφορτιστήξεκι
αποσυνδέοντάςτο.Στησυνέχεια,τραβήξτετουπόλοι
B.
Ανοίξτεμετοχέριτ
τοκάλυμμα.Στησυνέχεια,αποσυνδέστετοκαλώδιοεπικοινω
απότοκάλυμμα.
Λάβετευπόψηότιηχρήσηοποιουδήποτεείδουςεργαλείουγιατο
άνοιγματωνκλιπδενσυνιστ
LV
2 - V
A. Noņemietrāminolādētāja,sākotaraugšējomalu,toatāķējot.T
novelcietnostpārējorāmi.
B. Manuāliatverietdeviņasskavas,laiuzmanīginoņemtuvāk
atvienojietnovākakomunikācijaskabeli.
Atcerieties,kajebkāduinstrumentuizmantošanaska
netiekneieteikta,neirpieļaujama.
IS
2 - Hlífin opnuð
A. T
afsmella því. Togaðu síðan í restina af rammanum.
B. Opnaðusmellurnarníuhandvirkttilaðlosahlínagætilegaaf.
Aftengduþvínæstfjarskiptasnúrunafráhlínni.
Hafðu í huga að hvorki er mælt með því að nota verkfæri til að losa
smellurnar né telst það rétt aðferð.
RO
2 - Deschiderea capacului
A.
Scoatețicadruldinîncărcător
acestuia.Apoitragețirestulcadrului.
B.
Deschidețimanualcelenouăclemepentruadesfacecuatenție
capacul.Apoi,deconectațicabluldecomunicațiidelacapac.
Reținețicăutilizareaoricăruitipdeinstrumentpentrudeschiderea
clemelornuestenicirecomandată,niciacceptabilă.
PL
2 - Otwieranie pokrywy
A. Odłączyćramęodładowarki,zaczynającodpinanieodgóry.
Następnieściągnąćresztęramy.
B. Ręcznieodpiąćdziewięćzaciskówiostrożnieodpiąćpokrywę.
Następnie,odłączyćprzewódkomunikacyjnyodpokrywy.
Należypamiętać,żestosowaniejakichkolwieknarzędzidootwarcia
zaciskówniejestanizalecane,anidozwolone.
UK
2 - Відкриття кришки
A.
Знімітьіззарядногопристроюрамку
зверху
B.
Відкрийтевручнудев
кришку
Пам’ятайте,щоминерек
використаннябудь-якихінстр
SK
2 - Otvorenie kryt
A. Vyberterámznabíjačkytak,žehozhoraodopnete.Potom
potiahnitezvyšokrámu.
B. Manuálneotvortedeväťklipov
Ďalejodpojtekomunikačnýkábelzkrytu.
Majtenapamäti,žepoužitieakéhokoľvekdruhunástrojovna
otváraniespônsaneodporúča,aniniejeprijateľné.
RU
2 - Открытие крышки
A.
Снимитерамусзарядногоу
отст
B.
Вручнуюоткройт
крышку
Помните,чт
открываниязажимовнерекомендует
HE
יוסיכה תחיתפ - 2
.קדההמ הרורחש ידי .A
.תרגסמה ראש תא
.םיקדהה תעשת תא .B
.יוסיכהמ תרושקתה לבכ
תחיתפל והשלכ גוסמ ילכב
.םיקדהה
IT
2 - Apertura del coperchio
A. Rimuovi il telaio dal caricatore staccandolo dalla parte superiore.
Quindi, tira il resto del telaio.
B. Apri manualmente i nove morsetti per sganciare con attenzione il
coperchio. Successivamente, scollega il cavo di comunicazione dal
coperchio. Ricorda che non è consigliato né accettabile l’
nessun tipo di strumento per aprire i morsetti.
NL
2 - Het deksel openen
A. Verwijderhetframevandelader
het los te klikken. Trek vervolgens aan de rest van het frame.
B. Open de negen clips met de hand om het deksel voorzichtig los te
klikken. Koppel vervolgens de communicatiekabel los van het deksel.
Houd er rekening mee dat het gebruik van enig gereedschap voor het
openen van de clips niet wordt aanbevolen en ook niet acceptabel is.
NO
2 - Åpne dekselet
A. Fjernrammenfraladerenvedåtaa
Trekk deretter av resten av rammen.
B. Åpne forsiktig de ni klipsene for å løsne dekslet. Deretter frakobler
dukommunikasjonskabelenfradekslet.Huskatbruka
å løsne klipsene er ikke anbefalt eller akseptabelt.
PT
2 - Abertura da tampa
A. Remova a estrutura do carregador
ao desencaixá-la. Em seguida, puxe o resto da estrutura.
B. Abra os nove clipes manualmente, de forma a desencaixar
cuidadosamente a tampa. Em seguida, desligue o cabo de comunicações
da tampa. Tenha em consideração que a utilização de qualquer
ferramenta para abrir os clipes não é recomendada nem aceitável.
2 - Obertura de la coberta 2 - Öppna höljet
CA
A. Treu el marc del carregador començant per la part superior
desenganxant-lo. A continuació, estira la resta del mar
B. Obre els nou clips manualment per desenganxar amb cura la coberta.
A continuació, desconnecta el cable de comunicacions de la coberta.
Tingues en compte que l’ús de qualsevol tipus d’eina per obrir els clips
no és recomanable ni acceptable.
SV
A. T
Dra sedan ut ramen.
B. Lossade9clipsenförhandnärdulossarhöljet.Kopplasedanbort
bandkabelnfrånhöljet.Tänkpåattingetverktygfåranvändasför
att lossa clipsen.
Quita el marco del cargador soltándolo desde la
parte superior
marco.
Abre manualmente los nuev
cuidado la tapa. A continuación, desconecta el
cable de comunicaciones de la tapa.
T
aceptable usar ningún tipo de herramienta para
abrir los clips.
2 - Apertura de la cubierta