Parts ......................................................................................................................................................................................................5
Parts List ............................................................................................................................................................................ 6 - 7
Main Components ........................................................................................................................................................................... 8
Care & Maintenance ............................................................................................................................................................... 14
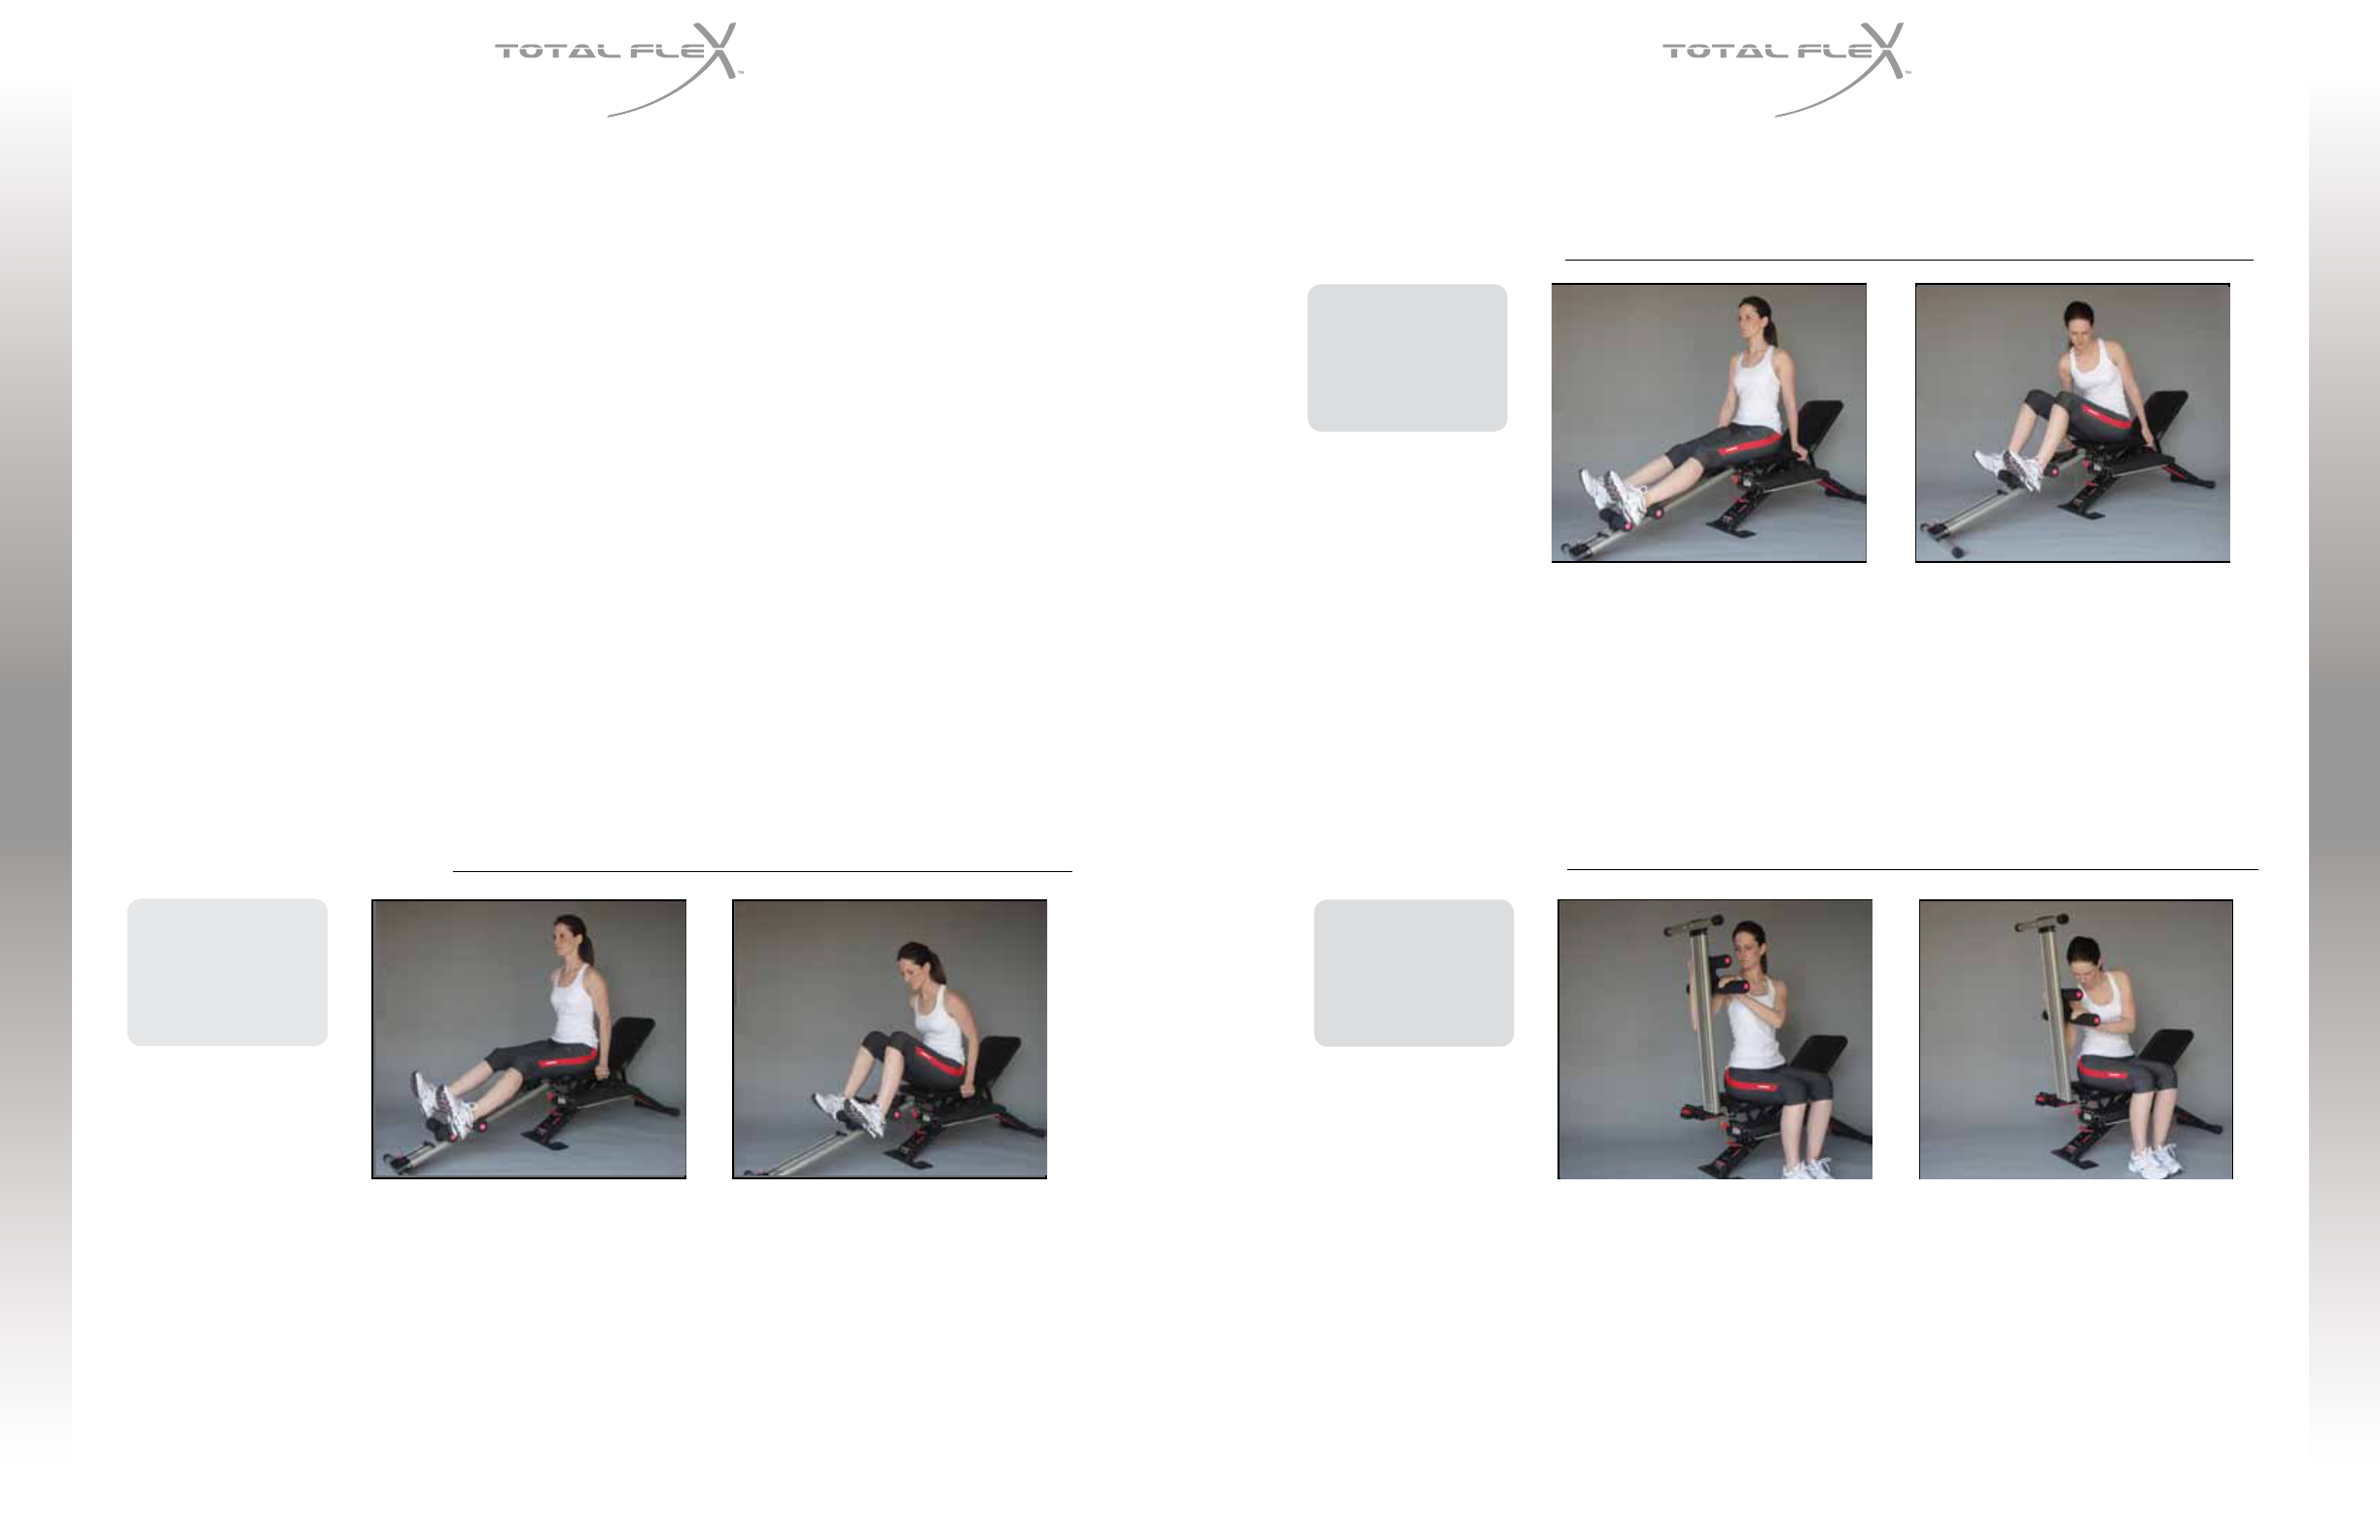
Leg Pull with Crunch ........................................................................................................................................................19
Oblique Leg Pull ..................................................................................................................................................................20
Straight Arm Pull Down ..................................................................................................................................................21
Back Extension ....................................................................................................................................................................22
Front Raise & Leg Pull Combo ....................................................................................................................................23
Side Raise & Leg Pull Combo .......................................................................................................................................23
Rowing & Leg Pull Combo ..............................................................................................................................................24
INTRODUCTION
Please Note: The Ab Developer is designed to be used in conjunction with the Total Flex* exercise machine.
Congratulations on the purchase of your Ab Developer exercise attachment to your Total Flex exercise
machine. You have taken an important step towards achieving a trim, fit and healthy body. Just a few
minutes a day is all it takes to start enjoying the benefits of exercising with your Ab Developer exercise
attachment.
Working out with the Ab Developer exercise attachment is comfortable and easy. You’ll effectively train
a wide range of muscle groups in your lower body and core area – even your upper body muscles. With
regular exercise you can reduce your body fat, improve muscle tone, develop endurance, increase energy
and reduce stress – certainly a worthwhile investment in time and money!
With regular use of the Ab Developer exercise attachment and with minimal time commitment, you’ll soon
see improvements in the way you look and feel to achieve the results you’ve always wanted.
*Total Flex is a trademark of Thane International, Inc., registered in the U.S. and other jurisdictions.
2
ab DeVELOPER
ab DeVELOPER
USER GUIDE
USER GUIDE
SAFETY WARNINGS
1. This product has been tested in accordance with the requirements of EN 957-1, class H – home use
only. THE MAXIMUM WEIGHT CAPACITY OF THE Ab Developer attachment is 136.4 KG/300 LBS.
Persons whose body weight exceeds this limit should NOT use this machine.
2. Carefully inspect the equipment prior to EVERY use. Never use the device if it is not functioning
correctly, or if it is damaged.
3. Use this device EXCLUSIVELY for the purpose intended and described in this User’s Guide. Do not alter
the equipment and only use those accessories which have been recommended by the manufacturer.
4. Ensure that at least 10-13 feet (2-3 meters) of free space is available surrounding the entire unit. It
is important that pets, furniture and other objects are kept away from the equipment during use.
5. THIS EQUIPMENT IS NOT SUITABLE FOR CHILDREN. In order to avoid injuries, keep this and all other
fitness equipment out of the reach of children.
6. Handicapped or disabled persons should not use the Ab Developer attachment without the presence
of a qualified health professional or physician.
7. Position the Ab Developer attachment on a firm, clear, level surface. To protect and avoid damage to
flooring, the unit should not be pushed across delicate floor coverings (laminate, parquet, carpet, etc.).
8. Wear appropriate clothing during training sessions. Training apparel should be comfortable and light,
allowing freedom of movement. Wear comfortable training shoes which provide good support and
have non-slip soles, such as running shoes or trainers.
9. Always warm up and stretch before each training session.
10. If you feel faint or experience dizziness, nausea, shortness of breath, chest pain, irregular heartbeat, or
any other abnormal symptoms, STOP the workout at once and CONSULT A PHYSICIAN IMMEDIATELY.
11. Check all screws and bolts before each workout and tighten if loose.
12. Always choose the proper intensity level that best suits your physical strength and flexibility. Know your
limits and train within them. Always use common sense when exercising.
13. Begin slowly and get used to the unique movement of the Ab Developer attachment prior to
starting your routine.
14. To avoid serious injury, never place any part of your body between or near any moving parts.
15. DO NOT use any accessories not recommended by the manufacturer. Understand correct use of
this machine.
16. Please read this User’s Guide and/or watch the instructional DVD prior to using your Ab Developer
attachment to understand the correct use of the equipment.
17. Refer to all of the included assembly guidelines to make certain your unit is properly assembled,
and to remind yourself of all maintenance guidelines.
18. Do not place your hands or fingers underneath the unit while it is being used.
Keep children away from the unit during use.
19. If you have long hair please tie it up to avoid getting caught in certain parts of the equipment.
20. Do not place the unit in direct sunlight, as heat can degrade the non-steel materials on the unit.
3
SAFETY WARNINGS
IMPORTANT MEDICAL WARNING
SAVE THESE INSTRUCTIONS
FOR HOUSEHOLD USE ONLY
4
Carefully review the User’s Guide and consult your physician before using this product or perform-
ing the exercises presented herein. The instructions and advice presented in this User’s Guide
are in no way intended to be a substitute for medical counseling. Not all exercises are suitable for
everyone and any user of this product assumes the risk of injury resulting from performing the
exercises shown. If at any time you feel you are exercising beyond your current fitness level or you
feel uncomfortable, you should discontinue exercise immediately. Your physician should help you
ascertain your target heart rate, as determined by your age and physical fitness. Certain training
programs and types of exercise equipment may not be suitable for everyone. This is particularly
important for those individuals over 35, pregnant women and individuals with existing health
problems or problems with balance. If you take medication which affects your heart rate, you must
seek medical advice from your doctor before starting your exercise program with this machine.
ab DeVELOPER
ab DeVELOPER
USER GUIDE
USER GUIDE
56
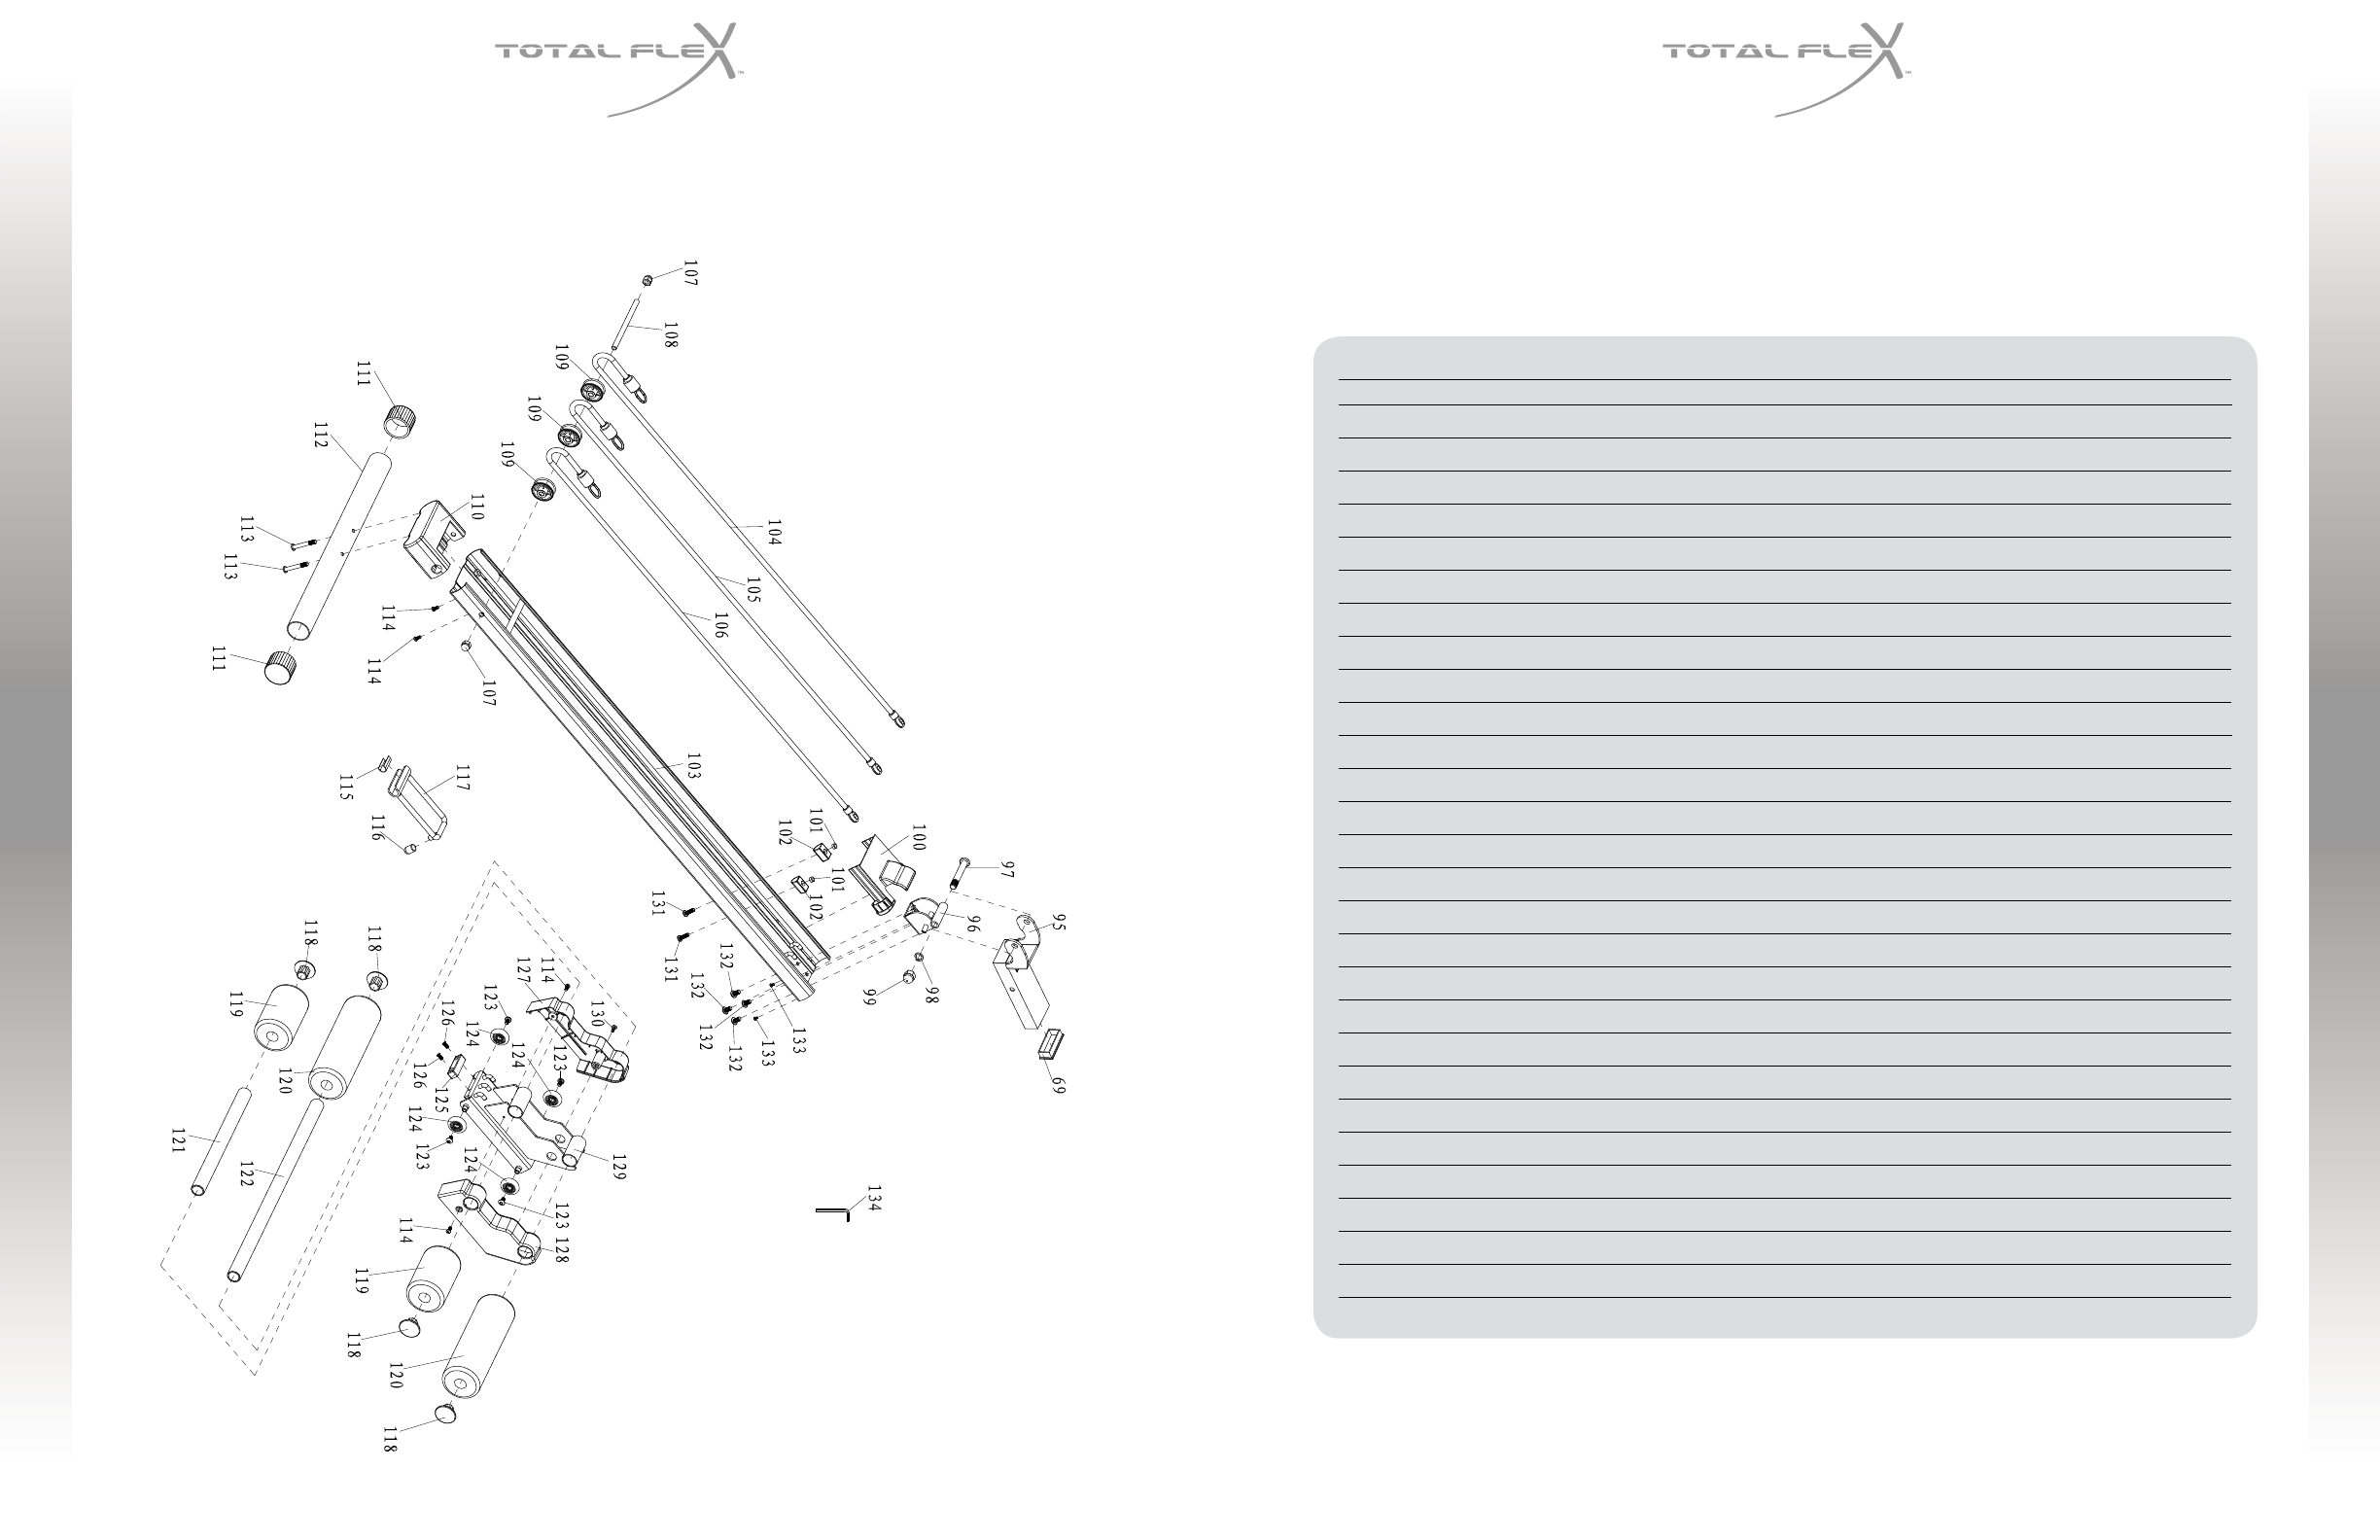
PARTS
EXPLODED VIEW
PARTS
PARTS LIST
ITEM NO. DESCRIPTIONSPEC. QUANTITY
69 Connector End Cap To Assemble With 53.5*23.5*1.5 Tube, Black 1
95 Seat Connector Assembly 1
96 Rail Hinge Assembly 1
97 Hex Screw M10*70, Zinc Coat 1
98 Spring Washer φ10, Zinc Coat 1
99 Acorn Nut M10, Zinc Coat 1
100 Rail Cover Black 1
101 Hex Nut M5, Zinc Coat 2
102 Stopper Black 2
103 Rail Assembly 1
104 Resistance Band Assembly Black φ8.0 1
105 Resistance Band Assembly Red φ8.6 1
106 Resistance Band Assembly Grey φ7.0 1
107 Acorn Nut M8, Zinc Coat 2
108 Pulley Axel Q235, Zinc Coat 1
109 Pulley Wheel Black 3
110 Pulley Holder Black 1
111 Foot Tube End Cap Black 2
112 Front Foot Pipe 1
113 Hex Screw M6*45, Zinc Coat 2
114 Cross Screw M4.0*10, Zinc Coat 4
115 Rubber Black 1
116 Stop Collar Black 1
117 Positioning Bracket Assembly 1
118 Foam Roller End Cap Red 4
119 Short Foam Roller Black 2
120 Long Foam Roller Black 2
121 Short Foam Roller Pipe 1
122 Long Foam Roller Pipe 1
ab DeVELOPER
ab DeVELOPER
USER GUIDE
USER GUIDE
117
78
PARTS
PARTS LIST
ITEM NO. DESCRIPTION SPEC. QUANTITY
123 Hex Screw M5*10, Zinc Coat 4
124 Pu Roller Wheel Assembly 4
125 Bumper Black 1
126 Cross Screw M4*8, Zinc Coat 2
127 Right Carriage Cover Black 1
128 Left Carriage Cover Black 1
129 Sliding Frame Assembly 1
130 Cross Tapping Screw ST4.2*13, Zinc Coat 1
131 Pan Head Screw M5*18, Zinc Coat 2
132 Button Head Screw M6*12, Zinc Coat 4
133 Cross Tapping Screw ST2.9*8, Zinc Coat 2
134 Allen Wrench 4#, Zinc Coat 1
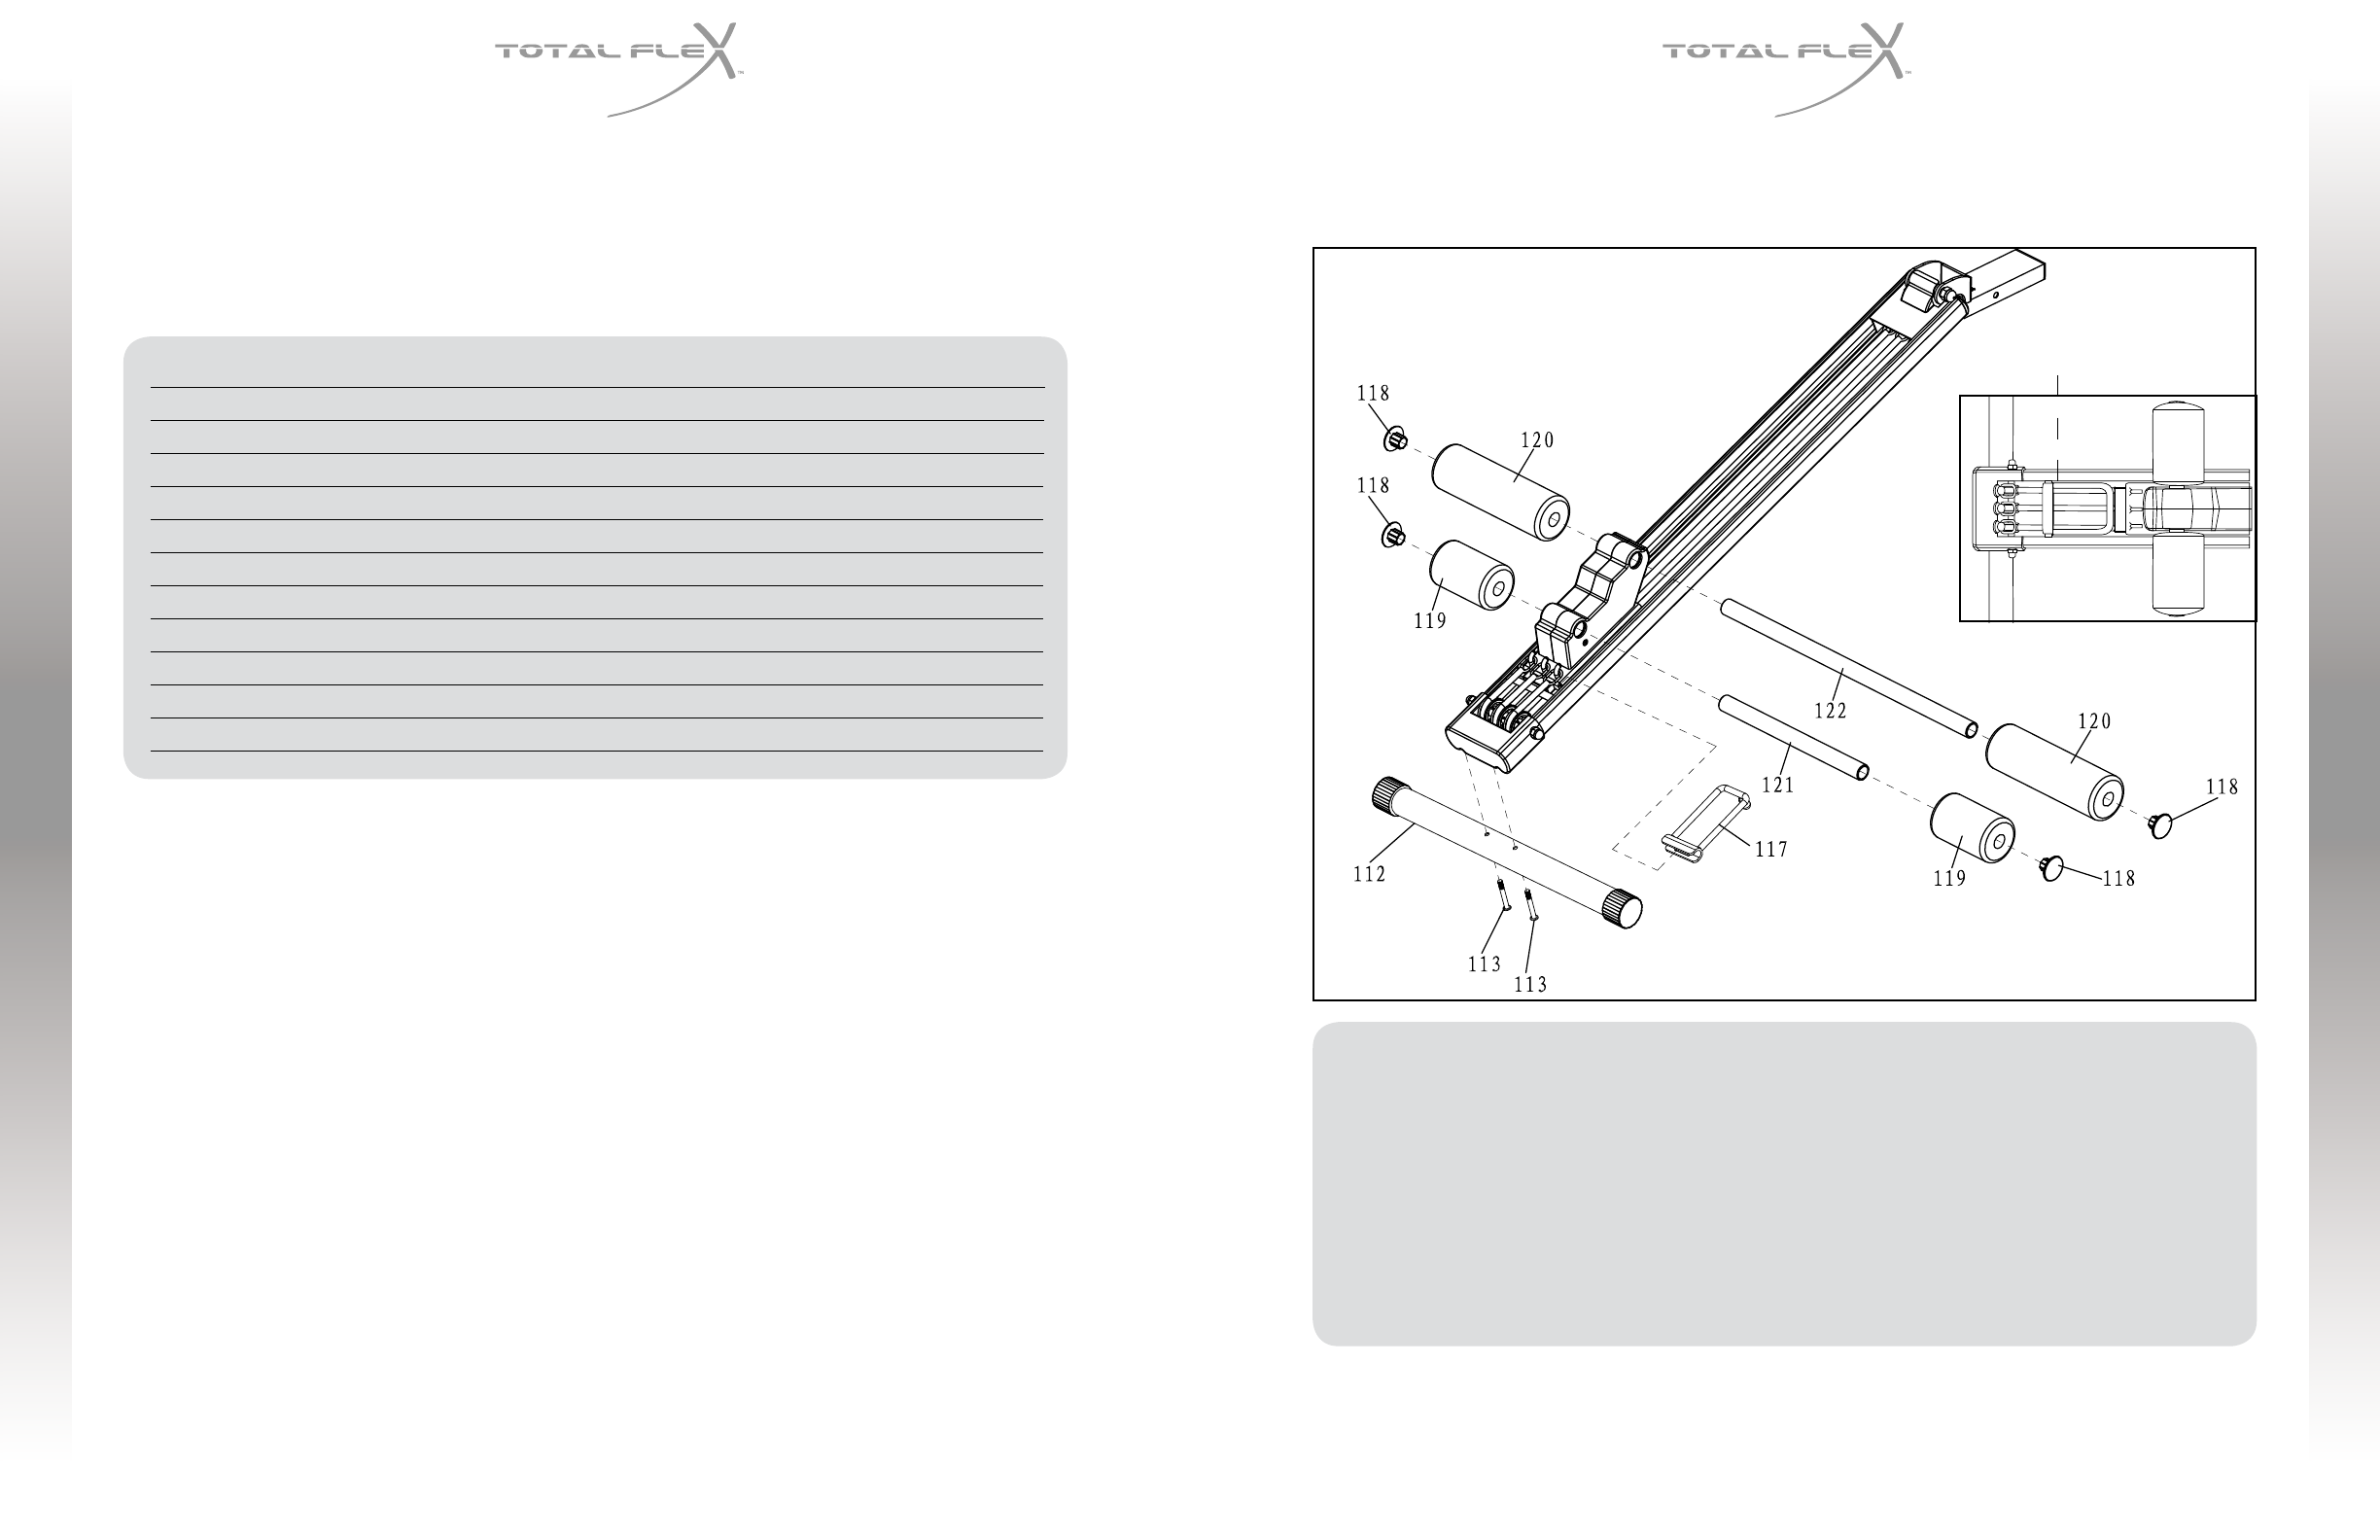
MAIN COMPONENTS
Front Foot Pipe (112)
Rail Assembly (103)
Short Foam Roller with Short Foam Roller Pipe x 2 (119, 121)
Long Foam Roller with Long Foam Roller Pipe x 2 (120, 122)
Foam Roller End Caps x 4 (118)
Resistance Band Assembly (with Oval Ring) (104,105,106)
Positioning Bracket (117)
Seat Connector (95)
Carriage with Hooks (129)
ab DeVELOPER
ab DeVELOPER
USER GUIDE
USER GUIDE
Important: Please carefully read the assembly instructions below before assembling the Ab Developer
attachment.
1. Lay the Ab Developer box flat on its side, carefully open one side of the box and slowly slide the Ab
Developer unit out. If the Seat Assembly (with Rail assembly over it) is not facing upwards, carefully
turn the pre-assembled Ab Developer unit over, with the Seat Assembly facing upwards.
2. Carefully remove the packaging material. Check that all parts are included before beginning
assembly (see FIG. 1).
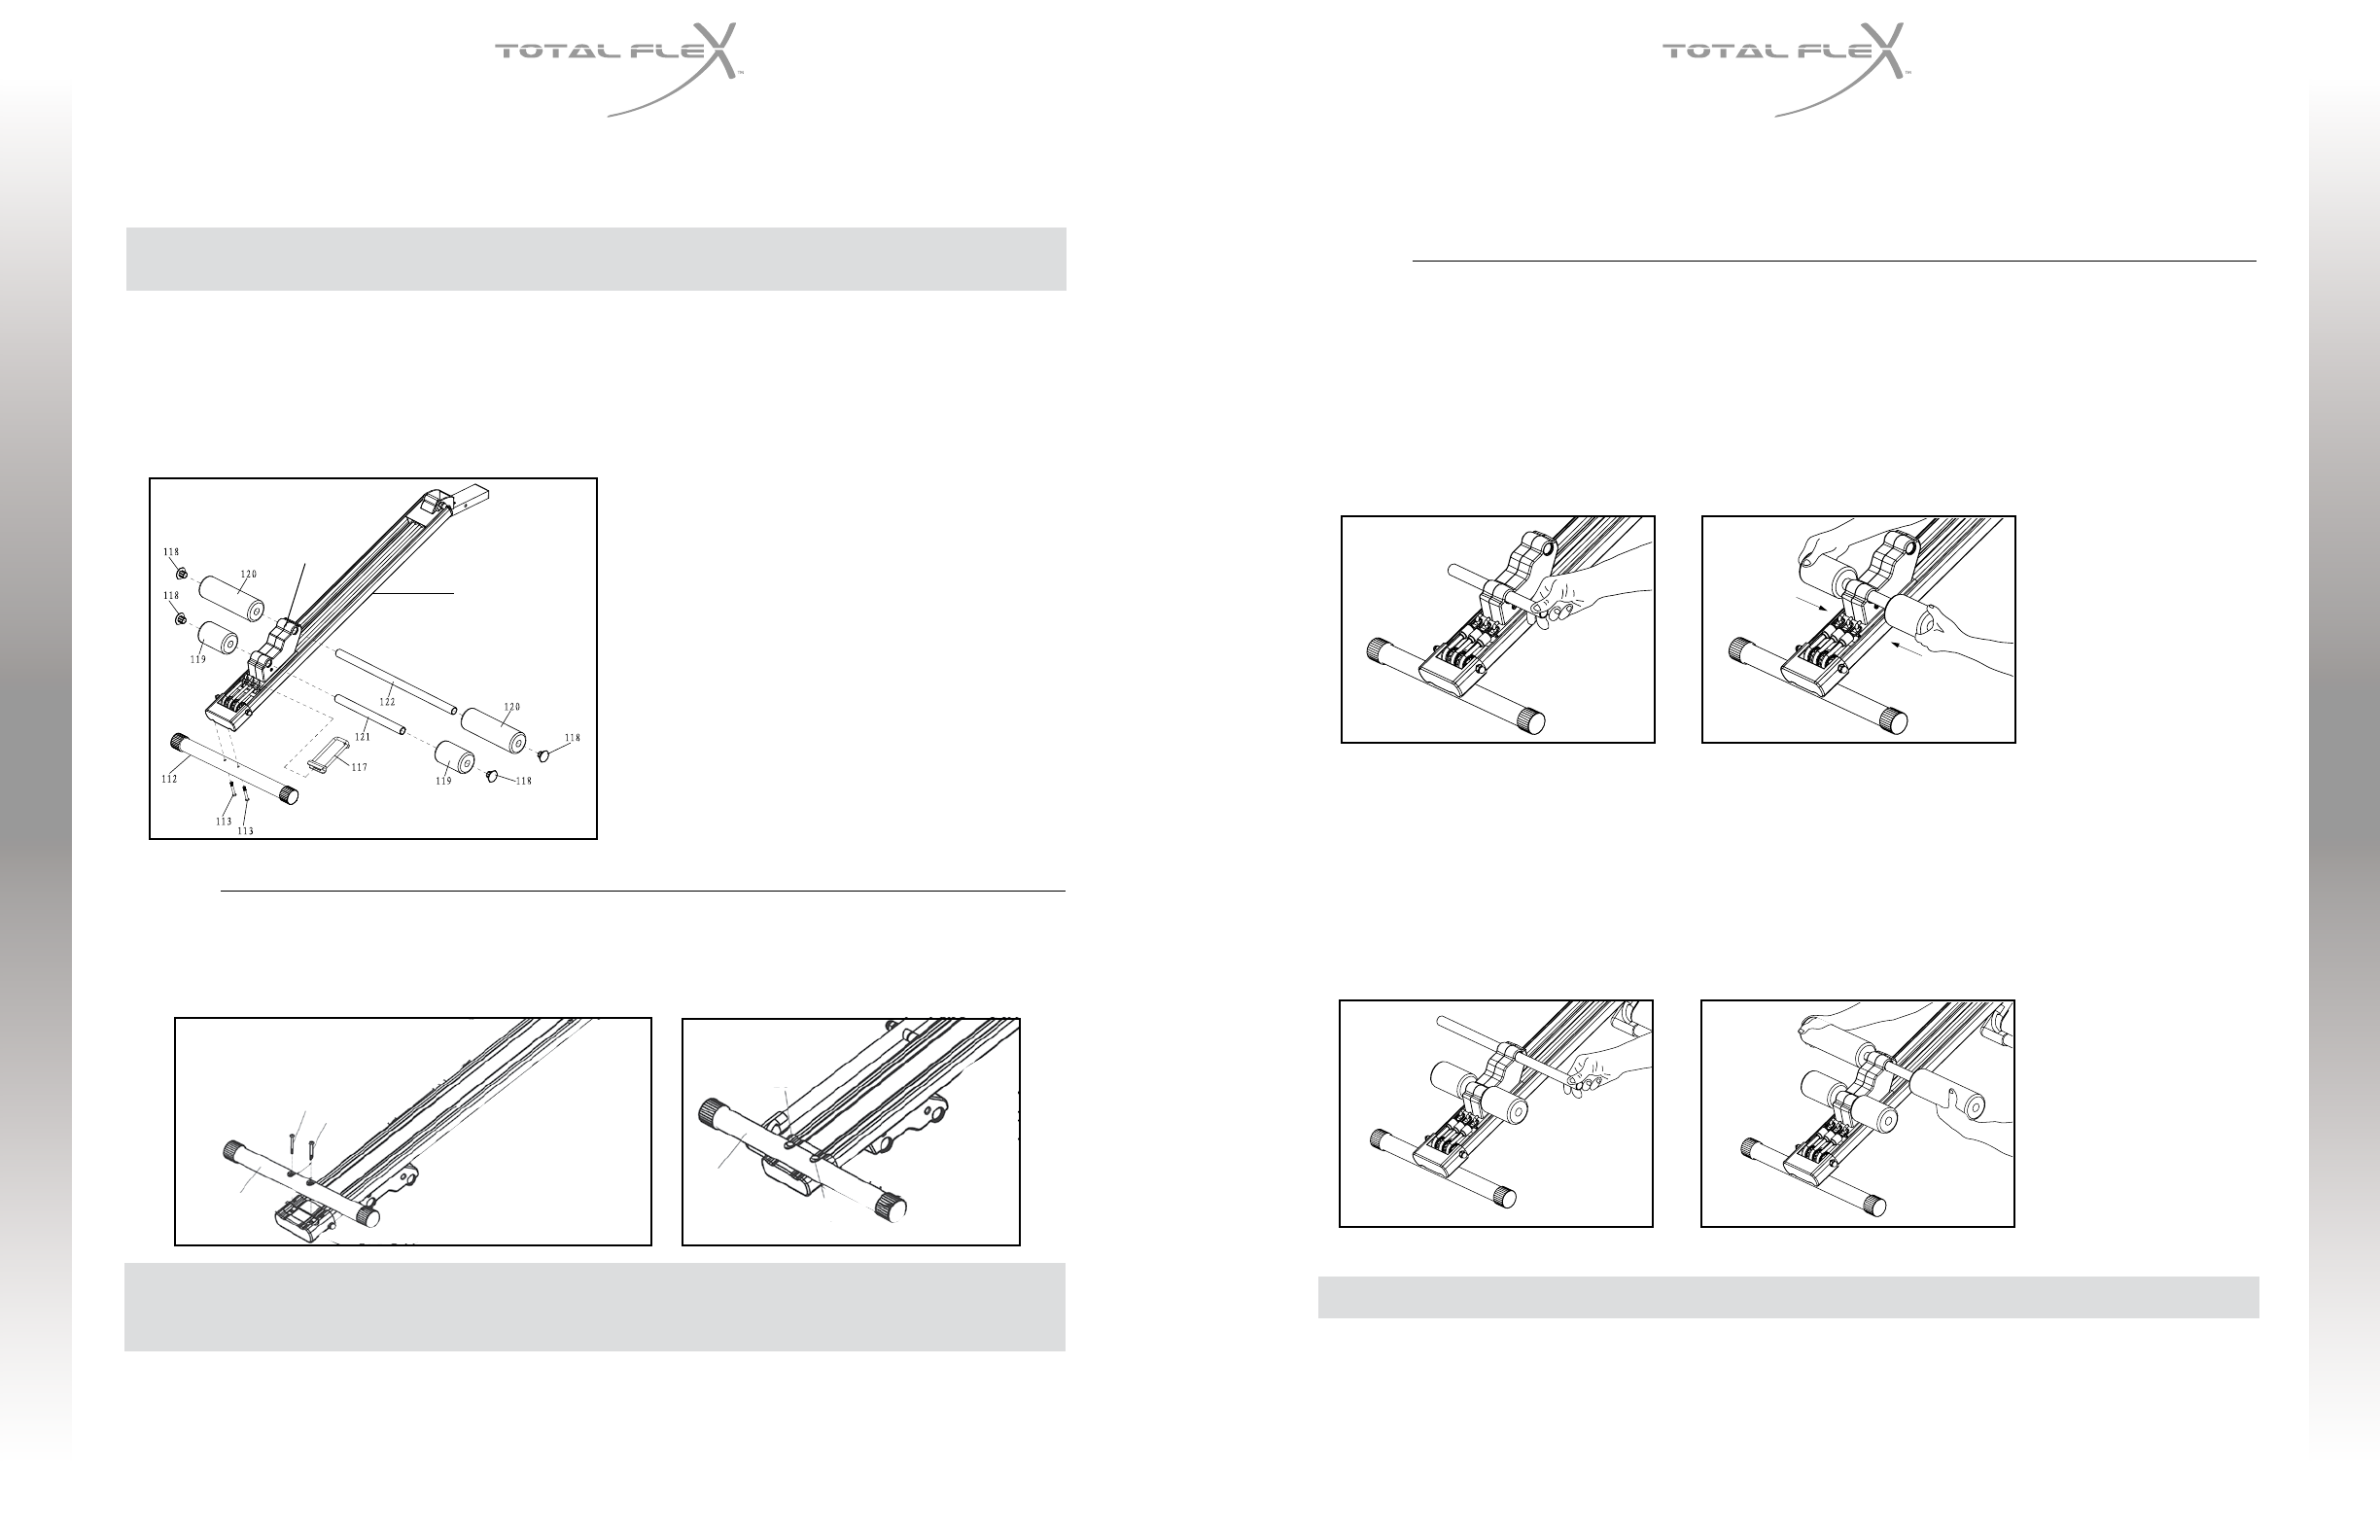
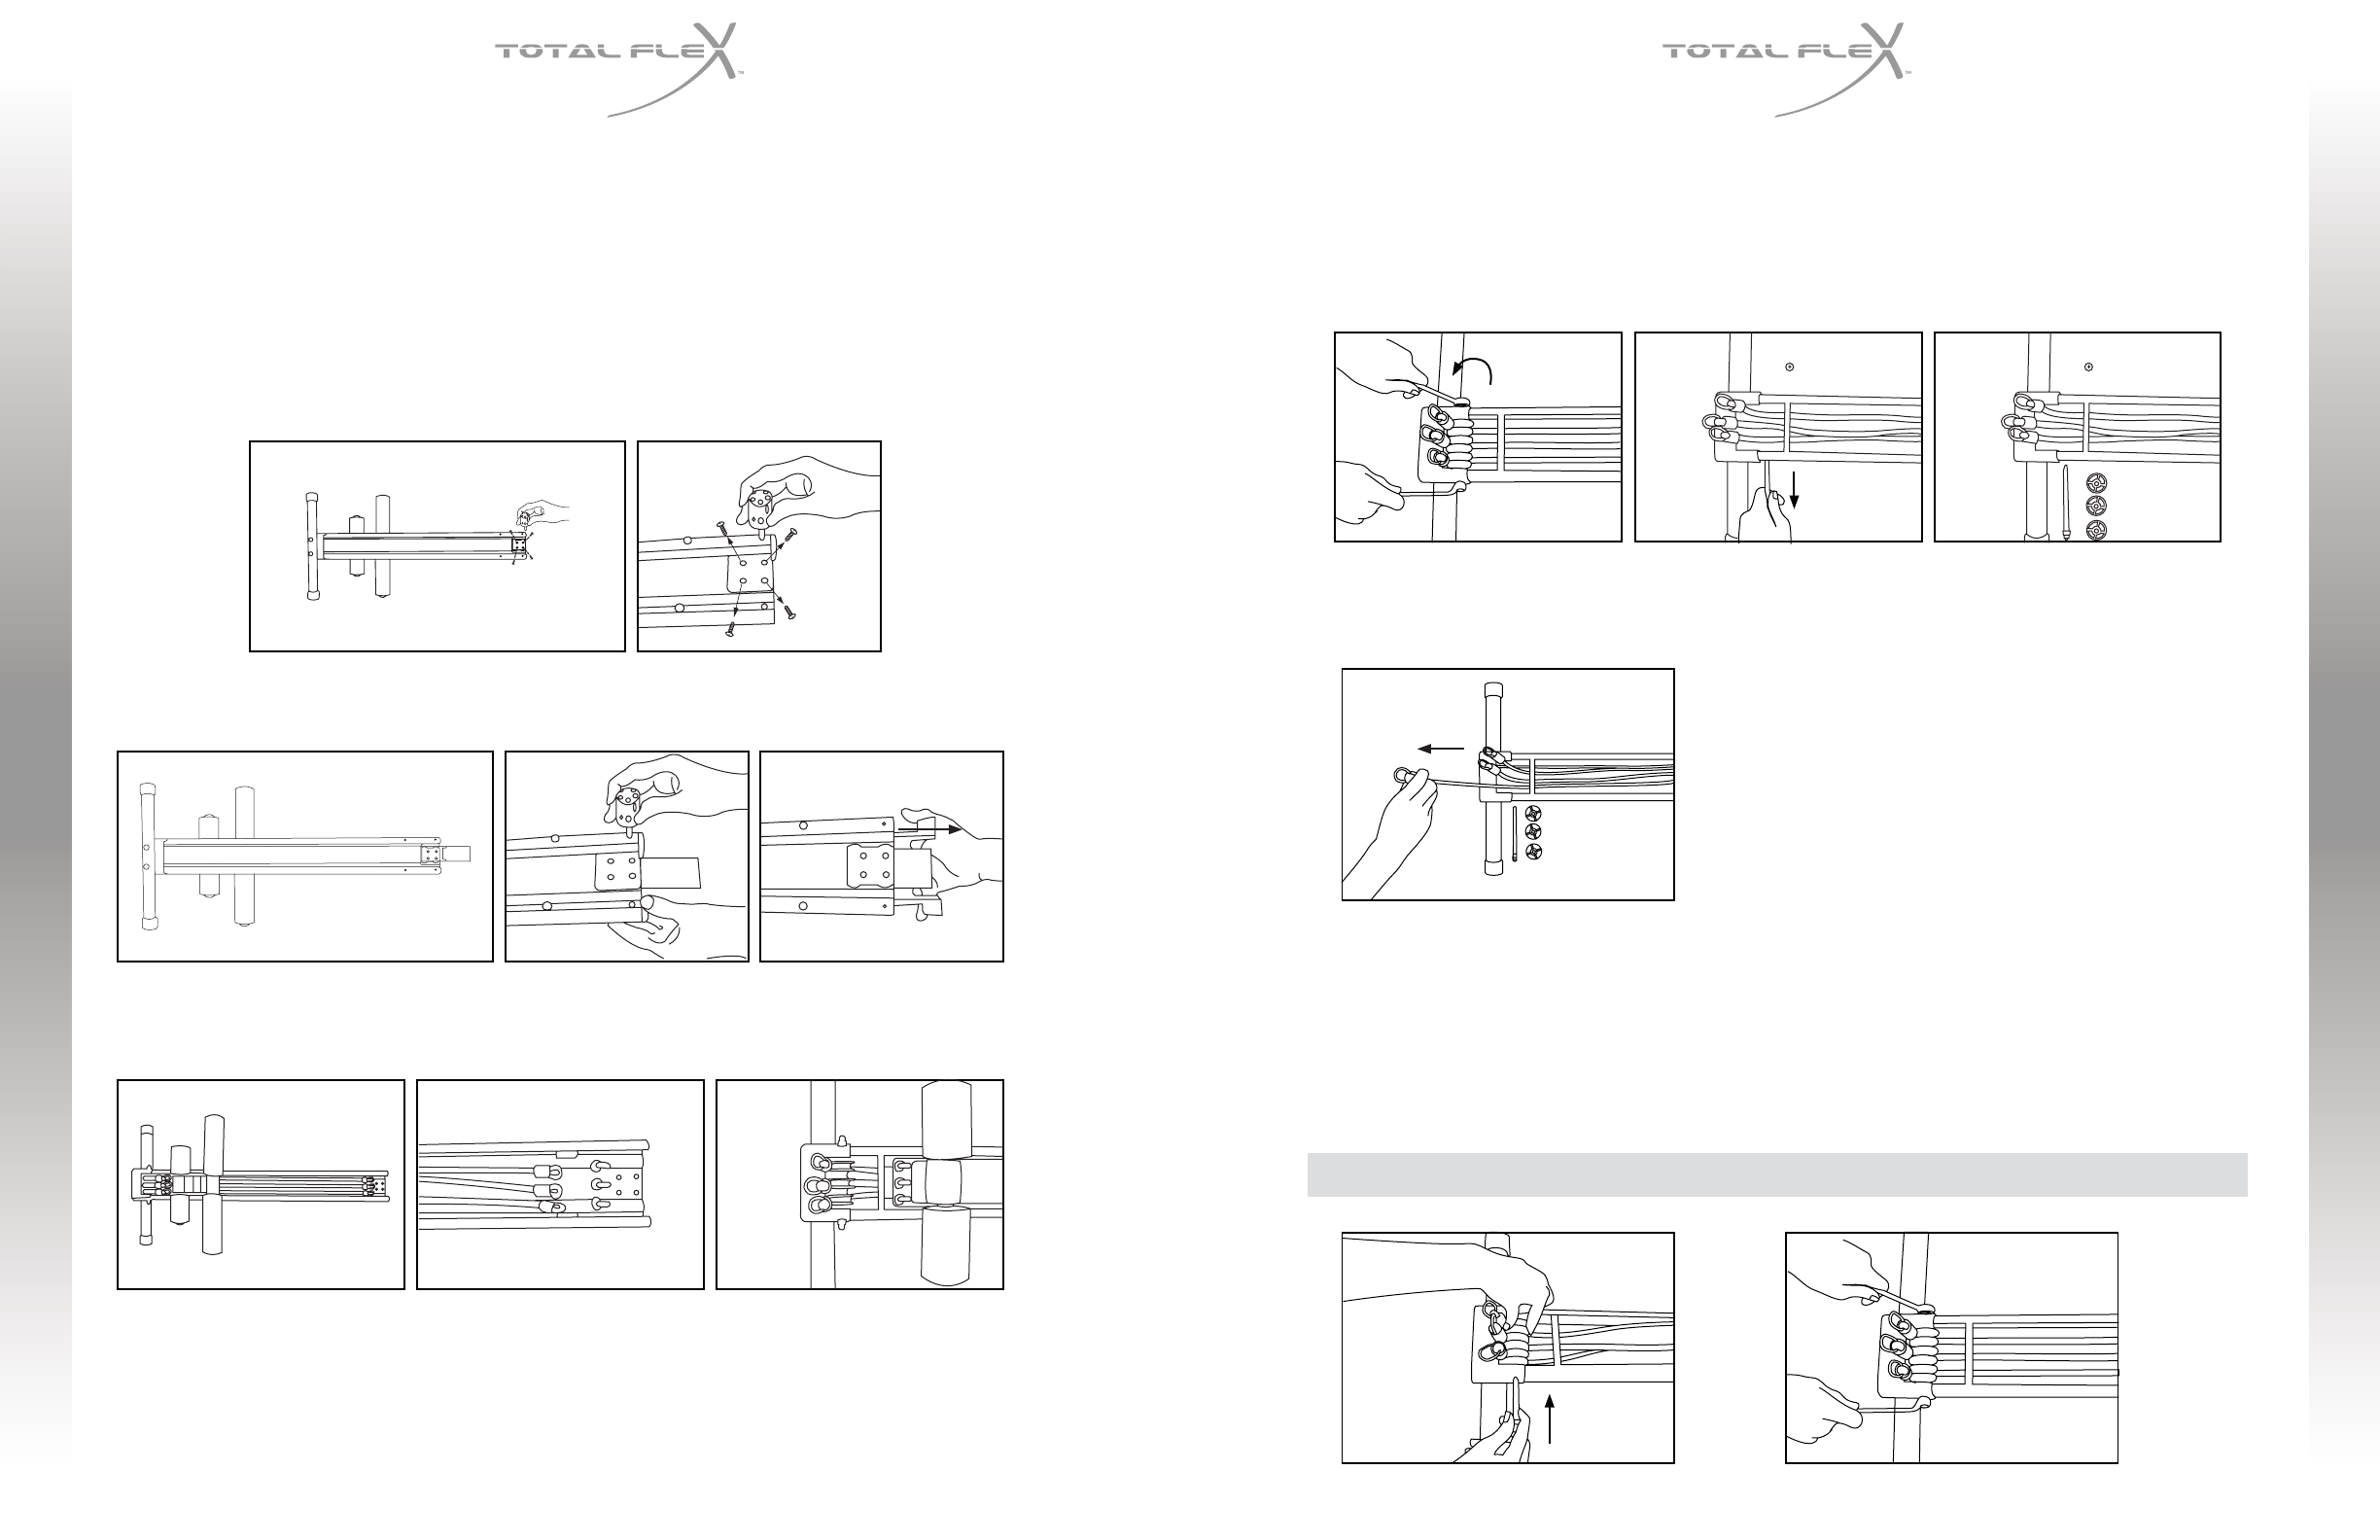
STEP 1
Connect Front Foot Tube to Rail Assembly.
1. Align the holes in the Front Foot Pipe with the two holes in the Rail Assembly (see FIG 2a).
Important: Two of the holes on one side of the Front Foot Pipe are sunken; the other two on the
op posite side are not. Place the Front Foot Pipe side with the holes that are not sunken against the
Rail Assembly for fastening.
2. Insert the two Allen Bolts using the supplied Allen Wrench and securely tighten the Front Foot Pipe
into the Rail Assembly (see FIG 2b).
STEP 2
Fit Roller Pipes & Foam Rollers.
Fitting the Short Foam Roller Pipe & Foam Rollers
1. Insert the short Foam Roller Pipe through the bottom hole of the Carriage Assembly (the hole closest
to the Foot Pipe) (see FIG. 3).
2. Slide the two small Foam Rollers over the Pipe ends (see FIG. 4).
Fitting the Long Foam Roller Pipe & Foam Rollers
1. Insert the long Foam Roller Pipe through the top hole of the Carriage Assembly (the hole closest to
the Seat) (see FIG. 5).
2. Slide the two long Foam Rollers over the Pipe ends (see FIG. 6).
Important: When fitting the Foam Rollers, ensure that the Long Foam Rollers are closest to the Seat.
ASSEMBLY INSTRUCTIONS
FIG. 1
ASSEMBLY INSTRUCTIONS
910
3. To assemble the Ab Developer, the
following parts must be assembled as
shown in steps 1-5 below:
Front Foot Pipe (112)
Rail Assembly (103)
Short Foam Roller Pipe x 2 (121)
Short Foam Roller x 2 (119)
Long Foam Roller Pipe x 2 (122)
Long Foam Roller x 2 (120)
Foam Roller End Caps x 4 (118)
Resistance Band Assembly (with
Oval Ring) (104,105,106)
Positioning Bracket (117) (if required)
FIG. 2a
112
112
113
113
113
113
FIG. 2b
103
129
FIG. 3
FIG. 5FIG. 6
FIG. 4
ab DeVELOPER
ab DeVELOPER
USER GUIDE
USER GUIDE
FIG. 13FIG. 14
Positioning Bracket
Inserting the End Caps
Insert the four End Caps into the Long and
Short Foam Roller Tube Pipe
(see FIG. 7).
STEP 3
Connect one or more of the Resistance Bands by hooking
the oval rings over the hooks on the Carriage (see FIG. 8).
STEP 4
Connecting the Ab Developer attachment
to the Total Flex exercise machine
(see FIG 9.)
Before connecting the Ab Developer to the Total Flex,
ensure the Receptor Tube Assembly is attached to
the underside of the Power Pod Seat (see D—Leg
Extender Assembly on page 4 of the Total Flex
User’s Guide).
Important: When attaching or detaching the Ab Developer to the Total Flex, ensure that at least one
Resistance Band is connected to a Hook on the Carriage.
Important: Before connecting the Ab Developer to the Total Flex, adjust the Seat (with Receptor
Assembly) to setting 2 —this is the only settings that must be used with the Ab Developer.
ASSEMBLY INSTRUCTIONS
Attach the Ab Developer attachment to
the Total Flex exercise machine by pulling
the Lock Pin on the underside of the Power
Pod Seat and insert the Seat Connector
(95) into the Receptor Tube (see FIG 10).
Check that the Lock Pin engages fully when
released (see FIG. 3b).
When exercising, adjust the seat of the Total
Flex to following setting: 2 & D.
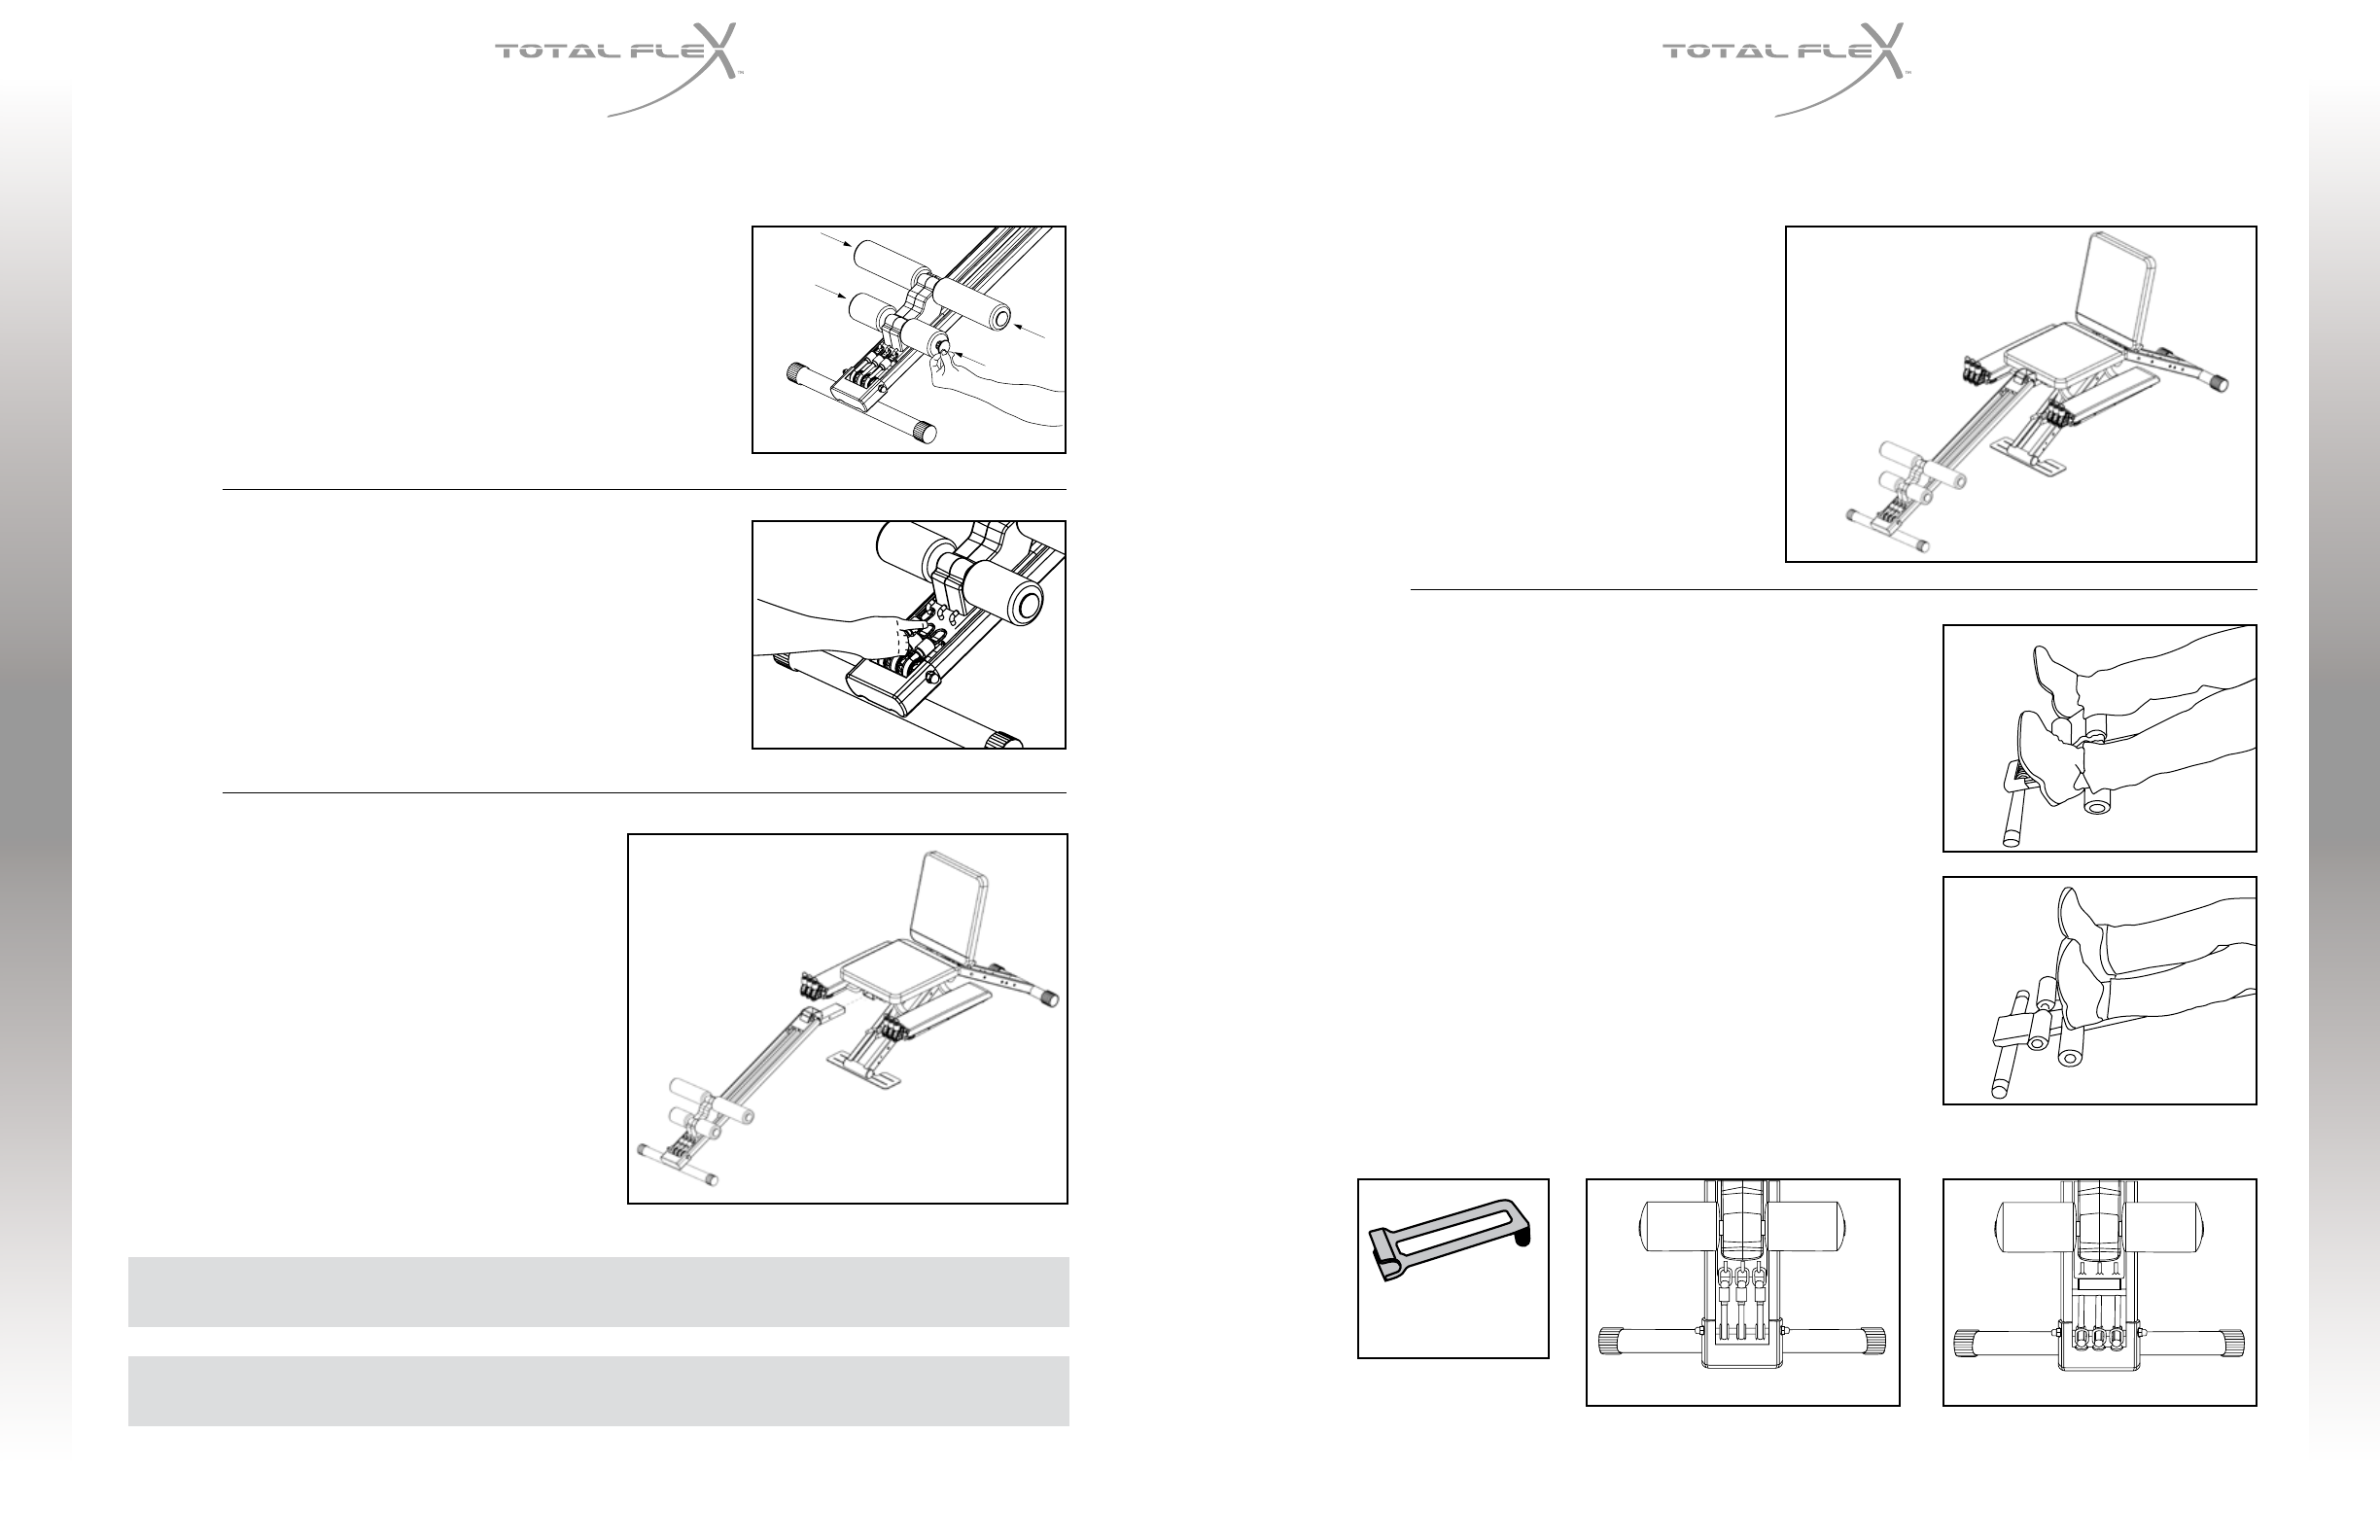
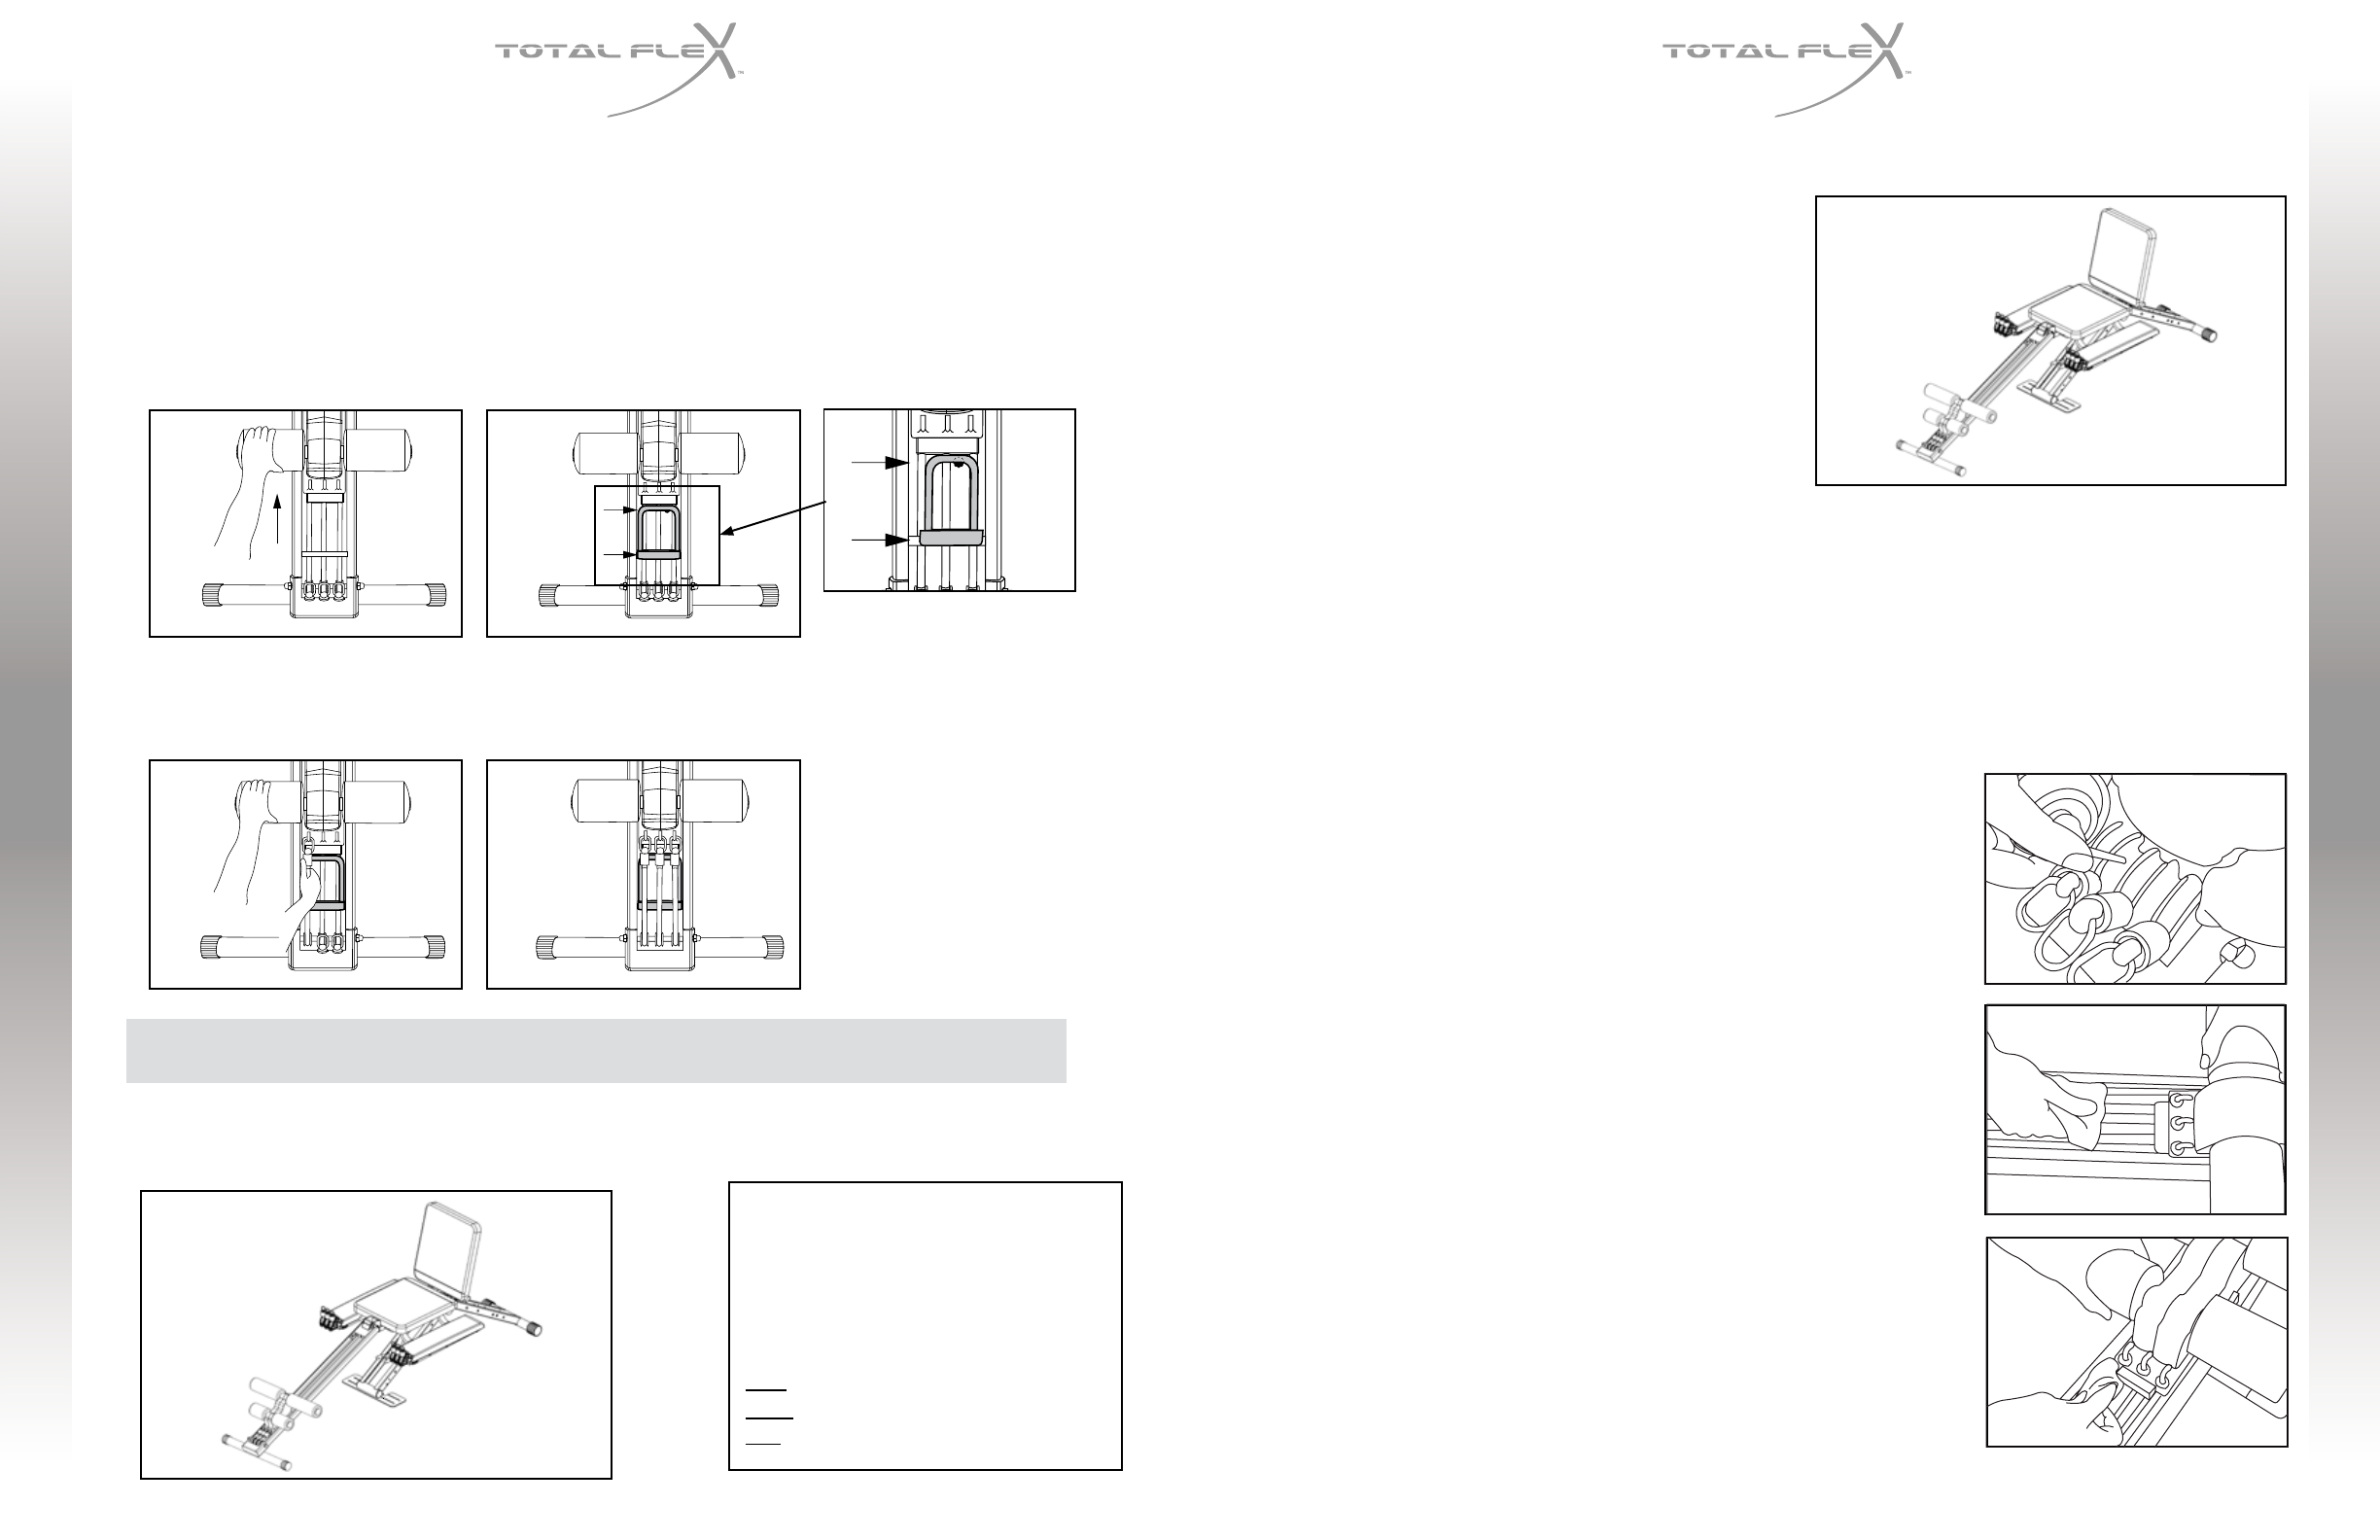
STEP 5
Fit the Positioning Bracket. (if required)
Depending on your height, you may have to fit the Positioning
Bracket to reposition the Carriage Assembly (holding the
Foam Rollers) closer to the Seat.
To check whether or not you must fit the Positioning
Bracket, sit on the Seat, facing towards the Foam Rollers
and extend your legs forwards.
If you can hook your heels
comfortably over the Long Foam Roller, use of the Positioning
Bracket is not required.
(see FIG. 11)
If you are unable to hook your heels over the Long
Foam Roller as illustrated, use of the Positioning
Bracket is required (see FIG 12) and proceed as
follows:.
1.
Disengage the Cable Resistance Bands before placing the
Positioning Bracket (see FIG. 13 & 14) below.
ASSEMBLY INSTRUCTIONS
1112
FIG. 5
FIG. 9
FIG. 7
FIG. 12
FIG. 11
ab DeVELOPER
ab DeVELOPER
USER GUIDE
USER GUIDE
FIG. 17FIG. 18
FIG. 19
FIG. 15FIG. 16
2. Once the Resistance Bands are disengaged, move the Carriage Assembly away from the Rail Pipe
(see FIG. 18) and place the curved section of the Positioning Bracket over the Rail Pipe (see FIG. 19).
The other end of the Positioning Bracket must rest against the Carriage Assembly Bumper. This way,
the Carriage (with Foam Rollers) is moved closer to the Seat, enabling you to hook your heels over the
Long Foam Rollers.
3. After fitting of the Positioning Bracket, engage one or more of the Cable Resistance Bands (see FIG. 17 & 18).
Note: The Resistance Bands must be pulled over the Positioning Bracket.
Important: When performing Exercise 1 (see Exercise 1 in the Exercise Guide of this Manual), the
positioning Bracket must be properly adjusted to the height of the user.
4. Assembly of the unit is complete (see FIG. 19).
Libble takes abuse of its services very seriously. We're committed to dealing with such abuse according to the laws in your country of residence. When you submit a report, we'll investigate it and take the appropriate action. We'll get back to you only if we require additional details or have more information to share.
Product:
Forumrules
To achieve meaningful questions, we apply the following rules:
First, read the manual;
Check if your question has been asked previously;
Try to ask your question as clearly as possible;
Did you already try to solve the problem? Please mention this;
Is your problem solved by a visitor then let him/her know in this forum;
To give a response to a question or answer, do not use this form but click on the button 'reply to this question';
Your question will be posted here and emailed to our subscribers. Therefore, avoid filling in personal details.
Register
Register getting emails for Thane TOTAL FLEX Ab Developer at:
new questions and answers
new manuals
You will receive an email to register for one or both of the options.
Get your user manual by e-mail
Enter your email address to receive the manual of Thane TOTAL FLEX Ab Developer in the language / languages: English as an attachment in your email.
The manual is 1,04 mb in size.
You will receive the manual in your email within minutes. If you have not received an email, then probably have entered the wrong email address or your mailbox is too full. In addition, it may be that your ISP may have a maximum size for emails to receive.
The manual is sent by email. Check your email
If you have not received an email with the manual within fifteen minutes, it may be that you have a entered a wrong email address or that your ISP has set a maximum size to receive email that is smaller than the size of the manual.
The email address you have provided is not correct.
Please check the email address and correct it.
Your question is posted on this page
Would you like to receive an email when new answers and questions are posted? Please enter your email address.