Certain Epic, Era, Camber, Rumor, Stumpjumper FSR and Enduro models are equipped with AUTOSAG, a unique new feature designed to simplify
and speed up the adjustment of air pressure. The AUTOSAG feature automatically determines the correct amount of sag, and eliminates the need to
refer to an air chart to determine the correct pressure based on rider weight. However, the shock still requires compression and rebound adjustment
based on type of terrain and rider weight. Please refer to the compression and rebound charts (page 17) following the setup steps.
NOTE: Shock air pressure can also be set up manually to rider preference.
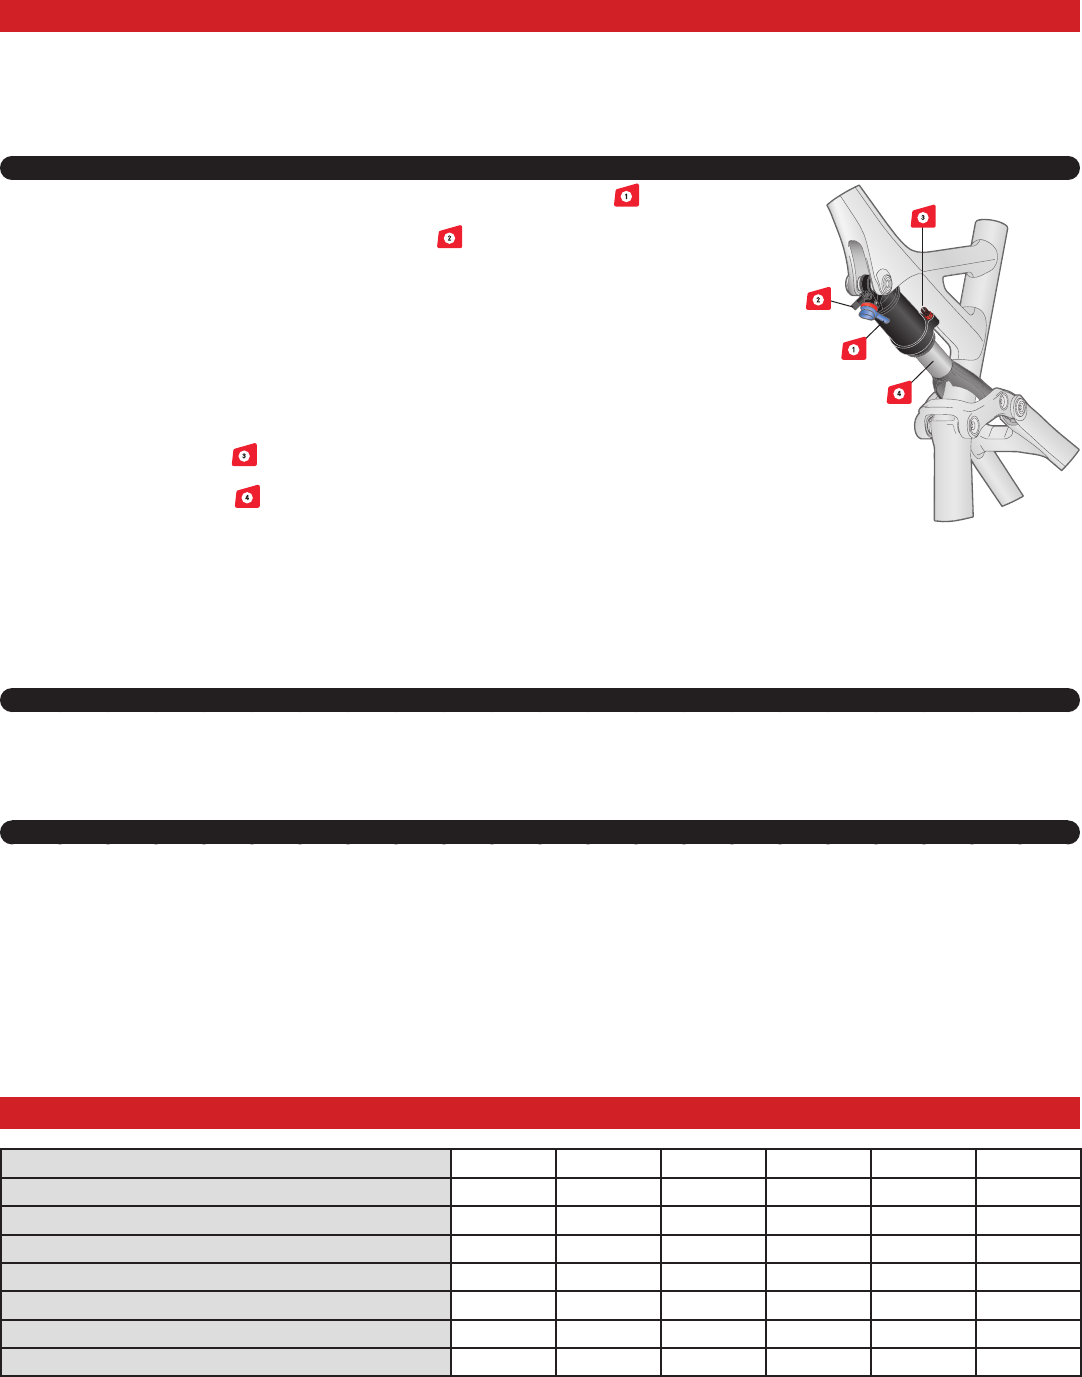
Step 1: Setting Autosag
1. Position the shock compression lever or knob (blue) to the full open or off position . Remove the positive
air valve cap (black) and the AUTOSAG valve cap (red).
2. Attach a high-pressure shock pump to the positive air valve
• All models except Epic and Era: inflate to the rider’s weight in pounds (lb) plus 50psi. For kilograms,
multiply by three (e.g. 75kg = 225psi).
• Epic and Era: inflate to the rider’s weight in pounds (lb) plus 100psi. For kilograms, multiply by two +
100psi (e.g. 75kg = 250psi).
NOTE: Do not exceed 350psi before activating the Autosag valve (this is a starting pressure only). After the Autosag is
activated, Fox recommends a maximum working pressure of 300psi when riding.
3. Make sure the rider is wearing all gear that would normally be worn on a ride (shoes, helmet, hydration pack if
used, etc.). Mount the bicycle, prop up against a wall, and sit in the saddle in a normal riding position. Do not
set sag while riding.
4. Press the AUTOSAG valve . Air will release as the suspension settles into its pre-adjusted sag point.
Make sure all the air is out and release the valve.
5. Cycle the shock a few times , then dismount the bicycle.
6. Do not depress the AUTOSAG valve again, otherwise the proper sag setting will be lost, and will require this
procedure to be repeated from step #2.
7. Put the positive air and AUTOSAG valve caps back on.
NOTE: Rider weight in pounds (lb) plus the PSI (depending on model as described above) is the lowest amount of pressure that should be in the shock before
activating AUTOSAG. If the air pressure is too low, the AUTOSAG button may let air out of the negative chamber, which would result in incorrect sag.
NOTE: Sag is measured as the distance between the o-ring and the shock body’s seal, after the rider’s weight has been applied to the bike, with no
bounce. When AUTOSAG is correctly set, sag should measure approximately (20-30% of stroke, depending on riding/terrain experience, i.e travel).
If the rider is approaching 300lbs, AUTOSAG may not function, and sag may exceed the bike’s prescribed amount.
Step 2: Adjusting rebound
Refer to the rebound/compression chart to set the rebound damping (red knob). Rebound damping controls the rate at which the shock returns after it
has been compressed.
Clockwise for slower rebound (slow speed, bigger hits).
Counter-clockwise for faster rebound (higher speeds, small bumps, more traction).
Step 3: Adjusting compression
Refer to the chart to set the compression damping (blue knob).
SPECIALIZED / FOX BRAIN FADE: Controls the inertia valve damping. The blue knob adjusts damping (Race Tune or Trail Tune) from firm
(clockwise) to soft (counter-clockwise) and does NOT completely lock out the shock.
Backing off from full firm can help with tracking in loose terrain conditions while riding off camber sections or climbing. The soft setting can also help
during lengthy downhill or rugged conditions where the rider may want the suspension active at all times.
FOX CTD:Provides varying levels of compression damping, depending on whether the rider is climbing, trail riding or descending.
C (Climb): The firmest low-speed compression setting is activated for maximum pedaling efficiency.
T (Trail): Moderate low-speed compression setting is activated for an optimal blend of pedaling efficiency and bike control on variable terrain.
Factory Series shocks offer three levels of Trail adjust. Performance and Evolution shocks are preset with low-speed compression damping.
D (Descend): Low-speed compression setting optimized for the perfect balance of control and plushness for steep, aggressive descents.
SETUP DATA
DATE
RIDER WEIGHT
FORK PSI
FORK REBOUND DAMPING (# of clicks from full slow)
FORK COMPRESSION DAMPING (# of clicks from full firm)
SHOCK PSI
SHOCK REBOUND DAMPING (# of clicks from full slow)
SHOCK COMPRESSION DAMPING (# of clicks from full firm)
Libble takes abuse of its services very seriously. We're committed to dealing with such abuse according to the laws in your country of residence. When you submit a report, we'll investigate it and take the appropriate action. We'll get back to you only if we require additional details or have more information to share.
Product:
Forumrules
To achieve meaningful questions, we apply the following rules:
First, read the manual;
Check if your question has been asked previously;
Try to ask your question as clearly as possible;
Did you already try to solve the problem? Please mention this;
Is your problem solved by a visitor then let him/her know in this forum;
To give a response to a question or answer, do not use this form but click on the button 'reply to this question';
Your question will be posted here and emailed to our subscribers. Therefore, avoid filling in personal details.
Register
Register getting emails for Specialized FSR - 2015 at:
new questions and answers
new manuals
You will receive an email to register for one or both of the options.
Get your user manual by e-mail
Enter your email address to receive the manual of Specialized FSR - 2015 in the language / languages: English as an attachment in your email.
The manual is 14,03 mb in size.
You will receive the manual in your email within minutes. If you have not received an email, then probably have entered the wrong email address or your mailbox is too full. In addition, it may be that your ISP may have a maximum size for emails to receive.
The manual is sent by email. Check your email
If you have not received an email with the manual within fifteen minutes, it may be that you have a entered a wrong email address or that your ISP has set a maximum size to receive email that is smaller than the size of the manual.
The email address you have provided is not correct.
Please check the email address and correct it.
Your question is posted on this page
Would you like to receive an email when new answers and questions are posted? Please enter your email address.