conforme est soumise à l’accord explicite du fabricant.
Toute demande de garantie doit être adressée au revendeur.
Toute intervention relevant de la garantie devra être effectuée par
le fabricant ou un revendeur agréé.
Toute réparation intervenant après la période de garantie
peut être exécutée par un professionnel qualifié.
Pour bénéficier de la garantie, conserver la facture d’achat
du matériel et utiliser uniquement des pièces d‘origine du
fabricant.
Livraison standard
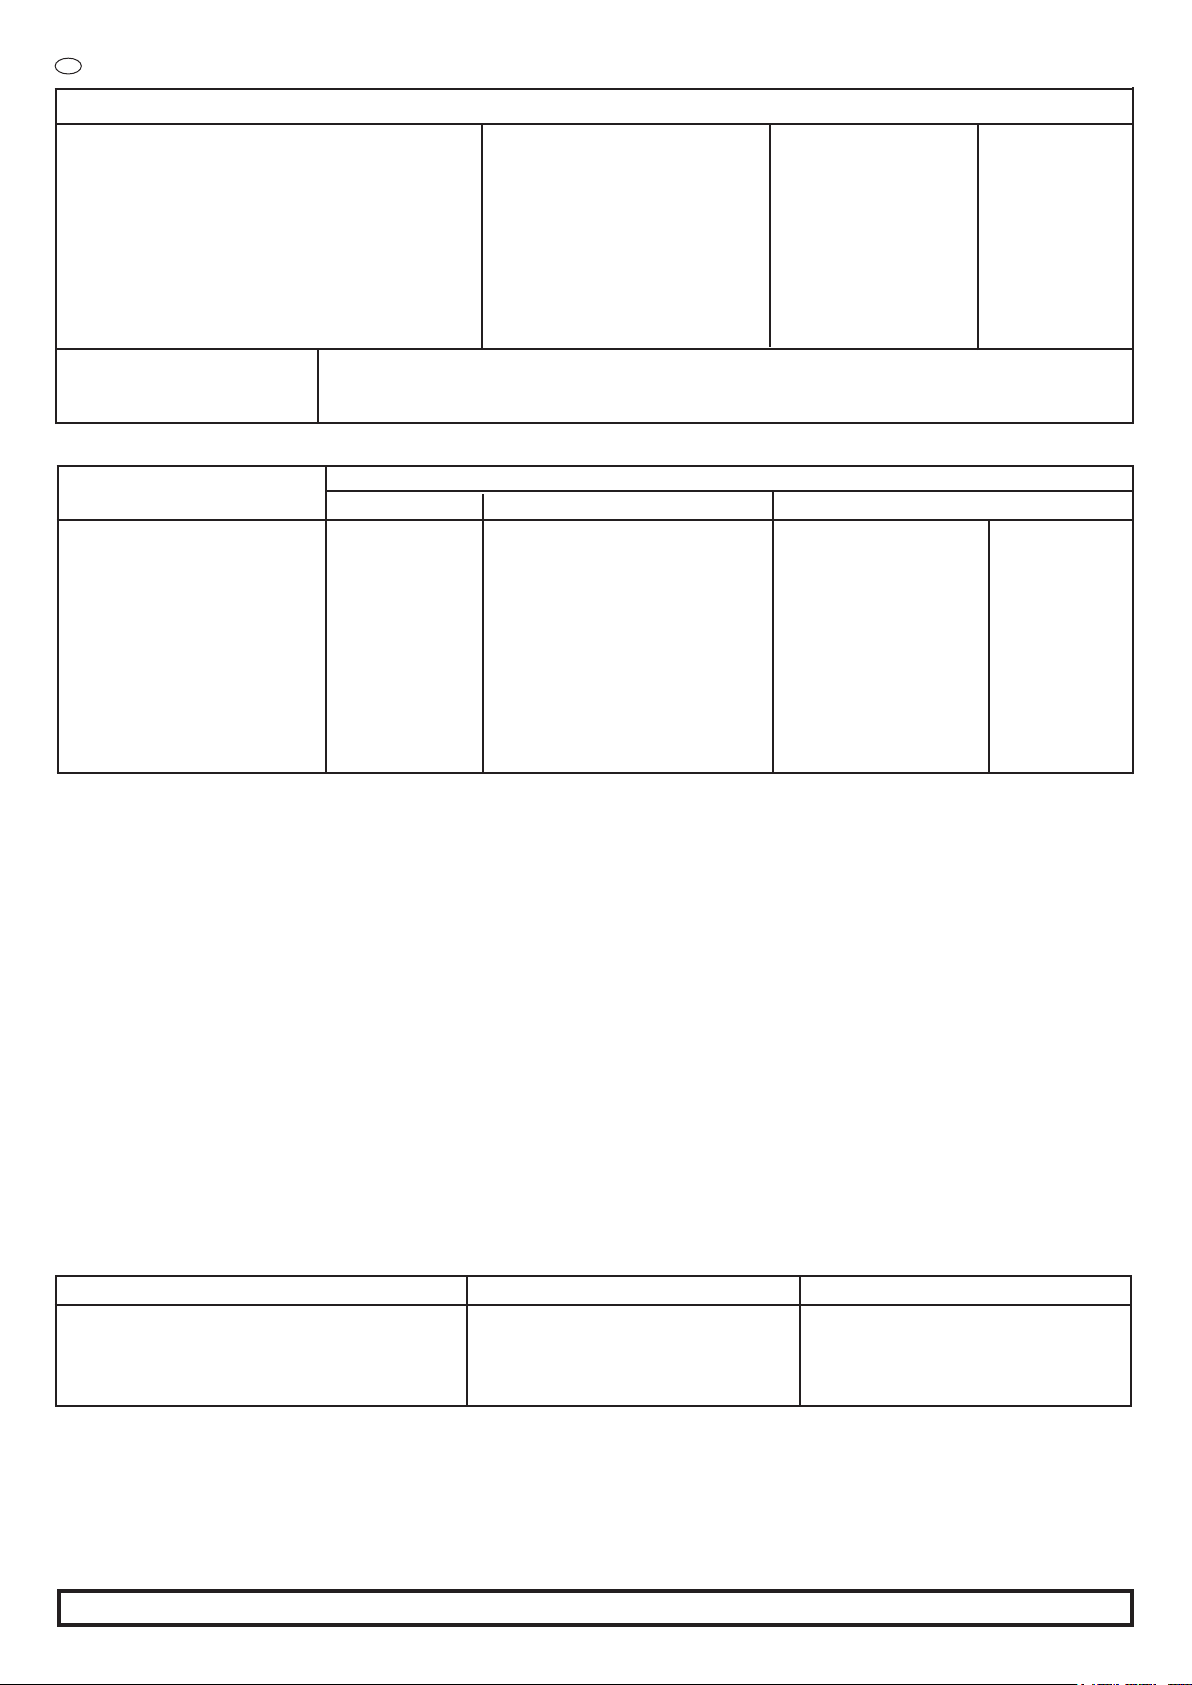
Scie circulaire
Lame de scie au carbure Ø 200/30
Guide de délignage
Toupie
Guide protecteur avec guide sortie à réglage fin
1 jeu de rondelles lumières
1 jeu de bagues et vis de serrage
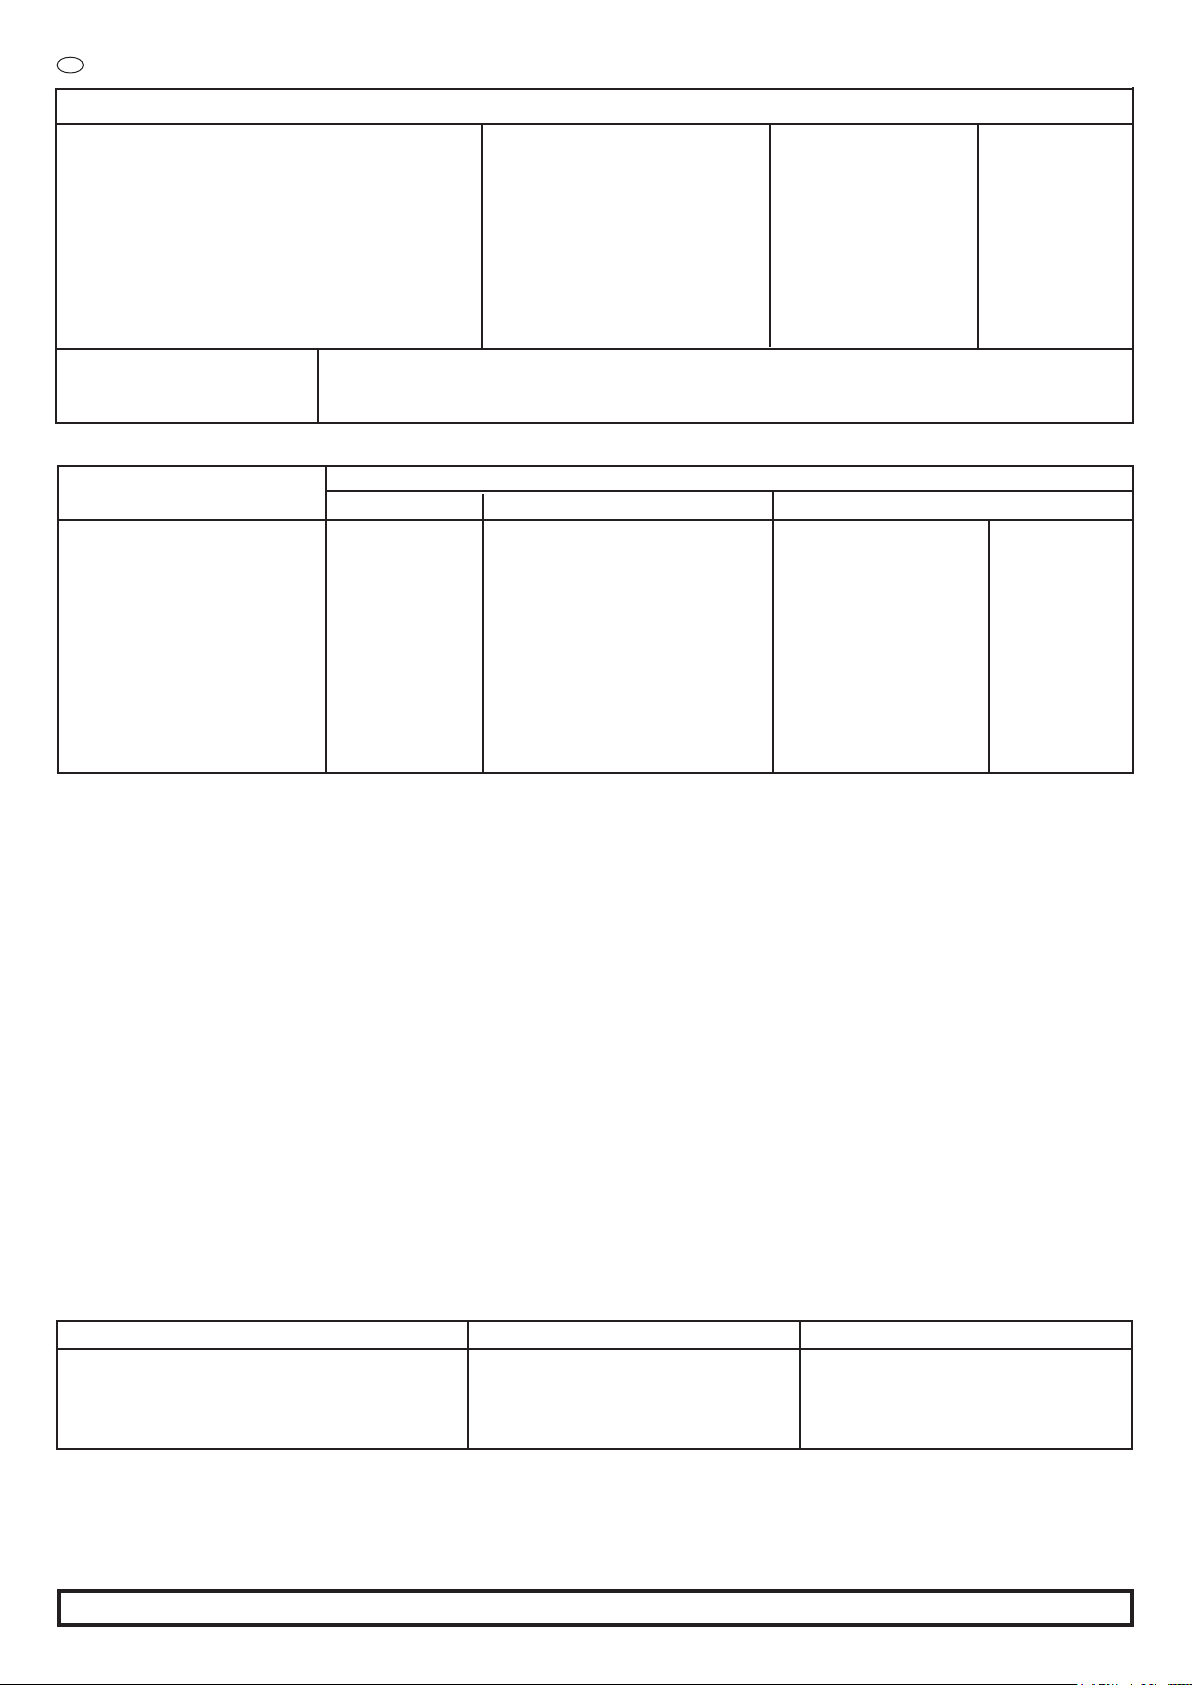
Dégau-rabot
1 jeu de fers de dégau
Protecteur à pont
Ejecteur de copeaux
Guide de dégauchissage (= guide // sur scie circulaire)
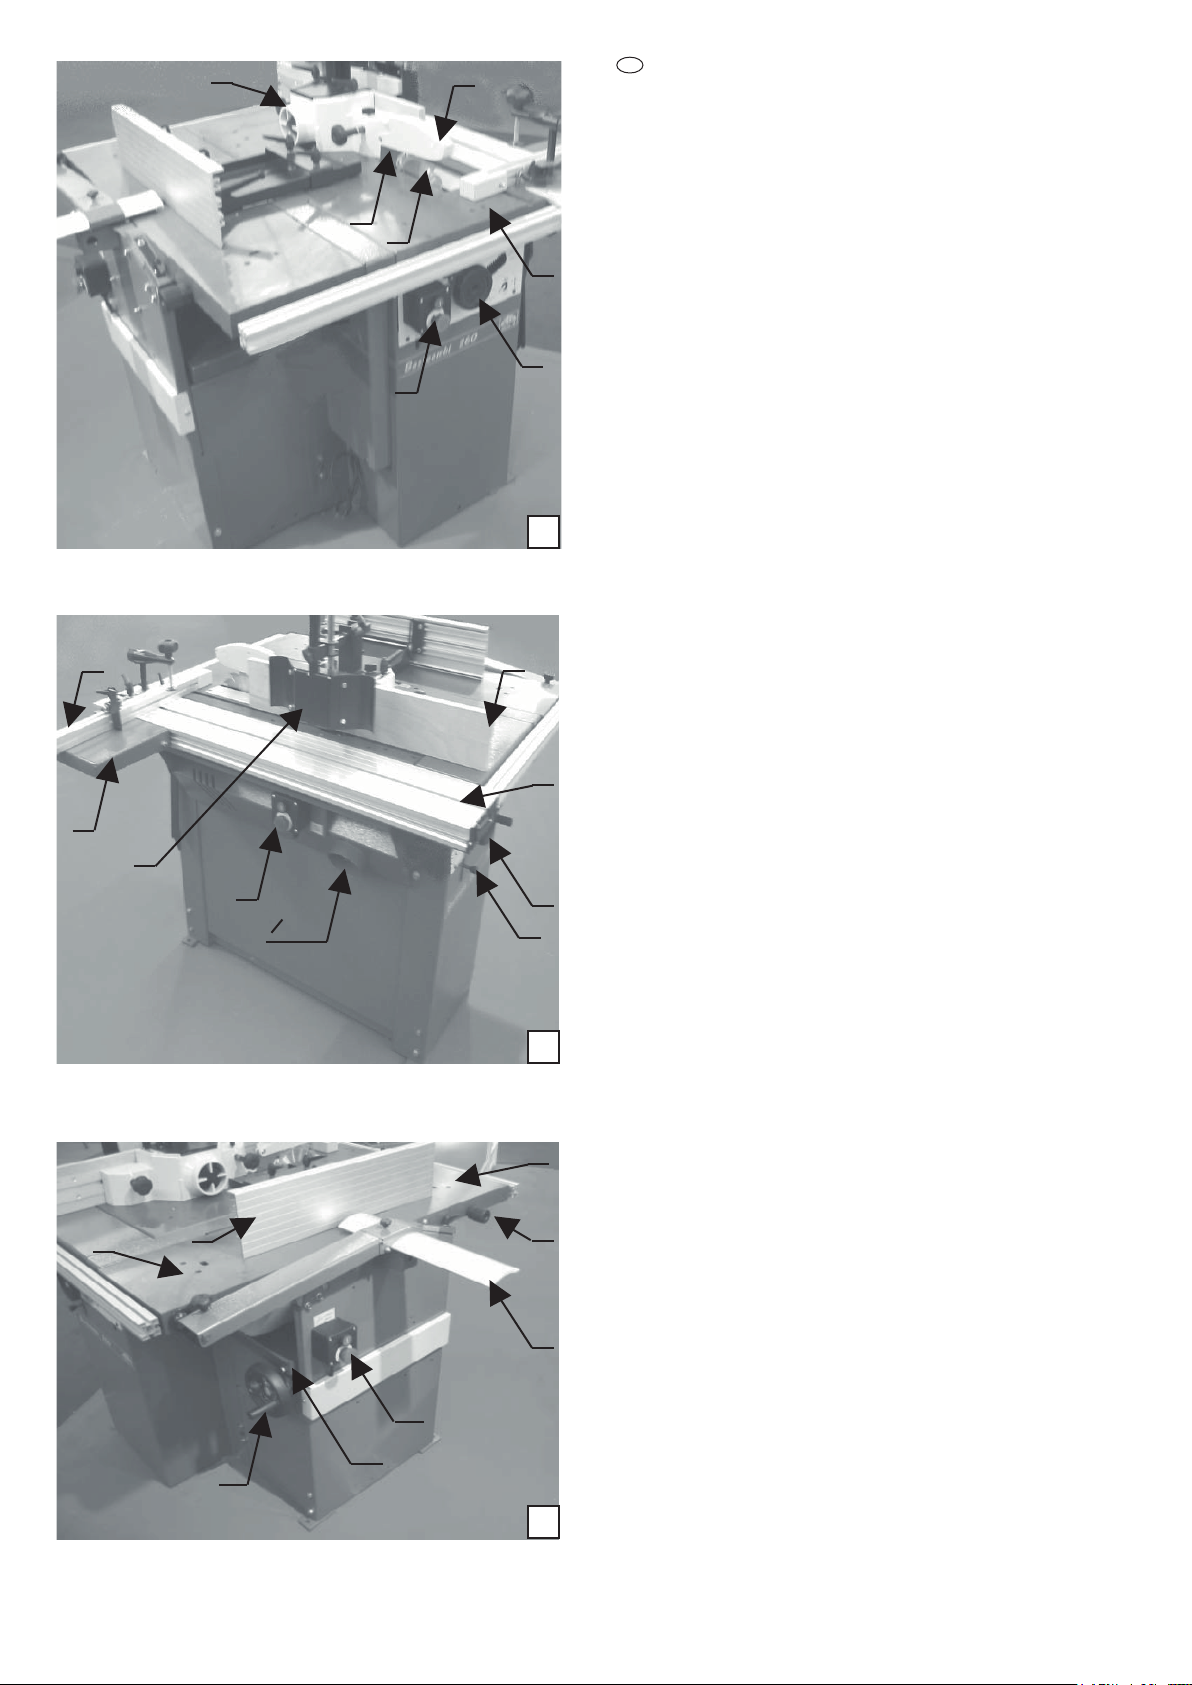
Chariot de sciage et de tenonnage
Guide orientable (L.600 mm)
avec butée escamotable de mise à longueur
Tablette transversale
Poussoir - Notice d’instruction - clés de service
Sommaire
1.0 Caractéristiques techniques
2.0 Recommandations
3.0 Scie circulaire
4.0 Toupie
5.0 Chariot mixte
6.0 Dégauchisseuse raboteuse
7.0 Séparation des modules
8.0 Anomalies de fonctionnement
9.0 Vues éclatées
10.0 Certificat
Insert milieu détachable : Règles générales de sécurité
Transport et stockage
- Température ambiante : -25°C à +55°C
(+70°C pour une durée inférieure à 24h)
- Protection anti-choc : emballage bois
- Livraison : sur caisse-palette en bois prévue pour la manutention
par chariot élévateur à fourches et transpalette.
Attention : éviter tout choc ou effort important,
risque de déréglages et de détérioration.
Déballage
Déballer de préférence la machine dans son local d’utilisation. La
machine peut-être soulevée à l’aide de crochets passés dans les
trous prévus à cet effet dans le bâti
(voir page 8).
Pour la séparation des modules (passage de porte) voir chapitre 7
Poids net : 260 kg
Conditions de fonctionnement
- Température ambiante +5°C à +40°C
- Humidité relative < 50% à 40°C
- Altitude maxi 1000 m
F
Groupe d’aspiration Woova 3.1
Absauganlage Woova 3.1
Dust extractor Woova 3.1
Adaptation mortaiseuse
Langlochbohrvorrichtung
Slot mortiser attachment
Gabarit de réglage des fers de dégau
Hobelmessereinstellehre
Setting device for planer knives
Protecteur pour toupie travail à l’arbre
Schutzvorrichtung für Fräsmaschinen Arbeit
an der Spindel
Guard for molling machines working with
spindle
Kit de déplacement pour la machine
Hubfahrwerk zum verfahren der Maschine
Wheel kit to move the machine
Adaptation mortaiseuse
Langlochbohrvorrichtung
Slot mortiser attachment
2
Réf. 1902402702
Réf. 3300656714
Réf. 20 1404 009
Réf. 20 0404 021
Réf. 1906306901
Réf. 20 0409 012
4
40/60 mm
200/30 mm
4800 mn-1
100 mm
1000 W
1060x560 mm
Toute intervention sur l’équipement électrique doit se faire par un professionnel.
Contrôle qualité : Chaque équipement est systématiquement contrôlé selon norme électrique EN 60204-1
* Les valeurs données sont des niveaux d’émission et pas nécessairement des niveaux permettant le travail en sécurité. Des corrélations existent
entre les niveaux d’émission et les niveaux d’exposition, mais celles-ci ne peuvent être utilisées de manière able pour déterminer si des précautions
supplémentaires sont nécessaires. Les paramètres qui inuencent les niveaux réels d’exposition comprennent la durée d’exposition, les caractéristi-
ques de l’atelier, les autres sources de poussières et de bruit, etc..., c’est-à-dire le nombre de machines et de procédés de fabrication voisins. De plus,
les niveaux d’exposition admissibles peuvent varier d’un pays à l’autre. Cependant, cette information permet à l’utilisateur de la machine de faire une
meilleure évaluation des risques.
Equipement électrique Mono Tri
Alimentation 230 V ~ 50Hz 400 V +/- 10% ~ 50Hz +/- 1%
Protection 20 A 16 A
Puissance requise 2000 W 1950 W
Fiches 2 P + T 3 P + T
Le câble de raccordement est en HO7RNF à conducteurs de section 1,5 mm (2,5 mm si la longueur excède 10 m)
La che de type normalisée sera branchée obligatoirement à la terre.
Information :
L’aspirateur à copeaux qui doit être connecté à la machine doit garantir qu’une vitesse moyenne d’air de 20 m/s ainsi qu’un débit de 565 m3/h minimum
soient obtenus au branchement de la machine.
Diamètre buse d’aspiration : 100 mm
1.1 CARACTERISTIQUES TECHNIQUES
F
Scie
Hauteur de coupe maxi à 45/90°
Diamètre de la lame / alésage
Vitesse de rotation
Diamètre d’aspiration
Puissance moteur P2 ‘‘utile’’
Dimensions des tables
Encombrement L x l x h
Hauteur du plan de travail
Poids
Toupie
Diamètre de l’arbre
Course de l’arbre
Hauteur de l’arbre
30 mm
85 mm
80 mm
6300 mn-1
100 mm
1000 W
1060x560 mm
259 mm
256x200 mm
7,5 m/min
2,5 mm
6500 mn-1
100 mm
1500 W
1060x270 mm
Dégau -Rabot
Largeur de dégauchissage
Capacité de rabotage
Avance débrayable
Prise de passe réglable
1800 mm x 1260 mm x 1100 mm
850 mm
260 Kg
Le niveau de pression par fonction est inférieur à 135 dB(A). Tolérance de mesure = ± 4dB
Partie 1652
76,2 dB(A)
89 dB(A)
83,6 dB(A)
97 dB(A)
Emission sonore *
Marche à vide
- Pression acoustique LpA
AP1
AP2
- Puissance acoustique LwA
En travail
- Pression acoustique LpA
AP1
AP2
- Puissance acoustique LwA
DIN 45635
Partie 1651
76,6 dB(A)
89,3 dB(A)
88,6 dB(A)
100,9 dB(A)
80,2 dB(A)
86,4 dB(A)
88,7 dB(A)
97,6 dB(A)
Partie 1650
75,5 dB(A)
79,1 dB(A)
90,9 dB(A)
82,3 dB(A)
82,5 dB(A)
96,7 dB(A)
Eingriffe auf Stromversorgung und elektrischen Teilen dürfen nur durch Elektro-Fachleuten ausgeführt werden.
Libble takes abuse of its services very seriously. We're committed to dealing with such abuse according to the laws in your country of residence. When you submit a report, we'll investigate it and take the appropriate action. We'll get back to you only if we require additional details or have more information to share.
Product:
Forumrules
To achieve meaningful questions, we apply the following rules:
First, read the manual;
Check if your question has been asked previously;
Try to ask your question as clearly as possible;
Did you already try to solve the problem? Please mention this;
Is your problem solved by a visitor then let him/her know in this forum;
To give a response to a question or answer, do not use this form but click on the button 'reply to this question';
Your question will be posted here and emailed to our subscribers. Therefore, avoid filling in personal details.
Register
Register getting emails for Scheppach Bestcombi 5.0 at:
new questions and answers
new manuals
You will receive an email to register for one or both of the options.
Get your user manual by e-mail
Enter your email address to receive the manual of Scheppach Bestcombi 5.0 in the language / languages: English, German, French as an attachment in your email.
The manual is 6.33 mb in size.
You will receive the manual in your email within minutes. If you have not received an email, then probably have entered the wrong email address or your mailbox is too full. In addition, it may be that your ISP may have a maximum size for emails to receive.
The manual is sent by email. Check your email
If you have not received an email with the manual within fifteen minutes, it may be that you have a entered a wrong email address or that your ISP has set a maximum size to receive email that is smaller than the size of the manual.
The email address you have provided is not correct.
Please check the email address and correct it.
Your question is posted on this page
Would you like to receive an email when new answers and questions are posted? Please enter your email address.