647852
8
Zoom out
Zoom in
Previous page
1/23
Next page
8
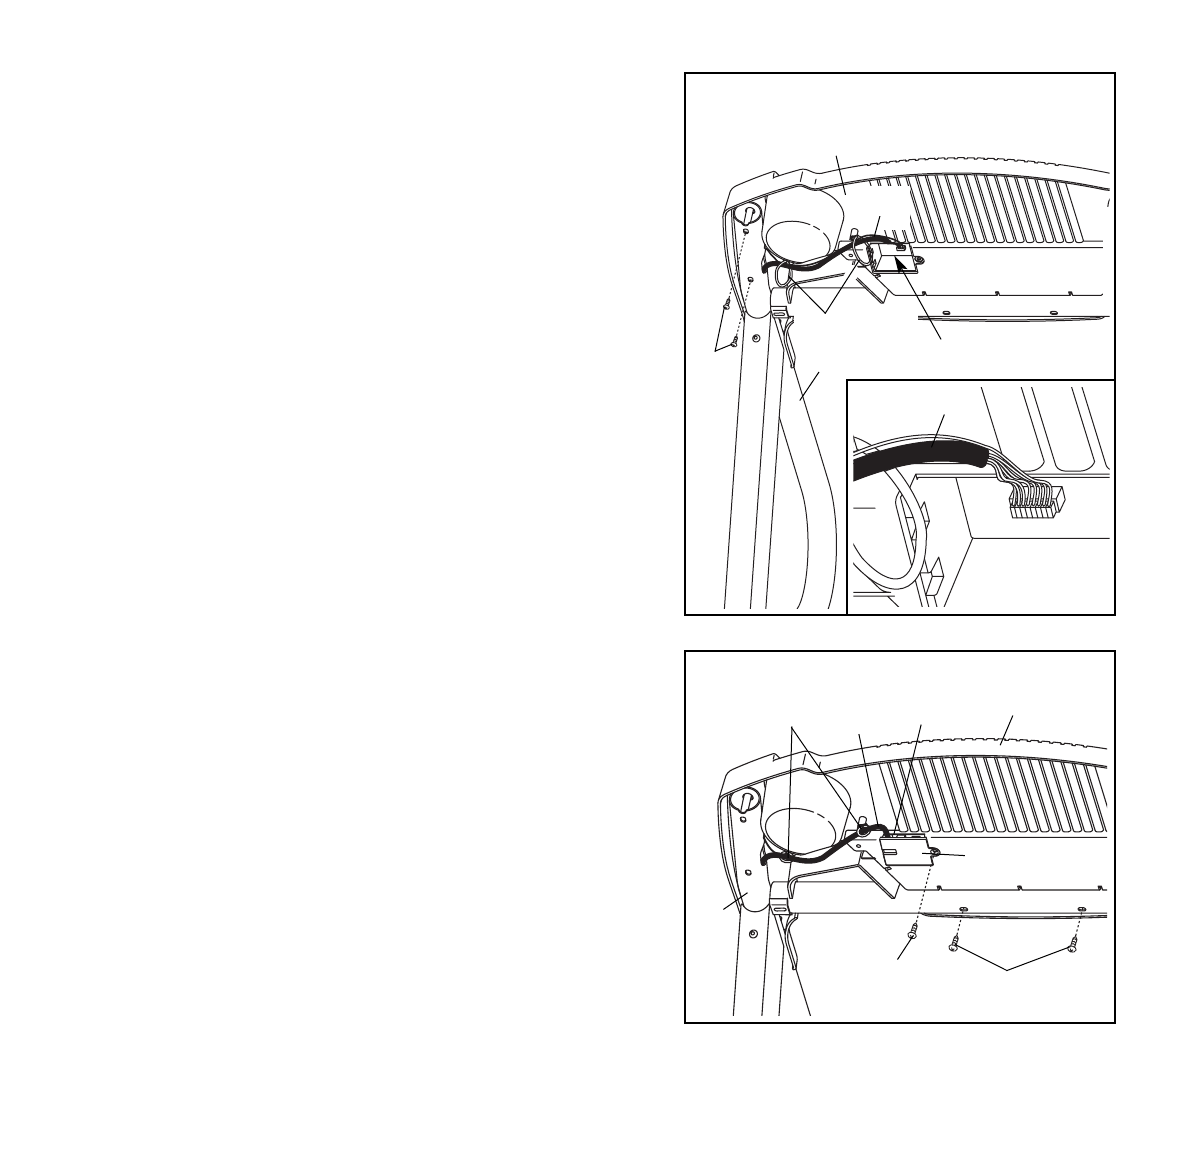
7. Steek het overschot van de Draadharnas (42) in het
grote gat in de zijkant van de Rechter Handleuning (72).
Maak de plastic verbindingen goed vast aan de on-
derkant van de Basis van het Bedieningspaneel (47)
zodat de Draadharnas niet glijdt. Snij vervolgens de
einden van de plastic verbindingen af.
Voer de Draadharnas (42) door de aangegeven opening
in de Basis van het Bedieningspaneel (47). Maak de Kap
van de Draad (44) aan de Basis van het Bedieningspa-
neel vast met een Zilveren Geaarde Schroef (75).
Draai de twee 3/4" Schroeven (61) in de Basis van het
Bedieningspaneel (47) vast.
Draai alle bouten en schroeven uit de montage stap-
pen 2, 3, 4, en 6 goed vast.
8. Zorg ervoor dat alle onderdelen goed zijn vastgedraaid voordat u de loopband gebruikt. Opgelet: Het kan
zijn dat er extra onderdelen zijn. Bewaar de meegeleverde inbussleutels op een veilige plaats. De grote sleutel is
voor het bijstellen van de band (zie pagina 16). Plaats een matje onder de loopband om uw vloer te beschermen.
47
42
44
7
61
72
75
Verbindingen
Opening
47
Verbindingen
72
6
6. Plaats de Basis van het Bedieningspaneel (47) op de
Rechter Handleuning (72) en de Linker Handleuning (niet
getoond). Maak de Basis van het Bedieningspaneel vast
met vier 3/4” Schroeven (61) (alleen twee Schroeven ge-
toond).
Draai de Schroeven niet te strak aan.
Steek de Draadharnas (42) door de twee aangegeven
plastic verbindingen van de Basis van het Bedieningspa-
neel (47). Raak de Rechter Handleuning (72) even aan
om statische elektriciteit te ontladen. Zie tekening 6a.
Zoek naar de connector aan het einde van de Draadhar-
nas (42). Steek de connector in het rode contactpunt
onder het Bedieningspaneel. (43). De connector moet
makkelijk in het contacpunt schuiven en vast zitten.
Als de connector niet makkelijk in het contactpunt schuift
en niet vast blijft zitten draai de connector dan en steek
deze weer in.
Zorg ervoor dat de connector en draden zoals in teke-
ning 6a wordt aangegeven geplaatst zijn. WANNEER DE
CONNECTORS NIET GOED ZIJN VERBONDEN KAN
HET BEDIENINGSPANEEL BESCHADIGD WORDEN
ALS DE STROOM INGESCHAKELD WORDT.
42
43
61
42
6a
8


Need help? Post your question in this forum.

Forumrules


Report abuse

Libble takes abuse of its services very seriously. We're committed to dealing with such abuse according to the laws in your country of residence. When you submit a report, we'll investigate it and take the appropriate action. We'll get back to you only if we require additional details or have more information to share.

Product:

For example, Anti-Semitic content, racist content, or material that could result in a violent physical act.

For example, a credit card number, a personal identification number, or an unlisted home address. Note that email addresses and full names are not considered private information.

Forumrules

To achieve meaningful questions, we apply the following rules:

Register

Register getting emails for Pro-form 360P - PETL30131 at:


You will receive an email to register for one or both of the options.


Get your user manual by e-mail

Enter your email address to receive the manual of Pro-form 360P - PETL30131 in the language / languages: Dutch as an attachment in your email.

The manual is 3,34 mb in size.


You will receive the manual in your email within minutes. If you have not received an email, then probably have entered the wrong email address or your mailbox is too full. In addition, it may be that your ISP may have a maximum size for emails to receive.

Others manual(s) of Pro-form 360P - PETL30131

Pro-form 360P - PETL30131 User Manual - English - 23 pages

Pro-form 360P - PETL30131 User Manual - German - 23 pages

Pro-form 360P - PETL30131 User Manual - French - 23 pages


The manual is sent by email. Check your email

If you have not received an email with the manual within fifteen minutes, it may be that you have a entered a wrong email address or that your ISP has set a maximum size to receive email that is smaller than the size of the manual.

The email address you have provided is not correct.

Please check the email address and correct it.

Your question is posted on this page

Would you like to receive an email when new answers and questions are posted? Please enter your email address.


Info