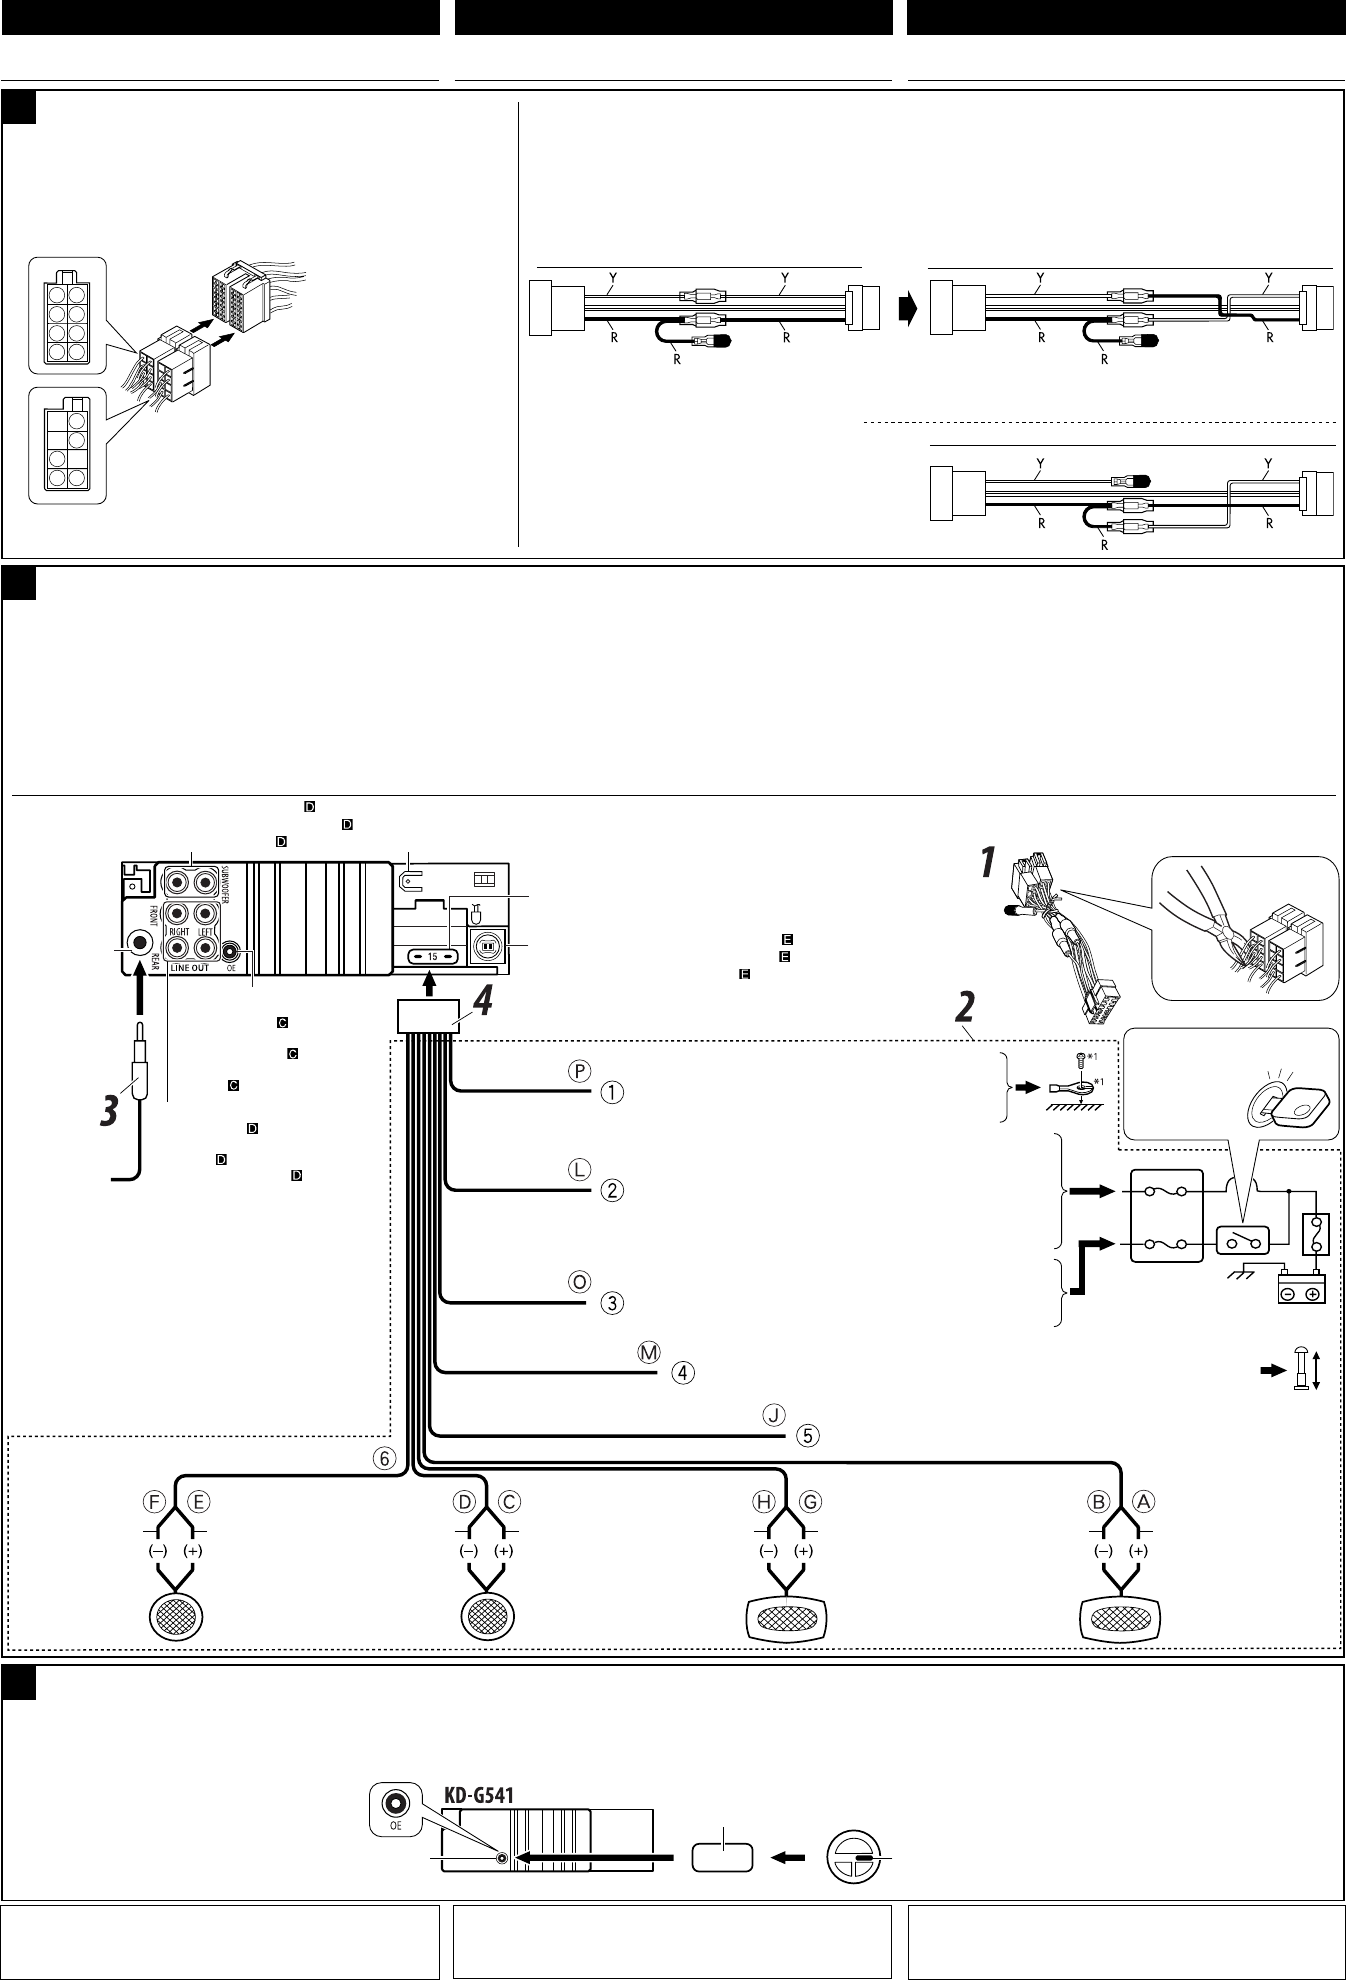
Anschlüsse ohne Verwendung der ISO-Steckverbinder / Connexions sans utiliser le connecteur ISO / Collegamenti senza utilizzare i connettori ISO
A
Schutz kappen Signalausgang
(siehe Schaltplan
)
Sortie de ligne (voir le
diagramme
)
Uscita linea (cfr. schema
)
15 A Sicherung
Fusible 15 A
Fusibile 15 A
Antennen-
anschlußklemme
Borne de l’antenne
Terminale per
antenna
Schwarz
Noir
Nero
Blau mit weißem Streifen
Bleu avec bande blanche
Blu a strisce bianche
Rot
Rouge
Rosso
Gelb
*
2
Jaune*
2
Giallo*
2
Braun
Marron
Marrone
Zur metallenen Karosserie oder zum Fahrwerk des Autos
Vers corps métallique ou châssis de la voiture
Sulla carrozzeria metallica o sul telaio dell’auto
Zur einer stromführenden Anschlußklemme im Sicherungsblock zum
Anschließen an die Autobatterie (Umgehen des Zündschalters) (konstant
12 V)
À une borne sous tension du porte-fusible connectée à la batterie de la voiture
(en dérivant l’interrupteur d’allumage) (12 V constant)
Su un terminale sotto tensione nel blocco fusibili che si collega alla
batteria dell’auto (bypassando l’interruttore di accensione) (12 V costanti)
Zündschalter
Interrupteur d’allumage
Interruttore di
accensione
Sicherungsblock
Porte-fusible
Blocco fusibili
Zur einer Zubehöranschlußklemme im Sicherungsblock
Vers borne accessoire du porte-fusible
Su un terminale per accessori nel blocco fusibili
Zum Zusatzkabel des anderen Geräts oder der Motorantenne, sofern vorhanden (max. 200 mA)
Au fil de télécommande de l’autre appareil ou à l’antenne automatique s’il y en a une (200 mA max.)
Allo spinotto remoto di altra attrezzatura o all’eventuale antenna elettrica (max 200 mA)
Linker Lautsprecher (vorne)
Enceinte gauche (avant)
Cassa sinistra (anteriore)
Rechter Lautsprecher (vorne)
Enceinte droit (avant)
Cassa destra (anteriore)
Linker Lautsprecher (hinten)
Enceinte gauche (arrière)
Cassa sinistra (posteriore)
Rechter Lautsprecher (hinten)
Enceinte droit (arrière)
Cassa destra (posteriore)
Lila
Violet
Porpora
Lila mit schwarzem
Streifen
Violet avec bande noire
Porpora a strisce nere
Grün
Vert
Verde
Grün mit schwarzem
Streifen
Vert avec bande noire
Verde a strisce nere
Grau
Gris
Grigio
Grau mit schwarzem
Streifen
Gris avec bande noire
Grigio a strisce nere
Weiß
Blanc
Bianco
Weiß mit schwarzem
Streifen
Blanc avec bande noire
Bianco a strisce nere
ITALIANO FRANÇAIS
B
Wenn Ihr Fahrzeug mit dem ISO-Steckverbinder
ausgestattet ist / Si votre voiture est équippée
d’un connecteur ISO / Se la propria auto dispone
del connettore ISO
Von der Fahrzeugkarosserie
De la carrosserie de la voiture
Dalla carrozzeria dell’auto
ISO-Stecker des mitgelieferten Stromkabels
Connecteur ISO pour le cordon d’alimentation fourni
Connettore ISO del cavo di alimentazione fornito
Von der Kabelseite aus gesehen
Vue à partir du côté des fils
Vista dal lato dei cavi
Bei bestimmten VW-/Audi- order Opel- (Vauxhall-) Fahrzeugen / Pour certaines automobiles
VW/Audi ou Opel (Vauxhall) / Per alcune automobili VW/Audi o Opel (Vauxhall)
Es kann erforderlich sein, die Verdrahtung des mitgelieferten Stromkabels zu modifizieren, wie in der Abbildung gezeigt.
• Wenden Sie sich vor dem Einbau dieses Receivers an Ihre Auto-Fachwerkstatt.
Vous aurrez peut-être besoin de modifier le câblage du cordon d’alimentation fourni comme montré sur l’illustration.
• Contactez votre revendeur automobile autorisé avant d’installer l’appareil.
Potrebbe essere necessario modificare il cablaggio del cavo di alimentazione fornito come illustrato.
• Contattare il proprio rivenditore di automobili prima di installare questo ricevitore.
Original verdrahtung / Câblage original / Cablaggio originale
Modifizierte Verdrahtung 1 / Câblage modifié 1 / Cablaggio modificato 1
Verwenden Sie die modifizierte Verdrahtung 2 wenn der Receiver nicht einschaltet.
Utilisez le câblage modifié 2 si l’appareil ne se met pas sous tension.
Utilizzare il cablaggio modificato 2 se il ricevitore non viene acceso.
ISO-Steckverbinder
Connecteur ISO
Connettore ISO
Y: Gelb
Jaune
Giallo
R: Rot
Rouge
Rosso
Modifizierte Verdrahtung 2 / Câblage modifié 2 / Cablaggio modificato 2
Avant de commencer la connexion: Vérifiez attentivement le
câblage du véhicule. Une connexion incorrecte peut endommager
sérieusement l’appareil.
Le fil du cordon d’alimentation et ceux des connecteurs du châssis de la
voiture peuvent être différents en couleur.
1 Coupez le connecteur ISO.
2 Connectez les fils colorés du cordon d’alimentation dans l’ordre
spécifié sur l’illustration ci-dessous.
3 Connectez le cordon d’antenne.
4 Finalement, connectez le faisceau de fils à l’appareil.
Prima del collegamento: Verificare attentamente il cablaggio
della vettura. Si ricorda che un collegamento improprio può
danneggiare seriamente l’apparecchio.
I conduttori del cavo di alimentazione e quelli del connettore
sulla carrozzeria potrebbero essere di colore diverso.
1 Tagliare il connettore ISO.
2 Collegare I conduttori colorati del cavo di alimentazione
nell’ordine indicato nella figura di seguito.
3 Collegare il cavo dell’antenna.
4 Infine, collegare i cablaggi all’apparecchio.
Vor dem Anschließen: Die Verdrahtung im Fahrzeug sorgfältig
überprüfen. Falsche Anschlüsse können ernsthafte Schäden am
Gerät hervorrufen.
Die Leiter des Stromkabels und die Leiter des Anschlusses im
Fahrzeug können sich farblich unterscheiden.
1 Schneiden Sie den ISO-Steckverbinder auf.
2 Die farbigen Adern des Stromkabels in der Reihenfolge
anschließen, wie in der Abbildung unten gezeigt.
3 Das Antennenkabel anschließen.
4 Die Kabelbäume am Gerät anschließen.
• Schließen Sie die ISO-Steckverbinder an, wie in der Abbildung gezeigt.
• Connectez les connecteurs ISO comme montré sur l’illustration.
• Collegare i connettori ISO come mostrato in figura.
ELEKTRISCHE ANSCHLÜSSE RACCORDEMENTS ELECTRIQUES COLLEGAMENTI ELETTRICI
*
1
Wird nicht mit Gerät mitgeliefert.
*
2
Vor der Überprüfung der Funktionsfähigkeit des Geräts vor dem
Einbau, muß diese Leitung angeschlossen werden, da sonst die
Stromversorgung nicht eingeschaltet werden kann.
*
1
Non fourni avec cet autoradio.
*
2
Pour vérifier le fonctionnement de cet appareil avant installation, ce fil
doit être raccordé, sinon l’appareil ne peut pas être mis sous tension.
*
1
Non fornite con l’apparecchio.
*
2
Per poter verificare il funzionamento dell’apparecchio prima
dell’installazione, è necessario avere già collegato questo filo
(altrimenti è impossibile accendere l’apparecchio).
OE
Eingang für Lenkradfernbedienung
(siehe Schaltplan
)
Entrée de la télécommande de volant
(voir le diagramme
Ingresso telecomando volante (cfr.
schema )
An externe Komponenten (siehe Schaltplan
)
Aux appareils extérieurs (voir le diagramme )
Ai componenti esterni (cfr. schema )
An Subwoofer (siehe Schaltplan
)
Au caisson de grave (voir le diagramme )
Al subwoofer (cfr. schema )
Anschluß an die Lenkradfernbedienung / Connexion de la télécommande de volant / Collegamento al telecomando sul volante
Si votre voiture est munie d’une télécommande de volant, vous pouvez
commander cet autoradio en utilisant la télécommande. Pour le faire, un
adaptateur pour télécommande au volant JVC (non fourni) correspondant à votre
voiture est nécessaire. Consultez votre revendeur d’autoradio JVC pour les détails.
C
Radio-Lenkrad-Fernbedienungsadaption (nicht mitgeliefert)
Adaptateur pour télécommande au volant (non fourni)
Adattatore OE per telecomando (non in dotazione)
OE
Eingang für Lenkradfernbedienung
Entrée de la télécommande de volant
Ingresso telecomando volante
Wenn Ihr Fahrzeug mit einer Lenkradferndienung ausgestattet ist, können
Sie damit diesen Receiver steuern. Hierfür ist ein für Ihr Fahrzeug passender
Radio-Lenkrad-Fernbedienungsadaption von JVC (nicht mitgeliefert)
erforderlich. Für weitere Einzelheiten wenden Sie sich an Ihren JVC
Autoradiohändler.
Se l’automobile è dotata di telecomando da volante, è possibile controllare
le funzionalitë del presente ricevitore per mezzo del telecomando. È
necessario utilizzare un adattatore OE per telecomando di JVC (non in
dotazione) corrispondente all’automobile in questione. Per ulteriori
informazioni consultare il rivenditore JVC car audio di fiducia.
Lenkradfernbedienung (im Fahrzeug installiert)
Télécommande de volant (installée dans la voiture)
Telecomando volante (in dotazione con l’automobile)
Hintere Erdungsc-anschlußklemme
Borne arrière de masse
Terminale di terra posteriore
Zur Mobiltelefon
À un système de téléphone cellulaire
Al sistema per telefono cellulare
Install3-4_KD-G541_008A_f.indd 3Install3-4_KD-G541_008A_f.indd 3 20/11/07 12:03:36 pm20/11/07 12:03:36 pm