D
Connecting the external amplifiers and subwoofer / Anschließen der externen Verstärker und Subwoofer / Подключение внешних
усилителей и низкочастотного динамика
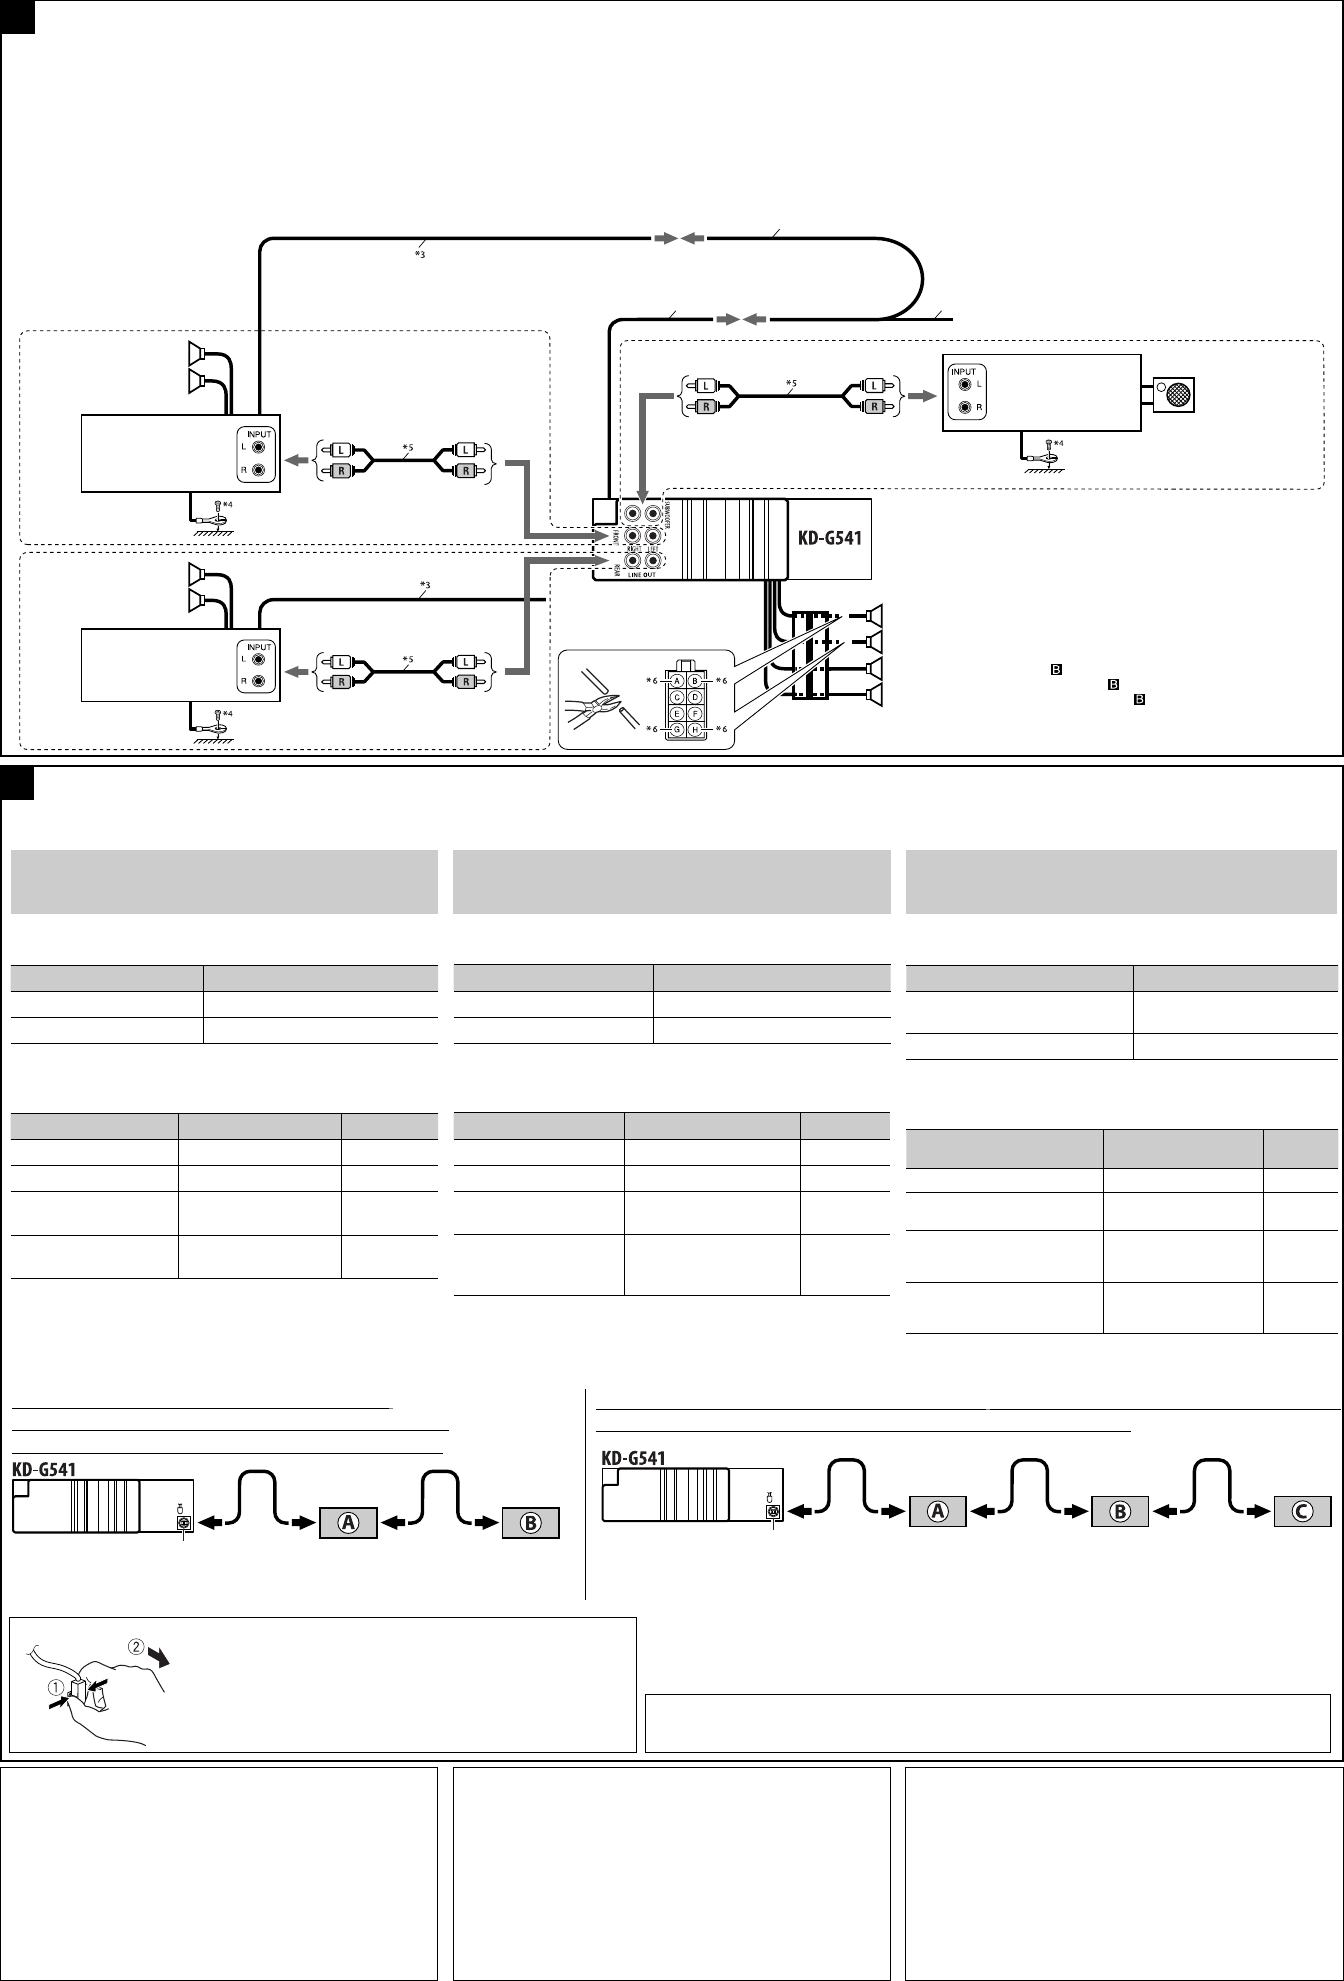
You can connect amplifiers to upgrade your car stereo system.
• Connect the remote lead (blue with white stripe) to the remote
lead of the other equipment so that it can be controlled through
this unit.
• Disconnect the speakers from this unit, connect them to the
amplifier. Leave the speaker leads of this unit unused.
Можно подключить усилитель для обновления автомобильной
стереосистемы.
• Подсоедините провод внешнего устройства (синий с белой
полосой) к проводу внешнего устройства другого оборудования
так, чтобы им можно было управлять с этого устройства.
•
Отсоедините громкоговорители от данного устройства,
подключите их к усилителю. Оставьте провода
громкоговорителей данного устройства неиспользованными.
Rear speakers
Hintere Lautsprecher
Задние громкоговорители
JVC Amplifier
JVC Verstärker
JVC-усилитель
Remote lead (blue with white stripe)
Fernbedienungsleitung (blau mit weißem Streifen)
Провод внешнего устройства (cиний с белой полосой)
To the remote lead of other equipment or power aerial if any
Zum Zusatzkabel des anderen Geräts oder der Motorantenne,
sofern vorhanden
К удаленному проводу другого оборудования или антенны
Sie können einen Verstärker anschließen, um Ihre Autostereoanlage zu
erweitern.
• Schließen Sie das Fernbedienungskabel (blau mit weißem Streifen) an
das Fernbedienungskabel des anderen Geräts an, so daß es über dieses
Gerät gesteuert werden kann.
• Die Lautsprecher von diesem Gerät abtrennen und am
Verstärker anschließen. Die Lautsprecherleitungen dieses
Geräts unbenutzt lassen.
Y-connector (not supplied for this unit)
Y-Anschluß (wird nicht mit Gerät mitgeliefert)
Разъем Y (не входит в комплект поставки)
*
3
Remote lead
*
4
Firmly attach the ground wire to the metallic body or to the chassis of
the car—to the place uncoated with paint (if coated with paint, remove
the paint before attaching the wire). Failure to do so may cause damage
to the unit.
*
5
Signal cord (not supplied for this unit)
*
6
Cut the rear speaker leads of the car’s ISO connector and connect them
to the amplifier.
*
7
To use these components, set the external input setting correctly (see page
15 of the INSTRUCTIONS).
*
8
If KS-BTA200 is available, connect it to A and connect KT-DB1000 to
position B .
*
3
Fernbedienungsleitung
*
4
Verbinden Sie den Erdungsleiter mit der Karosserie oder dem Rahmen
des Fahrzeugs. Die Kontaktstelle darf nicht lackiert sein (sollte die
Kontaktstelle lackiert sein, entfernen Sie den Lack der Kontaktstelle, bevor
Sie den Leiter befestigen). Wenn der Erdungsleiter nicht ordnungsgemäß
angeschlossen wird, kann dieses Gerät beschädigt werden.
*
5
Einzelleitung (wird nicht mit Gerät mitgeliefert)
*
6
Schneiden Sie die hinteren Lautsprecherkabel des ISO-Steckverbinders des
Fahrzeugs ab, und schließen diese an den Verstärker an.
*
7
Zur Verwendung dieser Komponenten stellen Sie die
externe Eingangseinstellung richtig ein (siehe Seite 15 der
BEDIENUNGSANLEITUNG).
*
8
Falls KS-BTA200 zur Verfügung steht, an Position A anschließen und
KT-DB1000 an Position B anschließen.
*
3
Провод внешнего устройства
*
4
Плотно прикрепите заземляющий провод к металлическому
кузову или шасси автомобиля—в месте, не покрытом краской
(если оно покрыто краской, удалите краску перед тем, как
прикреплять провод). Невыполнение этого требования может
привести к повреждению данного устройства.
*
5
Кабель сигнала (не входит в комплект поставки)
*
6
Отрежьте провода задних громкоговорителей разъема ISO и
подсоеди
*
7
Чтобы использовать данные устройства, необходима правильная
настройка внешнего входа (см. ИНСТРУКЦИИ ПО ЭКСПЛУАТАЦИИ
на стр. 15).
*
8
Если устройство KS-BTA200 доступно, подключите его к A , а
устройство KT-DB1000 — к B
Rear speakers
Hintere Lautsprecher
Задние громкоговорители
Front speakers (see diagram
)
Vordere Lautsprecher (siehe Schaltplan )
Передние громкоговорители (см. схему
)
E
Connecting the external components / Anschließen der externen Komponenten / Подключение внешних устройств
iPod is a trademark of Apple Inc., registered in the U.S. and other countries.
iPod ist ein Warenzeichen von Apple Inc., eingetragen in den USA und anderen Ländern.
iPod является торговой маркой Apple Inc., зарегистрированной в США и других странах.
Front speakers
Vordere Lautsprecher
Передние
громкоговорители
When connecting the external components, refer also to the
manuals supplied for the components and adapter.
CAUTION :
Before
unit is turned off.
You can connect the following JVC components to the CD changer
jack.
JVC component Model name
CD changer (CD-CH) CH-X1500, etc.
JVC DAB tuner
KT-DB1000
You can also connect the following components through the various
JVC adapters.
• Connection cords may need to be purchased separately.
Component Adapter Model name
Bluetooth device Bluetooth adapter KS-BTA200
iPod Interface adapter for iPod KS-PD100
Portable audio player with
line output jacks
Line input adapter KS-U57
Portable audio player with
3.5 mm stereo mini jack
AUX input adapter KS-U58
When connecting more than one component (maximum: three),
it is recommended that you connect the components in series as
explained below.
Beim A
Ko
ACHTUNG :
Vor
das Gerät ausgeschaltet ist.
Sie können die folgenden JVC-Komponenten an die CD-Wechslerbuchse
anschließen.
JVC-Komponente Modellname
CD-Wechsler (CD-CH) CH-X1500
usw.
DAB-Tuner von JVC
KT-DB1000
Sie können auch die folgenden externen Komponenten über die
verschiedenen JVC-Adapter anschließen.
• Es kann erforderlich sein, Verbindungskabel getrennt zu kaufen.
Komponente Adapter
Modellname
Bluetooth-Gerät Bluetooth-Adapter KS-BTA200
iPod
Schnittstellenadapter für iPod
KS-PD100
Tragbarer Audio-Player
mit Line-Ausgangsbuchsen
Line-Eingangsadapter KS-U57
Tragbarer Audio-Player
mit 3,5-mm-Stereo-
Minibuchse
AUX-Eingangsadapter KS-U58
Beim Anschließen von mehr als einer Komponente (Maximum: drei)
wird empfohlen, dass Sie die Komponenten in Serie anschließen, wie
unten beschrieben.
При подключении внешних устройств см. также руководства,
поставляемые для устройств и адаптера.
ПРЕДОСТЕРЕЖЕНИЕ :
Пер
том, что устройство выключено.
К разъему устройства автоматической смены компакт-дисков
можно подключать указанные ниже устройства JVC.
Устройство JVC Название модели
Устройство автоматической
смены компакт-дисков (CD-CH)
CH-X1500 и т. д.
Тюнер DAB JVC
KT-DB1000
Указанные ниже устройства можно также подключать с
помощью различных адаптеров JVC.
• Кабели подключения могут быть приобретены отдельно.
Компонентный Адаптер
Название
модели
Устройство Bluetooth Адаптер Bluetooth KS-BTA200
iPod
Интерфейсный адаптер
для проигрывателя iPod
KS-PD100
Портативный
аудиопроигрыватель с
разъемами линейного выхода
Адаптер линейного
входа
KS-U57
Портативный
аудиопроигрыватель со
стерео мини-разъемом 3,5 мм
Адаптер входа AUX KS-U58
При подключении нескольких устройств (максимум: трех)
рекомендуется подключить устройства последовательно, как
описано ниже.
When connecting two components in series /
Beim Anschließen von zwei Komponenten in Serie /
Последовательное подключение двух устройств
When connecting three components in series / Beim Anschließen von drei Komponenten
in Serie / При подключении трех устройств последовательно
A KS-BTA200
B KT-DB1000
C *
7
KS-PD100 / KS-U57 / KS-U58
*
7
*
7
A KS-BTA200 / KT-DB1000 *
8
B *
7
CD-CH / KS-PD100 / KS-U57 / KS-U58
To disconnect the connector / Zum Abtrennen des Steckers / Отключение разъема
Hold the connector tightly ( 1 2 ) .
Halten Sie den Steckverbinder fest (1 ) und ziehen Sie ihn heraus (2 ).
Крепко удерживая разъем (
1
), извлеките его (
2
).
JVC Amplifier
JVC Verstärker
JVC-усилитель
JVC Amplifier
JVC Verstärker
JVC-усилитель
Subwoofer
Subwoofer
Низкочастотный
динамик
CD changer jack
Buchse für CD-Wechsler
Разъем устройства
автоматической смены
компакт-дисков
CD changer jack
Buchse für CD-Wechsler
Разъем устройства автоматической
смены компакт-дисков
Install3-4_KD-G541_013A_f.indd 4Install3-4_KD-G541_013A_f.indd 4 20/11/07 11:54:10 am20/11/07 11:54:10 am