700765
42
Zoom out
Zoom in
Previous page
1/61
Next page
42
ADJUSTING THE SATELLITE RECEIVER
___________________________________
Follow these steps:
1 Display the »Main Menu« on the picture screen using the »
i
« button.
Select the »Installation« row using the »
,,..
« buttons then press the OK
button.
– If the »PASSWORD« window appears on the picture screen:
2 Enter the password »00 0 0« (= factory default setting) with
four digits
using the numeric button »0 «.
In the case of incorrect entries, the following message appears briefly on
the picture screen:
Mismatch ! Try again
The »Installation« menu appears on the picture screen.
3 Select the »LNB Configuration« row using the »
,,..
« buttons then press
the OK button.
– The ASTRA satellite is selected.
4 Select the desired satellite using the »
,,..
« buttons.
5 Activate the »L.O. High« row using the OK button then enter the oscillator
frequency with five digits using the numeric buttons »1 … 0«.
6 Select the »L.O. Low« row using the »
..
« button then enter the oscillator
frequency with five digits using the numeric buttons »1 … 0«.
Note
Is the power for the LNB supplied from the digital satellite receiver or from an
external power source?
At the factory, the LNB power supply is switched on and the satellite receiver
provides the satellite antenna with power.
If your satellite receiver is connected together with other satellite receivers to
a common antenna (a so-called single cable solution in the master distribu-
tion), you will need to switch off the LNB power supply.
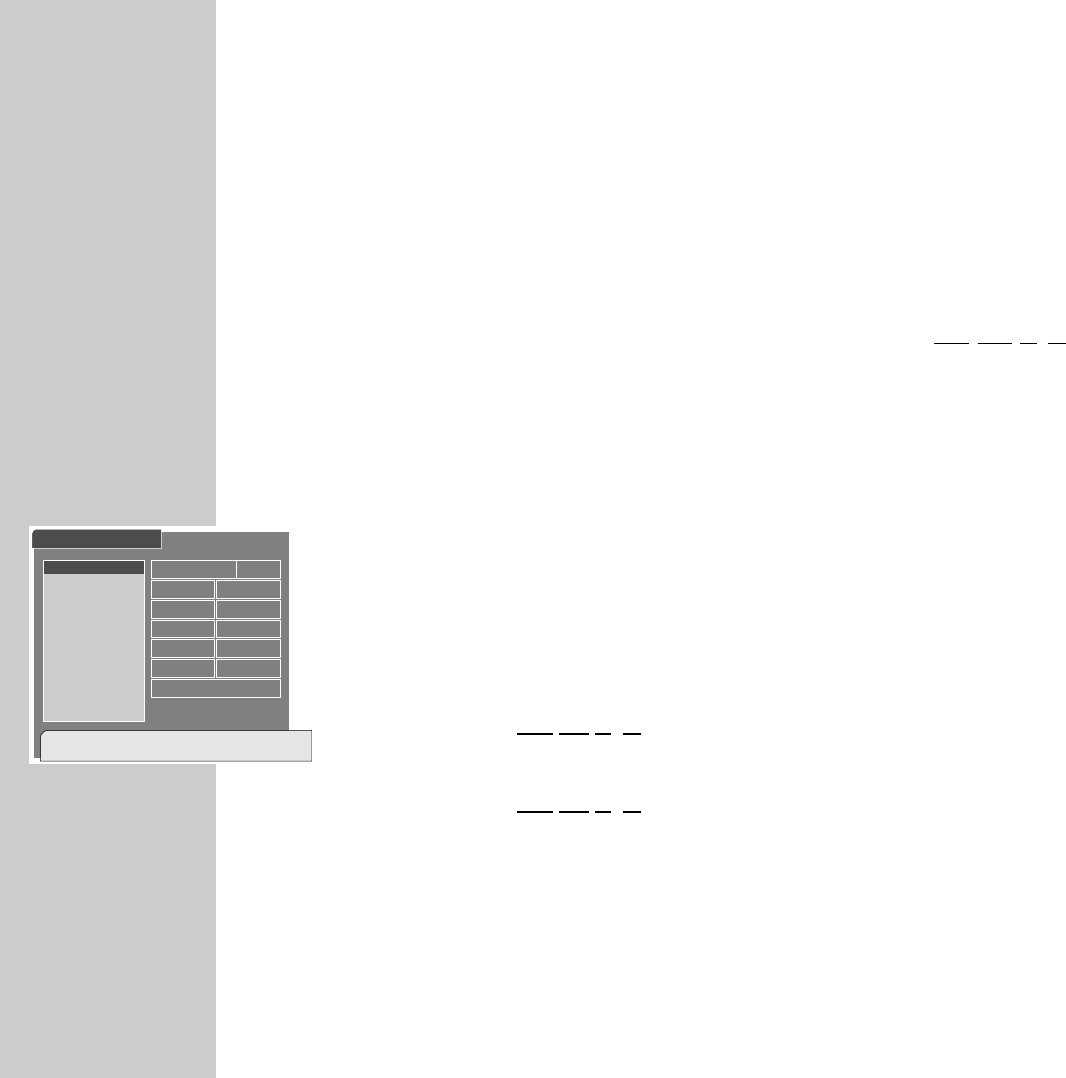
LNB Configuration
Register satellite to get signal.
[RED]-Add/Delete,[OK]-Edit,[TXT]-Previous
Astra 019.2°E
10,600 GHzL.O. High
9,750 GHzL.O. Low
ONPower
Auto0/22KHz
#1DiSEqC
Antenna Setup DiSEqC 1.2
Astra
ľ
ı
HotBird
EutelSat 10E
EutelSat 16E
TurkSat 42E
Telecom 5W
Telecom 8W
USER1
42


Need help? Post your question in this forum.

Forumrules


Report abuse

Libble takes abuse of its services very seriously. We're committed to dealing with such abuse according to the laws in your country of residence. When you submit a report, we'll investigate it and take the appropriate action. We'll get back to you only if we require additional details or have more information to share.

Product:

For example, Anti-Semitic content, racist content, or material that could result in a violent physical act.

For example, a credit card number, a personal identification number, or an unlisted home address. Note that email addresses and full names are not considered private information.

Forumrules

To achieve meaningful questions, we apply the following rules:

Register

Register getting emails for Grundig DTR6000S at:


You will receive an email to register for one or both of the options.


Get your user manual by e-mail

Enter your email address to receive the manual of Grundig DTR6000S in the language / languages: English as an attachment in your email.

The manual is 1,96 mb in size.


You will receive the manual in your email within minutes. If you have not received an email, then probably have entered the wrong email address or your mailbox is too full. In addition, it may be that your ISP may have a maximum size for emails to receive.

Others manual(s) of Grundig DTR6000S

Grundig DTR6000S User Manual - German - 61 pages


The manual is sent by email. Check your email

If you have not received an email with the manual within fifteen minutes, it may be that you have a entered a wrong email address or that your ISP has set a maximum size to receive email that is smaller than the size of the manual.

The email address you have provided is not correct.

Please check the email address and correct it.

Your question is posted on this page

Would you like to receive an email when new answers and questions are posted? Please enter your email address.


Info