463703
53
Zoom out
Zoom in
Previous page
1/67
Next page
MANUAL DE INSTRUCCIONES
MANUAL DE INSTRUÇÕES
BEDIENUNGSANLEITUNG
OPERATING INSTRUCTIONS
Estación meteorológica inalámbrica
Estação meteorológica
Digitale Funkwetterstation
Digital Radio-Controlled Weather Station
GT-WS-03s, GT-WS-03w
Ajuste de la hora CLOCK 2 ______________________Página 19
Ajuste de la alarma de tiempo __________________Página 19
Apagar la alarma de hora ______________________Página 19-20
Indicaciones __________________________________Página 20-25
Indicación de la temperatura y de la humedad
atmosférica _________________________________Página 20
Indicador de tendencia ________________________ Página 21
Previsión del tiempo __________________________Página 21-22
Indicación de las fases lunares __________________Página 23
Animación de la historia de la temperatura y de la
presión atmosférica ___________________________Página 23-24
Salida de sol, heliofanía y puesta de sol ___________Página 24
Iluminación de fondo _________________________Página 24
Ajuste del contraste de la pantalla _______________Página 25
Limpieza y mantenimiento _______________________Página 25
Solución de problemas __________________________ Página 26-27
Código de zona ________________________________Página 28
Declaración de conformidad _____________________Página 29
Garantía ______________________________________Página 117-118
Tarjeta de garantía _____________________________Página 121-122
Índice
Datos técnicos _________________________________Página 1
Volumen _____________________________________Página 1
Introducción __________________________________Página 2-3
Instrucciones de seguridad ______________________Página 4-5
Indicaciones respecto a las pilas _________________Página 4
Protección del medio ambiente _________________Página 5
Información e indicadores LCD ___________________Página 6
Estación meteorológica _______________________Página 6
Transmisor __________________________________Página 6
Designación de piezas y plano sinóptico ____________Página 7-8
Puesta en marcha ______________________________Página 8-12
Los botones y sus funciones ____________________Página 8-9
Inserción de las pilas __________________________Página 9-10
indicación de cambio de pilas __________________Página 10
Indicaciones generales para el montaje __________Página 11
Montaje en la pared __________________________Página 11-12
Ajuste del transmisor _________________________ Página 12
Setup ________________________________________Página 13
Función automática de aprendizaje ______________Página 13
Función de aprendizaje manual _________________Página 13
Ajustes _______________________________________Página 14-20
Ajuste del radio reloj __________________________Página 14-15
Ajuste manual de la hora CLOCK 1 / Fecha /
Zona horaria ________________________________Página 15-16
Ajuste de las estaciones del año verano/invierno ___ Página 16
Corrección de la altura y selección de la indicación _Página 17
Ajuste de alarma para la temperatura del interior ___Página 17
Ajuste de alarma para la temperatura del exterior __Página 18
Ajuste de la alarma para la temperatura __________Página 18
Desactivar la alarma de la temperatura ___________Página 18
Índice
Ajuste do alarme da hora ______________________Página 49
Terminar o alarme da hora _____________________Página 49-50
Indicações ____________________________________ Página 50-55
Indicação da temperatura e da humidade do ar ____Página 50
Indicação da tendência ________________________Página 51
Previsão meteorológica _______________________Página 51-52
Fases da lua _________________________________Página 53
Histórico animado da temperatura e da pressão
atmosférica _________________________________Página 53-54
Nascer do sol, horas de sol e pôr-do-sol ___________Página 54
Iluminação de fundo __________________________Página 54
Definição do contraste do visor _________________Página 55
Limpeza e conservação __________________________Página 55
Procura de falhas _______________________________ Página 56-57
Mapa de zonas ________________________________ Página 58
Declaração de conformidade _____________________Página 59
Garantia ______________________________________Página 119-120
Cartão de garantia _____________________________Página 121-122
Índice
Especificações Técnicas __________________________Página 31
Conteúdo _____________________________________Página 31
Introdução ____________________________________Página 32-33
Advertências de Segurança ______________________Página 34-35
Instruções para o uso de pilhas _________________ Página 34
Protecção do meio ambiente ___________________ Página 35
Informações e Indicações no visor LCD _____________ Página 36
Estação meteorológica ________________________Página 36
Emissor _____________________________________Página 36
Identificação do produto e perspectiva geral ________ Página 37-38
Colocação em funcionamento ____________________Página 38-42
Explicação dos botões _________________________Página 38-39
Colocar as pilhas _____________________________Página 39-40
Indicação de substituição das pilhas _____________Página 40
Advertências gerais relativas à colocação _________Página 41
Montagem na parede _________________________Página 41-42
Sintonização do emissor _______________________Página 42
Setup ________________________________________Página 43
Função de memorização automática _____________ Página 43
Função de memorização manual ________________Página 43
Definições ____________________________________ Página 44-50
Ajustar o rádio-relógio ________________________Página 44-45
Ajuste manual da hora CLOCK 1 / Data /
Região horária _______________________________Página 45-46
Ajuste do horário de Verão/Inverno ______________ Página 46
Correcção da altura e escolha da indicação _______Página 47
Definição do alarme para a temperatura interior ___Página 47-48
Definição do alarme para a temperatura exterior ___Página 48
Terminar o alarme da temperatura _______________Página 48
Ajuste da CLOCK 2 ____________________________Página 49
Índice
Einstellung des Zeit-Alarms ____________________Seite 79
Zeit-Alarm beenden __________________________Seite 79-80
Anzeigen _____________________________________Seite 80-85
Anzeige der Temperatur und der Luftfeuchtigkeit __Seite 80
Trendanzeige ________________________________ Seite 81
Wettervorhersage ____________________________Seite 81-82
Mondphasen ________________________________Seite 83
Animierte Temperatur- und Luftdruckhistorie ______Seite 83-84
Sonnenaufgang, Sonnenscheindauer
und Sonnenuntergang ________________________Seite 84
Hintergrundbeleuchtung ______________________Seite 84
Kontrasteinstellung des Displays ________________Seite 85
Reinigung und Pflege ___________________________Seite 85
Fehlersuche ___________________________________ Seite 86-87
Zonenkarte ___________________________________Seite 88
Konformitätserklärung __________________________Seite 88
Inhaltsangabe
Technische Daten ______________________________Seite 61
Lieferumfang __________________________________Seite 61
Einleitung ____________________________________Seite 62-63
Sicherheitshinweise ____________________________Seite 64-65
Batteriehinweise _____________________________ Seite 64
Umweltschutz _______________________________Seite 65
Informationen und LCD-Anzeigen _________________Seite 66
Wetterstation ________________________________Seite 66
Sender _____________________________________Seite 66
Teilebezeichnung und Übersicht __________________Seite 67-68
Inbetriebnahme _______________________________Seite 68-72
Erläuterung der Tasten ________________________Seite 68-69
Einlegen der Batterien_________________________Seite 69-70
Batteriewechselanzeige _______________________Seite 70
Allgemeine Hinweise zur Aufstellung ____________Seite 70-71
Wandmontage _______________________________Seite 71
Einstellen des Senders ________________________Seite 72
Setup ________________________________________Seite 73
Automatische Lernfunktion ____________________ Seite 73
Manuelle Lernfunktion ________________________Seite 73
Einstellungen__________________________________Seite 74-80
Einstellen der Funkuhr ________________________Seite 74-75
Manuelle Zeiteinstellung CLOCK 1 /
Datum / Zeitzone ____________________________Seite 75-76
Einstellung der Sommer- /Winterzeit _____________Seite 76
Korrektur der Höhe und Wahl der Anzeige ________Seite 77
Einstellung des Alarms für die Innentemperatur ____Seite 77-78
Einstellung des Alarms für die Außentemperatur ___Seite 78
Temperatur-Alarm beenden ____________________Seite 78
Einstellung der CLOCK 2 _______________________Seite 79
Inhaltsangabe
End time-alarmn _____________________________ Page 107
Displays ______________________________________ Page 108-113
Display of temperature and humidity ____________Page 108
Trend display ________________________________Page 109
Weather forecast _____________________________Page 109-110
Moon phases ________________________________Page 111
Animated temperature and air pressure history ____Page 111-112
Sunrise, daylight duration
and sundown ________________________________Page 112
Background illumination ______________________ Page 112
Contrast setting of the display __________________Page 113
Cleaning and care ______________________________Page 113
Error search ___________________________________Page 114-115
Zone map ____________________________________Page 116
Conformity declaration __________________________Page 116
Contents
Technical data _________________________________Page 89
Scope of delivery _______________________________Page 89
Introduction __________________________________Page 90-91
Safety information _____________________________Page 92-93
Battery information ___________________________Page 92
Environmental protection ______________________Page 93
Information and LCD displays_____________________Page 94
Weather station ______________________________Page 94
Transmitter _________________________________Page 94
Description of parts and overview _________________Page 95-96
Inital operation ________________________________Page 96-100
Explanation of the buttons _____________________Page 96-97
Inserting the batteries _________________________ Page 97-98
Battery change display ________________________Page 98
General information for setup __________________Page 98-99
Wall mounting _______________________________Page 99
Setting the transmitter ________________________Page 99-100
Setup ________________________________________Page 101
Automatic learning function ___________________Page 101
Manual learning function ______________________Page 101
Settings ______________________________________Page 102-107
Settings for the radio-controlled clock ____________ Page 102-103
Manual time setting CLOCK 1 / Date / Time zone ___Page 103-104
Setting of summer/winter time _________________ Page 104
Correction of height and selection of display ______ Page 105
Setting the alarm for the insider temperature ______Page 105
Setting the alarm for the outside temperature _____ Page 106
End temperature alarm _______________________Page 106
Setting CLOCK 2 _____________________________Page 107
Setting the time-alarm ________________________Page 107
Contents
1 2
Receptor GT-WS-03s, GT-WS-03w
Pilas 3 x 1,5 V / LR6 / R6 / AA / UM3
Temperatura de servicio -20°C hasta +55°C
Precisión de medición máx. +/- 1°C
Gama de medición de la
temperatura 0 a 40°C
Resolución 0,1°C
Gama de medición de la 25% al 90% de humedad
hum. atmosf. atmosférica relativa
Precisión de medición +/- 5%
Resolución 1%
Transmisor WT470
Pilas 2 x 1,5 V / LR6 / R6 / AA /UM3
Temperatura de servicio -30°C hasta +70°C
Gama de medición de la 25% al 90% de humedad
hum. atmosf. atmosférica relativa
Frecuencia de transmisión 868 MHz
Alcance máx. 100 metros (en campo abierto)
Salvo cambios técnicos.
Volumen
• EstaciónmeteorológicaGT-WS-03s,GT-WS-03w
• SensorexteriorWT470
• 5Pilas(R6,1,5V)
• Tornillosparamontajeenpared(pasadoresytornillos)
• Manualdeinstrucciones
Datos técnicos
Estimado cliente:
Le felicitamos por la compra de esta estación meteorológica con trans-
misión, ha adquirido un aparato de alto nivel que le dura muchos años,
facilitándole datos muy exactos sobre el tiempo.
Para poner el aparato en marcha, utilice el manual de instrucciones,
rogamos las guarden una vez consultadas para poder utilizarlas en caso
de dudas o preguntas.
Si entrega el aparato a terceras personas, no olvide entregar el manual
de instrucciones.
ATENCIÓN! – AVISOS IMPORTANTES
Después del desembalaje introduzca primero las baterías en el trans-
misor y a continuación en la estación meteorológica. Tenga presentes
las instrucciones de la página 9 (puesta en marcha). ¿Por qué?: La esta-
ción busca los datos del transmisor en los primeros dos minutos y se
actualiza. Por esta razón el transmisor debe estar en marcha cuando la
estación requiere los datos.
Sincronización de tiempo DCF: Una vez puesta en marcha, la esta-
ción comienza a buscar, a cabo de 3 minutos, la señal DCF. La estación
busca la señal durante 10 minutos y si la sincronización no tiene éxito
se intenta nuevamente recibir una señal cada dos horas. Si la estación
tiene dificultades de recepción, puede cambiar la posición de la misma
(p.e. cerca de ventana).
También puede ajustar la función de búsqueda manualmente, mante-
niendo pulsados los botones (1) y (7) durante 3 segundos.
Introducción
3 4
Una vez que la estación meteorológico ha obtenido los datos del tiem-
po, se actualizará cada 24 horas a las 4:03 h. Si se produce el cambio
de verano/invierno, la actualización se hará a las 4:03. Siempre que se
presenten dificultades con la actualización, cambie la estación de posi-
ción, si hace falta (p.e. cerca de la ventana).
También puede ajustar la función de búsqueda manualmente, mante-
niendo pulsados los botones (1) y (7) durante 3 segundos.
Después de haber iniciado la estación, entre la estación y la emisora se
produce cada minuto un Update. La presión atmosférica se actualiza
cada 16 minutos.
EL ALCANCE DEL TRANSMISOR PUEDE SER RESTRINGIDO CONSIDE-
RABLEMENTE POR OBSTÁCULOS.
PROTEGER EL TRANSMISOR CONTRA RAYOS SOLARES DIRECTOS.
LA PREVISIÓN METEOROLÓGICA ESTÁ LISTA PARA SER CONSULTA-
DA 12 HORAS DESPUÉS DE INSERTAR LAS PILAS.
Introducción
Indicaciones respecto a las pilas
La estación meteorológica contiene 3 y el transmisor 2 pilas del tipo
R6 / AA / UM3 (estas pilas están incluidas en el suministro).
La pilas deben mantenerse lejos del alcance de los niños.
En caso de tragarse una pila, el afectado debe irinmediatamente en
busca de ayuda médica.
Antes de insertar la pila limpie sus contactos y los del aparato.
No se debe intentar la reactivación de pilas usadas con calor u otros
medios. Nunca vuelva a cargar las pilas. ¡Peligro de explosión!
Las pilas no deben exponerse a cortocircuitos, no deben lanzarse al
fuego, no deben ser desmontadas.
Evite el contacto con la piel, los ojos y la mucosa corporal. Si se produce
el contacto con los ácidos de la pila, lave la zona en cuestión con abun-
dante agua corriente y acuda el médico de inmediato.
Retire las pilas gastadas del aparato de inmediato. Alto peligro de ago-
tamiento.
Todas las pilas del aparato deben ser cambiadas al mismo tiempo. No
emplear nuevas pilas conjuntamente con pilas usadas. No introducir
pilas de sistemas electroquímicos diferentes, no mezclar tipos y marcas.
Si no se hace caso a estas indicaciones, las pilas pueden descargarse y
sobrepasar la tensión de parada, existiendo el peligro de derrame.
Si no tiene previsto utilizar las pilas durante mucho tiempo, extráigalas
del dispositivo.
Instrucciones de seguridad
5 6
Protección del medio ambiente
¡Las pilas no deben lanzarse a la basura habitual!
Los usuarios están obligados legalmente a entregar todas las pilas y
acumuladores en un sitio de recogida en las barriadas de los respecti-
vos municipios, sin tener en cuenta, si contienen sustancias xicas o
no, con la finalidad de efectuar una eliminación de residuos que no
dañe al medio ambiente.
¡Entregar solamente las pilas y los acumuladores gastados!
Si el aparato ya no puede ser utilizado, póngase en contacto
con la empresa responsable de la eliminación de los residuos y
pregunte por las medidas a tomar con respecto a la retirada de
desechos.
Cartonajes son una materia prima que se puede reciclar (regeneración
de papelote) o utilizar nuevamente.
Estación meteorológica
– Hora exacta gracias a recepción de señal de radio DCF-77
– Indicación de 12 ó 24 horas para dos husos horarios
– Indicación de fecha y de día de la semana
– Indicación de temperatura interior en °C/°F
Indicación de temperatura exterior en °C/°F con hasta cuatro trans-
misores en diferentes puntos de medición
– Indicación de la humedad atmosférica en el interior y exterior
Indicación mínima/máxima de la temperatura y de la humedad
atmosférica
– Indicación de tendencia meteorológica
– Indicación de la tendencia de temperatura
– Indicación de tendencia actual y pasada de presión atmosférica
Alarma de temperatura para temperatura interior y de la temperatura
transmitida por 1 hasta 4 transmisores
– Símbolos para la previsión del tiempo
– 12 indicaciones de fases lunares
– Indicación de hora salida del sol y puesta del sol
– Indicación de la duración de la luz de día
– Indicación de display
– Indicación del control de pilas
Transmisor
– Indicación de temperatura en °C/°F
– Indicación de humedad atmosférica
– Indicación del control de las pilas
– Alcance hasta 100 metros
Información e indicadores LCDInstrucciones de seguridad
7 8
Designación de piezas y plano sinóptico
Puesta en marcha
Los botones y sus funciones
1. -: sirve para el ajuste manual de la hora, la alarma, la fecha y el año,
así como el valor máximo de la alarma de la temperatura y del valor
de la humedad atmosférica. Cambio de la indicación de 12 a 24
horas y viceversa.
2. +: sirve para el ajuste manual de la hora, la alarma, la fecha y el año, así
como el valor máximo de la alarma de la temperatura y del valor de la
humedad atmosférica. Cambio de la indicación de °F a °C y viceversa.
3. Snooze/Light: con esta tecla interrumpe la alarma y conecta la ilu-
minación del display durante aproximadamente 7 segundos.
4. Mode: con este botón puede seleccionar las distintas indicaciones
de la hora 1 + 2, alarma1 + 2, fecha, año y alarma de temperatura
(MÍN/MÁX).
5. Max/Min: indica los valores MAX y MIN.
Designación de piezas y plano sinóptico
indicación de estado de las
pilas transmisor
6
5
3
8
4
2 71
hora (hh:mm:ss);
año (yyyy);
código de zona
alarma (1 & 2)
hora (1 & 2)
día de la semana
día/mes (dd/mm)
En la parte trasera:
Compartimiento, soporte de
pie y montura en la pared
puesta del sol (pm, hh:mm)
salida del sol (am, hh:mm)
heliofanía (hh:mm)
símbolos de la predicción
del tiempo
fases de la luna
representación animada en
barra (presión atmosférica/
temperatura interior/
temperatura exterior)
unidad (hPa);
ajuste de la altura (m)
canal de emisión exterior
(1, 2 ,3, 4)
temperatura exterior (C/F)
humedad atmosférica
exterior (%)
tendencia de la temperatura
exterior/tendencia de la humedad
atmosférica exterior
temperatura interior (C/F)
humedad atmosférica interior (%)
tendencia de la temperatura interior/
tendencia de la humedad atmosférica interior
indicación de estado de las pilas
estación meteorológica
número del canal
(1 - 4)
temperatura /
humedad atmosférica
display LED
Soporte de pie y
montura en la pared
Compartimiento
de pilas
MAX/MIN
SELECT
SNOOZE/LIGHT
MODE
ALARM/CHANNEL
OUT
1
CLOCK 1
FORECAST
MOONPHASE
ALTITUDE
PRESSURE
HOUR
INDOOR
OUTDOOR
DAY
MONTH
9
10
9 10
6. Select: sirve para el ajuste de la hora, la alarma, la fecha y el año, así
como el valor de alarma de temperatura. Ajuste de contraste de la
pantalla. Cambio de la pantalla del historial animado de tempera-
tura y presión atmosférica.
7. Search: activación del proceso de búsqueda.
8. Alarm/Channel: con esta tecla se puede conectar y desconectar
la alarma 1 + 2, elegir entre los canales (1-4), el valor de la alarma
de temperatura, desplazarse a través de la barra de menú (presión
atmosférica/temperatura interior/temperatura exterior).
Las teclas 9 y 10 se encuentran en el compartimiento de pilas del
transmisor
9. SET: con esta tecla llega al modo de ajuste y confirma los valores
que acaba de ajustar.
10. C/F: con esta tecla modifica canales y el código interno (durante el
ajuste), pudiendo elegir entre la indicación en centígrados y en grados
Fahrenheit.
Inserción de las pilas
Atención: ¡Por favor, insertar las pilas primero en el transmisor
(véase también página 2)!
Es necesario extraer el bastidor de soporte del emisor antes de
acceder al compartimento de las pilas. Para ello sólo es necesario
combar ligeramente y lateralmente con un destornillador plano
el bastidor superior del emisor y extraerlo. A continuación, abra el
compartimento de las pilas mediante un pequeño destornillador
de cabeza en cruz.
El compartimento de las pilas de la estación meteorológica se
encuentra en la parte superior del panel trasero. Presione el clip de
cierre en la empuñadura ergonómica ligeramente y gire la tapa de
las pilas hacia fuera para extraerla.
Después de insertar las pilas vuelva a cerrar el compartimento.
Puesta en marcha
1. Abra el compartimiento para las pilas tanto en la estación meteoroló-
gica como también en el transmisor. Para abrir este compartimiento
se necesita un pequeño destornillador de cabeza ranurada en cruz.
Es imprescindible tener en cuenta la polaridad +/- indicada en
el compartimiento al insertar las pilas.
2. Inserte en el compartimiento de pilas del transmisor 2 pilas del
tamaño LR6/ R6/AA/UM3 y en el compartimiento de la estación mete-
orológica 3 pilas del tamaño AA/UM3. Estas pilas se encuentran
adjuntas a su aparato. Las pilas de la estación meteorológica deben
colocarse, siguiendo el orden indicado a continuación. Primera-
mente deben introducirse dos pilas, una a la derecha y otra a la
izquierda y a continuación se coloca una tercera en medio.
3. La capacidad de las pilas se indica en el display LCD tanto para la
estación meteorológica como también para el transmisor/los trans-
misores por medio de un símbolo de pila.
INDICACIÓN: No utilice pilas recargables en el aparato. La tensión
de las pilas es menor que la de las baterías y, dependiendo de la
situación, puede no ser suficiente para garantizar la recepción.
Utilice sólo pilas alcalinas de marca.
Indicación de cambio de pilas
Un símbolo de pila con indicación de nivel de llenado en el display de
la estación meteorológica señala un cambio necesario de pilas. También
en el indicador LCD del transmisor aparece un símbolo de pila cuando
deben cambiarse las pilas. En el display podrá ver asimismo el símbolo
de pila si se visualizan los datos del transmisor correspondiente.
Si parpadea permanentemente uno de estos símbolos de pila, deben
recambiarse las pilas correspondientes.
Puesta en marcha
11 12
Indicaciones generales para el montaje
La estación meteorogica intercambia los datos con el transmisor por
medio de una radiofrecuencia (868 MHz). La televisión, el computador, los
tubos florecientes y otros instalaciones eléctricas pueden producir interfe-
rencia en la transmisión. Puertas y marcos de ventanas de acero, así como
mampostería muy gruesa también pueden provocar interferencias. Las
temperaturas especialmente bajas en invierno (bajo 0°C) pueden llevar
a una disminución de la tensión de las pilas en el transmisor y mermar el
radio de transmisión. Posicione el transmisor lo más alto posible en un radio
de máximo 100 m y , si hace falta, cambie la posición. No exponga el trans-
misor a los rayos de sol directos o a la lluvia.
Montaje en la pared
Para el montaje fijo del aparato hace falta saber manejar las herramientas
necesarias. Encargue la instalación a un electricista, si no dispone de her-
ramientas adecuadas o si no esta familiarizado con el uso de las mismas.
Asegúrese que no hayan cables eléctricos ni tubos de gas o agua bajo el
revoque en el lugar de la instalación fija de la estación meteorológica. Al
taladrar los agujeros existe el peligro de un cortocircuito o de dañar los tubos.
Montaje en la pared de la estación meteorológica
Los tornillos tienen que introducirse horizontalmente con una distancia
de 150 mm. Introduzca los tornillos suministrados de tal manera, que
las cabezas de los tornillos sobresalgan aproximadamente 6 mm.
La estación meteorológica sólo puede engancharse a los tornillos medi-
ante las argollas del panel trasero.
Montaje en la pared del transmisor
El emisor se fija a la pared mediante la argolla del soporte de pie. Para
ello, coloque uno de los tornillos incluidos en la pared y deje que
sobresalga unos 5 mm. de tornillo de la cabeza del tornillo. El emi-
Puesta en marcha
sorsólo puede engancharse a la cabeza del tornillo mediante la argolla
del panel trasero del soporte de pie.
Ajuste del transmisor
• Apriete,conelcompartimientodepilasabierto,latecla (9) SET para
activar el transmisor.
• Elcódigointernoparpadeadurante10segundos.Duranteesteperío-
do puede elegir un código interno (1-15) apretando la tecla (10) C/F.
• Aprietelatecla (9) SET para confirmar su entrada.
Todos los transmisores deben ser ajustados al mismo código interno.
• Luego,la indicación decanal parpadea durante unos 10 segundos.
Durante este período puede elegir un canal (1-4) mediante pulsación
de la tecla (10) C/F.
• Aprietelatecla (9) SET para confirmar su entrada.
Cada transmisor debe ser ajustado a otro canal.
• Cambie a otro código interno si su estación meteorológica recibe
señales de transmisores vecinos que transmiten asimismo en la gama
de 868 MHz. Los ajuste de fábrica son para el código interno = 01 y
para el canal = 01.
Cierre cuidadosamente el compartimiento para las pilas para que no
pueda penetrar humedad en el transmisor.
Puesta en marcha
13 14
Función automática de aprendizaje
La función automática de aprendizaje arranca automáticamente
cuando inserta las pilas por primera vez en la estación meteorológica,
durando unos 3 minutos.
Dentro de estos tres minutos se inicializa la estación meteorológica,
recibiendo sucesivamente los valores de temperatura y de humedad
atmosférica de los transmisores.
Sólo se visualizan los valores de los transmisores recibidos. Instale el
transmisor cerca de la estación meteorológica hasta que haya con-
cluido la función automática de aprendizaje. Si los datos no han sido
correctamente transmitidos, entonces el display para la temperatura y
la humedad atmosférica señala „– –“. En este caso vuelva a iniciar la
función de aprendizaje manualmente o saque las pilas del transmisor
durante unos momentos.
Función de aprendizaje manual
Asimismo puede activar manualmente dicha función de aprendizaje si
instaló, por ejemplo, un transmisor adicional o si quedó interrumpida
la radiocomunicación entre transmisor y estación meteorológica. Esto
podrá verlo por el parpadeo de los valores del canal (transmisor) corre-
spondiente.
Setup
– Mantenga pulsado el botón Search (7) durante al menos 3 segundos.
Suena un sonido que le advierte que el modo de aprendizaje está
activado durante unos 3 minutos.
Comienza a parpadear el símbolo del canal/de los canales, sonando
una señal acústica cada vez que se identificó un transmisor.
Los valores de temperatura y de humedad atmosférica de los trans-
misores recibidos se indican de manera alterna.
La función automática o manual de aprendizaje no podrá ser activada
mientras parpadea el símbolo de antena, es decir que se están sincroni-
zando la hora y la fecha.
Ajuste de la radio-reloj
En la estación meteorológica GT-WS-03s, GT-WS-03w se encuentra
incorporado un radio reloj que en un perímetro de 1.500 Km. alrededor
de Francfort del Meno efectúa, por medio de la señal de radio DCF77
emitida desde allí, el ajuste automático de la hora y la fecha. Cuando
la estación meteorológica recibe esta señal de radio, se borra todo
ajuste manual de la fecha y de la hora, sobrescribiendo estos datos
con los datos de radio recibidos.
El parpadeo del símbolo de antena señala que se está recibiendo
y evaluando la señal de radio DCF77. El ajuste exacto puede durar
varios minutos en función de la intensidad de recepción.
Una vez que la hora y la fecha están ajustadas correctamente, deja de
parpadear el símbolo de antena.
Ajustes
señal fuerte
la señal se recibe
y se intensifica
señal débil o ninguna señalninguna
recepción
ninguna
indicación
señal medio
la señal se recibe
y se intensifica
la señal se recibe
15 16
Para garantizar una buena recepción de la señal de radio, no debe
colocar la estación meteorológica al lado de grandes objetos metálicos
o aparatos eléctricos como televisores, ordenadores, monitores, etc.
INDICACIONES: Si la estación esta en marcha, esta comienza a
buscar la señal DCF después de 3 minutos. La búsqueda de la señal
dura 10 minutos y si la sincronización no tiene éxito se intenta nue-
vamente recibir una señal cada dos horas. Si la estación tiene dificul-
tades de recepción puede cambiar la posición de la misma (p.e. cerca
de ventana).
Para inicializar la recepción de la señal de radio manualmente, pulse
el botón Search (7) y el botón - (1) durante al menos 3 segundos,
hasta que suene un pitido y el símbolo de la antena comience a par-
padear.
Ajuste manual de la hora CLOCK 1 / Fecha / Zona horaria
INDICACIÓN: Para hacer que los dígitos avancen más rápidamente
mantenga pulsado el botón Max/Min (5). Pulse el botón - (1), para
cambiar la indicación de 12 a 24 horas o viceversa. La indicación de 12
horas se señalizará mediante el símbolo PM para la segunda mitad del
día.
Mantenga pulsado el botón Mode (4) durante 3 segundos para pasar
al modo de ajuste de hora.
•AparecelaindicaciónCLOCK 1 y la señal de la hora comienza a parpa-
dear.
– Pulse + (2) o - (1), para ajustar las horas.
– Apriete el botón Select (6) para llegar al selector de los minutos..
– Apriete + (2) o. - (1) para ajustar los minutos.
•ConlateclaSnooze/Light (3) puede poner los segundos en 00.
– Apriete Select (6) para llegar al selector del día.
– Apriete + (2) o. - (1) para ajustar el día.
•La indicación del día de la semana se ajusta automáticamente
Ajustes
después de haber introducido la fecha.
– Apriete Select (6) para llegar al selector del „mes”.
– Apriete + (2) o. - (1) para ajustar el mes.
– Apriete Select (6) para llegar al selector del „año”.
– Apriete + (2) o. - (1) para ajustar el año.
– Apriete Select (6) para introducir el huso horario.
– Apriete + (2) o. - (1) para ajustar el huso horario.
•Elcódigodesuzonaloencontraráenla tablapágina28.Después
de haber introducido el código de la zona, la actualización del display
tardará hasta un minuto.
El ajuste finaliza pulsando el botón Mode (4) hasta que no parpadee
ningún indicador numérico o si no pulsa ningún botón durante un
minuto.
Ajuste de las estaciones del año verano/invierno
Mantenga pulsando el botón Mode (4) durante 3 segundos para
pasar al modo de ajuste de hora.
Mantenga pulsado el botón Select (6) hasta introducir el código
numérico.
Apriete el botón Snooze/Light (3) para cambiar los tiempos verano
- Invierno.
•ElveranoestamarcadoconDST(DaylightSavingTime,ingléspara
el tiempo de verano)
El ajuste finalizará pulsando el botón Mode (4) hasta el tope, hasta
que no parpadee ningún indicador numérico o bien, si duranteun
minuto no se pulsa ningún botón.
¡Atención! No realice ese ajuste manual entre las 23.00 y 01.00
horas, ya que la fecha no se cambiará.
Ajustes
17 18
Corrección de la altura y selección de la indicación (hPa)
AVISO: Si se cambia la altura de la estacón meteorológica (p.e. del
primer al segundo nivel) esta operación puede hacerse manualmente.
De lo contrario la presión atmosférica, detectada automáticamente por
el Setup, no sería señalada correctamente.
Mantenga pulsando el botón Mode (4) durante 3 segundos para
pasar al modo de ajuste de hora.
Vuelva a pulsar Mode (4).
Apriete + (2) para corregir la diferencia de altura hacia arriba.
•Cadavezquesepresionelateclalaalturaaumenta10m.
Apriete - (1) para corregir la diferencia de altura hacia abajo.
•Cadavezquesepresionelateclalaalturasereduce10m.
El ajuste finaliza pulsando el botón Mode (4) hasta que no parpadee
ningún indicador numérico o si no pulsa ningún botón durante un
minuto.
Ajuste de alarma para la temperatura del interior (INDOOR)
Mantenga pulsando el botón Mode (4) durante 3 segundos para
pasar al modo de ajuste de hora.
Vuelva a pulsar Mode (4) 2 veces.
•Laventanadeldisplayindicaelvalordelaalarmadelatemperatura
interior anteriormente ajustado.
Utilice las teclas + (2) o. - (1) para graduar la temperatura de la alarma.
Seleccione la tecla Snooze/Light (3) si la alarma debe activarse al
sobrepasar (símbolo
) o al quedar debajo (símbolo ) o si debe
desactivarse del todo (ningún símbolo).
El ajuste finaliza pulsando el botón Mode (4) hasta que no parpadee
ningún indicador numérico o si no pulsa ningún botón durante un
minuto.
Ajustes
Ajuste de alarma para la temperatura del exterior (OUTDOOR)
Mantenga pulsando el botón Mode (4) durante 3 segundos para
pasar al modo de ajuste de hora.
Vuelva a pulsar Mode (4) 4 veces.
•Eldisplayindicalatemperaturaexteriordelvalordelaalarmadela
temperatura, anteriormente graduado, con un parpadeo.
El ajuste se efectúa como anteriormente descrito en „Ajuste de la
alarma de la temperatura del interior (INDOOR)“.
Ajuste de la alarma para la temperatura (2-4 UTDOOR)
Mantenga pulsando el botón Mode (4) durante 3 segundos para
pasar al modo de ajuste de hora.
Vuelva a pulsar Mode (4) 4 veces.
Seleccione con la tecla Alarma/Channel (8) la emisora deseada (2-4).
El ajuste se efectúa como anteriormente descrito en „Ajuste de la
alarma de la temperatura del interior (INDOOR)”.
Desactivar la alarma de la temperatura
Apriete una de las teclas de la estación meteorológica para desactivar
la alarma.
•Sinoseaprietaningunatecla,laalarmaseapagaautomáticamente
después de un minuto y vuelve a sonar nuevamente después de
haber pasado 5 minutos.
AVISO: La alarma del tiempo, de la temperatura se distinguen clara-
mente por su sonido.
Ajustes
19 20
Ajuste de la hora CLOCK 2
– Pulse Mode (4).
•EldisplayCLOCK 2 aparece.
– Apriete + (2) o. - (1) para ajustar las horas.
•Los minutos no pueden ser ajustadas. El ajuste de los minutos y
segundos corresponde a la indicación de CLOCK 1.
Ajuste de la alarma de tiempo
AVISO: Dispone de 2 alarmas de hora. Puede ajustar la alarma para que
funcione: diariamente, diariamente de lunes a viernes, diariamente de
lunes a sábado, sábado y domingo o semanalmente.
– Pulse Mode (4), hasta que aparezca la indicación
y .
•Aparecerálahoraanteriormenteajustada.
– Apriete + (2) para ajustar las horas.
– Apriete - (1) para ajustar los minutos.
Seleccione los días mediante Select (8) para los que deberá estar
ajustada la alarma.
Active o desactive la alarma con las teclas de ajuste
y Alarm/
Channel (8).
•Eldisplaydistingue entreon y ninguna indicación.Sila alarma es
activa señala on y aparece el símbolo correspondiente
y el
símbolo corresponde a la hora (CLOCK 1).
Vuelva a la indicación de hora actual pulsando hasta el tope Mode
(4) hasta que aparezca el mensaje CLOCK 1, o bien, si durante un
minuto no se pulsa ningún botón.
Apagar la alarma de hora
Apriete la tecla Snooze/Light (3) para interrumpir la alarma durante
8 minutos.
Apriete una de la teclas de la estación meteorológica para apagar la
alarma.
Ajustes
valores de medición de
la estacón meteorológica
valores de medición
del transmisor exterior
indicador de tendencia
transmisor
temperatura
humedad
atmosférica
temperatura
humedad
atmosférica
o
Soleado Nublado Lluvia Nieve
parpadea
parpadea
Temperatura Humedad atmosférica Indicación
Interior > +55°C > 95% HI
Interior < -20°C < 15% LO
Exterior > +70°C > 95% HI
Exterior < -30°C < 15% LO
aumentando descendiendopermanece invariable
Aviso
deheladas
Aviso de
tempestad
•Sinoseaprietaningunatecla,laalarmaseapagaautomáticamente
después de haber transcurrido un minuto.
Indicaciones
Indicación de la temperatura y de la humedad atmosférica
– Apriete + (2) para cambiar las unidades de visualización: °C <-> °F
– Apriete Alarm/Channel (8) para cambiar los transmisores 1-2-3-4.
Apriete Max/Min (5) para cambiar de los valores: MIN - MAX - actual
(no hay indicación suplementaria) que indican la temperatura y
humedad atmosférica.
AVISO: Los valores Min y Max se borran automáticamente a la hora
00.00. Si los valores de la temperatura y de la humedad atmosférica se
encuentran fuera del alcance de medición, el display indica „HI (sobre-
pasa) y LO (queda debajo)“.
Ajustes
21 22
Indicador de tendencia
Basándose en los resultados de medición de la temperatura y humedad
atmosférica de la última media hora, se calcula y se indica la tendencia:
Previsión del tiempo
Esta moderna estación meteorológica es capaz de reconocer los cam-
bios de la presión atmosférica, realizando previsiones, con ayuda de los
datos recogidos durante las últimas 4 horas, para las próximas 12 a 24
horas. La previsión se refiere a la zona alrededor de la estación meteo-
rológica en un perímetro de 30 – 50 kilómetros aproximadamente.
Avisos de heladas: El parpadeo del símbolo de nieve se activa entre
+2.9°C y -1.9°C (solo a través del canal 1). Si la temperatura desciende
bajo -1,9°C el parpadeo del símbolo de nieve es constante.
Indicaciones
valores de medición de
la estacón meteorológica
valores de medición
del transmisor exterior
indicador de tendencia
transmisor
temperatura
humedad
atmosférica
temperatura
humedad
atmosférica
o
Soleado Nublado Lluvia Nieve
parpadea
parpadea
Temperatura Humedad atmosférica Indicación
Interior > +55°C > 95% HI
Interior < -20°C < 15% LO
Exterior > +70°C > 95% HI
Exterior < -30°C < 15% LO
aumentando descendiendopermanece invariable
Aviso
deheladas
Aviso de
tempestad
Notas referentes a la previsión meteorológica:
• Solamentesevaloraránlosdatosdelcanal1paraelavisodeheladas
o de caída de nieve. Si no se activa el canal 1, no se producirá ningún
aviso de heladas o caída de nieve.
• Despuésdehaberinstaladolaestaciónmeteorológicayalmenosun
transmisor, aún debe esperar unos 12 horas antes de que puedan uti-
lizarse los datos para la previsión del tiempo, dado que la estación
meteorológica necesita este tiempo para adaptarse a las condiciones
locales.
• Todas las previsiones del tiempo tienen en común que no puede
garantizarse su precisión. La precisión de la previsión del tiempo es
del 75% aproximadamente en función de las condiciones locales
para las que se concibió la estación meteorológica.
• Silaestaciónmeteorológicasetrasladaaunlugarmásalto(p.e.dela
planta baja al primer piso de un edificio, o al revés), se debe realizar
la correspondiente corrección de la altura. Véase „Ajuste de la altura
y selección del display (hPa)“.
Indicaciones
23 24
Indicación de las fases lunares
Las fases lunares se actualizan automáticamente en función de la fecha.
Animación de la historia de la temperatura y de la presión
atmosférica
Los símbolos animados de barra indican gráficamente los cambios
de las temperaturas y de la presión atmosférica durante las pasadas
últimas 12 horas.
Seleccione la indicación de temperatura del interior pulsando Select
(6), temperatura exterior y la presión atmosférica.
•Sieldisplayestaajustadoparalatemperaturadelexterior,todoslos
transmisores pueden ser activados con la tecla Alarm/Channel (8).
Indicaciones
FASE DE LA LUNA
FASE DE LA LUNAFASE DE LA LUNA
FASE DE LA LUNA
FASE DE LA LUNA
FASE DE LA LUNA
Luna nueva
Luna creciente
Primer cuarto
Media luna creciente
Tres cuartos de luna creciente
Luna llena creciente
Luna llena
Último cuarto
Media luna menguante
Tres cuartos de luna menguante
Luna llena menguante
Luna menguante
AVISO: La indicación aparece según la preselección de las unidades.
Salida de sol, heliofanía y puesta de sol
Con esta estación meteorológica puede hacerse indicar las horas de
salida y de puesta del sol de su lugar.
Aviso: El símbolo del Smily aparece
enseguida que los días se alar-
guen y desaparece tan pronto que los días se acorten. Estos “días fija-
dos“ pueden desplazarse en los años venideros por +/- 1 día.
Iluminación de fondo
Apriete el botón Snooze/Light (3) para activar la iluminación de
fondo del display.
•Lailuminaciónseapagaautomáticamentedespuésde8segundos.
Si dentro de este tiempo aprieta una tecla, la iluminación se prolon-
gará durante otros 8 segundos.
Indicaciones
cambios de la presión
atmosférica
cambios de la tempera-
tura interior
cambios de la temperatura
exterior
Puesta del sol
Salida del sol
Heliofanía
cambios de la presión
atmosférica
cambios de la tempera-
tura interior
cambios de la temperatura
exterior
Puesta del sol
Salida del sol
Heliofanía
25 26
Ajuste del contraste de la pantalla
– Pulse Mode (4).
•AparecerálaindicaciónClock 2.
– Pulse Select (6), para modificar el contraste de la pantalla.
•Elajustedisponede4niveles.
El ajuste finalizará pulsando Mode (4) hasta el tope hasta que aparez-
ca CLOCK 1.
Limpieza y mantenimiento
Puede limpiar la estaión con un trapo suave. Humedezca ligeramente
el trapo y vierta una gota de lavavajillas en el mismo.
ATENCIÓN: Nunca utilice detergentes agresivos, como, p.ej. soluci-
ones agresivas o líquidos que contengan disolventes.
Los arañazos leves pueden eliminarse mediante pasta quita-arañazos.
Puede adquirir la pasta quita-arañazos para la pantalla en establecimi-
entos especializados de construcción o tiendas de móviles.
Indicaciones
Problema
No puede recibirse la señal
DCF77 para la hora.
La indicación de temperatura en
el transmisor no coincide con la
indicación en el receptor.
La indicación de temperatura del
transmisor parece ser muy alta.
La estación meteorológica no
recibe señales del emisor o
parpadea.
Solución de problemas
Solución
No instale la estación meteoroló-
gica cerca de aparatos eléctricos.
Inicialice la recepción de radio
manualmente (véase págs. 15).
Asegúrese de que la señal del
emisor se recibe. Sincronice la
conexión de radio manualmente,
pulsando el botón Search (7)
durante 3 segundos. Si en la zona
colindante o en el vecindario se
utiliza la misma frecuencia cám-
biela (pág. 12).
Compruebe que el transmisor no
está expuesto a radiación solar
directa.
Repita el proceso de aprendizaje
manual (véase la página 13-14).
La temperatura exterior no debe
exceder los -30°C. Cerciórese de
que no haya fuentes de interfe-
rencias eléctricas cerca del trans-
misor. Compruebe las pilas en el
transmisor. Acerque la estación
meteorológica al transmisor o al
revés.
27 28
Problema
No hay previsión del tiempo
El tiempo de la salida y de la
puesta del sol no es correcta
La indicación aparece ilegible o
la función no se entiende
Solución de problemas
Solución
Compruebe si el transmisor
responsable está ajustado al
canal 1.
Desde la puesta en marcha de la
estación meteorológica o cambio
de pilas han transcurrido menos
de 12 horas.
El código de zonas está mal
ajustado. Encontrará el lugar
que le corresponde en el plano
de zonas horarias (pág. 28). El
tiempo del verano no se ha sido
activado o desactivado (véase
página 16).
Quite las pilas de la estación
meteorológica y introdúzcalas
de nuevo. Aumente el contraste
(pág. 25)
Su lugar de residencia tiene asignado un código en el mapa. Introduzca
este código de zona como descrito en la página 16.
Código de zona
29 30
Declaración de conformidad
Por la presente declaramos que este producto cumple los requisitos
generales y otras normas relevantes de la Directiva 1999/5/CEE.
Puede obtener la declaración de conformidad íntegra en la página web
www.gt-support.de.
31 32
Receptor GT-WS-03s, GT-WS-03w
Pilhas 3 x 1,5 V / LR6 / R6 / AA / UM3
Campo de medição
da temperatura -20°C até +55°C
Precisão da medição Máx. +/- 1°C Dentro de um campo
de medição de 0 até 40°C
Resolução 0,1°C
Campo de medição da
humidade do ar 25% até 90% de humidade relativa do ar
Precisão da medição +/- 5%
Resolução 1%
Emissor WT470
Pilhas 2 x 1,5 V / LR6 / R6 / AA /UM3
Campo de medição da
temperatura -30°C até +70°C
Campo de medição da
humidade do ar 25% até 90% de humidade relativa do ar
Frequência de transmissão 868 MHz
Alcance Máx. 100 metros (em campo aberto)
Reservado o direito de alterações técnicas.
Conteúdo
• EstaçãoMeteorológicaGT-WS-03s,GT-WS-03w
• SensorexteriorWT470
• 5PilhasR6, 1,5 V
• Parafusosparaamontagemnaparede(buchaeparafusos)
• Manualdeinstruções
Especificações Técnicas
Estimada(o) Cliente,
Antes de mais, queremos felicitá-la(o) pela compra desta estação mete-
orológica com emissor electrónica e altamente moderna. Adquiriu
desta forma um produto electrónico de alta tecnologia, que o satisfará
durante muitos anos e que lhe transmitirá informações precisas relati-
vamente ao tempo. De forma a entender a fácil utilização, leia atenta-
mente o manual de instruções e guarde-o bem, para poder tê-lo rapi-
damente à mão caso surjam perguntas. Entregue também este manual
de utilização caso passe este produto para outros utilizadores.
CUIDADO – INSTRUÇÕES IMPORTANTES
Depois de desembalar coloque primeiro as pilhas do emissor e
depois na estação. Para tal, tenha em conta as advertências da página
39 (colocação em funcionamento).
Porquê: Nos primeiros dois minutos, a estação procura os dados do
emissor e actualiza-se. Portanto, é necessário que o emissor se encontre
em funcionamento primeiro, para a estação lhe poder pedir os dados.
Sincronização horária DCF: Quando a estação estiver a funcionar
esta começa, após 3 minutos, a procurar o sinal DCF. O sinal é procur-
ado durante 10 minutos. Caso a sincronização não seja bem sucedida,
haverá uma tentativa de recepção de sinal a cada 2 horas. Se neces-
sário, altere local da estação (coloque-a perto da janela, por exemplo),
caso note dificuldades com a recepção.
Também poderá desencadear uma procura manual, mantendo premi-
dos os botões (1) e (7) durante 3 segundos.
Introdução
33 34
Depois de a sua estação meteorológica ter recebido as horas, a hora
será actualizada a todas as 24 horas ás 04:03. Aquando da alteração do
horário de Vero para o horário de Inverno a actualização também será
feita ás 04:03. Se necessário, altere local da estação (coloque-a perto da
janela, por exemplo), caso note dificuldades com a actualização.
Também poderá desencadear uma procura manual, mantendo premi-
dos os botões (1) e (7) durante 3 segundos.
Após a iniciação da estação todos os minutos será feita uma actuali-
zação entre a estação e o emissor. A pressão atmosférica será actualiza-
da a cada 16 minutos.
O ALCANCE DO EMISSOR PODE SER BASTANTE LIMITADO POR
OBSTÁCULOS.
PROTEJA O EMISSOR DE RAIOS SOLARES DIRECTOS.
A PREVISÃO METEOROLÓGICA ENCONTRA-SE PRONTA A FUNCIO-
NAR 12 HORAS DEPOIS DE TER COLOCADO AS PILHAS.
Introdução
Instruções para o uso de pilhas
A estação meteorológica funciona com 3 e o emissor funciona com
2 pilhas de tipo R6 / AA / UM3 (estas pilhas estão incluídas no conteúdo).
As pilhas devem ser afastadas de crianças.
Em caso de ingestão de uma pilha, a pessoa envolvida terá de ser ime-
diatamente assistida por um médico.
Se necessário, limpe os contactos das pilhas e do aparelho antes da
colocação das pilhas.
Não se deve tentar reactivar pilhas usadas com calor ou outros meios.
Nunca volte a carregar as pilhas! Perigo de explosão!
As pilhas não devem ser curto-circuitadas, atiradas para o lume ou
desmontadas.
Deve evitar-se o contacto com a pele, os olhos e as membranas muco-
sas. Em caso de contacto com o ácido das pilhas, lave imediatamente
as zonas afectadas com água limpa em abundância e procure imedia-
tamente um médico.
As baterias gastas devem ser imediatamente retiradas ao aparelho.
Perigo elevado de vazamento!
As pilhas do aparelho devem ser todas substituídas em simultâneo.
Não usar pilhas novas juntamente com pilhas usadas. Não misturar
pilhas de sistemas electroquímicos, marcas ou modelos diferentes. Em
caso de não cumprimento, as pilhas poderão debitar acima da sua vol-
tagem normal, havendo perigo acrescido de derrame. No caso de uma
não utilização prolongada do aparelho retire as pilhas do seu interior.
Advertências de segurança
35 36
Protecção do meio ambiente
Não colocar as pilhas no lixo doméstico!
Cada utilizador é legalmente responsável por entregar todas as pilhas
e baterias, independentemente de conterem ou não substância pol-
uentes, numa zona de recolha da sua comunidade/localidade, ou por
entregá-las na loja, para que possam ser recicladas da forma adequada.
Apenas entregar pilhas e baterias completamente descarregadas!
Caso já não seja possível utilizar o aparelho, entregue-o num
local de recolha para lixo eléctrico ou electrónico. Não o coloque
no lixo doméstico.
Recicle também os materiais de embalagem de forma apropria-
da e conforme as condições de protecção ambiental. Trata-se de
matérias-primas que poderão voltar a ser utilizadas.
Estação meteorológica
– Horas precisas através da recepção do sinal de rádio DCF 77
– Indicação de 12 ou de 24 horas para duas zonas horárias
– Indicação de data e de dia da semana
– Indicação de temperatura interior em ºC/ºF
Indicação de temperatura exterior em ºC/ºF com até quatro emis-
sores em diferentes pontos de emissão.
– Indicação da humidade do ar no interior e no exterior
– Indicação mínima/máxima para a temperatura e humidade do ar
– Indicação do histórico do tempo
– Indicação do histórico da temperatura
– Indicação actual e anterior da tendência da pressão atmosférica
Alarme de temperatura para a temperatura interior e para a tempera-
tura transmitida de um até quatro emissores.
– Símbolos para a previsão meteorológica
– 12 Indicações das fases da lua
– Indicação de tempo para o nascer e o pôr-do-sol
– Indicação de duração da luz do dia
– Indicações no ecrã de visualização
– Indicação do controlo das pilhas
Emissor
– Indicação de temperatura em °C/°F
– Indicação da humidade do ar
– Indicação do controlo das pilhas
– Alcance de até 100 metros
Informações e indicações no visor LCDAdvertências de segurança
37 38
Identificação do produto e perspectiva geral
Colocação em funcionamento
Explicação dos botões
1. -: serve para a defi nição manual da hora, do alarme, da data e do
ano, bem como do valor mínimo para o alarme da temperatura e
do valor do alarme da humidade do ar. Mudança da indicação de
12 para 24 horas.
2. +: serve para a definição manual da hora, do alarme, da data e do ano,
bem como do valor máximo para o alarme da temperatura e do valor
do alarme da humidade do ar. Mudança da indicação de °F para °C.
3. Snooze/Light: (Silenciar/Luz)com este botão poderá silenciar o alarme
e ligar a iluminação do ecrã durante aproximadamente 7 segundos.
4. Mode: (Modo): com este interruptor poderá escolher as diferentes
indicações para a hora 1 + 2, o alarme 1 + 2, a data, o ano e o
alarme da temperatura (mín./máx.).
5. Max/Min: (Máx./Mín.): apresenta os valores máximos e mínimos.
Identificação do produto e perspectiva geral
Indicação da pilha emissor
6
5
3
8
4
2 71
Indicação da pilha
estação meteorológica
Hora(hh:mm:ss);
Ano(yyyy);
Código da zona
Alarme (1 e 2)
Hora (1 e 2)
Dia da semana
Dia / Mês (dd/mm)
Pôr do sol (pm, hh:mm)
Nascer do sol (am, hh:mm)
Horas de sol (hh:mm)
Na parte traseira:
Compartimento de pilhas, apoio e
suporte para montagem na parede
Símbolos da previsão
meteorológica
Fases da lua
pressão atmosférica/
temperatura interior/
temperatura exterior
Unidade (hPa);
Ajuste de altura (m)
Canal do emissor exterior
(1, 2 ,3, 4)
Temperatura exterior (C/F)
Humidade do ar exterior (%)
Tendência da temperatura
exterior / Tendência da
humidade do ar exterior
Temperatura interior (C/F)
Humidade do ar interior (%)
Tendência da temperatura interior /
Tendência da humidade do ar interior
Número do canal
(1 - 4)
Temperatura /
Humidade do ar
Indicação LED
Compartimento
das pilhas
Apoio e suporte
para montagem
na parede
MAX/MIN
SELECT
SNOOZE/LIGHT
MODE
ALARM/CHANNEL
OUT
1
CLOCK 1
FORECAST
MOONPHASE
ALTITUDE
PRESSURE
HOUR
INDOOR
OUTDOOR
DAY
MONTH
9
10
39 40
6. Select: (Seleccionar): serve para a defi nição da hora, do alarme, da
data e do ano, bem como do valor para o alarme da temperatura e
do valor do alarme da humidade do ar. Defi nição do contraste do
visor. Alteração da indicação do histórico animado da temperatura
e da pressão atmosférica
7. Search: (Procura): Activação do processo de procura.
8. Alarm/Channel: (Alarme/Canal): com este botão poderá escolher
o alarme 1 + 2, alternar entre os emissores (1-4), escolher os valo-
res do alarme da temperatura e os valores do alarme da humidade
do ar, deslocar-se pela apresentação de barras animada (pressão
atmosférica, temperatura interior/exterior).
Os botões 9 e 10 encontram-se no compartimento das pilhas do
emissor.
9. SET: (DEFINIÇÃO): desta forma poderá entrar no modo de definição
e confirmar os valores que definiu.
10. C/F: desta forma pode alterar os canais e código da casa (durante a
definição) e escolher entre a indicação em graus Celsius ou Fahrenheit.
Colocar as pilhas
Cuidado: Por favor coloque primeiro a pilha no emissor (para isso
consulte também a página 32)!
No caso do emissor deverá, primeiro que tudo, retirar-se a estrutura de
suporte antes de o compartimento das pilhas ficar acessível. Para
tal, dobre ligeiramente e lateralmente, com uma chave de fendas
plana e retire a estrutura de suporte em cima, no emissor. Final-
mente, abra o compartimento das pilhas com uma chave de fendas
pequena.
O compartimento das pilhas da estação meteorológica encontra-se
em cima, na parte traseira. Carregue um pouco para dentro na patilha
de fecho da pega dobre o compartimentos das pilhas para fora.
Nach dem Einlegen der Batterien Batteriefächer wieder verschließen.
Colocação em funcionamento
1. Abra o compartimento das pilhas tanto na estação como no emis-
sor. Para abrir esse compartimento irá necessitar de uma chave de
estrela pequena (chave Philips).
Tenha sempre em atenção a polaridade apresentada no com-
partimento das pilhas ao colocá-las (+/-).
2. Coloque, no compartimento das pilhas do emissor, 2 pilhas de
tipo LR6/ R6/AA/UM3 e no compartimento das pilhas da estação
meteorológica coloque 3 pilhas de tamanho AA/UM3. Estas pilhas
encontram-se incluídas no aparelho.
As pilhas da estação meteorológica devem ser colocadas pela
ordem seguinte. Primeiro as duas pilhas à esquerda e à direita no
compartimento, e apenas no final a terceira pilha no meio.
A capacidade das pilhas será apresentada no visor LCD tanto da
estação meteorológica como do emissor/emissores, através de um
símbolo de uma pilha.
CONSELHO: Não utilize pilhas recarregáveis neste aparelho. A
sua tensão é menor do que a das pilhas normais e poderá não ser
suficiente para garantir uma boa recepção. Utilize apenas pilhas e
marca e alcalinas.
Indicação de substituição das pilhas
O símbolo de uma pilha com uma indicação substituição necessária da
pilha. Também símbolo de uma pilha quando esta tiver visualizar o sím-
bolo de uma pilha quando relativas ao emissor correspondente.
Quando um desses símbolos da pilha piscar continuamente devem
substituir-se as mesmas.
Colocação em funcionamento
41 42
Advertências gerais relativas à colocação
A estação meteorológica faz a troca de informação com o emissor
através de uma frequência de rádio (868 MHz). Televisões, computado-
res, lâmpadas fluorescentes e outros dispositivos eléctricos poderão
influenciar a recepção. A recepção também poderá ser perturbada
por portas em aço ou caixilhos de janelas, bem como por muros par-
ticularmente espessos. As temperaturas demasiado baixas no Inverno
(abaixo dos C) poderão levar a uma diminuição da tensão das pilhas
no emissor e, desta forma, diminuir também o alcance de emissão.
Se possível, coloque o emissor num ponto alto a um raio de um máxi-
mo de 100m e, se necessário, modifique a sua posição. Não exponha o
emissor aos raios solares directos ou à chuva.
Montagem na parede
Para uma montagem segura do aparelho é necessária habilidade com
ferramentas.
Se necessário, dirija-se a um electricista caso não tenha as ferramentas
adequadas ou não tenha experiência em lidar com ferramentas!
Aquando da instalação fixa da estação meteorológica dentro de casa,
certifiquese de que não se encontram cabos eléctricos, tubos de água
ou de gás na parede do local da instalação. Ao fazer os furos existe o
perigo de choque eléctrico ou de danificar as tubagens.
Montagem da estação meteorológica na parede
Os parafusos devem ser fixos na horizontal, a uma distância de 150 mm.
Introduza os parafusos fornecidos de forma que as suas cabeças ainda
fiquem aproximadamente 6 mm de fora.
La estación meteorológica sólo puede engancharse a los tornillos medi-
ante las argollas del panel trasero.
Colocação em funcionamento
Montagem do transmissor na parede
El emisor se fija a la pared mediante la argolla del soporte de pie. Para
ello, coloque uno de los tornillos incluidos en la pared y deje que
sobresalga unos 5 mm. de tornillo de la cabeza del tornillo. El emi-
sorsólo puede engancharse a la cabeza del tornillo mediante la argolla
del panel trasero del soporte de pie.
Sintonização do emissor
• Comatampadaspilhasabertas,pressioneSET (9) de forma a iniciar
a emissor.
• O código da casa pisca durante 10 segundos. Nesta altura poderá
escolher o código da casa (01-15) carregando no botão C/F (10).
• CarreguenateclaSET (9) de forma a confirmar a sua introdução.
Todos os emissores deverão regulados com o mesmo código.
• Depois disso,aindicação de canal pisca durante aproximadamente
10 segundos. Nesta altura poderá escolher o canal (1-4) carregando
no botão C/F (10).
• CarreguenateclaSET (9) de forma a confirmar a sua introdução.
Cada emissor deverá estar regulado num canal diferente.
• Mude para outro código no caso de a sua estação meteorológica
receber sinais de emissores vizinhos, que se encontrem a emitir, tam-
bém a uma frequência de 868 MHz. O aparelho, de fábrica, vem pro-
gramado com o código 01 e o canal 01.
Feche a tampa das pilhas com cuidado de forma a eu não entre
humidade para o emissor.
Colocação em funcionamento
43 44
Função de memorização automática
A função de memorização automática inicia-se automaticamente
quando as pilhas forem introduzidas pela primeira vez, durando
cerca de 3 minutos.
Dentro desses 3 minutos a estação meteorológica inicia-se e recebe
sucessivamente os valores da temperatura e da humidade por parte
do emissor.
Apenas serão apresentados os valores dos emissores recebidos. Colo-
que o emissor perto da estação meteorológica até que a função de
memorização esteja concluída. Caso as informações não tenham sido
correctamente transmitidas, o ecrã indicará, para a temperatura e a
humidade do ar „– –“. Nesse caso, inicie a função de memorização
manual e retire brevemente as pilhas do emissor.
Função de memorização manual
Também poderá iniciar esta função de memorização manualmente,
caso tenha instalado um emissor adicional ou caso tenha sido trans-
missão de rádio entre o emissor e a estação meteorológica. Poderá
reconhecer esta situação na medida em que os canais correspondentes
(emissor) começam a piscar.
Setup
Carregue no botão Search (7) durante pelo menos 3 segundos.
Irá soar um som que indica que o modo de memorização iniciou
durante cerca de 3 minutos.
O símbolo do canal/canais começa a piscar e soará um som de cada
vez que for reconhecido um emissor.
Os valores d temperatura e da humidade do ar recebidos pelos emis-
sores serão apresentados alternadamente.
Não será possível iniciar a função de memorização enquanto o símbo-
lo da antena se encontrar a piscar, o que dignifica que a hora e a data
estão a ser sincronizadas.
Ajustar o rádio-relógio
A estação meteorológica GT-WS-03s, GT-WS-03w tem integrado um
rádio-relógio que procede ao ajuste automático da hora e da data
num raio de 1.500km em volta de Frankfurt/Main, com a ajuda do
sinal de rádio DCF77 daí emitido. Quando a estação meteorológica
receber este sinal de rádio será apagada a introdução manual da hora
e da data, sendo esta substituída pelos dados de rádio recebidos.
Caso o símbolo da antera comece a piscar isso indica que foi recebido
o sinal de rádio DCF77 e que o mesmo se encontra a ser analisado. O
ajuste preciso poderá demorar alguns minutos, dependendo da força
do sinal recebido.
Quando a hora e a data tiverem sido correctamente definidos o sím-
bolo da antena pára de piscar.
Defnições
sinal forte
Sinal a ser recebido
e avaliado
sinal fraco ou sem sinal sem recepção
O visor não
apresenta
indicações
força de sinal média
Sinal a ser recebido
e avaliado
A receber sinal
45 46
De forma a garantir uma boa recepção deste sinal de rádio não colo-
que a estação meteorológica perto de grandes objectos em metal ou
aparelhos eléctricos como televisores, computadores, monitores ou
semelhantes.
CONSELHO: Quando a estação estiver a funcionar esta começa, após
3 minutos, a procurar o sinal DCF. O sinal é procurado durante 10
minutos. Caso a sincronização não seja bem sucedida, haverá uma
tentativa de recepção de sinal a cada 2 horas. Se necessário, altere ó
local da estação (coloque-a perto da janela, por exemplo), caso note
dificuldades com a recepção.
De forma a iniciar manualmente a recepção do sinal de rádio carregue
no botão Search (7) e (1) durante aproximadamente 3 segundos até
ouvir um som e o símbolo da antena começar a piscar.
Definição manual da hora CLOCK 1/ Data/ Região horária
CONSELHO: Para passar os números mais rapidamente poderá manter
premido o botão Máx/Mín (5). Carregue no botão - (1) para escolher
entre a indicação de 12 ou de 24 horas. Se escolher a indicação de 12
horas, a segunda metade do dia será assinalada com as letras PM.
Mantenha o botão Mode (4) carregado durante cerca de 3 segundos
para entrar no modo manual de ajuste da hora.
•IráapareceraindicaçãoCLOCK1,sendoqueaindicaçãodashoras
começará a piscar.
Carregue no botão + (2) ou - (1), para ajustar as horas.
Carregue no botão Select (6), para passar para a definição dos minutos.
Carregue no botão + (2) ou - (1), para ajustar os minutos.
•ComobotãoSnooze/Light (3) poderá colocar os segundos a 00.
Carregue no botão Select (6), para passar ao modo de definição do
dia.
Carregue em + (2) ou - (1), para ajustar o dia.
Definições
•A indicação do dia da semana será automaticamente definida
depois da introdução da data.
Carregue no botão Select (6), para passar ao modo de definição do
mês.
Carregue em + (2) ou - (1), para ajustar o mês.
Carregue no botão Select (6), para passar ao modo de definição do
ano.
Carregue em + (2) ou - (1), para ajustar o ano.
Carregue no botão v, para introduzir a região horária.
Carregue em + (2) ou - (1), para ajustar a sua região horária.
•Da tabelana página 27, retire o código de zona válido para a sua
área de residência. Após a introdução do código da zona, a actuali-
zação da indicação poderá demorar alguns minutos!
Poderá terminar a definição de valores carregando o botão Mode (4)
até nenhum dos algarismos continuar a piscar, ou não carregando
em qualquer botão durante pelo menos um minuto.
Ajuste do horário de Verão/Inverno
Mantenha o botão Mode (4) carregado durante cerca de 3 segundos
para entrar no modo manual de ajuste da hora.
Carregue repetidamente no botão Select (6) até chegar à introdução
do código da zona.
Carregue no botão Snooze/Light (3), para alterar entre o horário de
Verão e o horário de Inverno.
•OhoráriodeVerãoserásinalizadocomaabreviaturaDST(Daylight
Saving Time).
Poderá terminar a defi nição de valores carregando o botão Mode
(4) até nenhum dos algarismos continuar a piscar, ou não carregan-
do em qualquer botão durante pelo menos um minuto.
Cuidado: Não proceda a este ajuste manual entre as 23:00 e a 01:00
hora, visto que nessa altura a data não será ajustada.
Definições
47 48
Correcção da altura e escolha da indicação (hPa)
CONSELHO: Caso a posição em altura (por exemplo, se for transportada
do primeiro para o segundo andar) da estação meteorológica se alterar,
poderá proceder à correcção manual da altura. De outra forma, também
a pressão atmosférica determinada pela configuração automática não
seria apresentada correctamente.
Carregue o botão Mode (4) durante 3 segundos de forma a passar
para o modo de ajuste horário manual.
– Volte a carregar o botão Mode (4).
Carregue no botão + (2), para fazer uma compensação da diferença
da altura para cima.
•Aopremirobotãoaumentaaalturaem10m.
Carregue no botão - (1), para fazer uma compensação da diferença
da altura para baixo.
•Aopremirobotãodiminuiaalturaem10m.
Poderá terminar a confi gurão carregando o botão Mode (4) até nen-
hum dos algarismos continuar a piscar ou não carregando em qualquer
botão durante pelo menos um minuto.
Definição do alarme para a temperatura interior (INDOOR)
Carregue o botão Mode (4) durante 3 segundos de forma a passar
para o modo de ajuste horário manual.
Volte a carregar o botão Mode (4) por 2 vezes.
•Ocampoindicadordatemperaturainterioriráapresentar,apiscar,
o valor do alarme da temperatura ajustado anteriormente.
Utilize os botões + (2) ou - (1), para definir o alarme da temperatura.
Com o botão Snooze/Light (3) se o alarme deve disparar ao ultra-
passar (Símbolo
) ou ao descer da temperatura (símbolo ), ou se
o mesmo deve ser desactivado (sem símbolo).
Definições
Poderá terminar a configuração carregando o botão Mode (4) até
nenhum dos algarismos continuar a piscar ou não carregando em
qualquer botão durante pelo menos um minuto.
Definição do alarme para a temperatura exterior (1 OUTDOOR)
Carregue o botão Mode (4) durante 3 segundos de forma a passar
para o modo de ajuste de horário manual.
Volte a carregar o botão Mode (4) por 4 vezes.
•Ocampoindicadordatemperaturaexterioriráapresentar,apiscar,
o valor do alarme da temperatura ajustado anteriormente.
O ajuste é feito da mesma forma que na “Definição do alarme para
a temperatura interior (INDOOR)“.
Definição do alarme para a temperatura exterior
(2-4 OUTDOOR)
Carregue o botão Mode (4) durante 3 segundos de forma a passar
para o modo de ajuste horário manual.
Volte a carregar o botão Mode (4) por 4 vezes.
Escolha, por meio do botão Alarme/Canal (8) o emissor desejado
(2-4).
O ajuste é feito da mesma forma que na “Definição do alarme para
a temperatura interior (INDOOR)“.
Terminar o alarme da temperatura
Carregue num dos botões da estação meteorológica para silenciar o
alarme.
•Caso não carregueemqualquertecla o alarme desligar-se-áauto-
maticamente após um minuto, voltando a tocar passados 5 minutos.
INFORMAÇÃO: O alarme da hora e o alarme do tempo distinguem-se
perfeitamente pelo som.
Definições
49 50
Ajuste da CLOCK 2
– Carregue o botão Mode (4).
•IráapareceraindicaçãoCLOCK 2.
Carregue no botão + (2) ou - (1), para ajustar as horas.
•Oajustedosminutosnãopoderáserrealizado.Indicaçãodosminu-
tos e dos segundos corresponde á indicação na CLOCK 1.
Ajuste do alarme da hora
INFORMAÇÃO: Encontram-se à sua disposição 2 tipos de alarme.
Poderá regular o alarme para: diariamente, diariamente de segunda a
sexta-feira, diariamente de segunda a sábado, sábado e domingo ou
semanalmente.
Carregue o botão Mode (4) até aparecer
ou .
•Seráapresentadaahoraanteriormentedefinida.
– Carregue no botão + (2) para ajustar as horas.
– Carregue no botão - (1), para ajustar os minutos.
Com o botão Select (6) escolha os dias nos quais o alarme deve disparar.
Active ou desactive o alarme no modo de definição
ou com o
botão Alarme/Canal (8).
•Aindicaçãomudaráparaon(ligada)ousemqualquerindicação.Se
o alarme se encontrar activo (on), será apresentado o símbolo corre-
spondente ou
(e) durante a hora 1 (CLOCK 1).
Poderá voltar à indicação actual das horas carregando o botão Mode
(4) no sentido do batente, até aparecer CLOCK1 ou se não premir
qualquer botão no espaço de um minuto.
Terminar o alarme da hora
Carregue no botão Snooze/Light (3), para parar o alarme durante
8 minutos.
Carregue num dos botões da estação meteorológica para silenciar o
alarme.
Definições
Temp. Humid. do ar Indicações
Interior > +55°C > 95% HI
Interior < -20°C < 15% LO
Exterior > +70°C > 95% HI
Exterior < -30°C < 15% LO
•Se não carregar em nenhum botão o alarme desliga automatica-
mente após um minuto.
Indicações
Indicação da temperatura e da humidade do ar
Carregue no botão + (2), para alternar entre as unidades que pretende
visualizar: °C <-> °F
Carregue no botão Alarme/Canal (8), para alternar entre os emissores:
1 - 2 - 3 - 4
Carregue no boo Máx/Mín (5), para alternar entre os valores: MÍN -
MÁX - actual (nenhuma indicação adicional) para a temperatura e
humidade do ar.
INFORMAÇÃO: Os valores MÍN e X são automaticamente apagados
às 00:00 horas.
Caso o valor da temperatura ou da humidade do ar se encontrem fora
do campo de medição, o visor apresentará a indicação „HI” (ultrapas-
sado) ou „LO” (valor abaixo do campo).
Definições
Tendência
Canal do
emissor
exterior
Temperatura
Humidade do ar
Temperatura
Humidade do ar
Emissor
Indicações no ecrã de visualização
Estação meteorológica
Indicações no ecrã de visualização
51 52
Indicação da tendência
De acordo com os resultados de medição da temperatura e da humi-
dade do ar da última meia hora, será calculada e apresentada uma ten-
dência:
Previsão meteorológica
Esta estação meteorológica altamente moderna e electrónica tem a
capacidade de reconhecimento de alterações na pressão atmosférica e,
com ajuda dos dados armazenados das últimas horas, fazer previsões
meteorológicas para as próximas 12 até 24 horas. Previsão restringe-se
à zona em volta da estação meteorológica com um raio de cerca de
30 a 50 km.
Aviso de gelo: Os flocos de neve ficarão intermitentes quando a tem-
peratura atingir entre +2,9° C e -1,9° C (apenas através do canal 1). Caso
a temperatura desça abaixo dos –1,9° C, os flocos de neve deixam de
estar intermitentes e ficam constantes.
Indicações
leventando-se caindocontinuamente
FORECAST FORECASTFORECASTFORECASTFORECASTFORECAST
FORECAST
eller
Ensolarado Nuvem Chuva Neve
piscando
piscando
Aviso de Aviso de
geada tempestade
Observações relativas à previsão meteorológica:
• Apenas as informações do Canal 1 serão avaliadasno que respeita
aos avisos de neve e de gelo. Caso não utilize o Canal 1 não haverá
qualquer aviso de neve ou de gelo.
• Asindicaçõesparaaprevisãometeorológicanãopoderãoserutiliza-
das cerca de 12 horas depois de ter sido instalada a estação meteor-
ológica e pelo menos um emissor, dado que a estação precisa desse
tempo para se adaptar às condições locais.
• Não se pode garantirumaexactidão nocasodetodasas previsões
meteorológicas. A exactidão da previsão meteorológica encontra-se
em cerca de 75%, dependendo das condições locais para as quais a
estação meteorológica foi concebida.
• Caso o localda estação meteorológica seja alterado em altura(por
exemplo, mudança da estação do rés-do-chão para um andar superi-
or de um edifício ou ao contrário) deverá proceder-se à correcção da
altura. Para isso consulte a secção Correcção da altura e escolha da
indicação (hPa)“.
Indicações
53 54
Fases da lua
As fases da lua são automaticamente actualizadas com a data.
Histórico animado da temperatura e da pressão atmosférica
Os símbolos de barras animadas mostram-lhe graficamente as alterações
da temperatura ou da pressão atmosférica das últimas 12 horas.
Com o botão Select (6), escolha entre a temperatura interior, a tempe-
ratura exterior e a pressão atmosférica .
•Sedefiniuaindicaçãoparaatemperaturaexterior,poderáchamaros
emissores individuais com o botão Alarme/Canal (8).
Indicações
Lua nova
Lua crescente
Primeiro quarto
Meia-lua crescente
Lua em três quartos crescente
Lua cheia crescente
Lua minguante
Último quarto
Meia-lua minguante
Lua em três quartos minguante
Lua cheia minguante
Lua cheia
INFORMAÇÃO: A indicação depende da escolha prévia das unidades.
Nascer do sol, horas de sol e pôr-do-sol
Com esta estação meteorológica poderá apresentar as horas relativas
ao nascer e ao pôr-do-sol na sua localidade.
INFORMAÇÃO: O Smiley „
é apresentado assim que os dias ficarem
maiores e apaga quando estes ficarem mais pequenos. Estes dias e
referência poderão desviar-se, nos próximos anos, em +/- 1 dia.
Iluminação de fundo
Carregue no botão Snooze/Light (3), para ligar a iluminação de
fundo do visor.
•Esta apaga-se automaticamente após 8 segundos. Caso durante
este período de tempo carregue num botão, a duração da ilumi-
nação prolonga-se em mais 8 segundos.
Indicações
Alteração da pressão
atmosférica
Alteração da
temperatura interior
Alteração da temperatura
exterior (Canal 1)
Pôr-do-sol
Nascer do sol
Horas de sol
55 56
Definição do contraste do visor
– Carregue o botão Mode (4).
•IráapareceraindicaçãoCLOCK 2.
– Carregue no botão Select (6), para alterar o contraste do visor.
•Suadefiniçãopoderáserrealizadaem4graus.
Poderá sair da definição carregando o botão Mode (4) contra o
batente até que apareça a indicação CLOCK 1.
Limpeza e conservação
Poderá limpar a sua estação meteorológica com uma pano macio.
Poderá humedecer o pano ligeiramente e colocar-lhe um pouco de
detergente.
CUIDADO: Não utilize, de maneira alguma, detergentes abrasivos,
como por exemplo leites abrasivos ou líquidos que contenham dis-
solventes.
Os riscos leves poderão ser removidos com pasta de polir. Poderá
encontrar este tipo de pasta em lojas de materiais de construções ou
de bricolage.
Indicações
Problema
O sinal DCF77 relativo à hora não
consegue ser recebido.
A indicação de temperatura no
emissor não está de acordo com
a indicação do receptor.
A indicação de temperatura do
emissor parece ser demasiado
alta.
A estação meteorológica não
recebe qualquer sinal do emissor
ou encontra-se intermitente.
Procura de falhas
Solução
Não coloque a estação mete-
orológica perto de aparelhos
eléctricos. Inicie manualmente a
recepção (consulte a página 45).
Certifique-se de que é recebido
o sinal do emissor. Sincronize
manualmente a transmissão
de rádio, carregando durante 3
segundos no botão Search (7).
Está a ser utilizada a mesma
frequência na vizinhança – mude
de frequência (Página 42)
Verifique se o emissor não se
encontra exposto a radiação solar
directa.
Repita o processo de memori-
zação manual (consulte as pági-
nas 43-44). A temperatura exterior
não pode encontrar-se abaixo
dos -30° C. Certifi que-se que não
se encontra qualquer fonte de
interferência eléctrica nas pro-
ximidades do emissor.Verifique
as pilhas do emissor. Aproxime a
estação meteorológica do
emissor ou vice-versa.
57 58
Problema
Não existe qualquer previsão
meteorológica.
A hora do nascer/pôr-do-sol não
se encontra correcta.
A indicação é ilegível ou a função
não se encontra clara
Procura de falhas
Solução
Verifique se o emissor principal
se encontra regulado no Canal 1.
Desde a colocação em funciona-
mento da estação meteorológica
ou desde a substituição das pilhas
passaram-se menos do que 12
horas.
O código da zona encontra-se
mal definido. Poderá encontrar a
sua localidade no mapa das zonas
(Página 58) O horário de Verão
não foi ligado ou desligado
(consulte a página 46)
Retire as pilhas da estação
meteorológica e volte a
colocá-las. Aumente os contrastes
(Página 55)
Na carta, encontram-se atribuídos códigos de zona ao seu local de
residência.
Utilize estes códigos de zona como números a introduzir, conforme se
descreve na página 46.
Mapa de zonas
59 60
Declaração de conformidade ce
Declaramos que este produto se encontra conforme os requisitos
principais e as outras prescrições relevantes d Directiva 1999/5/CE.
Poderá consultar a declaração de conformidade completa na Internet,
em www.gt-support.de.
61 62
Empfänger GT-WS-03s, GT-WS-03w
Batterien 3 x 1,5V / LR6 / R6 / AA / UM3
Messbereich der Temperatur - 20°C bis +55°C
Messgenauigkeit max. +/- 1°C
innerhalb eines Messbereiches
von 0 bis 40°C
Auflösung 0,1°C
Messbereich der Luftfeuchtigkeit 25% bis 90%
relative Luftfeuchtigkeit
Messgenauigkeit +/- 5%
Auflösung 1%
Sender WT470
Batterien 2 x 1,5V / Typ LR6 / R6 / AA /UM3
Messbereich der Temperatur - 30°C bis +70°C
Messbereich der Luftfeuchtigkeit 25% bis 90%
relative Luftfeuchtigkeit
Sendefrequenz 868 MHz
Reichweite max. 100 Meter (in offenem Gelände)
Technische Änderungen vorbehalten.
Lieferumfang
• 1EmpfängerGT-WS-03s,GT-WS-03w
• 1SenderWT470
• 5BatterienR6,1,5V
• 1BeutelmitMontagematerial(Dübel,Schrauben)
• 1Bedienungsanleitung
Technische Daten
Sehr geehrter Kunde,
zunächst einmal gratulieren wir Ihnen zum Kauf dieser hochmodernen
elektronischen Wetterstation mit Sender. Sie haben hiermit ein tech-
nisch hoch entwickeltes elektronisches Produkt erworben, mit dem
Sie lange Jahre viel Freude haben werden und sehr genaue Informati-
onen über das Wettergeschehen erhalten. Um die einfache Bedienung
zu verstehen, lesen Sie bitte die Bedienungsanleitung sorgfältig durch
und bewahren Sie diese gut auf, um sie bei aufkommenden Fragen zur
Bedienung schnell zur Hand zu haben.
Geben Sie auch diese Bedienungsanleitung mit, wenn Sie das Produkt
an einen anderen Nutzer weitergeben.
ACHTUNG – WICHTIGE HINWEISE
Nach dem Auspacken zuerst Batterien in den Sender legen, dann erst in
die Station. Beachten Sie dazu die Hinweise auf S. 9 (Inbetriebnahme).
Warum: Die Station sucht in den ersten zwei Minuten nach den Daten
des Senders und aktualisiert sich. Deshalb sollte der Sender zuerst in
Betrieb sein, wenn die Station die Daten abfordert.
DCF Zeit-Synchronisierung: Ist die Station im Betrieb, fängt diese
nach 3 Minuten an, das DCF Signal zu suchen. 10 Minuten lang wird
das Signal gesucht. Ist die Synchronisation nicht erfolgreich, wird alle
2 Stunden erneut versucht, ein Signal zu empfangen. Verändern Sie
ggf. die Position der Station (z.B. ans Fenster), falls diese Schwierig-
keiten mit dem Empfang hat.
Sie können die Suchfunktion auch manuell auslösen, durch Halten
(3 Sekunden) der Tasten (1) und (7).
Einleitung
63 64
Hat Ihre Wetterstation die Zeit einmal empfangen, wird alle 24 Stunden
die Zeit um 04:03 Uhr aktualisiert. Beim Wechsel auf Sommer/Winter-
zeit, findet die Aktualisierung also um 4:03 Uhr statt. Verändern Sie ggf.
die Position der Station (z.B. ans Fenster), falls diese Schwierigkeiten mit
der Aktualisierung hat.
Sie können die Suchfunktion auch manuell auslösen, durch Halten
(3 Sekunden) der Tasten (1) und (7).
Nach Initialisierung der Station erfolgt jede Minute ein Update zwischen
Station und Sender. Der Luftdruck wird alle 16 Minuten aktualisiert.
DIE REICHWEITE DES SENDERS KANN DURCH HINDERNISSE ERHEB-
LICH EINGESCHRÄNKT WERDEN.
DEN SENDER VOR DIREKTEN SONNENSTRAHLEN SCHÜTZEN.
DIE WETTERVORHERSAGE IST 12 STUNDEN NACH EINLEGEN DER
BATTERIEN BETRIEBSBEREIT.
Einleitung
Batteriehinweise
Die Wetterstation wird mit 3 und der Sender mit 2 Batterien des Typs
R6 / AA / UM3 bestückt (diese Batterien sind im Lieferumfang enthalten).
Batterien sind von Kindern fernzuhalten.
Nach dem Verschlucken einer Batterie muss die betroffene Person
sofortige medizinische Hilfe in Anspruch nehmen.
Reinigen Sie Batterie- und Gerätekontakte bei Bedarf vor dem Einlegen.
Es darf nicht versucht werden, gebrauchte Batterien durch Wärme oder
andere Mittel zu reaktivieren. Batterien niemals wieder aufladen!
Explosionsgefahr!
Batterien dürfen nicht kurzgeschlossen, ins Feuer geworfen oder ausei-
nander genommen werden.
Kontakt mit Haut, Augen und Schleimhäuten muss vermieden werden.
Bei Kontakt mit Batteriesäure die betroffenen Stellen sofort mit reich-
lich klarem Wasser spülen und umgehend einen Arzt aufsuchen.
Erschöpfte Batterien müssen umgehend aus dem Gerät genommen
werden. Erhöhte Auslaufgefahr!
Alle Batterien eines Gerätes sind gleichzeitig zu ersetzen. Neue Batterien
nicht mit gebrauchten Batterien benutzen. Batterien der verschiedenen
elektrochemischen Systeme, Typen und Marken nicht gemischt einset-
zen. Bei Nichtbeachtung können Batterien über ihre normale Endspan-
nung hinaus entladen werden, wodurch erhöhte Gefahr des Auslaufens
besteht. Batterien bei längerer Nichtverwendung aus dem Gerät entfernen.
Sicherheitshinweise
65 66
Umweltschutz
Batterien dürfen nicht in den Hausmüll!
Jeder Verbraucher ist gesetzlich verpflichtet, alle Batterien und Akkus,
egal ob sie Schadstoffe enthalten oder nicht, bei einer Sammelstelle
seiner Gemeinde/ seines Stadtteils oder im Handel abzugeben, damit
sie einer umweltschonenden Entsorgung zugeführt werden können.
Batterien und Akkus bitte nur im entladenen Zustand abgeben!
Sollte das Gerät nicht mehr benutzt werden können, geben Sie
es an einer Sammelstelle für Elektro- und Elektronikschrott ab.
Werfen Sie es nicht in den Hausmüll.
Entsorgen Sie auch die Verpackungsmaterialien ordnungsgemäß und
umweltgerecht.
Diese sind Rohstoffe und können wieder verwertet werden.
Wetterstation
– Genaue Uhrzeit durch den Empfang des DCF-77 Funksignals
– 12- oder 24- Stunden-Anzeige für zwei Zeitzonen
– Datums- und Wochentagsanzeige
– Innentemperaturanzeige in °C/°F
Außentemperaturanzeige in °C/°F mit bis zu vier Sendern an verschie-
denen Messpunkten
– Innen- und Außen-Luftfeuchtigkeitsanzeige
Minimum/Maximum-Anzeige für die Temperatur und die Luftfeuch-
tigkeit
– Wettertrendanzeige
– Temperaturtrendanzeige
– Aktuelle und zurückliegende Luftdrucktendenzanzeige
Temperaturalarm für die Innentemperatur und die von einem und bis
zu vier Sendern übermittelte Temperatur
– Symbole für die Wettervorhersage
– 12 Mondphasenanzeigen
– Zeitanzeige für Sonnenaufgang und Sonnenuntergang
– Tageslichtdaueranzeige
– Display-Anzeige
– Batteriekontrollanzeige
Sender
– Temperaturanzeige in °C/°F
– Luftfeuchtigkeitsanzeige
– Batteriekontrollanzeige
– Reichweite bis zu 100 Metern
Informationen und LCD-AnzeigenSicherheitshinweise
67 68
Teilebezeichnung und Übersicht
Inbetriebnahme
Erläuterung der Tasten
1. -: dient der manuellen Einstellung der Uhr, des Alarms, des Datums
und des Jahres, sowie des Minimum-Temperaturalarmwertes.
Wechsel der Anzeige zwischen 12- und 24-Stunden Anzeige.
2. +: dient der manuellen Einstellung der Uhr, des Alarms, des Datums
und des Jahres, sowie des Maximum-Temperaturalarmwertes.
Wechsel der Anzeige zwischen °F und °C.
3. Snooze/Light: mit dieser Taste unterbrechen Sie den Alarm und
schalten die Displaybeleuchtung für ca. 7 Sekunden ein.
4. Mode: mit dieser Taste wählen Sie die verschiedenen Anzeigen für
Uhrzeit 1 + 2, Alarm 1 + 2, Datum, Jahr und Temperatur-alarm (Min/
Max).
5. Max/Min: zeigt die MAX und MIN Werte an.
Teilebezeichnung und Übersicht
Uhrzeit(hh:mm:ss);
Jahr(yyyy);
Zonencode
Uhrzeit (1 & 2)
Wochentag
Sonnenuntergang (pm, hh:mm)
An der Rückseite:
Batteriefach, Standstütze und
Halter zur Wandbefestigung
Sonnenscheindauer (hh:mm)
Sonnenaufgang (am, hh:mm)
Aussensenderkanal
(1, 2 ,3, 4)
Aussentemperatur (C/F)
Aussen-Luftfeuchtigkeit (%)
Aussen-Temperaturtrend/
Aussen-Luftfeuchtigkeitstrend
Batterieanzeige Sender
Innentemperatur (C/F)
Innen-Luftfeuchtigkeit (%)
Innen-Temperaturtrend/
Innen-Luftfeuchtigkeittrend
Batterieanzeige Station
Wetter Vor hersagesymbole
Mondphasen
Animierte Balkendarstellung
(Luftdruck/
Innentemperatur/
Aussentemperatur)
Einheit(hPa);
Höheneinstellung (m)
Temperatur /
Luftfeuchtigkeit
Kanalnummer
(1 - 4)
LED-Anzeige
Standstütze
und Halter zur
Wandbefestigung
Batteriefach
Tag / Monat (dd/mm)
Alarm (1 & 2)
6
5
3
8
4
2 71
OUT
1
MAX/MIN
SELECT
SNOOZE/LIGHT
MODE
ALARM/CHANNEL
CLOCK 1
FORECAST
MOONPHASE
ALTITUDE
PRESSURE
HOUR
INDOOR
OUTDOOR
DAY
MONTH
9
10
69 70
6. Select: dient der Einstellung der Uhr, des Alarms, des Datums und
des Jahres, sowie des Temperaturalarmwertes. Kontrasteinstellung
des Displays. Änderung der Anzeige der animierten Temperatur-
und Luftdruckhistorie.
7. Search: Aktivierung der Suchprozesse.
8. Alarm/Channel: hiermit können Sie Alarm 1+ 2 ein/aus wählen,
zwischen den Sendern (1-4) wechseln, den Temperaturalarmwert
auswählen, blättern durch die Animierte Balkendarstellung (Luft-
druck/ Innentemperatur/Außentemperatur).
Die Tasten 9 und 10 befinden sich im Batteriefach des Senders.
9. SET: hiermit gelangen Sie in den Einstellungsmodus und bestätigen
die Werte, die Sie eingestellt haben.
10. C/F: hiermit ändern Sie die Kanäle und den Hauscode (während der
Einstellung) und wählen zwischen der Anzeige in Celsius oder Fah-
renheit.
Einlegen der Batterien
Achtung: Bitte die Batterie zuerst in den Sender einlegen (siehe
hierzu auch Seite 62)!
Beim Sender muss zunächst die Standstütze entfernt werden,
bevor das Batteriefach zugänglich wird. Dazu die Standstütze oben
am Sender seitlich mit einem flachen Schraubendreher etwas auf-
biegen und abziehen. Anschließend Batteriefach mit einem kleinen
Kreuzschlitzschraubendreher öffnen.
Das Batteriefach der Wetterstation befindet sich oben auf der Rück-
seite. Verschlussclip an der Griffmulde etwas eindrücken und Batte-
riedeckel herausschwenken.
Nach dem Einlegen der Batterien Batteriefächer wieder verschließen.
1. Öffnen Sie das Batteriefach sowohl an der Wetterstation als auch
am Sender. Zum Öffnen dieses Faches benötigen Sie einen kleinen
Kreuzschlitzschraubendreher.
Inbetriebnahme
Beachten Sie unbedingt die im Batteriefach angegebene Pola-
rität +/- beim Einlegen der Batterien.
2. Legen Sie in das Batteriefach des Senders 2 Batterien des Typs LR6/
R6/AA/UM3 und in das Batteriefach der Wetterstation 3 Batterien.
Diese Batterien sind Ihrem Gerät beigelegt.
Die Batterien der Wetterstation müssen in folgender Reihenfolge
eingesetzt werden:
Zuerst zwei Batterien links und rechts in das Fach einlegen, um
anschließend die dritte Batterie mittig einzusetzen.
HINWEIS: Benutzen Sie keine aufladbaren Akkus für dieses Gerät.
Die Akkuspannung ist geringer als die von Batterien und reicht u.U.
nicht aus, um den Empfang zu gewährleisten. Verwenden Sie nur
Alkaline Markenbatterien.
Batteriewechselanzeige
Ein Batteriesymbol auf dem Display der Wetterstation weist auf einen
notwendigen Batteriewechsel hin. Auch auf der LCD-Anzeige des Sen-
ders erscheint ein Batteriesymbol, wenn die Batterie gewechselt werden
muss. Auf dem Display sehen Sie ebenfalls das Batteriesymbol, wenn
die Daten des korrespondierenden Senders angezeigt werden.
Wenn eines dieser Batteriesymbole dauernd blinkt, müssen die ent-
sprechenden Batterien ausgewechselt werden.
Allgemeine Hinweise zur Aufstellung
Die Wetterstation tauscht die Daten mit dem Sender über eine Radio-
frequenz (868 MHz) aus. Fernseher, Computer, Leuchtstoffröhren und
andere elektrische Einrichtungen können den Empfang beeinträchtigen.
Der Empfang kann ebenso durch Stahltüren oder Fensterrahmen, sowie
durch besonders dichtes Mauerwerk gestört werden. Besonders tiefe
Temperaturen im Winter (unter C) führen u.U. zum Spannungsabfall der
Batterien im Sender und somit zu einer verminderten Sende-Reichweite.
Inbetriebnahme
71 72
Platzieren Sie den Sender möglichst hoch in einem Radius von max.
100 m und verändern Sie ggf. die Position. Setzen Sie den Sender nicht
direkter Sonneneinstrahlung oder Regen aus.
Wandmontage
Zur festen Montage des Gerätes ist ein geübter Umgang mit Werkzeug
erforderlich. Wenden Sie sich ggf. an einen Elektroinstallateur, wenn
Sie über kein Werkzeug verfügen oder im Umgang mit Werkzeug nicht
erfahren sind!
Stellen Sie sicher, dass bei der Festinstallation der Wetterstation im
Haus an dem Anbringungsort keine elektrischen Kabel, Gas- oder Wasser-
rohre unter dem Putz verlegt sind. Beim Bohren der Löcher besteht die
Gefahr eines Stromschlages oder einer Beschädigung der Rohre.
Wandmontage der Wetterstation
Die Schrauben müssen waagerecht, in einem Abstand von 150 mm
angebracht werden. Drehen Sie die mitgelieferten Schrauben so weit
ein, dass die Schraubenköpfe noch etwa 6 mm weit herausragen.
Die Wetterstation kann nur mit den Ösen auf der Rückseite an den
Schrauben eingehängt werden.
Wandmontage des Senders
Der Sender wird mit Hilfe der Öse in der Standstütze an der Wand
befestigt.
Bringen Sie dazu eine der mitgelieferten Schrauben in der Wand an
und lassen Sie den Schraubenkopf etwa 5 mm weit herausragen.
Der Sender kann nur mit der Öse auf der Rückseite der Standstütze an
dem Schraubenkopf eingehängt werden.
Inbetriebnahme
Einstellen des Senders
• DrückenSiebeigeöffneterBatterieklappeSET (9), um den Sender zu
starten.
• DerHauscodeblinktfür10Sekunden.IndieserZeitkönnenSieeinen
Hauscode (01-15) durch Drücken der C/F-Taste (10) auswählen.
• DrückenSieSET (9), um Ihre Eingabe zu bestätigen.
Alle Sender müssen auf den gleichen Hauscode eingestellt werden.
• Danach blinkt die Kanalanzeige am linken Displayranddes Senders
für etwa 10 Sekunden. In dieser Zeit können Sie einen Kanal (1-4)
durch Drücken der C/F-Taste (10) auswählen.
• DrückenSieSET (9), um Ihre Eingabe zu bestätigen.
Jeder Sender muss auf einen anderen Kanal eingestellt werden.
• Wechseln Sie auf einen anderen Hauscode, wenn Ihre Wetterstation
Signale von benachbarten Sendern, die ebenfalls im 868 MHz-Bereich
senden, empfängt. Die Werkseinstellungen sind für den Hauscode =
01 und für den Kanal = 01.
Schließen Sie die Batterieklappe sorgfältig, damit keine Feuchtigkeit in
den Sender eindringen kann.
Inbetriebnahme
73 74
Automatische Lernfunktion
Die automatische Lernfunktion startet automatisch, wenn die Batte-
rien erstmals in die Wetterstation eingelegt werden und dauert etwa
3 Minuten.
Innerhalb dieser drei Minuten initialisiert sich die Wetterstation, emp-
fängt nacheinander die Werte der Temperatur und Luftfeuchtigkeit
der Sender.
Es werden nur die Werte der empfangenen Sender angezeigt. Stellen
Sie den Sender in der Nähe der Wetterstation auf, bis die automatische
Lernfunktion abgeschlossen ist. Wurden die Daten nicht korrekt über-
mittelt, so zeigt das Display für Temperatur und Luftfeuchtigkeit „– –“.
Starten Sie in diesem Fall die Lernfunktion manuell oder entnehmen
Sie kurz die Batterien aus dem Sender.
Manuelle Lernfunktion
Sie können diese Lernfunktion auch manuell starten, wenn Sie z.B.
einen zusätzlichen Sender installiert haben oder wenn die Funkverbin-
dung zwischen Sender und Wetterstation unterbrochen wurde. Letzteres
erkennen Sie daran, dass die Werte des entsprechenden Kanals (Sen-
ders) blinken.
– Drücken Sie die Taste Search (7) für mindestens 3 Sekunden.
Ein Piepton ertönt und weist darauf hin, dass der Lernmodus für etwa
3 Minuten gestartet ist.
Das Symbol für den Kanal/die Kanäle beginnt zu blinken, und ein
Piepton ertönt jedes mal, wenn ein Sender erkannt wurde.
Die Temperatur- und Luftfeuchtigkeitswerte der empfangenen Sender
werden im Wechsel angezeigt.
Die automatische oder manuelle Lernfunktion lässt sich nicht starten,
solange das Antennensymbol blinkt, d.h. die Uhrzeit und das Datum
werden synchronisiert.
Einstellen der Funkuhr
In die Wetterstation GT-WS-03s/GT-WS-03w ist eine Funkuhr
integriert, die im Umkreis von 1.500 km um Frankfurt/Main mit Hilfe
des von dort ausgestrahlten DCF77-Funksignals die automatische
Uhrzeit- und Datumseinstellung vornimmt. Wenn die Wetterstation
dieses Funksignal empfängt, wird eine manuell vorgenommene Ein-
stellung des Datums und der Uhrzeit gelöscht und mit den empfan-
genen Funkdaten überschrieben.
Das Blinken des Antennensymbols zeigt an, dass das DCF77-Funk-
signal empfangen und ausgewertet wird. Die genaue Einstellung
kann in Abhängigkeit der Empfangsstärke einige Minuten dauern.
Wenn die Uhrzeit und das Datum richtig eingestellt sind, hört das
Blinken des Antennensymbols auf.
EinstellungenSetup
75 76
Um guten Empfang dieses Funksignals zu gewährleisten, stellen
Sie die Wetterstation nicht neben große Metallgegenstände oder
elektrische Geräte wie Fernsehgeräte, Computer, Monitore oder
ähnliches. HINWEIS: Wird die Wetterstation in Betrieb genommen,
fängt diese nach 7 Minuten an, das DCF Signal zu suchen (die ersten
6 Minuten werden für das Empfangen/ Verarbeiten der Wetterdaten
benötigt). 10 Minuten lang wird das Signal gesucht. Ist die Synchro-
nisation nicht erfolgreich, wird alle 2 Stunden erneut versucht, ein
Signal zu empfangen. Verändern Sie ggf. die Position der Station (z.B.
ans Fenster), falls diese Schwierigkeiten mit dem Empfang hat.
Um den Empfang des Funksignals manuell zu starten, drücken Sie
Search (7) und - (1) für etwa 3 Sekunden, bis ein Piepton ertönt und
das Antennenzeichen zu blinken beginnt.
Manuelle Zeiteinstellung Clock 1 / Datum / Zeitzone
HINWEIS: Die Taste Max/Min (5) kann zum schnellen Vorwärtszählen
gedrückt gehalten werden. Drücken Sie - (1), um zwischen einer
12- oder 24-Stunden Anzeige zu wählen. Die 12-Stunden Anzeige wird
in der zweiten Tageshälfte mit PM gekennzeichnet.
Halten Sie Mode (4) für 3 Sekunden gedrückt, um in den manuellen
Zeiteinstellmodus zu gelangen.
•DieAnzeigeCLOCK 1 erscheint und die Anzeige der Stunden fängt
an zu blinken.
– Drücken Sie + (2) bzw. - (1), um die Stunden einzustellen.
– Drücken Sie Select (6), um in die Minuteneinstellung zu gelangen.
– Drücken Sie + (2) bzw. - (1), um die Minuten einzustellen.
•MitderTasteSnooze/Light (3) können Sie die Sekunden auf 00 setzen.
– Drücken Sie Select (6), um in die Tag“-Einstellung zu gelangen.
– Drücken Sie + (2) bzw. - (1), um den Tag einzustellen.
•Die Angabe desWochentageswird automatisch nach derAngabe
des Datums eingestellt.
Einstellungen
– Drücken Sie Select (6), um in die „Monat“-Einstellung zu gelangen.
– Drücken Sie + (2) bzw. - (1), um den Monat einzustellen.
– Drücken Sie Select (6), um in die „Jahr“-Einstellung zu gelangen.
– Drücken Sie + (2) bzw. - (1), um das Jahr einzustellen.
– Drücken Sie Select (6), um in die Zeitzone einzugeben.
– Drücken Sie + (2) bzw. - (1), um die Zeitzone einzustellen.
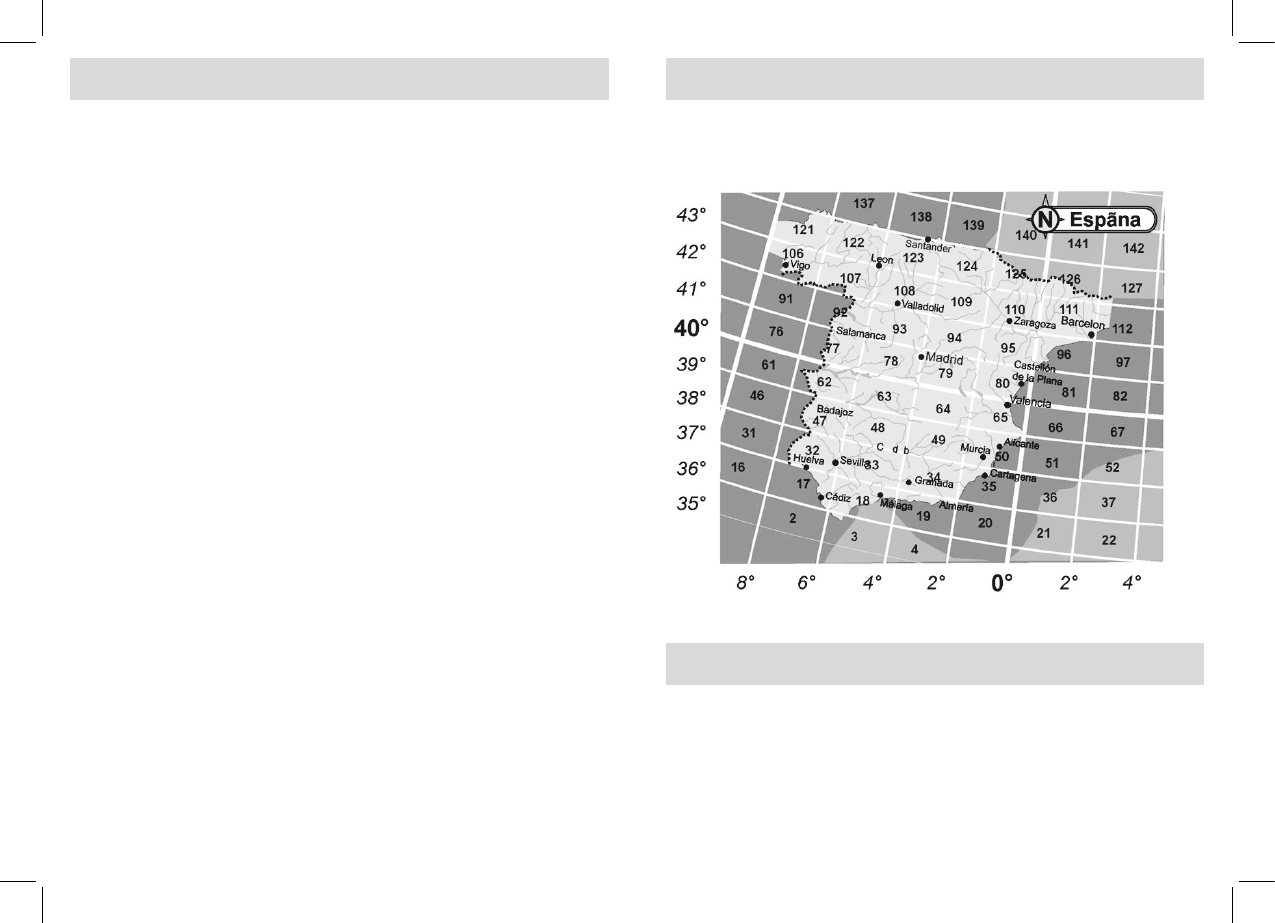
•Entnehmen Sie den für Ihren Wohnort gültigen Zonencode der
Tabelle auf Seite 28. Nach Eingabe des Zonencodes kann die Aktua-
lisierung der Anzeige bis zu einer Minute dauern!
Die Einstellung wird beendet, indem Sie Mode (4) so oft drücken,
bis keine der Ziffernanzeigen mehr blinkt oder für eine Minute keine
Taste betätigt wird.
Einstellung der Sommer- /Winterzeit
Halten Sie Mode (4) für 3 Sekunden gedrückt, um in den manuellen
Zeiteinstellmodus zu gelangen.
Drücken Sie Select (6) wiederholt, bis Sie zur Eingabe des Zonen-
codes gelangen.
Drücken Sie die Taste Snooze/Light (3), um zwischen der Sommer-
und Winterzeit umzustellen.
•Die Sommerzeit wird mit DST gekennzeichnet (Daylight Saving
Time, engl. für Sommerzeit).
Die Einstellung wird beendet, indem Sie Mode (4) so oft drücken,
bis keine der Ziffernanzeigen mehr blinkt oder für eine Minute keine
Taste betätigt wird.
Achtung: Nehmen Sie diese manuelle Einstellung nicht zwischen
23:00 und 01:00 Uhr vor, da das Datum nicht umgestellt wird.
Einstellungen
77 78
Korrektur der Höhe und Wahl der Anzeige (hPa)
HINWEIS: Wird die Höhenlage (z.B. von der ersten in die zweite Etage
gebracht) der Wetterstation verändert, kann eine Korrektur der Höhe
manuell vorgenommen werden. Der im automatischen Setup ermit-
telte Luftdruck würde andernfalls nicht mehr korrekt angezeigt.
Halten Sie Mode (4) für 3 Sekunden gedrückt, um in den manuellen
Zeiteinstellmodus zu gelangen.
– Drücken Sie Mode (4) erneut.
Drücken Sie + (2), um einen Höhenunterschied nach oben auszuglei-
chen.
•MitjedemDruckaufdieTastewirddieHöheum10merhöht.
Drücken Sie - (1), um einen Höhenunterschied nach unten auszuglei-
chen.
•MitjedemDruckaufdieTastewirddieHöheum10mverringert.
Die Einstellung wird beendet, indem Sie Mode (4) so oft drücken,
bis keine der Ziffernanzeigen mehr blinkt oder für eine Minute keine
Taste betätigt wird.
Einstellung des Alarms für die Innentemperatur (INDOOR)
Halten Sie Mode (4) für 3 Sekunden gedrückt, um in den manuellen
Zeiteinstellmodus zu gelangen.
– Drücken Sie Mode (4) erneut 2 Mal.
•DasAnzeigefeldderInnentemperaturzeigtblinkenddenzuvorein-
gestellten Temperatur-Alarmwert an.
Benutzen Sie die Tasten + (2) bzw. - (1), um die Alarm-Temperatur
einzustellen.
Wählen Sie mit der Taste Snooze/Light (3), ob der Alarm beim Über-
schreiten (Symbol
) oder beim Unterschreiten (Symbol ) ausge-
löst werden soll, oder ob er deaktiviert werden soll (kein Symbol).
Einstellungen
Die Einstellung wird beendet, indem Sie Mode (4) so oft drücken,
bis keine der Ziffernanzeigen mehr blinkt oder für eine Minute keine
Taste betätigt wird.
Einstellung des Alarms für die Außentemperatur (1 OUTDOOR)
Halten Sie Mode (4) für 3 Sekunden gedrückt, um in den manuellen
Zeiteinstellmodus zu gelangen.
– Drücken Sie Mode (4) erneut 4 Mal.
•Das Anzeigefeld der Außentemperatur zeigt blinkend den zuvor
eingestellten Temperatur-Alarmwert an.
Die Einstellung erfolgt wie unter „Einstellung des Alarms für die
Innentemperatur (INDOOR)“ beschrieben.
Einstellung des Alarms für die Außentemperatur
(2-4 OUTDOOR)
Halten Sie Mode (4) für 3 Sekunden gedrückt, um in den manuellen
Zeiteinstellmodus zu gelangen.
– Drücken Sie Mode (4) erneut 4 Mal.
Wählen Sie mit der Taste Alarm/Channel (8) den gewünschten Sen-
der (2-4) aus.
Die Einstellung erfolgt wie unter „Einstellung des Alarms für die
Innentemperatur (INDOOR)“.
Temperatur-Alarm beenden
Drücken Sie eine der Tasten an der Wetterstation, um den Alarm zu
beenden.
•WirdkeineTastegedrückt,schaltetsichderAlarmnacheinerMinute
selbst aus und ertönt nach 5 Minuten erneut.
HINWEIS: Der Zeit-Alarm und der Temperatur-Alarm unterscheiden
sich deutlich im Klang.
Einstellungen
79 80
Einstellung der CLOCK 2
– Drücken Sie Mode (4).
•DieAnzeigeCLOCK 2 erscheint.
– Drücken Sie + (2) bzw. - (1), um die Stunden einzustellen.
•Die Einstellung der Minuten kann nicht vorgenommen werden. Die
Angabe der Minuten und Sekunden entspricht der Angabe aus CLOCK 1.
Einstellung des Zeit-Alarms
HINWEIS: Es stehen Ihnen 2 Zeit-Alarme zur Verfügung. Sie können
den Alarm einstellen für: täglich, täglich von Montag bis Freitag, täglich
von Montag bis Samstag, Samstag und Sonntag oder wöchentlich.
– Drücken Sie Mode (4), bis
bzw. erscheint.
•EswirddiezuvoreingestellteZeitangezeigt.
– Drücken Sie + (2), um die Stunden einzustellen.
– Drücken Sie - (1), um die Minuten einzustellen.
Wählen Sie mit Select (6) die Tage aus, an denen der Alarm ausgelöst
werden soll.
Aktivieren bzw. deaktivieren Sie den Alarm im Einstellmodus
bzw.
mit Alarm/ Channel (8).
•Die Anzeige wechselt zwischen on und keine Anzeige. Ist der
Alarm aktiv (on), wird das entsprechende Symbol
bzw. (und)
während der CLOCK 1 angezeigt.
Zur aktuellen Uhrzeitanzeige kommen Sie zurück, indem Sie Mode
(4) so oft drücken, bis CLOCK 1 erscheint oder für eine Minute keine
Taste betätigt wird.
Zeit-Alarm beenden
Drücken Sie die Taste Snooze/Light (3), um den Alarm für 8 Minuten
zu unterbrechen.
Drücken Sie eine der Tasten an der Wetterstation, um den Alarm zu
beenden.
Einstellungen
•WirdkeineTastegedrückt,schaltetsichderAlarmnacheinerMinute
selbst aus.
Anzeigen
Anzeige der Temperatur und der Luftfeuchtigkeit
– Drücken Sie + (2), um zwischen den Anzeige-Einheiten zu wechseln:
°C <-> °F
Drücken Sie Alarm/Channel (8), um zwischen den Sendern zu wech-
seln: 1 - 2 - 3 - 4
Drücken Sie Max/Min (5), um zwischen den Werten zu wechseln:
MIN - MAX - Aktuell (keine Zusatzanzeige) für die Temperatur und
Luftfeuchtigkeit.
HINWEIS: Die MIN und MAX Werte werden automatisch um 00:00 Uhr
gelöscht.
Liegen die Temperatur- bzw. Luftfeuchtigkeitswerte außerhalb des
Messbereiches, so zeigt das Display „HI (überschritten) bzw LO (unter-
schritten)“ an.
Einstellungen
81 82
Trendanzeige
Anhand der Temperatur- bzw. Luftfeuchtigkeits-Messergebnisse der
letzten halben Stunde, wird ein Trend berechnet und angezeigt:
Wettervorhersage
Diese hochmoderne elektronische Wetterstation ist in der Lage, Luf-
druckveränderungen zu erkennen und mit Hilfe gesammelter Daten
der letzten Stunden Wettervorhersagen für die nächsten 12 bis 24
Stunden zu treffen. Die Vorhersage bezieht sich auf das Gebiet um die
Wetterstation mit einen Radius von etwa 30 – 50 km.
Frostwarnung: Das Blinken der Schneeflocken wird zwischen +2,9°C
und -1,9°C aktiviert (nur über Kanal 1). Fällt die Temperatur unter
-1,9°C, werden die Schneeflocken dauernd angezeigt.
Anzeigen
Anmerkungen zur Wettervorhersage:
• Nur die Daten von Kanal 1 werden zur Schnee- und Frostwarnung
ausgewertet. Wenn Sie Kanal 1 nicht belegen, erfolgt keine Schnee-
und Frostwarnung.
• Nachdem die Wetterstation und wenigstens ein Sender installiert
wurden, können die Angaben zur Wettervorhersage etwa 12 Stunden
noch nicht genutzt werden, da die Wetterstation diese Zeit benötigt,
um sich an die örtlichen Gegebenheiten anzupassen.
• AllenWettervorhersagenistgemeinsam,dasseineGenauigkeitnicht
garantiert werden kann. Die Genauigkeit der Wettervorhersage liegt
bei etwa 75% in Abhängigkeit der lokalen Gegebenheiten, für die die
Wetterstation konzipiert wurde.
• WenndieWetterstationaneinenhöhenmäßiganderenOrtgebracht
wird (z.B. auch vom Erdgeschoß in das erste Obergeschoß eines
Gebäudes oder umgekehrt) führen Sie eine Höhenkorrektur durch.
Siehe hierzu Korrektur der Höhe und Wahl der Anzeige (hPa)“.
Anzeigen
83 84
Mondphasen
Die Mondphasen werden automatisch mit dem Datum aktualisiert.
Animierte Temperatur- und Luftdruckhistorie
Die animierten Balkensymbole zeigen Ihnen grafisch die Veränderungen
der Temperaturen bzw. des Luftdruckes der vergangenen 12 Stunden
an.
Wählen Sie mit Select (6) zwischen Innentemperatur (INNEN TEMPE-
RATUR), Außentemperatur (1-4 TEMPERATUR) und Luftdruck (LUFT-
DRUCK).
•HabenSiedieAnzeigeaufAußentemperatureingestellt,könnenSie
die einzelnen Sender mit Alarm/Channel (8) aufrufen.
Anzeigen
HINWEIS: Die Anzeige erfolgt in Abhängigkeit von der Vorwahl der
Einheiten.
Sonnenaufgang, Sonnenscheindauer und Sonnenuntergang
Mit dieser Wetterstation können Sie die Sonnenaufgangs- und Sonnen-
untergangszeiten für Ihren Wohnort anzeigen lassen.
HINWEIS: Der Smiley „
wird angezeigt, sobald die Tage länger wer-
den und wird ausgeblendet, sobald die Tage kürzer werden. Diese „Stich-
tage“ können in den kommenden Jahren ggf. um +/- 1 Tag abweichen.
Hintergrundbeleuchtung
Drücken Sie Snooze/Light (3), um die Hintergrundbeleuchtung des
Displays einzuschalten.
•Die Beleuchtung erlischt automatisch nach ca. 8 Sekunden.Wenn
Sie innerhalb dieser Zeit eine Taste betätigen, verlängert sich die
Dauer der Beleuchtung um weitere 8 Sekunden.
Anzeigen
85 86
Kontrasteinstellung des Displays
– Drücken Sie Mode (4).
•DieAnzeigeCLOCK 2 erscheint.
– Drücken Sie Select (6), um den Kontrast des Displays zu verändern.
•DieEinstellungkannin4Stufenvorgenommenwerden.
Die Einstellung wird beendet, indem Sie Mode (4) so oft drücken, bis
CLOCK 1 erscheint.
Reinigung und Pflege
Ihre Wetterstation kann mit einem weichen Tuch gereinigt werden. Das
Tuch kann leicht angefeuchtet werden und mit einem Tropfen Geschirr-
spüler versehen werden.
ACHTUNG: Benutzen Sie keinesfalls scharfe Reinigungsmittel, wie
z.B. Scheuermilch, Scheuerpulver oder lösungsmittelenthaltende
Flüssigkeiten.
Leichte Kratzer können mit Polierpaste entfernt werden. Display-Polier-
paste bekommen Sie in Bau-Märkten oder Handy-Shops.
Anzeigen
Problem
Das DCF77-Signal für die Uhrzeit
kann nicht empfangen werden.
Die Temperaturanzeige auf dem
Sender stimmt nicht mit der
Anzeige auf dem Empfänger
überein.
Die Temperaturangabe des
Senders erscheint zu hoch.
Die Wetterstation empfängt
keine Signale des Senders oder
blinkt.
Fehlersuche
Lösung
Stellen Sie die Wetterstation nicht
in der Nähe von elektrischen
Geräten auf. Starten Sie den
Funkempfang manuell (siehe
Seite 75).
Vergewissern Sie sich, dass das
Signal des Senders empfangen
wird. Synchronisieren Sie die
Funkverbindung manuell, indem
Sie die Taste Search (7) 3 Sekun-
den drücken. In der Nachbar-
schaft wird die gleiche Frequenz
benutzt − wechseln Sie den
Hauscode (Seite 72).
Überprüfen Sie, ob der Sender
direkter Sonnenstrahlung
ausgesetzt ist.
Wiederholen Sie den manuellen
Lernprozess (siehe Seite 73-74).
Die Außentemperatur darf nicht
unter -30°C sein. Stellen Sie sicher,
dass sich keine elektrischen Stör-
quellen in der Nähe des Senders
oder der Wetterstation befinden.
Überprüfen Sie die Batterien im
Sender. Bewegen Sie die Wetter-
station näher zum Sender oder
umgekehrt.
87 88
Problem
Keine Wettervorhersage
Die Sonnenaufgangs/ -unter-
gangszeit ist nicht korrekt.
Die Anzeige ist unleserlich oder
die Funktion unklar
Fehlersuche
Lösung
Prüfen Sie, ob der maßgebliche
Sender auf Kanal 1 eingestellt ist.
Seit Inbetriebnahme der Wetter-
station oder Batteriewechsel sind
weniger als 12 Stunden vergangen.
Der Zonencode ist falsch einge-
stellt. Sie finden Ihren Standort
in der Zonenkarte (Seite 88) Die
Sommerzeit wurde nicht ein bzw.
ausgeschaltet (siehe Seite 76).
Entnehmen Sie die Batterien aus
der Wetterstation und legen Sie
sie erneut ein. Erhöhen Sie die
Kontrasteinstellung des Displays
(Seite 85).
Ihrem Wohnort sind auf der Karte Zonencodes zugewiesen. Benutzen
Sie diesen Zonencode als Eingabe, wie auf Seite 76 beschrieben.
Konformitätserklärung
Wir erklären, dass sich dieses Produkt in Übereinstimmung mit den
grundlegenden Anforderungen und den anderen relevanten Vor-
schriften der Richtlinie 1999/5/EG befindet.
Die vollständige Konformitätserklärung finden Sie im Internet unter
www.gt-support.de.
Zonenkarte
89 90
Receiver GT-WS-03s, GT-WS-03w
Batteries 3 x 1,5V / LR6 / R6 / AA / UM3
Measurement range of temperature - 20°C bis +55°C
Measurement precision max. +/- 1°C within a
measurement range of 0 to 40°C
Resolution 0.1°C
Measurement range of humidity 25% to 90%
Measurement precision +/- 5%
Resolution 1%
Transmitter WT470
Batteries 2 x 1,5V / Type LR6 / R6 / AA /UM3
Measurement range of temperature - 30°C bis +70°C
Measurement range of humidity 25% to 90%
relative humidity
Transmission frequency
Range 868 MHz
max. 100 metres
(in open terrain)
SCOPE OF DELIVERY
• 1receiverGT-WS-03s,GT-WS-03w
• 1transmitterWT470
• 5batteriesR6, 1,5V
• 1bagwithmountingmaterial(plugs,screws)
• 1operatinginstruction
Technical data
Dear Customer,
First of all, we congratulate you on the purchase of this state-of-the-art
electronic weather station and transmitter. With this, you have acquired
a technically highly developed electronic product, which you will
enjoy for many years and obtain very precise information about what
is happening with the weather. In order to understand its simple ope-
ration, please read the operating instructions carefully and keep it in a
safe place, in order to have it quickly available if questions should arise
regarding operation.
If you should pass this product on to another user, please also provide
these operating instructions.
CAUTION – IMPORTANT INFORMATION
After unpacking, first insert the batteries into the transmitter and only
then into the station. For this, please note the information on P. 97 (Ini-
tial operation). Why: During the first two minutes, the station searches
for data and updates itself. Therefore, the transmitter should be in ope-
ration when the station requests the data.
DCF time synchronisation: If the station is in operation, it will begin
to search for the DCF signal after 3 minutes. The signal will be sought
for a period of 10 minutes. If the synchronisation should not be suc-
cessful, an attempt will be made every 2 minutes to receive the signal.
If necessary, change the position of the station (e.g. to the window), if it
should have reception difficulties.
You can also activate the search function manually, pressing (3 seconds)
the buttons (1) and (7).
Introduction
91 92
Once your weather station has received the time, it will be updated
every 24 hours at 4:03 a.m. When changing to summer time/winter
time, the updating will therefore take place at 4:03 a.m. If the station
has difficulties with updating, move its position (e.g. to the window).
You can also activate the search function manually, by pressing
(3 seconds) the buttons (1) and (7).
After initialising the station, an update will take place between the sta-
tion and the transmitter every minute. The air pressure is updated every
16 minutes.
THE RANGE OF THE TRANSMITTER CAN BE SIGNIFICANTLY HIN-
DERED BY OBSTACLES.
PROTECT THE TRANSMITTER FROM DIRECT SUNLIGHT.
THE WEATHER FORECAST IS READY FOR OPERATION 12 HOURS
AFTER INSERTING THE BATTERIES.
Introduction
Battery information
The weather station is equipped with 3 batteries and the transmitter
with 2 batteries of the type R6/AA/UM3 (these batteries are included in
the scope of delivery).
Keep batteries away from children.
After swallowing a battery, the affected person must immediately seek
medical assistance.
Clean the battery and device contacts prior to inserting, if necessary.
No attempt must be made to reactivate used batteries with heat or by
other means. Never recharge batteries! Explosion hazard!
Batteries must not be short circuited, thrown into fire or dismantled.
Contact with skin, eyes and mucus membranes must be avoided. Upon
contact with battery acid, rinse the affected areas immediately with
plenty of clear water and immediately consult a doctor.
Depleted batteries must be immediately removed from the device.
Increased leaking hazard!
All batteries in a device are to be changed at the same time. Do not
use new batteries together with used batteries. Do not use batteries of
different electrochemical systems, types and brands together. If disre-
garded, batteries could be discharged beyond their maximum charge
voltage, which causes a high risk of leakage. Remove batteries from the
device, if disused for a longer period of time.
Safety information
93 94
Environmental protection
Batteries are not permitted to be added to household waste!
Every consumer is legally obligated to submit all batteries and rechar-
geable batteries, regardless of whether they contain harmful sub-
stances, to a local municipal/district collection centre or to a retailer, so
that they can be disposed of in an environmentally friendly manner.
Please only dispose of batteries and rechargeable batteries in a dischar-
ged condition!
If the device should no longer be usable, submit it to a collec-
tion centre for electrical and electronics waste. Do not put it into
household waste.
Also dispose of packaging materials in a proper and environ-
mentally friendly manner.
These are raw materials and can be recycled.
Weather station
– Precise time through reception of the DCF-77 radio signal
– 12-hour or 24-hour display for two time zones
– Date and day-of-the-week display
– Inside temperature display in °C/°F
Outside temperature display in °C/°F with up to four transmitters at
different measurement points
– Inside and outside humidity
– Minimum/maximum display for the temperature and humidity
– Weather trend display
– Temperature trend display
– Current and past air pressure trend display
Temperature alarm for the inside temperature and the temperature
transmitted from one and up to four transmitters
– Symbols for the weather forecast
– 12 moon phase displays
– Time display for sunrise and sunset
– Daylight duration display
– Display indicator
– Battery control display
Transmitter
– Temperature display in °C/°F
– Humidity display
– Battery control display
- Range up to 100 metres
Information and LCD displaysSafety information
95 96
Description of parts and overview
Initial operation
Explanation of the buttons
1. -: for manual setting of the clock, the alarm, the date and the year,
as well as the minimum temperature alarm value. Change of dis-
play between 12-hour and 24-hour display.
2. +: for manual setting of the clock, the alarm, the date and the year,
as well as maximum temperature alarm value. Change of display
between °F and °C.
3. Snooze/Light: with this button, you stop the alarm and switch on
the display illumination for approx. 8 seconds.
4. Mode: with this knob, you select the different displays for time 1 + 2,
alarm 1 + 2, date, year and temperature alarm (min/max).
5. Max/Min: displays the MAX and MIN values.
Description of parts and overview
Battery display transmitter
6
5
3
8
4
2 71
Battery display weather station
Time (hh:mm:ss);
Year (yyyy);
Zone code
Alarm (1 & 2
Time (1 & 2)
Day of the week
Day/month (dd/mm)
Sundown (pm, hh:mm)
Sunrise (am, hh:mm)
On the reverse:
Battery compartment,
stand support and holder
for wall mounting
Daylight duration (hh:mm)
Weather forecast symbols
Moon phases
animated bar chart
(Air pressure/
Inside temperature/
Outside temperature)
Unit (hPA);
Height setting (m)
Outside transmitter
channel (1,2,3,4)
Outside temperature (C/F)
Outside humidity (%)
Outside temperature trend/
Outside humidity trend
Inside temperature (C/F)
Inside humidity (%)
Inside temperature trend/
Inside humidity trend
Channel number
(1-4)
Temperature/
Humidity
LED display
Stand support
and holder for
wall mounting
Battery
compartment
MAX/MIN
SELECT
SNOOZE/LIGHT
MODE
ALARM/CHANNEL
OUT
1
CLOCK 1
FORECAST
MOONPHASE
ALTITUDE
PRESSURE
HOUR
INDOOR
OUTDOOR
DAY
MONTH
9
10
97 98
6. Select: for setting the clock, the alarm, the date and the year, as
well as the temperature alarm value, contrast setting of the display.
Change the display for the animated temperature and air pressure
history.
7. Search: Activation of the search processes.
8. Alarm/Channel: with this, you can switch alarm 1+ 2 on/off, switch
between the transmitters (1-4), select the temperature alarm value,
page through the animated bar chart (air pressure/inside tempera-
ture/outside temperature).
Buttons 9 and 10 are found in the battery compartment of the
transmitter.
9. SET: with this you reach the setting mode and confirm the values
that you have set.
10. C/F: with this, you change the channels and the house code (duri-
ng setting) and select between display in Celsius or Fahrenheit.
Inserting the batteries
Caution: Please insert the battery into the transmitter first (also
see Page 90)!
With the transmitter, the holding frame must first be removed,
before the battery compartment becomes accessible. For this,
bend the holding frame open slightly on the transmitter and pull
off. Then, open the battery compartment with a small crosshead
screwdriver.
The battery compartment of the weather station is found at the
top, on the reverse. Press the locking clip slightly on the grip recess
and swing the battery cover out.
After inserting the batteries, close the battery compartments again.
1. Open the battery compartment on the weather station and on the
transmitter. For opening this compartment, you require a small
crosshead screwdriver.
Initial operation
Please note the +/- polarities shown in the battery compart-
ment when inserting the batteries.
2. Insert 2 type LR6/ R6/AA/UM3 batteries into the battery compart-
ment of the transmitter and 3 into the battery compartment of the
weather station. These batteries are included with your device.
The batteries for the weather station must be inserted in the fol-
lowing order:
First insert two batteries on the left and right in the compartment
and then insert the third battery in the middle.
NOTE: Do not use rechargeable batteries for this device. The
rechargeable battery voltage is lower than that of regular batteries
and may not be sufficient for ensuring reception. Only use brand-
name alkaline batteries.
Battery change display
A battery symbol on the display of the weather station indicates that a
battery change is necessary. A battery symbol also appears on the LCD
display of the transmitter when a battery needs to be changed. You will
also see the battery symbol on the display if the data of the correspon-
ding transmitter is being shown.
If one of these battery symbols should constantly flash, the respective
batteries will need to be replaced.
General information regarding setup
The weather station exchanges data with the transmitter on a radio
frequency (868 MHz). Televisions, computers, fluorescent tubes and
other electrical installations can impair reception. The reception can
also be disrupted by steel doors or window frames, as well as particu-
larly thick brickwork. Particularly low temperatures in the winter (below
0°C) can result in a voltage reduction of the batteries in the transmitter
and therefore lead to a reduced transmission range.
Initial operation
99 100
Place the transmitter as high as possible in a radius of max. 100 m and
change the position, if necessary. Do not expose the transmitter to
direct sunlight or rain.
Wall mounting
For fixed installation of the device, skill use of tools is required. If neces-
sary, refer to an electrical engineer if you should not have any tools or
are not experienced in working with tools!
With fixed installation of the weather station in the house, ensure that
not electrical cables, gas or water pipes are laid beneath the plaster at
the installation site. When drilling the holes, there is a risk of electric
shock or damage to the pipes.
Wall mounting of the weather station
The screws must be inserted horizontally, at a distance of 150 mm.
Turn the screws provided, so that the screw heads still protrude by
approx. 6 mm.
The weather station can only be fastened on the wall with the ears on
the back.
Wall mounting of the transmitter
The transmitter is fastened to the wall with the aid of a holder. Turn
the screws provided, so that the screw heads still protrude by approx.
5 mm. The transmitter can only be fastened on the wall with the ears
on the back.
Setting the transmitter
• PressSET (9) with the battery cover open, in order to start the trans-
mitter.
• Thehousecode willflashfor10seconds.During this time,you can
select a house code (01-15) by pressing the C/F button (10).
Initial operation
• PressSET (9), in order to confirm your entry.
All transmitters must be set to the same house code.
• After this,the channel displaywillflashonthe leftedgeofthe dis-
play for approx. 10 seconds. During this time, you can select a chan-
nel (1-4) by pressing the C/F button (10).
• PressSET (9), in order to confirm your entry.
Each transmitter must be set to a different channel.
• Change to a different house code, if your weather station should
receive signals from neighbouring transmitters, which also transmit
in the 868 MHz range. The factory settings are for the house code =
01 and for the channel = 01.
Close the battery cover carefully, so that moisture cannot enter.
Initial operation
101 102
Automatic learning function
The automatics learning function starts automatically when the bat-
teries are inserted into the weather station for the first time and takes
approx. 3 minutes.
During these three minutes, the weather station initialises itself,
sequentially receiving the values of the temperature and humidity
from the transmitters.
Only the values of the received transmitters are displayed. Set the
transmitter up near the weather station until the automatic learning
function has been completed. If the data has not been correctly trans-
mitted, the display for temperature and humidity will show “– –“. In
this case, start the learning function manually or briefly remove the
batteries from the transmitter.
Manual learning function
You can also start this learning function manually, e.g. if you have
installed an additional transmitter or if the radio link between the
transmitter and the weather station has been interrupted. You can
identify the latter, if the values of the respective channel (transmitter)
are flashing.
Setup
– Press the Search (7) button for at least 3 seconds.
A beeping tone will sound and indicate that the learning mode is
started for approx. 3 minutes.
The symbol for the channel/channels begins to flash and a beeping
tone sounds each time a transmitter has been recognised.
The temperature and humidity values of the received transmitters
are alternately displayed.
The automatic or manual learning function cannot be started as long
as the antenna symbol is flashing, i.e. the time and date are being syn-
chronised.
Setting the radio-controlled clock
A radio-controlled clock is integrated into the GT-WS-03s, GT-WS-03w
weather station, which carries out an automatic time and date set-
ting in a vicinity of 1,500 km around Frankfurt /Main, with the assi-
stance of a DCF77 radio signal transmitted from there. When the
weather station receives this signal, a manual setting of the date and
time is deleted and overwritten with the received radio-transmitted
data.
The flashing of the antenna symbol indicates that the DCF77 radio
signal is being received and evaluated. The precise setting can take
several minutes, depending on the strength of reception. If the time
and date are set correctly, the antenna symbol will stop flashing.
Settings
Strong signal being
received and
evaluated
Weak or no signal
No display
No reception
Medium Signal being
received
and evaluated
Signal being received
103 104
In order to ensure good reception of the radio signal, do not place
the weather station next to large metal objects or electrical devices,
such as televisions, computers, monitors or similar. NOTE: If the wea-
ther station is put into operation, it will start to seek the DCF signal
after 7 minutes (the first 6 minutes are required for reception/pro-
cessing of the weather data). The signal is sought for 10 minutes. If
the synchronisation is not successful, a new attempt will be made to
receive a signal every 2 minutes. If necessary, change the position of
the station (e.g. to the window), if it has difficulties with reception.
In order to start reception of the radio signal manually, press Search
(7) and - (1) for approx. 3 seconds, until a beeping tone sounds and
the antenna symbol starts to flash.
Manual time setting CLOCK 1 / Date / Time zone
NOTE: The Max/Min button (5) can be used for fast forward counting.
Press - (1), in order to select between a 12-hour or 24-hour display. The
12-hour display is identified with PM during the second half of the day.
Hold Mode (4) pressed for 3 seconds, in order to reach the manual
time-setting mode.
•ThedisplayCLOCK 1 appears and the hour display begins to flash.
– Press + (2) / - (1), for setting the hours.
– Press Select (6), to reach the minutes setting.
– Press + (2) / - (1), to set the minutes.
•WiththeSnooze/Light button (3), you can set the seconds to 00.
– Press Select (6), in order to reach the day” setting.
– Press + (2) / - (1), to set the day.
•Theindicationofthedayoftheweekisautomaticallysetafterentry
of the date.
Settings
– Press Select (6), to reach the month setting.
– Press + (2) / - (1), to set the month.
– Press Select (6), to reach the “year” setting.
– Press + (2) / - (1), to set the year.
– Press Select (6), to enter the time zone.
– Press + (2) / - (1), to set the time zone.
•Find the zone code applicable to your place of residence in the
table on Page 83 After entering the zone code, the updating of the
display can take up to one minute!
The setting is ended by pressing Mode (4) repeatedly, until none of
the number displays are flashing anymore or no button is used for
one minute.
Setting the summer/winter time
Keep Mode (4) pressed for 3 seconds, in order to reach the manual
time-setting mode.
Press Select (6) repeatedly, until you reach the entry of the zone
code.
Press the Snooze/Light button (3), in order to switch between sum-
mer and winter time.
•SummertimeisidentifiedwithDST(DaylightSavingTime).
The setting is ended by pressed Mode (4) repeatedly until none of
the number displays are flashing anymore or no button is used for
one minute.
Caution: Do not carry out this manual setting between 11:00 p.m.
and 1:00 a.m., as the date will not be changed.
Settings
105 106
Correcting the height level and choice of display (hPa)
NOTE: If the height position of the weather station is changed (e.g.
moved from the first floor to the second floor), a manual correction can
be carried out. The air pressure determined in the automatic setup will
otherwise no longer be displayed correctly.
Keep Mode (4) pressed for 3 seconds, in order to reach the manual
time-setting mode.
– Press Mode (4) again.
Press + (2), in order to compensate a height difference upward.
•Witheachpushofthebutton,theheightisincreasedby10m.
– Press - (1), in order to compensate a height difference downward.
•Witheachpushofthebutton,theheightisdecreasedby10m.
The setting is ended by pressing Mode (4) repeatedly until none of
the number displays are flashing anymore or no button is used for one
minute.
Setting the alarm for the inside temperature (INDOOR)
Keep Mode (4) pressed for 3 seconds, in order to reach the manual
time-setting mode.
– Press Mode (4) again twice.
•Thedisplayfield fortheinside temperatureflashes withtheprevi-
ously set temperature alarm value.
– Use the + (2) / - (1) buttons, in order to set the alarm temperature.
Use the Snooze/Light (3) button, in order to choose whether the
alarm will be activated when exceeding (symbol
) or falling below
(symbol
), or whether it should be deactivated (no symbol).
The setting is ended by pressing Mode (4) repeatedly until none of
the number displays are flashing anymore or no button is used for
one minute.
Settings
Setting the alarm for the outside temperature (1 OUTDOOR)
Keep Mode (4) pressed for 3 seconds, in order to reach the manual
time-setting mode.
– Press Mode (4) again 4 times.
•Thedisplayfieldfortheoutsidetemperatureflasheswiththeprevi-
ously set temperature alarm value.
The setting takes place as described under ”Setting the alarm for
the inside temperature (INSIDE)“.
Setting the alarm for the outside temperature (2-4 OUTDOOR)
Keep Mode (4) pressed for 3 seconds, in order to reach the manual
time-setting mode.
– Press Mode (4) again 4 times.
Select the required transmitter (2-4) using the Alarm/Channel (8)
button.
The setting takes place as described under ”Setting the alarm for
the inside temperature (INDOOR)“.
End temperature alarm
Press one of the buttons on the weather station to end the alarm.
•Ifno buttonis pressed,thealarmwillswitchoffbyitselfafterone
minute and sound again after 5 minutes.
NOTE: The time alarm and the temperature alarm differ significantly in
terms of their sound.
Settings
107 108
Setting the CLOCK 2
– Press Mode (4).
•ThedisplayCLOCK2appears.
– Press + (2) / - (1), in order to set the hours.
•Thesettingoftheminutescannotbecarriedout.Thespecification
of the minutes corresponds to the information from CLOCK 1.
Setting the time alarm
NOTE: 2 time alarms are available to you. You can set the alarm for:
daily, daily from Monday to Friday, daily from Monday to Saturday,
Saturday and Sunday or weekly.
– Press Mode (4), until
/ appears.
• Thepreviouslysettimeisshown.
– Press + (2), for setting the hours.
– Press - (1), for setting the minutes.
– Use Select (6) to select the days on which the alarm is to be activated.
Activate / deactivate the alarm in the setting mode
/ with
Alarm/ Channel (8).
•Thedisplayswitchesbetweenon and no display. If the alarm is active
(on), the respective symbol
/ (and) will be displayed during
time 1 (CLOCK 1).
You can return to the current time setting by pressing Mode (4)
repeatedly until CLOCK 1 appears or no button is pressed for one
minute.
End time alarm
Press Snooze/Light (3) button, in order to interrupt the alarm for
8 minutes.
Press one of the buttons on the weather station in order to end the alarm.
•Ifnobutton ispressed,thealarm willswitchoffbyitselfafterone
minute.
Settings
Measurement values
of the weather station
Measurement values
of the outside transmitter
Trend display
Transmitter
No.
Temperature
Humidity
Humidity
Temperature
or
flashing
flashing
Temperature Humidity Display
Inside > +55°C > 95% HI
Inside < -20°C < 15% LO
Outside > +70°C > 95% HI
Outside < -30°C < 15% LO
Rising Constant Falling
Sunny Cloudy Rain Snow Frost warning
Storm
warning
FORECAST FORECAST FORECAST FORECAST FORECAST FORECAST
FORECAST
Display of temperature and humidity
Press + (2), in order to switch between display units: °C <-> °F
Press Alarm/Channel (8), in order to switch between the transmit-
ters: 1 - 2 - 3 - 4
Press Max/Min (5), in order to switch between the values: MIN - MAX
- current (no additional display) for the temperature and humidity.
NOTE: The MIN and MAX values are automatically deleted at 12:00
a.m.
If the temperature/humidity values should lie outside of the measure-
ment reange, the display will show HI (exceeded) / LO (below)“.
Displays
Measurement values
of the weather station
Measurement values
of the outside transmitter
Trend display
Transmitter
No.
Temperature
Humidity
Humidity
Temperature
or
flashing
flashing
Temperature Humidity Display
Inside > +55°C > 95% HI
Inside < -20°C < 15% LO
Outside > +70°C > 95% HI
Outside < -30°C < 15% LO
Rising Constant Falling
Sunny Cloudy Rain Snow Frost warning
Storm
warning
FORECAST FORECAST FORECAST FORECAST FORECAST FORECAST
FORECAST
109 110
Trend display
Based on the temperature/humidity measurement results of the last
half hour, a trend is calculated and displayed:
Weather forecast
This state-of-the-art electronic weather station is capable of recogni-
sing air pressure changes and make weather forecasts for the next 12
to 24 hours on the basis of data gathered during the last hours. The
forecast relates to the area around the weather station, with a radius of
approx. 30 – 50 km.
Frost warning: The flashing of the snowflakes is activated between
+2.9°C and -1.9°C (only via channel 1). If the temperature falls below
-1.9°C, the snowflakes are permanently displayed.
Displays
Measurement values
of the weather station
Measurement values
of the outside transmitter
Trend display
Transmitter
No.
Temperature
Humidity
Humidity
Temperature
or
flashing
flashing
Temperature Humidity Display
Inside > +55°C > 95% HI
Inside < -20°C < 15% LO
Outside > +70°C > 95% HI
Outside < -30°C < 15% LO
Rising Constant Falling
Sunny Cloudy Rain Snow Frost warning
Storm
warning
FORECAST FORECAST FORECAST FORECAST FORECAST FORECAST
FORECAST
Measurement values
of the weather station
Measurement values
of the outside transmitter
Trend display
Transmitter
No.
Temperature
Humidity
Humidity
Temperature
or
flashing
flashing
Temperature Humidity Display
Inside > +55°C > 95% HI
Inside < -20°C < 15% LO
Outside > +70°C > 95% HI
Outside < -30°C < 15% LO
Rising Constant Falling
Sunny Cloudy Rain Snow Frost warning
Storm
warning
FORECAST FORECAST FORECAST FORECAST FORECAST FORECAST
FORECAST
Comments regarding the weather forecast:
• Only the data from channel 1 is evaluatedfor snow and frost war-
ning. If you are not using channel 1, no snow and frost warning will
take place.
• After the weather station and at least one transmitter have been
installed, the information provided for the weather forecast cannont
be used yet for approx. 12 hours, as the weather station requires this
time to adapt to the local circumstances.
• All weather forecasts have in common that precision cannont be
guaranteed. The precision of the weather forecast is at approx. 75%,
depending on the local circumstances, for which the weather station
was designed.
• If the weather station is moved to a location that is at a different
height level (e.g. also from the ground floor to the first floor of a buil-
ding, or vice versa), you must carry out a height correction. For this,
please see „Correcting the height level and choice of display (hPa)”.
Displays
111 112
Moon phases
The moon phases are automatically updated with the date.
Animated temperature and air pressure history
The animated bar symbols graphically display the changes of tempera-
tures/air pressure for the past 12 hours.
Use Select (6) to choose between inside temperature (INSIDE TEM-
PERATURE), outside temperature (1-4 TEMPERATURE) and air pressure
(AIR PRESSURE).
•Ifyouhavesetthedisplaytooutsidetemperature,youcanaccessthe
individual transmitters using Alarm/Channel (8).
Displays
MOON PHASES
MOON PHASES MO ON PHASES
MOON PHASES
New moon
Waxing crescent
First quarter
Waxing half moon
Waxing Gibbous
Waxing full moon
Waning crescent
Last quarter
Waning half moon
Waning Gibbous
Waning full moon
Full moon
NOTE: The display takes place depending on the pre-selection of the
units
Sunrise, daylight duration and sundown
With this weather station, you can have the sunrise and sundown times
displayed for your place of residence.
NOTE: The happy face
“ is shown as soon as the days become longer
and is faded out as soon as the days become shorter. These “key dates”
can deviate by +/- 1 day during the coming years.
Background illumination
Press Snooze/Light (3), for switching on the background illuminati-
on for the display.
•Theilluminationwillautomaticallygooutafterapprox.8seconds.If
you push a button during this time, the duration of the illumination
will extent by a further 8 seconds.
Displays
Change of air pressure
Change of inside
temperature
Change of outside
temperature (channel 1)
Sundown
Sunrise
Daylight duration
Change of air pressure
Change of inside
temperature
Change of outside
temperature (channel 1)
Sundown
Sunrise
Daylight duration
113 114
Contrast setting of the display
– Press Mode (4).
•ThedisplayCLOCK 2 appears.
– Press Select (6), to change the contrast of the display.
•Thesettingcanbecarriedoutin4levels.
The setting is ended by pressing Mode (4) repeatedly, until CLOCK 1
appears.
Cleaning and care
Your weather station can be cleaned using a soft cloth. The cloth can
be moistened slightly and a drop of dishwashing detergent can be
applied.
CAUTION: Never use strong detergents, e.g. abrasive liquid, abrasive
powder or liquids containing solvent.
Minor scratches can be removed using polishing paste. You can obtain
display polishing paste in DIY shops or mobile phone shops.
Displays
Problem
The DCF77 signal for the time
cannot be received.
The temperature display on the
transmitter does not correspond
to the display on the receiver.
The temperature displayed on
the transmitter appears to be too
high.
The weather station is not recei-
ving any signals from the trans-
mitter or is flashing.
Troubleshooting
Solution
Do not position the weather
station near electrical devices.
Start the radio reception manually
(see Page 103).
Ensure that the transmitter’s
signal is being received. Synchro-
nise the radio link manually, by
pressing the Search (7) button for
3 seconds. If the same frequency
is being used in the neighbour-
hood, change the house code
(Page 99-100).
Check that the transmitter is not
exposed to direct sunlight.
Repeat the manual learning
process (see Page 101-102). The
outside temperature must not
be below –30°C. Ensure that no
electrical disturbance sources are
new the transmitter or the wea-
ther station. Check the batteries in
the transmitter. Move the weather
station closer to the transmitter,
or vice versa.
115 116
Problem
No weather forecast
The sunrise/sundown time is not
correct.
The display is illegible or the
function is unclear
Troubleshooting
Solution
Check whether the relevant trans-
mitter is set to channel 1. Less
than 12 hours have passed since
initial operation of the weather
station.
The zone code is set incorrectly.
For can find your location on the
zone map (Page 116). The sum-
mer time has not been switched
on/off (see Page 104).
Remove the batteries from the
weather station and re-insert
them. Increase the contrast est-
ting of the display (Page 113).
Zone codes are allocated on the map. Please use this zone code for
entry, as described on Page 104.
CONFORMITY DECLARATION
We declare that this product conforms to the basic requirements and
other relevant regulations of the Directive 1999/5/EC.
The complete conformity declaration can be found on the Internet at
www.gt-support.de.
Zone map
117 118
El producto adquirido ha sido fabricado con el mayor cuidado y bajo
un control permanente de la producción.
El período de garantía asciende a tres años y comienza con la fecha de
la adquisición.
1. Si a pesar de los procesos cuidadosos de producción y verificación se
produce un fallo del aparato, la reparación tiene que ser encargada a
especialistas.
2. Para todas las preguntas adicionales y pedidos de piezas de recam-
bio, háganos el favor de dirigirse por teléfono a nuestro centro de
servicio.
3. Prestamos garantía de acuerdo a las disposiciones legales/específi-
cas de los países (comprobación mediante factura). Quedan exclui-
dos de la garantía los daños que se producen por desgaste natural,
sobrecarga o manejo inadecuado.
En caso de una reclamación, háganos el favor de ponerse en primer
lugar en contacto con el servicio hot-line abajo indicado. Allá con
mucho gusto se le informará a Ud. acerca del procedimiento a seguir.
Por favor, ¡NO envíe su artículo espontáneamente!
Guarde el ticket de compra como comprobante.
La presente garantía no vale en el caso de daños producidos por
accidente, manejo inadecuado y/o fuerza mayor.
El derecho a la garantía caduca si personas no autorizadas han
realizado cualquier tipo de manipulación en el aparato.
Condiciones de garantía
En caso de enviar el aparato a la dirección de nuestro servicio, utilice un
embalaje adecuado. No respondemos por daños causados durante el
transporte.
En caso de garantía diríjase por favor a nuestra direccion de servicio:
WHI-Service
HOT-LINE:
00800 - 2804 2804 (gratuito)
Lunes - Viernes 9 - 17⁰⁰
Disponible en la red de Telefonica Madrid
Condiciones de garantía
119 120
O produto adquirido por si foi fabricado com o maior cuidado e
submetido a um controlo permanente durante a sua produção.
O período de garantia é de 3 anos e tem início na data de aquisição.
Se, apesar dos processos cuidados de produção e de verificação, existir
uma anomalia no aparelho, a reparação deve ser efectuada por espe-
cialistas.
No caso de qualquer pedido de informação ou de peças de substitu-
ição, indique sempre o modelo conforme a placa de indicação do
modelo do aparelho.
O serviço de garantia é prestado de acordo com as disposições legais/
específicas de cada país (comprovação mediante factura). Ficam excluí-
dos do serviço de garantia, os danos que sejam provocados por des-
gaste natural, sobrecarga ou manuseamento inadequado.
No caso de reclamação, contacte primeiro o serviço de apoio ao
cliente. Este serviço terá todo o prazer de o informar relativamente aos
procedimentos a seguir. Por favor, NÃO envie o seu artigo sem que lhe
seja requerido!
Deve guardar o talão de compra como comprovativo da mesma.
A presente garantia não se aplica no caso de danos causados por
acidente, manuseamento inadequado e/ou força maior.
O direito à garantia será anulado se pessoas não autorizadas tiverem
realizado qualquer tipo de manipulação no aparelho.
Condições de garantia
No caso de envio do aparelho ao nosso serviço, certifique-se que o
mesmo seja feito numa embalagem adequada. Não nos responsabiliza-
mos por quaisquer danos devidos ao transporte.
No caso de necessitar o nosso serviço de garantia, dirija-se por favor ao
nosso serviço de apoio ao cliente:
WHI-Service
Número verde:
00800 - 2804 2804 (gratuito)
Segunda-feira – Sexta-feira 8 - 16⁰⁰
Disponível na rede Marconi (Portugal Telecom)
Condições de garantia
121 122
Tarjeta de la garantía / Cartão da garantia Tarjeta de la garantía / Cartão da garantia
SÍRVASE SEPARAR ESTA TARJETA Y ADJUNTARLA AL APARATO.
DESTAQUE ESTE CARTÃO E JUNTE-O AO APARELHO.
Artículo / Artigo: Estación meteorológica inalámbrica
Estação meteorológica
GT-WS-03s, GT-WS-03w
Apellido / Sobrenome:
Nombre / Nome:
Calle / Rua:
Código postal y ciudad / Código postal e cidade:
Teléfono con prefijo local / Telefone com indicativo local:
Firma del cliente / Assinatura do cliente:
WHI-Service
HOT-LINE: 00800 - 2804 2804 (gratuito)
Lunes - Viernes 9 - 17°°
Disponible en la red de Telefonica Madrid
Número verde: 00800 - 2804 2804 (gratuito)
Segunda-feira – Sexta-feira 8 - 16°°
Disponível na rede Marconi (Portugal Telecom)
3 años de garantía a partir de la fecha de compra.
En caso de utilización de la garantía hay que adjuntarla junto con el
comprobante de compra al aparato defectuoso. No se pueden tener en
cuenta las tarjetas de garantía posteriormente enviadas.
3 anos de garantia a partir da data de compra.
No caso de utilização do serviço de garantia, o aparelho defeituoso
deverá ser acompanhado do cartão da garantia e do comprovativo de
compra. Os cartões de garantia não poderão ser considerados se forem
enviados posteriormente.
E42254 (ES), E42255 (PT) II/12/09 (ES), IV/11/09 (PT)
53


Need help? Post your question in this forum.

Forumrules
1

Forum

globaltronics-gt-ws-03s--wt470
  • i need the english user manual
    simonkuoru@gmail.com
    Submitted on 1-7-2023 at 06:05

    Reply Report abuse


Report abuse

Libble takes abuse of its services very seriously. We're committed to dealing with such abuse according to the laws in your country of residence. When you submit a report, we'll investigate it and take the appropriate action. We'll get back to you only if we require additional details or have more information to share.

Product:

For example, Anti-Semitic content, racist content, or material that could result in a violent physical act.

For example, a credit card number, a personal identification number, or an unlisted home address. Note that email addresses and full names are not considered private information.

Forumrules

To achieve meaningful questions, we apply the following rules:

Register

Register getting emails for GlobalTronics GT-WS-03s- WT470 at:


You will receive an email to register for one or both of the options.


Get your user manual by e-mail

Enter your email address to receive the manual of GlobalTronics GT-WS-03s- WT470 in the language / languages: Portuguese, Spanish as an attachment in your email.

The manual is 4,38 mb in size.


You will receive the manual in your email within minutes. If you have not received an email, then probably have entered the wrong email address or your mailbox is too full. In addition, it may be that your ISP may have a maximum size for emails to receive.

Others manual(s) of GlobalTronics GT-WS-03s- WT470

GlobalTronics GT-WS-03s- WT470 User Manual - German - 19 pages

GlobalTronics GT-WS-03s- WT470 User Manual - Dutch - 19 pages

GlobalTronics GT-WS-03s- WT470 User Manual - Polish - 19 pages


The manual is sent by email. Check your email

If you have not received an email with the manual within fifteen minutes, it may be that you have a entered a wrong email address or that your ISP has set a maximum size to receive email that is smaller than the size of the manual.

The email address you have provided is not correct.

Please check the email address and correct it.

Your question is posted on this page

Would you like to receive an email when new answers and questions are posted? Please enter your email address.


Info