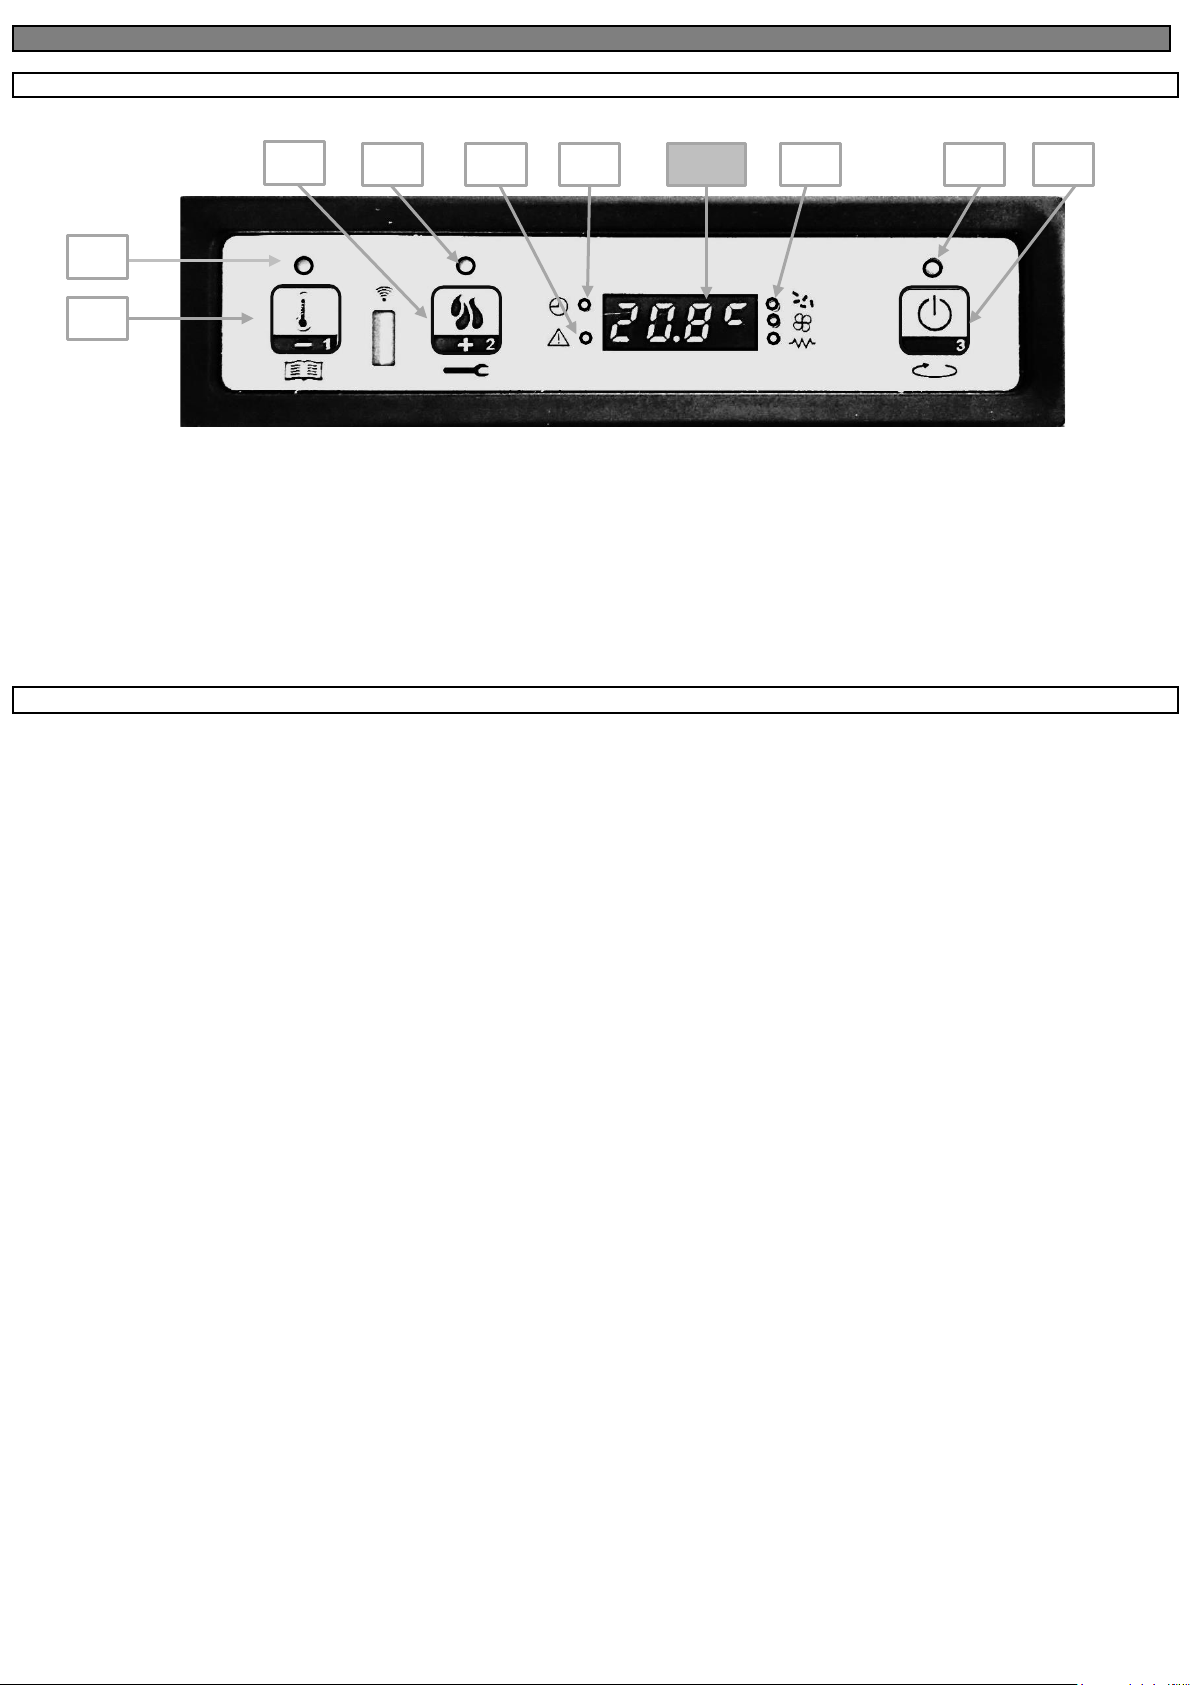
The control panel shows the information concerning the stove status. Several types of data can be displayed and the settings available according to the access
level can be modified by entering the menu. A display and the LED indicators inform about the stove operational status.
Depending on the operating mode, the displays may take on different meanings depending on their position on the display.
PANEL DESCRIPTION
LED (L0)set room Button (P1)decrease/menu/set room temperature
LED (L1)set heat outputButton (P2)increase/stove status/set heat output
LED (L2)chrono Button (P3)ON/OFF/ esc/confirm
LED (L3)ON/OFF
LED (L4)alarm Display (D1)status/heat output/parameter
LED (L5) auger/exchanger/glow plug
08.2 MENU
MENU
Hold P1 button down to access the menu.
It includes several items and levels to access settings and control board programming.
Menu M1 – SET CLOCK
Keep button (P1) pressed until message M1 appears, confirm with the ON/OFF button (P3), with buttons (P1) and (P2), change the current day and press the
ignition button; set the hour and press ON/OFF (P3); set the minutes and press ON/OFF (P3); set the current day as a number and press ON/OFF (P3), set the
current month and press ON/OFF (P3), set the current year; to confirm and exit keep the ON/OFF (P3) button pressed until the time reappears.
Menu M2 – SET CHRONO
Sub-menu M2 – 1 CHRONO ENABLE
Keep button (P1) pressed until message M1 appears, press the (P2) button up to M2, confirm with ON/OFF button (P3); the menu M2-1 appears, confirm with
ON/OFF (P3) and with the arrow (P1) set ON to activate the general chrono; go back keeping ON/OFF (P3) pressed, with button (P2) choose the programme
to enable.
Sub-menu M2 – 2 PROGRAM DAY
Two fixed ON/OFF cycles for each day.
Sub-menu M2 – 3 PROGRAM UEEK
The weekly programmable chrono-thermostat functions can be enabled, disabled and set. The weekly programmer has 4 independent programs whose final
effect involves the combination of the 4 individual programs. The weekly programmer can be enabled or disabled. Moreover, if the timeis set to OFF, the clock
ignores the corresponding control.
Caution: set carefully to prevent overlapping of different activation times of different programmes on the same day.
Sub-menu M2 – 4 PROGRAM U-END
The programmable chrono-thermostat functions can be enabled, disabled and set for the week-end (days 5 and 6, or Saturday and Sunday)
SUGGESTION: if you still do not know exactly the result you want to obtain, enable only one programme at a time to avoid confusion and unwanted stove
switching on and off.
Disable the daily programme if you want to use the weekly programme. If you use the weekly programme for 1, 2, 3 and 4 programmes, never enable the week-
end programme.
Always disable the weekly programme before enabling the week-end programme.
Settinga programme
Enter the desired programme by pressing ON/OFF (P3) once. The first parameter is the enabling of the programme itself, which should be set to ON by pressing
the (P2) button (CAUTION: ENABLE ONE PROGRAMME AT A TIME TO PREVENT ISSUES WITH THE CHRONO).Press ON/OFF (P3), to set the START time,
with buttons (P1) and (P2) enter the desired switch-on time; press SET (P3) to set the STOP time: with arrows (P1) and (P2) set the switch-off time; only for the
weekly program, press SET (P3) with the days requiring confirmation, with the ON/OFF button, navigate between the days of the week and with buttons (P1) and
(P2), set ON or OFF. Once the times and days have been set, to confirm and exit the chrono, press and hold the ON/OFF button until the initial screen is seen; if
the times have been set correctly, a green LED will illuminate near the clock at the top left of the display.
Menu M3 – LANGUAGE
Use this command to select one of the languages available. Press P2 (increase) and P1 (decrease) buttons to scroll through the options and press P3 button to
confirm.
Menu M4 – STAND-BY
Use to enable or disable Stand-by mode. Press P3 button to select menu M4 and then P1 (decrease) or P2 (increase) button to select the ON or OFF status.
Menu M5 – BUZZER
Allows the controller buzzer to be enabled or disabled during alarm signalling. Press the P1 or P2 button to enable or disable this command and P3 to confirm.
Libble takes abuse of its services very seriously. We're committed to dealing with such abuse according to the laws in your country of residence. When you submit a report, we'll investigate it and take the appropriate action. We'll get back to you only if we require additional details or have more information to share.
Product:
Forumrules
To achieve meaningful questions, we apply the following rules:
First, read the manual;
Check if your question has been asked previously;
Try to ask your question as clearly as possible;
Did you already try to solve the problem? Please mention this;
Is your problem solved by a visitor then let him/her know in this forum;
To give a response to a question or answer, do not use this form but click on the button 'reply to this question';
Your question will be posted here and emailed to our subscribers. Therefore, avoid filling in personal details.
Register
Register getting emails for Eva Calor TEK 80 at:
new questions and answers
new manuals
You will receive an email to register for one or both of the options.
Get your user manual by e-mail
Enter your email address to receive the manual of Eva Calor TEK 80 in the language / languages: English as an attachment in your email.
The manual is 2.55 mb in size.
You will receive the manual in your email within minutes. If you have not received an email, then probably have entered the wrong email address or your mailbox is too full. In addition, it may be that your ISP may have a maximum size for emails to receive.
If you have not received an email with the manual within fifteen minutes, it may be that you have a entered a wrong email address or that your ISP has set a maximum size to receive email that is smaller than the size of the manual.
The email address you have provided is not correct.
Please check the email address and correct it.
Your question is posted on this page
Would you like to receive an email when new answers and questions are posted? Please enter your email address.