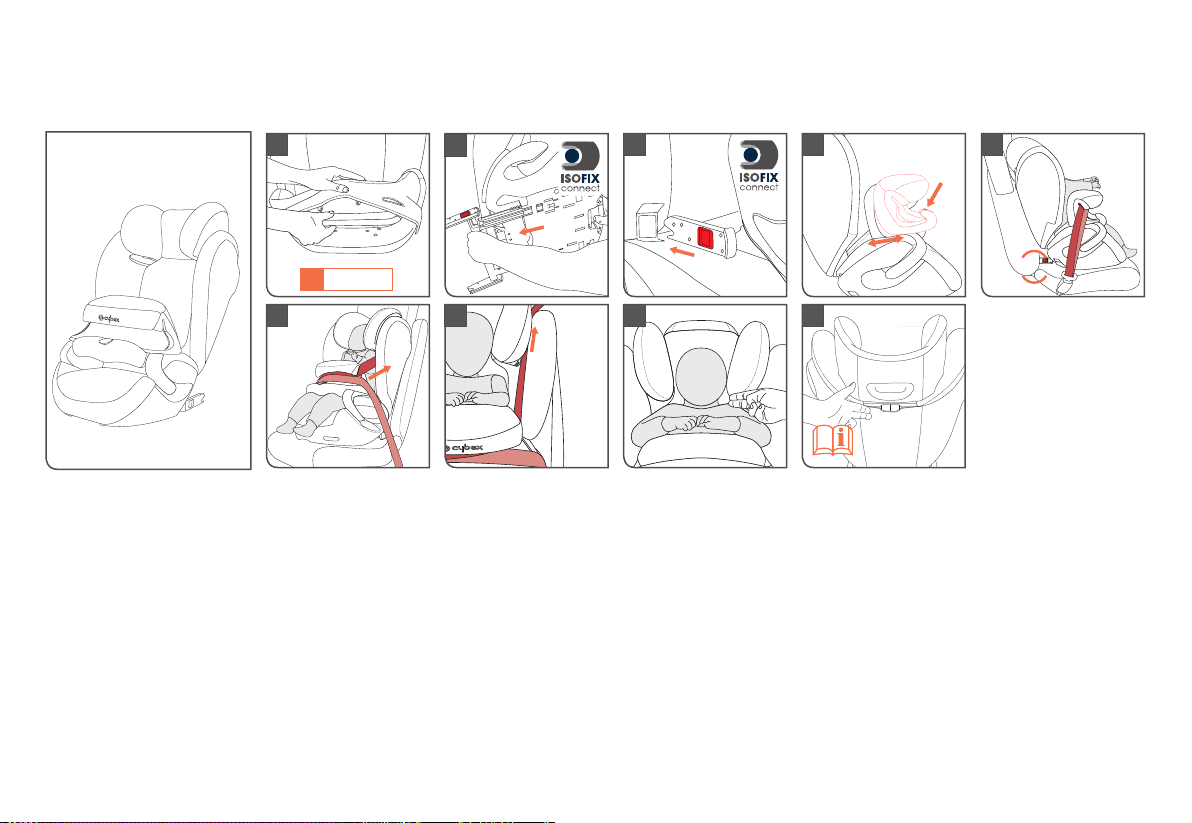
768276
106
Zoom out
Zoom in
Previous page
1/116
Next page
FR
HU
NL DEENCZ PLSK ITESPT
ECE R44/04, Gr. 1 | 9-18 kg
CYBEX PALLAS M-FIX SL
ECE R44/04, Gr. 2–3 | 15-36 kg
CYBEX SOLUTION M-FIX SL
PALLAS M-FIX SL
User guide
2
Kurzanleitung Gruppe 1 (9-18 kg) Brief instructions Group 1 (9-18 kg) Istruzioni brevi Gruppo 1 (9-18 kg)
DE – | EN – | IT –
Rövid használati utasítás I csoport (9-18 kg) 6WUXþQpLQVWUXNFH6NNJ 6WUXþQpLQãWUXNFLH6NXSLQDNJ
HU | CZ – | SK –
Instrucciones abreviadas Grupo 1 (9-18 kg) ,QVWUXo}HVEUHYHV*UNJ
ES | PT –
Skrócona instrukcja Grupa 1 (9-18 kg)
Korte handleiding Groep 1 (9-18 kg) | PL –| NL –
Instructions en bref Groupe 1 (9-18 kg)
FR –
8
5
CLICK!
1
!> 24 M
6
3
7
4
9
DE - WARNUNG! Ohne Genehmigung der Zulassungsstelle dürfen keine Veränderungen am Kindersitz vorgenommen und keine Ergänzungen hinzugefügt werden. Reparaturen dürfen ausschließlich durch
Personen vorgenommen werden, die hierfür autorisiert sind. Dabei dürfen stets nur original Bau- und Zubehörteile verwendet werden. Die Schutzfunktion des Kindersitzes ist sonst nicht mehr gewährleistet.
WARNUNG! Der Kindersitz bietet nur dann den bestmöglichen Schutz für ihr Kind, wenn Sie die Gebrauchsanweisung genau befolgen.
EN - WARNING! Without the approval of the certification office, the child car seat may not be modified or added to in any way. Repairs may only be performed by person authorised to this effect.
Only original parts and accessories may be used for repairs. Failure to comply with the above will result in the protective function of the child car seat no longer being guaranteed.
WARNING! The child car seat only offers optimum protection for your child if you follow the usage instructions precisely.
IT - ATTENZIONE! Senza l'approvazione dell'ufficio di certificazione il seggiolino non può subire modifiche o aggiunte di alcun genere. Le riparazioni possono essere eseguite solo da persone autorizzate in tal
senso. Per le riparazioni possono essere usati solo ricambi e accessori originali. Il mancato rispetto di quanto sopra avrà come conseguenza la terminazione della garanzia della funzione protettiva del seggiolino.
ATTENZIONE! Il seggiolino offre la protezione ottimale per il bambino solo qualora vengano seguite precisamente le istruzioni per l‘uso.
FR - ATTENTION! Le siège auto pour enfant ne saurait être modifié ou complété sans l’autorisation préalable de l’organisme de certification compétent. Seule une personne autorisée est habilitée à procéder
à des réparations. Seuls des pièces ou accessoires originaux peuvent être employés pour les réparations. Toute entorse aux règles précitées compromettra la fonction de protection du siège auto pour enfant.
ATTENTION! Le siège auto pour enfant n’offre une protection optimale que si vous suivez précisément les instructions d’utilisation.
NL - BELANGRIJK! Zonder de goedkeuring van het certificeringsinstelling mag het kinderzitje niet worden aangepast en mag er niets aan worden toegevoegd. Reparaties mogen alleen worden uitgevoerd door
personen die daartoe bevoegd zijn. Er mogen uitsluitend originele onderdelen en accessoires worden gebruikt voor reparaties. Niet-naleving van het bovenstaande resulteert erin dat de beschermende functie van het
kinderzitje niet langer gegarandeerd is.
BELANGRIJK! Het kinderzitje biedt uw kind alleen optimale bescherming als u de handleiding precies volgt.
2
3
Kurzanleitung Gruppe 2/3 (15-36 kg) Brief instructions Group 2/3 (15-36 kg) Istruzioni brevi Gruppo 2/3 (15-36 kg)
DE – | EN – | IT –
Instrucciones abreviadas Grupo 2/3 (15-36 kg) ,QVWUXo}HVEUHYHV*UNJ
ES – | PT –
Rövid használati utasítás 2/3 csoport (15-36 kg) 6WUXþQpLQVWUXNFH6NNJ 6WUXþQpLQãWUXNFLH6NNJ
HU – | CZ – | SK –
Skrócona instrukcja Grupa 2/3 (15-36 kg)Korte handleiding Groep 2/3 (15-36 kg) | PL –| NL –
Instructions en bref Groupe 2/3 (15-36 kg)
FR –
PL - OSTRZEŻENIE Bez zgody instytucji certyfikującej produkt, fotelik nie może być w żaden sposób modyfikowany lub zmieniany. Naprawy może dokonywać tylko autoryzowany serwis.
Tylko oryginalne części i akceoria mogą być użyte do naprawy. Niezastosowanie się do powyższego może powodować utratę funkcji ochronnych.
UWAGA! Fotelik zapewni maksimum bezpieczeństwa tylko wtedy jeśli przestrzegana będzie instrukcja obsługi.
EN - FIGYELEM! A hitelesítő intézet jóváhagyása nélkül a terméken semmilyen módosítás nem végezhető. Javítást csak szakképzett személy végezhet ennek betartásával. Javításhoz csak eredeti alkatrészeket és
kiegészítőket szabad felhasználni. A fentiek be nem tartása esetén a gyermekülés biztonságossága nem garantálható.
FIGYELEM! A gyermekülés csak abban az esetben nyújt optimális védelmet, ha pontosan betartják a használati utasításokat.
CZ - VAROVÁNÍ! Bez povolení certifikačního úřadu nesmí být autosedačka jakkoliv upravována. Opravy smí provádět pouze k tomu oprávněná osoba. K opravám lze používat pouze originální díly a příslušenství.
Při nedodržení výše uvedených podmínek není zaručena ochranná funkce dětské autosedačky.
VARONÍ! Dětská autosedačka nabízí optimální ochranu pro vaše dítě pouze pokud postupujte podle návodu k použití.
SK - VAROVANIE! Bez povolenia certifikačného úradu nesmie byť autosedačka akokoľvek upravovaná. Opravy smie vykonávať len k tomu oprávnená osoba. K opravám možno používať len originálne diely a
príslušenstvo. Pri nedodržaní vyššie uvedených podmienok nie je zaručená ochranná funkcia detskej autosedačky.
VAROVANIE! Detská autosedačka ponúka optimálnu ochranu pre vaše dieťa len ak postupujte podľa návodu na použitie.
ES - ¡Atención! La silla de auto no puede ser modificada ni se le pueden añadir componentes sin la aprobación de la oficina de certificación. Las reparaciones las realizará únicamente una persona autorizada para
ello. Sólo se utilizarán recambios y accesorios originales en las reparaciones El incumplimiento de lo expuesto anteriormente resultará en la pérdida de cobertura por garantía sobre la silla.
¡ATENCIÓN! La silla de auto sólo ofrecerá una protección óptima para su hijo si sigue las intrucciones con precisión.
PT - ATENÇÃO! Sem expressa autorização, a cadeira infantil não poderá ser modificada de nenhuma maneira As reparações deverão ser efectuadas por pessoal autorizado. Só peças originais e acessórios da
marca poderão ser utilizadas nas reparações ou trocas Em caso de que não se cumpram com as especificações descritas em cima, não se poderá assegurar a total proteção da cadeira
ATE NÇÃO! A cadeira só poderá oferecer a máxima proteção em caso de que siga expressamente as instruções deste manual.
CLICK!
45
3
2
8
1
976
4
CERTIFICATION
CYBEX PALLAS M-FIX SL
Recommended for:
Age: Approx. 9 months to 4 years
Weight: 9-18 kg
Only suitable for vehicle seats with automatic three-point
belts approved in accordance with ECE regulation 16 or
a comparable standard ECE R-44/04,
CYBEX PALLAS M-FIX SL - group 1, 9 to 18 kg
CYBEX SOLUTION M-FIX SL - group 2/3, 15 to 36 kg
ZULASSUNG
CYBEX PALLAS M-FIX SL
Empfohlen für:
Alter: ca. 9 Monate bis 4 Jahre
Gewicht: 9-18 kg
nur geeignet für Fahrzeugsitze mit Dreipunkt-Automatik-
Gurt, der nach ECE Regelung Nr. 16 oder gleichwerti-
gem Standard zugelassen ist ECE R-44/04,
CYBEX PALLAS M-FIX SL - Gruppe 1, 9 bis 18 kg
CYBEX SOLUTION M-FIX SL - Gruppe 2/3, 15 bis 36 kg
APPROVAZIONE
CYBEX PALLAS M-FIX SL
Raccomandato per:
Età: da 9 mesi a 4 anni circa
Peso: 9-18 kg
Adatto solo ai sedili dei veicoli con cinture automatiche
a tre punti approvate ai sensi del regolamento ECE 16 o
di uno standard equivalente ECE R-44/04,
CYBEX PALLAS M-FIX SL - Gruppo 1, da 9 a 18 kg
CYBEX SOLUTION M-FIX SL - Gruppo 2/3, da 15 a 36 kg
SEHR GEEHRTE KUNDIN, SEHR GEEHRTER KUNDE!
Vielen Dank, dass Sie sich bei der Wahl eines Kindersitzes für den CYBEX PALLAS
M-FIX SL entschieden haben. Bei der Entwicklung des CYBEX Kindersitzes PALLAS M-
FIX SL haben Sicherheit, Komfort und Bedienfreundlichkeit im Vordergrund gestanden.
Das Produkt wird unter besonderer Qualitätsüberwachung hergestellt und erfüllt strengs-
te Sicherheitsanforderungen.
HINWEIS! Bewahren Sie die Anleitung immer griffbereit auf (z.B. im dafür
vorgesehenen Fach an der Rückseite der Rückenlehne).
HINWEIS! Durch länderspezifische Anforderungen (z.B. Farbkennzeichnungen am
Kindersitz) können Produktmerkmale in ihrer äußeren Erscheinung variieren.
Die korrekte Funktionsweise des Produktes wird davon jedoch nicht beeinflusst.
WARNUNG! Um den optimalen Schutz für Ihr Kind zu gewährleisten, muss
der CYBEX PALLAS M-FIX SL unbedingt so verwendet werden, wie es in
dieser Anleitung beschrieben wird.
!
ECE-R44-04
UNIVERSAL
SEMI-UNIVERSAL
9 – 18 kg
CYBEX GmbH
Riedinger Str. 18, 95448 Bayreuth
Germany
04301314
ECE-R44-04
UNIVERSAL
SEMI-UNIVERSAL
15 – 36 kg
CYBEX GmbH
Riedinger Str. 18, 95448 Bayreuth
Germany
04301314
5
DEAR CUSTOMER! GENTILE CLIENTE,
Thank you for choosing the CYBEX PALLAS M-FIX SL child car seat. Safety, comfort
and ease of use were the foremost principles applied to the development of the
CYBEX PALLAS M-FIX SL child car seat. This product is manufactured subject
to special quality assurance measures and satisfies the most stringent of safety
requirements.
NOTE! Always keep these instructions to hand (e.g. in the designated compartment
on the rear of the backrest).
NOTE! Country-specific regulations (e.g. regarding colour-coding on child car seats)
may mean that product features may vary in appearance. This will, however, not affect
the product in its correct function.
grazie per aver scelto il seggiolino CYBEX PALLAS M-FIX SL. La sicurezza, il
comfort e la facilità d'uso hanno rappresentato i principi fondanti nello sviluppo del
seggiolino CYBEX PALLAS M-FIX SL. Questo prodotto è realizzato nel rispetto di
speciali misure di garanzia della qualità e soddisfa i requisiti di sicurezza più severi.
NOTE! Per assicurare la protezione ottimale per il bambino il CYBEX SOLUTION
M-FIX SL deve essere usato come descritto nelle presenti istruzioni.
NOTE! Le norme nazionali (ad esempio rispetto alla codifica cromatica dei seggiolini)
possono implicare che le caratteristiche esteriori del prodotto possano variare.
Questo non avrà ricadute sul funzionamento corretto del prodotto.
WARNING! To ensure optimum protection for your child, the CYBEX PALLAS
M-FIX SL must be used as described in these instructions.
ATTENZIONE! Per assicurare la protezione ottimale per il bambino il CYBEX
PALLAS M-FIX SL deve essere usato come descritto nelle presenti istruzioni.
! !
INHALT
KUR ZAN LEITU N G ........................................................................................................................ 2
ZULASSUNG ................................................................................................................................. 4
DER RICHTIGE PLATZ IM FAHRZEUG ................................................................................ 8
BEFESTIGEN DES KINDERSITZES MITTELS
ISOFIX CONNECT SYSTEM...................................................................................................10
AUSBAU DES CYBEX PALLAS MFIX SL ..........................................................................12
DEN SITZ INS FAHRZEUG STELLEN ................................................................................14
ANPASSEN AN DIE KÖRPERGRÖSSE ............................................................................16
ENTNEHMEN DER ZUSÄTZLICHEN SITZEINLAGE .....................................................16
ANSCHNALLEN MITTELS FANGRPER ......................................................................18
ANSCHNALLEN OHNE FANGKÖRPER ...........................................................................20
IST IHR KIND RICHTIG GESICHERT? ...............................................................................22
PFLEGE ..........................................................................................................................................24
ENTFERNEN DES BEZUGES ...............................................................................................24
ENTFERNEN DES BEZUGS VON DER KOPFSTÜTZE ................................................24
ENTFERNEN DES BEZUGS VOM SCHULTERTEIL ......................................................26
ENTFERNEN DES BEZUGS VON DER SITZFLÄCHE ..................................................26
ENTFERNEN DES BEZUGS VOM FANGKÖRPER ........................................................26
REINIGUNG .................................................................................................................................26
VERHALTEN NACH EINEM UNFALL ...................................................................................28
PRODUKTLEBENSDAUER .....................................................................................................28
ENTSORGUNG ...........................................................................................................................28
GARANTIEBEDINGUNGEN ...................................................................................................30
CONTENT CONTENUTI
SHORT INSTRUCTION ..............................................................................................................2 SO MM AR I O .................................................................................................................................... 2
CE RT IF ICATI ON ............................................................................................................................ 4
POSITIONING THE SEAT CORRECTLY IN THE VEHICLE ........................................... 9
SECURING THE CHILD CAR SEAT USING
THE ISOFIX CONNECT SYSTEM .........................................................................................11
REMOVAL OF THE CYBEX PALLAS MFIX SL.................................................................13
PLACING THE SEAT IN THE VEHICLE .............................................................................15
ADAPTING TO BODY SIZE ....................................................................................................17
REMOVING THE ADDITIONAL SEAT INSERT .................................................................17
SECURING THE CHILD WITH THE IMPACT SHIELD .................................................19
SECURING THE CHILD WITHOUT THE IMPACT SHIELD ........................................21
IS YOUR CHILD CORRECTLY SECURED? .....................................................................23
CARE & MAINTENANCE ..........................................................................................................25
REMOVING THE SEAT COVER ............................................................................................25
REMOVING THE COVER FROM THE HEAD SUPPORT .............................................25
REMOVING THE COVER FROM THE SHOULDER PART ...........................................27
REMOVING THE COVER FROM THE BOOSTER ..........................................................27
REMOVING THE COVER FROM THE IMPACT SHIELD ..............................................27
CLEANING ....................................................................................................................................27
HOW TO ACT FOLLOWING AN ACCIDENT ....................................................................29
PRODUCT SERVICE LIFE .......................................................................................................29
DISPOSAL ....................................................................................................................................29
WARRANTY CONDITIONS .....................................................................................................31
APPROVAZIONE .......................................................................................................................... 4
POSIZIONE CORRETTA DEL SEGGIOLINO NEL VEICOLO ...................................... 9
FISSAGGIO DEL SEGGIOLINO CON IL SISTEMA ISOFIX CONNECT ................11
RIMOZIONE DEL CYBEX PALLAS MFIX SL ...................................................................13
COLLOCAZIONE DEL SEGGIOLINO NEL VEICOLO .....................................................15
ADATTAMENTO ALLA TAGLIA CORPOREA .....................................................................17
RIMOZIONE DELL'INSERTO PER SEDILI AGGIUNTIVO ............................................17
ALLACCIAMENTO USANDO IL CUSCINO DI SICUREZZA .....................................19
ALLACCIAMENTO SENZA CUSCINO DI SICUREZZA ...............................................21
IL BAMBINO È MESSO IN SICUREZZA CORRETTAMENTE? ..................................23
CURA E MANUTENZIONE ......................................................................................................25
RIMOZIONE DELLA FODERA DEL SEGGIOLINO ........................................................25
RIMOZIONE DELLA FODERA DAL POGGIATESTA ......................................................25
RIMOZIONE DELLA FODERA DALL'AREA DELLA SPALLA .......................................27
RIMOZIONE DELLA FODERA DALLA SUPERFICIE DI SEDUTA ..............................27
RIMOZIONE DELLA FODERA DAL CUSCINO DI SICUREZZA ...............................27
PULIZIA ..........................................................................................................................................27
COME PROCEDERE IN SEGUITO A UN INCIDENTE .................................................29
VITA UTILE DEL PRODOTTO ..................................................................................................29
SMALTIMENTO ............................................................................................................................29
CONDIZIONI DI GARANZIA ................................................................................................... 31
DEENIT
9
POSITIONING THE SEAT CORRECTLY IN THE VEHICLE POSIZIONE CORRETTA DEL SEGGIOLINO NEL VEICOLO
The CYBEX PALLAS M-FIX SL with retracted ISOFIX Connect system
can be used on all vehicle seats with automatic three-point safety belts
approved in the vehicle manual for ‘universal’ use.
Il CYBEX PALLAS M-FIX SL con sistema ISOFIX CONNECT estraibile
può essere utilizzato su tutti i sedili con cinture di sicurezza automatiche a
tre punti approvate dal manuale della vettura, con uso universale.
WARNING! Luggage or other objects present in the vehicle that may cause
injury in the event of an accident must always be firmly secured. Otherwise,
they may be thrown, causing fatal injuries.
!ATTENZIONE! Bagagli o altri oggetti presenti nel veicolo che possono
causare lesioni in caso di incidente devono essere fissati saldamente. In caso
contrario potrebbero essere scagliati e causare lesioni mortali.
!
A ‘semi-universal’ certification is given to restraint systems that are connected
to the car through ISOFIX Connect (o). For this reason, ISOFIX Connect
can only be used in certain vehicles. Please refer to the enclosed vehicle
type list for approved vehicles. You can obtain the most up-to-date version
from www.cybex-online.com
In exceptional cases, the child car seat may also be used on the front passenger
seat. Please note the following in this case:
Per i fissaggi con i bracci di bloccaggio ISOFIX Connect (o) è fornita
un'approvazione "semi-universale". Gli ISOFIX Connect sono perciò utilizzabili
solo in alcuni veicoli. Consultare la lista di tipi di veicoli allegata per
conoscere i veicoli approvati. La versione più aggiornata è reperibile qui:
www.cybex-online.com
Il seggiolino è utilizzabile eccezionalmente sul sedile del passeggero anteriore. In
questo caso tenere conto di quanto segue:
In cars with airbags, you should push the passenger seat back as far as possible.
When doing so, however, ensure that the upper pivot point of the safety belt is
behind the belt feed point of the child car seat.
Always comply with the recommendations of the vehicle manufacturer.
Nelle auto dotate di airbag il sedile del passeggero va spinto il più indietro
possibile. Nel fare ciò accertare però che il punto di snodo superiore della cintura
di sicurezza sia dietro alla guida della cintura del seggiolino.
Rispettare sempre le raccomandazioni del costruttore del veicolo.
NOTE! Never leave your child unattended in the vehicle. NOTA BENE! Non lasciare mai il bambino incustodito nel veicolo.
WARNING! The diagonal belt (f) must run back at a recline and must never
run forward to the upper belt point in your vehicle. If it is not possible to adjust
the seat in this way, e.g. by pushing the car seat forward or using it on another
seat, this child car seat is not suitable for your vehicle.
!
WARNING! The child car seat may not be used on car seats facing to the side
of the direction of travel. Use of the child car seat is permitted on rear-facing
seats, e.g. in a van or minibus, provided that the seat is permitted for transporting
an adult. Please note that the vehicle headrest must not be removed when
fitting on a rear-facing seat! Even if not in use, the child car seat must always be
secured with the safety belt. This applies even if the child set has already been
secured to the vehicle using the ISOFIX Connect system.
An unsecured child car seat can injure other passengers and yourself even when
just performing an emergency brake or in the event of a minor collision.
!
ATTENZIONE! La cintura diagonale (f) deve scorrere indietro inclinata e non
deve mai scorrere in avanti verso il punto superiore della cintura nel veicolo. Il
seggiolino sarà inadatto al veicolo ove sia impossibile regolare il sedile in questo
modo, ad esempio spingendo avanti il sedile o usando un altro sedile.
!
ATTENZIONE! Il seggiolino non è utilizzabile sui sedili rivolti lateralmente
rispetto alla direzione di marcia. L‘uso del seggiolino è ammesso sui sedili rivolti
indietro, ad esempio nei minibus, a patto che il sedile sia abilitato al trasporto di
adulti. Notare che il poggiatesta veicolare non va rimosso in caso di montaggio
su un sedile rivolto indietro! Il seggiolino deve sempre essere assicurato con
la cintura di sicurezza, anche quando non è usato. Questo vale anche se il
seggiolino è già assicurato al veicolo con il sistema ISOFIX Connect.
Un seggiolino non assicurato può ferire gli altri passeggeri anche solo in caso
di frenata d‘emergenza o di collisione non grave.
!
WARNING! The seat is not suitable for use with a two-point or lap belt. If the
seat is secured using a two-point belt, an accident may result in severe or even
fatal injuries to the child.
!ATTENZIONE! The Il seggiolino è inadatto all‘uso con una cintura
subaddominale o a due punti. Gli incidenti possono causare lesioni gravi o
mortali al bambino in caso di messa in sicurezza con una cintura a due punti.
!
10
v
v
d
BEFESTIGEN DES KINDERSITZES MITTELS
ISOFIX CONNECT SYSTEM
HINWEIS! Die ISOFIX Befestigungspunkte (j) sind zwei Metalllaschen pro Sitzplatz
und befinden sich zwischen Rückenlehne und Sitzfläche des Fahrzeugsitzes.
Im Zweifelsfall nehmen Sie die Bedienungsanleitung Ihres Fahrzeuges zu Hilfe.
HINWEIS! Überprüfen Sie vor dem Verbinden der ISOFIX Connect Rastarme (o)
mit den ISOFIX Befestigungspunkten (j) deren Entriegelungstasten (y). Sind die grü-
nen Sicherheitsindikatoren (b) zu sehen, müssen Sie vor dem Verbinden zunächst die
ISOFIX Connect Rastarme entriegeln, indem Sie die Entriegelungstaste (y) drücken
und zurückziehen. Wiederholen Sie den Vorgang gegebenenfalls auch beim zweiten
Rastarm.
Ein vernehmbares Klickgeräusch ist bei korrekter Verbindung der ISOFIX Connect
Rastarme mit den ISOFIX Befestigungspunkten zu hören.
HINWEIS! Beachten Sie dazu den Abschnitt „DEN SITZ INS FAHRZEUG STELLEN“.
Schieben Sie die beiden Rastarme (o) in die Einführhilfen (u) bis diese mit einem
hörbaren „KLICK“ an den ISOFIX Befestigungspunkten (j) einrasten.
Vergewissern Sie sich, dass der Sitz gut hält, indem Sie versuchen ihn aus den
Einführhilfen (u) herauszuziehen.
Der grüne Sicherheitsindikator (b) muss nun an den beiden roten
Entriegelungstasten (y) gut sichtbar sein.
Mit dem Verstellgriff (v) am Rahmen (d) des CYBEX PALLAS M-FIX SL
Kindersitzes können Sie nun die Position des Sitzes einstellen.
Sie können jetzt Ihr Kind anschnallen; siehe Abschnitt „ANSCHNALLEN MITTELS
FANGKÖRPER.
Hängen Sie die mitgelieferten Einführhilfen (u) mit der längeren Lasche nach oben
in den beiden ISOFIX Befestigungspunkten (j) ein. In manchen Fahrzeugen eignet
sich eine entgegengesetzte Einbaurichtung der Einführhilfen (u) besser.
Betätigen Sie den Verstellgriff (v) unter dem Sitzkissen (d).
Ziehen Sie die beiden ISOFIX Connect Rastarme (o) bis zum Endanschlag.
Drehen Sie nun die ISOFIX Connect Rastarme (o) um 180°, damit diese in
Richtung der Einführhilfen (u) zeigen.
Mit dem ISOFIX Connect System können Sie den CYBEX PALLAS M-FIX
SL mit dem Fahrzeug verbinden und so die Sicherheit Ihres Kindes erhöhen.
Ihr Kind muss weiterhin mit dem 3-Punkt-Gurt Ihres Fahrzeuges ange-
schnallt werden.
u
j
yb
y
b
y
CLICK!
ov
DEENIT
11
SECURING THE CHILD CAR SEAT USING
THE ISOFIX CONNECT SYSTEM FISSAGGIO DEL SEGGIOLINO CON IL SISTEMA ISOFIX
CONNECT
NOTE! The ISOFIX fixture points (j) are two metallic clips for each seat and are
positioned between the backrest and the seating surface of the vehicle seat. In case
of doubt, please refer to the driver’s manual of your vehicle.
NOTA BENE! I punti di fissaggio ISOFIX (j) sono due clip metalliche per ogni sedile,
posizionate tra lo schienale e la superficie di seduta del sedile veicolare. In caso di
dubbio consultare il manuale del guidatore del proprio veicolo.
NOTE! Before clicking the ISOFIX Connect locking arms (o) into the ISOFIX fixture
points (j), check the release buttons (y). If the green safety indicators (b) are visible,
you must first release the ISOFIX Connect locking arms before joining by pressing
and pulling back the release button (y). Repeat the process if necessary with the
second locking arm.
A perceptible click will be heard when the ISOFIX Connect locking arm correctly
locks into place with the ISOFIX fixture points.
NOTA BENE! Controllare i pulsanti di rilascio (y) prima di unire i bracci di
bloccaggio ISOFIX Connect (o) ai punti di fissaggio ISOFIX (j). Se gli indicatori di
sicurezza verdi (b) sono visibili, prima dell'unione è necessario rilasciare i bracci di
bloccaggio ISOFIX Connect premendo e tirando indietro il pulsante di rilascio (y).
Se necessario ripetere l'operazione con il secondo braccio di bloccaggio.
Quando il braccio di bloccaggio ISOFIX Connect si unirà correttamente ai punti di
fissaggio ISOFIX si udrà chiaramente uno scatto.
NOTE! Note the information in the section “PLACING THE SEAT IN THE VEHICLE”. NOTA BENE! Consultare la sezione “COLLOCAZIONE DEL SEGGIOLINO NEL
VEICOLO”.
Push the two locking arms (o) into the ISOFIX guides (u) until these lock into
place in the ISOFIX fixture points with an audible ‘click’.
Ensure that the seat is secure by trying to pull it out of the ISOFIX guides (u).
The green safety indicator (b) must now be clearly visible on the two red release
buttons (y).
You can now use the adjustment lever (v) on the frame (d) of the CYBEX PALLAS
M-FIX SL child car seat position.
Premere i due bracci di bloccaggio (o) negli ausili di inserimento (u) fino a fissarli
in posizione nei punti di fissaggio ISOFIX con un chiaro scatto.
Accertare che il seggiolino sia in sicurezza tentando di tirarlo fuori dagli ausili di
inserimento (u).
L'indicatore di sicurezza verde (b) deve essere ora chiaramente visibile sui due
pulsanti di rilascio rossi (y).
Usare ora la leva di regolazione (v) sul telaio (d) del seggiolino CYBEX PALLAS
M-FIX SL per regolare la posizione.
You can now strap in your child; refer to the section “STRAPPING IN USING
Impact shield”.
Ora è possibile allacciare il bambino; vedere “ALLACCIAMENTO USANDO IL
CUSCINO DI SICUREZZA.
Insert the supplied ISOFIX guides (u) with the longer strap upwards into the two
ISOFIX fixture points (j). In some vehicles, it is better to mount the ISOFIX guides
aids (u) in the opposite direction.
Inserire gli ausili di inserimento (u) forniti con la linguetta più lunga in alto nei due
punti di fissaggio ISOFIX (j). In alcuni veicoli è preferibile montare gli ausili di
inserimento (u) in direzione opposta.
Use the adjustment lever (v) under the seat cushion (d).
Pull the two ISOFIX Connect locking arms (o) as far as they will go.
Now twist the ISOFIX Connect locking arms (o) 180° so that they are facing the
direction of the ISOFIX guides (u).
Usare la leva di regolazione (v) sotto il cuscino di seduta (d)
Tirare fino al limite i due bracci di bloccaggio ISOFIX Connect (o).
Ruotare ora di 180° i bracci di bloccaggio ISOFIX Connect (o), in modo che siano
rivolti in direzione degli ausili di inserimento (u).
Using the ISOFIX Connect system, you can fix the CYBEX PALLAS M-FIX
SL to the vehicle, thereby increasing your child’s safety. The child still needs
to be secured with the three-point belt of your vehicle.
Con il sistema ISOFIX Connect è possibile fissare il CYBEX PALLAS M-FIX
SL al veicolo, aumentando così la sicurezza del bambino. Il bambino sarà
assicurato utilizzando la cintura a tre punti del veicolo.
DEENIT
13
REMOVAL OF THE CYBEX PALLAS MFIX SL RIMOZIONE DEL CYBEX PALLAS M-FIX SL
Perform the installation steps in the reverse order. Eseguire i passi d'installazione in ordine inverso.
NOTE! By folding in the locking arms (o), you are not just protecting the vehicle seat
but also the locking arms of the ISOFIX Connect system from dirt and damage.
NOTA BENE! Piegando in dentro i bracci di bloccaggio (o) si proteggono dallo
sporco e dai danni tanto il sedile del veicolo, quanto i bracci di bloccaggio del
sistema ISOFIX Connect.
Unlock the ISOFIX locking arms (o) on both sides by pushing the red
release buttons (y) and pulling them back simultaneously.
Pull the seat out of the ISOFIX guides (u).
Rotate the locking arms (o) 180°.
Operate the adjustment lever (v) on the frame (d) of the CYBEX PALLAS M-FIX
SL and push the locking arms in as far as they will go.
Sbloccare i bracci di bloccaggio ISOFIX (o) su entrambi i lati premendo
e tirando simultaneamente i pulsanti di rilascio rossi (y).
Estrarre il seggiolino dagli ausili di inserimento (u).
Ruotare di 180° i bracci di bloccaggio (o).
Azionare la leva di regolazione (v) sul telaio (d) del CYBEX PALLAS M-FIX SL e
spingere all'interno i bracci di bloccaggio fino al limite.
WARNING! Never leave your child unattended in the car. The plastic parts
in the child restraint system heat up in sun and the child may sustain burns.
Protect your child and the car seat from direct sun exposure (e.g. by covering it
with a light colored cloth).
!ATTENZIONE! Non lasciare mai il bambino incustodito nel veicolo. Le parti
in plastica del seggiolino tendono a riscaldarsi se esposte al sole diretto con
pericolo di scottature per il bambino. Proteggere il bambino ed il seggiolino da
un‘eccessiva esposizione al sole diretto (per esempio stendendo un telo chiaro
sopra il seggiolino).
!
14
DEN SITZ INS FAHRZEUG STELLEN
HINWEIS! An einigen Autositzen aus empfindlichem Material (z.B. Velours, Leder,
etc.) können durch die Benutzung von Kindersitzen mögliche Gebrauchsspuren und/
oder Abfärbungen auftreten. Um das zu vermeiden, können Sie z.B. eine Decke oder
ein Handtuch unterlegen. Ferner weisen wir in diesem Zusammenhang auf unsere
Reinigungshinweise in dieser Gebrauchsanleitung hin, die vor der ersten Verwen-
dung des Sitzes unbedingt beachtet werden sollten.
Stellen Sie den Kindersitz auf den entsprechenden Fahrzeugsitz im Auto.
Achten Sie unbedingt darauf, dass die Rückenlehne (a) des CYBEX
PALLAS M-FIX SL vollflächig an der Rückenlehne des Fahrzeugsitzes
anliegt. Der Kindersitz darf sich auf keinen Fall in einer Liegeposition
befinden. Gegebenenfalls können Sie den Abstand mit dem Verstellgriff (v)
einstellen.
Sollte die Kopfstütze des Fahrzeuges störend sein, ziehen Sie diese ganz heraus
oder nehmen Sie diese ganz ab (Ausnahme siehe Abschnitt „DER RICHTIGE
PLATZ IM FAHRZEUG“). Die Rückenlehne passt sich optimal stufenlos nahezu
jeder Neigung des Fahrzeugsitzes an.
v
a
WARNUNG! Die Rückenlehne des CYBEX Kindersitzes muss an der Lehne
des Fahrzeuges flächig aufliegen. Um den größtmöglichen Schutz für das Kind
zu gewährleisten, muss sich der Sitz in einer normalen aufrechten Position
befinden!
!
DEENIT
15
PLACING THE SEAT IN THE VEHICLE COLLOCAZIONE DEL SEGGIOLINO NEL VEICOLO
NOTE! On some car seats made of sensitive materials (e.g. suede, leather etc.),
the use of child car seats may leave marks and/or cause discolouration. To prevent
this, you can place a blanket or towel underneath it, for example. Please also refer in
this connection to our cleaning advises in these usage instructions; these cleaning
instructions must be observed prior to using the seat for the first time.
NOTA BENE! L'uso del seggiolino su alcuni sedili veicolari realizzati in materiali
delicati (come pelle scamosciata, pelle, ecc.) può lasciare tracce e/o causare
scoloriture. Questo è evitabile utilizzando ad esempio una coperta o un asciugamano
come appoggio. Al riguardo vedere anche le istruzioni di pulizia nelle presenti
istruzioni per l'uso; le istruzioni di pulizia devono essere consultate prima del primo
uso del seggiolino.
Place the child car seat on the appropriate seat in the car. Collocare il seggiolino sul sedile dell'auto appropriato.
Always ensure that the entire surface of the backrest (a) of the CYBEX
PALLAS M-FIX SL is placed fully against the backrest of the vehicle
seat. The child car seat must never be in a lying position. If necessary,
you can adjust the distance using the adjustment lever (v).
If the headrest of the vehicle is in the way, pull it out all the way
or remove it completely (for exceptions to this, please refer to the section
“POSITIONING THE SEAT CORRECTLY IN THE VEHICLE”) The backrest (a)
will perfectly adapt to practically any recline of the vehicle seat.
Accertare sempre che l'intera superficie dello schienale (a) del CYBEX
PALLAS M-FIX SL poggi completamente contro lo schienale del sedile
veicolare. Il seggiolino non deve mai trovarsi in posizione sdraiata. Se
necessario è possibile regolare la distanza con la leva di regolazione (c)
Se il poggiatesta del veicolo è di ingombro, alzarlo del tutto o
rimuoverlo completamente (per eccezioni, si prega di consultare la sezione
" POSIZIONAMENTO CORRETTO DEL SEGGILINO NEL VEICOLO") Lo
schienale (a) si adatterà perfettamente praticamente a qualsiasi reclinazione del
sedile del veicolo.
WARNING! The full surface of the backrest of the CYBEX child car seat must
be against the backrest of the vehicle. To ensure maximum protection for your
child, the seat must be in a normal upright position!
!ATTENZIONE! L'intera superficie dello schienale del seggiolino CYBEX deve
poggiare contro lo schienale del veicolo. Per assicurare la massima protezione
per il bambino il sedile deve trovarsi nella normale posizione eretta!
!
16
d
Um den CYBEX PALLAS M-FIX SL optimal an die Körpergröße anzupassen ist
werkseitig eine Sitzeinlage (i) mitgeliefert und bereits unter dem Bezug eingelegt.
HINWEIS! Nur eine in optimaler Höhe eingestellte Kopfstütze (e) bietet den
größtmöglichen Schutz und Komfort für Ihr Kind und gewährleistet außerdem den
optimalen Verlauf des Diagonalgurtes (f). Die Höhenverstellung kann beim CYBEX
PALLAS M-FIX SL in 12 Positionen erfolgen.
ANPASSEN AN DIE KÖRPERGRÖSSE
ENTNEHMEN DER ZUSÄTZLICHEN SITZEINLAGE
Wir empfehlen diese zusätzliche Sitzeinlage (i) für Kinder vom 9. bis zum 24.
Lebensmonat zu verwenden.
Ab dem 25. Lebensmonat ist keine Sitzeinlage (i) mehr notwendig.
Danach ist die Größenanpassung ausschließlich über die verstellbare Kopfstütze (e)
vorzunehmen. Ziehen Sie dazu den Verstellgriff (h) nach oben, um die Kopfstütze (e)
zu entriegeln.
Die Anpassung hat so zu erfolgen, dass zwischen der unteren Kante der
Kopfstütze (e) und der Schulter des Kindes noch 2 fingerbreit Platz (ca. 2 cm) ist.
1. Lösen Sie die vorderen Druckknöpfe des Sitzbezuges vom Sitzkissen (d).
2. Ziehen Sie den Stoffbezug aus den Bezugsführungen vorn hoch, bis Sie die
Sitzeinlage herausziehen können.
3. Die Entnahme des Sitzeinlage hat entsprechend der obigen Altersangabe zu
erfolgen.
4. Bringen Sie den Sitzbezug wieder in den ursprünglichen Zustand und befestigen
Sie diesen anschließend wieder.
Durch Betätigen des zentralen Verstellknopfes (z) können Sie den Fangkörper an Ihr
Kind anpassen. Halten Sie den Verstellknopf (z) gedrückt, während Sie den Fangkör-
per an Ihr Kind anpassen.
Die seitlichen Flügel des Fangkörpers (p) passen exakt zwischen Armlehnen und
Sitzfläche (d) und dienen der Abstützung des Fangkörpers (p) am Sitz.
Stellen Sie den Fangkörper (p) so ein, dass er am Kind anliegt, jedoch ohne auf den
Körper des Kindes zu drücken.
EINSTELLEN DES FANGKÖRPERS  ECE GRUPPE 1 918 KG
zp
d
i
h
e
20
ANSCHNALLEN OHNE FANGKÖRPER
ECE GRUPPE 2/3 1536 KG
1. Setzen Sie ihr Kind in den Kindersitz. Ziehen Sie den Dreipunktgurt weit heraus
und führen Sie diesen vor Ihrem Kind entlang zum Gurtschloss (l).
2. Stecken Sie die Gurtzunge (m) in das Gurtschloss (l). Dieses muss mit einem
hörbaren „KLICK“ einrasten.
3. Als nächstes legen Sie den Beckengurt (n) in die unteren Gurtführungen (k) des
Kindersitzes ein.
4. Ziehen Sie nun kräftig am Diagonalgurt (f), um den Beckengurt (n) zu straffen. Je
enger der Gurt anliegt, desto besser kann er vor Verletzungen schützen. Auf der
Seite des Gurtschlosses (l) müssen der Diagonalgurt (f) und der Beckengurt (n)
zusammen in die untere Gurtführung (k) eingelegt sein.
WARNUNG! Den Gurt auf keinen Fall verdrehen.
!
WARNUNG! Der Beckengurt (n) muss auf beiden Seiten so tief wie möglich
über der Leistenbeuge Ihres Kindes verlaufen, um im Falle eines Unfalls
optimal wirken zu können.
!
WARNUNG! Das Fahrzeuggurtschloss (l) darf keinesfalls über die Armlehne
reichen. Ist die Gurtpeitsche zu lang, ist der Kindersitz für eine Verwendung
auf dieser Position im Fahrzeug nicht geeignet. Bitte wenden Sie sich im
Zweifelsfall an den Hersteller Ihres Kindersitzes.
!
5. Der Beckengurt (n) sollte auf beiden Seiten des Sitzkissens (d) in den unteren
Gurtführungen (k) liegen.
HINWEIS! Bringen Sie Ihrem Kind von Anfang an bei, immer auf eine straffe Gurt-
führung zu achten und bei Bedarf, selbst den Gurt festzuziehen.
6. Nun führen Sie den Diagonalgurt (f) durch die obere Gurtführung (g) in der
Kopfstütze (e) bis er sich innerhalb der Gurtführung befindet.
Achten Sie darauf, dass der Diagonalgurt (f) zwischen Schulteraußenkante und Hals
Ihres Kindes verläuft. Falls erforderlich, passen Sie durch Verstellen der Kopfstüt-
zenhöhe den Gurtverlauf an. Die Höhe der Kopfstütze (e) kann auch im eingebauten
Zustand im Auto eingestellt werden.
l
CLICK!
l
m
f
k
n
f
l
k
ng
f
s
e
f
WARNUNG! Benutzen Sie niemals andere als die in der Bedienungsanleitung
beschriebenen und am Sitz markierten Punkte, um den Kindersitz zu befestigen.
!
DEENIT
25
To ensure that your child car seat provides maximum protection, it is imperative that
you note the following:
Per garantire che il seggiolino offra la massima protezione è imperativo osservare
quanto segue:
CARE & MAINTENANCE CURA E MANUTENZIONE
All major parts of the child car seat should be checked regularly for damage.
The mechanical components must be free of defects.
It is absolutely necessary to ensure that the child car seat is not jammed between
hard elements such as the vehicle door or seat rail, which could potentially
damage it.
When exposed to extreme shock, e.g. after a crash, the child car seat must be
checked by the manufacturer.
Tutte le parti principali del seggiolino dovrebbero essere controllate regolarmente
alla ricerca di danni. I componenti meccanici devono essere privi di difetti.
È assolutamente necessario assicurare che il seggiolino non sia incastrato tra
elementi duri, quali la portiera o le guide dei sedili, che potrebbero potenzialmente
danneggiarlo.
Se esposto a colpi estremi, ad esempio in caso di incidente, il seggiolino deve
essere controllato dal produttore.
REMOVING THE SEAT COVER RIMOZIONE DELLA FODERA DEL SEGGIOLINO
REMOVING THE COVER FROM THE HEAD SUPPORT RIMOZIONE DELLA FODERA DAL POGGIATESTA
The cover of the infant seat consists of three parts (headrest, shoulder part cover,
booster cover and/or seat surface cover).This is complemented by the impact
shield cover.
The three covers of the seat are fitted into the cover attachment channels on the
edge of the infant seat and are held in position at several places by press-studs (see
image).
Once all studs have been released, the single parts of the cover can be removed
from the cover attachment channels.
La fodera del seggiolino è composta da tre parti (poggiatesta, fodera dell'area
della spalla, fodera dell'elevatore e/o fodera della superficie di seduta). Il tutto è
completato dalla fodera del cuscino di sicurezza.
Le tre fodere del seggiolino sono inserite nelle guide di attacco della fodera sui bordi del
seggiolino e sono tenute in posizione in vari punti da bottoni automatici (vedere figura).
Una volta sbloccati tutti gli automatici, le singole parti della fodera possono essere
rimosse dalle guide di attacco della fodera.
Release the two press-studs at each side of the rear of the shoulder area. Pull the
cover out of the cover attachment channel.
Rilasciare i due bottoni automatici su ogni lato del retro dell'area della spalla. Estrarre
la fodera dalla guida di attacco della fodera.
In order to put the covers back on the seat, proceed in the reversed order as remo-
ving them.
Procedere in ordine inverso rispetto alla rimozione al fine di ricollocare le fodere sul
seggiolino.
Ensure that only an original CYBEX seat cover is used, as the cover is a key element
of the seat’s function. Spare covers can be obtained from a specialist retailer.
Accertarsi di utilizzare solo una fodera del sedile CYBEX, in quanto la fodera
rappresenta un elemento chiave di funzionamento del seggiolino. Le fodere di
ricambio sono ottenibili presso i rivenditori specializzati.
ATTENZIONE! Il seggiolino non deve mai essere usato senza la fodera.
!
WARNING! The child car seat must never be used without the cover.
!
26
HINWEIS! Bitte den Bezug vor der ersten Verwendung waschen. Der Bezug darf
nur bei 30°C im Schonwaschgang gewaschen werden. Sollten Sie mit mehr als
30°C waschen, kann es zu Ausfärbungen des Bezugstoffes kommen. Bitte den
Bezug gesondert von anderer Wäsche waschen und nicht im Trockner trocknen! Den
Bezug keinesfalls in der prallen Sonne trocknen! Die Kunststoffteile können mit einem
milden Reinigungsmittel und warmen Wasser gereinigt werden.
REINIGUNG
ENTFERNEN DES BEZUGS VON DER SITZFLÄCHE
ENTFERNEN DES BEZUGS VOM FANGKÖRPER
Lösen Sie die vier Druckknöpfe des Sitzbezugs vorder- und rückseitig.
Ziehen Sie nun den Bezug über die Armlehnen und entlang der Sitzfläche ab.
Öffnen Sie zuerst die beiden Druckknöpfe des Fangkörperbezugs. Ziehen Sie dann
den Bezug um das Kissengehäuse hin zur dritten Befestigung am zentralen Verstell-
knopf ab und lösen Sie den Bezug an der Gummiöse des zentralen Verstellknopfes.
ENTFERNEN DES BEZUGS VOM SCHULTERTEIL
Ziehen Sie den Bezug aus dem Stoffkanal heraus.
WARNUNG! Bitte auf keinen Fall scharfe Reinigungs- oder Bleichmittel
verwenden!
!
DEENIT
27
NOTE! Please wash the cover before you use it the first time. The cover may only be
washed at 30°C with a delicate wash program. Washing at more than 30°C may re-
sult in discolouration of the cover fabric. Please wash the cover separately from other
laundry and do not dry in the dryer! Never dry the cover in direct sunlight! The plastic
parts can be cleaned with a mild cleaning agent and warm water.
NOTA BENE! Consigliamo il lavaggio prima del primo utilizzo. La fodera è lavabile
solo a 30°C con un programma di lavaggio delicato. Il lavaggio oltre i 30°C può
causare lo scolorimento del tessuto della fodera. Lavare la fodera separatamente
dagli altri capi e non asciugare in asciugatrice! Non fare mai asciugare la fodera
alla luce solare diretta! Le parti in plastica possono essere pulite con un detergente
delicato e dell'acqua tiepida.
CLEANING PULIZIA
REMOVING THE COVER FROM THE BOOSTER RIMOZIONE DELLA FODERA DALLA SUPERFICIE DI SEDUTA
REMOVING THE COVER FROM THE IMPACT SHIELD RIMOZIONE DELLA FODERA DAL CUSCINO DI SICUREZZA
Release the four press-studs of the seat cover at the front and the back.
Now, pull off the cover over the armrests and along the seat surface.
Sbloccare i quattro bottoni automatici anteriori e posteriori della fodera del sedile.
Estrarre ora la fodera oltre i braccioli e lungo la superficie di seduta.
First, release the two press-studs of the impact shield cover. Then pull off the cover
around the cushion towards the third attachment around the central adjustment
button and release the cover at the rubber eyelet of the adjustment button.
Sbloccare prima i due bottoni automatici della fodera del cuscino di sicurezza.
Estrarre quindi la fodera attorno al cuscino verso il terzo attacco attorno al pulsante
di regolazione centrale e sbloccare la fodera sull'occhiello in gomma del pulsante di
regolazione.
REMOVING THE COVER FROM THE SHOULDER PART RIMOZIONE DELLA FODERA DALL'AREA DELLA SPALLA
Pull the cover out of the cover attachment channel. Estrarre la fodera dalla guida di attacco della fodera.
ATTENZIONE! Non usare mai detergenti aggressivi o candeggine!
!
WARNING! Never use harsh cleaning agents or bleaches!
!
DEENIT
29
If the vehicle is directly exposed to sunlight for a longer time, the child car seat
must be removed from the vehicle or covered with a light cloth.
Regularly check all plastic and metal parts of the seat for damage, deformation or
change of colour. If you discover any changes, the child car seat must be disposed
or checked and possibly replaced by the manufacturer.
Changes to fabric, especially bleaching, are perfectly normal when used in a
vehicle and do not impair the seat’s function.
Se il veicolo è esposto direttamente alla luce solare per un periodo di tempo
prolungato, il seggiolino deve essere rimosso dal veicolo o coperto con un panno
chiaro.
Controllare regolarmente tutte le parti di plastica e metallo del seggiolino alla
ricerca di danni, deformazioni o cambiamenti di colore. Qualora si scopra qualsiasi
cambiamento, il seggiolino dovrà essere smaltito o controllato e, possibilmente,
sostituito dal produttore.
Le variazioni del tessuto, in particolare la scoloritura, sono perfettamente normali in
caso di uso in un veicolo e non intaccano il funzionamento del seggiolino.
PRODUCT SERVICE LIFE VITA UTILE DEL PRODOTTO
HOW TO ACT FOLLOWING AN ACCIDENT COME PROCEDERE IN SEGUITO A UN INCIDENTE
At the end of the child car seat’s service life, it must be disposed of correctly. The
separation of waste may be handled differently from place to place. To ensure that
the child car seat is disposed of in accordance with regulations, please contact your
local waste disposal institution or local council. Always observe the waste disposal
regulations of your country.
Al termine della vita utile del seggiolino, questo deve essere smaltito correttamente.
La differenziazione dei rifiuti potrebbe avvenire con modalità diverse da luogo
a luogo. Per accertare che il seggiolino sia smaltito nel rispetto delle norme si
raccomanda di contattare l'autorità locale responsabile dello smaltimento dei rifiuti
o l'amministrazione locale. Rispettare sempre le norme di smaltimento dei rifiuti del
proprio paese.
DISPOSAL SMALTIMENTO
The CYBEX PALLAS M-FIX SL is designed to meet its specifications for the entire
service life of approximately 11 years. However, as there can be very large tempera-
ture fluctuations and unpredictable strains in vehicles, the following points must be
observed:
Il CYBEX PALLAS M-FIX SL è progettato per soddisfare le proprie specifiche per
l'intera vita utile, pari a circa 11 anni. Tuttavia, alla luce delle possibili fluttuazioni
massicce di temperatura e degli sforzi imprevedibili nei veicoli, devono essere tenuti
in considerazione i punti seguenti:
ATTENZIONE! Un incidente può causare danni al seggiolino non identificabili
a occhio nudo. Sostituire il seggiolino dopo un incidente. In caso di dubbio
consultare il proprio rivenditore o il produttore.
!
WARNING! An accident may cause damage to the child car seat that is not
identifiable with the naked eye. Please replace the seat after an accident. In
case of doubt, please consult your dealer or the manufacturer.
!
BESTE KLANT, DROGI KLIENCIE,
Het verheugt ons dat u de CYBEX PALLAS M-FIX SL hebt gekocht. Bij de ontwik-
keling van het CYBEX PALLAS M-FIX SL-kinderzitje is alle aandacht besteed aan de
veiligheid, het comfort en de gebruiksvriendelijkheid. Het product werd aan een spe-
ciale kwaliteitscontrole onderworpen en voldoet aan de strengste veiligheidseisen.
LET OP! Houd deze handleiding altijd bij de hand (bijvoorbeeld in het daarvoor
bestemde vakje aan de achterzijde van rugsteun).
LET OP! Nationale regelgeving (bijvoorbeeld over de kleurcodering op kinderzitjes)
kan ertoe leiden dat productkenmerken er anders uitzien. Dat heeft echter geen
gevolgen voor het goed functioneren van het kinderzitje.
Dziękujemy za wybór fotelika samochodowego CYBEX PALLAS M-FIX SL.
Pragniemy zapewnić, że poświęciliśmy szczególna uwagę bezpieczeństwu,
wygodzie i funkcjonalności. Produkt ten jest wytwarzany z zachowaniem najwyższych
standardów jakości i spełnia najbardziej rygorystyczne wymogi bezpieczeństwa.
UWAGA! Przechowuj instrukcję z fotelikiem (np.w przeznaczonym do tego miejscu z
tyłu fotelika).
UWAGA! Przepisy krajowe (na przykład w zakresie oznaczenia kolorów na fotelikach
dziecięcych) mogą mieć wpływ, że cechy produktu mogą odbiegać wyglądem.
Niema to wpływu na prawidłowe funkcjonowanie produktu.
BELANGRIJK! Voor optimale bescherming van uw kind moet u de CYBEX
PALLAS M-FIX SL gebruiken volgens deze handleiding.
OSTRZEŻENIE! PALLAS M-FIX SL musi być używany zgodnie z instrukcją,
aby w pełni chronił Twoje dziecko.
! !
FRNLPL
41
DE CYBEX PALLAS MFIX SL WEGHALEN DEMONTAŻ FOTELIKA PALLAS MFIX SL
Voer de stappen van het plaatsen in omgekeerde volgorde uit. Wykonaj czynności w celu montażu fotelika w samochodzie w odwrotnej kolejności.
LET OP! Door de grijparmen (o) weg te klappen beschermt u niet alleen de
autostoel, maar ook de grijparmen van het ISOFIX Connect-systeem tegen vuil en
beschadiging.
UWAGA! Procedura ta chroni siedzisko fotelika i zapobiega uszkodzeniu lub popla-
mieniu uchwytów ISOFIX. Uszkodzenia lub plamy mogłyby mieć wpływ na spraw-
ność systemu mocowania fotelika.
Ontgrendel de ISOFIX-grijparmen (o) aan beide zijden door op de rode
ontgrendelingsknoppen (y) te drukken en ze tegelijk terug te trekken.
Trek het zitje uit de geleidehulzen (u).
Draai de grijparmen (o) 180 °.
Gebruik de aanpassingshendel (v) op het frame (d) van de CYBEX PALLAS M-FIX
SL en duw de grijparmen zo ver mogelijk in.
Zwolnij zaczepy ISOFIX (o), wciskając i przesuwając czerwone
przyciskizwalniające (y).
Wyjmij fotelik z elementów pomocniczych (u).
Obróć zaczepy (o) o 180°.
Pociągnij za uchwyt do regulacji (v) znajdujący się w podstawie (d) fotelika
CYBEX PALLAS M-FIX SL i wciśnij zaczepy (o) najdlaej jak to możliwe.
WAARSCHUWING! Laat uw kind nooit alleen in de auto achter. De kunststof
onderdelen van het kinderbeveiligingssysteem kunnen warm worden in de zon
en het kind brandwonden bezorgen. Bescherm uw kind en het autostoeltje
tegen directe blootstelling aan de zon (bijvoorbeeld door er een lichte doek
overheen te leggen).
!OSTRZEŻENIE! Nigdy nie zostawiaj dziecka w samochodzie bez opieki.
Plastikowe elementy fotelika nagrzewają się pozostawione w nasłonecznionym
miejscu. Uważaj, gdyż mogą oparzyć dziecko. Chroń swoje dziecko jak i fotelik
przed bezpośrednim przebywaniem na słońcu (np. przykrywając fotelik tkaniną.
!
106
Con el fin de garantizar la máxima seguridad para su hijo, antes de iniciar un viaje
compruebe que:
La correa abdominal (n) pasa por las guías inferiores (k) en ambos lados del cojín
del asiento (d).
La correa diagonal (f) en el lado de la hebilla del cinturón también pasa por la guía
inferior (k) del asiento.
La correa diagonal (f) pasa por la guía (g) marcada en rojo en el protector de
hombros (e).
La correa diagonal (f) está inclinada hacia abajo.
Todo el cinturón se ajusta al cuerpo del niño y no está retorcido.
¿ESTÁ BIEN SUJETO SU HIJO?
k
n
g
dk
f
n
106


Need help? Post your question in this forum.

Forumrules


Report abuse

Libble takes abuse of its services very seriously. We're committed to dealing with such abuse according to the laws in your country of residence. When you submit a report, we'll investigate it and take the appropriate action. We'll get back to you only if we require additional details or have more information to share.

Product:

For example, Anti-Semitic content, racist content, or material that could result in a violent physical act.

For example, a credit card number, a personal identification number, or an unlisted home address. Note that email addresses and full names are not considered private information.

Forumrules

To achieve meaningful questions, we apply the following rules:

Register

Register getting emails for Cybex PALLAS M-FIX SL at:


You will receive an email to register for one or both of the options.


Get your user manual by e-mail

Enter your email address to receive the manual of Cybex PALLAS M-FIX SL in the language / languages: English, German, Dutch, French, Italian, Polish, Portuguese, Spanish as an attachment in your email.

The manual is 3,37 mb in size.


You will receive the manual in your email within minutes. If you have not received an email, then probably have entered the wrong email address or your mailbox is too full. In addition, it may be that your ISP may have a maximum size for emails to receive.

The manual is sent by email. Check your email

If you have not received an email with the manual within fifteen minutes, it may be that you have a entered a wrong email address or that your ISP has set a maximum size to receive email that is smaller than the size of the manual.

The email address you have provided is not correct.

Please check the email address and correct it.

Your question is posted on this page

Would you like to receive an email when new answers and questions are posted? Please enter your email address.


Info