169042
65
Zoom out
Zoom in
Previous page
1/90
Next page
ENGLISH
65
Installation and Removal
The unit can be installed in any ISO installation slot. Please contact
the car manufacturer or the local dealer if your vehicle does not
come with an ISO slot.
NOTE
Before installation remove the two transport securing screws.
Connect all cables before mounting the unit. Ensure all con-
nections are correct and the system works properly.
Mounting Instruction
Insert the unit into the ISO slot or select a location where you
can reach all controls and the unit is not in the diver’s way.
Connect only to a properly installed 12V battery.
Connect only via the ISO connectors.
Install the unit in such way that no overheating is possible and
the unit is well ventilated.
If the installation angle exceeds 30º the unit might not perform well.
Avoid installing the unit where it is subjected to high tempera-
ture, such as from direct sunlight, hot air from the heating
ducts, or where subjected to dust, dirt or excessive vibration.
Contact your car manufacturer or the local dealer if vehicle
modications are necessary.
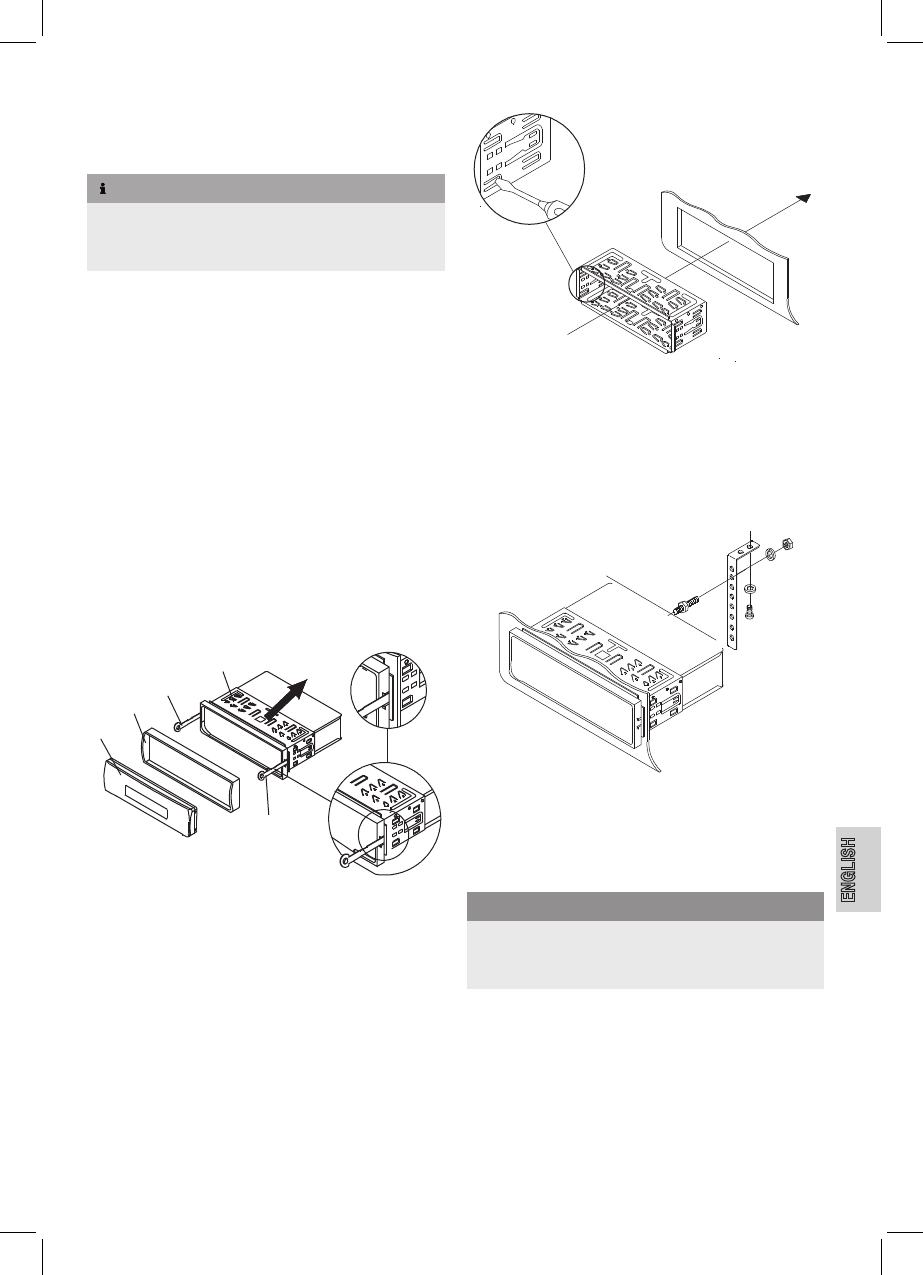
Installation in ISO Slot
A
B
C
D
C
Remove sleeve (D) and frame (B) from the unit. Use installa-
tion keys (C), if necessary.
Place the sleeve in the ISO slot.
Bend the claws outward with a screwdriver for perfect t.
Check the sleeve for tight t.
Connect the ISO female connectors of the unit with the two
ISO male connectors of the vehicle.
Connect the antenna to the antenna connector at the rear of
the unit.
Secure the unit against theft, if necessary. Attach bolt and
mounting strip with the fastening materials at the rewall.
Carefully slide the unit into the sleeve until it locks into place.
Press RESET (4) with a pen or other pointed object after all
connections are made.
Attach the front panel (A) as described under “Attach Front
Panel”.
CAUTION
Cable damage possible!
To avoid ca
ble damage observe the cables when sliding the
unit into the sleeve.
Attach the frame.
65


Need help? Post your question in this forum.

Forumrules


Report abuse

Libble takes abuse of its services very seriously. We're committed to dealing with such abuse according to the laws in your country of residence. When you submit a report, we'll investigate it and take the appropriate action. We'll get back to you only if we require additional details or have more information to share.

Product:

For example, Anti-Semitic content, racist content, or material that could result in a violent physical act.

For example, a credit card number, a personal identification number, or an unlisted home address. Note that email addresses and full names are not considered private information.

Forumrules

To achieve meaningful questions, we apply the following rules:

Register

Register getting emails for Clatronic ar 815 at:


You will receive an email to register for one or both of the options.


Get your user manual by e-mail

Enter your email address to receive the manual of Clatronic ar 815 in the language / languages: English, German, Italian, Portuguese, Spanish as an attachment in your email.

The manual is 5,61 mb in size.


You will receive the manual in your email within minutes. If you have not received an email, then probably have entered the wrong email address or your mailbox is too full. In addition, it may be that your ISP may have a maximum size for emails to receive.

The manual is sent by email. Check your email

If you have not received an email with the manual within fifteen minutes, it may be that you have a entered a wrong email address or that your ISP has set a maximum size to receive email that is smaller than the size of the manual.

The email address you have provided is not correct.

Please check the email address and correct it.

Your question is posted on this page

Would you like to receive an email when new answers and questions are posted? Please enter your email address.


Info