108402
15
Zoom out
Zoom in
Previous page
1/65
Next page
GB 7
maintenance (continued)
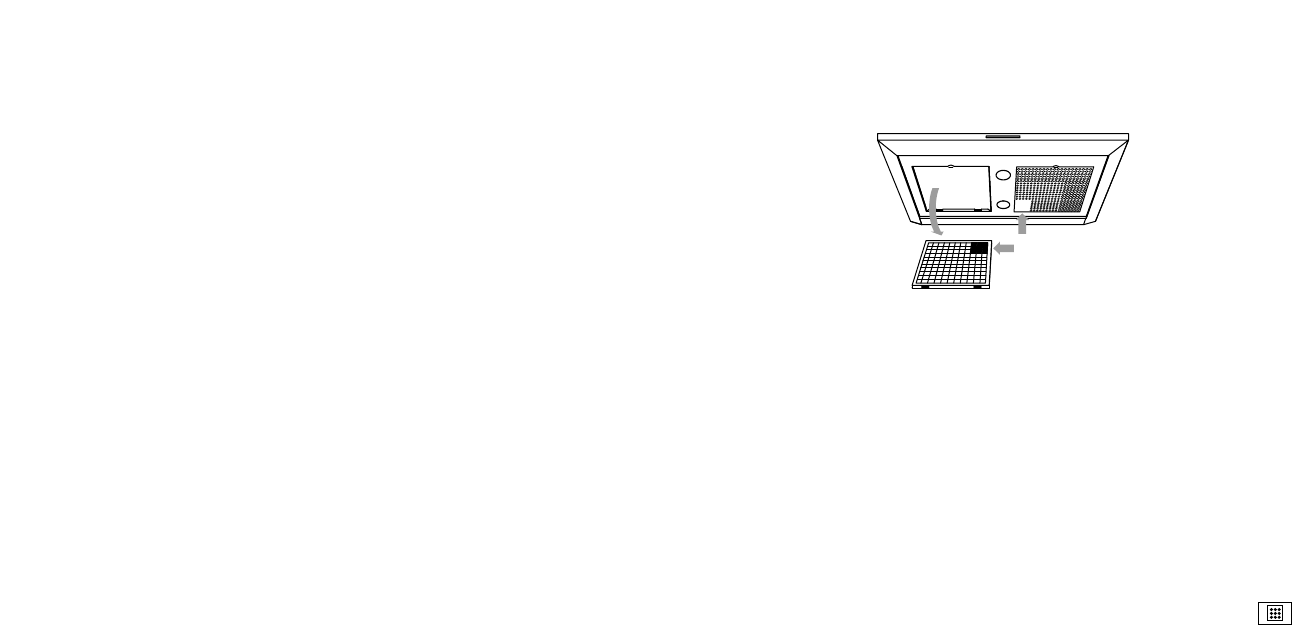
removing/replacing grease filters
Remove the filters as follows: switch the fan and the lighting
off.
Push the filter at the edge of the niche to the back and pull
the front end down. You can now remove the filter from the
hood.
The filter can only be put back into place in one way. Take
note of the correct position of the filter (see illustration).
Hold the filter in such a way that the covered part of the
underside is at the centre rear. This is recognizable on the
outside by the pattern with the smaller holes.
Put the filter back into place by first pushing the rear side
into the holder. Then push the front upwards until it cannot
go any further and let the filter slide forwards. The filter is
now once again in place. Erase the electronic memory by
pressing the button for approx. 5 seconds.
cleaning the grease filters
You can clean the grease filters in the dishwasher. Allow the
filter to drain well - through the slits in the side - before
putting it back.
replacing the carbon filter
Replace the carbon filter twice a year. This only applies to
recirculation hoods.
Put the carbon filter in the place intended for it above the
filters.
GB 6
maintenance
extractor hood
Clean the extractor hood as soon as the grease filter
indicator light comes on.
The stainless steel on the outside of the hood can be
cleaned with soapy water and a damp cloth. The stainless
steel will regain its shine if you occasionally use a stainless
steel care product or polish. The polish imparts a dirt-
resistant layer to the stainless steel. Always clean the
stainless steel in the direction of polishing.
Never use abrasive cleaning agents (such as Vim, green
scouring pads or other scourers) or polishing cleaning
products (such as liquid scourers and Jif).
Never use caustic cleaning agents. These can cause
stainless steel to discolour.
15


Need help? Post your question in this forum.

Forumrules


Report abuse

Libble takes abuse of its services very seriously. We're committed to dealing with such abuse according to the laws in your country of residence. When you submit a report, we'll investigate it and take the appropriate action. We'll get back to you only if we require additional details or have more information to share.

Product:

For example, Anti-Semitic content, racist content, or material that could result in a violent physical act.

For example, a credit card number, a personal identification number, or an unlisted home address. Note that email addresses and full names are not considered private information.

Forumrules

To achieve meaningful questions, we apply the following rules:

Register

Register getting emails for ATAG EG 411 X at:


You will receive an email to register for one or both of the options.


Get your user manual by e-mail

Enter your email address to receive the manual of ATAG EG 411 X in the language / languages: English, German, Dutch, Danish, French, Italian as an attachment in your email.

The manual is 1,75 mb in size.


You will receive the manual in your email within minutes. If you have not received an email, then probably have entered the wrong email address or your mailbox is too full. In addition, it may be that your ISP may have a maximum size for emails to receive.

Others manual(s) of ATAG EG 411 X

ATAG EG 411 X User Manual - English, German, Dutch, French - 34 pages


The manual is sent by email. Check your email

If you have not received an email with the manual within fifteen minutes, it may be that you have a entered a wrong email address or that your ISP has set a maximum size to receive email that is smaller than the size of the manual.

The email address you have provided is not correct.

Please check the email address and correct it.

Your question is posted on this page

Would you like to receive an email when new answers and questions are posted? Please enter your email address.


Info