11
STÖRUNGEN
Falls das Gerät Störungen aufweisen sollte,
überprüfen Sie zuerst folgendes:
• Steckt der Netzstecker in der Steckdose?
• Befindet sich der Hauptschalter der elektrischen
Anlage in der richtigen Stellung?
• Ist die Stromzufuhr unterbrochen?
• Befindet sich der Thermostatknopf in richtiger
Stellung?
• Wasserpfütze auf dem Boden des Kühlfaches:
• Abtauwasserloch verstopft? (siehe Abschnitt
“Abtauen”)
Sollten Sie nach o.e. Prüfungen zu keinem Resultat
kommen, so wenden Sie sich bitte an unseren
nächsten Kundendienst.
Um ein rasches Beheben des Schadens zu
ermöglichen, ist es beim Anruf an den
Kundendienst notwendig, die Modell- und
Seriennummer anzugeben, die Sie dem
Garantieschein oder dem Typenschild (– linke
Seite – unten) entnehmen können.
Abtauen
Die sich auf dem Verdampfer des Kühlschrankes
bildende Reifschicht taut jedesmal in den Stillstand-
zeiten des Motorkompressors von selbst ab. Das
Tauwasser läuft durch eine Rinne in eine Plastik-
schale auf der Rückseite des Gerätes (über dem
Kompressor) und verdunstet dort.
Wir empfehlen, das in der Mitte der
Abtauwasserrinne des Kühlraumes befindliche
Ablaufloch für das Abtauwasser regelmäßig zu
reinigen, um zu vermeiden, daß das
Abtauwasser auf die eingelagerten Lebensmittel
tropft.Verwenden Sie den dafür vorgesehenen
Reiniger,der sich schon im Ablaufloch befindet.
Die sich im Gefrierfach bildende Reifschicht soll,
sobald diese eine Stärke von 4 mm erreicht hat, mit
dem mitgelieferten Plastikschaber abgekratzt
werden. Während dieses Vorganges ist es nicht
nötig, das Gerät auszuschalten und die
Nahrungsmittel herauszunehmen.
Wenn sich jedoch eine dicke Eisschicht bildet, muß
man vollkommen abtauen. Um ein vollständiges
Abtauen durchzuführen, geht man wie folgt vor:
1. Den Thermostatknopf auf «O» einstellen oder
den Stecker aus der Steckdose herausziehen.
2. Die eventuell im Frosterfach liegenden
Lebensmittel herausnehmen, sie in
Zeitungspapier einwickeln und sehr kühl
aufbewahren.
3. Die Tür offen lassenund den Plastikschaber, der
als Rinne dient, am vorgesehenen Platz
einsetzen, sodaß das Abtauwasser in ein
geeignetes, darunter gestelltes Gefäß fließen
kann.
4. Nach beendetem Abtauprozeß das Fach gut
trocknen. Plastikschaber für späteren Gebrauch
aufbewahren.
5. Den Thermostatknopf wieder in die gewünschte
Stellung drehen bzw. den Stecker wieder
einstecken.
6. Nachdem das Gerät für 2-3 Std. in Betrieb
genommen wurde, können tiefgefrorene
Lebensmittel darin zurückgelegt
Achtung:
Benutzen Sie niemals Metallgegenstände, um die
Reifschicht abzukratzen, damit eine
Beschädigungen des Gerätes vermieden werden
kann.
Benutzen Sie kein mechanisches oder anderes
Mittel für einen schnelleren Abtauprozeß mit
Ausnahme der vom Hersteller empfohlenen.
Ein Temperaturanstieg der Tiefkühlkost während
des Abtauens könnte die Aufbewahrungsdauer
verkürzen.
62
Electrical connection
Before plugging in, ensure that the voltage and
frequency shown on the serial number plate
correspond to your domestic power supply.Voltage
can vary by ±6% of the rated voltage.
For operation with different voltages, a suitably sized
auto-transformer must be used.
The appliance must be earthed.
The power supply cable plug is provided with a
contact for this purpose.
If the domestic power supply socket is not earthed,
connect the appliance to a separate earth in
compliance with current regulations, consulting a
specialist technician.
INSTALLATION
Location
The appliance should be installed well away from
sources of heat such as radiators, boilers, direct
sunlight etc.
For building into kitchen units follow the special “
Building-in” instructions given.
Attention
It must be possible to disconnect the appliance from
the mains power supply; the plug must therefore be
easily accessible after installation.
TECHNICAL INFORMATION
210
70
0,87
318
13
20
Fridge Net Capacity lt.
Energy Consumption kWh/24h
Energy Consumption kWh/annuo
Freezing Capacity kg/24h
Rising Time
Freezer Net Capacity lt.
The Technical info are on the rating plate situated on the left inside the appliance.
The Manufacturer declines all responsibility if
the above safety precautions are not observed.
This appliance complies with the following
E.E.C. Directives:
- 87/308 EEC of 2/6/87 relative to radio interference
suppression.
- 73/23 EEC of 19.2.73 (Low Voltage Directive) and
subsequent modifications;
- 89/336 EEC of 3.5.89 (Electromagnetic
Compatibility Directive) and subsequent
modifications.
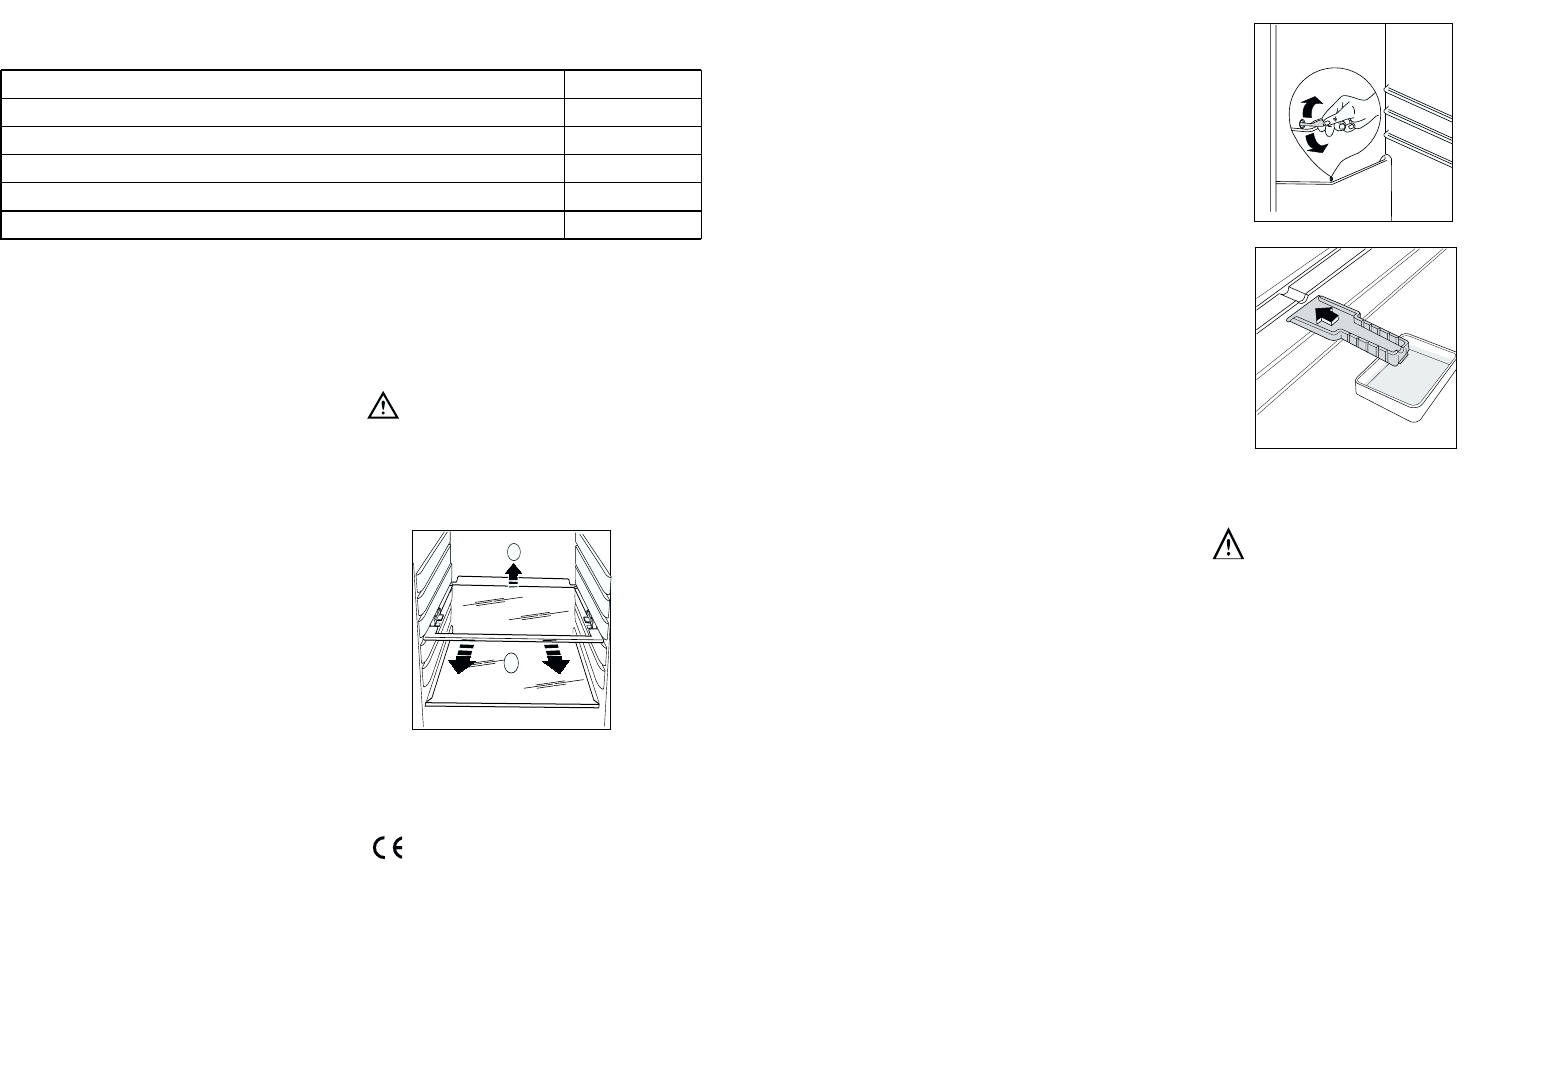
Shelf holders
Your appliance is equipped with shelf retainers that
make it possible to secure the shelves during
transportation.
To remove them proceed as follows:
Raise the shelf from the back, push it in the direction
of the arrow until it is freed and remove the retainers.