338159
10
Zoom out
Zoom in
Previous page
1/36
Next page
10
WARTUNG
Vor jeder Reinigungsarbeit immer den
Netzstecker aus der Steckdose ziehen.
Regelmäßige Reinigung
Benutzen Sie nie Metallgegenstände um das Gerät
zu reinigen, da es beschädigt werden könnte.
Den Innenraum mit lauwarmem Wasser und Natron
und die lackierten Teile mit einem Poliermittel
reinigen.
Gut nachwaschen und sorgfältig trocknen.
Den Kondensator und den Motorkompressor mit
einer Bürste oder einem Staubsauger reinigen. Dies
begünstigt den guten Betrieb mit folglicher
Stromersparnis.
Stillstandszeiten
Bei längerem Stillstand des Gerätes, müssen Sie
folgendermaßen vorgehen:
den Stecker aus der Steckdose ziehen;
alle Lebensmittel herausnehmen;
Gerät abtauen, Innenraum und Zubehörteile
reinigen; die Türen offen lassen, um im Innern eine
gute Luftzirkulation zu gewährleisten und somit
Geruchsbildung zu vermeiden.
Innenbeleuchtung
Die Innenbeleuchtungslampe im Kühlabteil ist durch
folgende Arbeitsschritte zugänglich:
Lösen Sie die Befestigungsschraube der
Lampenabdeckung.
Heben Sie den beweglichen Teil ab, indem Sie
wie in der Abbildung gezeigt darauf drücken.
Sollte sich die Beleuchtung beim Öffnen der Türe
nicht einschalten, ist zu überprüfen, ob die
Glühbirne fest eingeschraubt ist; wenn die Störung
dennoch bestehen bleibt, die defekte Glühbirne
durch eine neue Birne gleicher Leistung ersetzen.
Die maximale Leistung ist am Leuchtkörper
angegeben.
Achtung
Dieses Gerät enthält im Kältekreislauf Kohlen-
wasserstoff. Aus diesem Grund darf die Wartung
und das Nachfüllen aussschließlich von
autorisiertem Fachpersonal durchgeführt werden.
D411
63
Instructions for totally built-in appliances
Door reversibility
Instructions for totally built-in
appliances
Dimensions of the recess
Height (1) 1780 mm
Depth (2) 550 mm
Width (3) 560 mm
For safety reasons, minimum ventilation must be as
shown in Fig. Attention: keep ventilation openings
clear of obstruction.
50 mm
min.
200 cm
2
200 cm
2
min.
D567
B
C
A
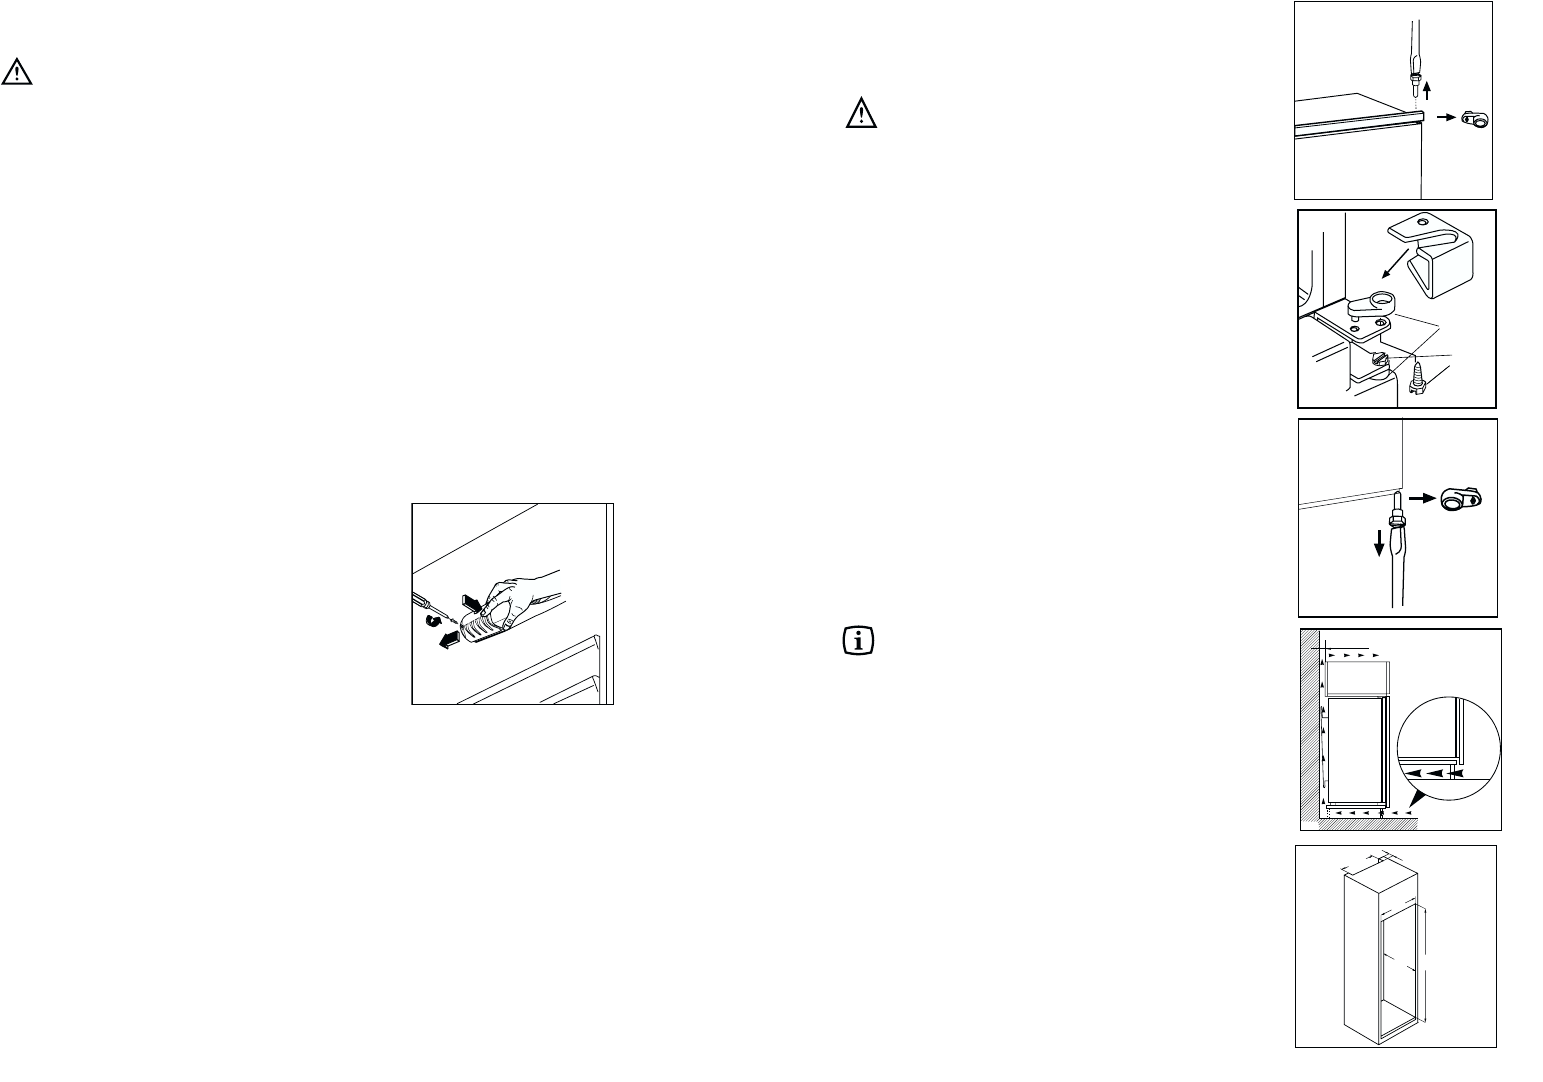
The appliance is supplied with the right
or left door opening.To change the opening
direction of the door proceed as in the
following instructions before installing it.
1. Unscrew the upper pin and remove the spacer
2. Remove the upper door
3. Unscrew the pins (B) and the spacers (C) and
refit them on the middle hinge of the opposite
side. Snap the hinge cover (A).
4. Refit the upper door, the upper pin and the
spacer on the opposite side
5. Unscrew the lower pin and remove the spacer
and refit them on the opposite side
PR01
540
50
3
2
1
Furthermore, it is necessary that the niche is provid
with a conduct of ventilation having the following
dimensions:
depth 50 mm
width 540 mm
10


Need help? Post your question in this forum.

Forumrules
1

Forum

zanussi-zi-922-9-dac

Reset search

  • I am looking for the circuit diagram for refrigator ZI 922/9 DAC Please Thank you Submitted on 14-9-2021 at 00:21

    Reply Report abuse


Report abuse

Libble takes abuse of its services very seriously. We're committed to dealing with such abuse according to the laws in your country of residence. When you submit a report, we'll investigate it and take the appropriate action. We'll get back to you only if we require additional details or have more information to share.

Product:

For example, Anti-Semitic content, racist content, or material that could result in a violent physical act.

For example, a credit card number, a personal identification number, or an unlisted home address. Note that email addresses and full names are not considered private information.

Forumrules

To achieve meaningful questions, we apply the following rules:

Register

Register getting emails for Zanussi zi 922-9 dac at:


You will receive an email to register for one or both of the options.


Get your user manual by e-mail

Enter your email address to receive the manual of Zanussi zi 922-9 dac in the language / languages: English, German, Dutch, French as an attachment in your email.

The manual is 0,96 mb in size.


You will receive the manual in your email within minutes. If you have not received an email, then probably have entered the wrong email address or your mailbox is too full. In addition, it may be that your ISP may have a maximum size for emails to receive.

The manual is sent by email. Check your email

If you have not received an email with the manual within fifteen minutes, it may be that you have a entered a wrong email address or that your ISP has set a maximum size to receive email that is smaller than the size of the manual.

The email address you have provided is not correct.

Please check the email address and correct it.

Your question is posted on this page

Would you like to receive an email when new answers and questions are posted? Please enter your email address.


Info