РУССКИЙУстановкаСтр.2Инструкции по пользованию приборомСтр100
БЪЛГАРСКИИнсталиранеСтраница2Инструкции за употребаСтраница106
ROMÂNĂInstalareaPagina2Instrucţiuni de utilizarePagina112
УКРАЇНСЬКАВстановленняСторінка2Інструкція з експлуатаціїСторінка118
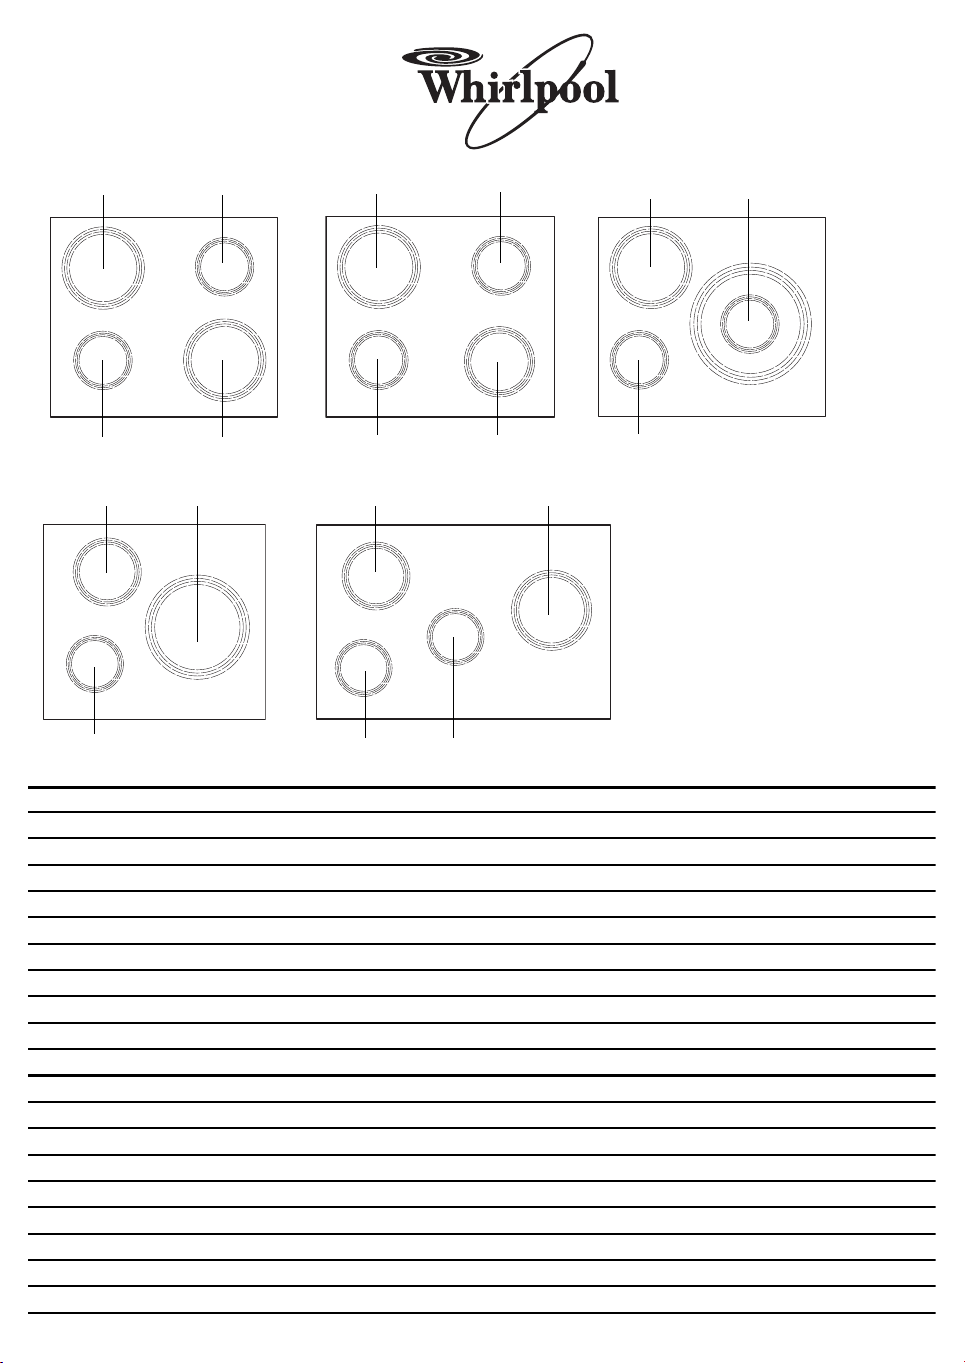
210mm145mm
210mm145mm
210mm145mm
180mm145mm
210mm280/180mm
145mm
180mm240mm
145mm
145mm145mm
180mm210mm
2
483 mm
553 mm
30 mm
+1
0
580 mm
510 mm
52 mm
A
R = Min. 6,5 mm
Max. 8 mm
490 mm
560 mm
0
+2
0
+2
513 mm
583 mm
0
+2
0
+2
6 mm
560 mm
490 mm
R = 11,5 mm
R = Min. 6,5 mm
Max. 8 mm
R = 11,5 mm
0
+2
0
+2
B
Min. 50 mm
483 mm
742 mm
30 mm
+1
0
770 mm
510 mm
52 mm
R = Min. 6,5 mm
Max. 8 mm
490 mm
750 mm
0
+2
0
+2
Min. 50 mm
513 mm
Min. 50 mm
773 mm
0
+2
0
+2
750 mm
490 mm
R = 11,5 mm
0
+2
0
+2
6 mm
R = 11,5 mm
R = Min. 6,5 mm
Max. 8 mm
3
12
3
Min. 5 mm
Min. 10 cm
Min. 3 cm
Max. 6 cm
Min. 5 mm
DE4
IHRE SICHERHEIT UND DIE ANDERER PERSONEN IST SEHR WICHTIG
Diese Anweisungen und das Gerät sind mit wichtigen Sicherheitshinweisen versehen, die Sie lesen und stets beachten sollten.
Alle Gefahrenhinweise bezeichnen das potenzielle Risiko, auf das sie sich beziehen und geben an, wie Verletzungsgefahren, Schäden und Stromschläge durch
unsachgemäßen Gebrauch des Gerätes vermieden werden können. Halten Sie sich strikt an folgende Anweisungen:
-Halten Sie das Gerät von der Stromversorgung getrennt, bis der Einbau durchgeführt wurde.
-Die Installation oder Wartung muss von einer Fachkraft gemäß den Herstellerangaben und gültigen örtlichen Sicherheitsbestimmungen durchgeführt werden.
Reparieren Sie das Gerät nicht selbst und tauschen Sie keine Teile aus, wenn dies vom Bedienungshandbuch nicht ausdrücklich vorgesehen ist.
-Die Erdung des Gerätes ist gesetzlich vorgeschrieben.
-Das Netzkabel muss lang genug sein, um das in die Küchenzeile eingebaute Gerät an das Stromnetz anzuschließen.
-Damit die Installation den geltenden Sicherheitsrichtlinien entspricht, muss ein allpoliger Sicherheitsschalter mit einer Mindestkontaktöffnung von 3 mm
verwendet werden.
-Verwenden Sie keine Mehrfachstecker oder Verlängerungskabel.
-Nie am Netzkabel ziehen.
-Nach der Installation dürfen Strom führende Teile für den Benutzer nicht mehr zugänglich sein.
-Das Gerät ist ausschließlich zur Zubereitung von Nahrungsmitteln für private Haushalte konzipiert. Jede andere Verwendung (z. B. das Heizen von Räumen) ist
unzulässig. Der Hersteller haftet nicht bei Schäden aufgrund unsachgemäßen Gebrauchs oder fehlerhafter Bedienung.
-Das Gerät darf nicht von Personen (einschließlich Kindern) benutzt werden, die körperlich, in ihrer Wahrnehmungsfähigkeit oder ihren geistigen Kräften
eingeschränkt sind oder die nicht über entsprechende Erfahrung und Kenntnisse verfügen, außer sie wurden durch eine verantwortliche Person entsprechend
angeleitet und in den Gebrauch des Gerätes eingewiesen.
-Die erreichbaren Teile des Gerätes können während des Betriebs sehr heiß werden. Halten Sie Kinder vom Gerät fern und achten Sie darauf, dass sie das Gerät
nicht als Spielzeug benutzen.
-Berühren Sie die Heizelemente während des Betriebs und unmittelbar danach nicht. Vermeiden Sie den Kontakt mit Tüchern oder anderen entflammbaren
Materialien, bis das Gerät wieder vollständig abgekühlt ist.
-Legen Sie keine brennbaren Gegenstände auf oder in die Nähe des Geräts.
-Heißes Fett und Öl sind leicht entzündlich. Beaufsichtigen Sie stets den Garvorgang, wenn Sie Speisen mit viel Fett oder Öl zubereiten.
-Legen Sie keine Metallgegenstände wie Küchenutensilien (Messer, Gabeln, Löffel, Deckel etc.) auf die Kochzonen, da diese heiß werden können.
-Unter dem Gerät muss eine Trennplatte (nicht im Lieferumfang enthalten) installiert werden.
-Verwenden Sie das Kochfeld nicht, wenn die Glaskeramik gebrochen oder gerissen ist. Rufen Sie den Kundendienst.
-Das Gerät ist nicht für den Betrieb mittels externer Zeitschaltuhr oder getrenntem Fernbedienungssystem vorgesehen.
WICHTIGE SICHERHEITSHINWEISE
Dieses Symbol warnt vor möglichen Gefahren für die Sicherheit des Benutzers und anderer Personen.
Alle Sicherheitshinweise werden von dem Gefahrensymbol und folgenden Begriffen begleitet:
GEFAHRWeist auf eine gefährliche Situation hin, die bei mangelnder Vorsicht zu schweren Verletzungen führen
kann.
ACHTUNGWeist auf eine gefährliche Situation hin, die bei mangelnder Vorsicht zu schweren Verletzungen führt.
DEUTSCHInstallationSeite2BedienungsanleitungSeite
DE5
Entsorgung von Verpackungsmaterialien
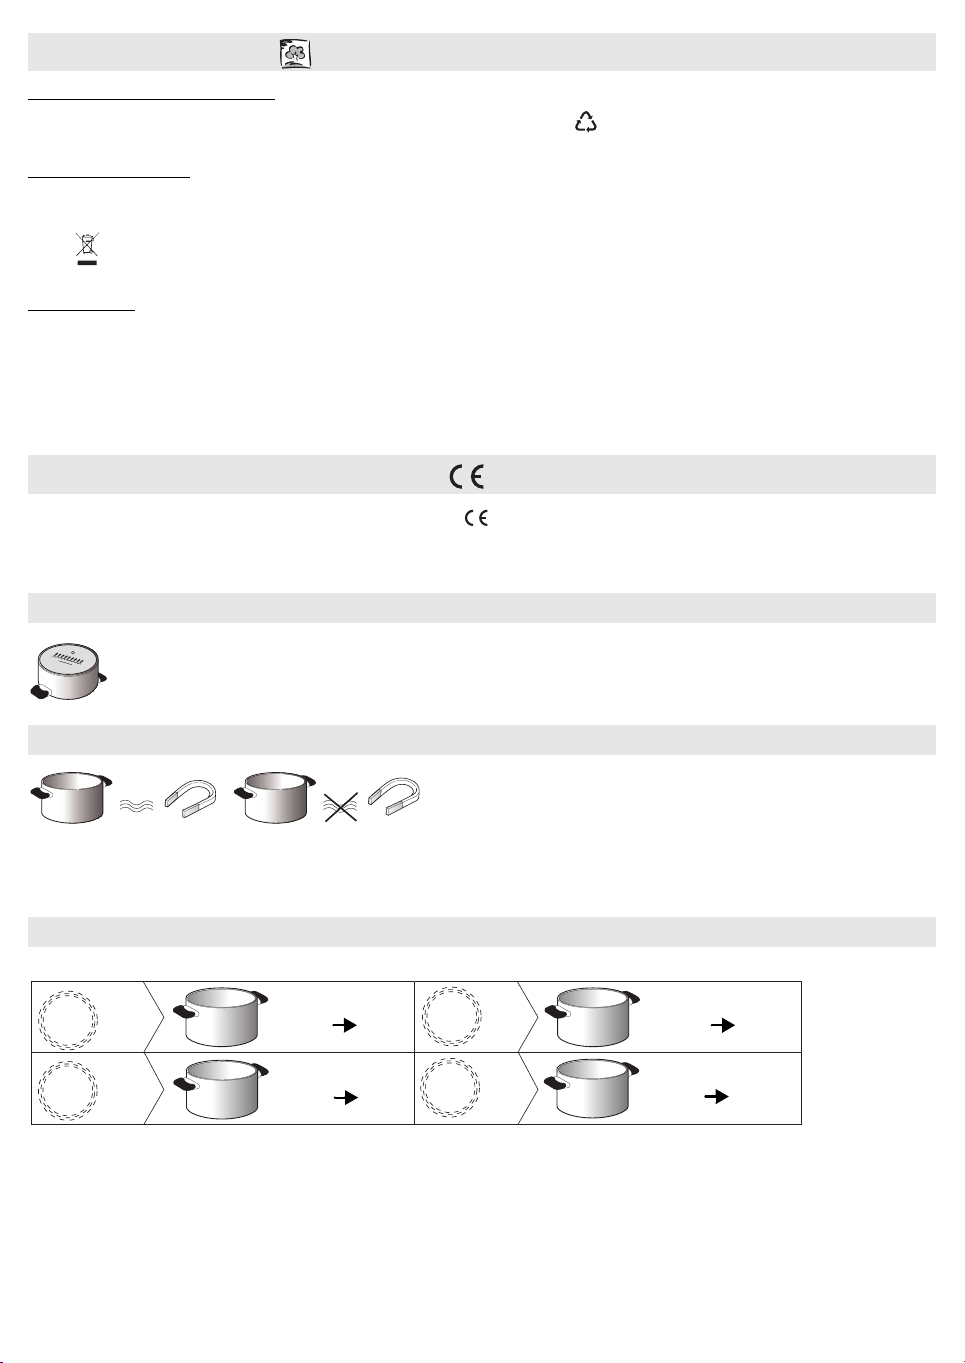
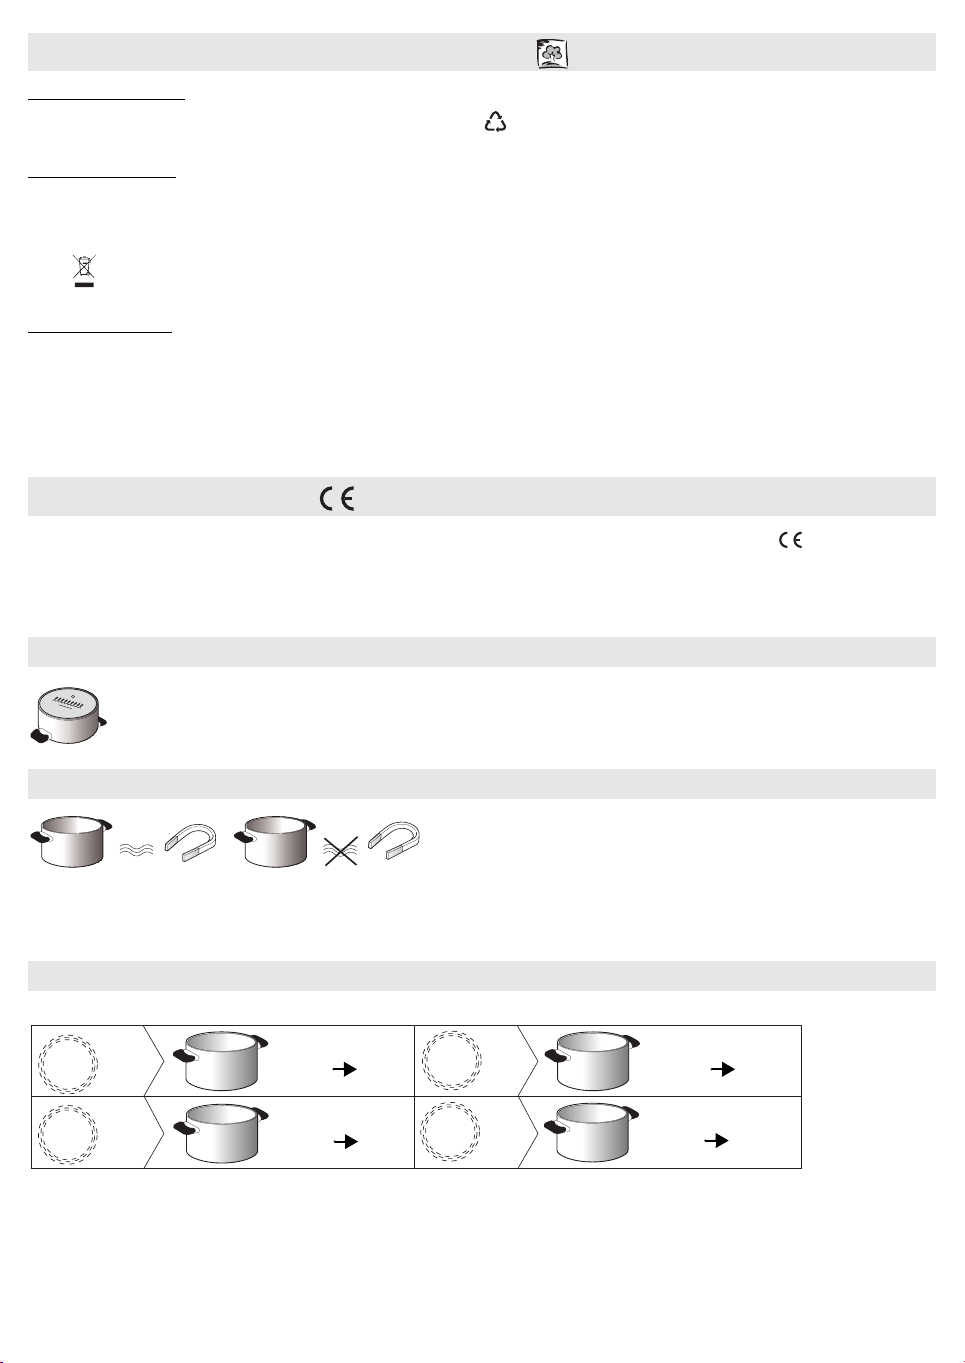
Das Verpackungsmaterial ist zu 100 % wiederverwertbar und trägt das Recycling-Symbol (). Werfen Sie das Verpackungsmaterial deshalb nicht einfach fort,
sondern entsorgen Sie es auf die von den verantwortlichen Stellen festgelegte Weise.
Entsorgung von Altgeräten
Dieses Gerät ist gemäß der Europäischen Richtlinie 2002/96/EG für Elektro- und Elektronik-Altgeräte gekennzeichnet.
Durch eine angemessene Entsorgung des Geräts trägt der Nutzer dazu bei, potentiell schädliche Auswirkungen für Umwelt und Gesundheit zu vermeiden.
Das Symbol auf dem Gerät bzw. auf dem beiliegenden Informationsmaterial weist darauf hin, dass dieses Gerät kein normaler Haushaltsabfall ist, sondern in einer
Sammelstelle für Elektro- und Elektronik-Altgeräte entsorgt werden muss.
Energiesparen
Für bestmögliche Ergebnisse berücksichtigen Sie bitte folgende Hinweise:
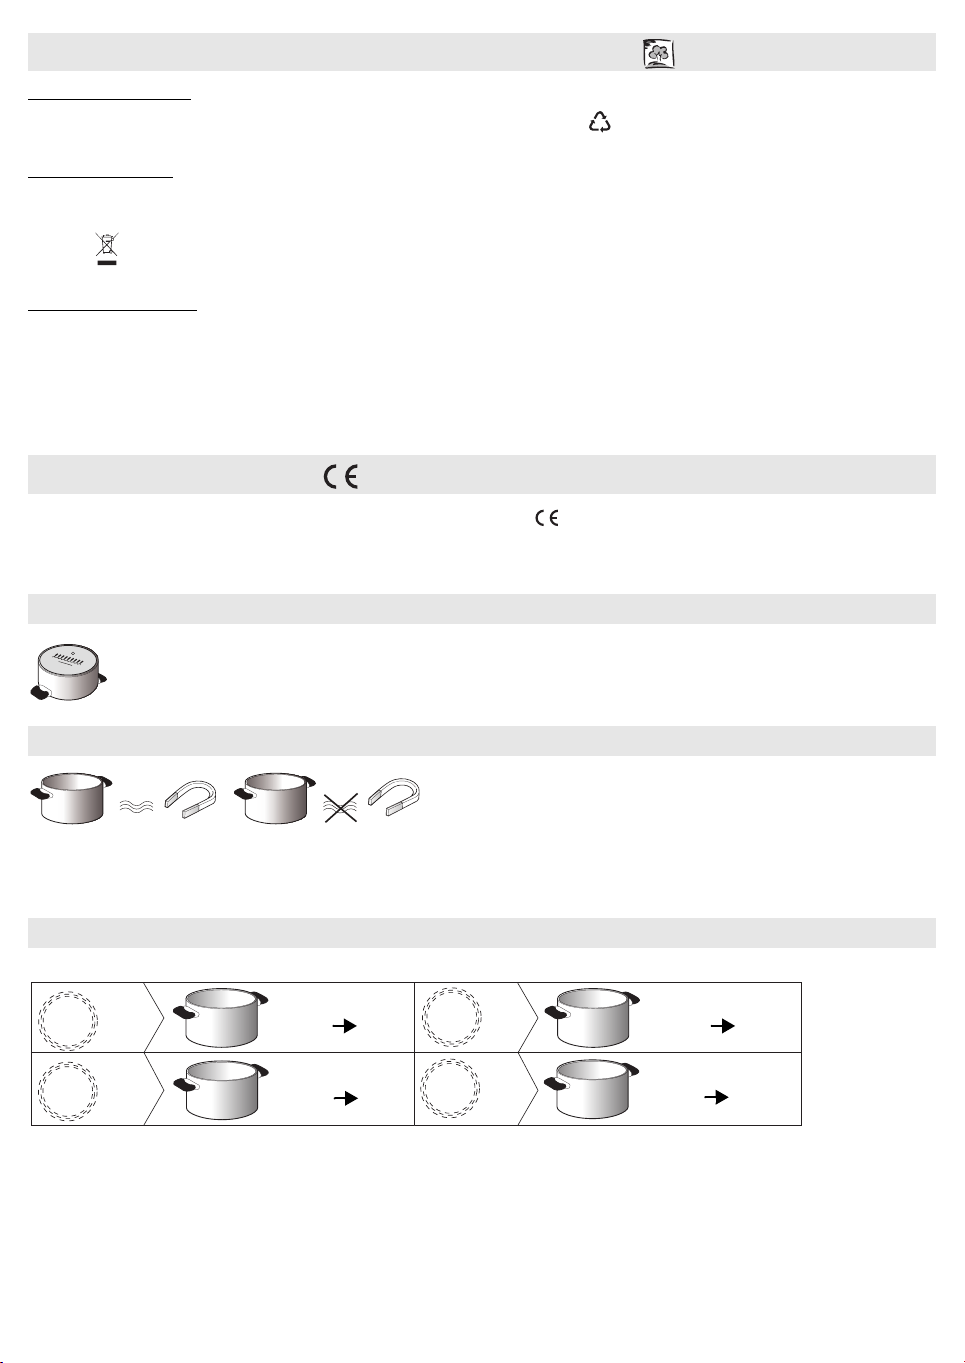
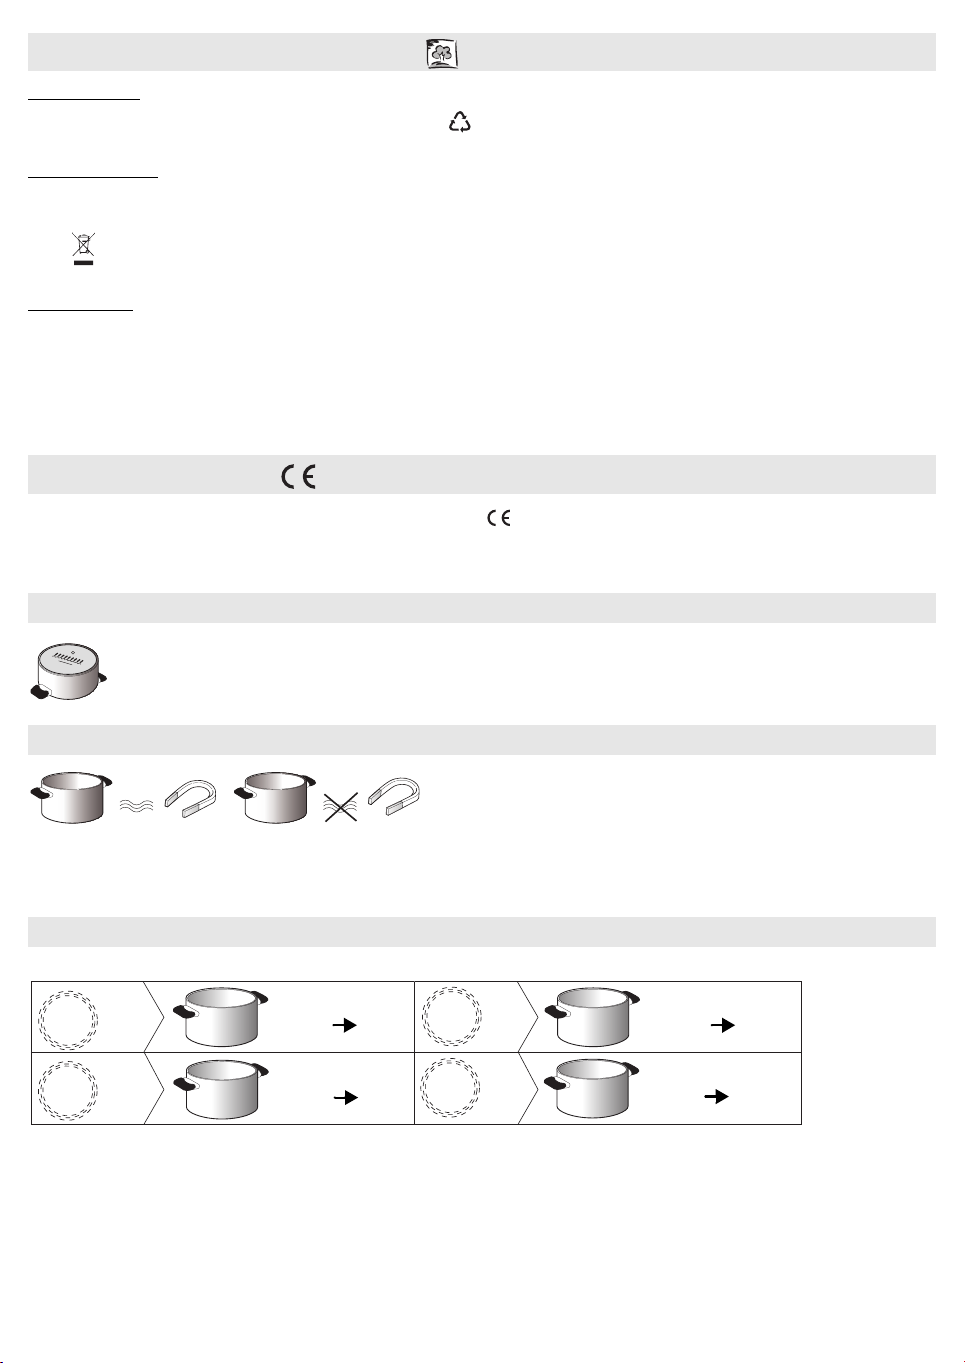
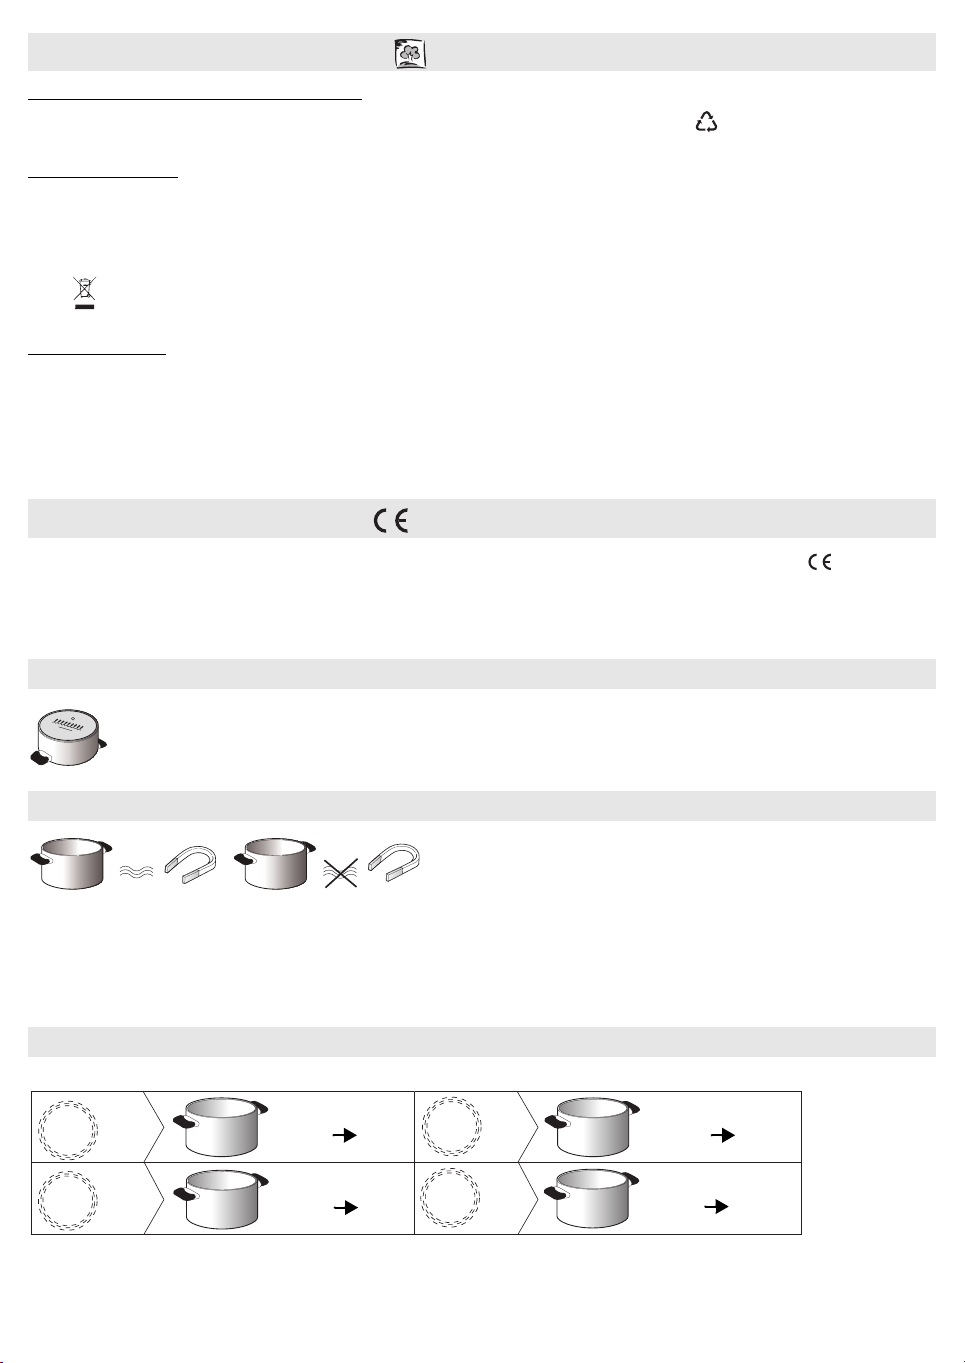
•Verwenden Sie nur Töpfe und Pfannen, deren Bodendurchmesser dem der Kochzone entspricht.
•Verwenden Sie nur Töpfe und Pfannen mit flachem Boden.
•Lassen Sie beim Kochen den Deckel möglichst auf dem Topf.
•Durch Verwendung eines Schnellkochtopfes können Sie noch mehr Energie und Zeit sparen.
•Stellen Sie das Geschirr stets mittig auf die gekennzeichneten Kochzonen des Induktionsfeldes.
-Dieses Gerät ist für den Kontakt mit Lebensmitteln bestimmt und entspricht der ()-Verordnung 1935/2004. Es wurde gemäß den Sicherheitsanforderungen
der “Niederspannungsrichtlinie” 2006/95/EG (ersetzt 73/23/EWG und nachfolgende Zusätze) und den Schutzvorschriften der “EMV”-Richtlinie 2004/108/EG
entworfen, hergestellt und in den Handel eingeführt.
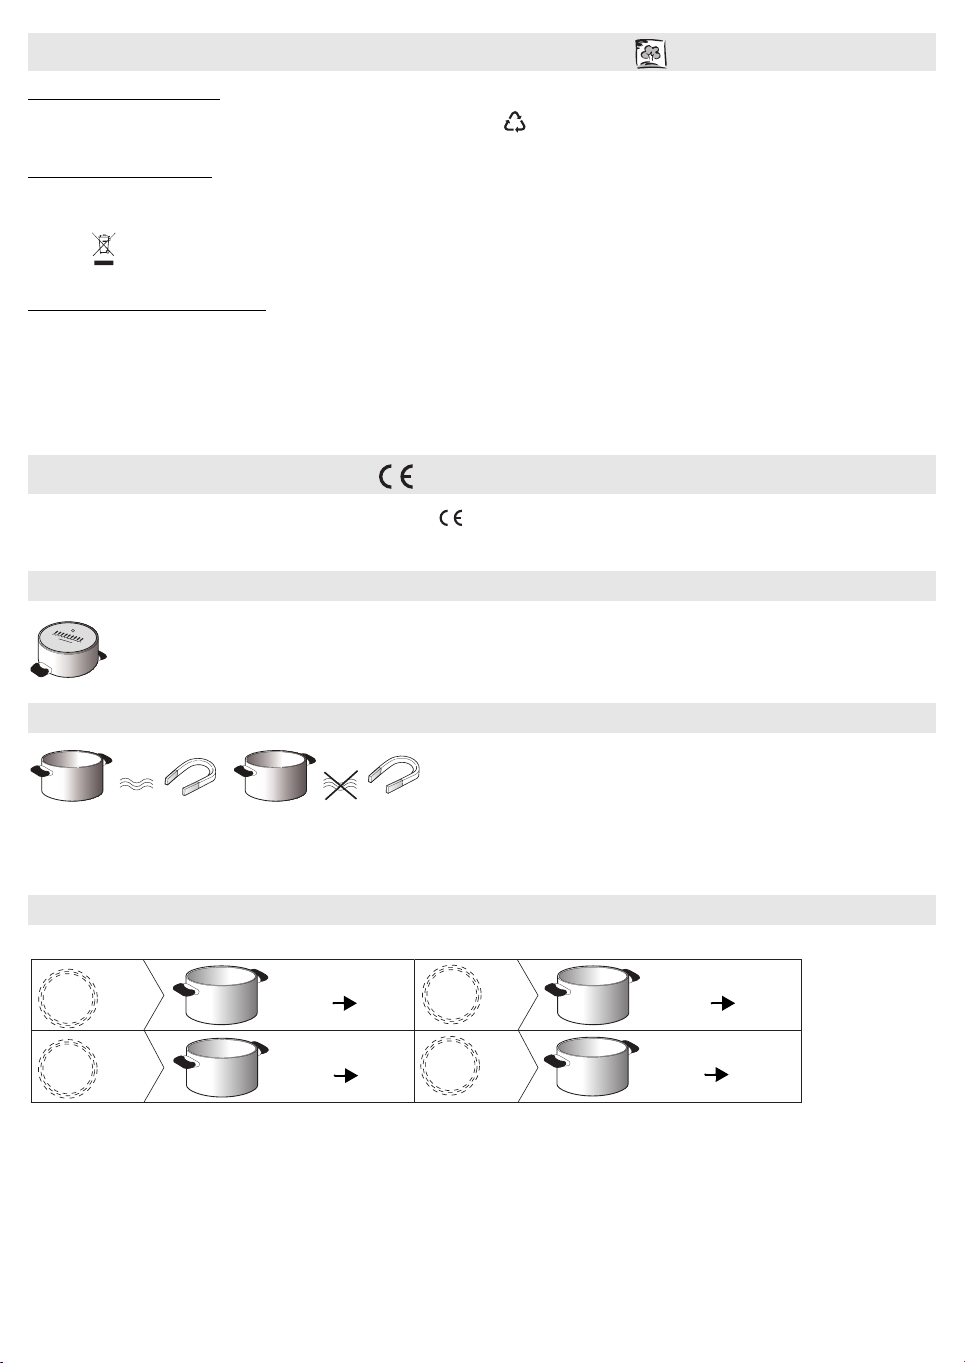
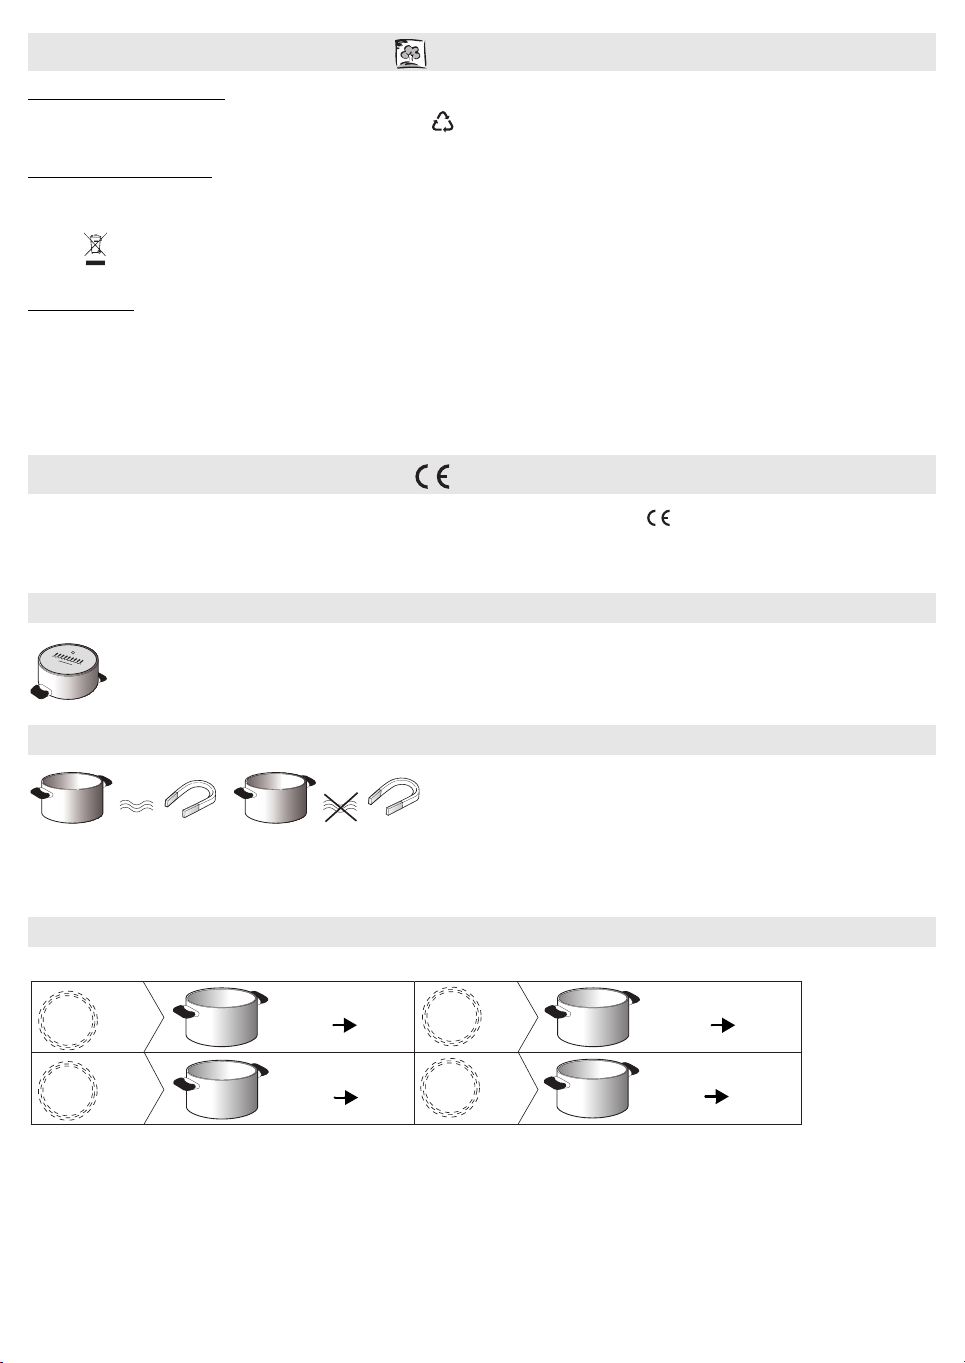
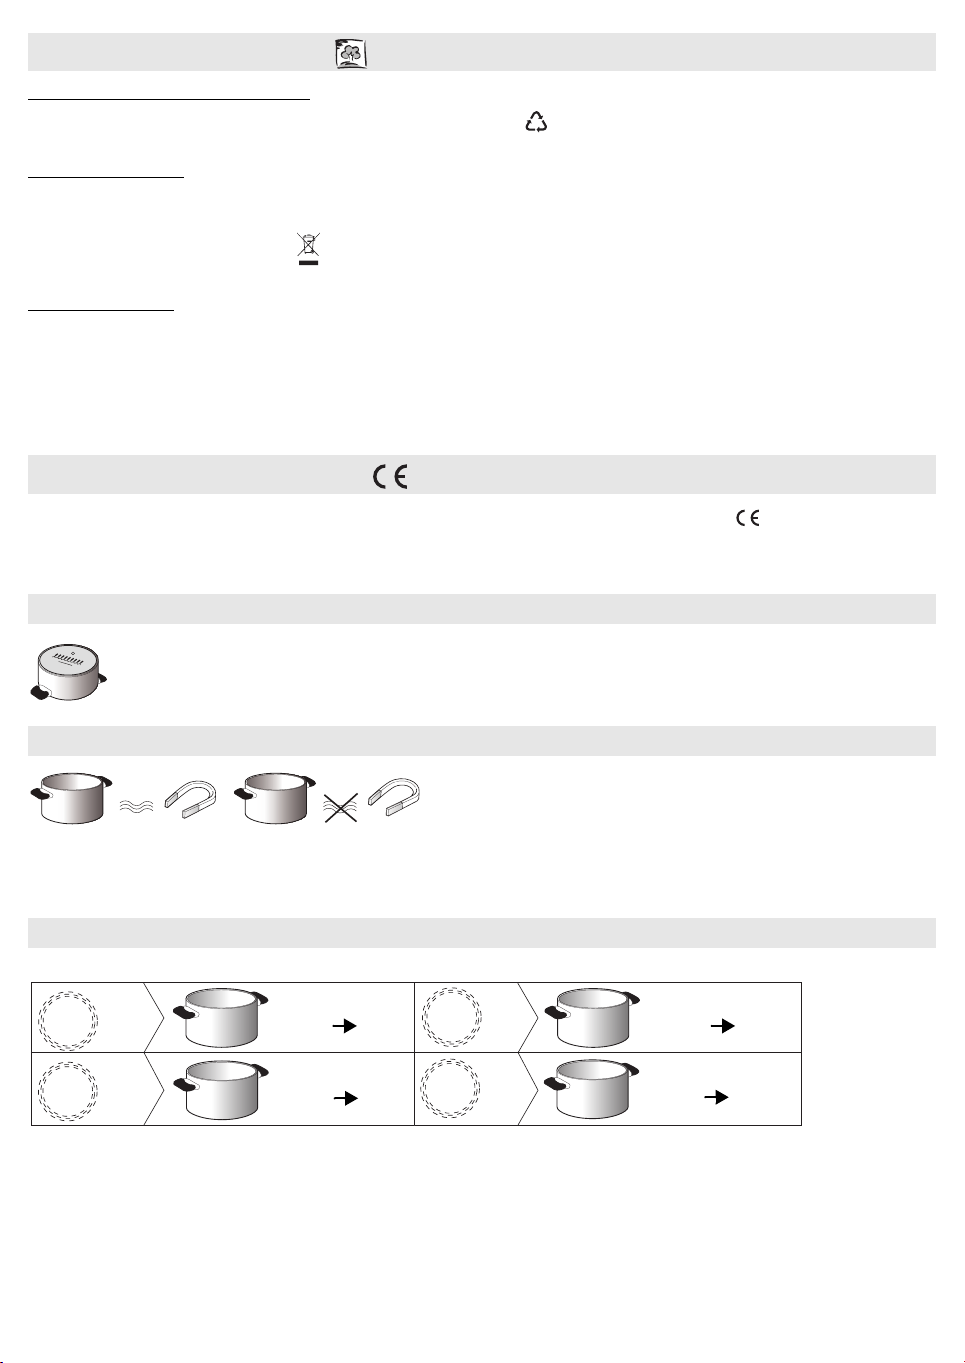
So stellen Sie mit einem Magnet fest, ob das Kochgeschirr für das Induktionskochsystem geeignet ist: die Töpfe sind ungeeignet, wenn sie vom Magneten nicht erfasst
werden.
-Stellen Sie sicher, dass der Unterboden des Kochgeschirrs nicht rau ist, da er die Glaskeramikoberfläche des Kochfelds zerkratzen könnte. Überprüfen Sie das
Kochgeschirr.
-Stellen Sie niemals heißes Kochgeschirr auf das Bedienfeld des Kochfeldes. Dieses könnte Schaden nehmen.
HINWEISE ZUM UMWELTSCHUTZ
KONFORMITÄTSERKLÄRUNG
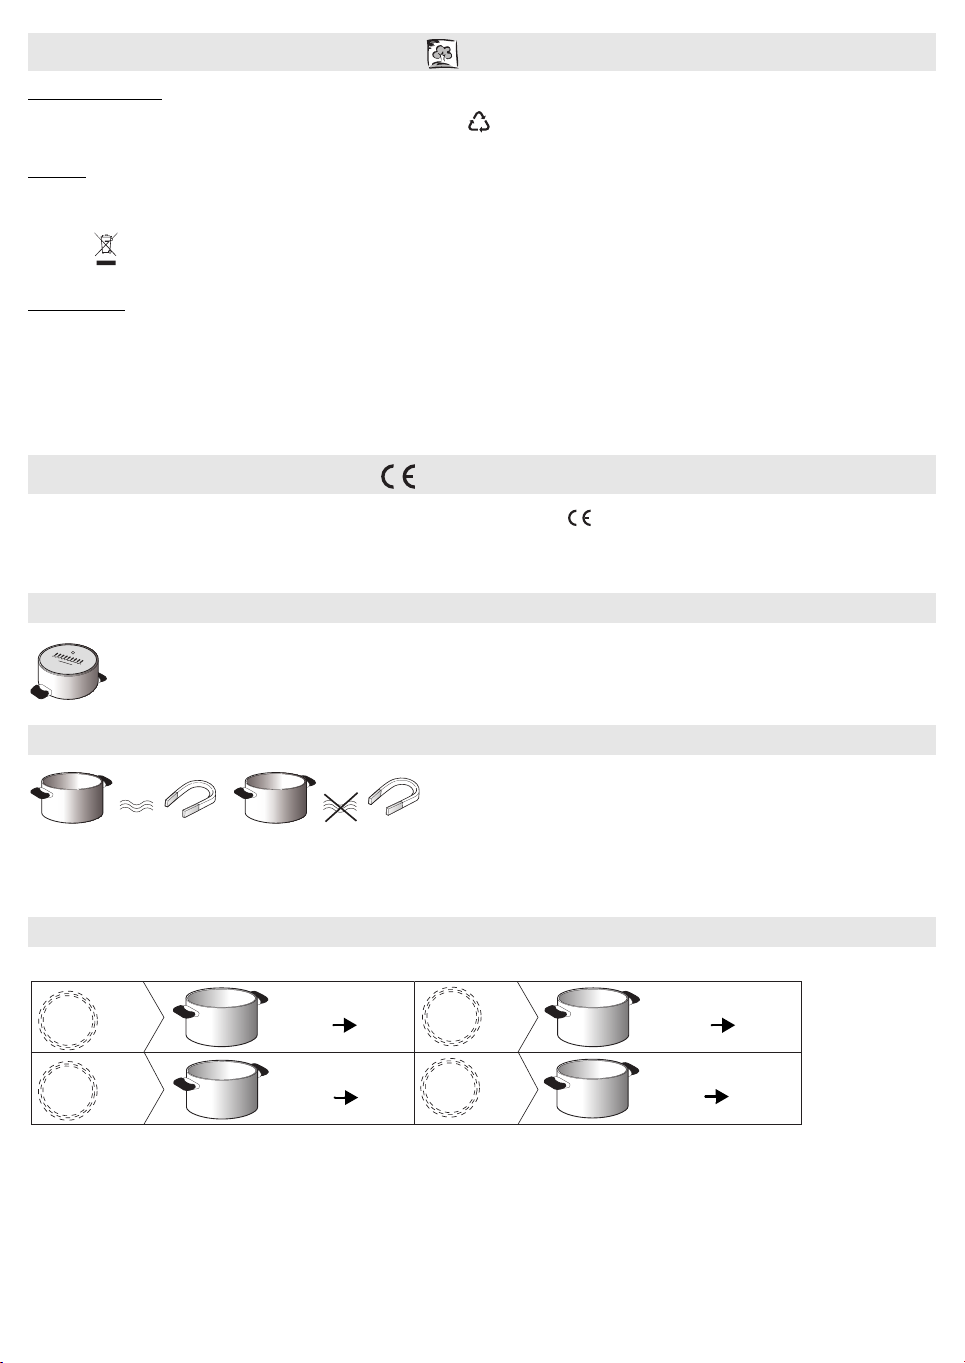
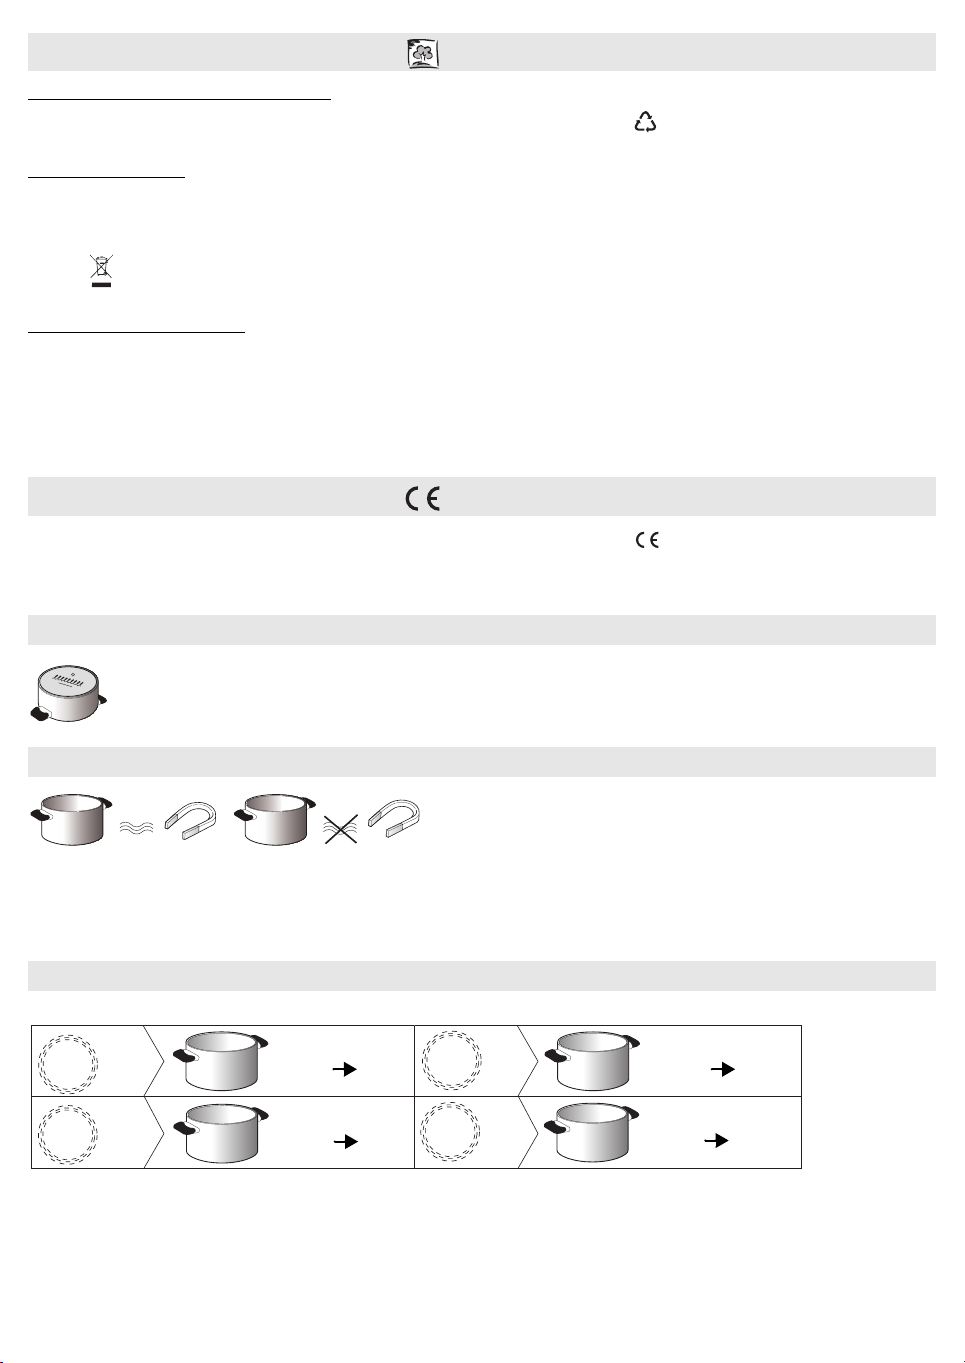
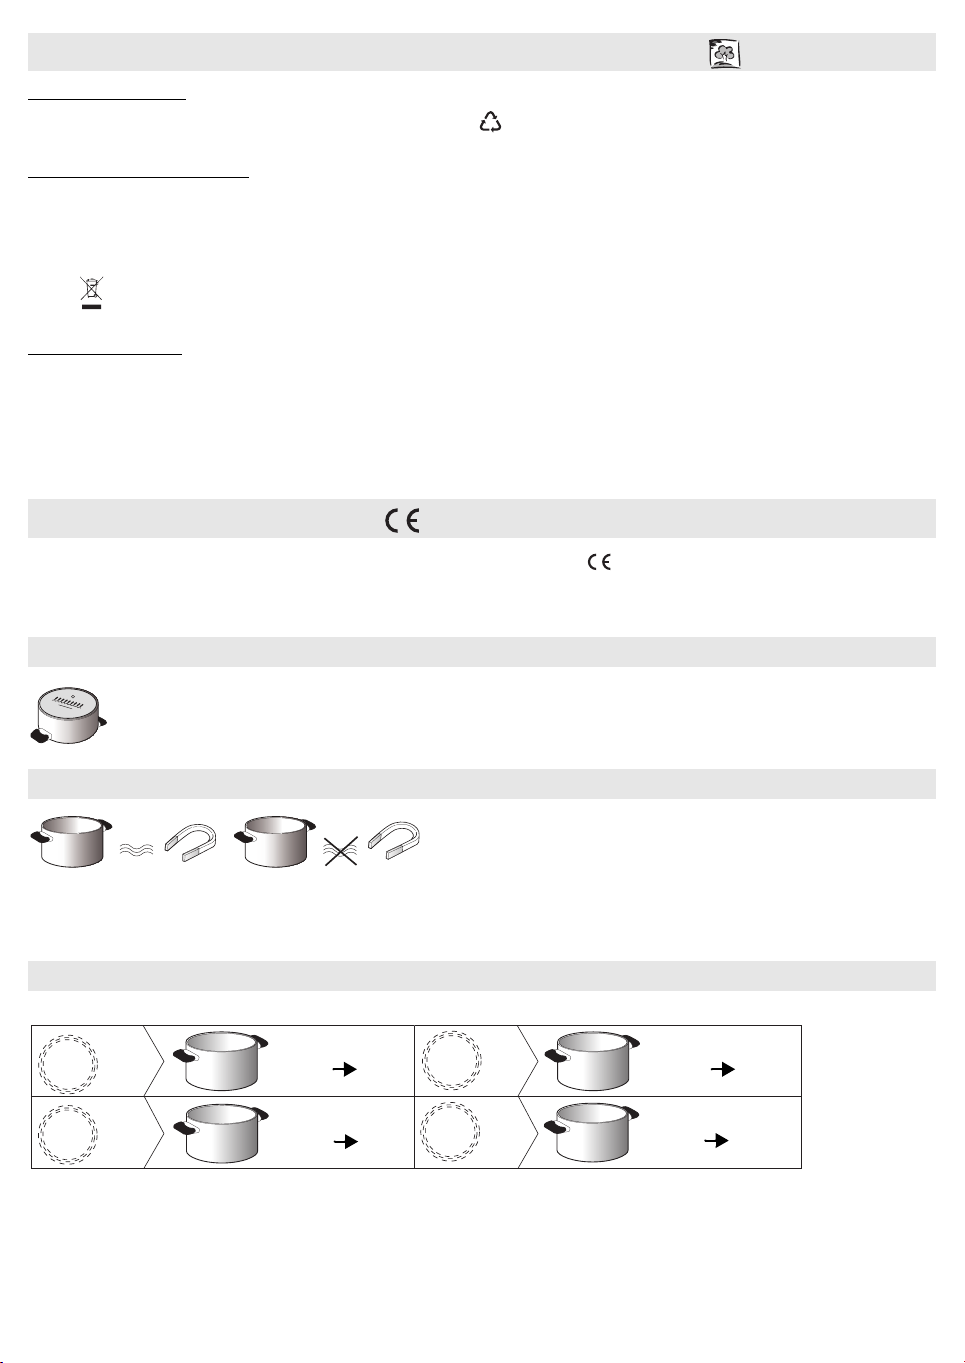
VOR DEM GEBRAUCH
WICHTIGER HINWEIS: Die Induktionszonen arbeiten nicht, wenn das Kochgeschirr nicht die korrekten Abmessungen hat. Verwenden Sie
ausschließlich Töpfe und Pfannen mit der Aufschrift “INDUKTIONSSYSTEM” (siehe nebenstehende Abbildung). Stellen Sie vor dem Einschalten des
Kochfelds das Kochgeschirr auf die gewünschte Kochzone.
BEREITS VORHANDENES KOCHGESCHIRR
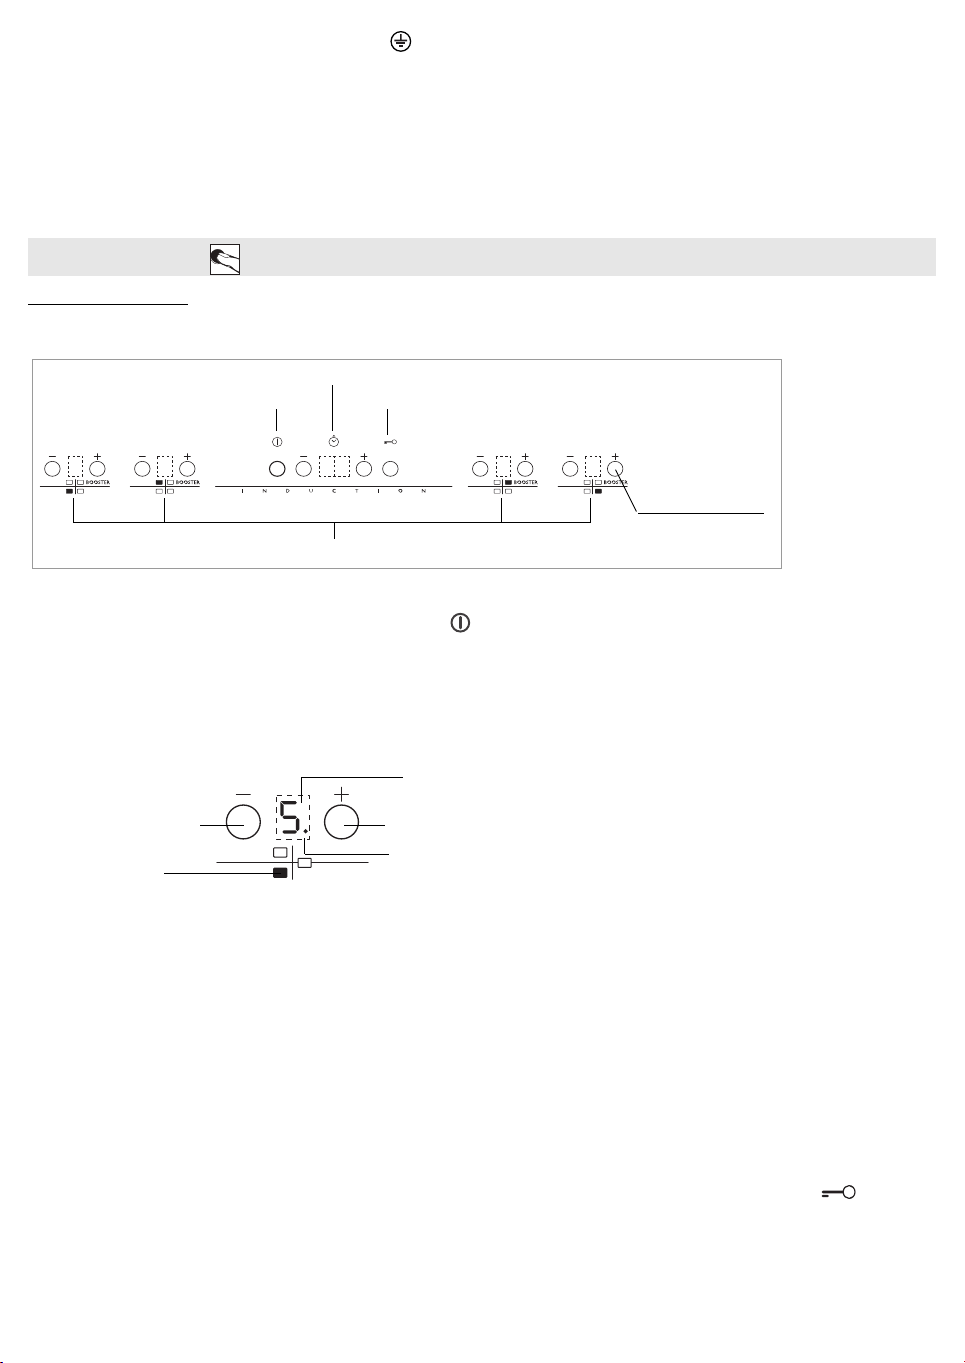
EMPFOHLENE DURCHMESSER DES KOCHGESCHIRRS
NEINOK
Ø
28 cm
XL
Ø
17 cm 28 cm
Ø
21 cm
L
Ø
15 cm 21 cm
Ø
18 cm
M
Ø
14,5 cm
S
Ø
12 cm 18 cm
Ø
10 cm 14,5 cm
DE6
Vergewissern Sie sich nach dem Auspacken, dass das Gerät keine Transportschäden aufweist. Bei auftretenden Problemen wenden Sie sich bitte an Ihren Händler oder
rufen die nächste Kundendienststelle an.
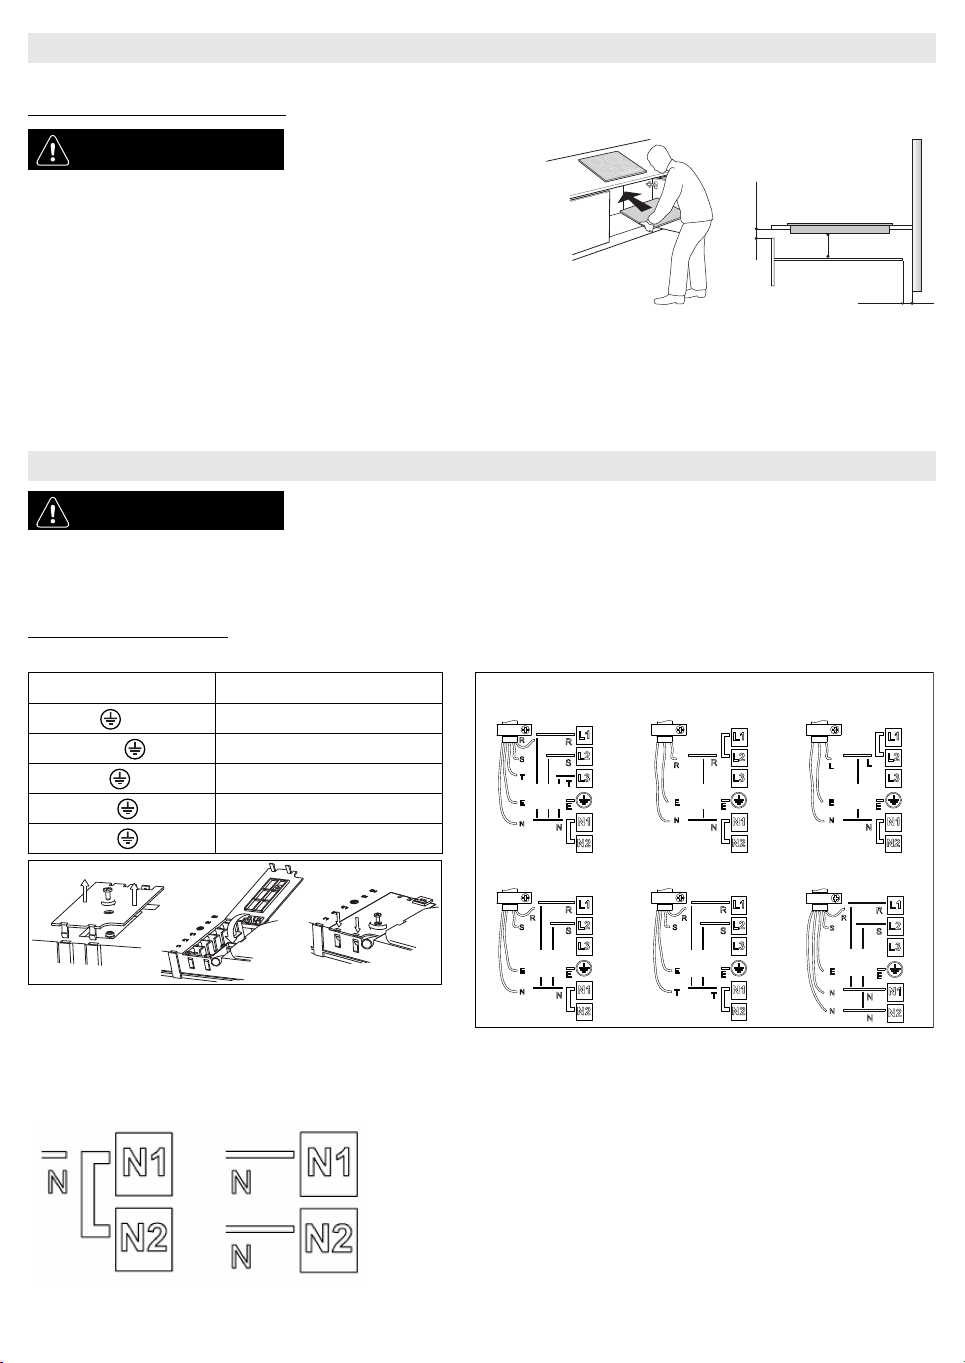
VORBEREITUNG DES UNTERBAUSCHRANKS
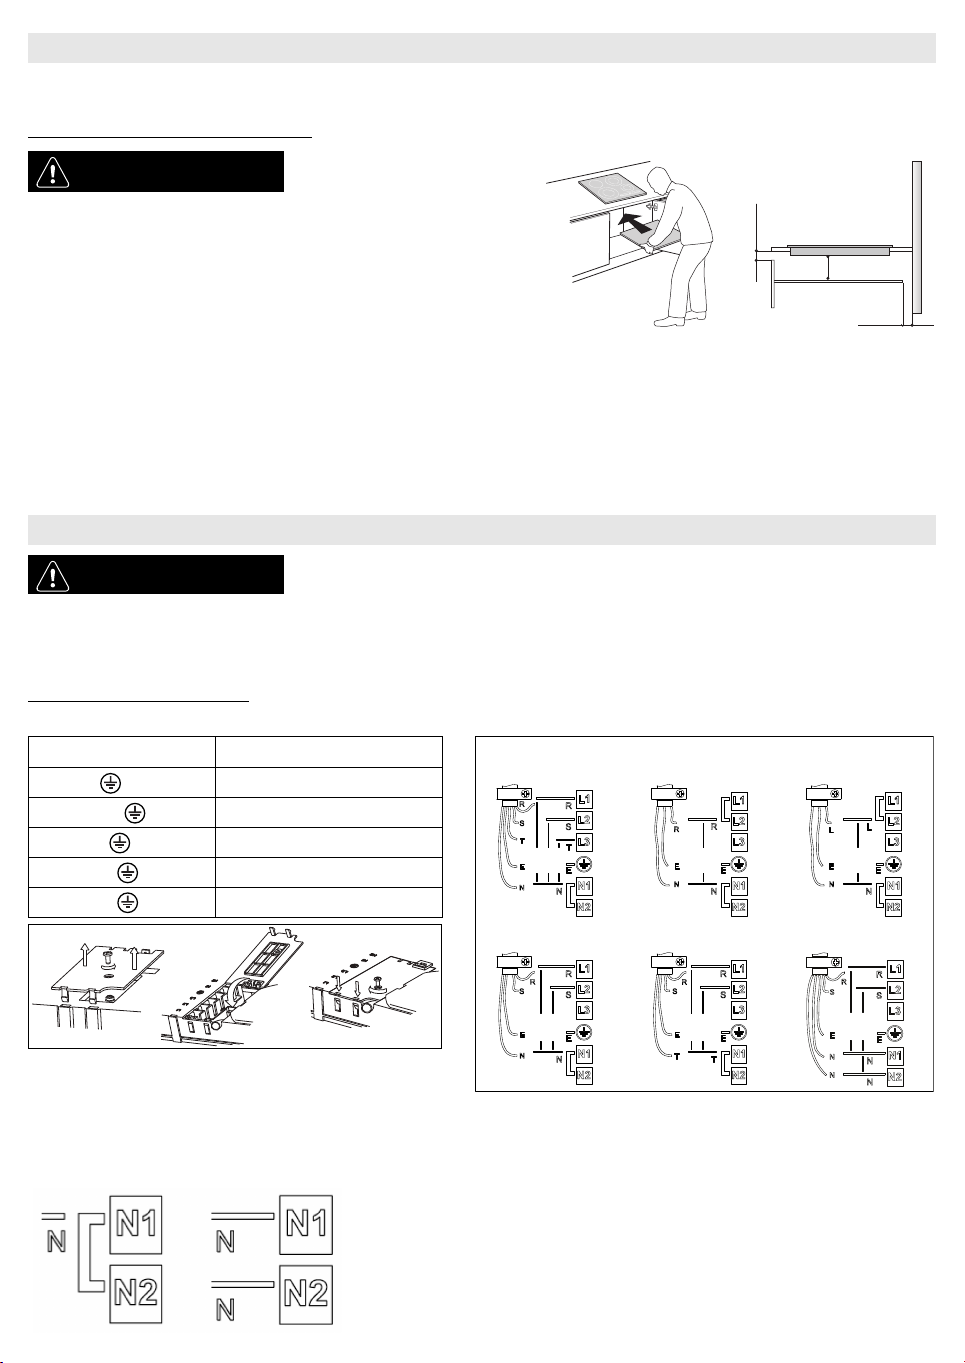
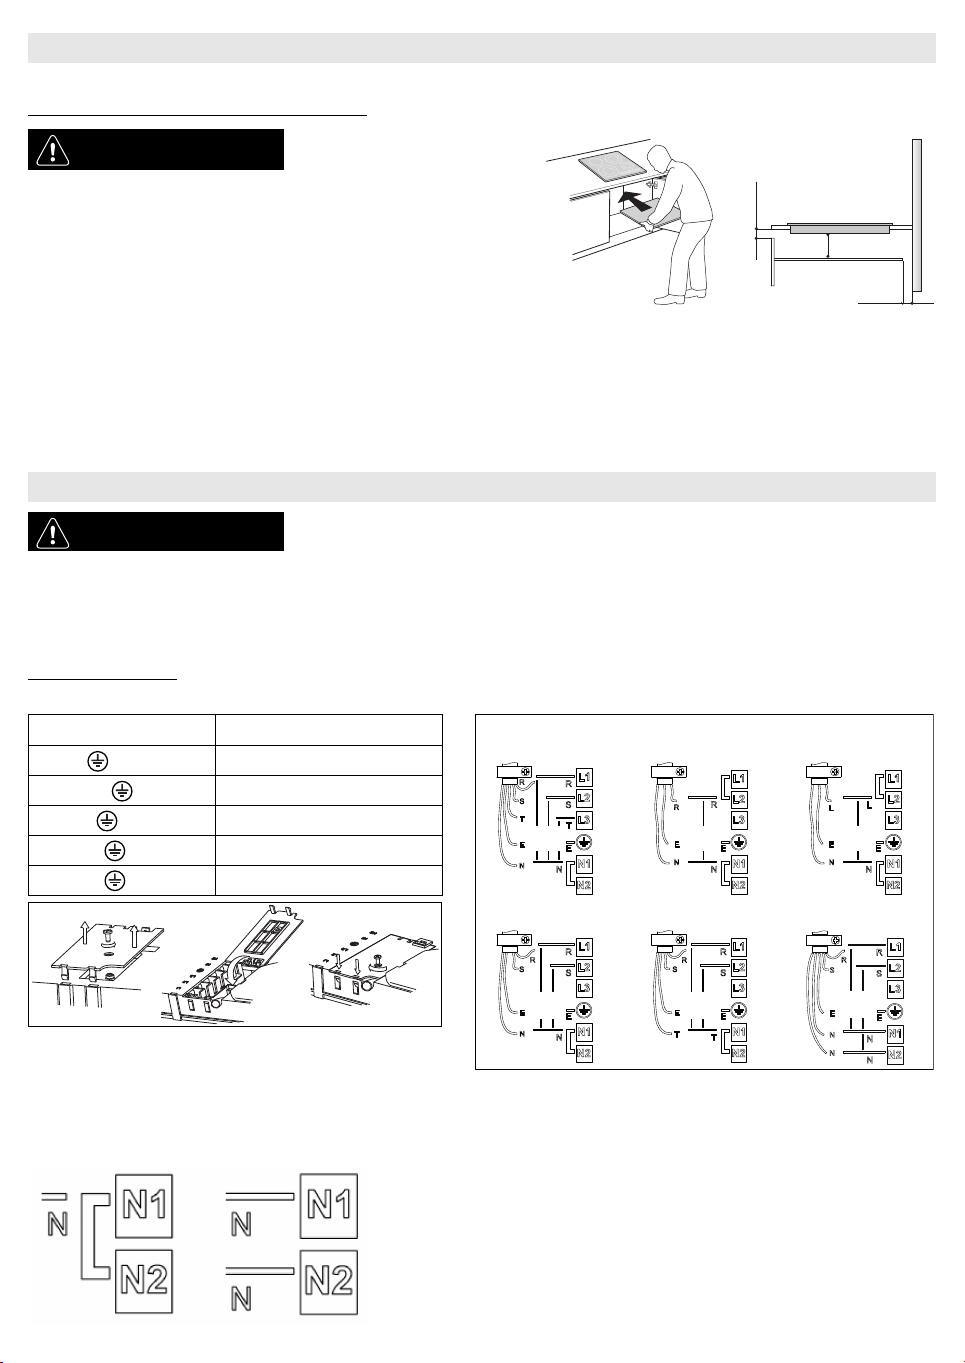
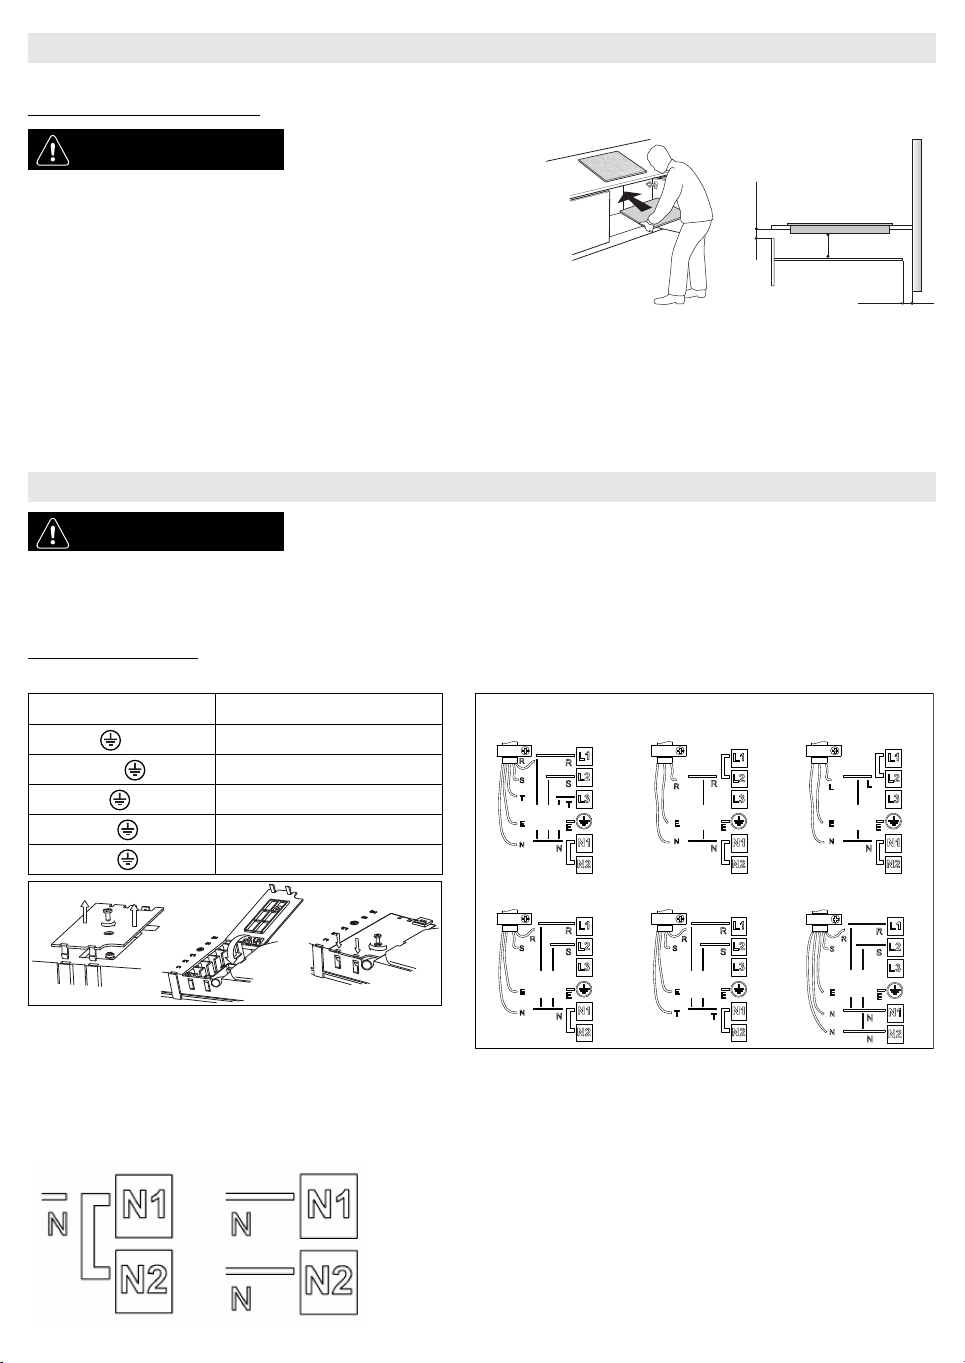
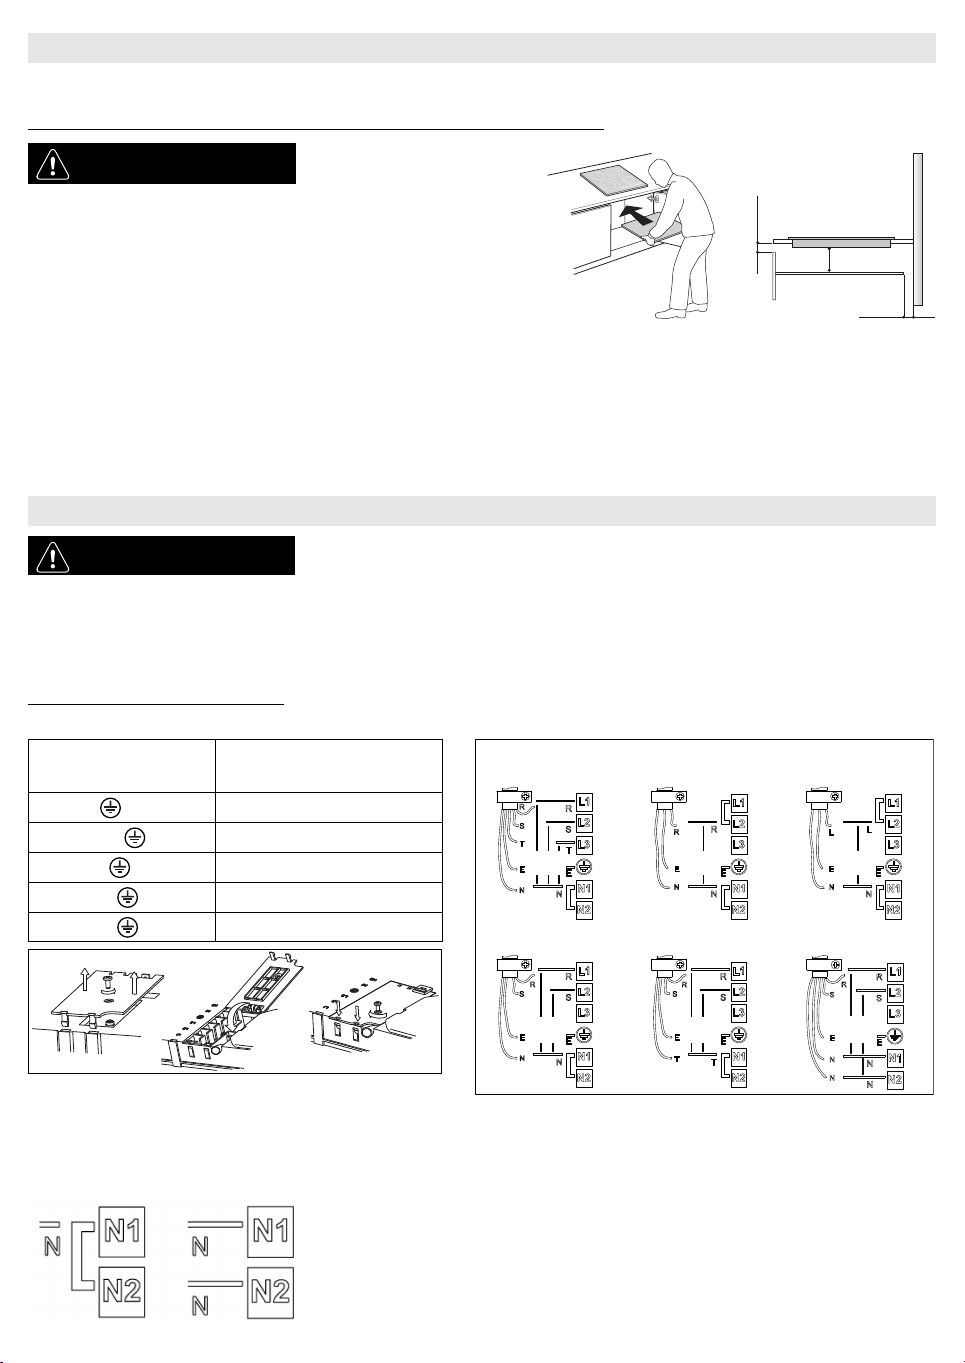
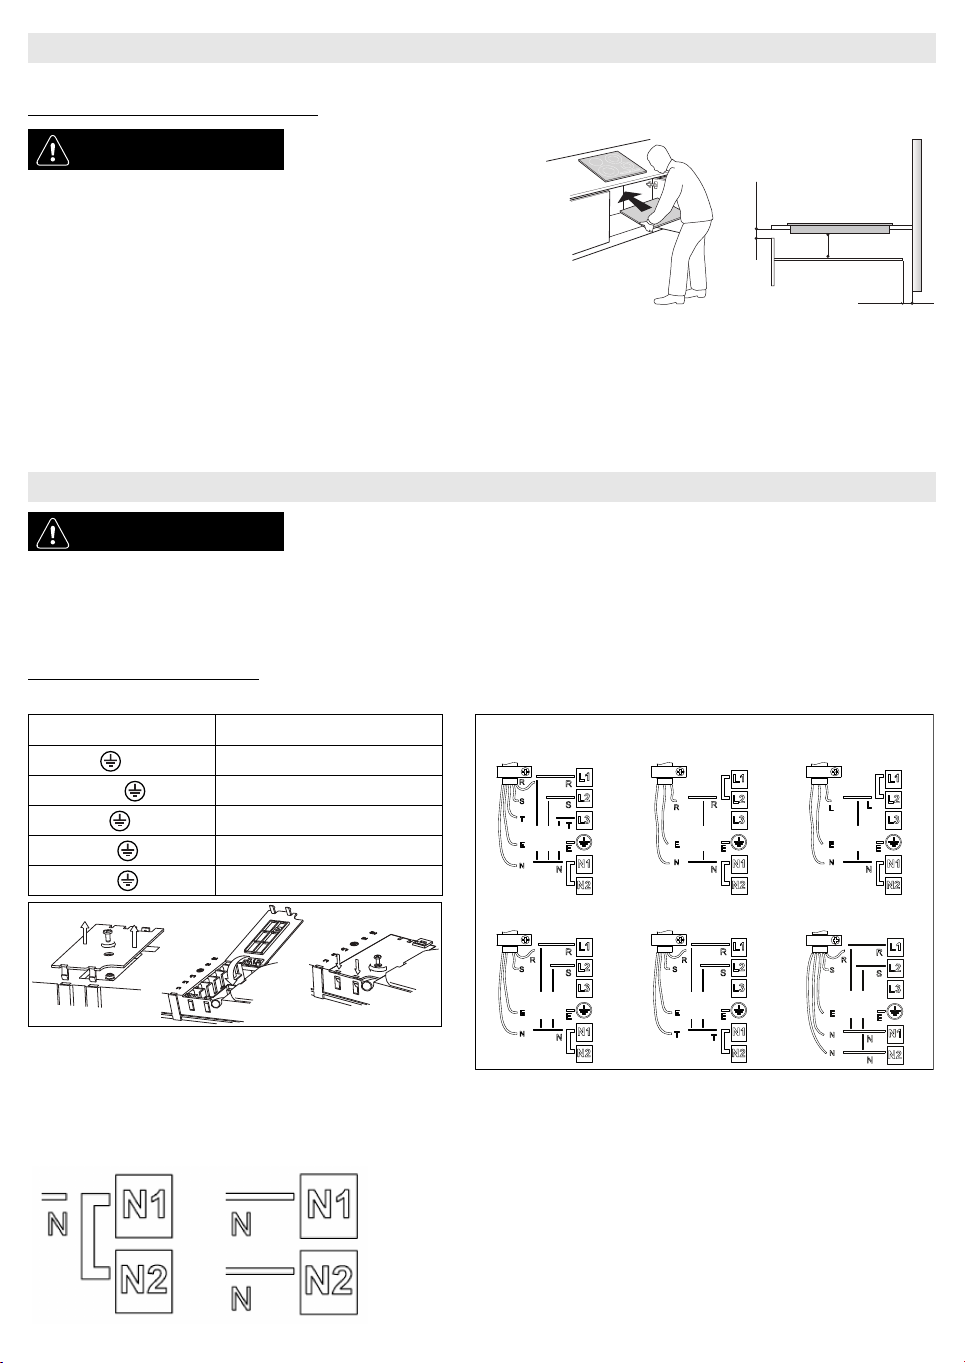
Anschluss an die Klemmenleiste
Verwenden Sie für den elektrischen Anschluss ein Kabel vom Typ H05RR-F laut Angaben in der folgenden Tabelle.
Wichtig:
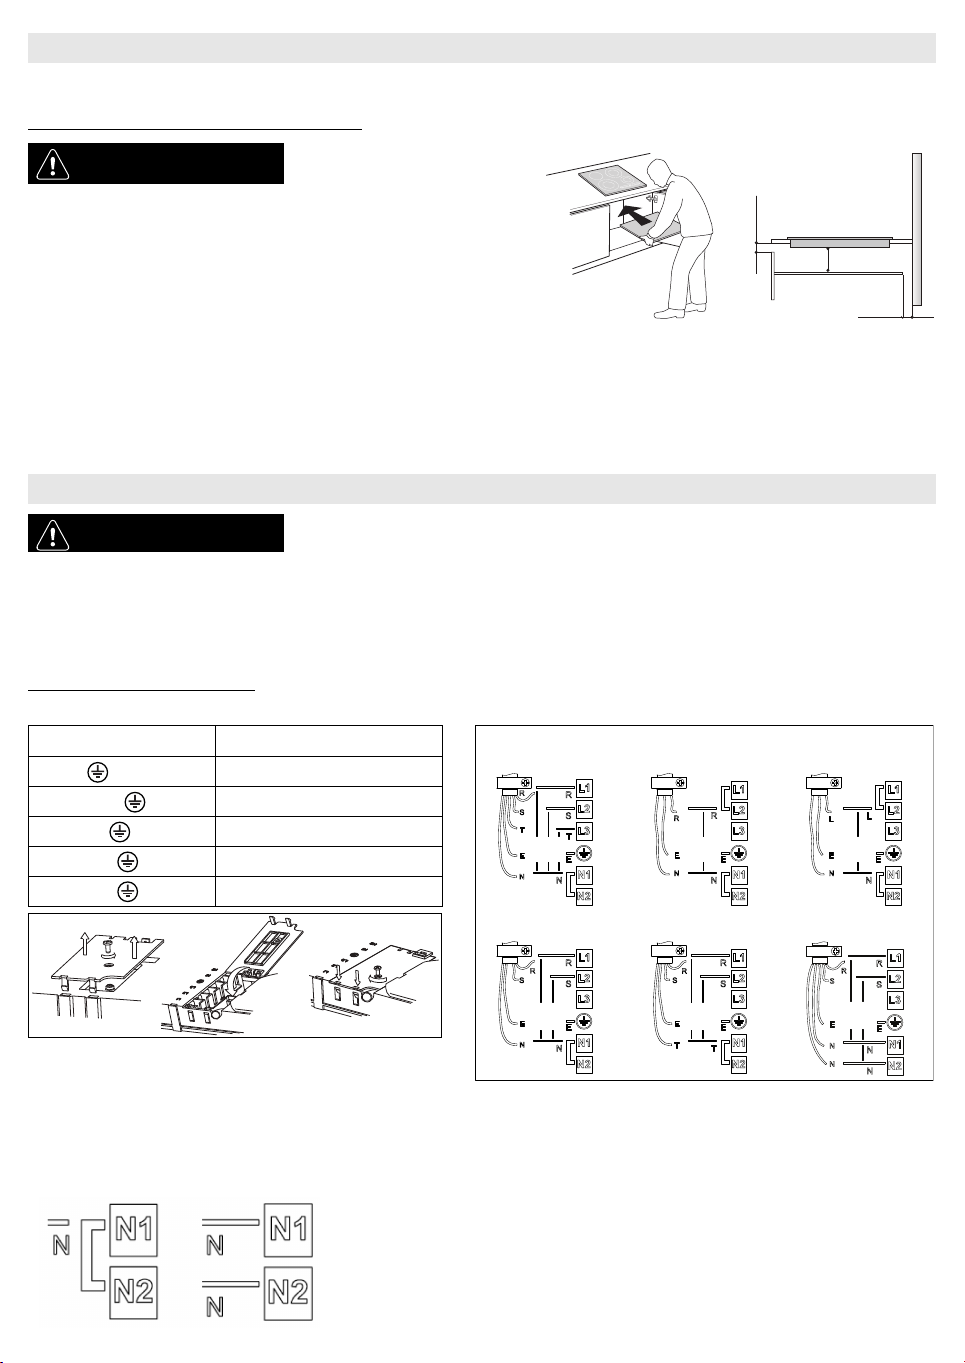
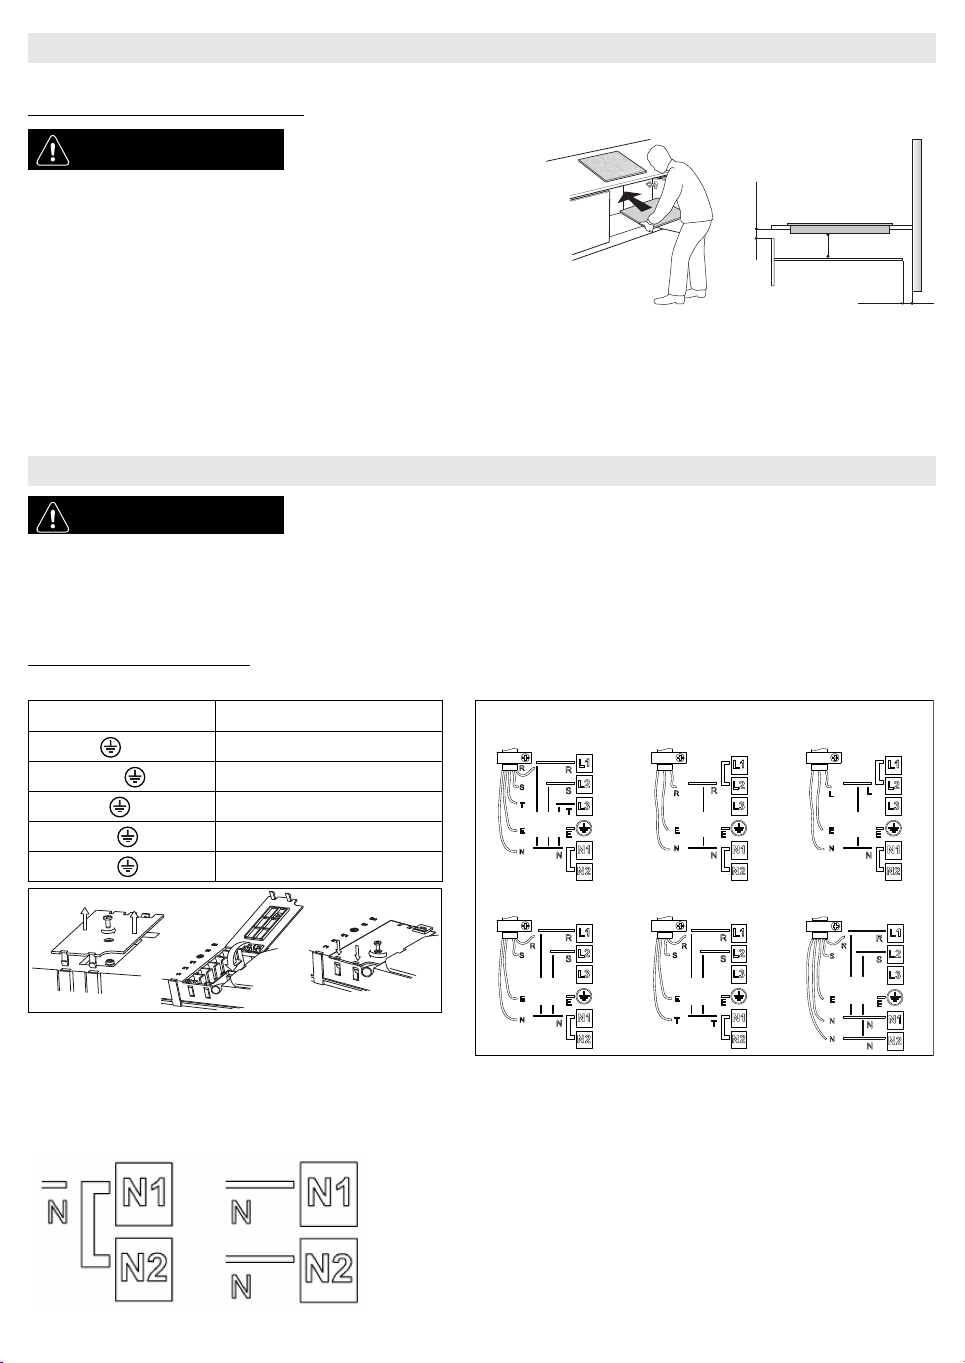
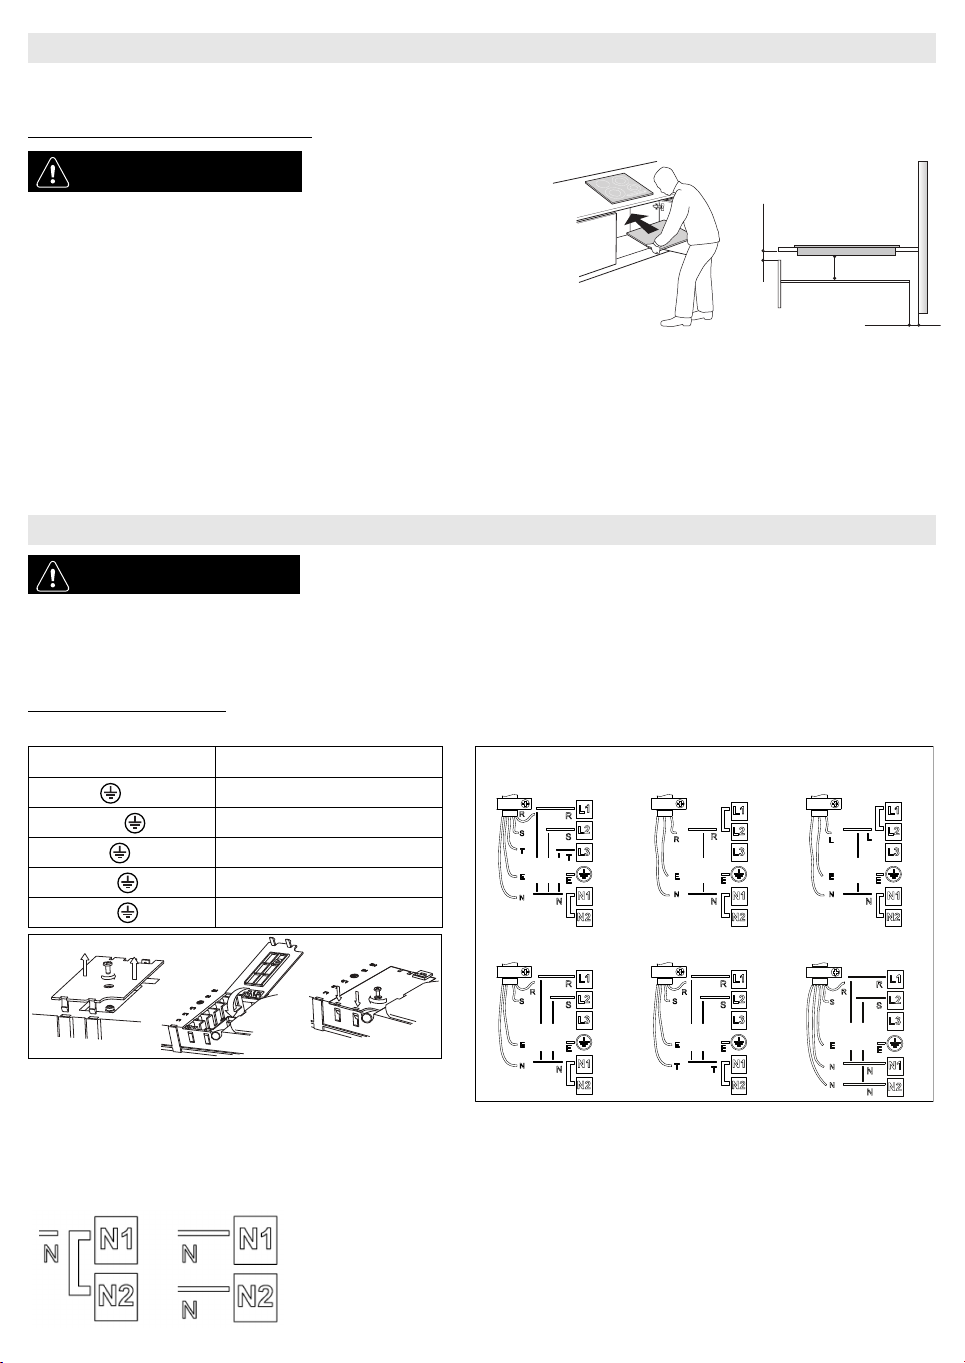
- Die Metallbrücken zwischen den Schrauben der Klemmenleisten L1-L2 oder N1-N2 laut Schaltbild beibehalten oder entfernen (siehe Abbildung).
- Kontrollieren, dass alle sechs Schrauben der Klemmenleiste nach Anschluss der Kabel festgezogen sind.
Beispiel einer vorhandenen (links) oder entfernten Brücke (rechts). Siehe das Schaltbild für weitere Einzelheiten (die Brücken können sich zwischen L1-L2 und N1-N2 befinden).
INSTALLATION
ACHTUNG-Bringen Sie eine Trennplatte
unter der Kochmulde an.
-Die Unterseite des Gerätes darf
nach der Installation nicht
zugänglich sein.
-Wird unter der Kochmulde ein
Backofen installiert, benötigen
Sie keine Trennplatte.
•Der Abstand zwischen der Unterseite des Gerätes und der Trennplatte muss den in der Abbildung angegebenen Maßen entsprechen.
•Um den einwandfreien Betrieb des Gerätes zu garantieren, darf der Lüftungsspalt zwischen der Kochmulde und der Oberseite der Küchenzeile (min. 5 mm)
nicht verschlossen werden.
•Soll unter dem Kochfeld ein Backofen eingebaut werden, so stellen Sie sicher, dass dieser über ein Kühlsystem verfügt.
•Bauen Sie das Kochfeld nicht über einem Geschirrspüler oder einer Waschmaschine ein; die elektronischen Schaltkreise können mit Dampf oder Feuchtigkeit in
Berührung kommen und beschädigt werden.
• Rufen Sie bei flächenbündiger Installation den Kundendienst für die Montage des Schraubenbausatzes 4801 211 00112.
•Das Kochfeld von der Arbeitsplatte mit einem Schraubendreher (nicht im Lieferumfang) lösen. Dazu die Federn an der Unterseite des Geräts lösen.
ANSCHLUSS AN DAS STROMNETZ
ACHTUNG-Trennen Sie das Gerät von der Stromversorgung.
-Das Gerät muss von einem Elektriker installiert werden, der mit allen gängigen Sicherheits- und
Installationsvorschriften vertraut ist.
-Der Hersteller haftet nicht für Personen-, Tier- und Sachschäden, die durch Missachten der in diesem Kapitel genannten Anweisungen entstehen.
-Das Stromkabel muss lang genug sein, um die Kochmulde von der Arbeitsplatte entfernen zu können.
-Die Spannung auf dem Typenschild an der Geräteunterseite muss der Spannung des Stromnetzes in Ihrer Wohnung entsprechen.
KabelAnzahl x Größe
230V ~ + 3 x 4 mm2
230-240V ~ + 3 x 4 mm2 (nur Australien)
230V 3 ~ + 4 x 1,5 mm2
400V 3N ~ + 5 x 1,5 mm2
400V 2N ~ + 4 x 1,5 mm2
Min. 5 mm
Min. 20 mm
Min. 5 mm
400 V 3N ~230 V ~230-240 V ~ (nur Australien)
230 V ~ (nur GB)
400 V 2N ~230 V 3 ~ (nur Belgien)400 V 2N ~ (nur Niederlande)
230 V
230 V
230 V
230 V
230 V
230 V
230 V
230 V
230 V
230 V
230 V
CBA
DE7
Das gelb-grüne Erdungskabel muss mit der Klemme mit dem Symbol verbunden werden.
Es muss länger als die anderen Kabel sein.
1.Nehmen Sie den Klemmenleistendeckel (A) nach Entfernen der Schraube ab und setzen Sie ihn in das Scharnier (B) der Klemmenleiste ein.
2.Setzen Sie das Kabel in die Kabelklemme ein und schließen Sie die Litzen an die Klemmenleiste an, wie auf dem Anschlussplan neben der Klemmenleiste
dargestellt ist.
3.Befestigen Sie das Netzkabel mit der Kabelklemme.
4.Schließen Sie den Deckel (C) und schrauben Sie ihn mit der vorher entfernten Schraube an.
Bei jedem Netzanschluss führt das Kochfeld eine automatische Kontrolle durch, die ein paar Sekunden dauert.
Falls das Kochfeld schon mit einem Netzkabel ausgerüstet ist, gehen Sie gemäß Anweisungen am Netzkabel vor. Den Netzanschluss über einen allpoligen Trennschalter
mit einer Mindestkontaktöffnung 3mm ausführen.
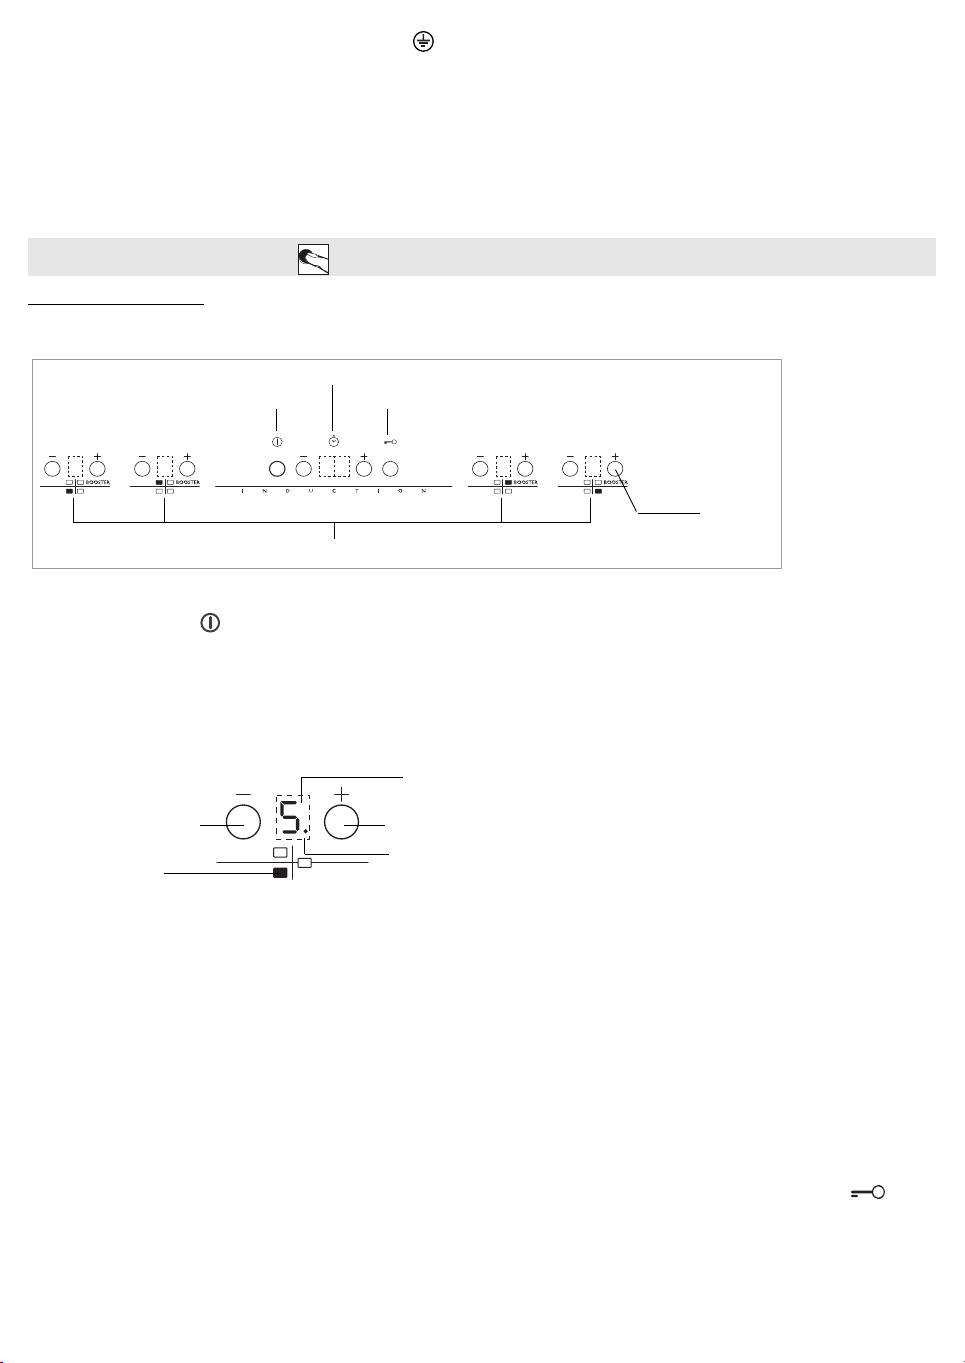
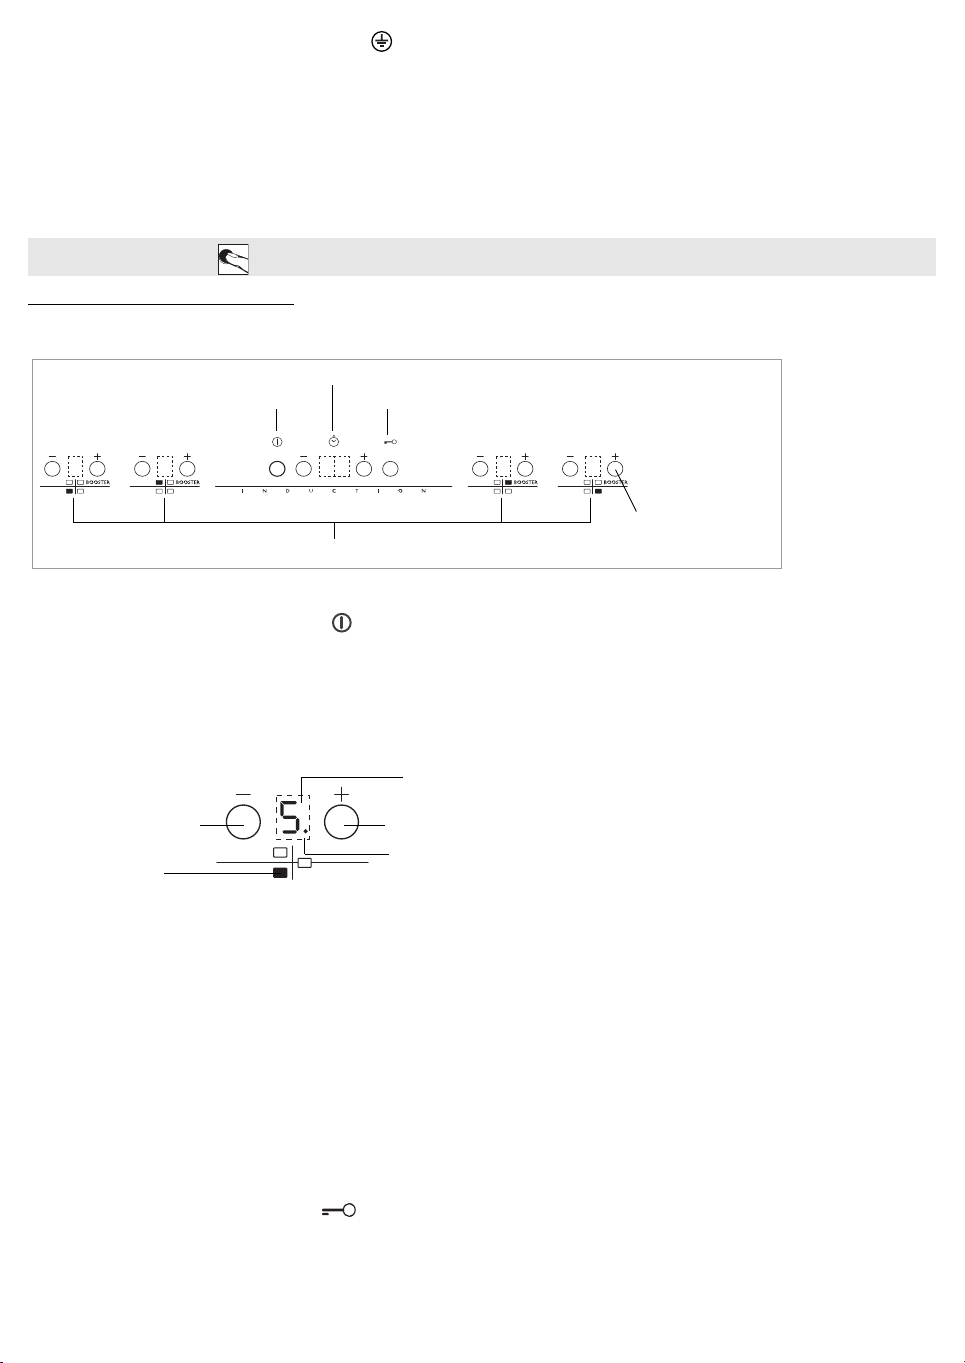
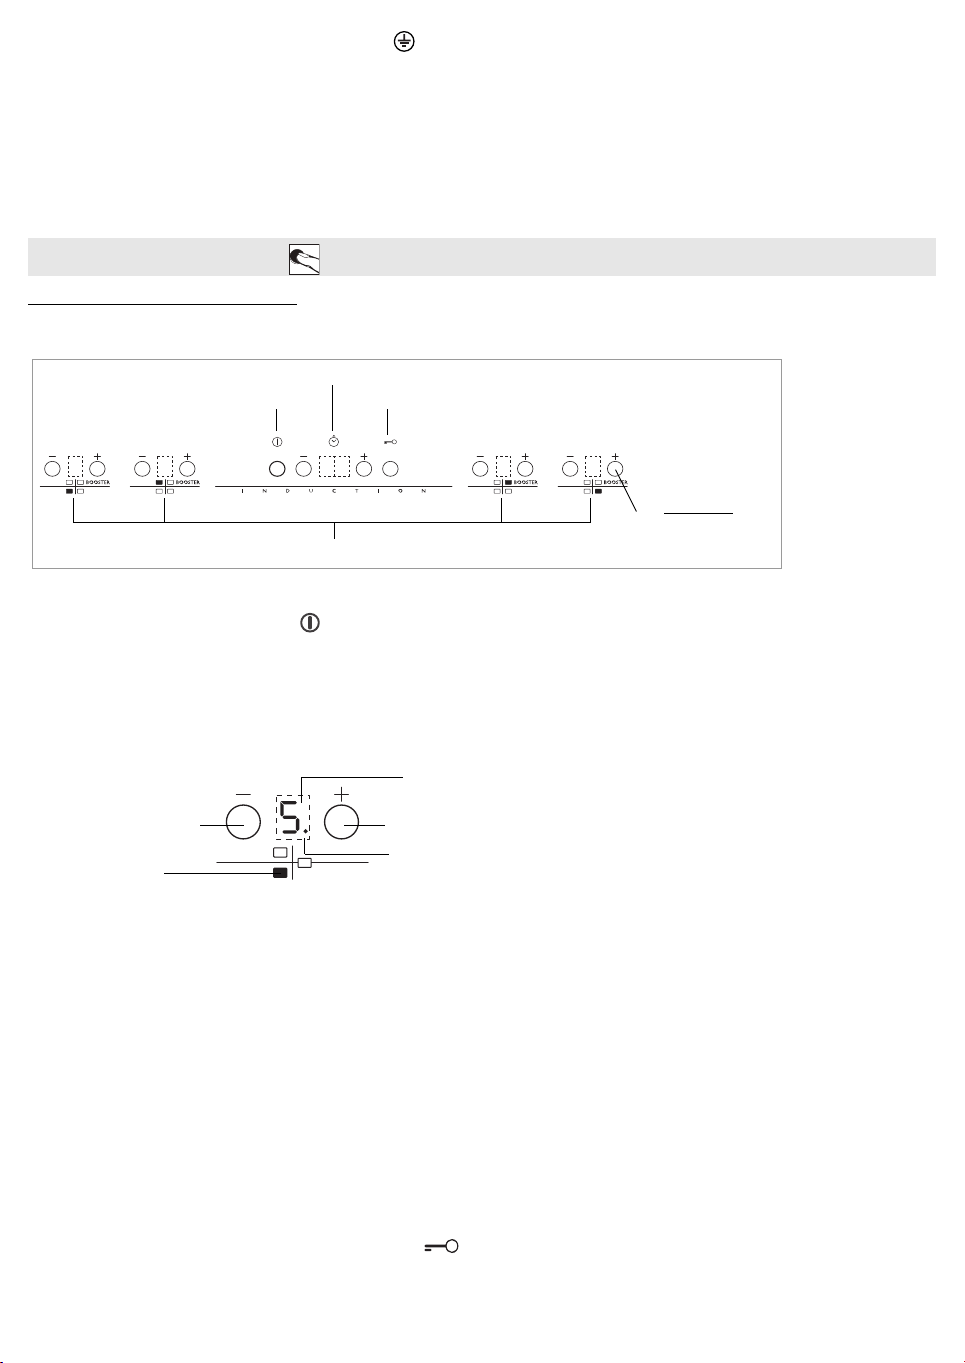
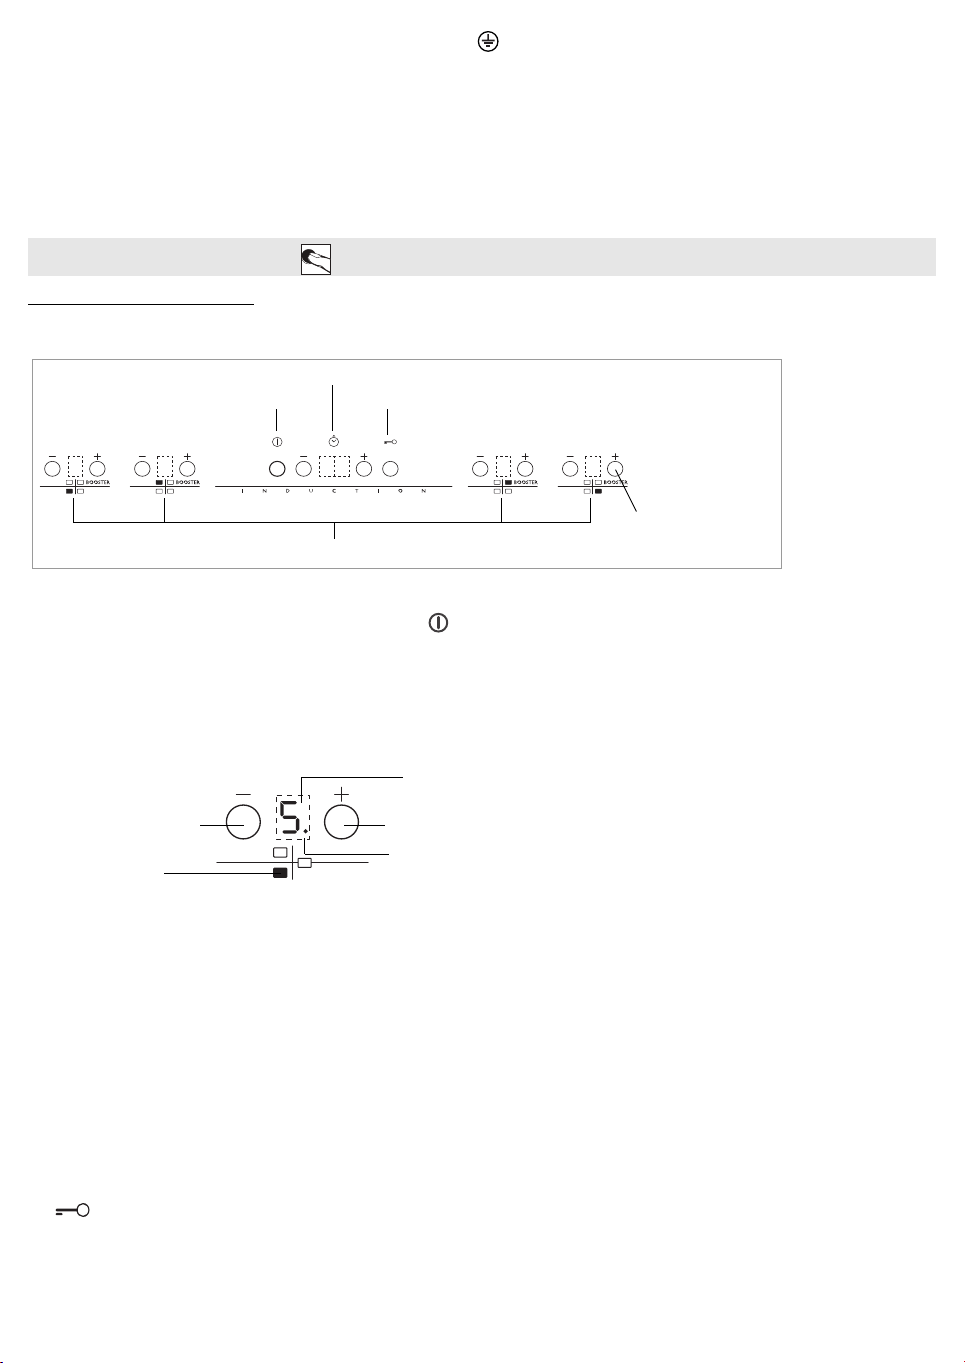
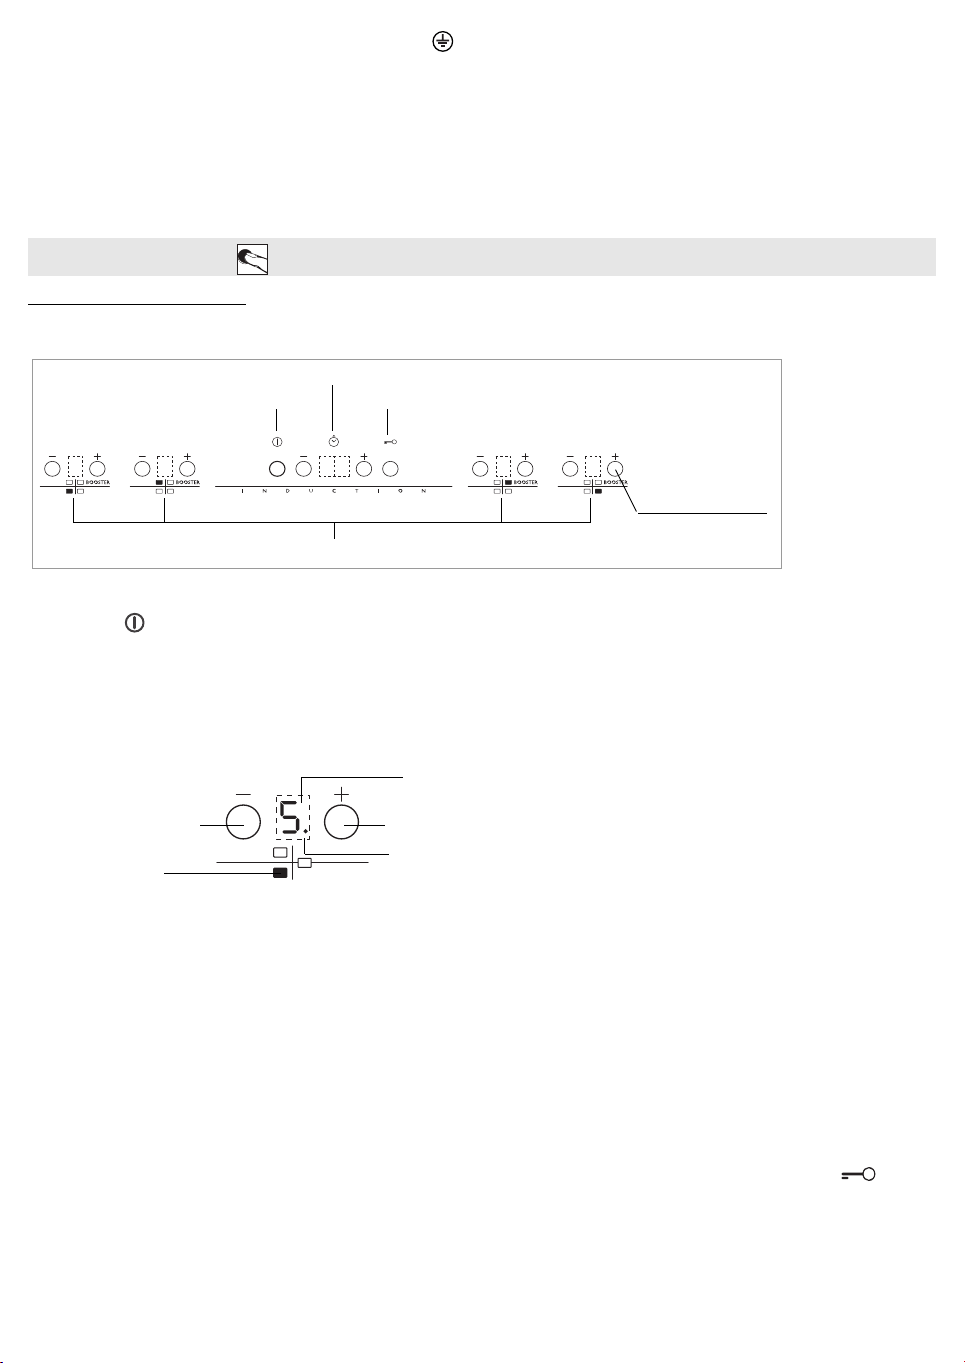
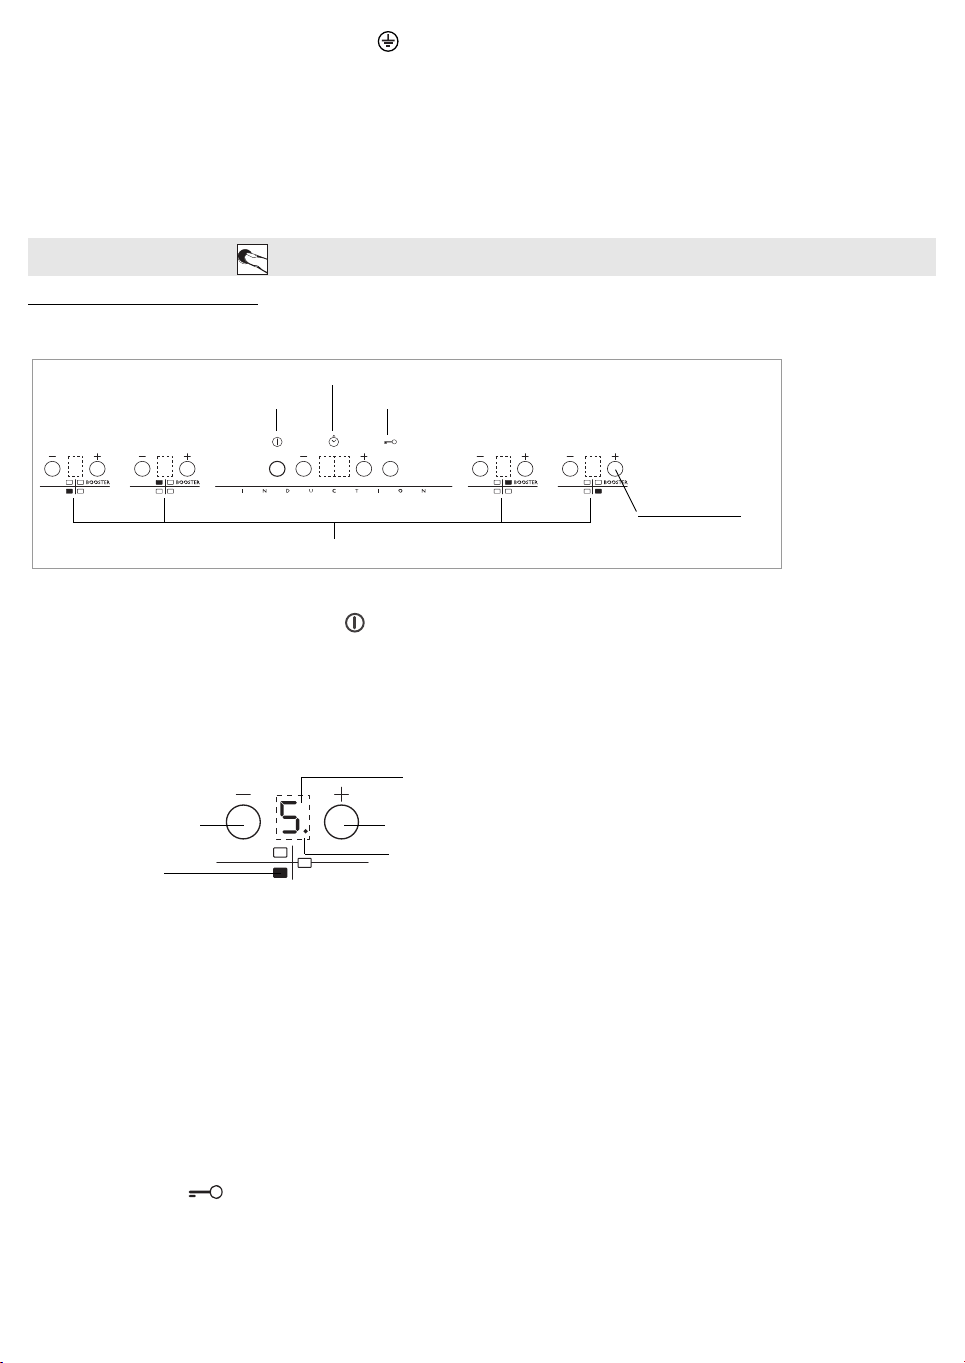
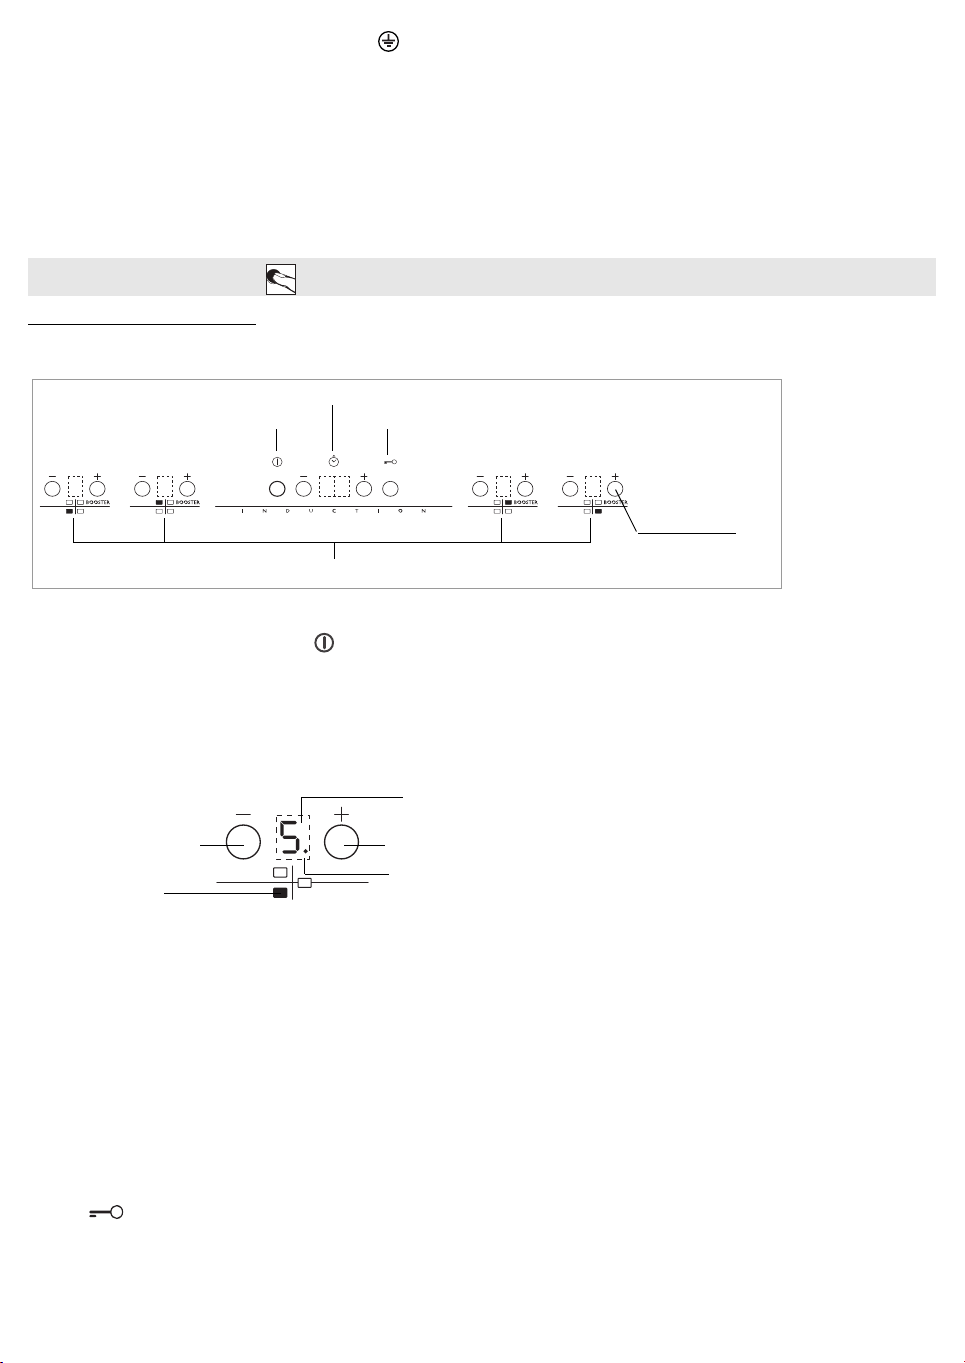
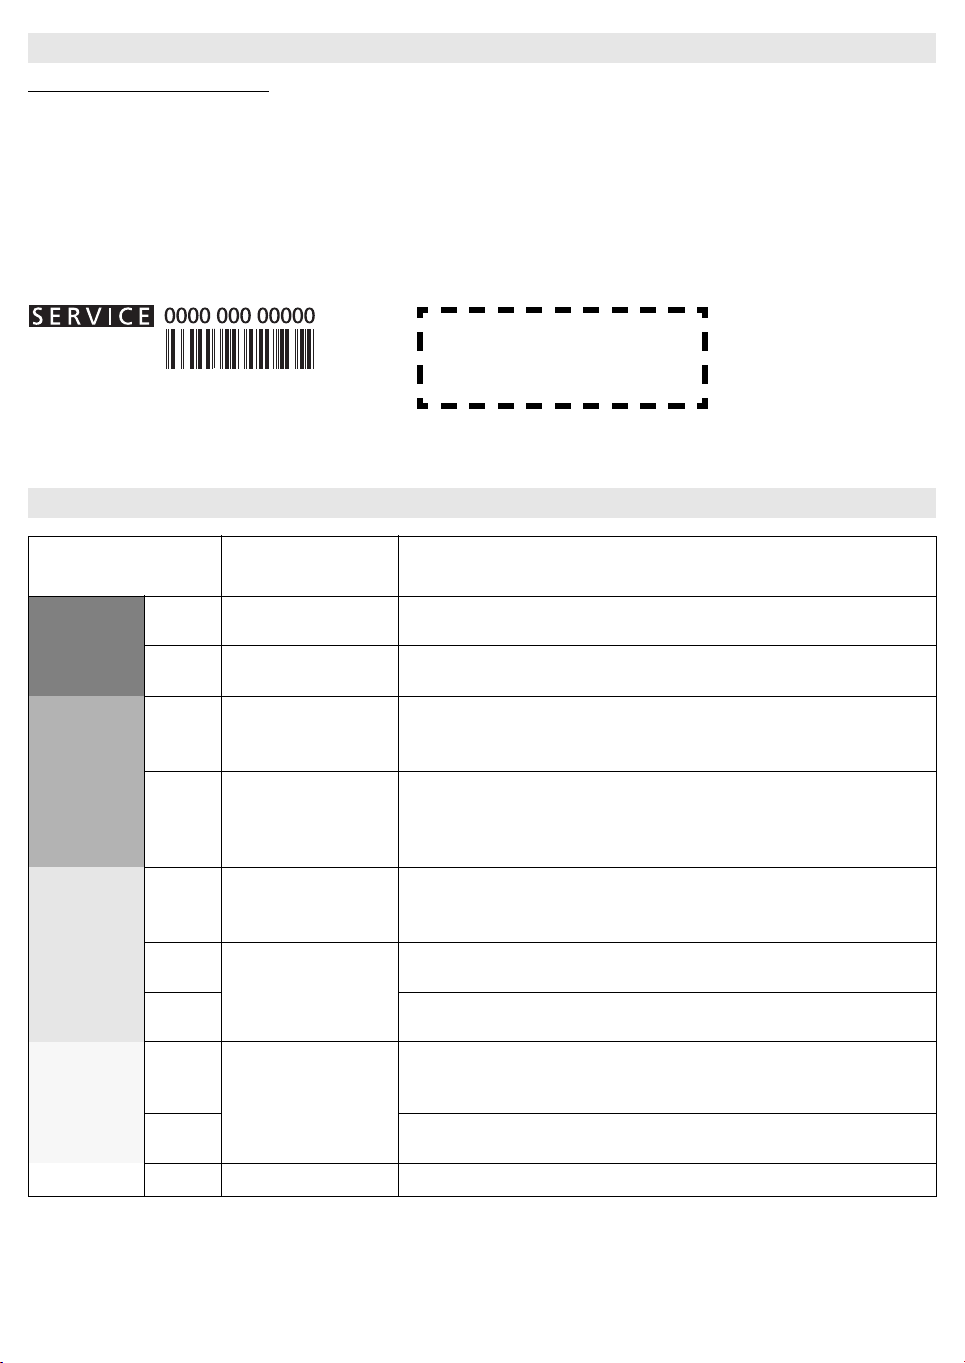
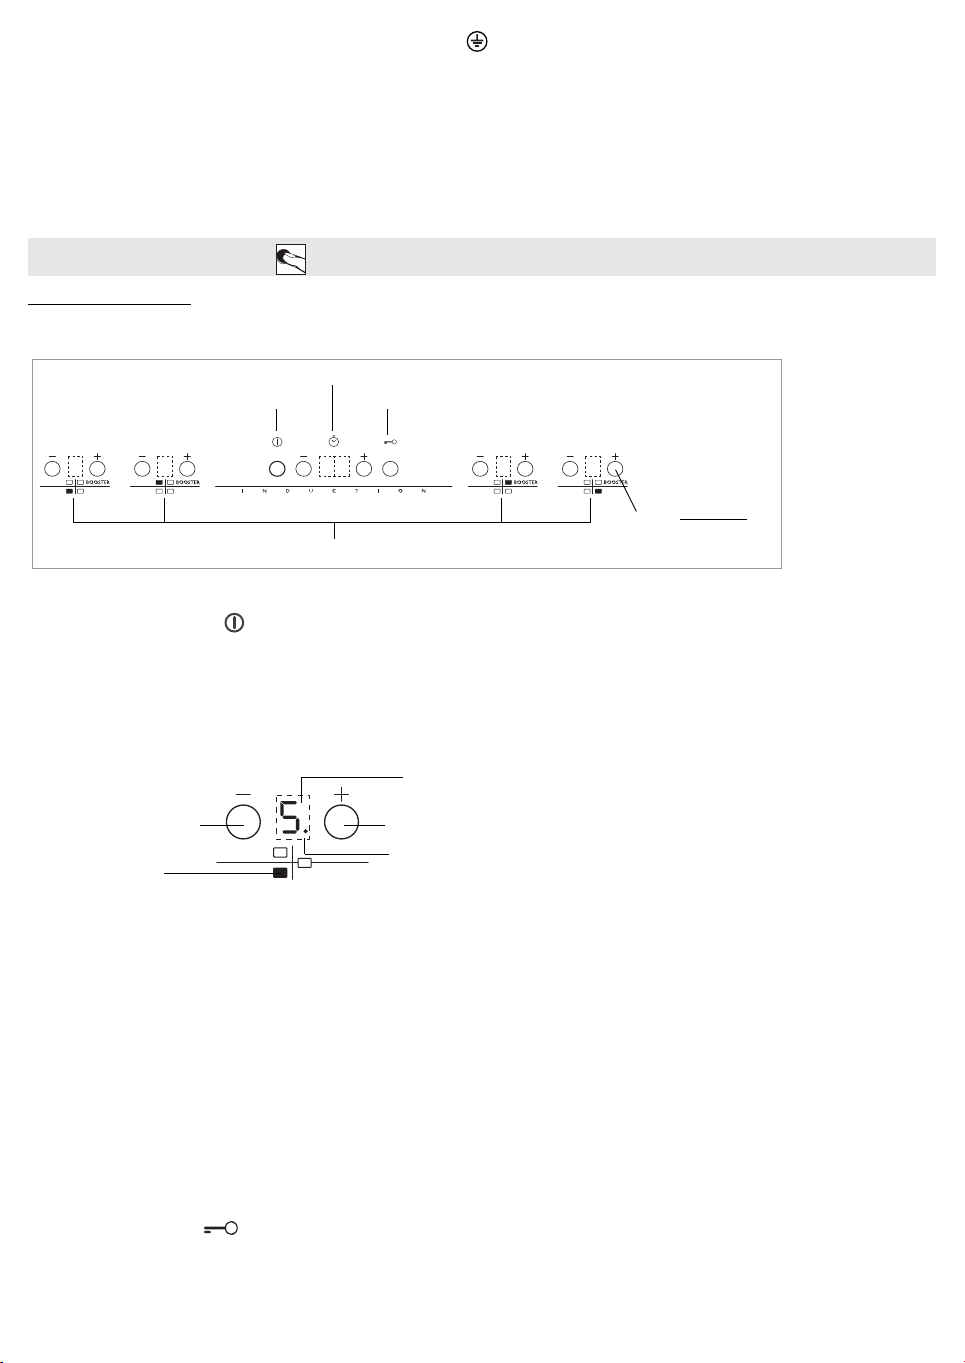
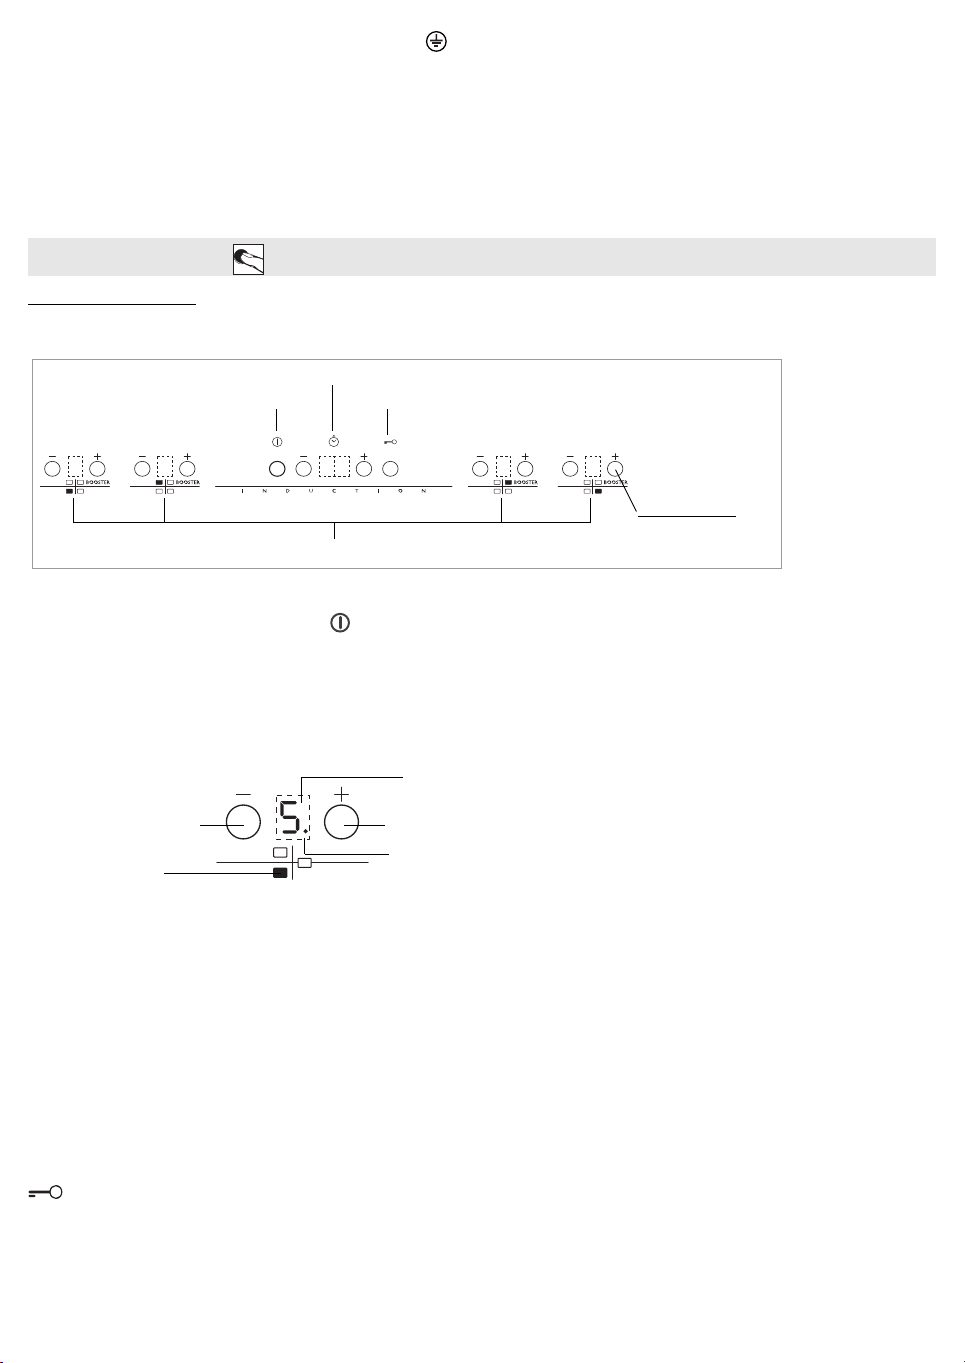
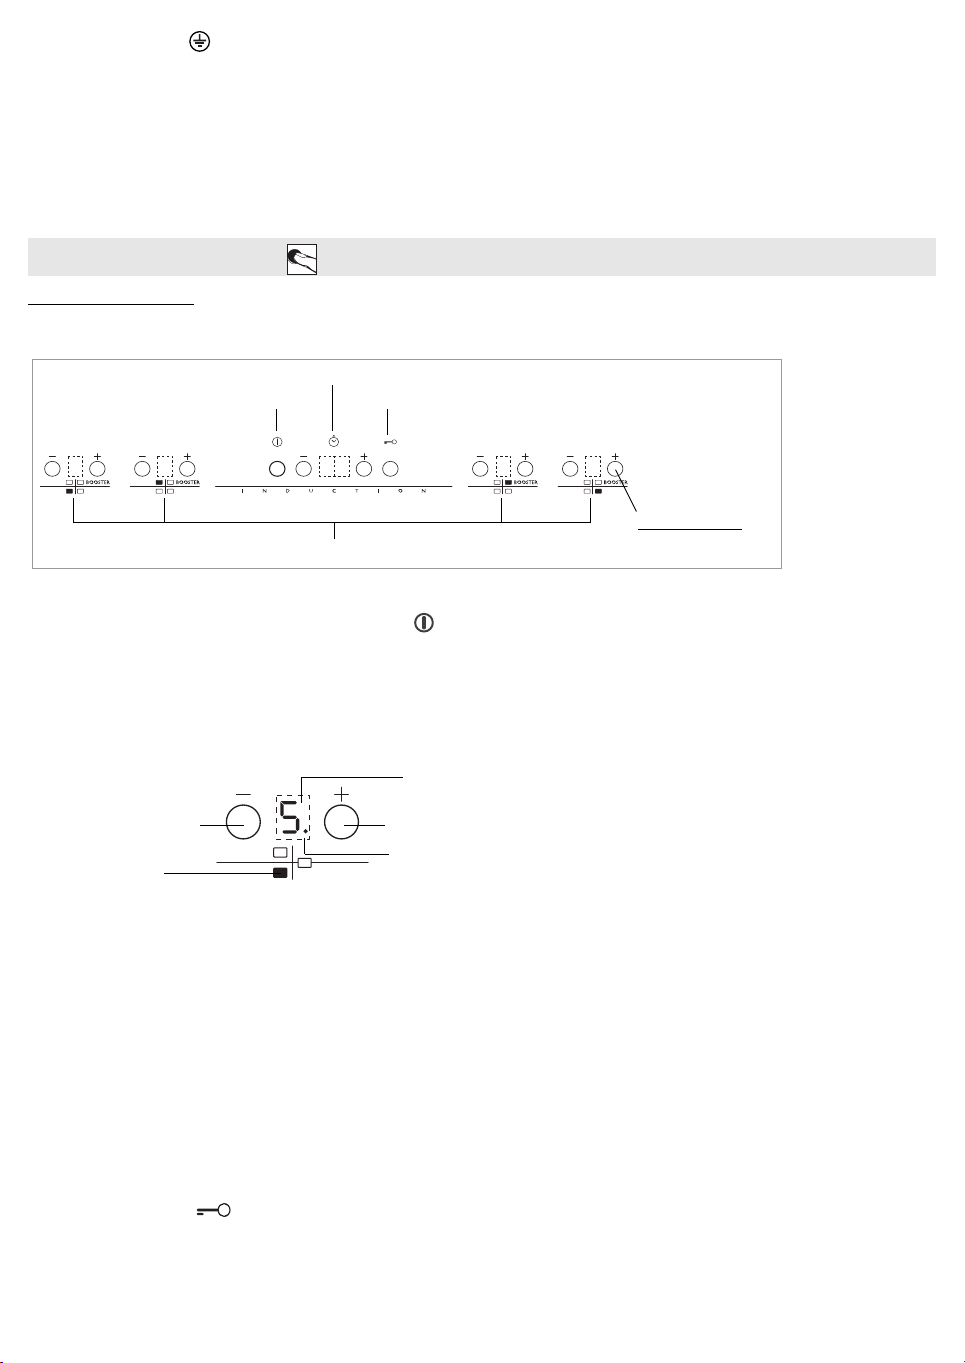
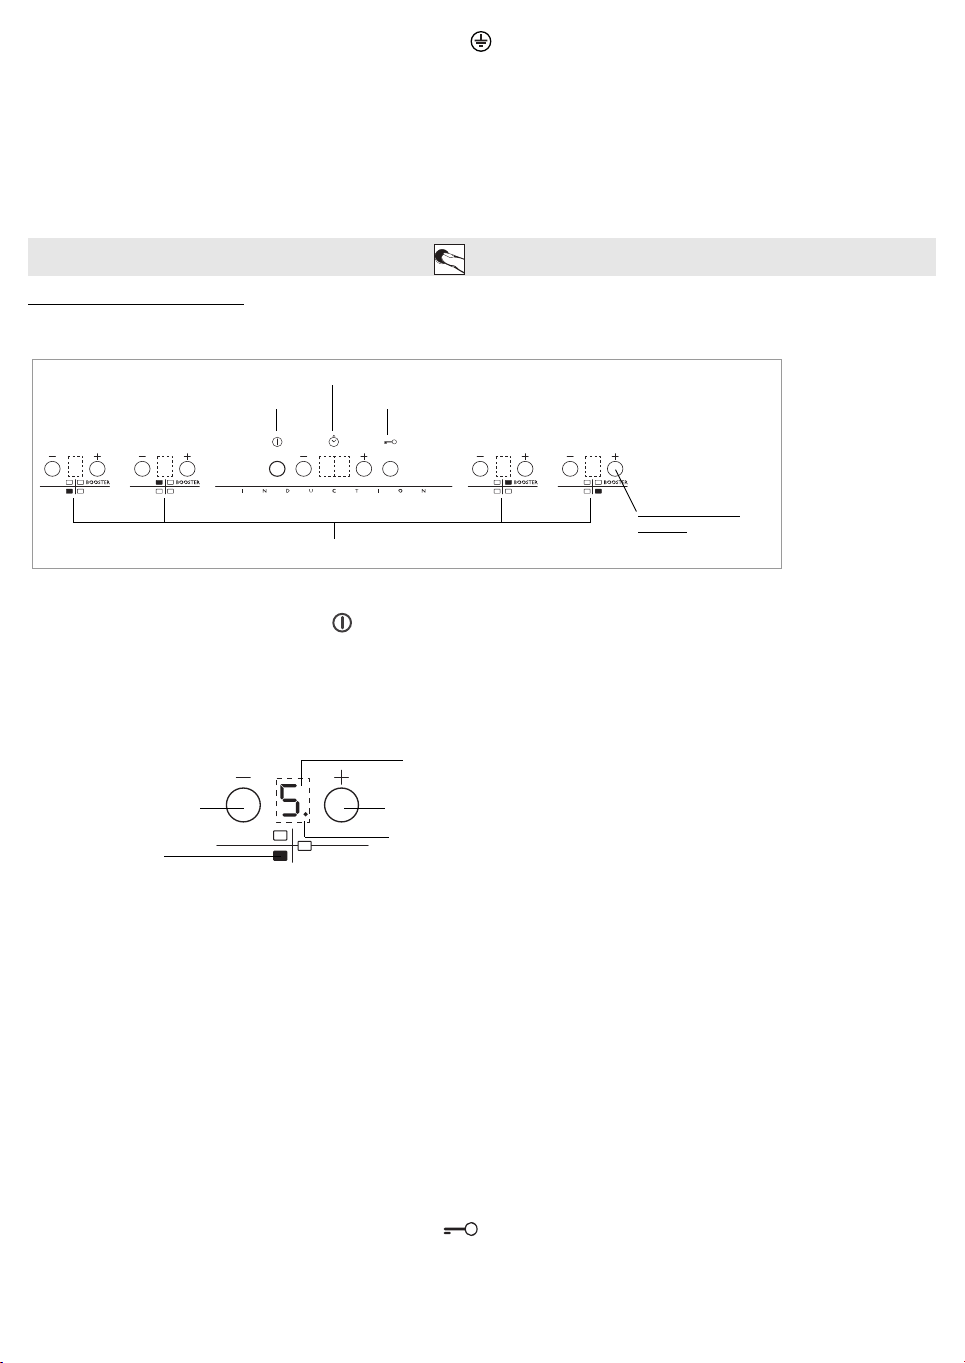
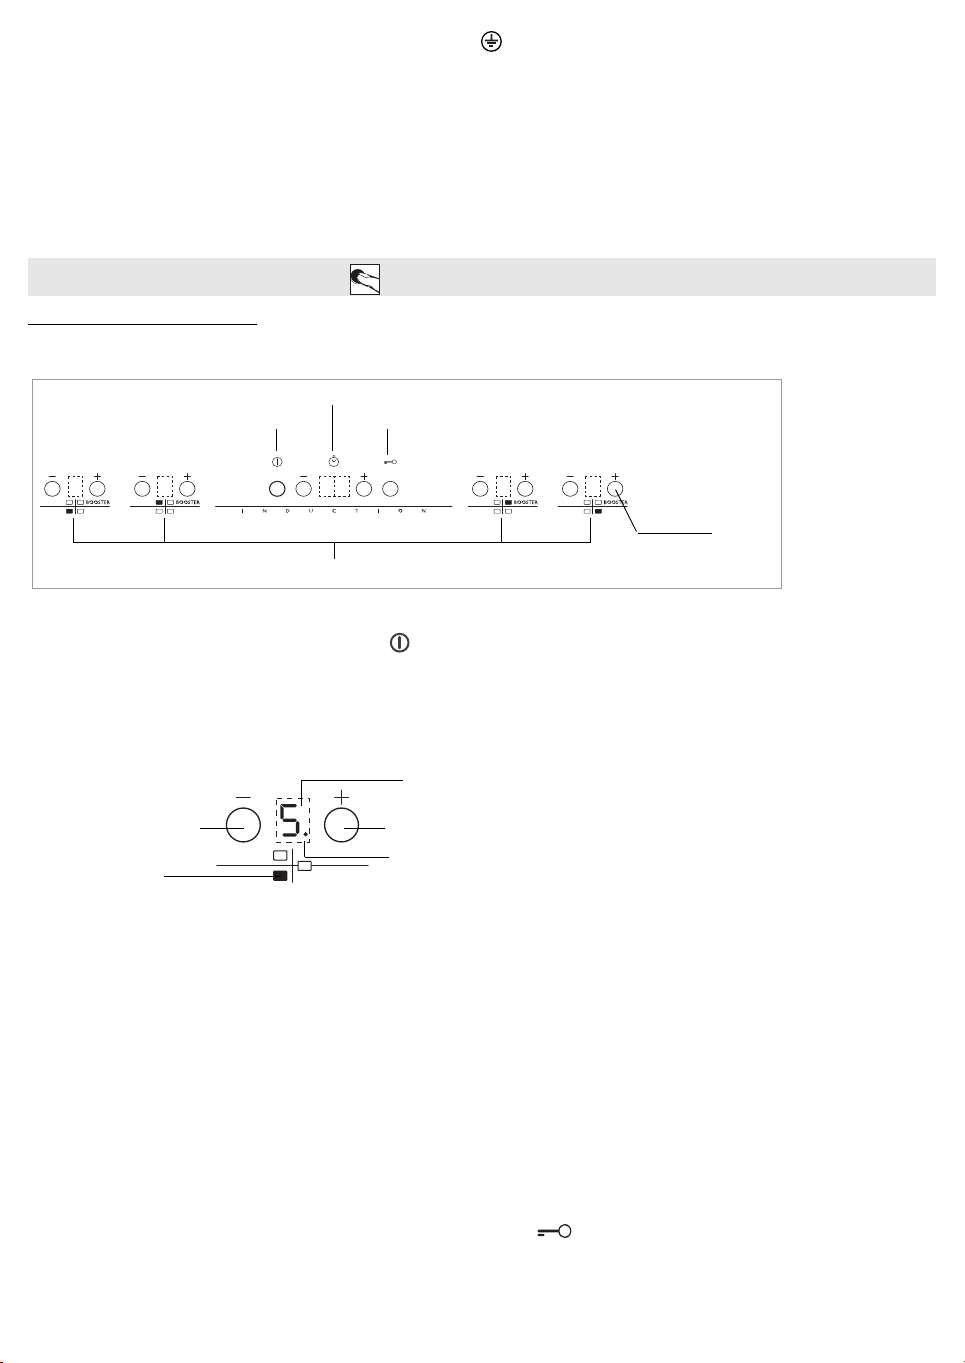
Beschreibung des Bedienfeldes
Bedienfeld
Ein-/Ausschalten des Kochfeldes
Zum Einschalten des Kochfeldes etwa 2 Sekunden lang die Taste drücken, bis die Anzeigen der Kochzonen aufleuchten Zum Ausschalten dieselbe Taste drücken, bis
alle Anzeigen erlöschen Alle Kochzonen werden abgeschaltet.
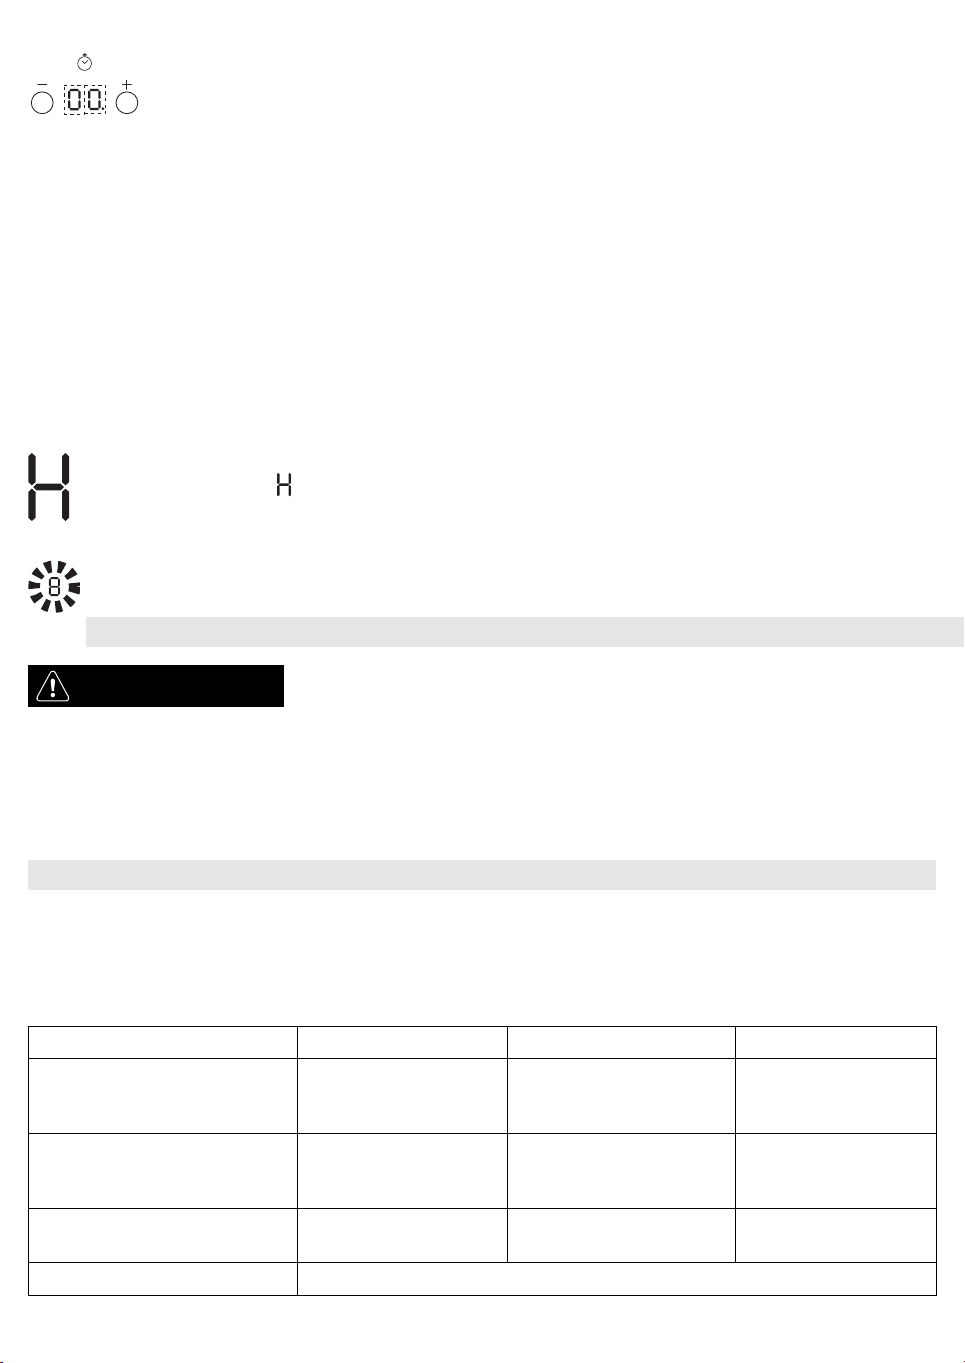
Falls das Kochfeld bereits benutzt wurde, leuchtet die Restwärmeanzeige “H”, bis die Kochzonen abgekühlt sind.
Wird innerhalb von 10Sekunden nach dem Einschalten des Kochfeldes keine Funktion gewählt, schaltet das Kochfeld automatisch wieder ab
Einschalten und Einstellen der Kochzonen
Nach Einschalten des Kochfeldes und nachdem das Kochgeschirr auf die gewünschte Kochzone gestellt wurde, die Leistungsstufe mit der Taste “+” einstellen. Beim
Einschalten wird die Stufe 5 angezeigt.
Jede Kochzone hat verschiedene Leistungsstufen, die mit den Tasten “+” oder “-” von “1” (niedrigste Stufe) bis “9” (höchste Stufe) eingestellt werden können. Einige
Kochzonen haben eine Boosterfunktion zum Schnellkochen, die mit dem Buchstaben “P” angezeigt wird.
Schnellkochfunktion (Booster)
Diese Funktion ist nur bei bestimmten Kochfeldern verfügbar und gestattet die maximale Nutzung der Kochfeldleistung (z. B. zum schnellen Sieden von Wasser) Drücken
Sie zum Aktivieren der Funktion die Taste “+”, bis “P” angezeigt wird oder nach dem Einschalten des Kochfeldes direkt die Taste “-” der gewünschten Kochzone. Auch dann
wird “P” angezeigt. Nach 10 Minuten schaltet das Gerät die Kochzone automatisch auf die Stufe 9 zurück.
Ausschalten der Kochzonen
Wählen Sie die Kochzone, die abgeschaltet werden soll, durch Drücken der Taste “+” oder “-” (der untere rechte Punkt der Leistungsstufe wird angezeigt).
Drücken Sie die Taste “-”, bis Stufe “0” erscheint.
Die Kochzone kann auch durch gleichzeitiges Drücken der Tasten “+” und “-” abgeschaltet werden. Die Kochzone schaltet ab und die Restwärmeanzeige “H” erscheint.
Bedienfeldsperre
Die Funktion sperrt die Bedienung des Kochfelds und verhindert versehentliches Einschalten durch Kinder. Zum Aktivieren der Kindersicherung schalten Sie das Kochfeld ein und
drücken Sie die Taste drei Sekunden lang. Ein Signalton und eine Leuchtanzeige unter dem Schlüsselsymbol bestätigen die erfolgte Aktivierung Das Bedienfeld ist mit
Ausnahme der Abschaltfunktion gesperrt. Zum Ausschalten der Bedienfeldsperre wiederholen Sie die beschriebene Vorgehensweise. Der Leuchtpunkt erlischt und das Kochfeld
ist wieder betriebsbereit.
Wasser beim Reinigen, aus den Töpfen übergelaufene Flüssigkeiten und Gegenstände aller Arten, die auf die Taste unter dem Symbol geraten, können zum
unbeabsichtigten Ein-/Ausschalten der Funktion führen.
BEDIENUNGSANLEITUNG
Bedienfeldsperre
Kochzonen-Bedienelemente und Anzeigen
Ein-/Ausschalten
Zeitschaltuhr
Die Symbole sind nicht aktiv!
zur Auswahl der gewünschten
Funktionen die
darunter befindlichen Bereiche
berühren.
Taste -
Leistungsanzeige
Anzeige der gewählten Kochzone
Taste +
Position der Kochzone
DE8
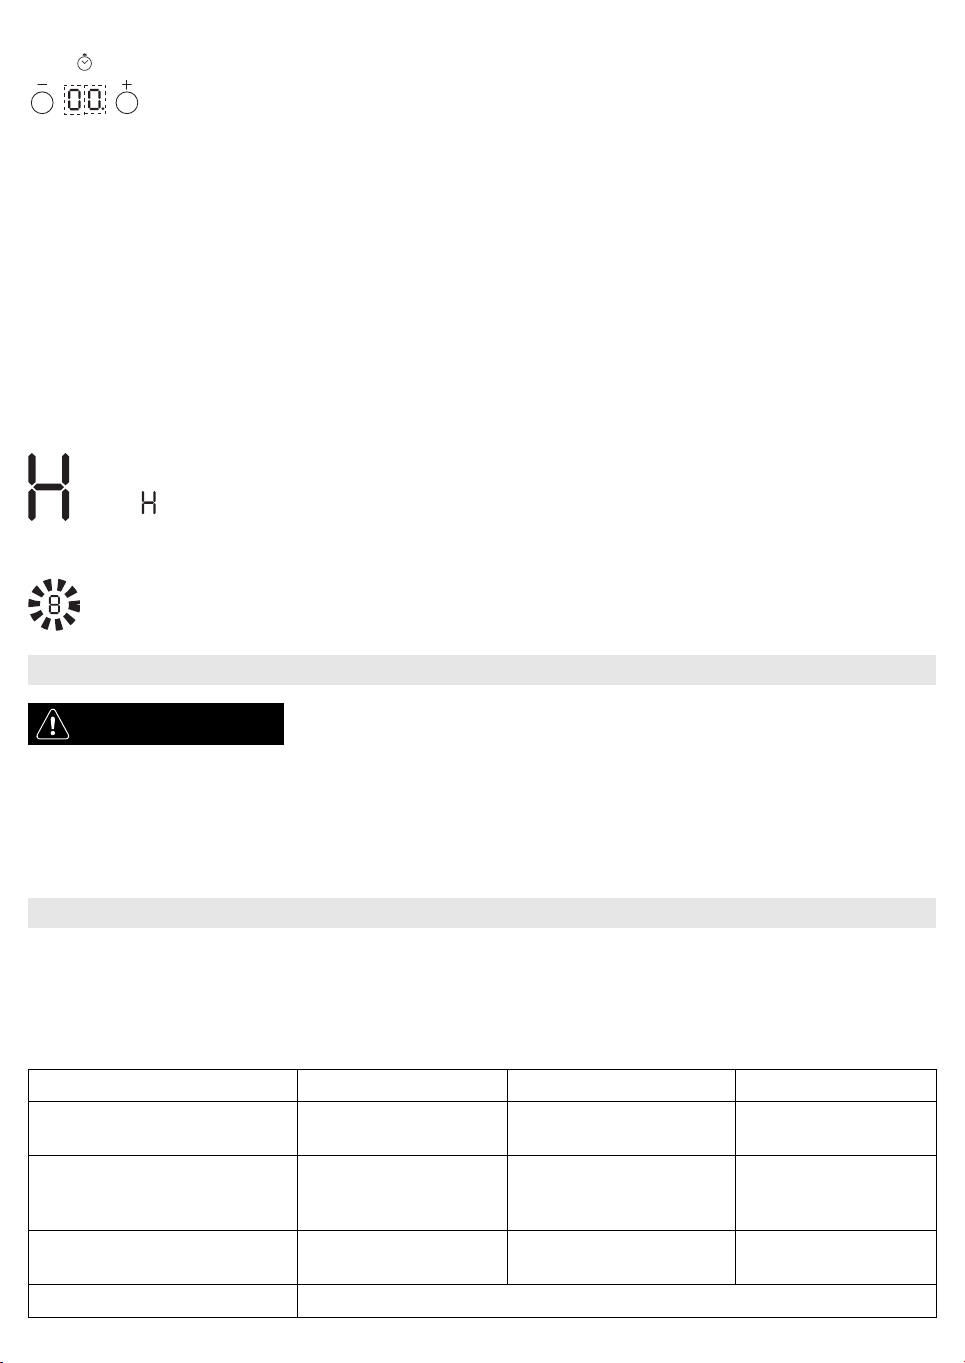
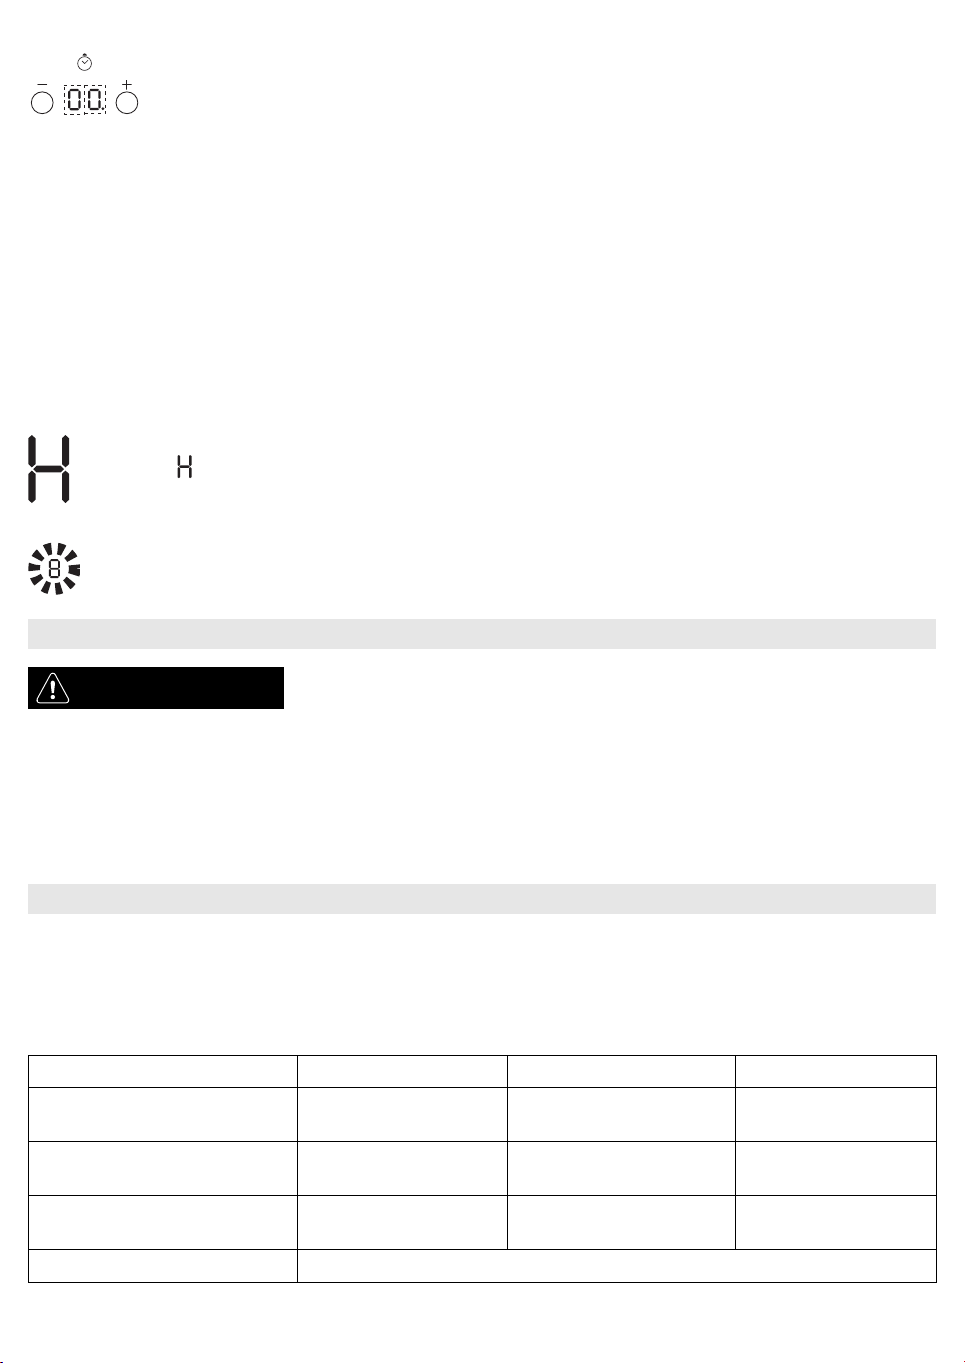
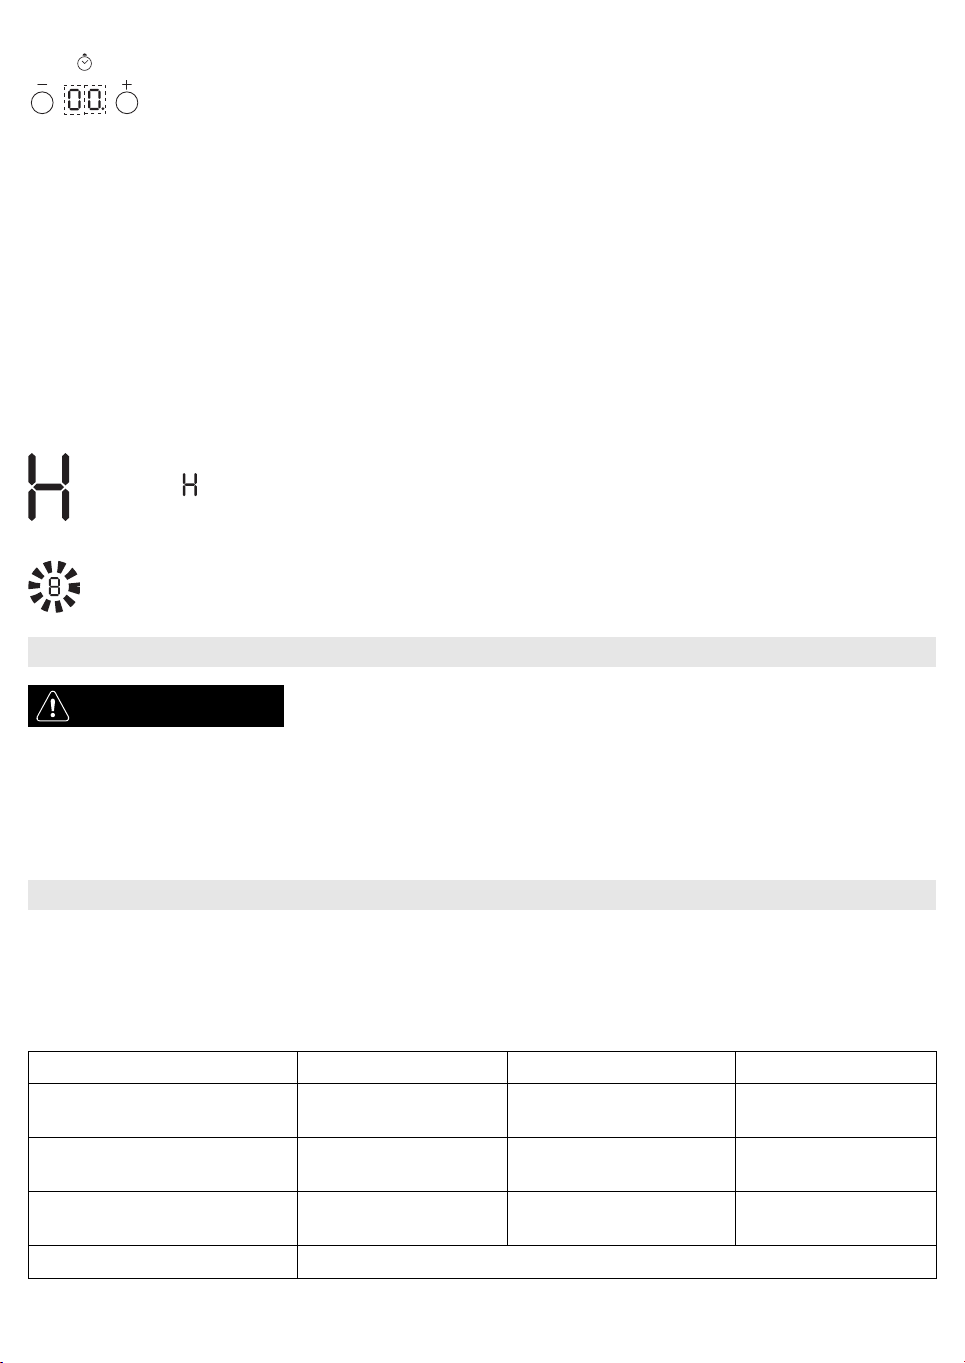
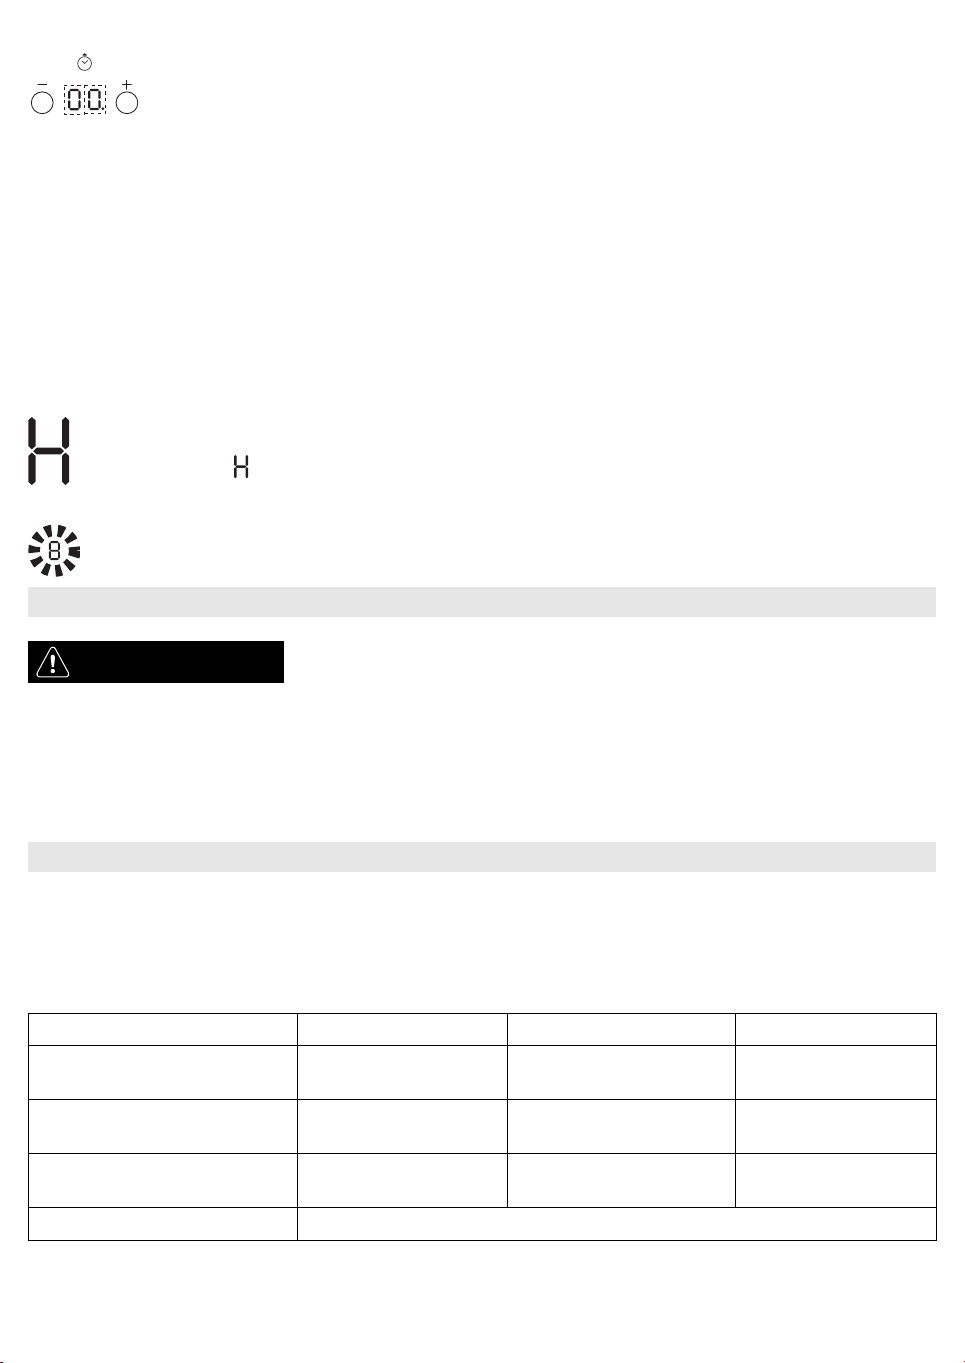
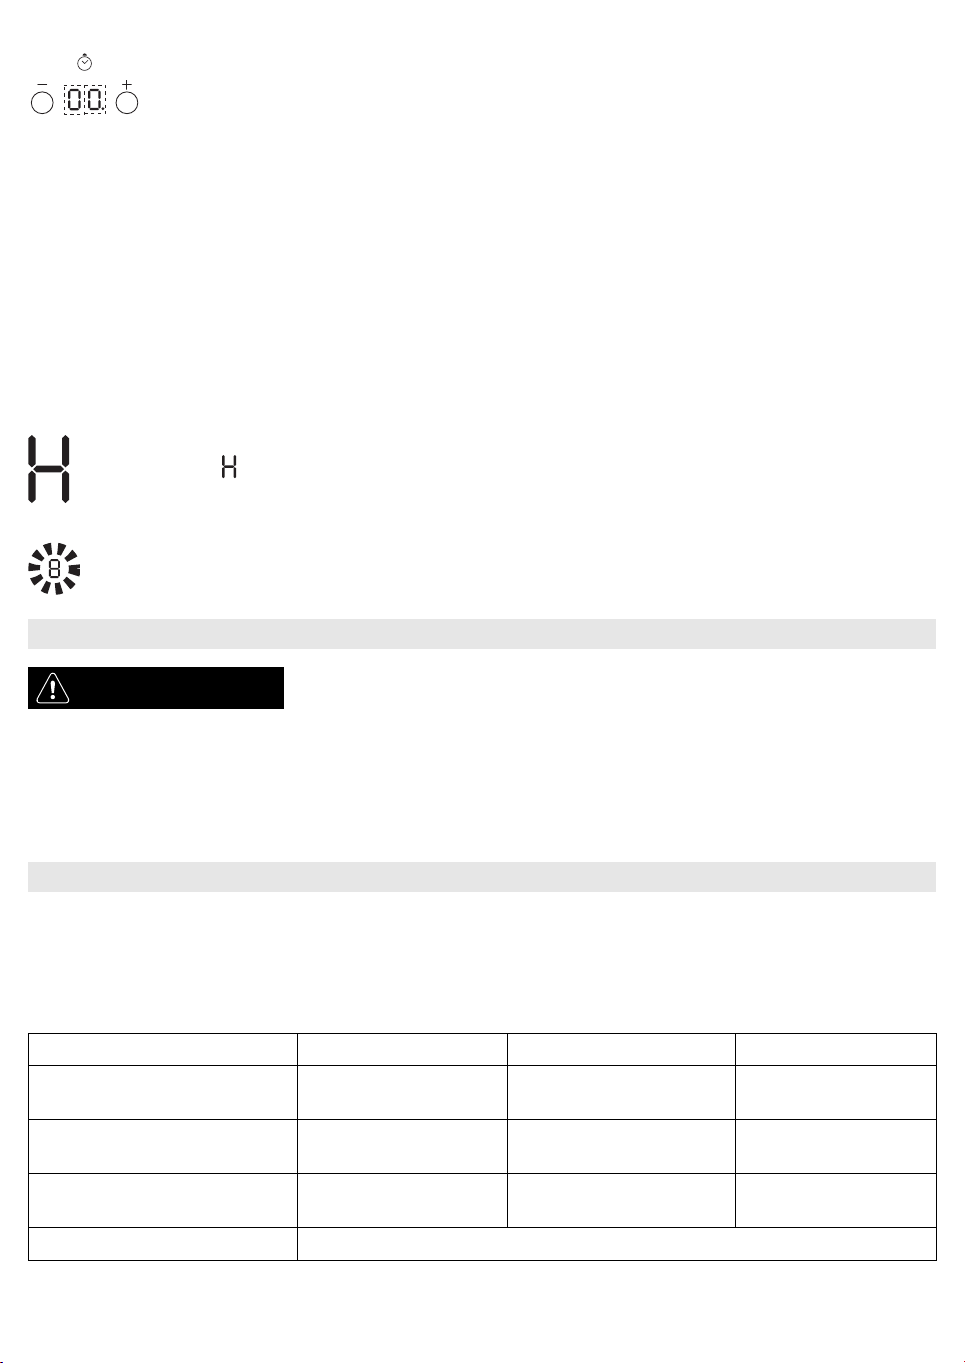
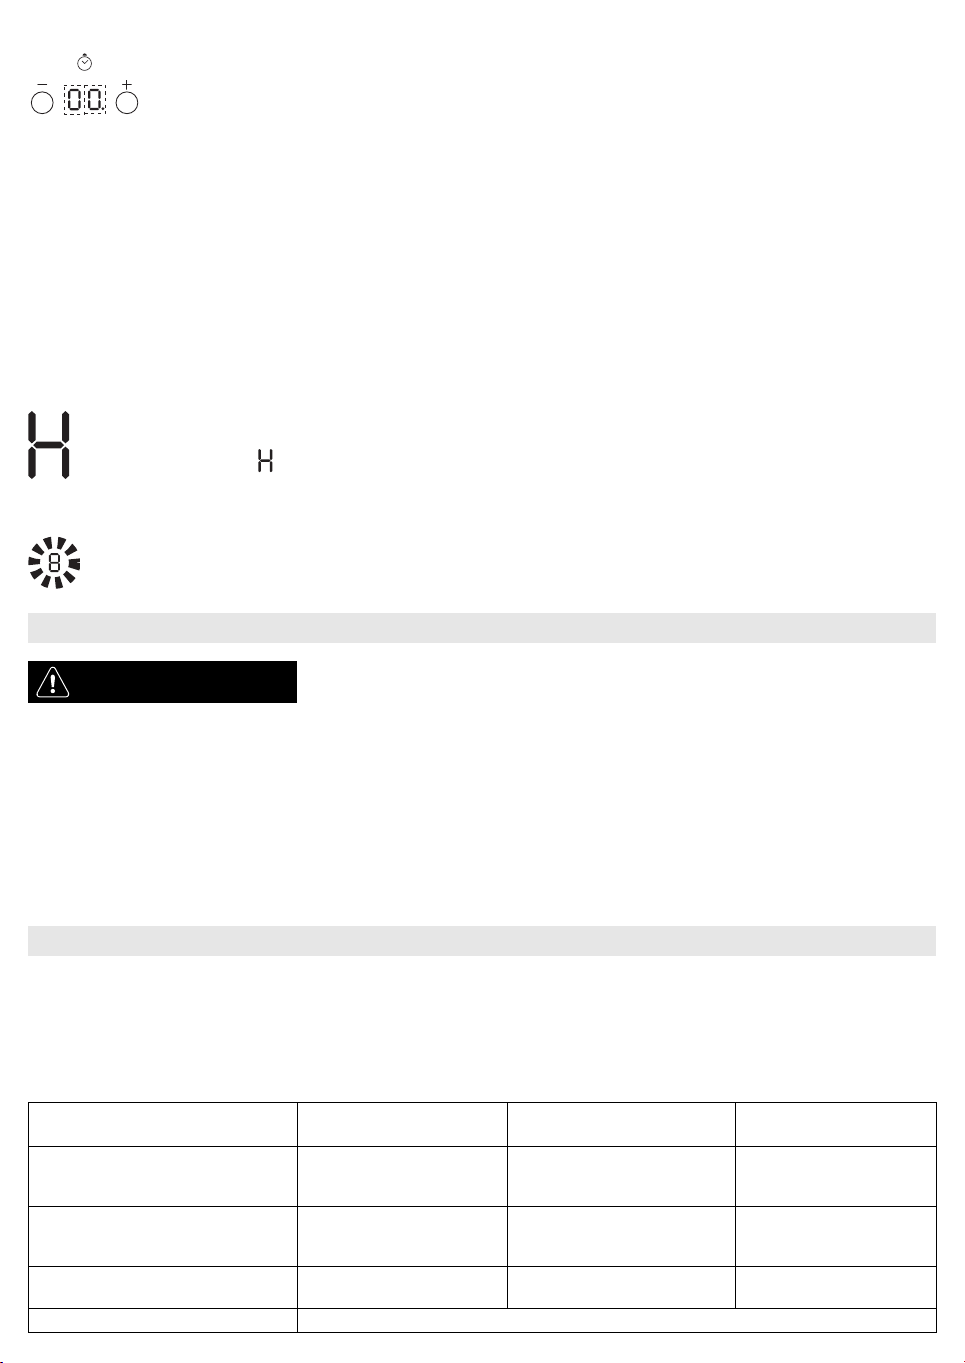
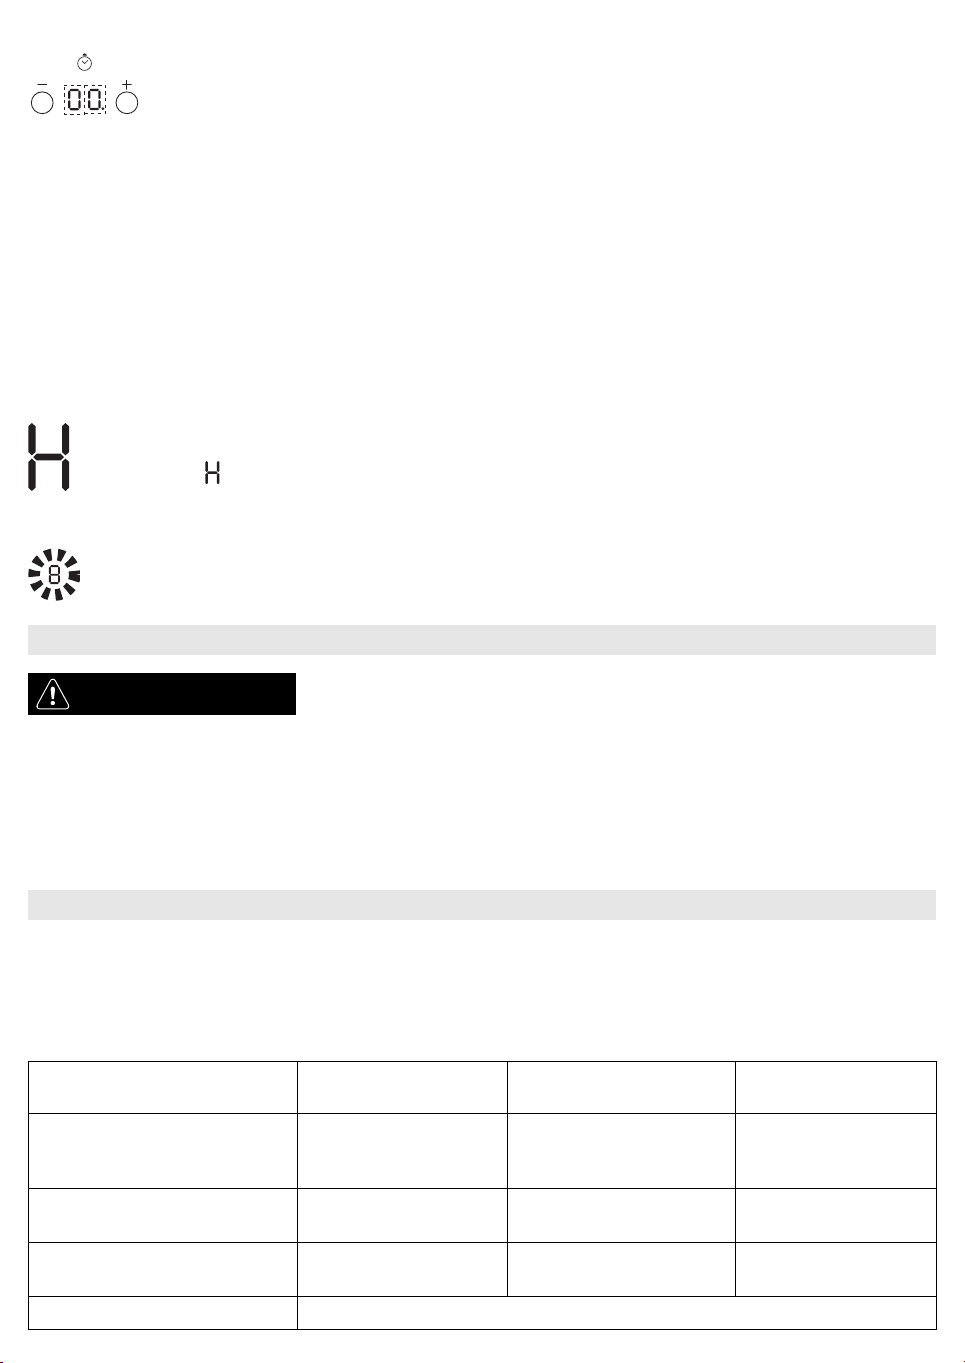
Zeitschaltuhr
Mit der Zeitschaltuhr kann jeweils eine einzige Kochzone auf einen Kochbetrieb vom maximal 99 Minuten (1 Stunde und 39 Minuten)
vorprogrammiert werden.
Wählen Sie die Kochzone, die vorprogrammiert werden soll (ein Leuchtpunkt erscheint rechts unterhalb der Leistungsstufenanzeige). Wählen
Sie dann die gewünschte Zeit mit den Tasten “+” und “-” der Timer-Funktion (siehe Abbildung oben). Einige Sekunden nach der letzten
Berührung setzt die Rückwärtszählung der Zeitschaltuhr ein und der Leuchtpunkt der gewählten Kochzone blinkt. Nach Ablaufen der Zeit ertönt
ein Signalton und die Kochzone schaltet automatisch ab.
Um den Timer zu deaktivieren, drücken Sie die Taste “-”, bis “0:0” angezeigt wird, oder gleichzeitig die Tasten “+” und “-” der Zeitschaltuhr.
Wichtig: Mit dem Timer kann jeweils nur eine Kochzone programmiert werden.
Kurzzeitwecker
Der Kurzzeitwecker lässt sich nur bei abgeschaltetem Ofen verwenden und auf eine Höchstzeit von 99 Minuten einstellen.
Die Taste “+” unter den Anzeigen der Zeitschaltuhr drücken: auf dem Display erscheinen die einzustellenden Minuten.
Stellen Sie die gewünschte Zeit mit den Tasten “+” und “-” ein.
Nach ein paar Sekunden startet der Countdown, nach dessen Ablauf ein Signalton ertönt
Wichtig: Der Kurzzeitwecker kann nur bei ausgeschaltetem Gerät verwendet werden. Bei Einschalten des Geräts wird die Funktion unterbrochen
Anzeigen des Bedienfeldes
Restwärmeanzeige.
Das Kochfeld ist mit einer Restwärmeanzeige für jede Kochzone ausgestattet. Diese Anzeige weist auf noch heiße Kochzonen hin.
Wirdangezeigt, so ist die Kochzone noch heiß Solange die Anzeige leuchtet, kann auf der Kochzone eine Speise warm gehalten oder Butter geschmolzen
werden
Erst nach Abkühlen der Kochzone erlischt die Anzeige.
Anzeige falsch positioniertes oder fehlendes Kochgeschirr
Das Kochfeld ist mit einem System zur automatischen Kochgeschirrerfassung für alle Kochzonen ausgestattet. Wird kein Kochgeschirr erfasst, blinkt die
Anzeige der Leistungsstufe der Kochzone. Vergewissern Sie sich, dass das Kochgeschirr korrekt positioniert ist und die in Abschnitt “vor dem gebrauch”
angeführten Eigenschaften aufweist.
Benutzen Sie keine Scheuerschwämmchen oder Topfkratzer. Mit der Zeit kann deren Gebrauch das Glas beschädigen.
•Lassen Sie das Kochfeld nach jedem Gebrauch abkühlen, bevor Sie Verkrustungen und Speisereste entfernen.
•Zucker oder stark zuckerhaltige Speisen beschädigen das Kochfeld und müssen sofort entfernt werden.
•Salz, Zucker und Sand können die Glasoberfläche verkratzen.
•Verwenden Sie ein weiches Tuch, Küchenpapier oder spezielle Reinigungsmittel für Glaskeramik-Kochfelder (beachten Sie die Herstellerangaben).
•Lesen und beachten Sie bitte die Anweisungen zur Bedienung des Geräts.
•Vergewissern Sie sich, dass kein Stromausfall vorliegt.
•Trocknen Sie die Glaskeramikoberfläche des Kochfelds nach dem Reinigen gut ab.
•Werden nach dem Einschalten des Kochfeldes alphanumerische Codes angezeigt, gehen Sie gemäß nachfolgender Tabelle vor.
•Wenn sich das Kochfeld nach dem Gebrauch nicht ausschalten lässt, trennen Sie es sofort vom Stromnetz.
REINIGUNG
ACHTUNG-Verwenden Sie keinesfalls Dampfstrahlreiniger.
-Schalten Sie vor dem Reinigen die Kochzonen unbedingt aus und achten Sie darauf, dass keine
Restwärmeanzeige (“H”) mehr leuchtet.
STÖRUNG - WAS TUN?
FEHLERCODEBESCHREIBUNGMÖGLICHE URSACHENBEHEBUNG DER STÖRUNG
Das Kochfeld schaltet sich aus, nach 30 Sekunden
ertönt alle 4 Sekunden ein akustisches Signal. Dauerdruck auf dem BedienfeldWasser oder Küchenutensilien auf dem
1.Versuchen Sie zuerst, die Störung anhand der in “Störung - was tun?” beschriebenen Anleitungen selbst zu beheben.
2.Schalten Sie das Gerät aus und wieder ein, um festzustellen, ob die Störung behoben ist.
Falls die Störung nach den vorstehend beschriebenen Kontrollen weiter besteht, rufen Sie bitte die nächstliegende Kundendienststelle an.
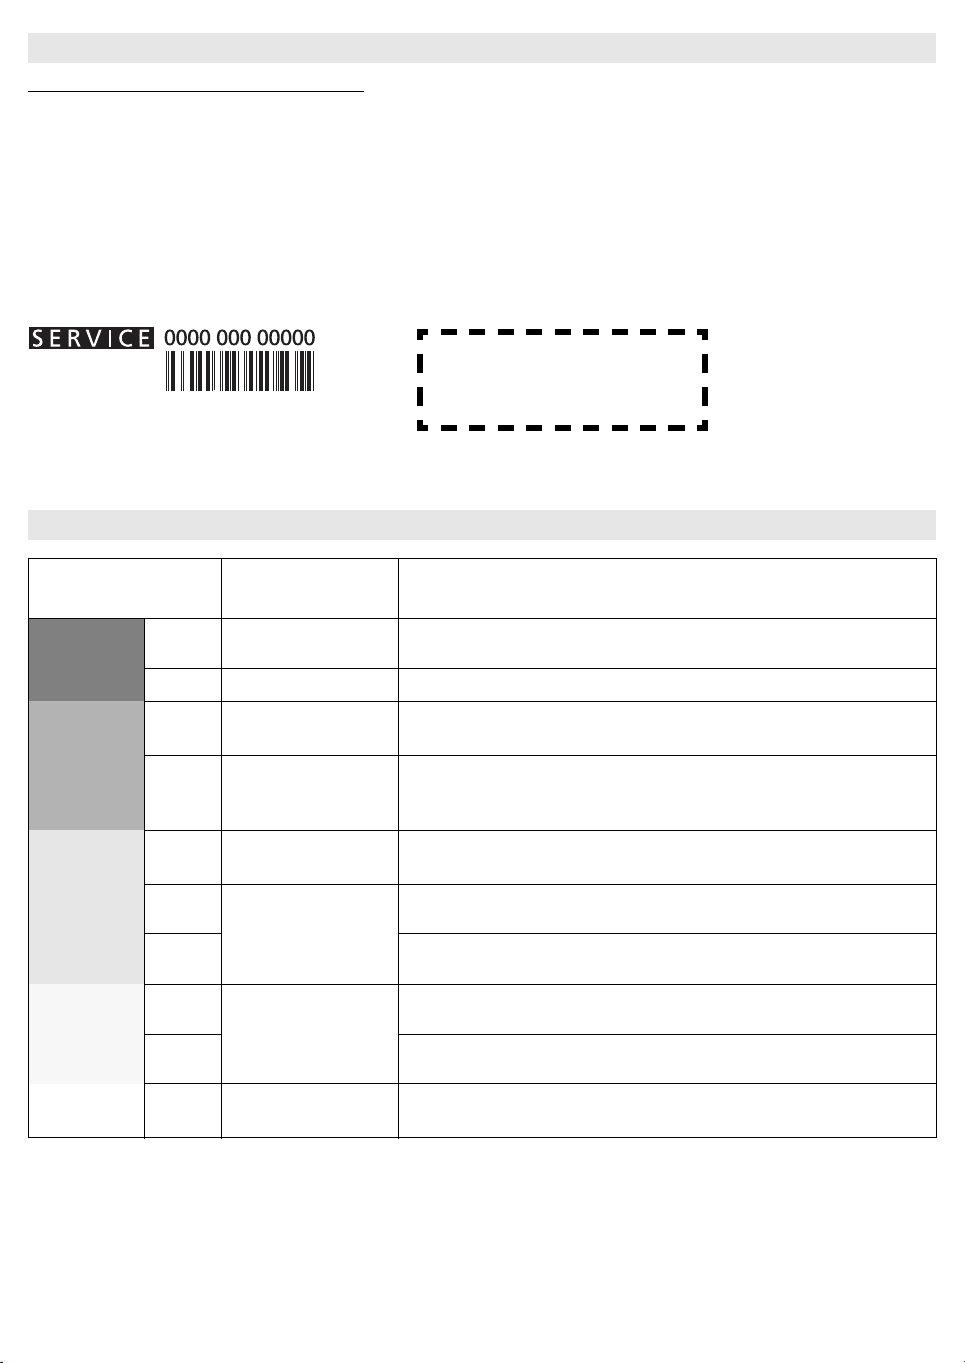
Sie benötigen dabei folgenden Angaben:
•Eine kurze Beschreibung der Störung,
•Gerätetyp und Modellnummer,
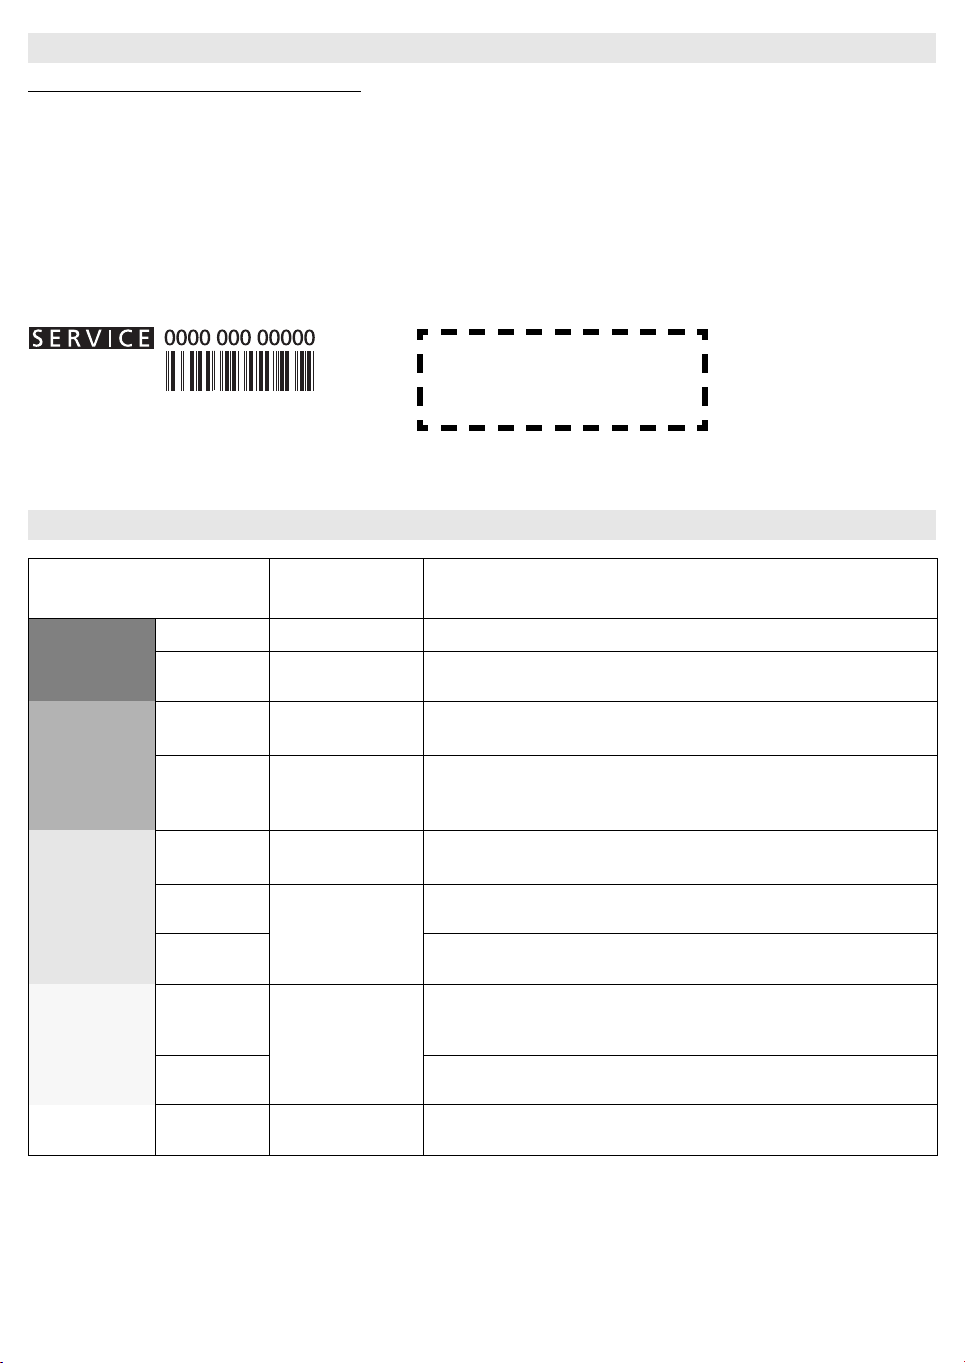
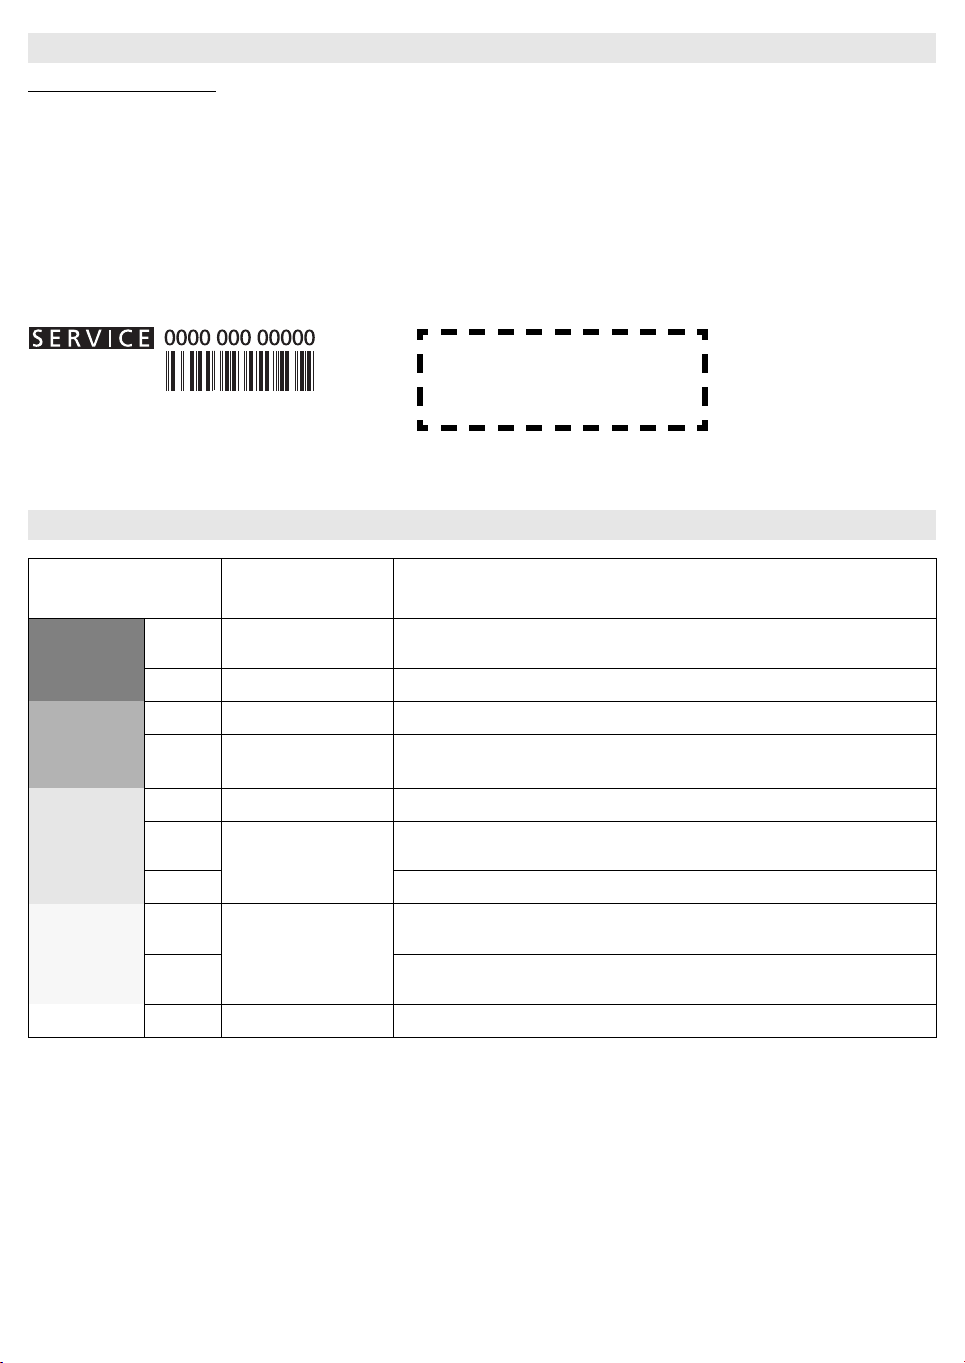
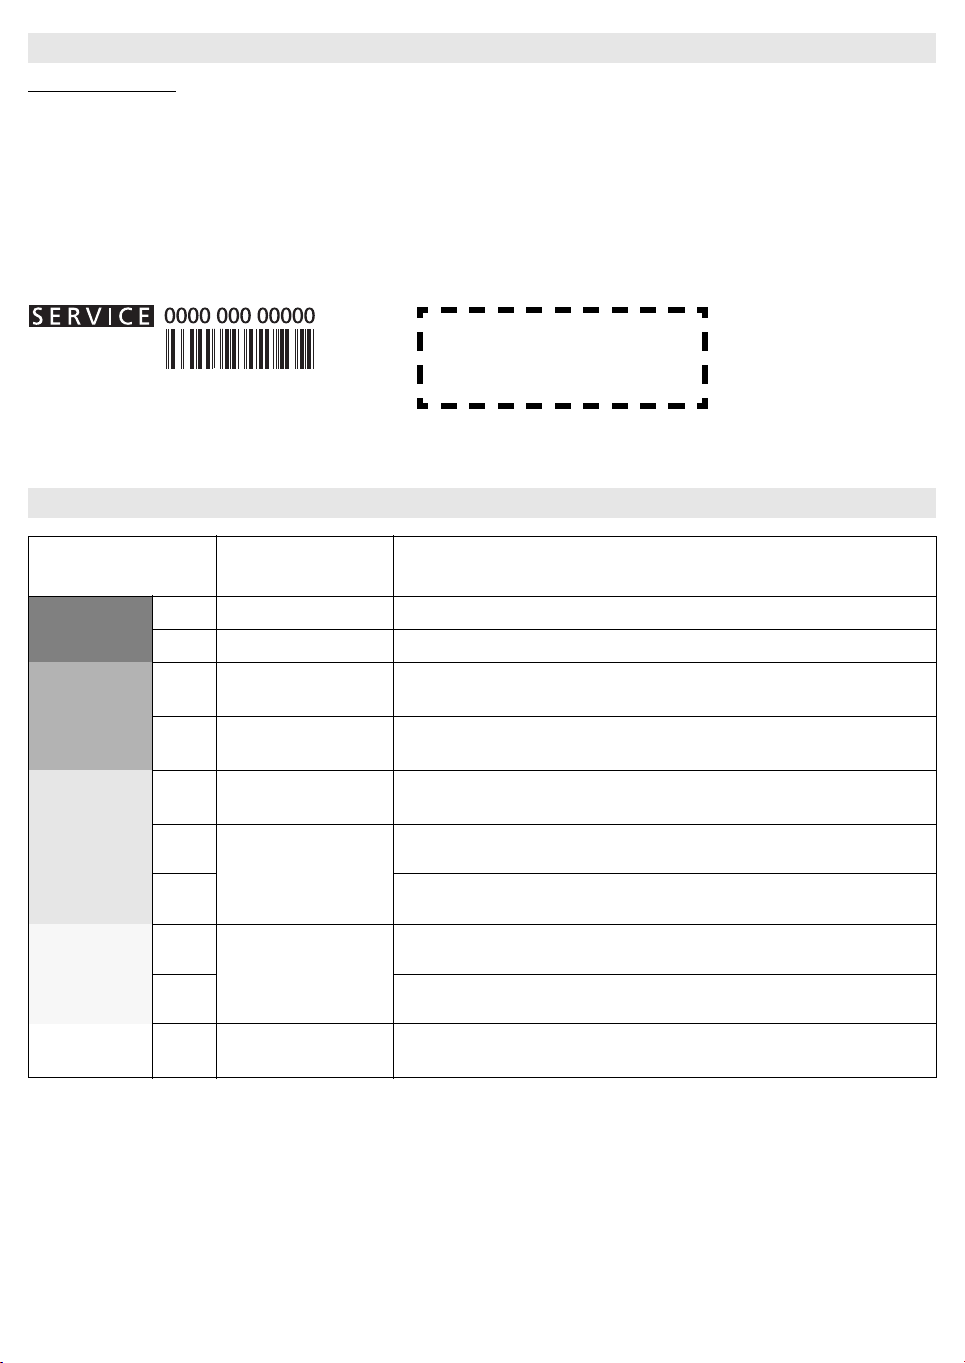
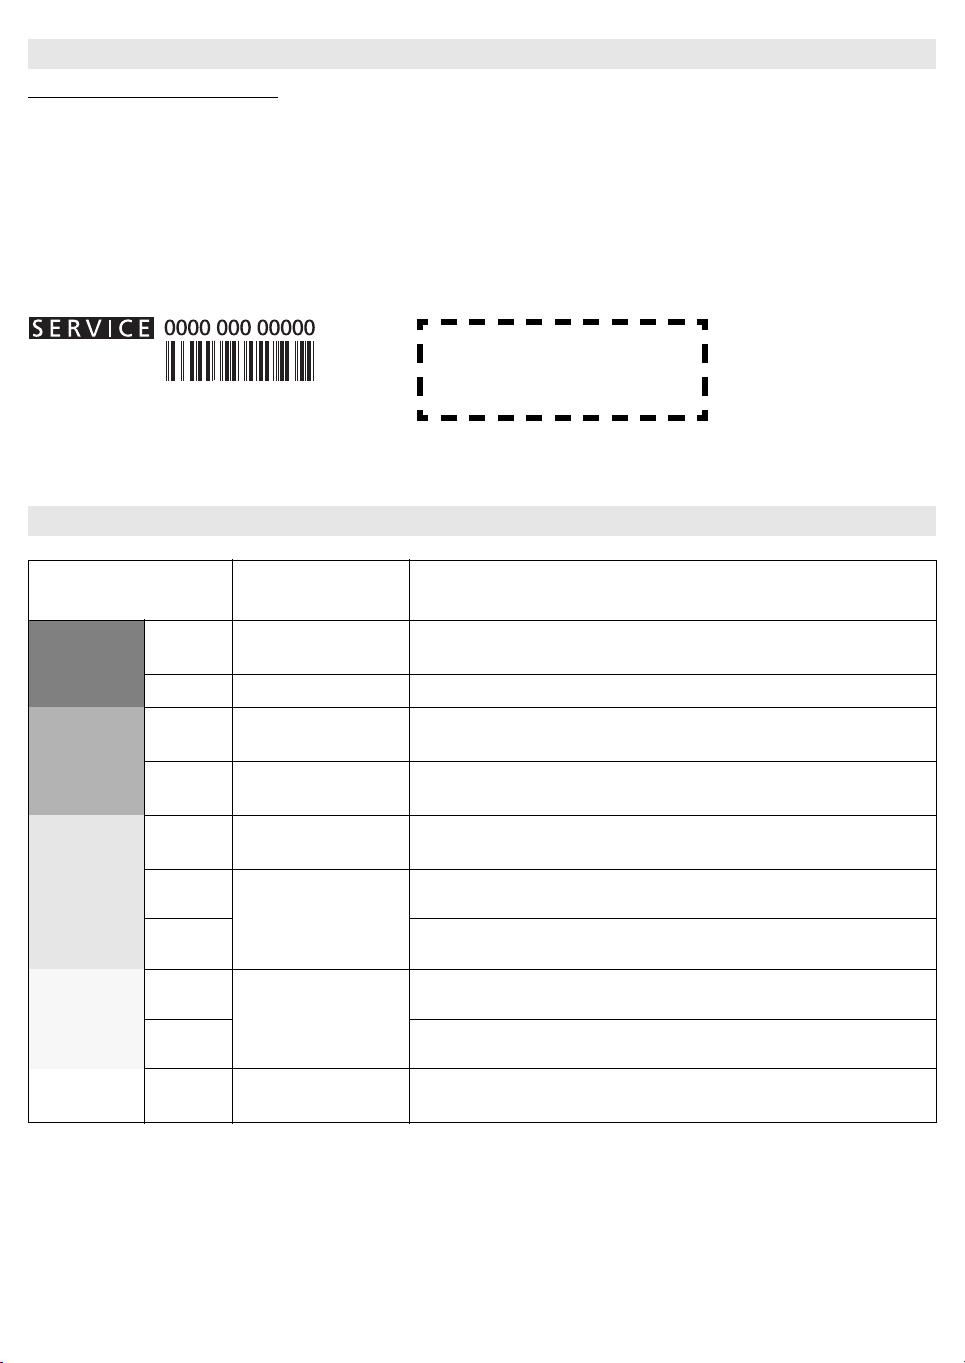
•die Servicenummer (die Ziffer hinter dem Wort Service auf dem Typenschild) auf der Unterseite des Gerätes (auf dem Metallschild). Die Servicenummer finden
Sie auch im Garantieheft,
•Ihre vollständige Anschrift,
•Ihre Telefonnummer.
Im Reparaturfall wenden Sie sich an den Kundendienst eines Vertragshändlers (nur so wird garantiert, dass Originalersatzteile zum Einsatz kommen und die Reparatur
fachgerecht ausgeführt wird). Ersatzteile sind 10 Jahre lang lieferbar.
ANMERKUNG:
Bei Zweikreiskochzone mit 28 cm Durchmesser (soweit installiert) wird für Zubereitungen mit kurzer Dauer, die perfekte Wärmeverteilung erfordern (zum Beispiel
Pfannkuchen), von der Benutzung von Kochgeschirr mit Durchmesser über 24 cm abgeraten. Zum schonenden Garen (zum Beispiel Schmelzen von Schokolade oder Butter)
sollten Einkreiskochzonen mit kleinerem Durchmesser verwendet werden.
KUNDENDIENST
TABELLE LEISTUNGSSTUFEN
LeistungsstufeGarartEinstellung Leistungsstufe
(die Angabe ergänzt Ihre Erfahrung und Kochgewohnheiten)
Höchste
Leistungsstufe
BoostSchnelles AufwärmenIdeal zum schnellen Erwärmen von Speisen bis zum schnellen Sieden von Wasser oder schnellen
Erhitzen von Garflüssigkeiten
8-9Braten - SiedenIdeal zum Anbraten, Ankochen, Braten von Tiefkühlkost, schnellen Sieden
Hohe
Leistungsstufe
7-8Anbraten - Bräunen - Sieden -
GrillenIdeal zum Bräunen, am Sieden halten, Garen und Grillen (für kurze Dauer, 5-10 Minuten).
6-7Schmoren - Garen - Schmoren
- Bräunen - Grillen
Ideal zum Bräunen, am Köcheln halten, Garen und Grillen (für mittlere Dauer, 10-20 Minuten),
Vorwärmen von Zubehör.
Mittlere
Leistungsstufe
4-5Garen - Schmoren - Anbraten -
GrillenIdeal zum Schmoren, leise am Köcheln halten, Garen (für lange Dauer). Teigwaren ziehen lassen
3-4Garen - leises Köcheln -
Eindicken - ziehen lassen
Ideal für lange Kochzeiten (Reis, Saucen, Braten, Fisch) in Flüssigkeit (z. B. Wasser, Wein, Brühe, Milch)
und um Teigwaren ziehen zu lassen.
2-3Ideal für lange Kochzeiten (Menge weniger als ein Liter: Reis, Saucen, Braten, Fisch) in Flüssigkeit (z. B.
Wasser, Wein, Brühe, Milch)
Niedrige
Leistungsstufe
1-2Schmelzen - Auftauen -
Warmhalten - Ziehen lassen
Ideal zum Zerlassen von Butter, vorsichtigen Schmelzen von Schokolade, Auftauen von Lebensmitteln
in kleinen Mengen und Warmhalten von frisch zubereiteten Speisen (z. B. Saucen, Suppen, Eintöpfen)
1Ideal zum Warmhalten von frisch zubereiteten Speisen, um Risotto ziehen zu lassen und zum
Warmhalten von Geschirr (mit für Induktion geeignetem Zubehör)
OFF
Leistung
sstufe
Null
AbstellflächeKochfeld in Position Standby oder aus (nach dem Garen kann noch Restwärme vorhanden sein, wird
durch “H” angezeigt)
Kleben Sie hier einen der Aufkleber mit den
Produktdaten ein, die sich in zweifacher
Ausfertigung im Garantieheft befinden.
GB10
YOUR SAFETY AND THAT OF OTHERS IS VERY IMPORTANT
This manual and the appliance itself provide important safety messages, to be read and always observed.
All messages relevant to safety specify the potential risk to which they refer and indicate how to reduce the risk of injury, damage and electric shocks due to incorrect
use of the appliance. Make sure to comply with the following:
-The appliance must be disconnected from the power supply before carrying out any installation operation.
-Installation and maintenance must be carried out by a specialised technician, in compliance with the manufacturer’s instructions and the local safety regulations
in force. Do not repair or replace any part of the appliance unless specifically stated in the user manual.
-The appliance must be earthed.
-The power cable must be long enough for connecting the appliance, fitted in the cabinet, to the power supply.
-For installation to comply with the current safety regulations, an omnipolar switch with minimum contact gap of 3mm is required.
-Do not use multi-sockets or extension cords.
-Do not pull the appliance’s power cable.
-The electrical components must not be accessible to the user after installation.
-The appliance is designed solely for domestic use for cooking food. No other use is permitted (e.g. heating rooms). The Manufacturer declines any liability for
inappropriate use or incorrect setting of the controls.
-The appliance must not be used by persons (including children) with reduced physical, sensory or mental abilities, or without experience or knowledge of it,
unless supervised or instructed in its correct use by a person responsible.
-The accessible parts can become very hot during use. Children must be kept away from the appliance and watched over to ensure that they do not play with it.
-Do not touch the appliance heating elements during and after use. Do not allow the appliance to come into contact with cloths or other flammable materials until
all the components have cooled sufficiently.
-Do not place flammable materials on or near the appliance.
-Overheated oils and fats catch fire easily. Pay attention when cooking food products rich in fat and oil.
-Do not place metal objects, such as kitchen utensils (knives, forks, spoons, lids, etc.), on the cooking zone, as they can become very hot.
-A separator panel (not supplied) must be installed in the compartment under the appliance.
-If the surface of the hob is damaged (glass cracked or broken), do not use the appliance. Call the After-Sales Service.
-The appliance is not intended to be operated by means of an external timer or separate remote control system.
IMPORTANT SAFETY INSTRUCTIONS
This is the danger symbol, regarding safety, warning of potential risks to users and others.
All safety messages will be preceded by the danger symbol and the following words:
DANGERIndicates a hazardous situation which, if not avoided, will result in serious injury.
WARNINGIndicates a hazardous situation which, if not avoided, could result in serious injury.
ENGLISH Installation Page 2 Instructions for use Page
GB11
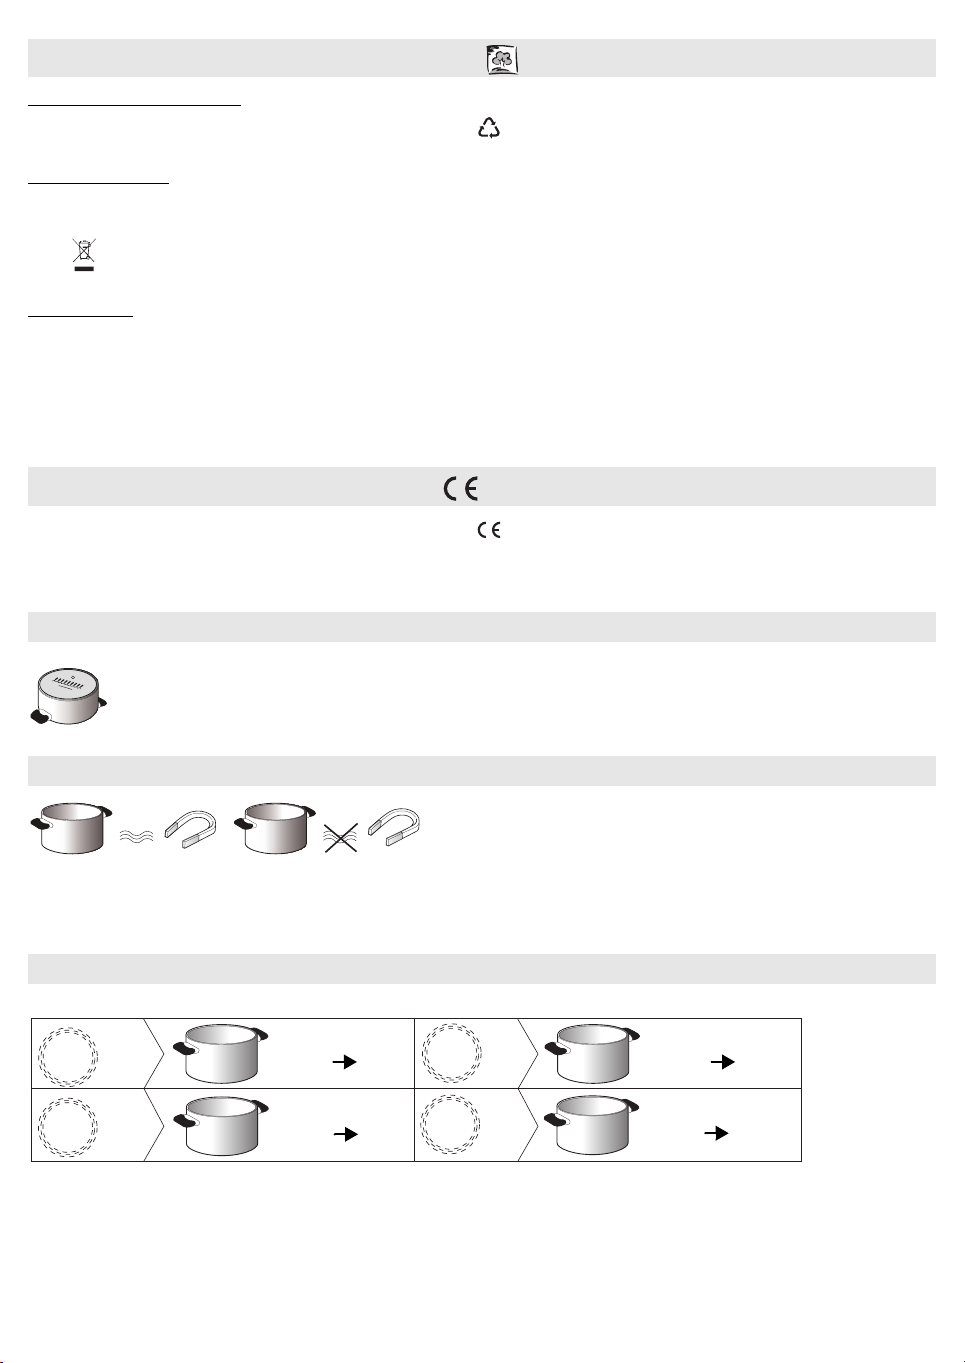
Disposal of packing
The packing material is 100% recyclable and marked with the recycling symbol (). The various parts of the packing must not be dispersed in the environment, but
disposed of in compliance with local regulations.
Disposal
This appliance is marked in conformity with European Directive 2002/96/EC on Waste Electrical and Electronic Equipment (WEEE).
By ensuring that this appliance is correctly disposed of, the user can help prevent potentially negative consequences for the environment and health.
The symbol on the appliance or the accompanying documentation indicates that this product should not be treated as domestic waste but must be taken to an
appropriate collection point for recycling WEEE.
Energy saving
For optimum results, it is advisable to:
•Use pots and pans with bottom width equal to that of the cooking zone.
•Only use flat-bottomed pots and pans.
•When possible, keep pot lids on during cooking.
•Use a pressure cooker to to save even more energy and time.
•Place the pot in the middle of the cooking zone marked on the hob.
-This appliance, intended to come into contact with food products, complies with Regulation () no. 1935/2004, and has been designed, manufactured and
marketed in conformity with the safety requirements of “Low Voltage” Directive 2006/95/EC (replacing 73/23/EEC as amended) and protection requirements of
“EMC” Directive 2004/108/EC.
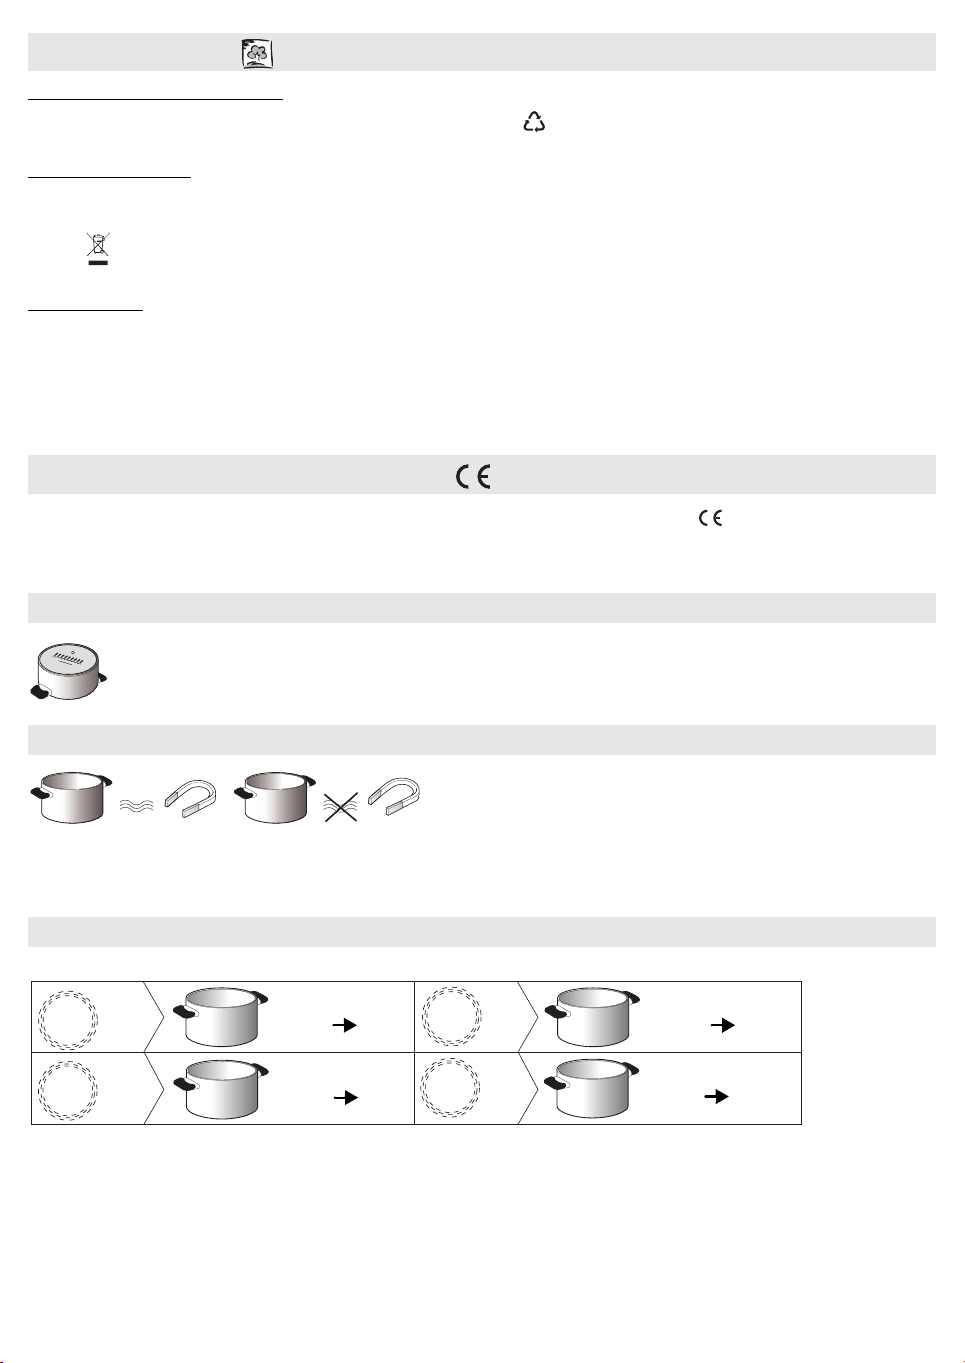
Use a magnet to check if the pot is suitable for the induction hob: pots and pans are unsuitable if not magnetically detectable.
-Make sure pots have a smooth bottom, otherwise they could scratch the hob. Check dishes.
-Never place hot pots or pans on the surface of the hob’s control panel. This could result in damage.
SAFEGUARDING THE ENVIRONMENT
DECLARATION OF CONFORMITY
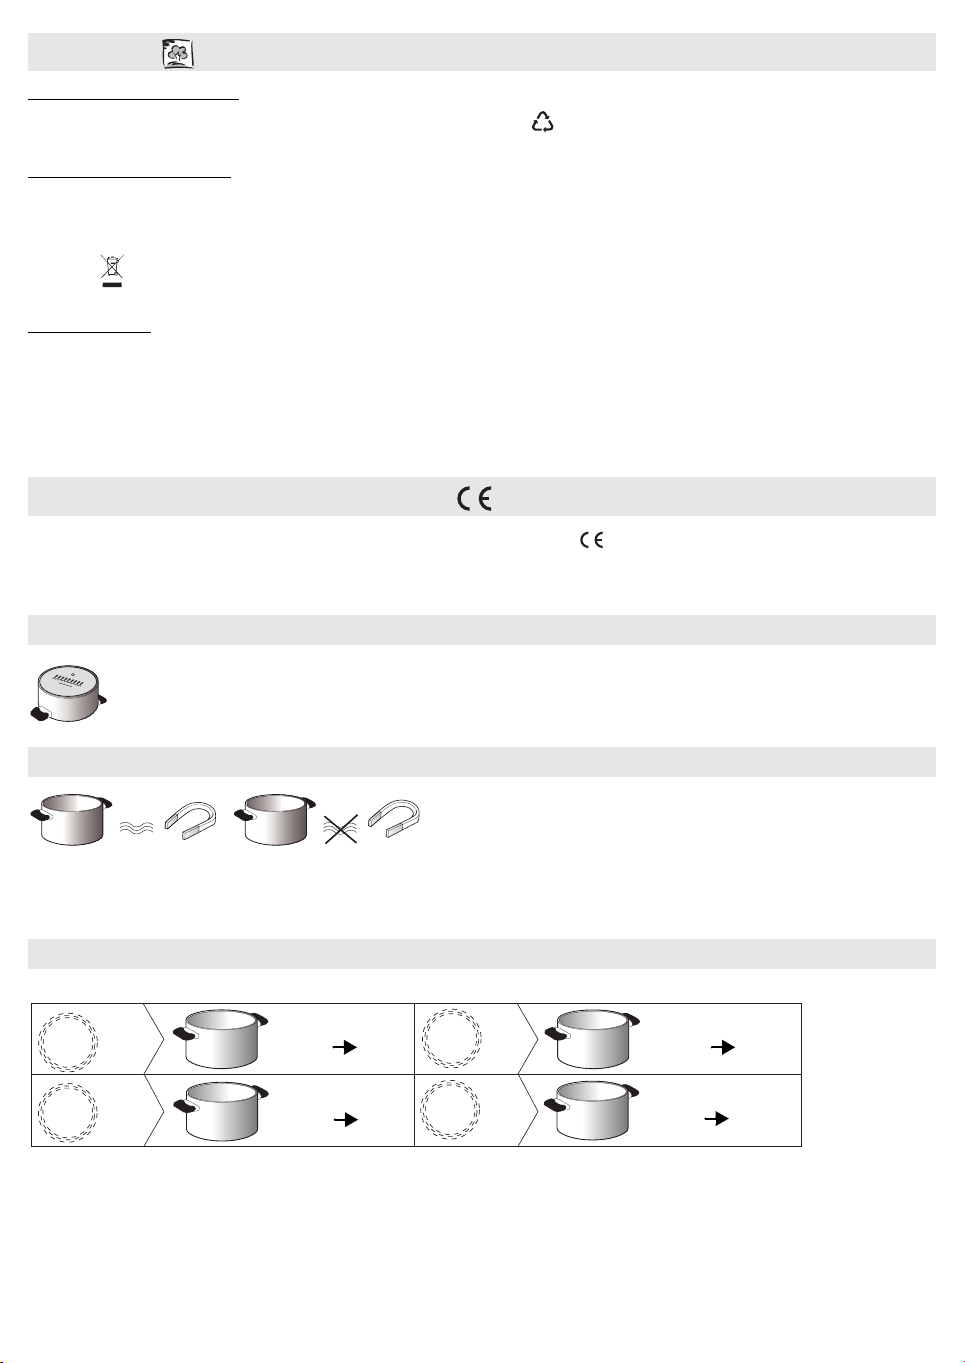
BEFORE USE
IMPORTANT: The cooking zones will not switch on if pots are not the right size. Only use pots bearing the symbol “INDUCTION SYSTEM” (Figure
opposite). Place the pot on the required cooking zone before switching the hob on.
EXISTING POTS AND PANS
RECOMMENDED POT BOTTOM WIDTHS
NOOK
Ø
28 cm
XL
Ø
17 cm 28 cm
Ø
21 cm
L
Ø
15 cm 21 cm
Ø
18 cm
M
Ø
14.5 cm
S
Ø
12 cm 18 cm
Ø
10 cm 14.5 cm
GB12
After unpacking the product, check for any damage during transport. In case of problems, contact the dealer or the After-Sales Service.
PREPARING THE CABINET FOR FITTING
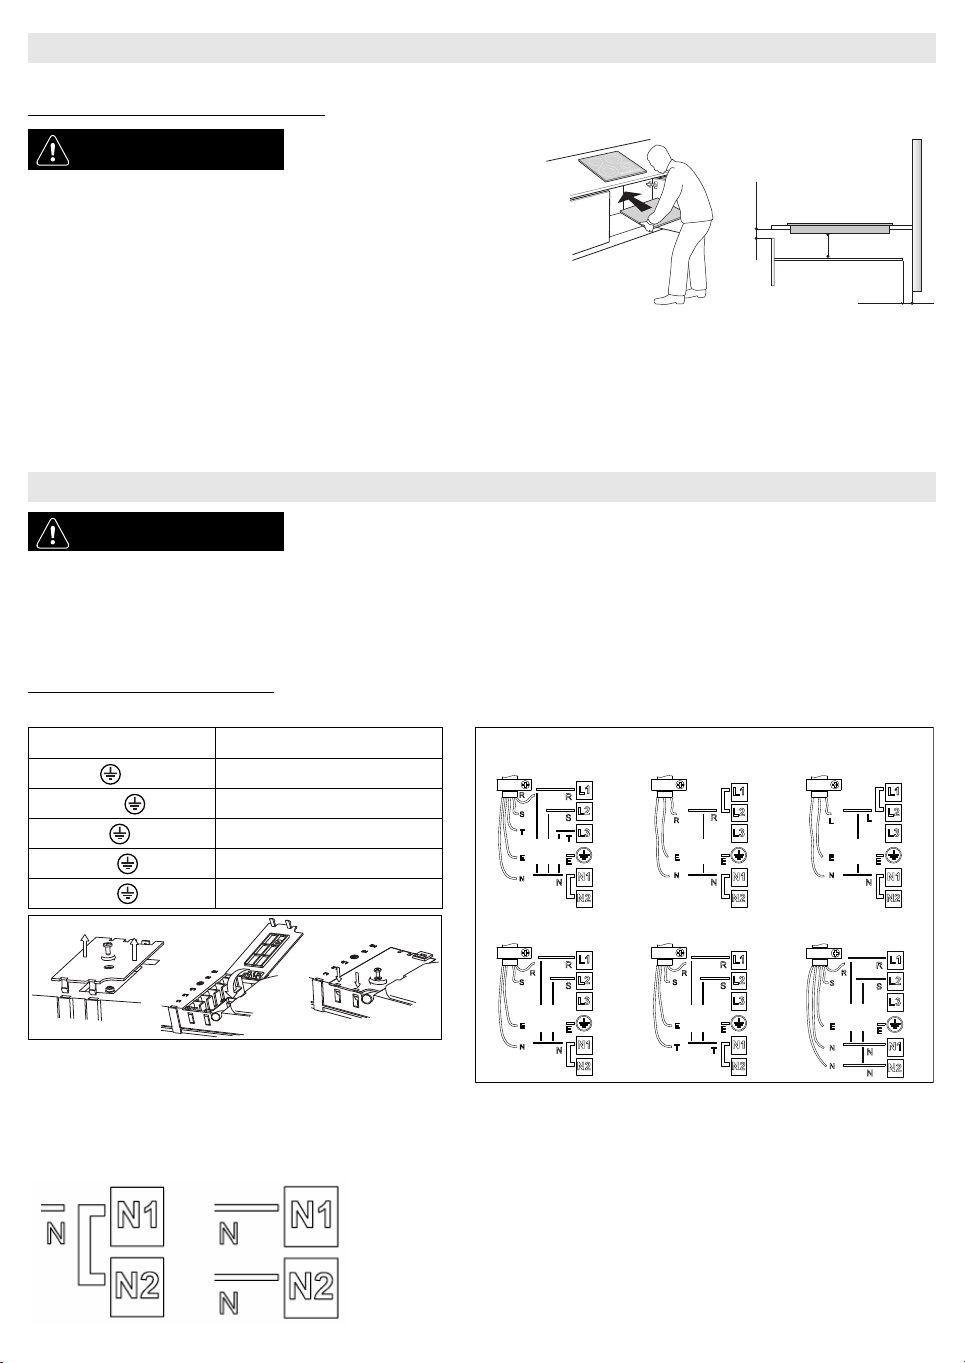
Connection to the terminal block
For the electrical connection, use an H05RR-F cable as specified in the table below.
Important:
- Based on the wiring diagram (see figure) either keep or remove the metal jumpers between the screws on the terminal block L1-L2 and N1-N2.
- Make sure all six screws on the terminal block are tightened after connecting the cables.
Example of jumper present (left) or removed (right). See the wiring diagram for details (the jumpers can be between L1-L2 and between N1-N2).
INSTALLATION
WARNING-Install a separator panel under
the hob.
-The lower part of the product
must not be accessible after
installation.
-In case of installation of an
undertop oven, do not interpose
the separator panel.
•The distance between the underside of the appliance and the separator panel must respect the dimensions given in the figure.
•In order to ensure the correct operation of the product, do not obstruct the minimum required clearance between the hob and the top of the unit (min. 5 mm).
•If an oven is installed beneath the hob, make sure the oven is equipped with a cooling system.
•Do not install the hob above a dishwasher or washing-machine, so that the electronic circuits do not come into contact with steam or moisture which could
damage them.
•In the case of flush-mounted installation, call the After-Sales Service to request assembly of screws kit 4801 211 00112.
•To remove the hob from the worktop use a screw driver (not supplied) unlocking the springs from the bottom side of the appliance.
ELECTRICAL CONNECTION
WARNING-Disconnect the appliance from the power supply.
-Installation must be carried out by qualified personnel who know the current safety and
installation regulations.
-The manufacturer declines all liability for injury to persons or animals and for damage to property resulting from failure to observe the
regulations provided in this chapter.
-The power cable must be long enough to allow the hob to be removed from the worktop.
-Make sure the voltage specified on the dataplate located on the bottom of the appliance is the same as that of the home.
WiresNumber x size
230V ~ + 3 x 4 mm2
230-240V ~ + 3 X 4 mm2 (Australia only)
230V 3 ~ + 4 x 1.5 mm2
400V 3N ~ + 5 x 1.5 mm2
400V 2N ~ + 4 x 1.5 mm2
min 5 mm
min 20 mm
min 5 mm
400 V 3N ~230 V ~230-240 V ~ (Australia only)
230 V ~ (UK only)
400 V 2N ~230 V 3 ~ (Belgium only)400V 2N ~ (Holland only)
230 V
230 V
230 V
230 V
230 V
230 V
230 V
230 V
230 V
230 V
230 V
CBA
GB13
Connect the yellow/green earth wire to the terminal with the symbol .
This wire must be longer than the other wires.
1.Remove the terminal block cover (A), undoing the screw and inserting the cover in the terminal block hinge (B).
2.Insert the power cable in the cable clamp and connect the wires to the terminal block as indicated in the connection diagram located near it.
3.Secure the power cable with the cable clamp.
4.Close the cover (C) and screw it on the terminal block with the previously removed screw.
Each time the power is connected, the hob performs an automatic check for a few seconds.
If the hob already has a power cable, follow the instructions attached to the cable. Connect the appliance to the power supply by means of a multipole switch with
minimum contact gap of 3mm.
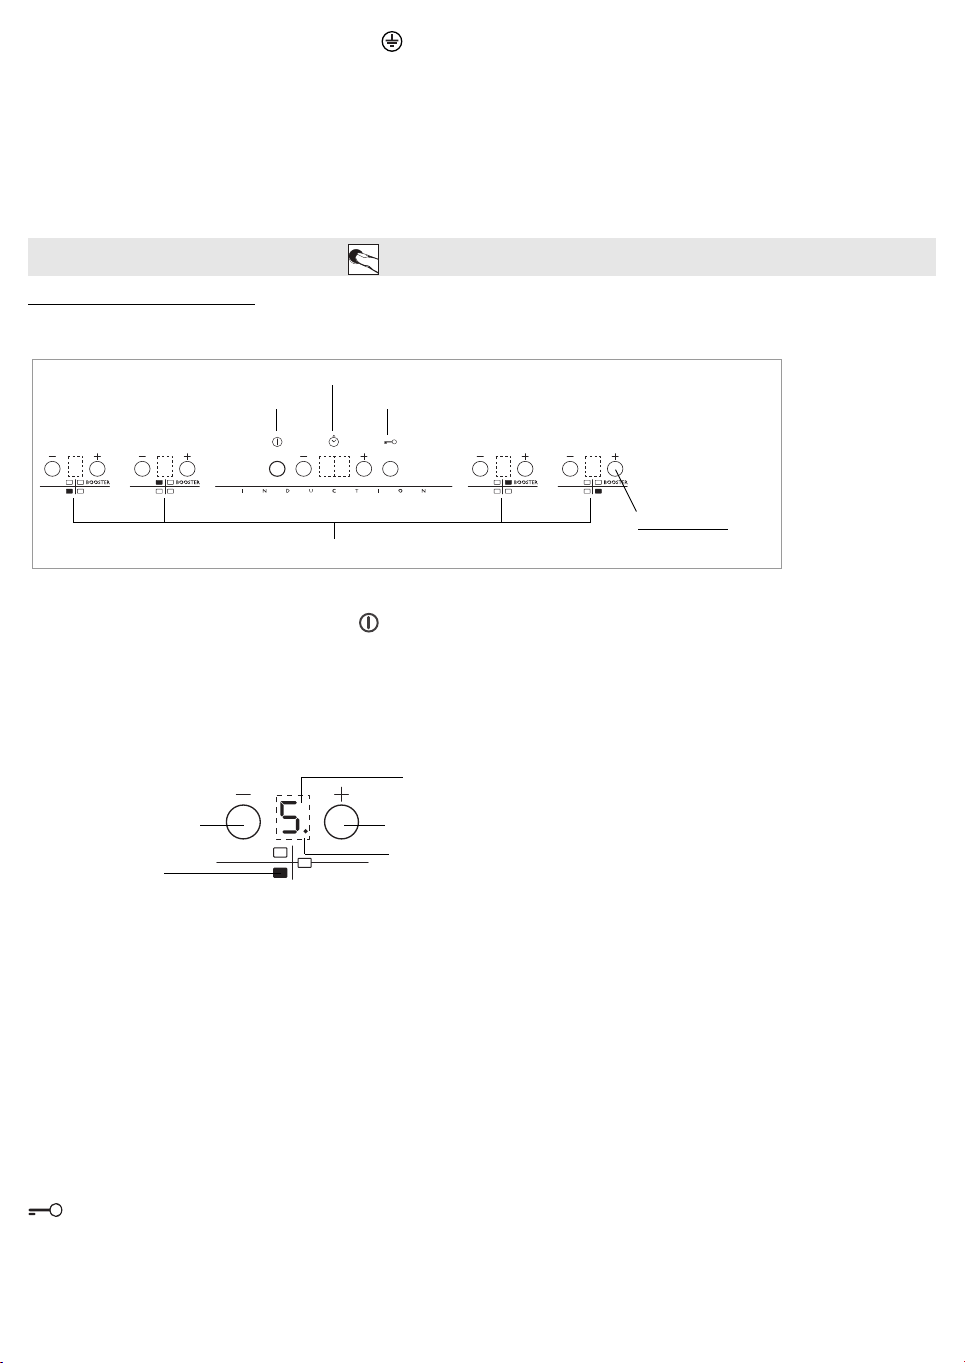
Control Panel Description
Control panel
Switching the hob ON/OFF
To switch the hob on, press the button for approx. 2 seconds until the cooking zone displays light up. To switch off, press the same button until the displays switch
off. All the cooking zones are deactivated
If the hob has been in use, the residual heat indicator “H” remains lit until the cooking zones have cooled down.
If within 10 seconds of switching on, no function is selected, the hob switches off automatically.
Switching on and adjusting cooking zones
After switching the hob on and placing the pot on the chosen cooking zone, adjust the power level using the + button. Upon activation, the display shows level 5.
Each cooking zone has various power levels, adjustable with the +/- buttons, going from “1”: min. power, to “9”: max. power. Some cooking zones have a fast boil
function (Booster), shown on the display with the letter “P”.
Fast boil function (Booster)
This function, only present on some cooking zones, makes it possible to exploit the hob’s maximum power (for example to bring water to the boil very quickly). To select this
function, press the button “+” until “P” appears on the display or, after switching the hob on, press the “-” button for the selected cooking zone. In this case too, “P” appears
on the display. After 10 minutes’ use of the booster function, the appliance automatically sets the zone to level 9.
Deactivation of cooking zones
Select the cooking zone to be switched off by pressing the “+” or “-” key (a dot lights up at the bottom right hand side of the heat setting indicator).
Press the key “-” to set the level to “0”.
The cooking zone can also be switched off by pressing the “+” and “-” buttons at the same time. The cooking zone switches off and the residual heat indicator “H” lights
up.
Control panel lock
This function locks the hob controls to prevent accidental switching on by children. To activate the control panel lock function, switch on the hob and hold button for three
seconds; an acoustic signal and a luminous indicator above the key signal activation. The control panel is locked except for the deactivation function. To deactivate the control panel
lock, repeat the activation procedure. The luminous dot goes off and the hob is active again.
The presence of cleaning water, liquid spilled from pots or any objects resting on the button below the symbol can accidentally activate or deactivate the control panel
lock function.
INSTRUCTIONS FOR USE
Control panel lock
Cooking zone controls and corresponding display
On/Off
Timer
the symbols are not active!
To select the desired
functions, touch the
areas below.
- button
Power indicator display
Selected cooking zone indication
+ button
Cooking zone
positioning
GB14
Timer
The timer can be used to set cooking time for a maximum of 99 minutes (1 hour and 39 minutes) for one cooking zone only.
Select the cooking zone to be used with the timer (an illuminated dot appears to the bottom right hand side of the heat setting indicator on the
display), then set the desired cooking time using the buttons “+” and “-” of the timer function (see figure above). A few seconds after the button
is pressed, the timer begins the countdown (the luminous dot of the selected cooking zone starts flashing). Once the set time has elapsed, an
acoustic signal sounds and the cooking zone switches off automatically.
To deactivate the timer, press the “-” button until the display shows “0:0” or press the “+” and “-” buttons of the timer at the same time.
Important: The timer function can only be used with one cooking zone at a time.
Minute minder
The minute minder can only be used when the hob is not in use and allows a maximum setting of 99 min.
Press the “+” button under the timer indicators: the display shows the minutes ready for setting.
Select the time desired using the buttons + and -.
After a few seconds the minute minder starts to count down. Once the set time has elapsed an acoustic signal sounds.
Important: The minute minder function can only be used when the hob is switched off; if it is then switched on, the minute minder countdown is automatically
cancelled.
Control panel warnings.
Residual heat indicator.
The hob is fitted with a residual heat indicator for each cooking zone. These indicators alert the user when cooking zones are still hot.
If the display shows, the cooking zone is still hot. If the residual heat indicator of a given cooking zone is lit, that zone can be used, for example, to keep a
dish warm or to melt butter.
When the cooking zone cools down, the display goes off.
Incorrect or missing pot indicator.
The hob features an automatic pot detection system for all cooking zones. If no pot is detected, the display with the cooking zone power level indicator
flashes. Make sure the pot is correctly positioned and that it has the characteristics given in the section “Before use”.
IMPORTANT: Do not use abrasive sponges or scouring pads. Their use could eventually ruin the glass.
•After each use, clean the hob (when it is cool) to remove any deposits and stains due to food residuals.
•Sugar or foods with a high sugar content damage the hob and must be immediately removed.
•Salt, sugar and sand could scratch the glass surface.
•Use a soft cloth, absorbent kitchen paper or a specific hob cleaner (follow the Manufacturer’s instructions).
•Read and follow the instructions given in the section “Instructions for use”.
•Make sure there is not a power outage.
•Dry the hob thoroughly after cleaning it.
•If, when the hob is switched on, alphanumeric codes appear on the display, consult the following table for instructions.
•If the hob cannot be switched off after using it, disconnect it from the power supply.
CLEANING
WARNING-Do not use steam cleaners.
-Before cleaning, make sure the cooking zones are switched off and that the residual heat indicator (“H”)
F12, F21, F25, F36, F37, F40, F47, F56, F58, F60Call the After-Sales Service and specify the error code
GB15
Before contacting the After-sales Service:
1.See if you can solve the problem yourself with the help of the “Troubleshooting guide”.
2.Switch the appliance off and then on again it to see if the problem has been eliminated.
If the problem persists after the above checks, contact the nearest After-Sales Service.
Always specify:
•a brief description of the fault;
•the product type and exact model;
•the Service number (the number after the word Service on the rating plate), located under the appliance (on the metal plate). The Service number is also given in
the warranty booklet;
•your full address;
•your telephone number.
If any repairs are required, contact an authorised After-Sales Service Centre (to ensure the use of original spare parts and correct repairs). Spare parts are available
for 10 years.
NOTE:
When using the 28 cm dual zone (where present) for quick preparations that require perfectly uniform heat distribution (for example, pancakes), make sure the diameter of
accessories used does not exceed 24 cm. For delicate cooking (for example, melting chocolate or butter) use the smaller diameter single zones.
AFTER-SALES SERVICE
POWER LEVEL TABLE
Power levelType of cookingLevel use
(indicating cooking experience and habits)
Max. powerBoostFast heatingIdeal for rapidly increasing the temperature of food to fast boiling in the case of water or rapidly
heating cooking liquids
8-9Frying - boilingIdeal for browning, starting to cook, frying deep frozen products, fast boiling
High power
7-8Browning - sautéing - boiling -
grilling
Ideal for sautéing, maintaining a lively boil, cooking and grilling (for a short period of time, 5-10
minutes)
6-7Browning - cooking - stewing -
sautéing - grilling
Ideal for sautéing, maintaining a light boil, cooking and grilling (for a medium period of time, 10-20
minutes), preheating accessories
Medium power
4-5Cooking - stewing - sautéing -
grillingIdeal for stewing, maintaining a gentle boil, cooking (for a long period of time). Creaming pasta
3-4Cooking - simmering -
thickening - creaming
Ideal for long-cooking recipes (rice, sauces, roasts, fish) with liquids (e.g. water, wines, broth, milk),
creaming pasta
2-3Ideal for long-cooking recipes (less than a litre in volume: rice, sauces, roasts, fish) with liquids (e.g.
water, wines, broth, milk)
Low power
1-2Melting - defrosting - keeping
food warm - creaming
Ideal for softening butter, gently melting chocolate, thawing small products and keeping just-cooked
food warm (e.g. sauces, soups, minestrone)
1Ideal for keeping just-cooked food warm, for creaming risottos and for keeping serving dishes warm
(with induction-suitable accessory)
OFFZero
powerSupport surfaceHob in stand-by or off mode (possible end-of-cooking residual heat, indicated by an “H”)
Attach here one of the two stickers giving the
product data, included in the warranty booklet.
FR16
VOTRE SÉCURITÉ ET CELLE DE VOTRE ENTOURAGE MÉRITENT TOUTE VOTRE ATTENTION
Le présent manuel contient des messages de sécurité importants qui figurent également sur l’appareil. Nous vous invitons à les lire soigneusement et à les respecter
en toute circonstance.
Les messages de sécurité précisent le danger auquel ils se réfèrent et indiquent comment réduire le risque de lésions, de dégâts matériels et d’électrocution qui peuvent
résulter d’une mauvaise utilisation de l’appareil. Veuillez observer scrupuleusement les instructions suivantes.
-Débranchez l’appareil du secteur avant l’installation.
-L’installation et l’entretien doivent être exécutés par un technicien spécialisé, conformément aux instructions du fabricant et à la réglementation locale en vigueur
en matière de sécurité. Ne réparez pas et ne remplacez pas les pièces de l’appareil si ces opérations ne figurent pas dans le manuel.
-La mise à la terre de l’appareil est obligatoire.
-Le cordon d’alimentation doit être assez long pour permettre de brancher au secteur l’appareil encastré dans un meuble.
-Pour réaliser une installation conforme aux normes de sécurité en vigueur, prévoyez un interrupteur omnipolaire avec une ouverture minimale de 3 mm entre les
contacts.
-N’utilisez en aucun cas de prises multiples ou de rallonges.
-Ne tirez pas sur le cordon de l’appareil.
-Une fois l’installation terminée, l’utilisateur ne doit plus pouvoir accéder aux composants électriques.
-La table de cuisson est un appareil électroménager conçu exclusivement pour la cuisson des aliments. Toute autre utilisation est considérée comme impropre (par
ex. chauffer des locaux). Le fabricant décline toute responsabilité en cas d’usage impropre ou de mauvais réglage des commandes.
-L’appareil ne doit pas être confié à des personnes (y compris les enfants) qui en raison de leurs capacités physiques, sensorielles ou mentales ou de leur
inexpérience ne peuvent pas l’utiliser en toute sécurité, à moins qu’elles ne soient sous la surveillance d’une personne responsable ou qu’elles n’aient reçu les
instructions nécessaires.
-Les parties accessibles de la table deviennent très chaudes pendant l’utilisation. Assurez-vous que les enfants restent à l’écart et qu’ils ne jouent pas avec
l’appareil.
-Pendant et après l’utilisation, veillez à ne pas toucher les résistances de l’appareil. Évitez tout contact avec des chiffons ou autre matière inflammable tant que les
composants de l’appareil n’ont pas refroidi.
-Ne placez jamais de produits inflammables sur la table de cuisson ou à proximité.
-L’huile et la graisse peuvent devenir très chaudes et s’enflammer facilement. Surveillez la cuisson des aliments qui contiennent beaucoup de graisse ou d’huile.
-Ne déposez aucun objet métallique comme les ustensiles de cuisine (couteaux, fourchettes, cuillères, couvercles, etc.) sur les foyers, car ils pourraient chauffer.
-Il est obligatoire d’installer une cloison de séparation (non fournie) sous l’appareil.
-Si la surface de la table s’abîme (fissures ou rupture du verre), cessez d’utiliser l’appareil et contactez immédiatement le service après-vente.
-Cet appareil n’a pas été conçu pour être mis en marche par un minuteur externe ou un système de commande à distance.
CONSIGNES DE SÉCURITÉ IMPORTANTES
Ceci est un symbole d’avertissement concernant la sécurité, il attire l’attention des utilisateurs sur les dangers auxquels eux-mêmes ou d’autres personnes
peuvent être exposés.
Tous les messages de sécurité sont précédés du symbole de danger et des termes suivants:
DANGERSituation dangereuse pouvant entraîner des lésions graves.
AVERTISSEMENTSituation dangereuse pouvant entraîner des lésions graves.
FRANÇAISInstallationPage2Mode d’emploiPage
FR17
Élimination des emballages
Les matériaux d’emballage sont entièrement recyclables comme l’indique le symbole (). Par conséquent, ne les jetez pas dans la nature et respectez les
réglementations locales en vigueur en matière d’élimination des déchets.
Mise au rebut de l’appareil
Cet appareil porte le symbole du recyclage conformément à la Directive Européenne 2002/96/CE relative aux déchets d’équipements électriques et électroniques (DEEE).
En procédant correctement à la mise au rebut de cet appareil, l’utilisateur contribue à la prévention des impacts nocifs sur l’environnement et la santé.
Le symbole sur l’appareil et sur la documentation qui l’accompagne indique qu’il ne peut en aucun cas être traité comme un déchet ménager et qu’il doit être remis
à un centre de collecte agréé pour le recyclage des équipements électriques et électroniques.
Conseils pour économiser l’énergie
Pour obtenir les meilleurs résultats, nous vous conseillons en outre:
•d’utiliser des ustensiles de cuisson et des casseroles d’un diamètre identique à celui du foyer;
•d’utiliser exclusivement des ustensiles de cuisson à fond plat;
•dans la mesure du possible, de laisser le couvercle sur la casserole pendant la cuisson;
•d’utiliser un autocuiseur pour économiser encore plus d’énergie et de temps;
•de placer la casserole au centre du foyer dessiné sur la table de cuisson.
-Cet appareil destiné au contact alimentaire est conforme au règlement () n°1935/2004. Il été conçu, réalisé et mis sur le marché conformément aux normes de
sécurité de la directive “Basse Tension“ 2006/95/CE (qui remplace la 73/2 3/CEE et ses modifications), ainsi qu’aux dispositions de la directive CEM 2004/108/CE.
Vérifiez avec un aimant que le récipient est bien adapté à la table de cuisson à induction: n’utilisez pas de casseroles contenant du fer.
-N’utilisez pas les casseroles ayant un fond rugueux susceptible de rayer la surface de la table de cuisson. Contrôlez les récipients.
-Ne posez jamais les casseroles ou les poêles chaudes sur le bandeau de commande de la table de cuisson. Vous risqueriez de l’endommager.
CONSEILS POUR LA PROTECTION DE L’ENVIRONNEMENT
DÉCLARATION DE CONFORMITÉ
AVANT D’UTILISER L’APPAREIL
Si la taille des casseroles ne convient pas, les foyers ne s’allument pas. Utilisez exclusivement des casseroles compatibles induction, portant le
symbole correspondant (voir la figure ci-contre). Avant d’allumer la table de cuisson, posez la casserole sur le foyer désiré.
ANCIENS RÉCIPIENTS
DIAMÈTRE CONSEILLÉ POUR LE FOND DES CASSEROLES
NONOK
Ø
28 cm
XL
Ø
17 cm 28 cm
Ø
21 cm
L
Ø
15 cm 21 cm
Ø
18 cm
M
Ø
14,5 cm
S
Ø
12 cm 18 cm
Ø
10 cm 14,5 cm
FR18
Après avoir déballé l’appareil, vérifiez qu’il n’a pas été endommagé pendant le transport. En cas de problème, contactez le revendeur ou le Service Après-Vente.
PRÉPARATION DU MEUBLE POUR L’ENCASTREMENT
Connexion au bornier
Pour le branchement électrique, utilisez un câble de type H05RR-F, comme l’indique le tableau ci-dessous.
Important:
- conservez ou enlevez les pontets métalliques situés entre les vis du bornier L1-L2 et N1-N2 selon le schéma de branchement (voir figure).
- vérifiez le serrage des vis du bornier après la connexion des câbles.
Exemple de pontet conservé (gauche) ou enlevé (droite). Consultez le schéma de branchement pour plus de détails (les pontets peuvent se trouver entre L1-L2 et N1-N2).
INSTALLATION
AVERTISSEMENT-Installez une cloison de
séparation sous la table de
cuisson.
-La partie inférieure de l’appareil
ne doit pas être accessible après
l’installation.
-Si la table de cuisson est installée
au-dessus d’un four, il est inutile
d’utiliser la cloison de séparation.
•Respectez les cotes indiquées sur la figure entre le fond de la table de cuisson et la cloison de séparation.
•Pour un bon fonctionnement de la table de cuisson, veillez à ne pas obstruer l’espace minimum entre le plan de travail et la surface supérieure du meuble (min. 5 mm).
•Si vous installez un four sous la table de cuisson, vérifiez qu’il est équipé d’un système de refroidissement.
•N’installez pas la table de cuisson au-dessus d’un lave-vaisselle ou d’un lave-linge pour pas exposer les circuits électroniques à la vapeur ou à l’humidité qui
risqueraient de les détériorer.
•Si vous souhaitez réaliser une installation bord à bord, appelez le service après-vente et demandez le montage du kit vis 4801 211 00112.
•Pour retirer la table de cuisson du plan de travail, utilisez un tournevis (non fourni) pour débloquer les ressorts situés sur la partie inférieure de l'appareil."
BRANCHEMENT AU RÉSEAU ÉLECTRIQUE
AVERTISSEMENT-Débranchez l’appareil.
-L’appareil doit être installé par un technicien spécialisé connaissant parfaitement les normes en
vigueur en matière de sécurité et d’installation.
-Le fabricant décline toute responsabilité concernant les dommages aux personnes, aux animaux et aux biens qui pourraient résulter du non-
respect des consignes données dans ce chapitre.
-Le cordon d’alimentation doit être suffisamment long pour permettre de sortir la table de cuisson du plan de travail.
-Vérifiez que la tension indiquée sur la plaque signalétique apposée sur le fond de l’appareil correspond à la tension d’alimentation de votre habitation.
ConducteursNombre x section
230 V ~ 3 x 4 mm2
230-240 V ~ 3 x 4 mm2 (Australie uniquement)
230 V 3 ~ 4 x 1,5 mm2
400 V 3N ~ 5 x 1,5 mm2
400 V 2N ~ 4 x 1,5 mm2
min. 5 mm
min. 20 mm
min. 5 mm
400 V 3N ~230 V ~230-240 V ~ (Australie uniquement)
230 V ~ (GB uniquement)
400 V 2N ~230 V 3 ~ (Belgique uniquement)400V 2N ~ (Hollande uniquement)
230 V
230 V
230 V
230 V
230 V
230 V
230 V
230 V
230 V
230 V
230 V
CBA
FR19
Reliez le fil de terre jaune/vert à la borne qui porte le symbole .
Ce fil doit être plus long que les autres.
1.Enlevez le couvercle du bornier (A) en ôtant la vis; l’introduire dans la charnière (B) du bornier.
2.Introduisez le cordon d’alimentation dans le serre-câble et connectez les fils au bornier en suivant les indications du schéma de branchement placé à côté.
3.Fixez le cordon d’alimentation avec le serre-câble.
4.Refermez le couvercle (C) et vissez-le sur le bornier avec la vis précédemment enlevée.
La table effectue un autodiagnostic de quelques secondes à chaque connexion au secteur.
Si la table est déjà équipée d’un cordon d’alimentation, suivez les instructions fixées au cordon. Effectuez le branchement au secteur avec un interrupteur multipolaire
ayant une distance entre les contacts d’au moins 3 mm.
Description du bandeau de commande
Bandeau de commande
Marche/arrêt de la table de cuisson
Pour allumer la table, appuyez 2 secondes sur la touche jusqu’à ce que les afficheurs des foyers s’éclairent. Pour éteindre, appuyez sur cette même touche jusqu’à
l’extinction des afficheurs. Tous les foyers sont désactivés.
Si la table de cuisson a déjà été utilisée, l’indicateur de chaleur résiduelle “H” reste actif jusqu’au refroidissement des foyers.
Si on ne sélectionne aucune fonction dans les 10 secondes qui suivent la mise en marche de la table de cuisson, elle se désactive automatiquement
Activation et réglage des foyers
Après avoir allumé la table de cuisson et posé la casserole sur le foyer, réglez la puissance avec la touche +. À l’activation du foyer, la puissance 5 apparaît sur l’afficheur.
Chaque foyer de cuisson a plusieurs réglages de puissance commandés par les touches +/-: de “1” minimum à “9” maximum. Certains foyers sont équipés d’une
fonction Booster permettant une montée en température ultra rapide. L’activation de cette fonction est signalée par la lettre “P“ sur l’afficheur.
Fonction Booster (ébullition rapide)
Cette fonction associée à certains foyers permet d’exploiter au maximum la puissance de la table de cuisson (par exemple, pour faire bouillir de l’eau rapidement). Pour
activer cette fonction, appuyez sur la touche “+“ jusqu’à afficher la lettre “P“ ou bien, après avoir allumé la table de cuisson, appuyez directement sur la touche “-“
correspondant au foyer sélectionné. Dans ce cas également, “P“ s’affiche. Dix minutes après l’activation de la fonction Booster, l’appareil règle automatiquement la puissance
du foyer sur 9.
Désactivation des foyers
Sélectionnez le foyer à éteindre en appuyant sur la touche “+“ ou “-“ (le point en bas à droite du niveau de puissance est visualisé sur l’afficheur).
Appuyez sur la touche “-“ jusqu’à ramener la puissance à “0“.
Il est également possible de désactiver le foyer en effleurant simultanément les touches “+“ et “-“. Le foyer s’éteint et l’indicateur “H“ de chaleur résiduelle apparaît.
Verrouillage du bandeau de commande
Cette fonction bloque les commandes de la table de cuisson pour éviter qu’elle ne soit mise en marche accidentellement par les enfants. Pour verrouiller les commandes, allumez
la table de cuisson et appuyez trois secondes sur la touche : un signal sonore et un indicateur lumineux situé sous le symbole de la clé indiquent que la fonction a été activée.
Le bandeau de commande est verrouillé, à l’exception de la fonction Arrêt. Pour déverrouiller les commandes, répétez ces opérations. Le point lumineux s’éteint et la table est à
nouveau active.
L’eau restant après le nettoyage, le liquide ayant débordé des casseroles et les objets posés sur la touche sous le symbole peuvent provoquer l’activation ou la
désactivation involontaires de la fonction Sécurité Enfants.
MODE D’EMPLOI
Verrouillage du bandeau de commande
Réglage des foyers et affichages
Marche/Arrêt
Minuterie
Les symboles ne sont pas
actifs ! Pour sélectionner les
fonctions, effleurez les
champs sous-jacents.
Touche-
Afficheur indicateur de puissance
Indicateur de sélection du foyer
Touche+
Position du foyer
FR20
Minuteur
Le minuteur est un interrupteur temporisé qui permet de programmer le temps de cuisson avec un maximum de 99 minutes (1 heure et 39
minutes). Il est associé à un seul foyer.
Sélectionnez le foyer associé au minuteur (un point lumineux s’affiche en bas et à droite de l’indicateur de puissance) puis entrez le temps désiré
à l’aide des touches “+“ et “-“ de la fonction (voir figure ci-dessus). Quelques secondes après la dernière pression sur la touche, le minuteur
démarre le compte à rebours (le point de sélection du foyer se met à clignoter). À la fin du temps prédéfini, un signal sonore retentit et le foyer
s’éteint automatiquement.
Pour désactiver le minuteur, appuyez sur la touche “-“ jusqu’à l’afficher “0:0“ ou appuyez simultanément sur les touches “+“ et “-“ du minuteur.
Important: le minuteur ne peut être associé qu’à un seul foyer à la fois.
Minuteur
Le minuteur peut être utilisé quand la table de cuisson est éteinte; il permet de programmer un temps maximum de 99 minutes.
Appuyez sur la touche “+” située sous les indicateurs du minuteur: les minutes apparaissent sur l’afficheur pour le réglage.
Sélectionnez le temps à l’aide des touches + et -.
Au bout de quelques secondes, le minuteur commence le compte à rebours; à la fin, un signal sonore retentit
Important: la fonction minuteur ne peut être utilisée que lorsque l’appareil est éteint; lorsqu’on allume la table de cuisson, le minuteur est remis à zéro.
Avis du bandeau de commande
Voyant de chaleur résiduelle
La table est équipée d’un indicateur de chaleur résiduelle pour chaque foyer. Cet indicateur signale les foyers dont la température est encore élevée.
L’afficheur indique si le foyer est encore chaud. Quand le foyer présente cette signalisation, il est possible, par exemple, de maintenir un plat au chaud ou
de faire fondre du beurre.
Lorsque le foyer a refroidi, l’afficheur s’éteint.
Détection des casseroles
La table de cuisson est équipée d’un système automatique de détection des casseroles sur tous les foyers. Si la casserole n’est pas détectée, le niveau de
puissance du foyer clignote sur l’afficheur. Vérifiez que la casserole est correctement positionnée et qu’elle remplit les conditions indiquées dans la section
“Avant d’utiliser la table de cuisson”.
IMPORTANT: n’utilisez pas d’éponges abrasives ou de pailles de fer. À la longue, leur utilisation pourrait rayer le verre.
•Après chaque utilisation, laissez refroidir la table de cuisson et nettoyez-la de façon à éliminer les résidus d’aliments incrustés et les taches.
•Le sucre et les aliments très sucrés abîment la table de cuisson et doivent être éliminés immédiatement.
•Le sel, le sucre et le sable peuvent rayer la surface du verre.
•Utilisez un chiffon doux, un essuie-tout ou des produits spécifiques pour le nettoyage de la table (suivez les indications du fabricant).
•Lisez et suivez les instructions de la section “Mode d’emploi“.
•Vérifiez qu’il n’y a pas de coupure de courant.
•Essuyez soigneusement la table de cuisson après l’avoir nettoyée.
•Si des codes alphanumériques s’affichent quand vous allumez la table de cuisson, suivez les indications du tableau suivant.
•Si vous n’arrivez pas à éteindre la table de cuisson après l’avoir utilisée, débranchez-la.
NETTOYAGE
AVERTISSEMENT-N’utilisez jamais d’appareil à vapeur pour nettoyer la table de cuisson.
-Avant le nettoyage, vérifiez que les foyers sont éteints et que l’indicateur de chaleur résiduelle (“H“) a
disparu.
DIAGNOSTIC DES PANNES
CODE D’ERREURDESCRIPTIONCAUSE PROBABLESOLUTION
La table de cuisson s’éteint. Au bout de 30
secondes, elle émet un signal sonore toutes les 4
secondes.
Pression permanente sur la zone des
commandes.
Eau ou ustensiles de cuisine sur la zone
des commandes.Nettoyez la zone des commandes.
C81, C82La zone des commandes s’éteint car la
température est trop élevée.
La température interne des composants
électroniques est trop élevée.
Attendez que la table ait refroidi
avant de l’utiliser.
F42 ou F43La tension d’alimentation de la table
n’est pas correcte.
Le capteur détecte une tension différente
de la tension d’alimentation.
Débranchez la table du secteur et
contrôlez le branchement.
F12, F21, F25, F36, F37, F40, F47, F56, F58, F60Contactez le Service Après-vente et communiquez le code d’erreur
FR21
Avant de contacter le Service Après-vente
1.Consultez le chapitre “Diagnostic des pannes“ et assurez-vous que vous ne pouvez pas remédier au problème par vous-même.
2.Éteignez et rallumez la table de cuisson pour voir si le problème a été éliminé.
Si le problème persiste après ces contrôles, adressez-vous au Service Après-Vente Whirlpool le plus proche.
Pensez à donner:
•une courte description de la panne;
•le type et le modèle exacts de la table de cuisson;
•le code service - numéro qui suit le mot Service sur la plaque signalétique, sous l’appareil (sur la plaque métallique) , le code service figure également dans le
livret de garantie -;
•votre adresse complète;
•votre numéro de téléphone.
Si une réparation est nécessaire, veuillez contactez un Service Après-vente agréé (qui vous garantira l’emploi de pièces détachées d’origine et une réparation correcte).
Les pièces détachées sont disponibles pendant 10 ans.
REMARQUE:
Sur le double foyer de 28 cm de diamètre (selon les modèles), il est conseillé d'utiliser pour les préparations courtes nécessitant une parfaite répartition de la chaleur (type crêpes)
des ustensiles ayant un diamètre inférieure à 24 cm. Pour les cuissons délicates (par exemple, pour faire fondre du chocolat ou du beurre), il est conseillé d'utiliser les foyers
simples plus petits.
SERVICE APRÈS-VENTE
TABLE DES PUISSANCES
Niveau de puissanceType de cuissonUtilisation du niveau
(valeur indicative pouvant être adaptée en fonction de l’expérience et des habitudes
de chacun)
Puissance maxiBoostChauffer rapidementAugmente rapidement la température de cuisson jusqu’à l’ébullition de l’eau ou chauffe rapidement les
liquides
8-9Frire - bouillirFaire rissoler, commencer une cuisson, frire des aliments surgelés, porter rapidement à ébullition
Puissance forte
7-8Rissoler - faire revenir -
bouillir - grillerFaire revenir, maintenir à ébullition, cuire et griller (cuisson courte, 5-10 minutes).
6-7
Rissoler - cuire - cuire à
l’étouffée - faire revenir -
griller
Faire revenir, maintenir à légère ébullition, cuire et griller (cuisson durée moyenne, 10-20 minutes),
préchauffer des accessoires.
Puissance
moyenne
4-5Cuire - cuire à l’étouffée - faire
revenir - grillerCuire à l’étouffée, maintenir une légère ébullition, cuissons de longue durée. Mélanger les pâtes
3-4Cuire - mitonner - épaissir -
mélanger
Pour les cuissons longues (riz, sauces, viandes, poisson) dans du liquide (ex. eau, vin, bouillon, lait) et
pour mélanger les pâtes
2-3Cuissons longues (volumes inférieurs à 1 litre: riz, sauces, viandes, poisson) d’aliments baignant dans
un liquide (ex. eau, vin, bouillon, lait)
Puissance faible
1-2Faire fondre - décongeler -
maintenir au chaud -
mélanger
Ramollir le beurre, faire fondre délicatement le chocolat, décongeler des aliments peu volumineux et
maintenir à température des aliments qui viennent d’être cuits (par ex.
1Garder au chaud de petites portions après cuisson ou des plats de service (avec accessoire pour plaque à
induction).
OFFPuissance
zéroSurface d’appuiTable de cuisson en veille ou éteinte (chaleur résiduelle après la fin de la cuisson, signalée par la lettre
H)
Collez ici l’une des deux étiquettes avec les
données de l’appareil que vous trouverez dans le
livret de garantie en deux exemplaires.
NL22
UW VEILIGHEID EN DIE VAN ANDEREN IS ERG BELANGRIJK
Deze handleiding en het apparaat zelf zijn voorzien van belangrijke veiligheidsinformatie, die te allen tijde gelezen en opgevolgd moet worden.
Alle veiligheidsberichten geven het mogelijke gevaar aan en geven aan hoe het risico op letsel, schade en elektrische schokken voortvloeiend uit het onjuiste gebruik
van het apparaat beperkt kan worden. Houd u strikt aan de volgende aanwijzingen:
-De stekker van het apparaat moet altijd uit het stopcontact getrokken zijn voordat welke installatiehandeling dan ook verricht wordt.
-De installatie of het onderhoud moet worden uitgevoerd door een gespecialiseerde monteur volgens de instructies van de fabrikant en in overeenstemming met
de plaatselijke veiligheidsvoorschriften. Repareer of vervang geen enkel onderdeel van het apparaat, behalve als dit expliciet aangegeven wordt in de
gebruikershandleiding.
-Dit apparaat moet worden geaard.
-Het netsnoer moet lang genoeg zijn om het apparaat, na inbouw in het meubel, aan te sluiten op de netvoeding.
-Om ervoor te zorgen dat de installatie voldoet aan de geldende veiligheidsvoorschriften, is er een omnipolaire schakelaar met een afstand van minstens 3 mm
tussen de contacten nodig.
-Gebruik voor de aansluiting geen meervoudige stekkers of verlengsnoeren.
-Trek niet aan het netsnoer van het apparaat.
-Na de installatie mogen de elektrische onderdelen niet meer toegankelijk zijn voor de gebruiker.
-Het apparaat is uitsluitend bestemd voor huishoudelijk gebruik en alleen voor het bereiden van voedsel. Elk ander gebruik is verboden (bijv. het verwarmen van
ruimtes). De fabrikant kan niet aansprakelijk gesteld worden voor schade die het gevolg is van oneigenlijk gebruik of een onjuiste instelling van de
bedieningsknoppen.
-Het gebruik van het apparaat is niet toegestaan aan personen (waaronder kinderen) met beperkte lichamelijke, zintuiglijke of verstandelijke vermogens, of met
weinig ervaring of kennis van het apparaat, tenzij ze instructies met betrekking tot het gebruik van het apparaat hebben gehad van personen die
verantwoordelijk zijn voor hun veiligheid.
-De toegankelijke delen kunnen tijdens de werking erg heet worden. Kinderen moeten uit de buurt en in de gaten gehouden worden, om te voorkomen dat ze
met het apparaat gaan spelen.
-Raak de verwarmingselementen van het apparaat niet aan tijdens en na het gebruik. Vermijd contact met doeken of andere brandbare materialen tot alle
onderdelen van het apparaat voldoende zijn afgekoeld.
-Leg geen brandbaar materiaal op het apparaat of in de buurt ervan:
-Oververhitte vetten en olie kunnen makkelijk vlam vatten. Controleer de kookplaat regelmatig als u bij de bereiding veel vet en olie gebruikt.
-Leg geen metalen voorwerpen zoals keukengerei (messen, vorken, lepels, deksels, enz.) op de kookzone, deze zouden hierdoor heet kunnen worden.
-Er moet in de ruimte onder het apparaat een scheidingspaneel, niet bijgeleverd, gemonteerd worden.
-Als het oppervlak van de plaat beschadigd mocht raken (barsten of breuk van het glas), gebruik het apparaat dan niet meer en neem onmiddellijk contact op met
de klantenservice.
-Het is niet de bedoeling dat het apparaat in werking gesteld kan worden met een externe timer of met een afzonderlijke afstandsbediening.
BELANGRIJKE VEILIGHEIDSINSTRUCTIES
Dit is het waarschuwingssymbool, behorend bij de veiligheid, waarmee gebruikers worden gewaarschuwd voor mogelijke gevaren voor henzelf en
anderen.
Alle veiligheidsberichten komen na het waarschuwingssymbool en de volgende tekst:
GEVAARGeeft een gevaarlijke situatie aan, die ernstig letsel veroorzaakt als deze niet wordt vermeden.
WAARSCHUWINGGeeft een gevaarlijke situatie aan, die ernstig letsel zou kunnen veroorzaken als deze niet wordt
De verpakking kan volledig gerecycled worden, zoals wordt aangegeven door het symbool (). De verschillende onderdelen van de verpakking mogen niet
terechtkomen in het milieu, maar moeten als afval verwerkt worden volgens de plaatselijke voorschriften.
Verwerking van het apparaat
Dit apparaat is voorzien van het merkteken volgens de Europese richtlijn 2002/96/EG inzake Afgedankte Elektrische en Elektronische Apparatuur (AEEA).
Door ervoor te zorgen dat dit product op de juiste wijze als afval wordt verwerkt, helpt u mogelijke schadelijke gevolgen voor het milieu en de gezondheid te
voorkomen.
Het symbool op het product of op de begeleidende documentatie bij het product geeft aan dat dit apparaat niet als huishoudelijk afval behandeld mag worden,
maar naar een speciaal verzamelpunt voor recycling van elektrische en elektronische apparaten moet worden gebracht.
Energiebesparing
Om de beste resultaten te verkrijgen adviseren wij het volgende:
•Gebruik potten en pannen met een doorsnede die gelijk is aan die van de kookzone.
•Gebruik alleen pannen met een platte bodem.
•Houd tijdens het koken zo veel mogelijk de deksel op de pan.
•Met een snelkookpan kunt u nog meer tijd en energie besparen.
•Zet de pan altijd in het midden van de op de kookplaat getekende kookzone.
-Dit apparaat, bedoeld om in contact te komen met levensmiddelen, voldoet aan het reglement () n.1935/2004 en is ontworpen, gefabriceerd en op de markt
gebracht in overeenstemming met de veiligheidsvoorschriften van de “Laagspanningsrichtlijn“ 2006/95/EG (die de richtlijn 73/2 3/EG en latere amendementen
vervangt), beveiligingsvereisten van de Richtlijn “Elektromagnetische compatibiliteit“ 2004/108/EG.
Om te controleren of de pan geschikt is voor de kookplaat kunt u een magneet gebruiken: pannen die niet worden aangetrokken door de magneet, zijn niet geschikt.
-Controleer of de bodem van de pannen niet ruw is en zo krassen in het oppervlak van de kookplaat zou kunnen maken. Controleer het keukengerei.
-Zet nooit warme pannen en koekenpannen op het bedieningspaneel van de plaat. Dit zou hierdoor schade kunnen oplopen.
MILIEUTIPS
VERKLARING VAN OVEREENSTEMMING
VOORDAT U DE KOOKPLAAT IN GEBRUIK NEEMT
BELANGRIJK: als de pannen niet de vereiste afmetingen hebben, zullen de kookzones niet werken. Gebruik alleen pannen met het symbool
“INDUCTION SYSTEM“ (afbeelding hiernaast). Voordat u de kookplaat inschakelt, eerst de pan op de gewenste kookzone zetten.
REEDS AANWEZIGE PANNEN
AANBEVOLEN DIAMETER PANBODEM
NEEOK
Ø
28 cm
XL
Ø
17 cm 28 cm
Ø
21 cm
L
Ø
15 cm 21 cm
Ø
18 cm
M
Ø
14,5 cm
S
Ø
12 cm 18 cm
Ø
10 cm 14,5 cm
NL24
Controleer na het uitpakken van het apparaat of het tijdens het transport geen beschadigingen heeft opgelopen en neem, in geval van problemen, contact op met de
leverancier of de Klantenservice.
VOORBEREIDING VAN HET MEUBEL VOOR INBOUW
Aansluiting op het klemmenblok
Gebruik voor de elektrische aansluiting een kabel van het type H05RR-F zoals aangegeven is in onderstaande tabel.
Belangrijk:
- Laat de tijdelijke metalen verbindingsdraden tussen de schroeven van het klemmenblok L1-L2 en N1-N2 zitten of verwijder ze volgens het aansluitdiagram (zie de afbeelding).
- Zorg ervoor dat alle zes de schroeven van het klemmenblok aangedraaid worden na het aansluiten van de kabels.
Voorbeeld van een aanwezige verbindingsdraad (links) of een verwijderde verbindingsdraad (rechts). Zie het aansluitdiagram voor details (de verbindingsdraden
kunnen tussen L1-L2 en tussen N1-N2 geplaatst zijn).
INSTALLATIE
WAARSCHUWING-Installeer een scheidingspaneel
onder de kookplaat.
-Het onderste gedeelte van het
apparaat mag na installatie niet
toegankelijk zijn.
-Als er onder de kookplaat een
oven geïnstalleerd wordt, geen
scheidingspaneel monteren.
•Houd u voor de afstand tussen de onderkant van de kookplaat en het scheidingspaneel aan de afmetingen in de afbeelding.
•Voor een correcte werking van het apparaat mag de minimaal vereiste opening tussen werkblad en bovenkant van het meubel (min. 5 mm) nooit afgedekt worden.
•Als er een oven onder de kookplaat geïnstalleerd wordt, controleer dan of de oven voorzien is van een koelsysteem.
•Installeer de kookplaat niet boven een afwasmachine of wasmachine, zodat de elektronische schakelingen niet in contact komen met stoom of vocht; hierdoor
kunnen de schakelingen beschadigd worden.
• Bij verzonken installatie dient u contact op te nemen met de klantenservice om te verzoeken om de montage van de schroevenset 4801 211 00112.
•Gebruik, om de kookplaat uit het werkblad te verwijderen, een schroevendraaier (niet bijgeleverd) om de veren aan de onderkant van het apparaat te ontgrendelen.
ELEKTRISCHE AANSLUITING
WAARSCHUWING-Koppel het apparaat los van het elektriciteitsnet.
-Het apparaat moet geïnstalleerd worden door een gekwalificeerd technicus die volledig op de
hoogte is van de geldende veiligheids- en installatievoorschriften.
-De fabrikant kan niet aansprakelijk worden gesteld voor letsel bij personen of dieren of schade aan voorwerpen die het gevolg is van het niet
naleven van de voorschriften uit dit hoofdstuk.
-Het netsnoer moet lang genoeg zijn om de kookplaat te kunnen verwijderen uit het werkblad.
-Verzeker u ervan dat de spanning die vermeld is op het typeplaatje op de bodem van het apparaat overeenkomt met de netspanning in de woning waar
het apparaat geïnstalleerd zal worden.
GeleidersAantal x afmeting
230 V ~ 3 x 4 mm2
230-240V ~ + 3 x 4 mm2 (alleen Australië)
230V 3 ~ + 4 x 1,5 mm2
400V 3N ~ + 5 x 1,5 mm2
400V 2N ~ + 4 x 1,5 mm2
min. 5 mm
min. 20 mm
min. 5 mm
400 V 3N ~230 V ~230-240 V ~ (alleen Australië)
230 V ~ (alleen VK)
400 V 2N ~230 V 3 ~ (alleen België)400 V 2N ~ (alleen Nederland)
230 V
230 V
230 V
230 V
230 V
230 V
230 V
230 V
230 V
230 V
230 V
CBA
NL25
Sluit de geel/groene aardleiding aan op de klem met het symbool .
Bovengenoemde leiding moet langer zijn dan de andere.
1.Verwijder het deksel van het klemmenblok (A) door de schroef los te draaien en steek het deksel in het scharnier (B) van het klemmenblok.
2.Steek het netsnoer daarna in de kabelklem en sluit de draden op het klemmenblok aan volgens het aansluitschema naast het klemmenblok.
3.Bevestig het netsnoer door middel van de kabelklem.
4.Sluit het deksel (C) en schroef het vast op het klemmenblok met de verwijderde schroef.
Bij elke aansluiting op de netvoeding voert de kookplaat gedurende enkele seconden een automatische controle uit.
Zie de instructies op het netsnoer als de kookplaat al van een netsnoer voorzien is. Breng de aansluiting op het net tot stand via een meerpolige schakelaar met een
afstand tussen de contacten van minimaal 3 mm.
Beschrijving van het bedieningspaneel
Bedieningspaneel
Aan- en uitzetten van de kookplaat
Om de kookplaat in te schakelen houdt u de toets circa 2 seconden ingedrukt, tot de displays van de kookzones oplichten. Om de kookplaat uit te schakelen, drukt
u op dezelfde toets tot de displays uitgaan Alle kookzones worden uitgeschakeld.
Wanneer de kookplaat eerder gebruikt is, blijft de restwarmte-indicator “H“ actief tot de kookzones zijn afgekoeld.
Als er binnen 10 seconden na het inschakelen van de kookplaat geen enkele functie wordt geselecteerd, zal de plaat automatisch worden uitgeschakeld.
Inschakeling en instelling kookzones
Nadat de kookplaat is ingeschakeld en de pan op de gekozen zone is gezet, stelt u het vermogensniveau in met de toets +. Bij de inschakeling wordt op het display het
niveau 5 aangegeven.
Iedere kookzone heeft diverse vermogensniveaus die ingesteld kunnen worden met de +/- toetsen, die van “1”: minimaal vermogen tot “9”: maximaal vermogen
lopen. Sommige kookzones hebben een snelkookfunctie (Booster), dit wordt op het display aangegeven met de letter “P”.
Snelkookfunctie (Booster)
Deze functie is slechts op enkele kookzones aanwezig en maakt het mogelijk het vermogen van de plaat optimaal te benutten (bijvoorbeeld om snel water aan de kook te
brengen). Om de functie te activeren drukt u op de toets “+“ tot er op de display een “P“ wordt weergegeven, of drukt u, na de kookplaat te hebben ingeschakeld,
rechtstreeks op de toets “-“ die hoort bij de geselecteerde zone. Ook in dit geval verschijnt de letter “P“ op de display. Nadat de boosterfunctie 10 minuten gebruikt is, stelt
het apparaat de zone automatisch in op niveau 9.
Uitschakeling kookzones
Selecteer de kookzone die u uit wilt schakelen door op de toets “+“ of “-“ te drukken (het puntje van het vermogensniveau wordt rechtsonder op het display weergegeven).
Druk op de toets “-“ tot het niveau “0“ is.
Het is ook mogelijk de kookzone uit te schakelen door tegelijkertijd op de toetsen “+“ en “-“ te drukken. De kookzone wordt uitgeschakeld en de restwarmte-indicator
“H“ verschijnt.
Blokkeren van het bedieningspaneel
De functie blokkeert de bedieningen van de kookplaat om te voorkomen dat deze per ongeluk door kinderen in werking kan worden gesteld. Om de blokkering van het
bedieningspaneel te activeren schakelt u de kookplaat in en houdt u de toets drie seconden ingedrukt. Een geluidssignaal en een lichtindicator onder het symbool van de
sleutel geven aan dat de beveiling geactiveerd is. Het bedieningspaneel is geblokkeerd, met uitzondering van de uitschakelfunctie. Om de blokkering van de bedieningen uit te
schakelen herhaalt u de activeringsprocedure. Het lichtpuntje gaat uit en de kookplaat is weer actief.
De aanwezigheid van water dat gebruikt is om de plaat schoon te maken, vloeistof die overgekookt is uit de pannen of voorwerpen die op de toets onder het symbool
worden gezet, kunnen ertoe leiden dat de blokkering van het bedieningspaneel onbedoeld in- of uitgeschakeld wordt.
GEBRUIKSAANWIJZING
Blokkeren van het bedieningspaneel
Instelbedieningen kookzones en bijbehorende displays
Inschakeling/uitschakeling
Timer
De symbolen zijn niet
actief! Om de gewenste
functies te selecteren raakt
u de zones eronder aan.
Toets-
Vermogensindicatiedisplay
Indicatie geselecteerde kookzone
Toets +
Positie kookzone
NL26
Timer
De timer is een tijdschakelaar die de mogelijkheid biedt om voor één kookzone een bereidingsduur in te stellen van maximaal 99 minuten (1 uur
en 39 minuten).
Selecteer de kookzone waarvoor u de timer wilt instellen (rechts onder de indicator van het vermogensniveau op het display verschijnt een
lichtpuntje), en stel vervolgens de gewenste tijd in met de toetsen “+“ en “-“ van de timerfunctie (zie de afbeelding hierboven). Enkele seconden
nadat u de toets voor het laatst heeft aangeraakt, begint de timer met aftellen (het lichtpuntje voor selectie van de kookzone begint te
knipperen). Wanneer de ingestelde tijd verstreken is, klinkt er een geluidssignaal en wordt de kookzone automatisch uitgeschakeld.
Om de timer te deactiveren, drukt u op de toets “-“ tot het display “0:0” aangeeft of drukt u de toetsen “+“ en “-“ van de timer tegelijkertijd in.
Belangrijk: De timer kan slechts aan één kookzone tegelijk worden toegewezen.
Kookwekker
De kookwekker kan worden gebruikt als de kookplaat niet in werking is. Er kan een duur van maximaal 99 min. mee worden ingesteld.
Druk op de toets “+” onder de indicatielampjes van de timer: op het display verschijnen de minuten om in te stellen.
Selecteer de gewenste tijd met de toetsen + en -.
Na enkele seconden klinkt een geluidssignaal en begint het aftellen van de tijd.
Belangrijk: De kookwekkerfunctie kan alleen gebruikt worden als het apparaat uitstaat. Bij inschakeling van de kookplaat wordt de kookwekkerfunctie geannuleerd.
Waarschuwingen van het bedieningspaneel
Restwarmte-indicator.
De kookplaat heeft voor iedere kookzone een restwarmte-indicator. Deze indicator signaleert welke kookzones nog warm zijn.
Als op het display wordt weergegeven, is de kookzone nog warm. Als deze signalering voor de zone wordt gegeven is het bijvoorbeeld mogelijk een gerecht
warm te houden of boter te laten smelten
Wanneer de kookzone afkoelt, gaat het display uit.
Indicator ’verkeerde pan of geen pan’.
De kookplaat is voorzien van een automatisch systeem voor detectie van de aanwezigheid van de pannen, op alle kookzones. Als er geen pan wordt
gedetecteerd, knippert het display met het vermogensniveau van de kookzone. Controleer of de pan correct op de zone gezet is en beschikt over de
eigenschappen die zijn toegelicht in de paragraaf “voordat u de kookplaat in gebruik neemt“.
BELANGRIJK: gebruik geen schuursponsjes of metalen sponsjes. Daardoor kan het glas, in de loop van de tijd, beschadigd raken.
•Na elk gebruik de kookplaat af laten koelen en schoonmaken om aangekoekt vuil en vlekken van gemorst voedsel te te verwijderen.
•Suiker of suikerhoudende levensmiddelen beschadigen het glaskeramische oppervlak en moeten onmiddellijk worden verwijderd.
•Zout, suiker en zand kunnen krassen maken in het glazen oppervlak.
•Gebruik een zachte doek, absorberend keukenpapier of specifieke producten voor het reinigen van de kookplaat (houd u aan de aanwijzingen van de fabrikant).
•Lees en volg de instructies op uit de paragraaf “Gebruiksaanwijzing“.
•Controleer of er geen stroomuitval is.
•Maak het oppervlak van de kookplaat na het schoonmaken goed droog.
•Als bij de inschakeling van de kookplaat op het display alfanumerieke codes worden weergegeven, dient u volgens onderstaande tabel te handelen.
•Als u er niet in slaagt de kookplaat na gebruik uit te schakelen, de stekker uit het stopcontact trekken.
REINIGING
WAARSCHUWING-Gebruik nooit een stoomreiniger.
-Controleer voordat u gaat schoonmaken of de kookzones uitgeschakeld zijn en dat de restwarmte-
indicator (“H“) niet wordt weergegeven.
OPSPOREN VAN STORINGEN
FOUTCODEBESCHRIJVINGMOGELIJKE OORZAKENOPLOSSING
De kookplaat wordt uitgeschakeld en geeft na 30
seconden iedere 4 seconden een geluidssignaal
Er wordt ononderbroken op het
bedieningspaneel gedrukt
Water of keukengerei op het
bedieningspaneelMaak het bedieningspaneel schoon
C81, C82
Het bedieningspaneel wordt
uitgeschakeld door te hoge
temperaturen
De interne temperatuur van de
elektronische onderdelen is te hoog
Wacht tot de kookplaat is afgekoeld
voordat u hem weer gebruikt
F42 of F43Het aansluitvoltage is niet goed
De sensor detecteert een verschil tussen
het voltage van het apparaat en het
voltage van de netvoeding
Koppel de kookplaat los van het
elektriciteitsnet en controleer de
aansluiting
F12, F21, F25, F36, F37, F40, F47, F56, F58, F60Bel de Klantenservice en geef de foutcode door
NL27
Voordat u contact opneemt met de Klantenservice
1.Controleer of het mogelijk is het probleem zelf op te lossen aan de hand van punten die beschreven worden in “Het opsporen van storingen“.
2.Schakel de kookplaat uit en weer aan, om te controleren of het probleem verdwenen is.
Als na het uitvoeren van deze controles de storing nog steeds aanwezig is, contact opnemen met de dichtstbijzijnde Klantenservice.
Vermeld altijd:
•de aard van de storing;
•het type en het exacte model van de kookplaat;
•het servicenummer (dat is het nummer achter het woord Service op het typeplaatje), dat aan de onderkant van het apparaat zit (op de metalen plaat). Het
servicenummer staat ook in het garantieboekje;
•uw volledige adres;
•uw telefoonnummer.
Wanneer er een reparatie nodig is, neem dan contact op met een officieelklantenservicecentrum (om te garanderen dat er originele reserveonderdelen worden
gebruikt en de reparatie correct wordt uitgevoerd). De reserveonderdelen blijven nog 10 jaar lang verkrijgbaar.
OPMERKING:
Geadviseerd wordt, op de dubbele zone met een doorsnede van 28 cm (waar aanwezig) voor kortdurende bereidingen die een perfecte warmtedistributie vereisen (bijvoorbeeld
pannenkoeken), accessoires te gebruiken met een doorsnede van maximaal 24 cm. Voor behoedzame bereidingen (bijvoorbeeld chocolade of boter smelten) wordt geadviseerd
de enkele zones met een kleinere doorsnede te gebruiken.
KLANTENSERVICE
VERMOGENSTABELLEN
VermogensniveauSoort bereidingGebruik van het niveau
(de indicatie hangt af van de ervaring en de bereidingsgewoonten)
Max. vermogen
BoostSnel verwarmenIdeaal om in korte tijd de temperatuur van het voedsel te verhogen tot het kookpunt, in het geval van
water, of snel kookvocht te verwarmen
8-9Bakken - kokenIdeaal om aan te braden, een bereiding te starten, diepvriespoducten te bakken, water snel aan de
kook te brengen
Hoog vermogen
7-8Aanbraden - fruiten - koken -
grillen
Ideaal om te fruiten, vocht aan de kook te houden, koken en grillen (gedurende korte tijd, 5-10
minuten).
6-7Aanbraden - koken - laten
sudderen - fruiten - grillen
Ideaal om te fruiten, vocht zachtjes aan de kook te houden, koken en grillen (gedurende gemiddelde
tijd, 10-20 minuten), accessoires voorwarmen.
Gemiddeld
vermogen
4-5Koken - laten sudderen -
fruiten - grillen
Ideaal om te laden sudderen, vocht heel zachtjes aan de kook te houden, koken (gedurende lange tijd).
Deeg smeuïg maken
3-4Koken - laten pruttelen -
inkoken - smeuïg maken
Ideaal voor langere bereidingen (rijst, sauzen, braadstukken, vis) met bijbehorend vocht (bijv. water,
wijn, bouillon, melk), deeg smeuïg maken
2-3Ideaal voor langere bereidingen (hoeveelheden kleiner dan een liter: rijst, sauzen, braadstukken, vis) in
Ideaal om boter zacht te maken, voorzichtig chocolade te smelten, producten van kleine afmetingen te
ontdooien en net bereide gerechten warm te houden (bv. sauzen, soepen, minestrone’
1Ideaal voor het warmhouden van net bereide gerechten, het smeuïg maken van risotto’s en het
warmhouden van dekschalen (met accessoires die geschikt zijn voor inductie)
OFFVermogen
nulSteunoppervlakKookplaat in stand-by of uitgeschakeld (mogelijke aanwezigheid van restwarmte na afloop van de
bereiding, aangegeven door H)
Plak hier één van de stickers met de
productgegevens, waarvan zich twee exemplaren
in het garantieboekje bevinden.
ES28
SU SEGURIDAD Y LA DE LOS DEMÁS SON SUMAMENTE IMPORTANTES
Tanto el manual como el aparato tienen importantes mensajes de seguridad que hay que leer y respetar siempre.
Todos los mensajes de seguridad especifican el peligro al que se refieren e indican cómo reducir el riesgo de lesiones, daños y descargas eléctricas resultantes de un uso
no correcto del aparato. Atenerse estrictamente a las siguientes instrucciones:
-El aparato se debe desconectar de la red eléctrica antes de efectuar cualquier trabajo de instalación.
-La instalación y el mantenimiento deben ser ejecutados por un técnico especializado según las instrucciones del fabricante y de conformidad con las normas
locales vigentes en materia de seguridad. No realizar reparaciones o sustituciones de partes del aparato no indicadas específicamente en el manual de uso.
-La puesta a tierra del aparato es obligatoria.
-El cable de alimentación debe ser suficientemente largo para permitir la conexión del aparato, empotrado en el mueble, a la red eléctrica.
-Para que la instalación sea conforme a las normas de seguridad vigentes, es necesario un interruptor omnipolar con una distancia mínima de 3mm entre los
contactos.
-No utilizar tomas múltiples ni prolongadores.
-No tirar del cable de alimentación del aparato.
-Una vez terminada la instalación, los componentes eléctricos no deberán quedar accesibles para el usuario.
-El aparato está destinado exclusivamente al uso doméstico para la cocción de alimentos. No se admite ningún otro uso (ej. calentar ambientes). El fabricante
declina cualquier responsabilidad por los daños producidos por un mal uso del aparato.
-El uso del aparato no está permitido a menores ni a personas con capacidades físicas, sensoriales o mentales reducidas o carentes de la experiencia y los
conocimientos necesarios para ponerlo en funcionamiento, salvo bajo las instrucciones de una persona responsable de su seguridad.
-Las partes accesibles pueden recalentarse mucho durante el uso. Los niños deben mantenerse a distancia y vigilados para que no jueguen con el aparato.
-Durante y después del uso no tocar las resistencias del aparato. Evitar el contacto con paños u otros materiales inflamables hasta que todos los componentes del
aparato se hayan enfriado lo suficiente.
-No apoyar material inflamable sobre el aparato o cerca de él.
-El aceite y la grasa recalentados pueden arder con facilidad. Vigilar la cocción de los alimentos ricos en grasa y aceite.
-No apoyar en la zona de cocción objetos metálicos como utensilios de cocina (cuchillos, tenedores, cucharas, tapas, etc.), ya que podrían recalentarse.
-Es obligatorio instalar un panel separador (no incluido en el suministro) debajo del aparato.
-En caso de rotura o fisura de la superficie de la placa de cocción (grietas o roturas del vidrio), no utilizarla. Ponerse en contacto con el Servicio de Asistencia
Técnica.
-El aparato no está destinado a ponerse en funcionamiento por medio de un temporizador externo o de un sistema de mando a distancia por separado.
INSTRUCCIONES IMPORTANTES PARA LA SEGURIDAD
Símbolo de peligro que advierte sobre riesgos posibles para el usuario y las demás personas.
Todos los mensajes de seguridad están precedidos del símbolo de peligro y de los siguientes términos:
PELIGROIndica una situación peligrosa que, en caso de no evitarse, provoca lesiones graves.
ADVERTENCIAIndica una situación peligrosa que, en caso de no evitarse, podría provocar lesiones graves.
ESPAÑOL Instalación Página 2 Instrucciones de uso Página
ES29
Eliminación del embalaje
El material de embalaje es 100% reciclable y está marcado con el símbolo de reciclado (). Elimine los distintos tipos de material del embalaje conforme a la
normativa local sobre eliminación de desechos.
Eliminación del producto
Este aparato lleva la marca CE de conformidad con la Directiva 2002/96/EC del Parlamento Europeo y del Consejo sobre desechos de aparatos eléctricos y electrónicos
(RAEE).
La correcta eliminación de este producto evita consecuencias negativas para el medio ambiente y la salud.
El símbolo en el aparato o en la documentación que lo acompaña indica que no se puede tratar como desecho doméstico, sino que debe entregarse en un punto
de recogida para el reciclado de aparatos eléctricos y electrónicos.
Ahorro de energía
Para obtener los mejores resultados:
•Utilice ollas y sartenes cuyo diámetro de fondo sea igual al de la zona de cocción.
•Utilice exclusivamente ollas y sartenes con fondo plano.
•Si es posible, mantenga la olla tapada durante la cocción.
•Las ollas a presión permiten ahorrar tiempo y energía.
•Coloque la olla en el centro de la zona de cocción señalada en la placa.
-Este aparato, destinado a entrar en contacto con productos alimentarios, es conforme al reglamento () n.1935/2004 y ha sido proyectado, construido e
introducido en el mercado de conformidad con los requisitos de seguridad de la directiva de “Baja Tensión” 2006/95/CE (que sustituye la 73/2 3/CEE y posteriores
enmiendas) y los requisitos de protección de la directiva “EMC” 2004/108/CE.
Para comprobar si el recipiente es compatible con la placa de cocción por inducción, utilice un imán: las ollas sólo serán adecuadas si son atraídas por el imán.
-Asegúrese de que el fondo de las ollas no sea rugoso ya que podría dañar la superficie de cocción. Compruebe la vajilla.
-No apoye las ollas ni las sartenes calientes sobre la superficie del panel de mandos de la placa. Podrían causar daños materiales.
CONSEJOS PARA PROTEGER EL MEDIO AMBIENTE
DECLARACIÓN DE CONFORMIDAD
ANTES DEL USO
IMPORTANTE: si las ollas no son de la dimensión adecuada, las zonas de cocción no se encenderán. Utilice sólo ollas que tengan el símbolo de
“SISTEMA POR INDUCCIÓN” (figura al lado). Antes de encender la placa de cocción, coloque la olla sobre la zona de cocción deseada.
RECIPIENTES PREEXISTENTES
DIÁMETROS RECOMENDADOS PARA EL FONDO DE LA OLLA
NOOK
Ø
28 cm
XL
Ø
17 cm 28 cm
Ø
21 cm
L
Ø
15 cm 21 cm
Ø
18 cm
M
Ø
14,5 cm
S
Ø
12 cm 18 cm
Ø
10 cm 14,5 cm
ES30
Desembalar el producto y comprobar que no se haya dañado durante el transporte. En caso de problemas, contactar con el revendedor o el Servicio de Asistencia al Cliente.
PREPARACIÓN DEL MUEBLE PARA EL EMPOTRADO
Conexión al bloque de terminales
Para la conexión eléctrica, utilice un cable de tipo H05RR-F, como se indica en la tabla siguiente.
Importante:
- Mantener o quitar los puentes metálicos entre los tornillos de la regleta L1-L2 y N1-N2 siguiendo el esquema de conexiones (ver figura).
- Asegurarse de que los seis tornillos de la regleta queden apretados después de la conexión de los cables.
Ejemplo de puente presente (izquierda) o quitado (derecha). Vea los detalles en el esquema de conexiones (los puentes pueden estar entre L1-L2 y entre N1-N2).
INSTALACIÓN
ADVERTENCIA-Instalar un panel separador
debajo de la placa de cocción.
-La parte inferior del producto no
debe quedar accesible después de
la instalación.
-En caso de instalar un horno
abajo, no interponer el panel
separador.
•La distancia entre la cara inferior de la placa y el panel separador debe respetar las dimensiones indicadas en la figura.
•Para asegurar el funcionamiento correcto del aparato, la abertura mínima (mín. 5 mm) necesaria entre la superficie de apoyo y el lado superior del plano del
mueble no debe estar obstruida.
•Si debajo de la placa de cocción se instala un horno, hay que asegurarse de que esté provisto de sistema de enfriamiento.
•No instale la placa de cocción cerca del lavavajillas ni de la lavadora, para evitar la exposición de los circuitos electrónicos a vapor o humedad que podrían dañarlos.
• En caso de instalación al ras, llamar al servicio de asistencia para pedir el montaje del kit de tornillos 4801 211 00112.
•Para quitar la placa de la encimera, utilice un destornillador (no suministrado) soltando los muelles de la parte inferior del aparato.
CONEXIÓN A LA RED ELÉCTRICA
ADVERTENCIA-Desconecte el aparato de la red eléctrica.
-La instalación del aparato debe dejarse en manos de un técnico cualificado que conozca a fondo la
normativa de seguridad e instalación.
-El fabricante declina toda responsabilidad ante daños a personas, animales o bienes en caso de incumplimiento de las normas mencionadas en
este capítulo.
-La longitud del cable de alimentación debe ser suficiente para que la placa de cocción se pueda retirar de la superficie de apoyo.
-Asegúrese de que el valor de tensión indicado en la placa de identificación, colocada en el fondo del aparato, coincida con el valor de tensión
Conecte el conductor de tierra amarillo/verde al terminal marcado con el símbolo .
Dicho conductor debe ser más largo que los otros.
1.Quite la tapa de la regleta (A) aflojando el tornillo e introduzca la tapa en la bisagra (B) de la regleta.
2.Fije el cable de alimentación en la abrazadera y conecte los conductores al bloque de terminales como indica el esquema de conexión ubicado cerca de la regleta.
3.Fije el cable de alimentación con la abrazadera.
4.Cierre la tapa (C) y fíjela a la regleta con el tornillo que se ha quitado.
Cada vez que se conecta a la alimentación de red, la placa de cocción realiza un control automático durante unos segundos.
Si la placa ya está dotada de cable de alimentación, siga las instrucciones adjuntas al cable de alimentación. Conecte la placa a la red de suministro de energía eléctrica
a través de un interruptor multipolar con una distancia mínima de 3 mm entre los contactos.
Descripción del panel de mandos
Panel de mandos
Encendido/apagado de la placa de cocción
Para encender la placa de cocción, mantener pulsada 2 segundos la tecla hasta que se iluminen las pantallas de las zonas de cocción. Para apagarla, volver a
presionar la tecla hasta que las pantallas se apaguen. Se desactivan todas las zonas de cocción.
Si la placa de cocción se ha utilizado, el indicador de calor residual “H” permanecerá encendido hasta que las zonas de cocción se enfríen.
Si a los 10 segundos de encender la placa de cocción no se ha seleccionado una función, la placa se apaga automáticamente.
Activación y regulación de las zonas de cocción
Tras encender la placa de cocción y colocar la olla en la zona seleccionada, regule el nivel de potencia con la tecla +. Al encender la placa, la pantalla muestra el nivel 5.
Cada zona de cocción posee distintos niveles de potencia, regulables con las teclas +/-, de “1” (potencia mínima) a “9” (potencia máxima). Algunas zonas de cocción
disponen de función de ebullición rápida (Booster), letra “P” de la pantalla.
Función de ebullición rápida (Booster)
Función disponible sólo en algunas zonas de cocción que permite aprovechar al máximo la potencia de la placa (por ejemplo, para hacer hervir el agua rápidamente). Para
activar la función, pulse la tecla “+” hasta que en la pantalla aparezca la letra “P” o, tras encender la placa de cocción, pulse directamente la tecla “-” de la zona seleccionada.
En este caso, la letra “P” también aparece en la pantalla. A los 10 minutos de uso de la función booster, el aparato pone la zona automáticamente en el nivel 9.
Desactivación de las zonas de cocción
Pulsar la tecla “+” o “-” para seleccionar la zona de cocción que desea apagar (en la pantalla se enciende el punto inferior derecho del nivel de potencia).
Pulsar la tecla “-” hasta seleccionar el nivel “0”.
También se puede desactivar la zona de cocción presionando al mismo tiempo las teclas “+” y “-”. La zona de cocción se desactiva y aparece el indicador “H” de calor
residual.
Bloqueo del panel de mandos
Esta función bloquea los mandos de la placa de cocción para impedir que los niños la enciendan por accidente Para activar la función, encender la placa y pulsar tres segundos la
tecla . Una señal acústica y un indicador luminoso señalizan debajo del símbolo de la llave la activación del bloqueo. Se bloquean todas las funciones del panel de mandos,
excepto la de apagado. Para desactivar el panel de mandos, repetir la secuencia de activación. El punto luminoso se apagará y las funciones de la placa volverán a activarse.
El agua de limpieza, los líquidos desbordados de las ollas o los objetos depositados sobre la tecla debajo del símbolo pueden activar o desactivar accidentalmente el
bloqueo del panel de mandos.
INSTRUCCIONES DE USO
Bloqueo del panel de mandos
Mandos de regulación de las zonas de cocción y pantalla
Encendido/Apagado
Temporizador
Los símbolos no se activan.
Para seleccionar las
funciones, tocar las
áreas subyacentes.
Tecla-
Pantalla de potencia
Indicador de la zona de cocción seleccionada
Tecla +
Posición de la zona de
cocción
ES32
Temporizador (Timer)
El temporizador es un interruptor horario que permite programar un tiempo de cocción máximo de hasta 99 minutos (1 hora y 39 minutos); esta
función no se puede utilizar en varias zonas de cocción a la vez.
Seleccionar la zona de cocción que se desea controlar con el temporizador (en la pantalla se enciende un punto luminoso en la parte inferior
derecha del indicador de nivel de potencia) y programar el tiempo con las teclas “+” y “-” de la función temporizador (figura superior). Unos
segundos después de pulsar la última tecla, el temporizador iniciará la cuenta atrás (el punto de selección de la zona de cocción parpadea). Al
cumplirse el tiempo programado, la señal acústica se activa y la zona de cocción se apaga automáticamente.
Para desactivar el temporizador, pulse la tecla “-” hasta que en la pantalla aparezca “0:0” o pulse las teclas “+” y “-” del temporizador al mismo tiempo.
Importante: El temporizador no se puede activar en varias zonas de cocción a la vez.
Cuentaminutos
Sólo se puede utilizar cuando la placa de cocción está apagada y permite programar un tiempo máximo de 99min.
Pulsar la tecla “+” situada debajo de los indicadores del temporizador: aparecen en pantalla los minutos a programar.
Seleccionar el tiempo con las teclas + y.
Unos segundos después, se iniciará la cuenta atrás y se activará la señal acústica.
Importante: Esta función sólo se puede utilizar cuando el aparato está apagado. El cuentaminutos se desactiva al encender la placa de cocción.
Avisos del panel de mandos
Indicador de calor residual.
La placa posee un indicador de calor residual para cada zona de cocción. Este indicador muestra las zonas de cocción que todavía están excesivamente calientes.
Si en la pantalla se visualiza , quiere decir que la zona de cocción todavía está caliente Si el indicador de una zona está encendido, ésta se podrá utilizar para
mantener caliente un alimento o derretir mantequilla.
Al enfriarse la zona de cocción, la pantalla se apaga.
Indicador de olla inadecuada o ausente.
La placa posee un sistema automático que detecta la olla, en todas las zonas de cocción. Si la placa no detecta la olla, la pantalla del nivel de potencia de la
zona de cocción parpadea. Asegurarse de que la olla esté colocada correctamente y posea las características indicadas en la sección “Antes del uso”.
IMPORTANTE: no utilizar esponjas abrasivas ni lana de metal. Con el tiempo podrían estropear el vidrio.
•Después de cada uso, esperar que la placa se enfríe y limpiarla para eliminar incrustaciones, manchas y restos de comida.
•El azúcar y los alimentos con alto contenido de azúcar pueden dañar la placa si no se eliminan inmediatamente.
•La sal, el azúcar y la arena podrían rayar la superficie del vidrio.
•Utilizar un paño suave, papel absorbente o productos específicos para la limpieza de placas de cocción (según las indicaciones del fabricante).
•Leer y seguir las instrucciones de la sección “Instrucciones de uso”.
•Asegurarse de que no haya interrupciones de suministro de corriente eléctrica.
•Secar la superficie de la placa después de limpiarla.
•Si al encender la placa en la pantalla se visualiza un código alfanumérico, seguir las instrucciones de la tabla.
•Después de utilizar la placa de cocción, si no es posible pagarla, desconectarla de la red eléctrica.
LIMPIEZA
ADVERTENCIA-No utilizar nunca limpiadoras de vapor.
-Antes de limpiar la placa, asegurarse de que las zonas de cocción y el indicador de calor residual (“H”)
estén apagados.
GUÍA PARA LA SOLUCIÓN DE PROBLEMAS
CÓDIGO DE ERRORDESCRIPCIÓNCAUSAS POSIBLESELIMINAR ERROR
La placa se apaga y después de 30 segundos
emite una señal acústica cada 4 segundos.
La zona de los mandos está
presionada.
Hay agua o utensilios de cocina sobre la
zona de los mandos.Limpiar la zona de los mandos.
C81, C82
La zona de los mandos se apaga
porque la temperatura es demasiado
elevada.
La temperatura interior de los circuitos
electrónicos es demasiado alta.
Esperar que la placa se enfríe antes
de utilizarla.
F42 o F43El voltaje de conexión de la placa es
incorrecto.
El sensor detecta un voltaje incompatible
con el de conexión.
Desconectar la placa de la red y
controlar la conexión.
F12, F21, F25, F36, F37, F40, F47, F56, F58, F60Llamar al Servicio de Asistencia y comunicar el código de error.
ES33
Antes de llamar al Servicio de Asistencia Técnica
1.Intentar resolver el problema consultando el apartado “Guía para la solución de problemas”.
2.Apagar y volver a encender el aparato para comprobar si se ha solucionado el problema.
Si el fallo persiste, contactar con el Servicio de Asistencia más cercano.
Indicar:
•una breve descripción del problema;
•el tipo de placa y el modelo exactos;
•el número de asistencia (que sigue a la palabra Service en la placa de identificación), situado debajo del aparato (en la placa metálica). También aparece en el
folleto de la garantía;
•su dirección completa;
•su número de teléfono.
Si fuera necesaria una reparación, dirigirse a un Servicio de Asistencia Técnica autorizado (que garantiza la utilización de piezas de recambio originales y una correcta
reparación) Las piezas de recambio están disponibles por 10 años.
NOTA:
En la zona doble, de 28 cm de diámetro (si la hay), para las preparaciones de breve duración y que requieren una distribución perfecta del calor (por ejemplo, crepes), se
recomienda utilizar accesorios de no más de 24 cm de diámetro. Para las cocciones delicadas (por ejemplo, derretir chocolate o mantequilla) se recomienda utilizar las zonas
simples, de inferior diámetro.
SERVICIO DE ASISTENCIA TÉCNICA
TABLA DE POTENCIAS
Nivel de potenciaTipo de cocciónNivel
(la indicación complementa la experiencia y los hábitos de cocción)
Máx. potenciaBoostCalentar rápidamenteIdeal para aumentar en breve tiempo la temperatura de la comida, hervir agua o calentar rápidamente
líquidos de cocción
8-9Freír - hervirIdeal para dorar, comenzar una cocción, freír productos congelados, hervir rápidamente
Alta potencia
7-8Dorar - sofreír - hervir - asarIdeal para sofreír, mantener vivo el hervor, cocinar y asar (5-10minutos)
6-7Dorar - cocinar - estofar -
sofreír - asarIdeal para sofreír, mantener un hervor ligero, cocinar y asar (10-20minutos), precalentar accesorios
Mediana
potencia
4-5Cocinar - estofar - sofreír - asarIdeal para estofar, mantener un hervor delicado, cocinar (durante mucho tiempo). Mantecar la pasta
3-4Cocinar - dejar hervir - espesar
- mantecar
Ideal para cocciones prolongadas (arroz, salsas, carne, pescado) con líquidos de acompañamiento (ej.
agua, vino, caldo, leche) y para mantecar pasta
2-3Ideal para cocciones prolongadas (volúmenes inferiores a un litro: arroz, salsas, carne, pescado) con
líquidos de acompañamiento (ej. agua, vino, caldo, leche)
Baja potencia
1-2Derretir - descongelar -
mantener caliente - mantecar
Ideal para ablandar matenquilla, derretir chocolate delicadamente, descongelar productos de
1Ideal para mantener calientes alimentos recién cocidos, mantecar arroz y mantener en temperatura
fuentes de comida (con accesorio para la inducción)
OFFPotencia
ceroSuperficie de apoyoPlaca de cocción en posición de stand-by o apagada (posible presencia de calor residual de fin de
cocción, señalizado con H)
Pegar aquí una de las dos copias de la etiqueta
adhesiva de datos del producto incluidas en el
folleto de garantía.
PT34
A SUA SEGURANÇA E A DE TERCEIROS É MUITO IMPORTANTE
Este manual e o próprio aparelho possuem mensagens importantes relativas à segurança, que deve ler e respeitar sempre.
Todas as mensagens relativas à segurança especificam o potencial perigo a que se referem e indicam a forma de reduzir o risco de lesões, danos e choques eléctricos
provenientes de uma utilização incorrecta do aparelho. Tenha em atenção as instruções seguintes:
-Deve desligar o aparelho da rede eléctrica antes de efectuar qualquer intervenção de instalação.
-A instalação e a manutenção devem ser efectuadas por um técnico especializado, de acordo com as instruções do fabricante e respeitando as normas locais em
vigor em matéria de segurança. Não repare nem substitua nenhuma peça do aparelho a não ser que especificamente indicado no manual de utilização.
-A ligação à terra do aparelho é obrigatória.
-O cabo de alimentação deverá ter um comprimento suficiente para permitir a ligação do aparelho, encastrado no móvel, à rede eléctrica.
-Para que a instalação esteja em conformidade com as normas de segurança actuais, deverá utilizar um disjuntor multipolar com uma distância mínima entre os
contactos de 3mm.
-Não utilize tomadas múltiplas nem extensões.
-Não puxe o cabo de alimentação do aparelho.
-Após a instalação do aparelho, os componentes eléctricos devem estar inacessíveis ao utilizador.
-O aparelho destina-se apenas a uso doméstico para a cozedura de alimentos. Estão proibidos outros tipos de utilização (por ex.: aquecer divisões). O Fabricante
declina toda e qualquer responsabilidade por uma utilização inadequada ou por uma regulação errada dos comandos.
-Este aparelho não se destina a ser utilizado por pessoas (incluindo crianças) com capacidades físicas, sensoriais ou mentais reduzidas, ou com uma experiência e
conhecimentos insuficientes, a menos que tenham recebido formação relativa à utilização por parte de um responsável pela sua segurança.
-As partes acessíveis ficam muito quentes durante o funcionamento. Mantenha as crianças afastadas e vigiadas para que não brinquem com o aparelho.
-Durante e após a utilização, não toque nas resistências do aparelho. Evite o contacto com panos ou outros materiais inflamáveis até que todos os componentes do
aparelho arrefeçam suficientemente.
-Não coloque materiais inflamáveis no aparelho ou perto dele.
-As gorduras e óleos aquecidos incendeiam-se facilmente. Vigie a cozedura dos alimentos ricos em gordura e óleo.
-Não coloque na zona de cozedura objectos metálicos, como utensílios de cozinha (facas, garfos, colheres, testos, etc.), pois podem ficar quentes.
-É obrigatória a instalação de um painel de separação, não fornecido com o equipamento, no compartimento por baixo do aparelho.
-Se a superfície da placa estiver danificada (vidro partido ou estalado), não utilize o aparelho e contacte o serviço de assistência técnica.
-O aparelho não deve ser activado através de um temporizador externo ou de um sistema de comando à distância separado.
INSTRUÇÕES DE SEGURANÇA IMPORTANTES
Este é o símbolo de perigo, relativo à segurança, que alerta para potenciais riscos para o operador ou para terceiros.
Todas as mensagens relativas à segurança são precedidas do símbolo de perigo e dos termos seguintes:
PERIGOIndica uma situação perigosa que, se não for evitada, provoca lesões graves.
AVISOIndica uma situação perigosa que, se não for evitada, pode provocar lesões graves.
ITALIANOInstalaçãoPágina2Instruções de utilizaçãoPágina
PT35
Eliminação da embalagem
O material da embalagem é 100% reciclável, conforme confirmado pelo símbolo de reciclagem (). Os diversos materiais da embalagem não devem ser abandonados
no meio ambiente, mas sim eliminados em conformidade com as normas estabelecidas pelas autoridades locais.
Eliminação do produto
Este aparelho está classificado de acordo com a Directiva Europeia 2002/96/EC sobre Resíduos de equipamento eléctrico e electrónico (REEE).
Ao assegurar a eliminação correcta deste produto, estamos a proteger o ambiente e a saúde humana contra riscos potencialmente negativos.
O símbolo no produto, ou na documentação que acompanha o produto, indica que este produto não deve ser tratado como resíduo doméstico, devendo ser
entregue num centro de recolha que proceda à reciclagem de equipamentos eléctricos e electrónicos.
Poupança de energia
Para obter melhores resultados, recomendamos que:
•Use panelas e frigideiras com um diâmetro de base igual ao da zona de cozedura.
•Utilize apenas panelas e frigideiras com fundo plano.
•Se possível, mantenha as panelas tapadas durante a cozedura.
•A utilização da panela de pressão reduz significativamente o consumo de energia e o tempo de cozedura.
•Coloque a panela no centro da zona de cozedura desenhada na placa.
-Este forno, que se destina a entrar em contacto com produtos alimentares, está em conformidade com a norma () n.º 1935/2004 e foi concebido, fabricado e
comercializado em conformidade com os requisitos de segurança da directiva de “Baixa tensão” 2006/95/CE (a qual substitui a directiva 73/2/ 3/CEE e
subsequentes emendas), os requisitos de protecção da directiva “EMC” 2004/108/CE.
Para verificar se o recipiente é adequado à placa de indução, utilizar um ímã: as panelas que não são magneticamente identificáveis não são adequadas.
-Certifique-se de que o fundo das panelas não está áspero, pois poderia riscar a superfície da placa. Verifique a loiça.
-Não apoie os tachos e as frigideiras quentes na superfície do painel de comando da placa. Pode provocar danos.
CONSELHOS PARA A PROTECÇÃO DO AMBIENTE
DECLARAÇÃO DE CONFORMIDADE
ANTES DA UTILIZAÇÃO
IMPORTANTE: se as panelas não tiverem as dimensões correctas, as zonas de cozedura não se acendem. Utilize apenas panelas que possuam o símbolo
de “SISTEMA DE INDUÇÃO“ (Figura ao lado). Antes de ligar a placa, coloque a panela na zona de cozedura pretendida.
RECIPIENTES PRÉ-EXISTENTES
DIÂMETROS ACONSELHADOS DO FUNDO DOS TACHOS
NÃOOK
Ø
28 cm
XL
Ø
17 cm 28 cm
Ø
21 cm
L
Ø
15 cm 21 cm
Ø
18 cm
M
Ø
14,5 cm
S
Ø
12 cm 18 cm
Ø
10 cm 14,5 cm
PT36
Depois de desembalar o produto, verifique se sofreu danos durante o transporte e, em caso de problemas, contacte o seu revendedor ou o Serviço Pós-venda.
PREPARAÇÃO DO MÓVEL DE EMBUTIR
Ligação ao painel de terminais
Para a ligação eléctrica, utilize um cabo de tipo H05RR-F como indicado na tabela em baixo.
Importante:
- Mantenha ou remova os jumpers entre os parafusos da régua de terminais L1-L2 e N1-N2, de acordo com o esquema de ligações (consulte a figura).
- Verifique se os seis parafusos da régua de terminais estão apertados após a ligação dos cabos.
Exemplo de jumper presente (esquerda) ou removido (direita). Consulte o esquema de ligações para mais informações (os jumpers podem estar entre L1-L2 e entre N1-N2).
INSTALAÇÃO
AVISO-Instale um painel de separação
por baixo da placa de cozedura.
-A parte inferior do produto não
deve ficar acessível após a
instalação.
-Para instalar um forno por baixo
da placa, não coloque o painel de
separação.
•A distância entre a parte inferior do aparelho e o painel de separação deve respeitar as dimensões indicadas na figura.
•Para um correcto funcionamento do produto, não tape a abertura mínima entre a bancada de trabalho e o lado superior da placa do móvel (mín. 5 mm).
•Em caso de instalação de um forno debaixo da placa, certifique-se de que ele está equipado com um sistema de arrefecimento.
•Não instalar a placa por cima do lava-louça ou da máquina de lavar, para que os circuitos electrónicos não entrem em contacto com vapor ou humidade, o que
os pode danificar.
•No caso de instalação com fios, contactar o serviço de assistência e solicitar a montagem do kit de parafusos 4801 211 00112.
•Para remover a placa do tampo utilize uma chave de fendas (não fornecida) para soltar as molas situadas na secção inferior do aparelho.
LIGAÇÃO À REDE ELÉCTRICA
AVISO-Desligue o aparelho da rede eléctrica.
-O aparelho deverá ser instalado por um técnico qualificado, com conhecimento das normas de
segurança e de instalação em vigor.
-O fabricante rejeita qualquer responsabilidade por danos a pessoas, animais ou bens materiais no caso de incumprimento das directivas
fornecidas neste capítulo.
-O cabo de alimentação deverá ter um comprimento suficiente para permitir a remoção da placa de fogão do tampo.
-Certifique-se de que a tensão indicada na chapa de características situada no fundo do aparelho corresponde à da habitação na qual vai ser instalado.
CondutoresQuantidade x dimensões
230V ~ + 3 x 4 mm2
230-240V ~ + 3 x 4 mm2 (apenas Austrália)
230V 3 ~ + 4 x 1,5 mm2
400V 3N ~ + 5 x 1,5 mm2
400V 2N ~ + 4 x 1,5 mm2
mín. 5 mm
mín. 20 mm
mín. 5 mm
400 V 3N ~230 V ~230-240 V ~ (apenas Austrália)
230V ~ (apenas UK)
400 V 2N ~230 V 3 ~ (apenas Bélgica)400 V 2N ~ (apenas Holanda)
230 V
230 V
230 V
230 V
230 V
230 V
230 V
230 V
230 V
230 V
230 V
CBA
PT37
Ligue o cabo de terra amarelo/verde ao terminal com o símbolo .
Esse cabo deve ser mais comprido que os outros.
1.Retire a tampa do painel de terminais (A) desapertando o parafuso e insira a tampa na dobradiça (B) do painel de terminais.
2.Insira o cabo de alimentação no fixador do cabo e ligue os fios à régua de terminais como indicado no esquema de ligação colocado junto à régua de terminais.
3.Fixe o cabo de alimentação com o fixador do cabo.
4.Feche a tampa (C) e aperte-a na régua de terminais com o parafuso removido.
A cada ligação à alimentação da rede, a placa efectua uma verificação automática durante alguns segundos.
Se a placa já possuir cabo de alimentação, siga as instruções fornecidas juntamente com o cabo de alimentação. Efectue a ligação à rede fixa através de um interruptor
multipolar com uma distância mínima entre os contactos de 3 mm.
Descrição do painel de comandos
Painel de controlo
Ligar/desligar a placa
Para ligar a placa, prima durante cerca de 2 segundos a tecla até que os visores das zonas de cozedura se acendam. Para desligar, toque na mesma tecla até que os
visores se apaguem Todas as zonas de cozedura são desactivadas.
Se a placa já tiver sido utilizada, o indicador de calor residual “H” permanece activo até que as zonas de cozedura arrefeçam.
Se 10 segundos depois de ligar a placa, não for seleccionada nenhuma função, a placa desactiva-se automaticamente.
Activação e regulação das zonas de cozedura
Depois de ligar a placa de cozedura e colocar o tacho na zona pré-seleccionada, regule o nível de potência com a tecla +. Ao ligar, aparece no visor o nível 5.
Cada zona de cozedura possui diversos níveis de potência, reguláveis com as teclas +/-, que vão de “1” (potência mínima) a “9”: (potência máxima). Algumas zonas de
cozedura possuem a função de fervura rápida (Booster), que aparece no visor com a letra “P”.
Função fervura rápida (Booster)
Função existente apenas em algumas zonas de cozedura que permite aproveitar ao máximo a potência da placa (por exemplo, para ferver rapidamente a água). Para activar
a função, prima a tecla “+“ até visualizar a letra “P“ ou, depois de ligar a placa, prima directamente a tecla “-“ relativa à zona seleccionada. Mesmo neste caso, aparece “P“
no visor. Após 10 minutos de utilização da função Booster, o aparelho programa automaticamente a zona para o nível 9.
Desactivação das zonas de cozedura
Seleccione a zona de cozedura que pretende desligar premindo a tecla “+” ou “-” (o ponto em baixo à direita do nível de potência aparece no visor).
Prima a tecla “-” até colocar o nível no “0”.
É também possível desactivar a zona de cozedura tocando nas teclas “+“ e “-“ ao mesmo tempo. A zona de cozedura desactiva-se e aparece o indicador “H“ do calor
residual.
Bloqueio do painel de comandos
A função bloqueia os comandos da placa para evitar a activação acidental da placa por parte de crianças. Para activar o bloqueio dos comandos, ligue a placa e mantenha a tecla
premida durante três segundos: um sinal sonoro e um indicador luminoso debaixo do símbolo da chave assinalam a activação. O painel de comandos fica bloqueado, à
excepção da função de desactivação. Para desactivar o bloqueio dos comandos, repita o procedimento de activação. O ponto luminoso apaga-se e a placa fica novamente activa.
A presença de água de limpeza, líquido derramado dos tachos ou objectos de qualquer espécie pousados sobre a tecla por baixo do símbolo podem provocar a activação
ou desactivação involuntária da função de bloqueio do painel de comandos.
INSTRUÇÕES DE UTILIZAÇÃO
Bloqueio do painel de comandos
Comandos de regulação das zonas de cozedura e respectivo visor
Ligar/desligar
Temporizador
os símbolos não estão
activos! Para seleccionar as
funções pretendidas, toque
nas
áreas subjacentes.
Tecla -
Indicador de potência
Indicação da zona de cozedura seleccionada
Tecla +
Posicionamento da zona
de cozedura
PT38
Temporizador
O temporizador é um interruptor horário que oferece a possibilidade de programar uma duração de cozedura por um período máximo de 99
minutos (1 hora e 39 minutos) associável a uma única zona de cozedura.
Seleccione a zona de cozedura a que pretende associar o temporizador (aparece um ponto luminoso em baixo à direita do indicador do nível de
potência no visor); em seguida, programe o tempo pretendido regulando-o com as teclas “+“ e “-“ da função do temporizador (consulte a figura
em cima). Alguns segundos após o último toque, o temporizador inicia a contagem decrescente (o ponto de selecção da zona de cozedura
começa a piscar). No final do tempo, activa-se um sinal sonoro e a zona de cozedura desliga-se automaticamente.
Para desactivar o temporizador, prima a tecla “-” até aparecer “0:0” no visor ou prima simultaneamente as teclas “+” e “-” do temporizador.
Importante: É possível associar o temporizador a uma única zona de cozedura de cada vez.
Contador de minutos
Pode ser utilizado com a placa desligada e permite programar um tempo máximo de 99 min.
Prima a tecla “+“ colocada por baixo dos indicadores do temporizador: no visor surgem os minutos a programar.
Seleccione o tempo desejado utilizando as teclas + e.
Após alguns segundos, inicia-se a contagem decrescente, no final da qual soa um sinal sonoro.
Importante: É possível utilizar a função conta-minutos apenas com o aparelho desligado e a activação da placa provoca a anulação do próprio conta-minutos.
Avisos do painel de comandos
Indicador de calor residual.
A placa está equipada com um indicador de calor residual para cada zona de cozedura. Este indicador mostra quais são as zonas de cozedura ainda com
temperatura elevada.
Se aparecer no visor, a zona de cozedura ainda está quente. Se a zona apresentar esta indicação, é possível, por exemplo, manter alimentos quentes ou
derreter manteiga
Quando a zona de cozedura fica fria, o visor apaga-se.
Indicador de tacho não adequado ou ausente.
A placa está equipada com um sistema automático de detecção da presença de tachos, em todas as zonas de cozedura. Se não forem detectados, o visor com
o nível de potência da zona de cozedura começa a piscar. Verifique se o tacho está correctamente posicionado e se possui as características indicadas na secção
“antes da utilização”.
IMPORTANTE: não utilize esponjas abrasivas ou palha-de-aço. A sua utilização, com o tempo, pode danificar o vidro.
•Após cada utilização, deixe arrefecer a placa e limpe-a para retirar as incrustações e manchas provocadas pelos resíduos de alimentos.
•O açúcar e os alimentos com elevado teor de açúcar danificam a placa de cozedura e devem ser removidos imediatamente.
•O sal, o açúcar e a areia podem riscar a superfície do vidro.
•Utilize um pano húmido, papel absorvente de cozinha ou produtos de limpeza específicos para placas (siga as indicações do fabricante).
•Leia e siga as instruções da secção “Instruções de utilização“.
•Certifique-se de que não existem interrupções no abastecimento.
•Seque bem a superfície da placa depois de a limpar.
•Se, ao ligar a placa, o visor mostrar códigos alfanuméricos, proceda de acordo com a seguinte tabela.
•Se não conseguir desligar a placa depois de a utilizar, desligue-a da rede eléctrica.
LIMPEZA
AVISO-Nunca utilize máquinas de limpeza a vapor.
-Antes de proceder às operações de limpeza, certifique-se de que as zonas de cozedura estão desligadas e
que a indicação de calor residual (“H“) desapareceu.
GUIA PARA RESOLUÇÃO DE AVARIAS
CÓDIGO DE ERRODESCRIÇÃOCAUSAS POSSÍVEISSOLUÇÃO
A placa desliga-se e, ao fim de 30 segundos,
emite um sinal sonoro a cada 4 segundos
Pressão permanente na zona de
comandos.
Água ou utensílios de cozinha na zona de
comandosVolte a limpar a zona de comandos.
C81, C82
A zona de comandos desliga-se
devido a temperatura demasiado
elevada.
A temperatura interna das peças
electrónicas é demasiado elevada.
Aguarde até que a placa arrefeça
antes de a utilizar de novo.
F42 ou F43A ligação da placa não possui a tensão
correcta
O sensor detecta uma tensão diferente da
de ligação.
Desligue a placa da rede e verifique
a ligação.
F12, F21, F25, F36, F37, F40, F47, F56, F58, F60Contacte o serviço de assistência e comunique o código de erro
PT39
Antes de contactar o Serviço Pós-Venda
1.Tente solucionar o problema consultando o “Guia de resolução de problemas“.
2.Desligue e volte a ligar a placa para verificar se o problema foi resolvido.
Se após efectuar as verificações, o problema persistir, contacte o Serviço Pós-Venda mais próximo.
Comunique:
•uma breve descrição do problema;
•o tipo e o modelo exacto da placa;
•o número de serviço (número após a palavra Service na chapa de características) situado por baixo do aparelho (na placa metálica). O número de assistência está
também indicado no livro de garantia;
•o seu endereço completo;
•o seu número de telefone e o indicativo da zona.
Se for necessário efectuar alguma reparação, contacte um Serviço Pós-Venda autorizado (terá a garantia da utilização de peças sobresselentes originais e de uma
reparação correcta). As peças de substituição estão disponíveis por 10 anos.
NOTA:
Na zona dupla de 28 cm de diâmetro (se presente) para preparações rápidas e que requerem uma perfeita distribuição do calor (por exemplo, panquecas), recomenda-se utilizar
acessórios não superiores a 24 cm de diâmetro. Para tipos de cozedura delicadas (por exemplo, derreter chocolate ou manteiga), recomenda-se utilizar as zonas únicas de
diâmetro inferior.
SERVIÇO PÓS-VENDA
TABELA DE POTÊNCIAS
Nível de potênciaTipo de cozeduraUtilização do nível
(a indicação junta a experiência e os hábitos de cozedura)
Potência
máxima
BoostAquecer rapidamenteIdeal para aumentar rapidamente a temperatura dos alimentos até uma fervura rápida, no caso da
água, ou aquecer rapidamente os líquidos de cozedura
8-9Fritar - ferverIdeal para tostar, iniciar uma cozedura, fritar produtos congelados, ferver rapidamente
Potência alta
7-8Tostar - fritar lentamente -
ferver - grelhar
Ideal para fritar lentamente, manter fervuras vivas, cozer e grelhar (por um curto período de tempo, 5-
10 minutos)
6-7Tostar - cozer - estufar - fritar
lentamente - grelhar
Ideal para fritar lentamente, manter fervuras ligeiras, cozer e grelhar (por um período de tempo médio,
10-20 minutos), pré-aquecer os acessórios
Potência média
4-5Cozer - estufar - fritar
lentamente - grelharIdeal para estufar, manter fervuras delicadas, cozer (por um longo período de tempo). Envolver a massa
3-4Cozer - ferver lentamente -
adensar - envolver
Ideal para cozeduras prolongadas (arroz, molhos, assados, peixe) na presença de líquidos de
acompanhamento (por ex. água, vinho, caldo, leite), envolver massa
2-3Ideal para cozeduras prolongadas (volumes inferiores a 1 litro: arroz, molhos, assados, peixe) na
presença de líquidos de acompanhamento (por ex. água, vinho, caldo, leite)
Potência baixa
1-2Derreter - descongelar -
manter quente - envolver
Ideal para amolecer a manteiga, derreter delicadamente o chocolate, descongelar produtos de
pequenas dimensões e manter quentes alimentos acabados de cozinhar (ex.: molhos, sopas)
1Ideal para manter quentes alimentos acabados de cozinhar, envolver risottos e manter a temperatura
dos pratos de servir (com o acessório adequado à indução)
OFFPotência
zeroSuperfície de apoioPlaca na posição de stand-by ou desligada (possível presença de calor residual do final da cozedura,
assinalado com H)
Cole aqui um dos autocolantes com os dados do
produto que se encontra em duplicado no manual
de garantia.
IT40
LA SICUREZZA VOSTRA E DEGLI ALTRI È MOLTO IMPORTANTE
Il presente manuale e l’apparecchio stesso sono corredati da importanti messaggi relativi alla sicurezza, da leggere ed osservare sempre.
Tutti i messaggi relativi alla sicurezza specificano il potenziale pericolo a cui si riferiscono ed indicano come ridurre il rischio di lesioni, danni e scosse elettriche
conseguenti ad un non corretto uso dell’apparecchio. Attenersi scrupolosamente alle seguenti istruzioni:
-L’apparecchio deve essere scollegato dalla rete elettrica prima di effettuare qualunque intervento d’installazione.
-L’installazione o la manutenzione deve essere eseguita da un tecnico specializzato, in conformità alle istruzioni del fabbricante e nel rispetto delle norme locali
vigenti in materia di sicurezza. Non riparare o sostituire qualsiasi parte dell’apparecchio se non specificamente richiesto nel manuale d’uso.
-La messa a terra dell’apparecchio è obbligatoria.
-Il cavo di alimentazione deve essere sufficientemente lungo da permettere il collegamento dell’apparecchio, incassato nel mobile, alla rete elettrica.
-Affinché l’installazione sia conforme alle norme di sicurezza vigenti, occorre un interruttore onnipolare avente una distanza minima di 3mm. tra i contatti.
-Non utilizzare prese multiple o prolunghe.
-Non tirare il cavo di alimentazione dell’apparecchio.
-Una volta terminata l’installazione, i componenti elettrici non dovranno più essere accessibili dall’utilizzatore.
-L’apparecchio è destinato esclusivamente ad uso domestico per la cottura di alimenti. Non sono consentiti altri usi (es. riscaldare ambienti). Il fabbricante declina
ogni responsabilità per usi non appropriati o per errate impostazioni dei comandi.
-L’utilizzo dell’apparecchio non è consentito alle persone (inclusi i bambini) con ridotte capacità fisiche, sensoriali o mentali, o con mancanza di esperienza o
conoscenza, a meno che non abbiano avuto istruzioni riguardanti l’uso dell’apparecchio da parte di persone responsabili della loro sicurezza.
-Le parti accessibili possono diventare molto calde durante l’uso. I bambini devono essere mantenuti a distanza e sorvegliati affinchè non giochino con
l’apparecchio.
-Durante e dopo l’uso non toccare gli elementi riscaldanti dell’apparecchio. Evitare il contatto con panni o altro materiale infiammabile fino a che tutti i
componenti dell’apparecchio non si siano sufficientemente raffreddati.
-Non riporre materiale infiammabile sull’apparecchio o nelle sue vicinanze.
-I grassi e gli oli surriscaldati prendono facilmente fuoco. Sorvegliare la cottura di alimenti ricchi di grasso e di olio.
-Non porre sulla zona di cottura oggetti metallici, quali utensili da cucina (coltelli, forchette, cucchiai, coperchi, etc.) perchè potrebbero scaldarsi.
-È obbligatoria l’installazione di un pannello separatore, non fornito a corredo, nel vano sotto l’apparecchio.
-Nel caso in cui la superficie del piano si danneggiasse (crepe o rotture del vetro), non utilizzare l’apparecchio e chiamare il servizio di assistenza tecnica.
-L’apparecchio non è destinato ad essere messo in funzione per mezzo di un temporizzatore esterno oppure di un sistema di comando a distanza separato.
ISTRUZIONI IMPORTANTI PER LA SICUREZZA
Questo è il simbolo di pericolo, relativo alla sicurezza, il quale avverte dei potenziali rischi per l’utilizzatore e per gli altri.
Tutti i messaggi relativi alla sicurezza saranno preceduti dal simbolo di pericolo e dai seguenti termini:
PERICOLOIndica una situazione pericolosa che, se non evitata, provoca lesioni gravi.
AVVERTENZAIndica una situazione pericolosa che, se non evitata, potrebbe provocare lesioni gravi.
ITALIANOInstallazionePagina2Istruzioni per l’usoPagina
IT41
Smaltimento imballaggio
Il materiale di imballaggio è riciclabile al 100% ed è contrassegnato dal simbolo di riciclaggio (). Le diverse parti dell’imballaggio non devono essere disperse
nell’ambiente, ma smaltite in conformità alle norme stabilite dalle autorità locali.
Smaltimento prodotto
Questo apparecchio è contrassegnato in conformità alla Direttiva Europea 2002/96/EC, Waste Electrical and Electronic Equipment (WEEE).
Assicurandosi che questo prodotto sia smaltito in modo corretto, l’utente contribuisce a prevenire le potenziali conseguenze negative per l’ambiente e la salute.
Il simbolo sul prodotto o sulla documentazione di accompagnamento indica che questo prodotto non deve essere trattato come rifiuto domestico, ma deve essere
consegnato presso l’idoneo punto di raccolta per il riciclaggio di apparecchiature elettriche ed elettroniche.
Risparmio energetico
Per ottenere migliori risultati si consiglia di:
•Utilizzare tegami e pentole con diametro del fondo uguale a quello della zona di cottura.
•Utilizzare soltanto pentole e tegami con fondi piatti.
•Dove possibile, tenere il coperchio sulle pentole durante la cottura.
•Utilizzare la pentola a pressione, riduce ulteriormente il consumo di energia e il tempo di cottura.
•Posizionare la pentola nel centro della zona di cottura disegnata sul piano.
-Questo apparecchio, destinato ad entrare a contatto con prodotti alimentari, è conforme al regolamento () n.1935/2004 ed è stato progettato, costruito ed
immesso sul mercato in conformità ai requisiti di sicurezza della direttiva “Bassa Tensione” 2006/95/CE (che sostituisce la 73/2 3/CEE e successivi emendamenti),
requisiti di protezione della direttiva “EMC” 2004/108/CE.
Per verificare che il recipiente sia adatto al piano cottura ad induzione servirsi di una calamita: le pentole non sono adatte se non sono rilevabili magneticamente.
-Assicurarsi che il fondo delle pentole non sia ruvido perché potrebbe graffiare la superficie del piano cottura. Controllare le stoviglie.
-Non appoggiare mai le pentole e le padelle calde sulla superficie del pannello di controllo del piano. Potrebbero derivarne danni.
CONSIGLI PER LA SALVAGUARDIA DELL’AMBIENTE
DICHIARAZIONE DI CONFORMITÀ
PRIMA DELL’UTILIZZO
IMPORTANTE: se le pentole non sono delle dimensioni corrette le zone cottura non si accendono. Utilizzare solo pentole che riportano il simbolo
“SISTEMA A INDUZIONE” (Figura a lato). Prima di accendere il piano di cottura, posizionare la pentola sulla zona di cottura desiderata.
RECIPIENTI PREESISTENTI
DIAMETRI FONDO PENTOLA CONSIGLIATI
NOOK
Ø
28 cm
XL
Ø
17 cm 28 cm
Ø
21 cm
L
Ø
15 cm 21 cm
Ø
18 cm
M
Ø
14,5 cm
S
Ø
12 cm 18 cm
Ø
10 cm 14,5 cm
IT42
Dopo aver disimballato il prodotto verificare che non si sia danneggiato durante il trasporto e in caso di problemi, contattare il rivenditore o il Servizio Assistenza Clienti.
PREDISPOSIZIONE DEL MOBILE PER INCASSO
Connessione alla morsettiera
Per il collegamento elettrico servirsi di un cavo ditipo H05RR-F come da tabella sotto.
Importante:
- Mantenere o rimuovere i ponticelli metallici tra le viti della morsettiera L1-L2 e N1-N2 in accordo con lo schema connessioni (vedi figura).
- Accertarsi che tutte le sei viti della morsettiera siano serrate dopo la connessione dei cavi.
Esempio di ponticello presente (sinistra) o rimosso (destra). Si veda lo schema connessioni per i dettagli (i ponticelli possono essere tra L1-L2 e tra N1-N2).
INSTALLAZIONE
AVVERTENZA-Installare un pannello separatore
sotto il piano cottura.
-La parte inferiore del prodotto
non deve essere accessibile dopo
l’installazione.
-Nel caso di installazione di un
forno sottopiano, non interporre
il pannello separatore.
•La distanza tra parte inferiore dell’apparecchio e il pannello divisorio deve rispettare le dimesioni riportate in figura.
•Per un corretto funzionamento del prodotto non ostruire l’apertura minima tra piano di lavoro e il lato superiore del piano del mobile (min. 5 mm).
•Nel caso di installazione di un forno sottopiano, accertarsi che il forno sia dotato di sistema di raffreddamento.
•Evitare l’installazione del piano cottura sopra alla lavastoviglie o lavatrice affinchè i circuiti elettronici non vengano a contatto con vapore ed umidità e quindi si
danneggino.
•Nel caso d’installazione a filo, chiamare il servizio assistenza per richiedere il montaggio del kit viti 4801 211 00112.
•Per la rimozione del piano utilizzare un cacciavite ( non fornito ) agendo sulle molle perimetrali nella parte inferiore del prodotto.
CONNESSIONE ALLA RETE ELETTRICA
AVVERTENZA-Scollegare l’apparecchio dalla rete elettrica.
-L’installazione deve essere effettuata da personale professionalmente qualificato a conoscenza
delle norme vigenti in materia d’installazione e sicurezza.
-Il costruttore declina ogni responsabilità per danni a persone, animali o a cose in caso di mancata osservanza delle direttive fornite nel presente
capitolo.
-Il cavo di alimentazione deve essere sufficientemente lungo da permettere la rimozione del piano cottura dal piano di lavoro.
-Assicurarsi che la tensione indicata sulla targhetta matricola posta sul fondo dell’apparecchio corrisponda a quella dell’abitazione in cui verrà installato.
Collegare il cavo di terra giallo/verde al terminale con simbolo .
Il suddetto cavo deve essere più lungo degli altri.
1.Rimuovere il coperchio morsettiera (A) svitando la vite ed inserire il coperchio nella cerniera (B) della morsettiera.
2.Inserire il cavo di alimentazione nel fissacavo e collegare i fili alla morsettiera come indicato nello schema di collegamento posizionato vicino alla morsettiera.
3.Fissare il cavo di alimentazione con il fissacavo.
4.Chiudere il coperchio (C) ed avvitarlo sulla morsettiera con la vite rimossa.
Ad ogni collegamento all’alimentazione di rete il piano cottura effettua un controllo automatico per alcuni secondi.
In caso il piano fosse già provvisto di cavo di alimentazione, seguire istruzioni allegate al cavo di alimentazione. Effettuare il collegamento a rete fissa tramite un
interruttore multipolare con distanza minima tra i contatti di 3mm.
Descrizione Pannello Comandi
Pannello comandi
Accensione/spegnimento piano cottura
Per accendere il piano premere per circa 2 secondi il tasto finché non si illuminano i display delle zone di cottura. Per spegnere toccare lo stesso tasto fino allo
spegnimento dei display. Tutte le zone di cottura vengono disattivate.
Qualora il piano fosse già stato utilizzato l’indicatore del calore residuo “H” resta attivo fino a raffreddamento delle zone di cottura.
Se entro 10secondi dopo l’accensione del piano cottura non si seleziona nessunafunzione, esso si disattiva automaticamente.
Attivazione e Regolazione zone cottura
Una volta acceso il piano cottura e posizionata la pentola sulla zona prescelta, regolare il livello di potenza con il tasto +. All’accensione, sul display viene visualizzato
il livello5.
Ogni zona cottura ha diversi livelli di potenza, regolabili con i tasti +/-, che vanno da “1”: potenza minima a “9”: potenza massima. Alcune zone cottura hanno la
funzione ebollizione rapida (Booster), visualizzata a display con la lettera “P”.
Funzione ebollizione rapida (Booster)
Funzione presente solo su alcune zone cottura che permette di sfruttare al massimo la potenza del piano (adesempio per portare ad ebollizione rapidamente l’acqua). Per
attivare la funzione, premere il tasto “+” fino a che il display visualizza “P” oppure, dopo aver acceso il piano cottura, premere direttamente il tasto “-” relativo alla zona
selezionata. Anche in questo caso “P” appare a display. Dopo 10 minuti di utilizzo della funzione booster, l’apparecchio imposta automaticamente la zona al livello 9.
Disattivazione zone cottura
Selezionare la zona cottura da spegnere premendo il tasto “+” o “-” (il puntino in basso a destra del livello di potenza, viene visualizzato a display).
Premere il tasto “-” fino a portare il livello a “0”.
È anche possibile disattivare la zona di cottura toccando i tasti “+” e “-” contemporaneamente. La zona di cottura si disattiva e compare l’indicatore “H” del calore
residuo.
Blocco pannello comandi
La funzione blocca i comandi del piano cottura per prevenire l’attivazione accidentale del piano di cottura da parte di bambini. Per attivare la blocco pannello comandi accendere
il piano cottura, premere per tre secondi iltasto: un segnale acustico e un indicatore luminoso sotto il simbolo della chiave segnalano l’avvenuta attivazione. Il pannello di
comandi è bloccato ad eccezione della funzione di spegnimento. Perdisattivare il blocco comandi ripetere la procedura di attivazione. Il puntino luminoso si spegne e il piano è
nuovamente attivo.
La presenza di acqua di pulizia, liquido fuoriuscito dalle pentole o oggetti di qualsiasi genere posati sul tasto sotto il simbolo possono provocare l’attivazione o la
disattivazione involontaria del blocco pannello comandi.
ISTRUZIONI PER L’USO
Blocco pannello comandi
Comandi regolazione zone cottura e relativo display
Accensione/spegnimento
Timer
i simboli non sonoattivi!
Perselezionare le funzioni
desiderate, toccare nelle
aree sottostanti.
Tasto-
Display indicatore potenza
Indicazione zona cottura selezionata
Tasto+
Posizionamento zona
cottura
IT44
Temporizzatore (Timer)
Il timer è un interruttore orario che offre la possibilità di impostare una durata di cottura per un tempo massimo di 99 minuti (1ora e 39minuti)
associabile aduna sola zona di cottura.
Selezionare la zona di cottura a cui si intende associare il timer (un puntino luminoso compare in basso a destra dell’indicatore del livello di
potenza sul display), impostare quindi il tempo desiderato regolandosi con i tasti “+” e “-” della funzione timer (vedi figura sopra). Dopo alcuni
secondi dall’ultimo tocco, iltimer comincia il conto alla rovescia (il puntino diselezione zona cottura comincia a lampeggiare). Alloscadere del
tempo si attiva un segnale acustico e lazona di cottura si spegne automaticamente.
Per disattivare il timer premere il tasto “-” fino all’indicazione “0:0” sul display o premere contemporaneamente i tasti “+” e “-” del timer.
Importante: È possibile associare il timer ad una sola zona cottura alla volta.
Contaminuti
Può essere utilizzato a piano cottura non in uso e permette di impostare un tempo massimo di 99min.
Premere il tasto “+” posizionato sotto gli indicatori del timer: sul display compaiono i minuti da impostare.
Selezionare il tempo desiderato usando i tasti + e -.
Dopo alcuni secondi si avvia il conto alla rovescia, allo scadere dei quali entra in funzione un segnale acustico.
Importante: È possibile utilizzare la funzione contaminuti soltanto ad apparecchio spento e l’accensione del piano provoca l’annullamento del contaminuti stesso.
Avvisi del pannello comandi
Indicatore di calore residuo.
Il piano è dotato di un indicatore di calore residuo per ciascuna zona di cottura. Taleindicatore segnala quali sono le zone dicottura ancora a temperatura
elevata.
Se il display visualizza, la zona di cottura è ancora calda. Se la zona presenta questa segnalazione è possibile, per esempio, mantenere calda una pietanza
o far sciogliere il burro.
Con il raffreddamento della zona di cottura, il display si spegne.
Indicatore di pentola non corretta o assente.
Il piano è dotato di sistema automatico dirilevamento presenza pentola, su tutte le zone di cottura. Se questa non viene rilevata, il display con il livello di
potenza della zona cottura lampeggia. Verificare che lapentola sia correttamente posizionata e che abbiale caratteristiche riportate nella sezione “Prima
dell’utilizzo”.
IMPORTANTE: non utilizzare spugne abrasive, pagliette. Il loro impiego, col tempo, potrebbe rovinare il vetro.
•Dopo ogni uso, lasciare raffreddare il piano e pulirlo per rimuovere incrostazioni e macchie dovute a residui di cibo.
•Zucchero o alimenti ad alto contenuto zuccherino danneggiano il piano cottura e vanno rimossi immediatamente.
•Sale, zucchero e sabbia potrebbero graffiare la superficie del vetro.
•Usare un panno morbido, carta assorbente da cucina o prodotti specifici per la pulizia del piano (attenersi alle indicazioni del Fabbricante).
•Leggere e seguire le istruzioni della sezione “Istruzioni per l’uso”.
•Controllare che non ci siano interruzioni nella fornitura.
•Asciugare bene la superficie del piano dopo averlo pulito.
•Se, accendendo il piano cottura, il display visualizza codici alfanumerici procedere secondo la seguente tabella.
•Dopo avere utilizzato il piano di cottura, se non riuscite a spegnerlo, disconnettere il piano dalla rete elettrica.
PULIZIA
AVVERTENZA-Non usare pulitrici a getto di vapore.
-Prima di procedere alle operazioni di pulizia, assicurarsi che le zone di cottura siano spente e che
l’indicazione di calore residuo (“H”) sia scomparsa.
F12, F21, F25, F36, F37, F40, F47, F56, F58, F60Chiamare il servizio di assistenza e comunicare il codice d’errore
IT45
Prima di contattare il Servizio Assistenza
1.Verificare che non sia possibile risolvere da soli il problema sulla base dei punti descritti in “Guida ricerca guasti”.
2.Spegnere e riaccendere l’apparecchio per accertarsi che l’inconveniente sia stato ovviato.
Se dopo i suddetti controlli l’inconveniente permane, contattare il Servizio Assistenza più vicino.
Indicare sempre:
•una breve descrizione del guasto;
•il tipo e il modello esatto del prodotto;
•il numero Assistenza (è il numero che si trova dopo la parola Service sulla targhetta matricola), posto sotto l’apparecchio (sulla piastra metallica). Il numero
Assistenza è anche riportato sul libretto di garanzia;
•il vostro indirizzo completo;
•il vostro numero telefonico.
Qualora si renda necessaria una riparazione, rivolgersi ad un Centro di Assistenza Tecnica autorizzato (a garanzia dell’utilizzo di pezzi di ricambio originali e di una
corretta riparazione). I pezzi di ricambio sono disponibili per 10 anni.
NOTA:
Sulla doppia zona da 28 cm di diametro (dove presente) per preparazioni di breve durata e che necessitano di una perfetta distribuzione di calore ( esempio pancake) si consiglia
di utilizzare accessori non superiori a 24 cm di diametro. Per tipologie di cottura delicate (esempio fondere il cioccolato o burro) si consiglia di utilizzare le zone singole di diametro
inferiore.
SERVIZIO ASSISTENZA
TABELLA POTENZE
Livello di potenzaTipologia di cotturaUtilizzo livello
(l’indicazione affianca l’esperienza e le abitudini di cottura)
Max potenzaBoostRiscaldare rapidamenteIdeale per innalzare in breve tempo la temperatura del cibo fino a veloce ebollizione in caso di acqua o
riscaldare velocemente liquidi di cottura
8-9Friggere - bollireIdeale per rosolare, iniziare una cottura, friggere prodotti surgelati, bollire rapidamente
Alta potenza
7-8Rosolare - soffriggere - bollire -
grigliareIdeale per soffriggere, mantenere bolliture vive, cuocere e grigliare (per breve durata, 5-10minuti)
6-7Rosolare - cuocere - stufare -
soffriggere - grigliare
Ideale per soffriggere, mantenere bolliture leggere, cuocere e grigliare (per media durata,
10-20minuti), preriscaldare accessori
Media potenza
4-5Cuocere - stufare - soffriggere -
grigliareIdeale per stufare, mantenere bolliture delicate, cuocere (per lunga durata). Mantecare la pasta
3-4Cuocere - sobbollire -
addensare - mantecare
Ideale per cotture prolungate (riso, sughi, arrosti, pesce) in presenza di liquidi di accompagnamento
(es. acqua, vino, brodo, latte), mantecare pasta
2-3Ideale per cotture prolungate (volumi inferiori al litro: riso, sughi, arrosti, pesce) in presenza di liquidi di
accompagnamento (es. acqua, vino, brodo, latte)
Bassa potenza
1-2Fondere - scongelare -
mantenere in caldo -
mantecare
Ideale per ammorbidire il burro, fondere delicatamente il cioccolato, scongelare prodotti di piccole
dimensioni e mantenere in caldo cibi appena cucinati (es. sughi, zuppe, minestroni)
1Ideale per il mantenimento in caldo di cibo appena cucinato, mantecare risotti e tenere in temperatura
piatti di portata (con accessorio adatto all’induzione)
OFFPotenza
zeroSuperficie di appoggioPiano cottura in posizione di stand-by o spento (possibile presenza di calore residuo da fine cottura,
segnalato con H)
Incollare qui uno degli adesivi con i dati del
prodotto che si trova sul libretto di garanzia in
duplice copia.
GR46
Η ΠΡΟΣΩΠΙΚΗ ΣΑΣ ΑΣΦΑΛΕΙΑ ΚΑΙ Η ΑΣΦΑΛΕΙΑ ΑΛΛΩΝ ΑΤΟΜΩΝ ΕΙΝΑΙ ΠΟΛΥ ΣΗΜΑΝΤΙΚΗ
Το παρόν εγχειρίδιο και η συσκευή περιλαμβάνουν σημαντικά μηνύματα σχετικά με την ασφάλεια, τα οποία πρέπει να διαβάσετε και να τηρείτε πάντα.
Όλα τα μηνύματα σχετικά με την ασφάλεια υποδεικνύουν πιθανούς κινδύνους και περιλαμβάνουν οδηγίες για τη μείωση του κινδύνου τραυματισμού, βλάβης ή
ηλεκτροπληξίας λόγω εσφαλμένης χρήσης της συσκευής. Τηρείτε αυστηρά τις παρακάτω οδηγίες:
-Η συσκευή πρέπει να αποσυνδέεται από το ηλεκτρικό δίκτυο πριν από κάθε εργασία εγκατάστασης.
-Η εγκατάσταση ή η συντήρηση πρέπει να εκτελούνται από εξειδικευμένο τεχνικό, σύμφωνα με τις οδηγίες του κατασκευαστή και τους τοπικούς ισχύοντες
κανονισμούς ασφαλείας. Μην επισκευάζετε και μην αντικαθιστάτε κανένα εξάρτημα της συσκευής, εάν δεν αναφέρεται ρητά στο εγχειρίδιο χρήσης.
-Η γείωση της συσκευής είναι υποχρεωτική.
-Το καλώδιο τροφοδοσίας πρέπει να έχει επαρκές μήκος, ώστε να είναι δυνατή η σύνδεση της εντοιχισμένης συσκευής στο ηλεκτρικό δίκτυο.
-Για να διασφαλιστεί η συμμόρφωση της εγκατάστασης με τους ισχύοντες κανονισμούς, απαιτείται η χρήση πολυπολικού διακόπτη με ελάχιστη απόσταση 3 mm
μεταξύ των επαφών.
-Μη χρησιμοποιείτε πολύπριζα ή προεκτάσεις.
-Μην τραβάτε το καλώδιο τροφοδοσίας της συσκευής.
-Μετά την ολοκλήρωση της εγκατάστασης, δεν πρέπει να είναι δυνατή η πρόσβαση στα ηλεκτρικά εξαρτήματα.
-Η συσκευή προορίζεται αποκλειστικά για οικιακή χρήση και πρέπει να χρησιμοποιείται μόνο για το μαγείρεμα φαγητών. Απαγορεύεται οποιαδήποτε άλλη χρήση
(π.χ. θέρμανση χώρου). Ο κατασκευαστής δεν φέρει καμία ευθύνη για ακατάλληλες χρήσεις ή εσφαλμένες ρυθμίσεις των διακοπτών.
-Η συσκευή αυτή δεν προορίζεται για χρήση από άτομα (συμπεριλαμβανομένων παιδιών) με μειωμένες σωματικές, αισθητηριακές ή διανοητικές ικανότητες ή με
έλλειψη εμπειρίας και γνώσεων, εκτός εάν έχουν λάβει οδηγίες σχετικά με τη χρήση της συσκευής από άτομα υπεύθυνα για την ασφάλειά τους.
-Τα προσβάσιμα μέρη μπορεί να υπερθερμανθούν κατά τη διάρκεια της χρήσης. Τα παιδιά πρέπει να βρίσκονται υπό επιτήρηση, ώστε να μην πλησιάζουν και να μην
παίζουν με τη συσκευή.
-Κατά τη διάρκεια ή και μετά τη χρήση, μην αγγίζετε τα θερμαντικά στοιχεία της συσκευής. Αποφεύγετε την επαφή με πανιά ή με άλλα εύφλεκτα υλικά μέχρι να
κρυώσουν επαρκώς όλα τα στοιχεία της συσκευής.
-Μην τοποθετείτε εύφλεκτα υλικά πάνω ή κοντά στη συσκευή.
-Τα λίπη ή τα λάδια αναφλέγονται εύκολα όταν ζεσταθούν. Επιβλέπετε το μαγείρεμα φαγητών με μεγάλη ποσότητα λίπους ή λαδιού.
-Μην τοποθετείτε στις εστίες μεταλλικά αντικείμενα, όπως σκεύη κουζίνας (μαχαίρια, πιρούνια, κουτάλια, καπάκια, κλπ.) που μπορούν να θερμανθούν.
-Στο χώρο κάτω από τη συσκευή πρέπει να τοποθετηθεί υποχρεωτικά ένα διαχωριστικό πλαίσιο (δεν παρέχεται με τη συσκευή).
-Σε περίπτωση φθοράς της επιφάνειας (ρωγμές ή θραύση της γυάλινης επιφάνειας), επικοινωνήστε με την υπηρεσία τεχνικής υποστήριξης και μη χρησιμοποιήσετε
τη συσκευή.
-Η συσκευή δεν προορίζεται για λειτουργία μέσω της χρήσης εξωτερικού χρονοδιακόπτη ή ξεχωριστού συστήματος τηλεχειρισμού.
ΣΗΜΑΝΤΙΚΕΣ ΠΛΗΡΟΦΟΡΙΕΣ ΓΙΑ ΤΗΝ ΑΣΦΑΛΕΙΑ
Αυτό το σύμβολο κινδύνου που αφορά την ασφάλεια υποδεικνύει πιθανούς κινδύνους για το χρήστη και άλλα άτομα.
Όλα τα μηνύματα που αφορούν την ασφάλεια συνοδεύονται από το σύμβολο κινδύνου και τις παρακάτω επισημάνσεις:
ΚΙΝΔΥΝΟΣΥποδεικνύει μια επικίνδυνη κατάσταση, η οποία εάν δεν αποφευχθεί, θα οδηγήσει στην πρόκληση
σοβαρών τραυματισμών.
ΠΡΟΕΙΔΟΠΟΙΗΣΗΥποδεικνύει μια επικίνδυνη κατάσταση, η οποία εάν δεν αποφευχθεί, μπορεί να οδηγήσει στην πρόκληση
σοβαρών τραυματισμών.
ΕΛΛΗΝΙΚΑΕγκατάστασηΣελίδα2Οδηγίες χρήσηςΣελίδα
GR47
Απόρριψη συσκευασίας
Τα υλικά συσκευασίας είναι 100% ανακυκλώσιμα και επισημαίνονται με το σύμβολο της ανακύκλωσης (). Τα διάφορα υλικά συσκευασίας δεν πρέπει να
απορρίπτονται στο περιβάλλον, αλλά σύμφωνα με τους κανονισμούς που καθορίζονται από τις τοπικές αρχές.
Απόρριψη προϊόντος
Αυτή η συσκευή φέρει σήμανση σύμφωνα με την ευρωπαϊκή οδηγία 2002/96/ΕΚ σχετικά με τα απόβλητα ειδών ηλεκτρικού και ηλεκτρονικού εξοπλισμού (ΑΗΗΕ).
Με τη σωστή απόρριψη του προϊόντος αυτού, ο χρήστης συμβάλλει στην αποφυγή πιθανών αρνητικών επιπτώσεων για το περιβάλλον και την ανθρώπινη υγεία.
Το σύμβολο πάνω στο προϊόν ή στα συνοδευτικά έγγραφα υποδεικνύει ότι το προϊόν αυτό δεν πρέπει να υποβάλλεται σε επεξεργασία όπως τα οικιακά απόβλητα,
αλλά να παραδίδεται σε κατάλληλα σημεία συλλογής για την ανακύκλωση ηλεκτρικού και ηλεκτρονικού εξοπλισμού.
Εξοικονόμηση ενέργειας
Για να επιτευχθούν άριστα αποτελέσματα:
•Χρησιμοποιείτε σκεύη με διάμετρο βάσης ίση με εκείνη των εστιών.
•Χρησιμοποιείτε μόνο σκεύη με επίπεδη βάση.
•Εάν είναι δυνατό, σκεπάζετε τα σκεύη με το καπάκι κατά το μαγείρεμα.
•Η χρήση χύτρας ταχύτητας μειώνει ακόμη περισσότερο την κατανάλωση ενέργειας και το χρόνο μαγειρέματος.
•Τοποθετείτε τα σκεύη στο κέντρο της εστίας που είναι σχεδιασμένη στην επιφάνεια της μονάδας.
-Η συσκευή αυτή προορίζεται για επαφή με τρόφιμα, συμμορφώνεται με τον κανονισμό () αρ.1935/2004 και έχει σχεδιαστεί, κατασκευαστεί και διατεθεί στην
αγορά σύμφωνα με τις απαιτήσεις ασφαλείας της οδηγίας 2006/95/ΕΚ για τη «Χαμηλή τάση» (που αντικαθιστά την οδηγία 73/23/ΕΟΚ και μετέπειτα
τροποποιήσεις), καθώς και με τις απαιτήσεις προστασίας της οδηγίας 2004/108/ΕΚ για την «Ηλεκτρομαγνητική συμβατότητα».
Για να βεβαιωθείτε ότι το σκεύος είναι κατάλληλο για επαγωγικές εστίες, χρησιμοποιήστε ένα μαγνήτη: τα σκεύη δεν είναι κατάλληλα, εάν δεν έλκονται από το μαγνήτη.
-Βεβαιωθείτε ότι η βάση των σκευών είναι λεία, καθώς μπορούν να προκληθούν εκδορές στην επιφάνεια της μονάδας εστιών. Ελέγχετε τα σκεύη.
-Μην ακουμπάτε ποτέ ζεστές κατσαρόλες και τηγάνια στον πίνακα διακοπτών της μονάδας. Μπορεί να προκληθεί ζημιά.
ΣΥΜΒΟΥΛΕΣ ΓΙΑ ΤΗΝ ΠΡΟΣΤΑΣΙΑ ΤΟΥ ΠΕΡΙΒΑΛΛΟΝΤΟΣ
ΔΗΛΩΣΗ ΣΥΜΜΟΡΦΩΣΗΣ
ΠΡΙΝ ΑΠΟ ΤΗ ΧΡΗΣΗ
ΣΗΜΑΝΤΙΚΟ: εάν τα σκεύη δεν έχουν το σωστό μέγεθος, οι εστίες δεν ανάβουν. Χρησιμοποιείτε μόνο σκεύη με το σύμβολο «ΕΠΑΓΩΓΙΚΟ ΣΥΣΤΗΜΑ»
(Διπλανή εικόνα). Πριν ανάψετε τη μονάδα εστιών, τοποθετήστε το σκεύος στην επιθυμητή εστία.
ΣΚΕΥΗ ΠΑΛΑΙΟΥ ΤΥΠΟΥ
ΣΥΝΙΣΤΩΜΕΝΕΣ ΔΙΑΜΕΤΡΟΙ ΒΑΣΗΣ ΣΚΕΥΩΝ
ΟΧΙOK
Ø
28 cm
XL
Ø
17 cm 28 cm
Ø
21 cm
L
Ø
15 cm 21 cm
Ø
18 cm
M
Ø
14,5 cm
S
Ø
12 cm 18 cm
Ø
10 cm 14,5 cm
GR48
Μετά την αφαίρεση της συσκευασίας του προϊόντος, βεβαιωθείτε ότι δεν έχει υποστεί ζημιά κατά τη μεταφορά. Σε περίπτωση προβλημάτων, επικοινωνήστε με το
κατάστημα αγοράς ή με την υπηρεσία τεχνικής υποστήριξης.
ΠΡΟΕΤΟΙΜΑΣΙΑ ΤΟΥ ΕΠΙΠΛΟΥ ΓΙΑ ΕΝΤΟΙΧΙΣΜΟ
Σύνδεση στον πίνακα ακροδεκτών
Για την ηλεκτρική σύνδεση, χρησιμοποιήστε ένα καλώδιο τύπου H05RR-F όπως αναφέρεται στον παρακάτω πίνακα.
Σημαντικό:
- Τοποθετήστε ή αφαιρέστε τις μεταλλικές γέφυρες ανάμεσα στις βίδες του πίνακα ακροδεκτών L1-L2 και N1-N2 σύμφωνα με το διάγραμμα συνδέσεων (βλ. εικόνα).
- Βεβαιωθείτε ότι και οι έξι βίδες του πίνακα ακροδεκτών είναι σφιγμένες μετά τη σύνδεση των καλωδίων.
Παράδειγμα γέφυρας που έχει τοποθετηθεί (αριστερά) ή αφαιρεθεί (δεξιά). Ανατρέξτε στο διάγραμμα συνδέσεων για λεπτομέρειες (οι γέφυρες μπορούν να
τοποθετηθούν ανάμεσα στα L1-L2 και N1-N2).
ΕΓΚΑΤΑΣΤΑΣΗ
ΠΡΟΕΙΔΟΠΟΙΗΣΗ-Τοποθετήστε ένα διαχωριστικό
πλαίσιο κάτω από τη μονάδα
εστιών.
-Δεν πρέπει να είναι δυνατή η
πρόσβαση στο κάτω μέρος του
προϊόντος μετά την εγκατάσταση.
-Εάν εγκατασταθεί φούρνος στο
κάτω μέρος της μονάδας, μην
τοποθετήσετε το διαχωριστικό
πλαίσιο.
•Η απόσταση ανάμεσα στο κάτω μέρος της συσκευής και το διαχωριστικό πλαίσιο πρέπει να αντιστοιχεί στις διαστάσεις που αναφέρονται στο σχήμα.
•Για να διασφαλιστεί η σωστή λειτουργία του προϊόντος, μη φράζετε το ελάχιστο άνοιγμα ανάμεσα στην επιφάνεια εργασίας και την πάνω πλευρά της μονάδας (5
mm το ελάχ.).
•Εάν εγκατασταθεί φούρνος κάτω από τον πάγκο, βεβαιωθείτε ότι ο φούρνος διαθέτει σύστημα ψύξης.
•Αποφεύγετε την εγκατάσταση της μονάδας εστιών πάνω από πλυντήριο πιάτων ή ρούχων, ώστε τα ηλεκτρονικά κυκλώματα να μην έρχονται σε επαφή με
υδρατμούς και υγρασία και να μην υποστούν βλάβη.
• Σε περίπτωση χωνευτής εγκατάστασης, απευθυνθείτε στην υπηρεσία τεχνικής υποστήριξης για την τοποθέτηση του κιτ βιδών 4801 211 00112.
•Για να αφαιρέσετε τη μονάδα εστιών από τον πάγκο εργασίας, χρησιμοποιήστε ένα κατσαβίδι (δεν παρέχεται) για να απασφαλίσετε τα ελατήρια από την κάτω
πλευρά της συσκευής.
ΣΥΝΔΕΣΗ ΣΤΟ ΗΛΕΚΤΡΙΚΟ ΔΙΚΤΥΟ
ΠΡΟΕΙΔΟΠΟΙΗΣΗ-Αποσυνδέστε τη συσκευή από το ηλεκτρικό δίκτυο.
-Η εγκατάσταση πρέπει να γίνει από εξειδικευμένο προσωπικό που γνωρίζει τους ισχύοντες
κανονισμούς εγκατάστασης και ασφάλειας.
-Ο κατασκευαστής δεν φέρει καμία ευθύνη για τραυματισμούς σε ανθρώπους ή ζώα ή για υλικές ζημιές σε περίπτωση μη τήρησης των οδηγιών
του παρόντος κεφαλαίου.
-Το καλώδιο τροφοδοσίας πρέπει να έχει επαρκές μήκος, ώστε να είναι δυνατή η αφαίρεση της μονάδας εστιών από την επιφάνεια εργασίας.
-Βεβαιωθείτε ότι η τάση που αναγράφεται στην πινακίδα τεχνικών στοιχείων στο πίσω μέρος της συσκευής είναι ίδια με εκείνη του ηλεκτρικού δικτύου
στο χώρο εγκατάστασης.
ΑγωγοίΠοσότητα x διαστάσεις
230V ~ + 3 x 4 mm2
230-240V ~ + 3 x 4 mm2 (μόνο για την Αυστραλία)
230V 3 ~ + 4 x 1,5 mm2
400V 3N ~ + 5 x 1,5 mm2
400V 2N ~ + 4 x 1,5 mm2
ελάχ. 5 mm
ελάχ. 20 mm
ελάχ. 5 mm
400V 3N ~230V ~230-240V ~ (μόνο για την Αυστραλία)
230V ~ (μόνο για το Ηνωμένο Βασίλειο)
400V 2N ~230V 3 ~ (μόνο για το Βέλγιο)400V 2N ~ (μόνο για την Ολλανδία)
230V
230 V
230 V
230 V
230 V
230 V
230 V
230 V
230 V
230 V
230 V
CBA
GR49
Συνδέστε το κίτρινο/πράσινο καλώδιο γείωσης στον ακροδέκτη με το σύμβολο .
Το καλώδιο αυτό πρέπει να έχει μεγαλύτερο μήκος από τα υπόλοιπα.
1.Αφαιρέστε το κάλυμμα του πίνακα ακροδεκτών (A) ξεβιδώνοντας τη βίδα και τοποθετήστε το κάλυμμα στο μεντεσέ (B) του πίνακα ακροδεκτών.
2.Τοποθετήστε το καλώδιο τροφοδοσίας στο σφιγκτήρα καλωδίου και συνδέστε τους αγωγούς στον πίνακα ακροδεκτών σύμφωνα με το διάγραμμα κοντά στον
πίνακα ακροδεκτών.
3.Στερεώστε το καλώδιο τροφοδοσίας με το σφιγκτήρα.
4.Κλείστε το κάλυμμα (C) και βιδώστε το στον πίνακα ακροδεκτών με τη βίδα που αφαιρέσατε.
Κάθε φορά που η μονάδα συνδέεται στην κεντρική τροφοδοσία, εκτελείται ένας αυτόματος έλεγχος από τη μονάδα εστιών που διαρκεί μερικά δευτερόλεπτα.
Εάν η μονάδα διαθέτει ήδη καλώδιο τροφοδοσίας, ακολουθήστε τις οδηγίες που παρέχονται με το καλώδιο τροφοδοσίας. Η σύνδεση στο δίκτυο πρέπει να γίνει μέσω
πολυπολικού διακόπτη με ελάχιστη απόσταση μεταξύ των επαφών 3mm.
Περιγραφή πίνακα διακοπτών
Πίνακας διακοπτών
Ενεργοποίηση/απενεργοποίηση μονάδας εστιών
Για να ενεργοποιήσετε τη μονάδα εστιών, πατήστε για 2 δευτερόλεπτα περίπου το πλήκτρο μέχρι να ανάψουν οι ενδείξεις στις εστίες. Για να την απενεργοποιήσετε,
πατήστε το ίδιο πλήκτρο μέχρι να σβήσουν οι ενδείξεις. Όλες οι εστίες θα απενεργοποιηθούν.
Εάν οι εστίες έχουν ήδη χρησιμοποιηθεί, η ένδειξη υπολειπόμενης θερμότητας «H» παραμένει ενεργοποιημένη μέχρι να κρυώσουν οι εστίες.
Εάν εντός 10 δευτερολέπτων από την ενεργοποίηση της μονάδας εστιών δεν επιλεγεί καμία λειτουργία, η μονάδα απενεργοποιείται αυτόματα.
Ενεργοποίηση και ρύθμιση εστιών
Μετά την ενεργοποίηση της μονάδας εστιών και την τοποθέτηση του σκεύους στην επιλεγμένη εστία, επιλέξτε το επίπεδο ισχύος με το πλήκτρο +. Μετά την
ενεργοποίηση, στην οθόνη εμφανίζεται το επίπεδο 5.
Κάθε εστία διαθέτει διάφορα επίπεδα ισχύος, τα οποία μπορούν να ρυθμιστούν με τα πλήκτρα +/-, ξεκινώντας από το επίπεδο «1», ελάχιστη ισχύς, έως το επίπεδο «9»,
μέγιστη ισχύς. Ορισμένες εστίες διαθέτουν τη λειτουργία ταχυβραστήρα (Booster), η οποία υποδεικνύεται στην οθόνη με την ένδειξη «P».
Λειτουργία ταχυβραστήρα (Booster)
Η λειτουργία αυτή είναι διαθέσιμη σε ορισμένες μόνο εστίες και παρέχει τη δυνατότητα αξιοποίησης στο μέγιστο της ισχύος της εστίας (π.χ. για γρήγορο βράσιμο του νερού).
Για να ενεργοποιήσετε τη λειτουργία, πατήστε το πλήκτρο «+» έως ότου εμφανιστεί η ένδειξη «P» στην οθόνη ή όταν η μονάδα εστιών είναι ενεργοποιημένη, πατώντας
απευθείας το πλήκτρο «-» της επιθυμητής εστίας. Η ένδειξη «P» εμφανίζεται και πάλι στην οθόνη. Μετά από 10 λεπτά χρήσης της λειτουργίας booster, η συσκευή επιλέγει
αυτόματα το επίπεδο 9 για την εστία.
Απενεργοποίηση εστιών
Επιλέξτε την εστία που θέλετε να απενεργοποιήσετε, πατώντας το πλήκτρο «+» ή «-» (στην οθόνη εμφανίζεται η κουκκίδα που βρίσκεται κάτω δεξιά της ένδειξης
επιπέδου ισχύος).
Πατήστε το πλήκτρο «-» μέχρι να εμφανιστεί το επίπεδο «0».
Μπορείτε, επίσης, να απενεργοποιήσετε την εστία, πατώντας ταυτόχρονα τα πλήκτρα «+» και «-». Η εστία απενεργοποιείται και εμφανίζεται η ένδειξη υπολειπόμενης
θερμότητας «H».
Κλείδωμα πίνακα διακοπτών
Η λειτουργία ασφαλίζει τους διακόπτες της μονάδας, ώστε να μην είναι δυνατή η κατά λάθος ενεργοποίηση της μονάδας από τα παιδιά. Για να ενεργοποιήσετε τη λειτουργία
κλειδώματος του πίνακα διακοπτών, ενεργοποιήστε τη μονάδα εστιών και πατήστε για τρία δευτερόλεπτα το πλήκτρο : το ηχητικό σήμα που ενεργοποιείται και η φωτεινή
ένδειξη που εμφανίζεται κάτω από το σύμβολο κλειδιού υποδεικνύουν την ενεργοποίηση της λειτουργίας. Ο πίνακας διακοπτών είναι κλειδωμένος, εκτός από το πλήκτρο
απενεργοποίησης. Για να απενεργοποιήσετε τη λειτουργία κλειδώματος των διακοπτών, επαναλάβετε τη διαδικασία ενεργοποίησης. Η φωτεινή κουκκίδα σβήνει και η μονάδα
εστιών είναι και πάλι ενεργή.
Η λειτουργία κλειδώματος του πίνακα διακοπτών μπορεί να ενεργοποιηθεί ή να απενεργοποιηθεί ακούσια σε περίπτωση ύπαρξης νερού, υπερχείλισης υγρού από τα
σκεύη ή τοποθέτησης αντικειμένων πάνω στο πλήκτρο κάτω από το σύμβολο.
ΟΔΗΓΙΕΣ ΧΡΗΣΗΣ
Κλείδωμα πίνακα διακοπτών
Διακόπτες ρύθμισης εστιών και σχετική οθόνη
Ενεργοποίηση/απενεργοποίηση
Χρονοδιακόπτης
τα σύμβολα δεν είναι
ενεργοποιημένα! Για την
επιλογή των επιθυμητών
λειτουργιών, πατήστε
στο κάτω μέρος.
Πλήκτρο -
Οθόνη ένδειξης ισχύος
Ένδειξη επιλεγμένης εστίας
Πλήκτρο +
Θέση εστίας
GR50
Χρονοδιακόπτης
Ο χρονοδιακόπτης είναι ένας διακόπτης που παρέχει τη δυνατότητα ρύθμισης της διάρκειας μαγειρέματος για μέγιστο χρονικό διάστημα 99
λεπτών (1 ώρα και 39 λεπτά) για μία μόνο εστία.
Επιλέξτε την εστία για την οποία θέλετε να χρησιμοποιήσετε το χρονοδιακόπτη (στην οθόνη εμφανίζεται μια φωτεινή κουκκίδα που βρίσκεται
κάτω δεξιά της ένδειξης επιπέδου ισχύος). Στη συνέχεια, ρυθμίστε τον επιθυμητό χρόνο με τα πλήκτρα «+» και «-» της λειτουργίας
χρονοδιακόπτη (βλ. εικόνα παραπάνω). Μερικά δευτερόλεπτα μετά την τελευταία ρύθμιση, ο χρονοδιακόπτης ξεκινά να μετρά αντίστροφα (η
ένδειξη της επιλεγμένης εστίας αρχίζει να αναβοσβήνει). Όταν λήξει ο χρόνος, ενεργοποιείται ένα ηχητικό σήμα και η εστία απενεργοποιείται αυτόματα.
Για να απενεργοποιήσετε το χρονοδιακόπτη, πατήστε το πλήκτρο «-» έως ότου εμφανιστεί η ένδειξη «0:0» στην οθόνη ή πατήστε ταυτόχρονα τα πλήκτρα «+» και «-» του
χρονοδιακόπτη.
Σημαντικό: Ο χρονοδιακόπτης μπορεί να ρυθμιστεί για μία μόνο εστία.
Χρονόμετρο
Μπορεί να χρησιμοποιηθεί όταν η μονάδα εστιών δεν χρησιμοποιείται και μπορεί να ρυθμιστεί για μέγιστο χρονικό διάστημα 99 λεπτών.
Πατήστε το πλήκτρο «+» που βρίσκεται κάτω από τις ενδείξεις του χρονοδιακόπτη: στην οθόνη εμφανίζονται τα λεπτά για ρύθμιση.
Επιλέξτε το επιθυμητό χρονικό διάστημα χρησιμοποιώντας τα πλήκτρα + και -.
Μετά από μερικά δευτερόλεπτα, ξεκινά η αντίστροφη μέτρηση. Όταν ολοκληρωθεί, ενεργοποιείται ένα ηχητικό σήμα.
Σημαντικό: Μπορείτε να χρησιμοποιήσετε τη λειτουργία χρονόμετρου μόνο όταν η συσκευή είναι απενεργοποιημένη. Το χρονόμετρο μηδενίζεται όταν ενεργοποιηθεί
η μονάδα εστιών.
Προειδοποιητικές ενδείξεις πίνακα διακοπτών
Ένδειξη υπολειπόμενης θερμότητας.
Η μονάδα εστιών διαθέτει ένδειξη υπολειπόμενης θερμότητας για κάθε εστία. Η ένδειξη αυτή επισημαίνει τις εστίες που έχουν ακόμη υψηλή θερμοκρασία.
Εάν στην οθόνη εμφανιστεί η ένδειξη , η εστία είναι ακόμη ζεστή. Για παράδειγμα, εάν στην εστία εμφανίζεται αυτή η ένδειξη, μπορείτε να διατηρήσετε ζεστό
ένα φαγητό ή να λιώσετε βούτυρο.
Όταν η εστία κρυώσει, η ένδειξη σβήνει.
Ένδειξη ακατάλληλου σκεύους ή απουσίας σκεύους.
Η μονάδα εστιών διαθέτει αυτόματο σύστημα ανίχνευσης σκευών για όλες τις εστίες. Εάν δεν ανιχνευτεί σκεύος, η ένδειξη επιπέδου ισχύος της εστίας
αναβοσβήνει. Βεβαιωθείτε ότι το σκεύος έχει τοποθετηθεί σωστά και ότι διαθέτει τα χαρακτηριστικά που αναφέρονται στην ενότητα «πριν απο τη χρηση».
ΣΗΜΑΝΤΙΚΟ: μη χρησιμοποιείτε λειαντικά ή συρμάτινα σφουγγάρια. Με την πάροδο του χρόνου, μπορεί να προκληθεί ζημιά στη γυάλινη επιφάνεια.
•Μετά από κάθε χρήση, αφήστε τη μονάδα να κρυώσει και καθαρίστε την, ώστε να απομακρυνθούν υπολείμματα τροφίμων και κηλίδες.
•Η ζάχαρη ή τα φαγητά με υψηλή περιεκτικότητα σε σάκχαρα προκαλούν φθορά στη μονάδα εστιών και πρέπει να καθαρίζονται αμέσως.
•Το αλάτι, η ζάχαρη και η άμμος μπορούν να χαράξουν τη γυάλινη επιφάνεια.
•Χρησιμοποιείτε μαλακό πανί, απορροφητικό χαρτί κουζίνας ή ειδικά προϊόντα για τον καθαρισμό της μονάδας (ακολουθείτε τις οδηγίες του κατασκευαστή).
•Διαβάστε και ακολουθήστε τις οδηγίες της ενότητας «Οδηγίες χρήσης».
•Βεβαιωθείτε ότι η ηλεκτρική σύνδεση λειτουργεί σωστά.
•Σκουπίστε καλά την επιφάνεια της μονάδας εστιών μετά τον καθαρισμό.
•Εάν μετά την ενεργοποίηση της μονάδας εστιών στην οθόνη εμφανίζονται αλφαριθμητικοί κωδικοί, ακολουθήστε τις οδηγίες του παρακάτω πίνακα.
•Εάν δεν μπορείτε να απενεργοποιήσετε τη μονάδα εστιών μετά τη χρήση της, αποσυνδέστε την από το ηλεκτρικό δίκτυο.
ΚΑΘΑΡΙΣΜΟΣ
ΠΡΟΕΙΔΟΠΟΙΗΣΗ-Μη χρησιμοποιείτε συσκευές καθαρισμού με ατμό.
-Πριν από τον καθαρισμό, βεβαιωθείτε ότι οι εστίες είναι απενεργοποιημένες και ότι η ένδειξη
υπολειπόμενης θερμότητας («H») δεν εμφανίζεται πλέον.
ΟΔΗΓΟΣ ΕΝΤΟΠΙΣΜΟΥ ΒΛΑΒΩΝ
ΚΩΔΙΚΟΣ ΣΦΑΛΜΑΤΟΣΠΕΡΙΓΡΑΦΗΠΙΘΑΝΕΣ ΑΙΤΙΕΣΛΥΣΗ
Η μονάδα εστιών απενεργοποιείται και μετά από
30 δευτερόλεπτα εκπέμπεται ένα ηχητικό σήμα
ανά 4 δευτερόλεπτα
Παρατεταμένη πίεση στην περιοχή
των διακοπτών
Ύπαρξη νερού ή σκευών κουζίνας στην
περιοχή των διακοπτών
Καθαρίστε την περιοχή των
διακοπτών
C81, C82
Η περιοχή των διακοπτών
απενεργοποιείται λόγω υπερβολικά
υψηλής θερμοκρασίας
Υπερβολικά υψηλή εσωτερική
θερμοκρασία στα ηλεκτρονικά
εξαρτήματα
Περιμένετε να κρυώσει η μονάδα
εστιών πριν την χρησιμοποιήσετε
ξανά
F42 ή F43Εσφαλμένη τάση τροφοδοσίας της
μονάδας εστιών
Ο αισθητήρας ανιχνεύει διαφορετική τάση
από την τάση σύνδεσης
Αποσυνδέστε τη μονάδα εστιών από
το δίκτυο και ελέγξτε τη σύνδεση
F12, F21, F25, F36, F37, F40, F47, F56, F58, F60Επικοινωνήστε με την τεχνική υποστήριξη και αναφέρετε τον κωδικό σφάλματος
GR51
Πριν επικοινωνήσετε με την τεχνική υποστήριξη
1.Βεβαιωθείτε ότι δεν μπορείτε να λύσετε μόνοι σας το πρόβλημα σύμφωνα με τις οδηγίες της ενότητας «Οδηγός εντοπισμού βλαβών».
2.Απενεργοποιήστε και ενεργοποιήστε ξανά τη συσκευή για να βεβαιωθείτε ότι το πρόβλημα έχει λυθεί.
Εάν η βλάβη παραμένει μετά τους παραπάνω ελέγχους, επικοινωνήστε με το πλησιέστερο τμήμα τεχνικής υποστήριξης.
Δηλώστε:
•Μια σύντομη περιγραφή της βλάβης.
•Τον τύπο και το μοντέλο του προϊόντος.
•Τον αριθμό σέρβις (ο αριθμός μετά τη λέξη Service στην πινακίδα τεχνικών στοιχείων), κάτω από τη συσκευή (στο μεταλλικό πλαίσιο). Ο αριθμός σέρβις
αναγράφεται επίσης στο έντυπο εγγύησης.
•Την πλήρη διεύθυνσή σας.
•Τον αριθμό τηλεφώνου σας.
Εάν πρέπει να εκτελεστεί επισκευή, απευθυνθείτε σε ένα εξουσιοδοτημένο κέντρο τεχνικής υποστήριξης (για να διασφαλιστεί η χρήση γνήσιων ανταλλακτικών και
η σωστή επισκευή). Τα ανταλλακτικά είναι διαθέσιμα για 10 χρόνια.
ΣΗΜΕΙΩΣΗ:
Για σύντομες διαδικασίες μαγειρέματος στη διπλή ζώνη διαμέτρου 28 cm (όπου υπάρχει), στις οποίες απαιτείται άριστη κατανομή της θερμότητας (για παράδειγμα, τηγανίτες),
συνιστάται να χρησιμοποιείτε σκεύη διαμέτρου έως 24 cm. Για διαδικασίες μαγειρέματος για τις οποίες απαιτείται ιδιαίτερη προσοχή (για παράδειγμα, λιώσιμο σοκολάτας ή
βουτύρου), συνιστάται να χρησιμοποιείτε τις μονές ζώνες μικρότερης διαμέτρου.
ΤΕΧΝΙΚΗ ΥΠΟΣΤΗΡΙΞΗ
ΠΙΝΑΚΑΣ ΡΥΘΜΙΣΕΩΝ ΙΣΧΥΟΣ
Επίπεδο ισχύοςΤρόπος μαγειρέματοςΧρήση επιπέδου ισχύος
(βάσει της εμπειρίας και του τρόπου μαγειρέματος)
Μέγ. ισχύς
BoostΓρήγορο ζέσταμαΙδανική ρύθμιση για ζέσταμα φαγητών, βράσιμο νερού και υγρών σε σύντομο χρόνο
8-9Τηγάνισμα - βράσιμοΙδανική ρύθμιση για ρόδισμα, έναρξη του μαγειρέματος, τηγάνισμα κατεψυγμένων προϊόντων και
γρήγορο βράσιμο
Υψηλή ισχύς
7-8Ρόδισμα – τηγάνισμα –
βράσιμο - ψήσιμο
Ιδανική ρύθμιση για τηγάνισμα, διατήρηση έντονου βρασμού, μαγείρεμα και ψήσιμο (για σύντομο
διάστημα 5-10 λεπτών)
6-7
Ρόδισμα – μαγείρεμα –
σιγοβράσιμο - τηγάνισμα -
ψήσιμο
Ιδανική ρύθμιση για τηγάνισμα, διατήρηση χαμηλού βρασμού, μαγείρεμα και ψήσιμο (για μέτριο
διάστημα 10-20 λεπτών), ζέσταμα σκευών
Μέτρια ισχύς
4-5Μαγείρεμα – σιγοβράσιμο
- τηγάνισμα - ψήσιμο
Ιδανική ρύθμιση για σιγοβράσιμο, διατήρηση πολύ χαμηλού βρασμού, μαγείρεμα (για μεγάλο
διάστημα), ανακάτεμα ζυμαρικών
3-4Μαγείρεμα - αργό
βράσιμο - πήξιμο -
ανακάτεμα
Ιδανική ρύθμιση για μαγείρεμα μεγάλης διάρκειας (ρύζι, σάλτσες, ψητά, ψάρια) με υγρά (π.χ.
νερό, κρασί, ζωμός, γάλα), ανακάτεμα ζυμαρικών
2-3Ιδανική ρύθμιση για μαγείρεμα μεγάλης διάρκειας (με όγκο μικρότερο του λίτρου: ρύζι, σάλτσες,
ψητά, ψάρια) με υγρά (π.χ. νερό, κρασί, ζωμός, γάλα)
Χαμηλή ισχύς
1-2Λιώσιμο – ξεπάγωμα –
διατήρηση θερμοκρασίας
φαγητών - ανακάτεμα
Ιδανική ρύθμιση για λιώσιμο βουτύρου και σοκολάτας, ξεπάγωμα προϊόντων μικρού μεγέθους και
διατήρηση της θερμοκρασίας των φαγητών που μόλις μαγειρέψατε (π.χ. σάλτσες, σούπες,
μινεστρόνε)
1Ιδανική ρύθμιση για διατήρηση της θερμοκρασίας των φαγητών που μόλις μαγειρέψατε,
ανακάτεμα ριζότο και ζέσταμα σκευών σερβιρίσματος (με ειδικό εξάρτημα για επαγωγικές εστίες)
ΑΠΕΝΕΡΓΟΠΟΙΗΣΗΜηδενική ισχύςΕπιφάνεια στήριξηςΗ μονάδα εστιών βρίσκεται σε κατάσταση αναμονής ή είναι απενεργοποιημένη (μπορεί να υπάρχει
υπολειπόμενη θερμότητα στο τέλος του μαγειρέματος που υποδεικνύεται από την ένδειξη H)
Κολλήστε στο σημείο αυτό ένα από τα αυτοκόλλητα
με τα τεχνικά χαρακτηριστικά του προϊόντος που
παρέχονται εις διπλούν στο έντυπο εγγύησης.
SV52
DIN OCH ANDRAS SÄKERHET ÄR MYCKET VIKTIG
Både instruktionsboken och apparaten själv är utrustade med viktiga meddelanden som handlar om säkerhet - läs dessa och följt alltid råden.
Alla säkerhetsmeddelanden specificerar vilken eventuell risk du utsätts för, och visar hur du kan reducera risken för skada eller elchock som kan ske då apparaten inte
används korrekt. Följ noggrant följande instruktioner:
-Apparaten skall alltid vara skild från elnätet innan arbete med installation utförs på apparaten.
-Installation och underhåll skall utföras av behörig fackman i enlighet med tillverkarens anvisningar och i enlighet med lokala säkerhetsbestämmelser. Reparera
inte eller byt ut delar på apparaten om detta inte direkt rekommenderas i instruktionsboken.
-Enligt lag är det obligatoriskt att ansluta apparaten till jord.
-Elsladden måste vara tillräckligt lång för att apparat som är inbyggd i köksskåp skall kunna anslutas till ett eluttag.
-För att installationen skall uppfylla gällande säkerhetskrav, krävs att du använder en enpolig strömbrytare med minst 3mm kontaktavstånd.
-Använd inte adaptrar eller förlängningssladdar.
-Dra inte i apparatens elsladd.
-När installationen är klar skall det inte gå att komma åt de elektriska komponenterna.
-Apparaten är uteslutande avsedd att användas i hushållet för tillagning av livsmedel. Det är inte tillåtet att använda apparaten för andra ändamål (t ex värma
upp rum). Tillverkaren åtar sig inget ansvar för olämplig eller felaktig användning eller för felaktiga inställningar av reglagen.
-Apparaten får ej användas av personer (inklusive barn) med reducerad fysisk, känslomässig eller mental kapacitet, eller av personer utan lämplig kompetens eller
erfarenhet, såvida de inte fått instruktioner om apparatens användande från den eller de personer som ansvarar för deras säkerhet.
-Apparatens åtkomliga delar kan bli mycket heta under användning. Barn måste hållas under uppsikt så att de inte leker med apparaten.
-Under och efter användning av apparaten, skall du inte röra vid värmeelementen. Undvik kontakt med trasor eller andra brännbara material tills alla apparatens
komponenter har svalnat.
-Lägg aldrig lättantändligt material inne i apparaten eller i närheten av apparaten.
-Fett och upphettade oljor kan lätt fatta eld. Övervaka tillagningen när du lagar mat med mycket fett och olja.
-Lägg inte metallföremål på kokzonerna (som köksredskap, knivar, gafflar, skedar, lock eller annat) eftersom de då kan bli heta.
-Det är obligatoriskt att montera en skiljepanel (medföljer ej) i utrymmet under apparaten.
-Om hällens yta skulle skadas (sprickor eller trasigt glas) skall du inte använda apparaten, utan kontakta kundtjänst.
-Apparaten får inte startas med hjälp av en extern timer eller med hjälp av ett externt fjärrstyrningssystem.
VIKTIG SÄKERHETSINFORMATION
Detta är en säkerhetssymbol för fara, och symbolen varnar för eventuella risker för användaren och andra i närheten.
Alla säkerhetsmeddelanden har farosymbolen och följande ord i sin absoluta närhet:
FARAVisar på en farlig situation som, om den inte undviks, kommer att förorsaka svåra skador.
VARNINGVisar på en farlig situation som, om den inte undviks, kan förorsaka svåra skador.
SVENSKA InstallationSida2Bruksanvisning Sida
SV53
Kassering av förpackningsmaterialet
Förpackningsmaterialet kan återvinnas till 100%, vilket framgår av återvinningssymbolen (). Hantera inte förpackningsmaterialet vårdslöst, utan ta ditt ansvar och
sortera och kassera det enligt de anvisningar som finns vid återvinningscentralen.
Kassering av apparaten
Denna apparat är märkt enligt EG-direktiv 2002/96/EG beträffande elektriskt och elektroniskt avfall (Waste Electrical and Electronic Equipment, WEEE).
Genom att säkerställa en korrekt skrotning av denna apparat bidrar du till att förhindra eventuella negativa konsekvenser för vår miljö och vår hälsa.
Symbolen på apparaten och på de dokument som medföljer apparaten visar att denna apparat inte får skrotas som hushållsavfall, utan skall lämnas in på
miljöstation för återvinning av elektroniska apparater.
Energibesparing
För att få bästa resultat, rekommenderar vi följande:
•Använd kastruller och stekpannor vars botten har samma diameter som kokzonen.
•Använd endast flatbottnade kastruller och stekpannor.
•Ha alltid lock på kokkärlen när du lagar mat om det är möjligt.
•Med en tryckkokare kan du spara ännu mer elektricitet och tid.
•Se till att kastrullen är i mitten av den kokzon som är ritad på glaskeramikhällen.
-Denna apparat är avsedd att komma i kontakt med livsmedel, och är tillverkad i överensstämmelse med regelverket () nr.1935/2004 och är designad,
framtagen och såld på marknaden i enlighet med kraven i direktivet för Lågspänning 2006/95/EG (som ersätter direktivet 73/23/EEG och påföljande tillägg), och
skyddskraven i direktivet “EMC“ 2004/108/EG.
För att kontrollera om kärlet kommer att fungera på induktionshällen, använd en magnet: kastruller som inte är magnetiska fungerar inte på hällen.
-Se till att botten på kastrullen inte är rispig, eftersom det kan repa spishällens yta. Kontrollera dina köksredskap.
-Placera aldrig varma kastruller eller stekpannor på kontrollpanelens yta. Den kan skadas.
MILJÖSKYDDSRÅD
FÖRSÄKRAN OM ÖVERENSSTÄMMELSE
FÖRE FÖRSTA ANVÄNDNING
VIKTIGT: Om kastrullen inte är av rätt storlek kommer kokzonen inte att slås på. Använd endast kastruller som bär symbolen “INDUCTION SYSTEM“
(Se bild). Innan du slår på plattan skall du placera kastrullen på den önskade kokzonen.
GAMLA KASTRULLER
REKOMMENDERAD DIAMETER PÅ KASTRULLENS BOTTEN
NOOK
Ø
28 cm
XL
Ø
17 cm 28 cm
Ø
21 cm
L
Ø
15 cm 21 cm
Ø
18 cm
M
Ø
14,5 cm
S
Ø
12 cm 18 cm
Ø
10 cm 14,5 cm
SV54
Avlägsna apparatens förpackning och kontrollera att den inte har skadats under transport - vid problem kontakta Kundtjänst.
ATT FÖRBEREDA INBYGGNADSUTRYMMET
Anslutning till kopplingsplinten
Använd en elsladd av typ H05RR-F för den elektriska anslutningen, se nedanstående tabell.
Observera:
- Behåll eller avlägsna metallbyglarna från kopplingsplintens skruvar L1-L2 och N1-N2 enligt kopplingsschemat (se fig.).
- Se till att alla de sex skruvarna på kopplingsplinten är åtdragna efter att du kopplat kablarna.
Exempel på bygel på plats (vänster) och bygel avlägsnad (höger). Se kopplingsschemat för detaljer (byglarna kan vara mellan L1-L2 och mellan N1-N2).
MONTERING
VARNING-Installera en skiljepanel under
spishällen.
-Den undre delen av apparaten får
inte vara åtkombar efter
installation.
-Om du installerar en ugn
undertill, skall skiljepanelen inte
installeras.
•Avståndet mellan apparatens undersida och skiljepanelen därunder skall vara enligt de dimensioner som visas i bilden här intill.
•För att apparaten skall fungera korrekt skall du inte stänga igen minimumöppningen mellan arbetsbänken och den övre delen av arbetsbänken (min. 5 mm).
•Om en ugn skall installeras under spishällen, försäkra dig om att den är utrustad med kylsystem.
•Installera inte spishällen nära en disk- eller tvättmaskin, detta för att förhindra att de elektroniska kretsarna skadas genom exponering för ånga eller fukt.
• Om den skall installeras i jämnhöjd med arbetsbänken, ring Kundservice för att beställa skruvsetet för montering 4801 211 00112.
•För att ta loss spishällen från arbetsbänken, använd en skruvmejsel (medföljer ej) och lås upp fjädrarna från apparatens undersida.
ANSLUTNING TILL STRÖMFÖRANDE NÄT
VARNING-Skilj apparaten från elnätet.
-Apparaten måste installeras av en behörig servicetekniker som har kännedom om gällande
bestämmelser avseende säkerhet och installation.
-Tillverkaren frånsäger sig allt ansvar för skador på person, djur eller egendom som uppstår på grund av att anvisningarna i detta kapitel ej har
följts.
-Nätkabeln måste vara så lång att spishällen kan flyttas från bänken.
-Kontrollera att spänningen som anges på märkplåten är densamma som nätspänningen på den plats där apparaten installeras.
LedareAntal x storlek
230V ~ + 3 x 4 mm2
230-240V ~ + 3 x 4 mm2 (endast Australien)
230 V 3 ~ + 4 x 1,5 mm2
400V 3N ~ + 5 x 1,5 mm2
400V 2N ~ + 4 x 1,5 mm2
min 5 mm
min 20 mm
min 5 mm
400V 3N ~230V ~230-240V ~ (endast Australien)
230V ~ (endast UK)
400V 2N ~230 V 3 ~ (endast Belgien)400 V 2N ~ (endast Holland)
230V
230 V
230 V
230 V
230 V
230 V
230 V
230 V
230 V
230 V
230 V
CBA
SV55
Den gul/gröna jordledaren ska anslutas till kontakten med jordsymbolen .
Denna ledare ska vara längre än de andra ledarna.
1.Avlägsna locket på kopplingsplinten (A) genom att lossa skruven, och för in locket i bygeln (B) på plinten.
2.För sedan in nätkabeln i kabelklammern och anslut ledarna till kopplingsplinten enligt kopplingsschemat som är placerat i närheten av kopplingsplinten.
3.Skruva fast nätkabeln med kabelklammern.
4.Stäng locket (C) och skruva fast det till plinten med hjälp av den tidigare avlägsnade skruven.
Varje gång hällen kopplas till elnätet utförs automatiskt en kontroll under några sekunder.
Om hällen redan är utrustad med en strömkabel, följ de instruktioner som medföljer den strömförande kabeln. Utför koppling till fast nät med hjälp av en flerpolig
strömbrytare med minst 3 mm avstånd mellan kontakterna
Beskrivning av kontrollpanelen
Kontrollpanel
Att slå på/stänga av spishällen
Tryck på knappen under cirka 2 sekunder tills kokzonernas displayer tänds. För att stänga av trycker du på samma knapp tills displayerna slocknar Alla kokzoner
stängs då av.
Om spishällen har använts kommer restvärmevakten “H” förbli tänd tills kokzonerna kylts av.
Om ingen funktion väljs inom 10 sekunder efter att spishällen slås på, stängs den av automatiskt.
Aktivering och reglering av kokzoner
Då du slagit på spishällen och placerat kastrullen på den valda zonen, kan du reglera effekten med hjälp av knappen +. Då du slår på hällen visas nivå 5 på displayen.
Varje kokzon har flera effektnivåer, som regleras med hjälp av knapparna +/-, som går från “1”: minimal effekt till “9”: maximal effekt. Somliga kokzoner är utrustade
med snabbuppkokningsfunktion (Booster), som visas på displayen med bokstaven “P”.
Funktion för snabbvärme (Booster)
Funktion som finns på somliga kokzoner och som gör det möjligt att ställa in ett effektlägre högre än den vanliga maximaleffekten (t ex för att snabbt kunna koka upp
vatten). För att använda denna funktion, tryck på knappen “+” tills du ser bokstaven “P” på displayen, eller, efter att du slagit på spishällen: tryck direkt på knappen “-” för
den kokzon du valt. Även nu visas bokstaven “P” på displayen. Efter 10 minuters användning av booster-effekten, går apparaten automatiskt ned till nivå 9.
Stänga av kokzoner
Välj den kokzon som skall stängas av genom att trycka på knappen “+” eller “-” (en liten svart prick visas nere till höger på displayen).
Tryck på knappen “-” tills nivån är på “0”.
Det går även att stänga av kokzonen genom att samtidigt trycka på knapparna “+” och “-”. Kokzonen stängs då av och på displayen visas “H” för restvärmevakt.
Spärr av kontrollpanelen
Barnspärren blockerar alla spishällens reglage, för att undvika att barn skall slå på den av misstag. För att aktivera barnspärren skall du trycka i tre sekunder på knappen -
en ljudsignal hörs och en lampa tänds under nyckelsymbolen för att signalera att spärren är på. Kontrollpanelen är blockerad med undantag för avstängning. För att stänga av
barnspärren, repetera aktiveringsförfarandet.. Lampan slocknar och spishällen är på nytt aktiv.
Om knappen under nyckelsymbolen blir blöt av rengöringsvatten, matlagningsvätska från kastruller eller annat, kan ofrivillig aktivering/disaktivering av knappspärren
ske.
BRUKSANVISNING
Spärr av kontrollpanelen
Styrreglage för kokzoner och dess display
På/Av
Timer
Symbolerna är inte aktiva!
För att välja önskad
funktion, tryck på de
underliggande områdena!
Knapp -
Display för effekt
Indikerar vald kokzon
Knapp +
Placering på kokzon
SV56
Timer
Timern är en äggklocka som gör det möjligt att ställa in en koktid som maximalt är 99 minuter (1 timme och 39 minuter), och den kopplas till
en enda kokzon.
Välj den kokzon som skall användas med timern (en lampa tänds nere till höger om effektnivån på displayen), ställ sedan in den tid som önskas
med hjälp av knapparna “+” och “-” i timerfunktionen (se bild ovan). Efter några sekunder efter att du rört vid knapparna startar nedräkningen
(lampan för den valda kokzonen börjar blinka). När den inställda tiden har gått ut hörs en ljudsignal och kokzonen stängs av automatiskt.
Koppla ur funktionen genom att trycka på knappen “-” tills displayen visar “0:0” eller tryck samtidigt på knapparna “+” och “-” på timern.
Observera: Det går bara att koppla timern till en kokzon åt gången.
Äggklocka
Kan endast användas då spishällen inte är igång, du kan ställa in en maximal tid om 99 min.
Tryck på knappen “+“ som sitter under timerindikatorerna: på dispalyen visas de minuter som skall ställas in.
Välj önskad tid med knapparna + och -.
Efter några sekunder startar nedräkningen, och då tiden är slut hörs en ljudsignal.
Observera: Det går endast att använda funktionen äggklocka då apparaten är avstängd - om spishällen slås på slås äggklockan genast av.
Kontrollpanelens signaler
Restvärmevakt.
Spishällen är försedd med restvärmevakt på varje kokzon. Denna signal visar vilka zoner som fortfarande är mycket varma.
Om displayen visar, är kokzonen fortfarande varm Om kokzonen visar denna symbol, kan du till exempel hålla en maträtt varm eller passa på att smälta smör
Då kokzonen svalnat slocknar signalen på displayen.
Signal för felaktig, eller ingen kastrull.
Spishällen är försedd med ett automatiskt avkänningssystem som känner om det finns en kastrull på varje kokzon. Om en kastrull ej avkänns på vald kokzon
kommer effektnivån för denna kokzon att börja blinka på displayen. Kontrollera att kastrullen är korrekt placerad och att den har de egenskaper som
specificerats i kapitlet “före första användning”.
OBSERVERA: Använd inte slipande svampar eller stålull. De kan förstöra glaskeramiken.
•Rengör hällen från alla matrester när den svalnat efter varje användningstillfälle.
•Socker och matrester med hög sockerhalt kan skada spishällen och skall därför avlägsnas omedelbart.
•Salt, socker och sand repar hällens yta.
•Använd en ren trasa eller hushållspapper och flytande diskmedel eller produkter som är speciellt avsedda för rengöring av glaskeramikhällar (se Tillverkarens
indikationer).
•Läs och följ anvisningarna i kapitlet “Bruksanvisning“.
•Kontrollera att det inte är strömavbrott.
•Torka noggrant rent spishällen efter rengöring.
•Om hällen, då du slår på den, visar siffror skall du göra så som står i tabellen nedan.
•Om du inte kan stänga av spishällen efter användning, koppla genast bort den från strömförande nät.
RENGÖRING
VARNING-Använd absolut inte högtryckstvätt med ångstråle för rengöringen.
-Innan du börjar rengöra spishällen, skall du försäkra dig om att alla kokzoner är avstängda och att
restvärmevakten (“H“) är släckt.
FELSÖKNING
FELKODBESKRIVNINGMÖJLIGA ORSAKERFELAVHJÄLPNING
Spishällen slocknar och efter 30 sekunder hörs en
ljudsignal var 4:e sekund Ständigt tryck på kontrollpanelenVatten eller hushållsgeråd på
1.Försök att lösa problemet på egen hand enligt anvisningarna i punkterna i kapitel “Felsökning“.
2.Stäng av och slå på apparaten igen för att undersöka om problemet har löst sig.
Om problemet kvarstår efter dessa kontroller bör du kontakta närmaste Kundservice.
Var beredd att lämna följande information:
•en kort beskrivning av felet;
•typ av apparat och exakt modell;
•servicenumret (dvs numret som finns efter ordet Service på typskylten), som är placerad under apparaten (på en metallplatta). Servicenumret finns även i
garantihäftet;
•fullständig adress;
•telefonnummer.
Vänd dig alltid till en auktoriserad serviceverkstad om det blir nödvändigt med reparationer (till garanti för att originalreservdelar används och att reparationerna
görs på korrekt sätt). Reservdelar finns under 10 år.
OBSERVERA:
På dubbelzonen med 28 cm diameter (där sådan finns) rekommenderar vi att du använder tillbehör som inte överstiger 24 cm i diameter för tillagning av snabba och heta rätter,
som till exempel pannkakor. Detta för att distribuera värmen på bästa sätt. Vid försiktig tillagning, t ex för att smälta choklad eller smör, rekommenderar vi att du använder
enkelzon med mindre diameter.
KUNDSERVICE
EFFEKTTABELL
EffektnivåTyp av tillagningAnvänd nivå
(indikationen skall förstås integreras med din erfarenhet och dina tillagningsvanor)
MaxeffektBoostVärma upp snabbtPerfekt för att snabbt få maträtten till kokpunkten, speciellt för vatten eller för att snabbvärma
kokvätskor
8-9Fritera - kokaPerfekt för att bryna, starta en tillagning, fritera djupfrysta livsmedel, snabbkoka
Hög effekt
7-8Bryna - fräsa - koka - griljeraPerfekt för att fräsa, hålla rätter kokande, tillaga och griljera (för kortare period, 5-10 minuter)
6-7Bryna - koka - ånga - fräsa -
griljera
Perfekt för att fräsa, hålla rätter småkokande, tillaga och griljera (för medellång period, 10-20
minuter), förvärma tillbehör
Medeleffekt
4-5Koka - ånga - bryna - griljeraPerfekt för att ånga, hålla rätter småkokande, tillaga (för längre period). Fräsa ihop pasta med såsen
3-4Koka - småkoka - koka ihop -
fräsa ihop pasta med såsen
Perfekt för längre kokning, (ris, såser, grytor, fisk) med vätska (t ex vatten, vin, buljong, mjölk), för att
fräsa ihop pasta med såsen
2-3Perfekt för längre kokning, (ris, såser, grytor, fisk) med vätska (t ex vatten, vin, buljong, mjölk)
Låg effekt
1-2Smälta - tina - varmhålla -
fräsa ihop
Perfekt för att mjukgöra smör, försiktigt smälta choklad, tina små mängder frusna livsmedel eller för
att varmhålla varmrätter (t ex såser, soppor, minestronesoppor)
1Perfekt för att varmhålla nytillagade maträtter, värma risotto, och för att hålla temperaturen på
uppläggningsfat (med tillbehöret för induktion)
OFFNolleffektAvställningsytaSpishällen är i stand-by eller avstängd (det kan finnas värme kvar i plattorna, detta markeras med H)
Här kan du klistra in en av de självhäftande
etiketterna med produktdata - du finner dem i
garantihäftet i dubbel kopia.
NO58
DIN EGEN OG ANDRES SIKKERHET ER MEGET VIKTIG
Denne bruksanvisningen og selve apparatet er utstyrt med viktige sikkerhetsmeldinger, som alltid må leses og følges.
Alle sikkerhetsmeldingene vil beskrive den mulige risikoen de henviser til og viser hvordan man reduserer faren for personskader, materielle skader og elektrisk støt
som følge av feil bruk av apparatet. Følg disse instruksene nøye:
-Apparatet må alltid frakobles strømnettet før installasjon.
-Installasjon og vedlikehold skal utføres av en autorisert elektriker i samsvar med produsentens instrukser og gjeldende lokale sikkerhetsforskrifter. Forsøk aldri å
reparere eller skifte ut noen del av apparatet dersom det ikke uttrykkelig oppfordres til dette i bruksanvisningen.
-Det er påbudt å jorde apparatet.
-Strømledningen må være lang nok til at det innebygde apparatet kan tilkobles stikkontakten.
-For at installasjonen skal være i samsvar med gjeldende sikkerhetsforskrifter, må det monteres en flerpolet bryter med en kontaktåpning på minst 3 mm.
-Unngå bruk av doble stikkontakter og skjøteledninger.
-Ikke dra i apparatets strømledning.
-De elektriske komponentene må ikke være tilgjengelige etter installasjonen.
-Apparatet er kun beregnet på mattilberedning i privat husholdning. Annen bruk er ikke tillatt (f.eks. oppvarming av rom). Produsenten fraskriver seg ethvert
ansvar for feil bruk eller feil innstilling av bryterne.
-Dette apparatet må ikke brukes av personer (deriblant barn) med reduserte fysiske, følelsesmessige eller mentale evner, eller mangel på erfaring og kunnskap,
uten tilsyn eller opplæring i bruk av apparatet av en person som har ansvar for deres sikkerhet.
-Tilgjengelige deler av ovnen kan bli varme under bruk. Pass på at barn ikke leker med apparatet.
-Berør aldri varmeelementene på apparatet under eller rett etter bruk. Pass på at ikke varme deler på apparatet kan komme i kontakt med tekstiler eller annet
brennbart materiale.
-Plasser aldri brennbart materiale på eller i nærheten av apparatet.
-Overopphetet fett og olje tar lett fyr. Vær alltid tilstede og pass på ved tilberedning av fett- eller oljeholdig mat.
-På kokesonene må det aldri legges metallgjenstander som kjøkkenredskap (kniver, gafler, skjeer osv.), lokk eller annet, da disse kan bli svært varme.
-Under apparatet skal det plasseres et skillepanel (følger ikke med).
-Ikke bruk apparatet hvis den keramiske overflaten har skader eller sprekker. I dette tilfellet må du kontakte serviceverkstedet så raskt som mulig.
-Apparatet er ikke beregnet på å settes igang ved hjelp av en ekstern timer eller et separat fjernkontrollsystem.
VIKTIG SIKKERHETSINFORMASJON
Dette er faresymbolet, som gjelder sikkerheten og som advarer om mulig risiko for brukeren og andre.
Alle sikkerhetsmeldingene er merket med faresymbolet og følgende ord:
FAREViser til en farlig situasjon som vil føre til alvorlige skader dersom den ikke unngås.
ADVARSELViser til en farlig situasjon som kan føre til alvorlige skader dersom den ikke unngås.
NORSKInstallasjonSide2BruksanvisningSide
NO59
Håndtering av emballasjen
Emballasjematerialet er fullstendig resirkulerbart og er merket med resirkuleringssymbolet (). Det er svært viktig at emballasjematerialet avhendes ifølge
gjeldende miljøforskrifter.
Avfallsbehandling av apparatet
Dette apparatet er merket i samsvar med EU-direktiv 2002/96/EC om avhending av elektrisk og elektronisk utstyr (WEEE - Waste Electrical and Electronic Equipment).
Ved å sørge for at apparatet blir avfallsbehandlet på korrekt måte, bidrar du til å forebygge negative konsekvenser for mennesker og miljø.
Symbolet på produktet, eller på de medfølgende dokumentene, indikerer at dette apparatet ikke skal behandles som usortert restavfall, men at det må bringes til
en mottaksstasjon for elektrisk og elektronisk avfall.
Spare strøm
Slik oppnår du best mulige resultater:
•Bruk gryter og panner som har en diameter som tilsvarer kokesonene.
•Bruk kun gryter og panner som er helt flate i bunnen.
•La om mulig alltid lokket ligge på ved koking.
•Hvis du bruker trykkoker, kan du spare enda mer tid og strøm.
•Pass på at du plasserer pannen eller gryten midt på kokesonen som er markert på platetoppen.
-Dette apparatet som er beregnet på å komme i kontakt med næringsmidler, er i samsvar med bestemmelsen () nr.1935/2004 og er prosjektert, bygget og
markedsført i samsvar med sikkerhetskravene i lavspenningsdirektivet 2006/95/CE (som erstatter 73/2 3/CEE og følgende endringer), og beskyttelseskravene i
“EMC”-direktivet 2004/108/CE.
Bruk en magnet for å kontrollere om kokeredskapet er egnet til induksjonsplatetoppen: Grytene er ikke egnet dersom de ikke er magnetiske.
-Pass på at ikke grytene og pannene er ru i bunnen, da det ellers kan oppstå riper på platetoppen. Kontroller kokeredskapene.
-Plasser aldri varme gryter eller panner oppå betjeningspanelet på platetoppen. Det kan føre til skader.
BESKYTTE MILJØET
SAMSVARSERKLÆRING
FØR BRUK
VIKTIG: Dersom grytene ikke er av riktig størrelse, slår ikke kokesonene seg på. Bruk kun kokeredskap med symbolet “INDUKSJONSSYSTEM“ (Figur på
siden). Før platetoppen slås på, skal kokeredskapet plasseres på riktig kokesone.
KOKEREDSKAP DU ALLEREDE EIER
ANBEFALT DIAMETER PÅ GRYTER OG PANNER
NEIOK
Ø
28 cm
XL
Ø
17 cm 28 cm
Ø
21 cm
L
Ø
15 cm 21 cm
Ø
18 cm
M
Ø
14,5 cm
S
Ø
12 cm 18 cm
Ø
10 cm 14,5 cm
NO60
Etter at du har pakket ut apparatet, må du kontrollere at det ikke har lidd noen skade under transporten. I motsatt fall kontaktes forhandleren eller serviceavdelingen.
KLARGJØRING AV KJØKKENSEKSJONEN
Tilkobling til koblingsboksen
Ved elektrisk tilkobling skal det benyttes en strømledning av typen H05RR-F som vist i tabellen under.
Viktig:
- Behold eller fjern metallbroene mellom skruene på klemmebrettet L1-L2 og N1-N2 i samsvar med koblingsskjemaet (se figur).
- Påse at alle seks skruene på klemmebrettet er tilstrammet etter tilkobling av ledningene.
Eksempel med bro (venstre) eller uten (høyre). Se koblingsskjemaet for detaljer (broene kan være mellom L1-L2 og mellom N1-N2).
INSTALLASJON
ADVARSEL-Det skal plasseres en skilleplate
under platetoppen.
-Undersiden av apparatet må ikke
være tilgjengelig etter
installasjon.
-Dersom det skal installeres en
ovn under platetoppen, skal det
ikke monteres en skilleplate.
•Avstanden mellom undersiden av apparatet og skilleplaten skal være som vist i figuren.
•For at apparatet skal fungere korrekt, er det viktig å sørge for fritt rom mellom kjøkkenbenken og den øvre overflaten på seksjonen (min 5 mm).
•Dersom det installeres en ovn under, må man påse at ovnen er utstyrt med et avkjølingssystem.
•Ikke installer platetoppen over oppvaskmaskinen eller vaskemaskinen for å unngå at de elektroniske kretsene kommer i kontakt med damp og fuktighet og blir skadet.
•Ved installasjon i flukt med kjøkkenbenken, kontakt serviceavdelingen for montering av skruesettet 4801 211 00112.
•Hvis du skal fjerne platetoppen fra benkeplaten, bruk en skrutrekker (medfølger ikke) til å løsne fjærene fra undersiden av apparatet.
ELEKTRISK TILKOBLING
ADVARSEL-Frakoble apparatet fra strømnettet.
-Apparatet må installeres av en kvalifisert elektriker i overensstemmelse med gjeldende
sikkerhets- og installasjonsforskrifter.
-Produsenten fraskriver seg ethvert ansvar for skader på personer, dyr eller ting som skyldes at angivelsene i dette kapittelet ikke følges.
-Strømledningen må være lang nok til at platetoppen kan fjernes fra kjøkkenbenken.
-Pass på at spenningen som er spesifisert på apparatets typeplate er den samme som i husets elektriske system.
Koble den gule/grønne jordlederen til klemmen med symbolet .
Den ovennevnte lederen skal være lengre enn de andre.
1.Fjern lokket på klemmebrettet (A) ved å løsne skruen og sett lokket i hengslet (B) på klemmebrettet.
2.Stikk deretter strømledningen inn i kabelklemmen og koble lederne til klemmene som vist på koblingsskjemaet ved klemmebrettet.
3.Fest strømledningen ved hjelp av kabelklemmen.
4.Lukk lokket (C) og skru det fast over klemmebrettet med skruen som ble fjernet tidligere.
Hver gang platetoppen kobles til strømnettet, utfører den en automatisk kontroll som varer i flere sekunder.
Hvis platetoppen leveres med ferdig montert strømledning, følg instruksjonene som er festet til ledningen. Utfør tilkobling til strømnettet med en flerpolet bryter med
en kontaktåpning på minst 3mm.
Beskrivelse av betjeningspanelet
Betjeningspanel
Slå platetoppen på/av
Slå på platetoppen ved trykke i cirka 2 sekunder på tasten til displayene for kokesonene tennes. For å slå av displayene igjen, trykker man om igjen på samme tast
Alle kokesonene vil kobles ut.
Dersom platetoppen har vært i bruk, lyser restvarmeindikatoren “H” til kokesonene er avkjølt.
Dersom du ikke velger en funksjon innen 10sekunder etter at du har slått på platetoppen, deaktiveres den automatisk.
Slå på og regulere kokesonene
Når man har slått på kokesonen og satt gryten/stekepannen på den, må man regulere varmeinnstillingen med tasten +. Når du slår på kokesonen viser displayet nivå5.
Hver kokesone har flere varmeinnstillinger som kan reguleres med tastene +/-, som går fra “1”: minste effekt til “9”: høyeste effekt. Noen kokesoner er utstyrt med
hurtigkok-funksjon (Booster), som vises på displayet med bokstaven “P“.
Hurtigkok-funksjon (Booster)
Med denne funksjonen som kun finnes på noen kokesoner kan man utnytte platetoppens effekt maksimalt (for eksempel for å koke opp vann hurtig). For å aktivere denne
funksjonen, trykker du på tasten “+“ til displayet viser “P“, eller slår først på platetoppen og trykker deretter direkte på tasten “-“ for den valgte kokesonen. Også i dette
tilfellet vil “P“ vises på displayet. Etter 10 minutters bruk med booster-funksjonen, stiller apparatet sonen automatisk inn på nivå 9.
Slå av kokesonene
Velg kokesonen som skal slås av ved å trykke på tasten “+” eller “-” (punktet nede til høyre for effektnivået vil vises på displayet).
Trykk på tasten “-“ slik at nivået innstilles på “0“.
Du kan også slå av kokesonen ved å berøre tastene “+” og “-” samtidig. Nå er kokesonen slått av, og restvarmeindikatoren “H“ tennes.
Blokkering av betjeningspanelet
Funksjonen blokkerer betjeningspanelet for å hindre at barn ved en feiltakelse slår på platetoppen. For å aktivere blokkeringen av betjeningspanelet, slår du på platetoppen og
trykker i tre sekunder påtasten: Et lydsignal og en indikatorlampe under nøkkelsymbolet viser at funksjonen er aktivert. Alle funksjonene på betjeningspanelet er blokkert,
bortsett fra Av-funksjonen. For å deaktivere blokkeringen av betjeningspanelet, gjentar du framgangsmåten for aktivering. Det lysende punktet vil forsvinne og platetoppen kan
igjen brukes.
Vannrester etter rengjøring, væsker som er kokt over eller hvilken som helst gjenstand på tasten under symbolet, kan forårsake utilsiktet aktivering eller deaktivering
av blokkeringen av betjeningspanelet.
BRUKSANVISNING
Blokkering av betjeningspanelet
Brytere for regulering av kokesoner og tilhørende display
Slå på/av
Timer
Symbolene er ikke aktivert!
For å velge ønskede
funksjoner, berør
feltene nedenfor.
Tast-
Indikatordisplay for varmeinnstilling
Indikator for valgt kokesone
Tast+
Plassering av kokesone
NO62
Tidsinnstilling (Timer)
Timeren er en tidsbryter som gjør det mulig å stille inn en tilberedningstid på maksimalt 99 minutter (1time og 39minutter). Funksjonen kan
kun brukes på en kokesone.
Velg kokesonen der du vil bruke timeren (et lysende punkt vises nede til høyre for indikatoren for effektnivå på displayet), og still inn ønsket tid
med tastene “+” og “-” for timer-funksjonen (se figur over). Noen sekunder etter siste berøring, begynnertimeren nedtellingen (punktet for
valgt kokesone begynner å blinke). Når tiden er ute, høres et lydsignal og kokesonen slå seg automatisk av.
Timeren kobles ut ved å trykke på tasten “-“ til displayet viser “0:0“ eller trykke samtidig på tastene “+“ og “-“ for timeren.
Viktig: Timeren kan kun kobles til en kokesone ad gangen.
Stoppeklokke
Kan brukes når platetoppen ikke er i bruk og kan stilles inn på maksimalt 99min.
Trykk på tasten “+” under indikatorene for timeren: På displayet vises minuttene som kan stilles inn.
Velg ønsket tidsinnstilling ved hjelp av tastene + og -.
Etter noen sekunder begynner nedtellingen. Når tiden er ute, høres et lydsignal.
Viktig: Du kan kun bruke stoppeklokke-funksjonen når apparatet er slått av. Dersom platetoppen slås på annulleres stoppeklokken.
Meldinger på betjeningspanelet
RestvarmeiIndikator.
Platetoppen er utstyrt med en restvarmeindikator for hver av kokesonene. Denneindikatoren viser hvilken av kokesonene som fortsatt er svært varme.
Dersom displayet viser, er kokesonen fortsatt varm. I så fall er det for eksempel mulig å holde mat varm på den eller smelte smør
Når kokesonen er avkjølt, vil displayet slukke.
Indikator for feil eller ingen gryte.
Platetoppen er utstyrt med et automatisk system for registrering av gryter, på alle kokesonene. Hvis gryten ikke registreres, vil displayet med
varmeinnstillingen for kokesonen blinke. Kontroller at gryten er riktig plassert og at den har de spesifikasjonene som er oppgitt i delen “Før bruk”.
VIKTIG: Ikke bruk gryteskrubber eller stålull. Slike produkter kan over tid føre til skader på glassoverflaten.
•Det anbefales å rengjøre platetoppen hver gang den har vært i bruk og har fått avkjølt seg, slik at ikke matrestene brenner seg fast og blir vanskelige å fjerne.
•Sukker og matvarer med høyt sukkerinnhold skader platetoppen og må fjernes umiddelbart.
•Salt, sukker og sand kan lage riper på glassoverflaten.
•Benytt en myk klut, tørkerull eller spesialprodukter for rengjøring av glasskeramiske platetopper (følg produsentens anvisninger).
•Les og følg instruksene i avsnittet “Bruksanvisning“.
•Forsikre deg om at det ikke er brudd på strømtilførselen.
•Tørk godt av overflaten på platetoppen etter rengjøring.
•Hvis displayet viser en kode når du slår på platetoppen, må du sjekke i tabellen under.
•Hvis du ikke er i stand til å slå av platetoppen etter bruk, må du øyeblikkelig avbryte strømtilførselen.
RENGJØRING
ADVARSEL-Ikke bruk damprengjøringsapparater.
-Pass på at kokesonene er avslått og at restvarmeindikatoren (“H“) ikke vises før du rengjør apparatet.
FEILSØKINGSLISTE
FEILKODEBESKRIVELSEMULIGE ÅRSAKERLØSNING
Platetoppen slår seg av og etter 30 sekunder
høres et lydsignal hvert 4 sekund
Permanent trykk på
betjeningspanelet
Vann eller kjøkkenredskaper på
betjeningspaneletRengjør betjeningspanelet
C81, C82Betjeningspanelet slår seg av pga. for
høy temperatur
Temperaturen inne i de elektroniske
delene er for høy
Vent til platetoppen er avkjølt før du
bruker den
F42 eller F43Strømtilkoblingen til platetoppen har
1.Forsikre deg om at du ikke kan løse feilen selv på bakgrunn av punktene under “Feilsøkingsliste“.
2.Slå av og på igjen apparatet for å se om problemet har løst seg.
Hvis feilen fremdeles er der, kontakt nærmeste kundeservice.
Vennligst oppgi:
•en kort beskrivelse av feilen;
•typen platetopp og eksakt modellbetegnelse;
•servicenummeret (tallet etter ordet SERVICE på typeplaten) som er plassert på undersiden av platetoppen (på metallplaten). du kan også finne servicenummeret
i garantiheftet;
•din fulle adresse;
•ditt telefonnummer.
Dersom det er nødvendig med reparasjon, henvend deg til et autorisert servicesenter (som garanti for bruk av originale reservedeler og for en korrekt reparasjon).
Reservedeler er tilgjengelige i 10 år.
MERK:
For korte tilberedninger på den doble kokesonen på 28 cm i diameter (noen versjoner) som trenger en perfekt varmedistribusjon ( f.eks. pannekaker) anbefales det å bruke utstyr
som ikke er større enn 24 cm i diameter. For delikate tilberedninger (smelte sjokolade eller smør) anbefaler vi bruk av de enkle kokesonene med minst diameter.
SERVICE
EFFEKTTABELL
EffektnivåTilberedningstypeBruk av nivåene
( en indikasjon som hjelp i tillegg til erfaring og tilberedningsvaner)
Maks. effektBoostHurtig oppvarmingIdeell for rask temperaturøkning i maten eller hurtig oppkoking av vann eller rask oppvarming av kraft
8-9Frityrsteke - kokeIdeell til bruning, starte tilberedning, steking av frysevarer, hurtig oppkoking
Høy effekt
7-8Brune - brase - koke - grilleIdeell for brasering, fosskoking, steking og grilling (av kort varighet, 5-10minutter)
6-7Brune - koke - gryteretter -
brase - grille
Ideell for brasering, småkoking, steking og grilling (av middels varighet, 10-20minutter), forvarming
av tilbehør
Middels effekt
4-5Koke - gryteretter - brase -
grilleIdeell for gryteretter, holde såvidt kokende, koke (over lengre tid). Blande saus og pasta
3-4Koke - trekke - tykne - holde
varm
Ideell for lange tilberedninger (ris, sauser, steker, fisk) i væske (eks. vann, vin, buljong, melk), blande
saus og pasta
2-3Ideell for lange tilberedninger (ris, sauser, steker, fisk) i væske (eks. vann, vin, buljong, melk)
Lav effekt
1-2Smelte - tine - holde varm -
tilsette smør
Ideell for mykgjøring av smør, smelting av sjokolade, tining av små frossenvarer og holde mat som
nettopp er tilberedt varm (eks. sauser, supper, grønnsaksupper)
1Ideell for å holde mat som nettopp er tilberedt varm, tilsette smør til risotto og holde serveringsfat
varme (med tilbehør som egner seg for induksjon)
AVNull
effektStøtteoverflatePlatetopp i stand-by eller avslått (mulig gjenværende restvarme, indikert med H)
Her fester du et av klebemerkene med apparatets
spesifikasjoner som det finnes to av i garantiheftet.
DK64
DIN OG ANDRES SIKKERHED ER MEGET VIGTIG
Denne brugervejledning og selve apparatet er forsynet med vigtige oplysninger om sikkerhed, der altid skal læses og overholdes.
Alle oplysninger om sikkerheden specificerer den potentielle fare, som de henviser til og angiver, hvordan man kan forhindre risikoen for læsioner, skader og elektriske
stød som følge af ukorrekt brug af apparatet. Overhold omhyggeligt følgende:
-Tag stikket ud af stikkontakten før enhver form for installation eller vedligeholdelse.
-Installationen eller vedligeholdelsen skal udføres af en autoriseret elinstallatør i henhold til producentens anvisninger og gældende lovgivning. Reparer eller
udskift ikke nogen af apparatets dele, medmindre det kræves specifikt i brugervejledningen.
-Dette apparat skal ekstrabeskyttes, jvf. stærkstrømsreglementet.
-Strømforsyningskablet skal være tilstrækkelig langt til, at det er muligt at slutte det indbyggede apparat til strømforsyningen.
-For at opfylde de gældende sikkerhedsdirektiver for installation skal der anvendes en afbryderkontakt med en afstand på mindst 3mm mellem kontakterne.
-Brug ikke multistikdåser eller forlængerledninger.
-Træk ikke i apparatets strømkabel.
-Efter endt installation må der ikke være direkte adgang til de elektriske dele.
-Apparatet er udelukkende beregnet til husholdningsbrug til tilberedning af madvarer. Ingen anden brug er tilladt (f.eks. opvarmning af rum). Producenten
fralægger sig ethvert ansvar for skader forårsaget af fejlagtig brug eller forkert indstilling af betjeningsknapperne.
-Apparatet er ikke beregnet til at blive brugt af personer (herunder børn), der er fysisk, sensorisk eller mentalt funktionshæmmede, eller som mangler den
nødvendige erfaring og viden, medmindre de er under opsyn eller er oplært i brugen af en person med ansvar for deres sikkerhed.
-Apparatet kan blive meget varmt, når det er i brug. Børn skal holdes på afstand og være under opsyn for at sikre, at de ikke leger med apparatet.
-Rør ikke ved apparatets opvarmede dele under og efter brug. Undgå kontakt med klude eller andet brændbart materiale, indtil alle apparatets dele er
tilstrækkeligt afkølet.
-Anbring ikke brændbart materiale på apparatet eller i nærheden af det.
-Hede fedtstoffer og olier kan nemt antændes. Hold øje med tilberedningen af fedt- og olieholdige madvarer.
-Der må ikke anbringes metalgenstande så som knive, gafler, skeer eller låg på overfladerne på kogesektionen, da de kan blive varme.
-Der skal monteres en skilleplade (medfølger ikke) i rummet under apparatet.
-Hvis overfladen af glas knækker eller revner, må apparatet ikke anvendes. Stikket skal tages ud af stikkontakten, og der skal øjeblikkelig tilkaldes en
servicetekniker.
-Apparatet er ikke beregnet til at blive startet ved hjælp af en ekstern timer eller en separat fjernbetjening.
VIGTIGE ANVISNINGER VEDRØRENDE SIKKERHEDEN
Dette er symbolet for fare, der advarer om potentielle risici for brugeren og andre.
Foran oplysningerne om sikkerhed findes faresymbolet og følgende termer:
FAREAngiver en farlig situation, der, hvis den ikke forhindres, fremkalder alvorlige læsioner.
ADVARSELAngiver en farlig situation, der, hvis den ikke forhindres, vil kunne fremkalde alvorlige læsioner.
DANSKInstallationSide2BrugervejledningSide
DK65
Bortskaffelse af emballagen
Emballagen kan genbruges 100% og er mærket med genbrugssymbolet (). Emballagen må derfor ikke efterlades i miljøet, men skal bortskaffes i
overensstemmelse med lokale regler.
Bortskaffelse af produktet
Dette apparat er i overensstemmelse med EU-direktiv 2002/96/EF, Affald af elektrisk og elektronisk udstyr (WEEE).
Når dette produkt bortskaffes på korrekt vis, er brugeren med til at forhindre potentielt negative konsekvenser for miljøet og folkesundheden.
Symbolet på produktet eller på dokumenterne, der ledsager produktet, angiver, at produktet ikke må bortskaffes sammen med husholdningsaffaldet. Det skal i
stedet afleveres på en genbrugsstation for elektrisk og elektronisk udstyr.
Energispareråd
For at opnå de bedste tilberedningsresultater anbefales følgende:
•Brug kogegrej med en bunddiameter, der svarer til kogezonens diameter.
•Brug kun kogegrej med plan bund.
•Om muligt skal grydernes låg være lagt på under tilberedningen.
•Ved brug af trykkoger afkortes tilberedningstiden, og der opnås yderligere energibesparelser.
•Anbring kogegrejet på midten af kogezonen (aftegnet på kogesektionen).
-Dette produkt er beregnet til at komme i kontakt med fødevarer og er i overensstemmelse med forordning () nr. 1935/2004. Produktet er udviklet,
produceret og markedsført i overensstemmelse med sikkerhedskravene i Lavspændingsdirektivet 2006/95/EF (der erstatter direktiv 73/23/EØF og efterfølgende
ændringer) og beskyttelseskravene i EMC-direktivet 2004/108/EF.
Brug en magnet til at teste, om kogegrejet er egnet til kogesektionen: Kogegrejet kan ikke bruges, hvis det ikke er magnetisk.
-Kontrollér, at grydernes bund ikke er ru, da dette vil kunne ridse kogesektionens overflade. Kontrollér køkkengrejet.
-Sæt aldrig varme gryder eller pander på betjeningspanelets overflade. Den kan blive beskadiget.
OPLYSNINGER OM MILJØHENSYN
OVERENSSTEMMELSESERKLÆRING
FØR BRUG
VIGTIGT:Kogezonerne tænder ikke, hvis kogegrejet ikke har den korrekte diameter. Brug kun gryder med symbolet for “INDUKTION“ (se figur ved
siden af). Før der tændes for kogesektionen, anbringes gryden på den ønskede kogezone.
EKSISTERENDE KOGEGREJ
ANBEFALET DIAMETER AF KOGEGREJETS BUND
NEJOK
Ø
28 cm
XL
Ø
17 cm 28 cm
Ø
21 cm
L
Ø
15 cm 21 cm
Ø
18 cm
M
Ø
14,5 cm
S
Ø
12 cm 18 cm
Ø
10 cm 14,5 cm
DK66
Kontrollér, at apparatet ikke er blevet beskadiget under transporten. I tilfælde af problemer kontaktes forhandleren eller Service.
FORBEREDELSE AF INDBYGNINGEN
Tilslutning til klemkasse
Anvend et kabel af typen H05RR-F til den elektriske tilslutning, som angivet i tabellen nedenfor.
Vigtigt:
- Lad de små metalbroer mellem klemkassens skruer L1-L2 og N1-N2 sidde, eller tag dem af i overensstemmelse med forbindelsesdiagrammet (se figuren).
- Sørg for, at alle klemkassens seks skruer er fastspændte efter tilslutningen af ledningerne.
Eksempel på tilstedeværende bro på plads (til venstre) eller aftaget bro (til højre). Se forbindelsesdiagrammet for detaljer (broerne kan sidde mellem L1-L2 og mellem
N1 og N2).
INSTALLATION
ADVARSEL-Monter en skilleplade under
kogesektionen.
-Der må ikke være adgang til
produktets underside efter
opstillingen.
-Ved installation af en ovn under
kogesektionen må der ikke
placeres en skilleplade.
•Afstanden mellem apparatets underside og skillepladen skal overholde målene anført på figuren.
•For at sikre produktets korrekte funktion må minimumåbningen mellem bordpladen og møblets øverste kant ikke spærres (min. 5 mm).
•Hvis der er installeret en ovn under bordet, skal det sikres, at den er udstyret med et kølesystem.
•Monter aldrig kogesektionen oven på opvaskemaskinen eller vaskemaskinen. På denne måde undgås det, at de elektroniske kredsløb kommer i kontakt med
damp eller fugt, der kan ødelægge dem.
•Hvis apparatet skal monteres i niveau med bordpladen, kontaktes Service for at få skruesæt 4801 211 00112.
•Anvend en skruetrækker (medfølger ikke) til at frigøre fjedrene fra apparatets underside, når kogesektionen skal fjernes fra bordpladen.
TILSLUTNING TIL STRØMFORSYNINGEN
ADVARSEL-Tag stikket ud af stikkontakten.
-Installationen skal udføres af en autoriseret elektriker, der har kendskab til de aktuelle regulativer
vedrørende sikkerhed og installation.
-Producenten fralægger sig ethvert ansvar for skader på personer, dyr eller ting, der skyldes manglende overholdelse af anvisningerne i dette afsnit.
-Strømforsyningskablet skal være så langt, at kogesektionen kan fjernes fra bordpladen.
-Kontrollér, at spændingen på typepladen, der er anbragt på bunden af apparatet, svarer til spændingen, der hvor apparatet installeres.
LedereMængde x størrelse
230V ~ + 3 x 4 mm2
230-240 V ~ + 3 x 4 mm2 (kun Australien)
230 V 3 ~ + 4 x 1,5 mm2
400V 3N ~ + 5 x 1,5 mm2
400V 2N ~ + 4 x 1,5 mm2
min. 5 mm
min. 20 mm
min. 5 mm
400 V 3N ~230 V ~230-240 V ~ (kun Australien)
230V ~ (kun UK)
400 V 2N ~230 V 3 ~ (kun Belgien)400 V 2N ~ (kun Holland)
230 V
230 V
230 V
230 V
230 V
230 V
230 V
230 V
230 V
230 V
230 V
CBA
DK67
Den gul/grønne jordledning skal tilsluttes polen med symbolet .
Denne ledning skal være længere end de andre ledninger.
1.Fjern låget fra klemkassen (A) ved at skrue skruerne løse, og sæt låget i beslaget (B) på klemkassen.
2.Sæt derefter strømkablet fast i kabelholderen, og forbind ledningerne til klemkassen som angivet på forbindelsesdiagrammet, der er anbragt ved siden af
klemkassen.
3.Fastgør strømkablet med kabelholderen.
4.Luk låget (C), og skru det fast på klemkassen med skruen, der blev fjernet.
Hver gang kogesektionen sluttes til strømforsyningen, udfører den en automatisk kontrol, der varer flere sekunder.
Hvis kogesektionen allerede er forsynet med et strømkabel, følges anvisningerne på produktkortet, der sidder fast på kablet. Når apparatet sluttes til strømforsyningen,
skal der anvendes en multipolær afbryder med en kontaktafstand på mindst 3mm.
Beskrivelse af betjeningspanelet
Betjeningspanel
Tænding og slukning af kogesektionen
Kogesektionen tændes, ved at der trykkes på tasten i 2 sekunder, indtil kogezonens display lyser. Sluk ved at trykke på den samme tast, indtil displayet slukker.
Alle kogezoner deaktiveres.
Hvis kogesektionen allerede har været brugt, lyser Indikatoren for restvarme “H”, indtil kogezonerne er afkølede.
Hvis der ikke vælges en funktion inden for 10 sekunder, efter at der er tændt for kogesektionen, deaktiveres den automatisk.
Tænding og regulering af kogezone
Når der er tændt for kogesektionen, og gryden er anbragt på den valgte kogezone, reguleres varmen med tasten +. Når der tændes, vises niveauet 5 på displayet.
Hver kogezone har forskellige effektniveauer, der kan reguleres med tasterne +/-, og som går fra “1” (laveste effekt) til “9” (maksimal effekt). Nogle kogezoner har en
lynkogningsfunktion (Booster), der angives på displayet med bogstavet “P”.
Lynkogningsfunktion (Booster)
Funktionen findes kun sammen med nogle af kogezonerne, og den gør det muligt at udnytte kogesektionens effekt maksimalt (for eksempel til at bringe vand i kog hurtigt).
Funktionen aktiveres ved at der trykkes på tasten “+“, indtil displayet viser “P“, eller ved at der trykkes direkte på tasten “-“ for den valgte kogezone, efter at der er tændt
for kogesektionen. Også i dette tilfælde vises “P“ på displayet. Efter 10 minutters brug af boosterfunktionen indstiller kogesektionen automatisk zonen til niveau 9.
Slukning af kogezone
Vælg den kogezone, der skal slukkes for, og tryk på tasten “+“ eller “-“ (punktet nederst til højre for effektniveauet vises på displayet).
Tryk på tasten “-“, indtil niveauet er “0”.
Det er også muligt at deaktivere kogezonen ved at berøre tasterne “+“ og “-“ samtidigt. Kogezonen deaktiveres, og restvarmeindikatoren “H“ vises.
Låsning af betjeningspanel
Denne funktion blokerer betjeningen af kogesektionen, så børn ikke kan tænde for den ved et uheld. Tænd for kogesektionen for at aktivere låsningen af betjeningspanelet, og
hold tasten nede i tre sekunder. Et lydsignal og en kontrollampe under nøglesymbolet angiver aktiveringen. Betjeningspanelet er låst med undtagelse af
slukningsfunktionen. For at deaktivere låsningen gentages aktiveringsproceduren. Kontrollampen slukker, og kogesektionen er igen aktiveret.
Hvis der er vand tilovers fra rengøringen, væske, der er kogt over, eller genstande, der trykker på tasten under symbolet, kan låsningen af betjeningspanelet aktiveres
eller deaktiveres utilsigtet.
BRUGERVEJLEDNING
Låsning af betjeningspanel
Betjeningsfunktioner og display for kogezone
Tænding/slukning
Timer
Symbolerne er ikke aktive!
For at vælge de ønskede
funktioner skal der røres ved
området under dem.
Tasten-
Display, der angiver effektniveauet
Angiver den valgte kogezone
Tasten+
Kogezonens placering
DK68
Timer
Timeren er en tidsstyret afbryder, der gør det muligt at indstille en tilberedningstid på maks. 99 minutter (1 time og 39 minutter) for en enkelt
kogezone.
Vælg den kogezone, der skal forbindes med timeren (et lyspunkt vises på displayet nederst til højre for kontrollampen for effektniveauet), og
indstil den ønskede tid for timerfunktionen med tasterne “+“ og “-“ (se ovenstående figur). Et par sekunder efter at der er trykket sidste gang,
begynder timeren nedtællingen (lyspunktet for den valgte kogezone begynder at blinke). Når tiden er udløbet, aktiveres et lydsignal, og
kogezonen slukker automatisk.
Timeren slukkes, ved at der trykkes på tasten “-“, indtil displayet viser “0:0”, eller ved at der trykkes samtidig på timerens “+“ og “-“ taster.
Vigtigt: Timeren virker kun for én kogezone ad gangen.
Minutur
Kan bruges, når kogesektionen ikke er i brug og gør det muligt at indstille maks. 99 minutter.
Tryk på tasten “+” under timerindikatorerne: på displayet vises minutterne, der skal indstilles.
Vælg det ønskede tidsrum ved hjælp af tasterne + og -.
Efter et par sekunder begynder nedtællingen, og der afgives et lydsignal, når tiden er gået.
Vigtigt: Minuturet virker kun, når apparatet er slukket, og det deaktiveres, når der tændes for kogesektionen.
Meddelelser fra betjeningspanelet
Indikator for restvarme.
Kogesektionen er udstyret med en restvarmeindikator for hver kogezone. Denne indikator viser hvilke kogezoner, der stadig er varme.
Hvis displayet viser , er kogezonen stadig varm. Hvis indikatoren for kogezonen viser restvarme, kan den stadig bruges til at holde maden varm på eller til
at smelte smør.
Når kogezonen er afkølet, slukker displayet.
Indikator for en ikke korrekt gryde eller gryde ikke til stede.
Kogesektionen er udstyret med et automatisk system, der registrerer, om der står gryder på kogezonerne. Hvis der ikke registreres en gryde, blinker displayet
med effektniveauet for kogezonen. Kontrollér, at gryden er placeret korrekt, og at den er egnet iht. angivelserne i afsnittet “Før brug”.
VIGTIGT: Brug ikke skure-/metalsvampe, da brug af disse svampe med tiden vil ødelægge glasset.
•Lad kogesektionen køle af efter hver brug, og rengør den, så ophobning af fastbrændte madrester undgås.
•Sukker og andre madvarer med et højt sukkerindhold kan beskadige kogesektionen og skal fjernes med det samme.
•Salt, sukker og sand kan ridse glasoverfladen.
•Brug en blød klud, køkkenrulle eller et specialmiddel, der er beregnet specifikt til rengøring af kogesektionen (følg producentens anvisninger).
•Læs og følg anvisningerne i afsnittet “Brugervejledning“.
•Kontrollér, at der ikke er strømafbrydelse.
•Tør kogesektionen omhyggeligt af efter rengøring.
•Hvis displayet viser alfanumeriske koder, når der tændes for kogesektionen, gås der frem i henhold til nedenstående tabel.
•Hvis der ikke kan slukkes for kogesektionen efter brug, skal stikket straks tages ud af stikkontakten.
RENGØRING
ADVARSEL-Anvend aldrig damprensere.
-Før rengøringen påbegyndes, skal det kontrolleres, at der er slukket for kogezonerne, og at
restvarmeindikatoren (“H“) er slukket.
FEJLFINDINGSOVERSIGT
FEJLKODEBESKRIVELSEMULIG ÅRSAGLØSNING
Kogesektionen slukker, og efter 30 sekunder lyder
der et lydsignal hvert 4. sekund Konstant tryk på betjeningspaneletVand eller køkkenredskaber på
betjeningspaneletRengør betjeningspanelet igen
C81, C82Betjeningspanelet slukker, når
temperaturen bliver for høj
Temperaturen i de elektroniske
komponenter er for høj
Vent, til kogesektionen er afkølet,
før den bruges igen
F42 eller F43Kogesektionen er ikke forbundet til
den rigtige spænding
Sensoren registrerer en anden spænding
end tilslutningens
Tag stikket ud af stikkontakten, og
kontrollér tilslutningen
F12, F21, F25, F36, F37, F40, F47, F56, F58, F60Ring til Service, og opgiv fejlkoden
DK69
Før Service kontaktes
1.Undersøg, om det er muligt selv at rette fejlen ved at følge anvisningerne i afsnittet “Fejlfinding“.
2.Sluk for apparatet, og tænd for det igen for at kontrollere, om fejlen er afhjulpet.
Hvis apparatet stadig ikke fungerer korrekt, kontaktes Service.
Oplys venligst:
•En kort beskrivelse af fejlen.
•Den præcise type og model.
•Servicenummeret (tallet står efter ordet Service på typepladen), der er placeret under apparatet (på metalpladen). Servicenummeret står også i garantibeviset.
•Fulde navn og adresse.
•Telefonnummer.
Hvis det er nødvendigt at reparere apparatet, kontaktes et autoriseret servicecenter (som garanti for brug af originale reservedele og en korrekt reparation).
Reservedele vil kunne fås i 10 år.
BEMÆRK:
På den dobbelte kogezone med Ø 28 cm (hvor den forefindes) anbefales det, i forbindelse med tilberedninger, der kræver en perfekt varmefordeling (f.eks. pandekager), at der
anvendes kogegrej med en diameter på ikke over 24 cm. I forbindelse med skånsomme tilberedninger (f.eks. smeltning af chokolade eller smør) anbefales det at anvende
enkeltzoner med en mindre diameter.
SERVICE
EFFEKTTABEL
EffektindstillingTilberedningstypeAnvendelse
(angivelsen afhænger af erfaring og tilberedningsvaner)
Maks. indstillingBoostHurtig opvarmningIdeel til hurtigt at øge madens temperatur, til hurtigt at bringe vand eller anden væske i kog
8-9Stegning - kogningIdeel til bruning, start på en tilberedning, stegning af frosne produkter, bringe hurtigt i kog
Høj indstilling
7-8Bruning - svitsning - kogning -
grilningIdeel til at svitse, holde i kog, stege og grille (i kort tid, 5-10 minutter)
6-7Bruning - kogning - stuvning -
svitsning - grilningIdeel til at svitse, holde let i kog, stege og grille (i gennemsnitligt 10 20 minutter), forvarme tilbehør
Mellemindstilling
4-5Stegning - stuvning - svitsning
- grilningIdeel til at stuve retter, holde svagt i kog, stege (i lang tid). Vende pasta med f.eks. olie eller parmesan
3-4Stegning - simring -
indkogning - vending med
afsluttende ingrediens
Ideel til langvarig tilberedning (ris, sovse, steg, fisk) med væske (f. eks. vand, vin, bouillon, mælk),
vende pastaretten til sidst
2-3Ideel til langvarig tilberedning (mængder under en liter: ris, sovse, steg, fisk) med væske (f. eks. vand,
vin, bouillon, mælk)
Lav indstilling
1-2Smeltning - optøning -
varmholdning - afsluttende
vending
Ideel til blødgøring af smør, smeltning af chokolade, optøning af små madvarer og varmholdning af
1Ideel til varmholdning af netop færdige retter, vending af risotto med de sidste ingredienser og
varmholdning af serveringsfade (med tilbehør egnet til induktion)
OFFIngen
varmeStøttefladeKogesektionen er i standby eller slukket (mulig restvarme efter tilberedningen, vises med H)
Anbring en af etiketterne fra garantien her.
FI70
OMA SEKÄ MUIDEN TURVALLISUUS ON HYVIN TÄRKEÄÄ
Tässä käyttöohjeessa ja itse laitteessa on tärkeitä turvallisuutta koskevia ohjeita. Lue ne aina ja noudata niitä.
Kaikki turvallisuutta koskevat ohjeet mainitsevat mahdollisen vaaran ja kertovat miten laitteen väärästä käytöstä johtuvien tapaturmien, vahinkojen ja sähköiskujen
riskiä voi vähentää. Noudata tarkkaan seuraavia ohjeita:
-Laite tulee kytkeä irti sähköverkosta ennen minkään asennustoimenpiteen aloittamista.
-Asennuksen tai huollon saa suorittaa vain ammattitaitoinen asentaja valmistajan ohjeiden ja voimassa olevien paikallisten turvallisuusmääräysten mukaisesti.
Älä korjaa tai vaihda mitään laitteen osaa, ellei käyttöohjeessa nimenomaan neuvota tekemään niin.
-Laitteen maadoitus on lakisääteinen.
-Virtajohdon on oltava riittävän pitkä, jotta kalusteeseen asennetun laitteen voi kytkeä sähköverkkoon.
-Asennus on voimassa olevien turvallisuusmääräysten mukainen vain, jos järjestelmässä on moninapainen verkkokytkin, jonka koskettimien väli on vähintään
3mm.
-Älä käytä soviteosia tai jatkojohtoja.
-Älä vedä laitteen virtajohtoa.
-Kun asennus on tehty, sähköosat eivät saa enää olla käyttäjän ulottuvilla.
-Laite on tarkoitettu ainoastaan elintarvikkeiden kypsentämiseen kotitaloudessa. Mikä tahansa muu käyttö on kielletty (esimerkiksi huoneen lämmittäminen).
Valmistaja ei vastaa väärästä tai ohjeiden vastaisesta käytöstä aiheutuvista vahingoista.
-Laitetta eivät saa käyttää henkilöt (lapset mukaan lukien), joiden fyysinen, aistien tai mielen terveys on heikentynyt, tai henkilöt, joilla ei ole tarpeellista
kokemusta tai taitoa, ellei heidän turvallisuudestaan vastaava henkilö ole valmentanut heitä laitteen käyttöön.
-Kosketettavissa olevat osat voivat tulla hyvin kuumiksi laitteen käytön aikana. Lapset on paras pitää turvallisen välimatkan päässä ja on varottava, etteivät lapset
pääse leikkimään laitteella.
-Älä koske laitteen lämpövastuksiin käytön aikana tai heti sen jälkeen. Vältä kosketusta pyyhkeiden tai muiden tulenarkojen materiaalien kanssa, kunnes kaikki
laitteen osat ovat jäähtyneet.
-Älä laita laitteen päälle tai sen läheisyyteen tulenarkoja materiaaleja.
-Ylikuumentunut rasva tai öljy syttyy helposti palamaan. Valvo kypsymistä, jos ruoka sisältää paljon rasvaa tai öljyä.
-Älä aseta keittoalueille metalliesineitä, kuten keittiövälineitä (veitsiä, haarukoita, lusikoita, kansia jne.), ne saattavat kuumentua.
-Laitteen alle on ehdottomasti asennettava välilevy, joka ei kuulu toimitukseen.
-Mikäli keittotason pinta vahingoittuu (lasin halkeama tai rikkoutuminen), älä käytä laitetta vaan ota yhteys huoltoon.
-Laite ei ole tarkoitettu käytettäväksi ulkopuolisen ajastimen tai erillisen kauko-ohjauksen kanssa.
TÄRKEITÄ TURVALLISUUSOHJEITA
Tämä on turvallisuuteen liittyvä vaaran merkki, joka ilmoittaa käyttäjälle tai muulle henkilölle aiheutuvasta mahdollisesta vaarasta.
Kaikkia turvallisuutta koskevia ohjeita edeltää vaaran merkki ja toinen seuraavista sanoista:
VAARAOsoittaa vaarallisen tilanteen, joka aiheuttaa vakavia vammoja, ellei sitä vältetä.
VAROITUSOsoittaa vaarallisen tilanteen, joka voi aiheuttaa vakavia vammoja, ellei sitä vältetä.
SUOMIAsennusSivu2KäyttöohjeetSivu
FI71
Pakkausmateriaalien hävittäminen
Pakkaus on valmistettu 100-prosenttisesti kierrätettävästä materiaalista ja siinä on kierrätysmerkki (). Pakkausmateriaaleja ei saa heittää ympäristöön, vaan ne on
hävitettävä paikallisten jätehuoltomääräysten mukaisesti.
Tuotteen hävittäminen
Tämä laite on merkitty WEEE-direktiivin (Waste Electrical and Electronic Equipment) 2002/96/EY mukaisesti.
Varmistamalla, että laite poistetaan käytöstä asianmukaisesti, voit auttaa välttämään ympäristö- ja terveyshaittoja.
Symboli tuotteessa tai sen asiakirjoissa tarkoittaa, ettei laitetta saa hävittää kotitalousjätteiden mukana, vaan se on toimitettava sähkö- ja elektroniikkalaitteiden
keräyskeskukseen.
Energiansäästö
Parhaan tuloksen saavuttamiseksi:
•Käytä kattiloita ja pannuja, joiden pohjan läpimitta on sama kuin keittoalueen läpimitta.
•Käytä vain tasapohjaisia kattiloita ja pannuja.
•Peitä kattila kannella kypsennyksen ajaksi, jos mahdollista.
•Käytä painekeitintä, se alentaa energian kulutusta ja lyhentää kypsennysaikaa.
-Tämä laite, joka tulee kosketuksiin elintarvikkeiden kanssa, on asetuksen () 1935/2004 mukainen, ja se on suunniteltu, valmistettu ja tuotu markkinoille
pienjännitedirektiivin 2006/95/EY (joka korvaa direktiivin 73/23/ETY ja myöhemmät muutokset) turvallisuusvaatimusten sekä EMC-direktiivin 2004/108/EY
suojausvaatimusten mukaisesti.
Tarkista astian sopivuus keittotasolle magneetin avulla: kattilat eivät ole sopivia, ellei magneetti havaitse niitä.
-Varmista, että kattiloiden pohja on tasainen, sillä epätasainen pinta voi naarmuttaa keittotasoa. Tarkista astiat.
-Älä koskaan laita kuumia kattiloita tai pannuja keittotason käyttöpaneelin päälle. Se saattaa vahingoittua.
YMPÄRISTÖNSUOJELU
VAATIMUSTENMUKAISUUSVAKUUTUS
ENNEN KÄYTTÖÄ
TÄRKEÄÄ: Keittoalueet eivät kytkeydy toimintaan, jos kattilat ja pannut eivät ole oikean kokoisia. Käytä ainoastaan sellaisia kattiloita, joissa on
merkintä “INDUCTION SYSTEM“ (Katso viereistä kuvaa). Kattila tulee laittaa valitulle keittoalueelle ennen keittotason kytkemistä toimintaan.
ENTISTEN KATTILOIDEN TARKISTAMINEN
KEITTOASTIAN POHJAN SUOSITELTAVAT LÄPIMITAT
EIOK
Ø
28 cm
XL
Ø
17 cm 28 cm
Ø
21 cm
L
Ø
15 cm 21 cm
Ø
18 cm
M
Ø
14,5 cm
S
Ø
12 cm 18 cm
Ø
10 cm 14,5 cm
FI72
Kun laite on purettu pakkauksesta tarkista, että se ei ole vahingoittunut kuljetuksen aikana. Mikäli havaitset ongelmia, ota yhteys jälleenmyyjään tai huoltopalveluun.
KALUSTEEN VALMISTELU ASENNUSTA VARTEN
Liitäntärasian liitännät
Käytä sähköliitännässä alla olevan taulukon mukaisesti kaapelia tyyppiä H05RR-F.
Tärkeää:
- Pidä metalliset hyppyjohtimet L1-L2 ja N1-N2 ruuvien välissä liitäntärasiassa tai poista ne liitäntäkaavion mukaisesti (katso kuvaa).
- Varmista, että kaikki kuusi liitäntärasian ruuvia kiristetään, kun johdot on kytketty.
Esimerkki hyppyjohtimesta paikallaan (vasen) tai irrotettuna (oikea). Yksityiskohdat liitäntäkaaviossa (hyppyjohtimet voivat olla välillä L1-L2 ja N1-N2).
ASENNUS
VAROITUS-Asenna keittotason alle välilevy.
-Tuotteen alaosa ei saa olla
kosketettavissa asennuksen
jälkeen.
-Jos keittotason alle asennetaan
uuni, välilevyä ei tarvita.
•Keittotason alapinnan ja välilevyn välisen etäisyyden tulee olla kuvassa näkyvien mittojen mukainen.
•Laitteen moitteettoman toiminnan varmistamiseksi keittotason ja kalusteen yläreunan välissä olevaa pientä rakoa (min. 5 mm) ei saa tukkia.
•Jos lieden alle asennetaan uuni, varmista että siihen kuuluu jäähdytysjärjestelmä.
•Vältä keittotason asentamista astianpesukoneen tai pyykinpesukoneen yläpuolelle, jotta virtapiirit eivät joudu kosketukseen höyryn tai kosteuden kanssa,
mikä voisi vahingoittaa niitä.
•Jos keittotaso upotetaan työtasoon, ota yhteys huoltopalveluun ja pyydä ruuvisarja 4801 211 00112.
2.Työnnä virtajohto kaapelin vedonpoistimeen ja kytke johtimet liitäntärasiaan sen vierellä olevan kaavion mukaisesti.
3.Kiinnitä virtajohto vedonpoistimeen.
4.Sulje kansi (C) ja ruuvaa se kiinni liitäntärasiaan aikaisemmin irrottamallasi ruuvilla.
Joka kerta kun liesi kytketään sähköverkkoon, se suorittaa muutaman sekunnin pituisen automaattisen tarkistustoiminnon.
Mikäli liedessä jo on virtajohto, noudata virtajohtoon liitettyjä ohjeita. Suorita sähköverkkoon liittäminen moninapaisen verkkokytkimen avulla, jonka koskettimien
väli on ainakin 3 mm.
Käyttöpaneelin kuvaus
Käyttöpaneeli
Keittotason kytkeminen toimintaan/pois toiminnasta
Keittotaso kytketään toimintaan painamalla noin 2 sekunnin ajan painiketta , kunnes keittoalueiden näytöt syttyvät. Se kytketään pois toiminnasta koskemalla
samaa painiketta, kunnes näytöt sammuvat. Kaikki keittoalueet kytkeytyvät pois toiminnasta.
Jos keittotasoa on käytetty, jälkilämmön merkkivalo H palaa, kunnes keittoalueet ovat jäähtyneet.
Jos mitään toimintoa ei valita 10 sekunnin kuluessa keittotason kytkemisestä toimintaan, se kytkeytyy automaattisesti pois toiminnasta.
Keittoalueiden kytkeminen toimintaan ja lämpötilan säätäminen
Kun keittotaso on kytketty toimintaan ja valitulle keittoalueelle on laitettu keittoastia, teho säädetään painikkeella +. Käynnistettäessä näyttöön tulee taso 5.
Jokaisella keittoalueella on painikkeilla +/- säädettäviä tehotasoja, joiden minimiteho on 1 ja maksimiteho on 9. Joillakin keittoalueilla on pikakuumennustoiminto
(Booster), jonka osoittaa näytössä kirjain P.
Pikakuumennustoiminto (Booster)
Toiminto on vain joillakin keittoalueilla, ja se hyödyntää keittotason maksimitehoa (esimerkiksi veden kuumentamiseksi nopeasti kiehumispisteeseen). Toiminto
aktivoidaan painamalla painiketta +, kunnes näyttöön tulee P, tai painamalla valitun keittoalueen painiketta keittotason toimintaan kytkemisen jälkeen. Tässäkin
tapauksessa näyttöön tulee P. Kun pikakuumennustoiminto on ollut käytössä 10 minuuttia, keittoalue siirtyy automaattisesti tasolle 9.
Keittoalueiden kytkeminen pois toiminnasta
Valitse sammutettava keittoalue painamalla painiketta + tai - (näyttöön tulee piste tehotason näytön oikeaan alareunaan).
Paina painiketta -, kunnes taso on 0.
Voit myös sammuttaa keittoalueen koskettamalla samanaikaisesti painikkeita + ja -. Keittoalue kytkeytyy pois toiminnasta ja näyttöön tulee jälkilämmön merkkivalo
H.
Käyttöpaneelin lukitus
Toiminto lukitsee keittotason painikkeet, jotta lapset eivät voi vahingossa käyttää laitetta. Lukitus aktivoidaan painamalla kolmen sekunnin ajan painiketta . Äänimerkki ja
avainkuvakkeen alle syttyvä merkkivalo osoittavat aktivoinnin. Käyttöpaneeli on lukittu ja vain laitteen kytkeminen pois toiminnasta on sallittu. Lukitus poistetaan käytöstä
toistamalla sen aktivointimenettely. Merkkivalo sammuu ja keittotaso on taas käytettävissä.
Pesuvesi, kattilasta kuohunut neste tai mikä tahansa esine kuvakkeen alapuolella olevan painikkeen päällä voi aiheuttaa lukitustoiminnon aktivoitumisen vahingossa
tai sen poistumisen käytöstä.
KÄYTTÖOHJEET
Käyttöpaneelin lukitus
Keittoalueiden säätökytkimet ja näyttö
Virtakytkin
Ajastin
Kuvakkeet eivät toimi!
Halutut toiminnot valitaan
koskettamalla
alapuolella olevia alueita.
Painike-
Tehon näyttö
Keittoalueen valinnan osoitin
Painike +
Keittoalueen sijainti
FI74
Ajastin
Ajastin on aikakytkin, joka avulla voit asettaa enintään 99 minuutin (1 tunnin ja 39 minuutin) pituisen kypsennysajan vain yhtä keittoaluetta
varten.
Valitse ajastettava keittoalue (näytössä syttyy piste tehotason näytön oikeaan alareunaan) ja aseta haluamasi aika ajastintoiminnon painikkeilla
+ ja - (katso yllä olevaa kuvaa). Ajastin käynnistyy muutaman sekunnin kuluttua (keittoalueen valinnan ilmaiseva piste alkaa vilkkua). Asetetun
ajan päätyttyä kuuluu äänimerkki ja keittoalue kytkeytyy automaattisesti pois toiminnasta.
Ajastin kytketään pois toiminnasta painamalla painiketta -, kunnes näyttöön tulee 0:0, tai painamalla samanaikaisesti ajastintoiminnon painikkeita + ja -.
Tärkeää: Ajastin voidaan kohdistaa vain yhdelle keittoalueelle kerrallaan.
Minuuttikello
Tätä kelloa voidaan käyttää kun keittotaso ei ole toiminnassa ja sen ajaksi voidaan asettaa enintään 99 min.
Paina ajastimen osoittimien alla olevaa painiketta +: näyttöön tulee minuuttien asetus.
Valitse haluamasi aika painikkeilla + ja -.
Muutaman sekunnin kuluttua alkaa ajan laskenta ja kun aika on kulunut, kuuluu äänimerkki.
Tärkeää: Minuuttikelloa voidaan käyttää vain keittotason ollessa kytketty pois toiminnasta ja keittotason kytkeminen toimintaan aiheuttaa minuuttikellon toiminnan
peruuntumisen.
Käyttöpaneelin osoittimet
Jälkilämmön merkkivalo
Keittotasossa on jokaisen keittoalueen jälkilämmön merkkivalo. Se näyttää minkä keittoalueen lämpötila on vielä korkea.
Jos näytössä näkyy , keittoalue on vielä kuuma. Kun tämä merkkivalo palaa, voit esimerkiksi pitää ruokaa lämpimänä keittoalueella tai sulattaa voita.
Kun keittoalue jäähtyy, merkkivalo sammuu.
Vääränlainen keittoastia tai keittoastiaa ei ole.
Jokaisella keittotason alueella on automaattinen keittoastian tunnistin. Jos keittoastiaa ei havaita, keittoalueen tehotason näyttö vilkkuu. Tarkista, että
keittoastia on oikein paikallaan ja että sen ominaisuudet vastaavat kohdassa ennen käyttöä kuvattuja ominaisuuksia.
TÄRKEÄÄ: Älä käytä karheita sieniä tai teräsvillaa. Niiden käyttäminen voi ajan myötä vahingoittaa lasia.
•Jokaisen käytön jälkeen anna keittotason ensin jäähtyä ja puhdista se sitten ruoanjäänteistä muodostuvien kerrostumien ja tahrojen välttämiseksi.
•Sokeri tai hyvin sokeripitoiset ruoat vahingoittavat keittotasoa ja ne täytyy poistaa heti.
•Suola, sokeri ja hiekka voivat naarmuttaa lasipintaa.
•Käytä pehmeää liinaa, keittiöpaperia tai erityisesti lasikeraamiselle keittotasolle tarkoitettuja puhdistusaineita (noudata valmistajan ohjeita).
•Lue kohdassa Käyttöohjeet annetut ohjeet ja noudata niitä.
•Tarkista, että kyseessä ei ole sähkökatko.
•Kuivaa pinta huolellisesti puhdistamisen jälkeen.
•Jos näyttöön keittotasoa käynnistettäessä tulee aakkosnumeerinen koodi, toimi seuraavan taulukon mukaan.
•Ellet saa keittotasoa käytön jälkeen kytkettyä pois toiminnasta, kytke se irti sähköverkosta.
-Varmista ennen puhdistamisen aloittamista, että kaikki keittoalueet on kytketty pois toiminnasta eikä
näytössä enää näy jälkilämmön merkkiä (H).
VIANMÄÄRITYS
VIRHEKOODIKUVAUSMAHDOLLINEN SYYKORJAUSTOIMENPIDE
Keittotaso kytkeytyy pois toiminnasta ja 30
sekunnin kuluttua kuuluu äänimerkki 4 sekunnin
välein
Kytkimet ovat jatkuvasti painettunaKäyttöpaneelilla on vettä tai
keittiövälineitäPuhdista käyttöpaneeli
C81, C82Käyttöpaneeli sammuu liian korkean
lämpötilan vuoksi
Sisäisten elektronisten osien lämpötila on
liian korkea
Odota, että keittotaso jäähtyy
ennen kuin käytät sitä uudelleen
F42 tai F43Keittotason liitännän jännite ei ole
oikea
Anturi havaitsee liitäntäjännitteestä
poikkeavan jännitteen
Irrota laite sähköverkosta ja tarkista
liitäntä
F12, F21, F25, F36, F37, F40, F47, F56, F58, F60Ota yhteys huoltopalveluun ja ilmoita virhekoodi
FI75
Ennen kuin otat yhteyttä huoltoon
1.Kokeile, voitko korjata vian itse. Katso kohdassa Vianetsintä olevia neuvoja.
2.Sammuta keittotaso ja kytke se uudelleen päälle nähdäksesi onko vika poistunut.
Jos ongelma ei poistu edellä mainittujen tarkistusten jälkeen, ota yhteyttä valtuutettuun huoltoliikkeeseen.
Ilmoita aina:
•lyhyt häiriön kuvaus
•keittotason tyyppi ja malli
•huoltokoodi (arvokilvessä Service-sanan jälkeen oleva numerosarja), joka on merkitty laitteen alle (metallilevyyn). Huoltokoodi on merkitty myös takuukorttiin
•tarkka osoitteesi
•puhelinnumerosi.
Jos laite tarvitsee korjausta, ota yhteys takuutiedoissa mainittuun valtuutettuun huoltopalveluun (näin voit olla varma, että käytetyt varaosat ovat alkuperäisiä ja
että korjaukset tehdään oikein). Varaosia on saatavissa 10 vuotta.
HUOM:
Kaksoiskeittoalueella, jonka läpimitta on 28 cm (mallikohtainen), lyhyttä käyttöä varten ja sellaisille kypsennyksille, jotka vaativat lämmön tasaista jakautumista (esimerkiksi
pannukakku), on suositeltavaa käyttää varusteita, joiden läpimitta ei ylitä 24 cm. Varovasti tehtäviä toimintoja varten (esimerkiksi suklaan tai voin sulattaminen) on
suositeltavaa käyttää pienempiä keittoalueita.
HUOLTOPALVELU
TEHOTAULUKKO
TehotasoToimintoTason käyttö
(viitteellinen - kokemus ja ruoanlaittotottumus vaikuttavat käyttöön)
Maksimiteho
BoostNopea kuumentaminenIhanteellinen ruoan lämpötilan nopeaa nostamista varten, veden saamiseksi kiehumispisteeseen tai
OFFNollatehoAlustasoKeittotaso valmiustilassa tai sammutettu (mahdollinen jälkilämpö, jonka ilmaisee H)
Liimaa tähän yksi takuukirjasessa olevista,
tuotetiedot sisältävistä tarroista.
PL76
PAŃSTWA BEZPIECZEŃSTWO ORAZ BEZPIECZEŃSTWO OSÓB TRZECICH JEST BARDZO WAŻNE
Niniejsza instrukcja zawiera ważne informacje dotyczące bezpieczeństwa, z którymi należy się zapoznać i których należy ściśle przestrzegać.
Wszystkie komunikaty dotyczące bezpieczeństwa określają rodzaj potencjalnego ryzyka oraz informują, w jaki sposób zmniejszyć ryzyko urazów, szkód oraz porażenia
prądem wskutek nieprawidłowej obsługi urządzenia. Należy ściśle przestrzegać następujących instrukcji:
-Przed przystąpieniem do jakichkolwiek czynności instalacyjnych urządzenie należy odłączyć od zasilania elektrycznego.
-Instalacja lub konserwacja powinna zostać przeprowadzona przez technika specjalistę zgodnie z instrukcjami producenta oraz obowiązującymi lokalnie
przepisami dotyczącymi bezpieczeństwa. Nie naprawiać i nie wymieniać żadnej części urządzenia, jeśli nie jest to konkretnie zalecane w instrukcji obsługi.
-Urządzenie musi być uziemione.
-Przewód zasilający powinien mieć wystarczającą długość, aby umożliwić podłączenie zabudowanego urządzenia do sieci elektrycznej.
-Aby instalacja była zgodna z obowiązującymi przepisami bezpieczeństwa, należy zamontować wyłącznik wielobiegunowy o minimalnym odstępie styków
wynoszącym 3 mm.
-Nie wolno stosować rozgałęziaczy ani przedłużaczy.
-Nie ciągnąć kabla zasilającego urządzenia.
-Po zakończeniu instalacji użytkownik nie powinien mieć dostępu do komponentów elektrycznych urządzenia.
-Urządzenie jest przeznaczone wyłącznie do użytku domowego do przygotowywania żywności. Nie dopuszcza się żadnych innych zastosowań (np. do ogrzewania
pomieszczeń). Producent nie ponosi żadnej odpowiedzialności za uszkodzenia i straty spowodowane niewłaściwym użyciem lub nieprawidłową konfiguracją
ustawień.
-Niniejsze urządzenie nie powinno być obsługiwane przez osoby (w tym dzieci) o ograniczonej sprawności fizycznej, sensorycznej lub umysłowej, ani przez osoby
niedoświadczone lub nieposiadające wystarczającej wiedzy, chyba że obsługują one urządzenie pod nadzorem lub po uprzednim przeszkoleniu w zakresie
prawidłowej obsługi przez osobę odpowiedzialną za ich bezpieczeństwo.
-Dostępne części mogą się bardzo rozgrzać podczas pracy urządzenia. Należy pilnować, aby dzieci nie zbliżały się do urządzenia i nie bawiły się nim.
-Podczas pracy urządzenia i po jej zakończeniu nie wolno dotykać grzałek. Nie dopuszczać do kontaktu ze ściereczkami lub innym łatwopalnym materiałem,
dopóki wszystkie komponenty urządzenia nie wystygły wystarczająco.
-Nie wolno wkładać do piekarnika materiałów łatwopalnych ani przechowywać ich w jego pobliżu:
-Przegrzane tłuszcze i oleje mogą się łatwo zapalić. Należy nadzorować pieczenie potraw z dużą ilością tłuszczu lub oleju.
-Nie kłaść na polu grzejnym przedmiotów metalowych, np. przyrządów kuchennych (noży, widelców, łyżek,…), pokrywek ani innych podobnych, ponieważ
mogą się one rozgrzać do wysokiej temperatury.
-We wnęce pod urządzeniem należy zainstalować panel oddzielający, który nie został dostarczony w komplecie.
-W razie uszkodzenia powierzchni płyty (np. pęknięcia lub zbicia szkła) należy zaprzestać jej używania i skontaktować się z lokalnym autoryzowanym serwisem.
-Urządzenia nie można włączać przy pomocy zewnętrznego timera ani oddzielnego systemu zdalnego sterowania.
WAŻNE INSTRUKCJE BEZPIECZEŃSTWA
Ten symbol informuje o potencjalnym zagrożeniu dla bezpieczeństwa użytkownika i osób trzecich.
Wszystkie wiadomości dotyczące bezpieczeństwa będą poprzedzone tym symbolem oraz następującymi oznaczeniami:
NIEBEZPIECZEŃSTWOOznacza niebezpieczną sytuację, której ewentualne zaistnienie prowadzi do poważnych obrażeń.
OSTRZEŻENIEOznacza niebezpieczną sytuację, której ewentualne zaistnienie mogłoby prowadzić do poważnych
obrażeń.
POLSKIInstalacjaStrona2Instrukcja obsługiStrona
PL77
Utylizacja opakowania
Materiał z opakowania w 100% nadaje się do recyklingu i jest oznaczony symbolem (). Części opakowania nie należy wyrzucać, lecz utylizować zgodnie z przepisami
określonymi przez lokalne władze.
Utylizacja urządzenia
Niniejsze urządzenie jest oznaczone zgodnie z Dyrektywą Europejską 2002/96/WE (WEEE) oraz polską ustawą o zużytym sprzęcie elektrycznym i elektronicznym.
Zapewniając prawidłowe złomowanie niniejszego urządzenia przyczynią się Państwo do ograniczenia ryzyka wystąpienia negatywnego wpływu produktu na
środowisko i zdrowie ludzi.
Symbol na urządzeniu lub w dokumentacji do niego dołączonej oznacza, że urządzenia nie wolno traktować podobnie jak zwykłe odpady domowe. Należy oddać
je do punktu zajmującego się utylizacją i recyklingiem urządzeń elektrycznych i elektronicznych.
Oszczędzanie energii
Aby uzyskać najlepsze wyniki pracy urządzenia, należy:
•Używać garnków i patelni, których średnica dna jest równa średnicy pola grzejnego.
•Stosować tylko garnki i patelnie o płaskim dnie.
•Jeśli to możliwe, garnki powinny być nakryte w czasie gotowania.
•Dzięki naczyniom ciśnieniowym można zmniejszyć zużycie energii i skrócić długość gotowania.
•Naczynia należy stawiać na środku pola grzejnego oznaczonego na płycie.
-Niniejsze urządzenie jest przeznaczone do kontaktów z artykułami spożywczymi i spełnia wymagania określone w Rozporządzeniu () Nr 1935/2004. Zostało
ono zaprojektowane, wyprodukowane i wprowadzone na rynek zgodnie z wymogami bezpieczeństwa określonymi w Dyrektywie 2006/95/WE w sprawie
niskiego napięcia (która zastąpiła Dyrektywę 73/2 3/EWG z późniejszymi zmianami) oraz w Dyrektywie 2004/108/WE w sprawie kompatybilności
elektromagnetycznej.
Aby sprawdzić, czy naczynie nadaje się do stosowania na indukcyjnych płytach kuchennych, posłużyć się magnesem: garnki się nadają, jeśli reaguje na nie magnes.
-Sprawdzić, czy spód naczynia nie jest chropowaty, aby nie doszło do porysowania powierzchni płyty kuchennej. Sprawdzić naczynia.
-Nie opierać gorących garnków i patelni o powierzchnię panelu sterowania. Może to prowadzić do jego uszkodzenia.
PORADY DOTYCZĄCE OCHRONY ŚRODOWISKA
DEKLARACJA ZGODNOŚCI
PRZED ROZPOCZĘCIEM PRACY
WAŻNE: Jeśli naczynia nie mają prawidłowych rozmiarów, pola grzejne nie włączą się. Stosować wyłącznie naczynia opatrzone napisem “INDUCTION
SYSTEM“ (Rysunek obok). Naczynie należy postawić na żądane pole grzejne przed włączeniem płyty kuchennej.
ISTNIEJĄCE NACZYNIA
ZALECANE ŚREDNICE DNA NACZYŃ
NIEOK
Ø
28 cm
XL
Ø
17 cm 28 cm
Ø
21 cm
Napięcie
Ø
15 cm 21 cm
Ø
18 cm
M
Ø
14,5 cm
S
Ø
12 cm 18 cm
Ø
10 cm 14,5 cm
PL78
Po rozpakowaniu urządzenia należy sprawdzić, czy nie zostało ono uszkodzone w czasie transportu. W razie problemów skontaktować się ze sprzedawcą lub
autoryzowanym serwisem.
PRZYGOTOWANIE MEBLA DO ZABUDOWY
Przyłączenie do płytki zaciskowej
Do podłączenia elektrycznego należy użyć przewodu typu HO5RR-F, jak pokazano w poniższej tabeli.
Ważne:
- Zachować lub zdjąć metalowe mostki między śrubami skrzynki zaciskowej L1-L2 i N1-N2 zgodnie ze schematem połączeń (patrz rysunek).
- Upewnić się, że wszystkie sześć śrub skrzynki zaciskowej zostało dokręconych po podłączeniu kabli.
Przykład mostka obecnego (po lewej stronie) i zdjętego (po prawej stronie). Sprawdzić szczegóły na schemacie połączeń (mostki mogą być pomiędzy L1-L2 i pomiędzy
N1-N2).
INSTALACJA
OSTRZEŻENIE-Zainstalować panel oddzielający
pod płytą kuchenną.
-Po zainstalowaniu dolna część
urządzenia nie powinna być już
dostępna.
-W razie instalacji piekarnika pod
płytą nie instalować panelu
oddzielającego.
•Odległość między spodem urządzenia a panelem oddzielającym powinna być zgodna z wymiarami podanymi na rysunku.
•Aby zagwarantować prawidłową pracę urządzenia, nie wolno blokować minimalnego otworu między blatem a górną częścią blatu mebla (min. 5 mm).
•Jeśli pod płytą kuchenną jest instalowany piekarnik, sprawdzić, czy posiada on system chłodzenia.
•Nie instalować płyty kuchennej na zmywarkach bądź pralkach, aby zapobiec kontaktowi obwodów elektronicznych z parą lub wilgocią, która może je uszkodzić.
•W przypadku montażu płyty równo z blatem skontaktować się z serwisem w celu montażu zestawu śrub 4801 211 00112.
•Aby wyjąć płytę z blatu, należy przy pomocy śrubokrętu (niedostarczony w komplecie) zwolnić śruby od spodu urządzenia.
PODŁĄCZENIE ELEKTRYCZNE
OSTRZEŻENIE-Odłączyć urządzenie od zasilania elektrycznego.
-Urządzenie powinno być zainstalowane przez wykwalifikowanego technika, znającego
obowiązujące przepisy w zakresie bezpieczeństwa i właściwego instalowania.
-Producent nie będzie ponosił żadnej odpowiedzialności za obrażenia cielesne osób lub zwierząt, ani za szkody materialne wynikłe w związku z
nieprzestrzeganiem zaleceń podanych w niniejszym rozdziale.
-Długość przewodu zasilającego powinna umożliwiać wyjęcie płyty kuchennej z blatu.
-Napięcie podane na tabliczce znamionowej znajdującej się na dnie urządzenia musi odpowiadać napięciu w Państwa mieszkaniu.
Podłączyć kabel uziemiający (żółto-zielony) do zacisku oznaczonego symbolem .
Ten kabel powinien być dłuższy od pozostałych.
1.Odkręcić śrubę, aby wyjąć pokrywę płytki zaciskowej (A) i włożyć pokrywę w zawias (B) płytki zaciskowej.
2.Włożyć przewód zasilający do dławika i podłączyć żyły do płytki zaciskowej zgodnie ze schematem połączeń znajdującym się w pobliżu płytki.
3.Zamocować przewód zasilający dławikiem.
4.Zamknąć pokrywę (C) i przykręcić ją do płytki zaciskowej uprzednio odkręconą śrubą.
Po każdym podłączeniu do zasilania sieciowego płyta przeprowadza automatyczną kontrolę trwającą kilka sekund.
Jeśli płyta już posiada przewód zasilający, należy wykonać polecenia podane na tabliczce do niego dołączonej. Stałe podłączenie urządzenia do sieci zasilającej wymaga
zastosowania wyłącznika wielobiegunowego z minimalnym rozwarciem styków wynoszącym 3 mm.
Opis panelu sterowania
Panel sterowania
Włączenie/wyłączenie płyty kuchennej
Aby włączyć płytę, wcisnąć przycisk na ok. 2 sekundy i przytrzymać, dopóki nie zapalą się wyświetlacze pól grzewczych. Aby wyłączyć płytę, dotknąć tego samego
przyciski i przytrzymać do czasu wyłączenia wyświetlaczy Wszystkie pola grzejne zostaną wyłączone.
Gdy płyta już pracowała, wskaźnik ciepła resztkowego “H” świeci, dopóki płyta kuchenna nie wystygnie.
Jeśli w ciągu 10 sekund od włączenia płyty kuchennej nie wybierze się żadnej funkcji, płyta wyłączy się automatycznie.
Włączenie i regulacja pól grzejnych
Po włączeniu płyty kuchennej i ustawieniu naczynia na wybranym polu grzejnym należy ustawić poziom mocy przy pomocy przycisku +. Po włączeniu na wyświetlaczu
świecić się będzie poziom 5.
Każde pole grzejne posiada kilka poziomów mocy, które można regulować przyciskami +/- w zakresie od “1“ (moc minimalna) do “9“ (moc maksymalna). Niektóre
pola grzejne posiadają funkcję szybkiego gotowania (Booster), której symbolem na wyświetlaczu jest litera “P”.
Funkcja szybkiego gotowania (Booster)
Funkcja jest dostępna jedynie dla określonych pól grzejnych. Pozwala ona na wykorzystanie maksymalnej mocy płyty (np. w celu szybkiego doprowadzenia wody do
wrzenia). Aby włączyć tę funkcję, należy naciskać przycisk “+“, dopóki na wyświetlaczu nie pojawi się “P“, lub po włączeniu płyty kuchennej nacisnąć bezpośrednio przycisk
“-“ przy wybranym polu. Również w takim przypadku na wyświetlaczu pojawi się “P”. Po 10 minutach działania funkcji booster urządzenie automatycznie ustawia dla
danego pola poziom 9.
Wyłączenie pola grzejnego
Wybrać pole grzejne, które ma był wyłączone, naciskając przycisk “+” lub “-” (na wyświetlaczu pojawia się punkcik u dołu po prawej stronie poziomu mocy).
Naciskać przycisk “-”, dopóki nie dojdzie się do poziomu “0”.
Można również wyłączyć pole grzejne, równocześnie wciskając przyciski “+” oraz “-”. Pole grzejne wyłącza się i pojawia się wskaźnik ciepła resztkowego “H”.
Blokada panelu sterowania
Funkcja blokuje przyciski płyty kuchennej, aby nie dopuścić do przypadkowego włączenia urządzenia przez dzieci. Aby włączyć blokadę panelu sterowania, włączyć płytę kuchenną
i wcisnąć na trzy sekundy przycisk . Sygnał dźwiękowy oraz wskaźnik świetlny pod symbolem klucza sygnalizują włączenie funkcji. Panel sterowania jest zablokowany za
wyjątkiem funkcji wyłączania. Aby wyłączyć blokadę, należy wykonać tę samą procedurę, co przy włączaniu. Wyłączy się wskaźnik świetlny i płyta będzie ponownie aktywna.
Obecność wody po umyciu płyty, płynu, jaki wydostał się z garnka na płycie, a także innych przedmiotów na przycisku pod symbolem może być powodem
przypadkowego i niepożądanego włączenia się lub wyłączenia blokady panelu sterowania.
INSTRUKCJA OBSŁUGI
Blokada panelu sterowania
Przyciski regulacji pól grzejnych i wyświetlacz
Włączenie/Wyłączenie
Timer
symbole nie są aktywne!
Aby wybrać żądane funkcje,
dotknąć pól poniżej.
Przycisk-
Wyświetlacz wskaźnika mocy
Wskazanie wybranego pola grzejnego
Przycisk+
Położenie pola grzejnego
PL80
Timer
Timer to wyłącznik czasowy, dzięki któremu można ustawić określoną długość czasu gotowania, maksymalnie do 99 minut (1 godz. i 39 minut).
Działa on wyłącznie w odniesieniu do jednego pola grzejnego.
Wybrać pole grzejne, które ma być sterowane przy pomocy timera (u dołu po prawej stronie wskaźnika poziomu mocy na wyświetlaczu pojawi
się świecący punkcik), następnie ustawić żądany czas przy pomocy przycisków “+” oraz “-” funkcji timera (patrz rysunek powyżej). Po kilku
sekundach od ostatniego dotknięcia timer rozpoczyna odliczanie od końca (świecący punkcik przy wybranym polu grzejnym zaczyna migać). Po
upływie ustawionego czasu włącza się sygnał dźwiękowy i pole grzejne wyłącza się automatycznie.
Aby wyłączyć timer, należy naciskać przycisk “-“, dopóki na wyświetlaczu nie pojawi się “0:0“, lub równocześnie nacisnąć przyciski “+“ i “-“ timera.
Ważne: W danym czasie timer może sterować tylko jednym polem grzejnym.
Minutnik
Minutnik można używać jedynie, gdy piekarnik nie jest w użyciu. Umożliwia on ustawienie czasu maksymalnego 99 min.
Nacisnąć klawisz “+” pod wskaźnikami timera: na wyświetlaczu pojawia się wartość w minutach, którą należy odpowiednio nastawić.
Wybrać żądany czas przyciskami + i -.
Po kilku sekundach włącza się odliczanie od końca, a po jego zakończeniu włącza się sygnał dźwiękowy.
Ważne: Funkcja minutnika jest dostępna jedynie wtedy, gdy urządzenie jest wyłączone. Włączenie płyty powoduje skasowanie minutnika.
Informacje dotyczące panelu sterowania
Wskaźniki ciepła resztkowego.
Płyta jest wyposażona we wskaźnik ciepła resztkowego dla każdego pola grzejnego. Wskaźnik taki sygnalizuje, które pola grzejne mają jeszcze wysoką
temperaturę.
Jeśli na wyświetlaczu pojawia się , pole grzejne jest nadal gorące. Jeśli przy danym polu świeci się ten symbol, pole można jeszcze wykorzystać aby, na
przykład, roztopić masło lub utrzymać temperaturę potrawy.
Po wystygnięciu pola grzejnego wyświetlacz gaśnie.
Wskaźnik nieprawidłowego naczynia lub braku naczynia.
Płyta jest wyposażona w automatyczny system wykrywania obecności naczynia na każdym polu grzejnym. W razie wykrycia braku naczynia miga
wyświetlacz poziomu mocy danego pola grzejnego. Należy sprawdzić, czy naczynie jest prawidłowo położone oraz czy spełnia wymogi określone w rozdziale
“Przed rozpoczęciem pracy”.
WAŻNE: nie stosować gąbek ani myjek ściernych. Jeśli będą stosowane, mogą z czasem uszkodzić szkło.
•Po każdym użyciu odczekać, aż płyta ostygnie, a następnie wyczyścić ją, aby zapobiec powstawaniu osadów i plam z resztek jedzenia.
•Cukier lub artykuły o dużej zawartości cukru uszkadzają płytę kuchenną i należy je natychmiast usuwać.
•Sól, cukier i piasek mogą zarysować szklaną powierzchnię.
•Stosować miękkie ściereczki, ręczniki papierowe lub specjalne produkty do czyszczenia płyt (przestrzegać wskazówek producenta).
•Proszę uważnie przeczytać i wykonać instrukcje podane w rozdziale “Instrukcja obsługi“.
•Sprawdzić, czy nie doszło do przerw w zasilaniu elektrycznym.
•Dobrze wytrzeć powierzchnię płyty po jej umyciu.
•Jeśli po włączeniu płyty na wyświetlaczu pojawiają się kody alfanumeryczne, należy postępować zgodnie z instrukcjami podanymi w poniższej tabeli.
•Jeśli po zakończeniu pracy nie można wyłączyć płyty kuchennej, należy ją odłączyć od zasilania elektrycznego.
CZYSZCZENIE
OSTRZEŻENIE-Unikać stosowania czyścików parowych.
-Przed przystąpieniem do czyszczenia należy upewnić się, czy wszystkie pola grzejne są wyłączone oraz
czy nie świeci się wskaźnik ciepła resztkowego (“H“).
INSTRUKCJA WYSZUKIWANIA USTEREK
KOD BŁĘDUOPISPRAWDOPODOBNA
PRZYCZYNAUSUNIĘCIE BŁĘDU
Płyta wyłącza się i po 30 sekundach rozlega się
sygnał dźwiękowy powtarzany co 4 sekundy
Obszar panelu sterowania jest stale
pod naciskiem
Woda lub narzędzia kuchenne na panelu
sterowaniaOczyścić panel sterowania
C81, C82Panel sterowania wyłącza się w
związku ze zbyt wysoką temperaturą
Temperatura wewnętrzna części
elektronicznych jest zbyt wysoka
Odczekać, aż płyta się ochłodzi i
dopiero wtedy włączyć ją ponownie
F42 lub F43Nieprawidłowe napięcie
doprowadzane do płyty kuchennej
Czujnik wykrywa napięcie inne niż
wymagane
Odłączyć płytę od sieci zasilającej i
sprawdzić podłączenie
F12, F21, F25, F36, F37, F40, F47, F56, F58, F60Skontaktować się z lokalnym autoryzowanym serwisem i podać kod błędu
PL81
Przed skontaktowaniem się z serwisem technicznym
1.Sprawdzić, czy nie można samodzielnie rozwiązać problemu zgodnie z punktami opisanymi w “Instrukcji wyszukiwania usterek“.
2.Wyłączyć i ponownie włączyć urządzenie, aby sprawdzić, czy usterka nie ustąpiła.
Jeśli po przeprowadzeniu powyższych kontroli usterka nie znikła, należy skontaktować się z najbliższym autoryzowanym serwisem technicznym.
Należy podać:
•krótki opis usterki;
•typ i dokładny model płyty grzejnej;
•numer serwisowy (numer po słowie SERVICE na tabliczce znamionowej) znajdujący się pod urządzeniem (na metalowej płytce). Numer serwisowy jest także
podany w karcie gwarancyjnej;
•Państwa dokładny adres;
•numer telefonu.
Jeżeli konieczne jest dokonanie naprawy, prosimy o kontakt z autoryzowanym Serwisem Technicznym (zapewnia to użycie oryginalnych części zamiennych oraz
prawidłowe wykonanie naprawy). Części zamienne są dostępne przez 10 lat.
UWAGA:
W przypadku podwójnego pola grzewczego o średnicy 28 cm (tam, gdzie jest ono dostępne) do przyrządzania potraw wymagających krótkiego gotowania i idealnego
rozprowadzania ciepła (na przykład naleśniki) zaleca się używanie naczyń o średnicy nieprzekraczającej 24 cm. Do potraw wymagających delikatnej obróbki cieplnej (na przykład
topienie czekolady czy masła) zaleca się używanie pojedynczych pól grzewczych o mniejszej średnicy.
SERWIS TECHNICZNY
TABELA MOCY
Poziom mocyRodzaj gotowaniaUżycie poziomu
(wskazanie należy skorygować wg własnego doświadczenia oraz nawyków
gotowania)
Moc
maksymalna
BoostSzybkie podgrzewanieIdealne do podniesienia temperatury potrawy w krótkim czasie, szybkiego zagotowania wody lub
Idealne do podsmażania, gotowania na wolnym ogniu, gotowania lub grillowania (krótkie gotowanie,
5-10minut)
6-7
Przyrumienianie - gotowanie -
duszenie - podsmażanie -
grillowanie
Idealne do podsmażania, gotowania na wolnym ogniu, gotowania lub grillowania (średniej długości
gotowanie, 10-20minut), podgrzewania akcesoriów
Średnia moc
4-5Gotowanie - duszenie -
podsmażanie - grillowanie
Idealne do duszenia, delikatnego gotowania na wolnym ogniu, gotowania (długi czas gotowania).
Gotowanie makaronu al dente
3-4Gotowanie - utrzymywanie na
ogniu - zagęszczanie -
kremowanie
Idealne do długiego gotowania (ryż, sosy, pieczenie, ryby) z dodatkiem płynów (np. wody, wina,
bulionu, mleka), gotowania makaronu al dente
2-3Idealne do długiego gotowania (poniżej jednego litra objętości: ryż, sosy, pieczenie, ryby) z dodatkiem
płynów (np. wody, wina, bulionu, mleka)
Mała moc
1-2Roztapianie - rozmrażanie -
utrzymywanie w cieple -
kremowanie
Idealne do zmiękczania masła, delikatnego roztapiania czekolady, rozmrażania małych artykułów
spożywczych oraz utrzymywania w cieple świeżo ugotowanych potraw (np. sosy, zupy)
1
Idealne do utrzymywania w cieple świeżo ugotowanych potraw, gotowania risotto oraz utrzymywania
temperatury talerzy, na których będą podawane dania (z wykorzystaniem specjalnych akcesoriów do
płyt indukcyjnych)
OFFMoc zeroPowierzchnia podparciaPłyta kuchenna w położeniu czuwania lub wyłączona (możliwa obecność ciepła resztkowego
pozostałego po zakończeniu gotowania, sygnalizowana przez symbol H)
Tutaj przykleić jedną z nalepek z danymi
urządzenia, która znajduje się w gwarancji w
dwóch egzemplarzach.
CZ82
VAŠE BEZPEČNOST I BEZPEČNOST DALŠÍCH OSOB JE VELMI DŮLEŽITÁ
V tomto návodu a na samotném spotřebiči jsou důležitá bezpečnostní upozornění, která si musíte přečíst a dodržovat je.
Všechna bezpečnostní upozornění udávají konkrétní podrobnosti o možném nebezpečí a obsahují pokyny, jak snížit nebezpečí poranění, poškození a úrazu elektrickým
proudem způsobené nesprávným použitím trouby. Dodržujte pečlivě následující pokyny:
-Spotřebič je před každým instalačním postupem nutné odpojit od sítě.
-Instalaci nebo údržbu musí provést kvalifikovaný technik podle pokynů výrobce a v souladu s platnými místními bezpečnostními předpisy. Neopravujte ani
nevyměňujte žádnou část spotřebiče, pokud to není výslovně požadováno v návodu k použití.
-Uzemnění spotřebiče je podle zákona povinné.
-Napájecí kabel musí být tak dlouhý, aby umožnil připojení spotřebiče, zabudovaného do skříňky, k elektrické síti.
-Instalace musí být v souladu s platnými bezpečnostními předpisy, a proto je nutné použít jednopólový vypínač s minimální vzdáleností mezi kontakty 3 mm.
-Nepoužívejte rozdvojky ani prodlužovací šňůry.
-Netahejte za napájecí kabel spotřebiče.
-Po provedení instalace nesmí být elektrické prvky spotřebiče pro uživatele přístupné.
-Tento spotřebič je určen výlučně k pečení jídel v domácnosti. Jiný způsob využití (např. vytápění místností) je zakázaný. Výrobce odmítá jakoukoli odpovědnost za
škody vzniklé nevhodným použitím nebo nesprávným nastavením ovladačů.
-Tento spotřebič nesmí používat dospělé osoby ani děti s jakoukoli fyzickou, smyslovou nebo duševní vadou, nebo bez patřičných zkušeností a znalostí, pokud je
nesledují osoby odpovědné za jejich bezpečnost, nebo jim nedaly příslušné pokyny k použití spotřebiče.
-Přístupné části spotřebiče se při použití mohou zahřát na velmi vysokou teplotu. Malé děti se nesmí ke spotřebiči přibližovat, a je třeba dohlédnout, aby si se
spotřebičem nehrály.
-Během použití a po něm se nedotýkejte topných těles spotřebiče, protože byste se mohli popálit. Na varnou desku nepokládejte utěrky ani jiný hořlavý materiál,
dokud všechny součásti spotřebiče dostatečně nevychladnou.
-Na spotřebič ani do jeho blízkosti nepokládejte hořlavý materiál.
-Přehřáté tuky a oleje se mohou snadno vznítit. Při vaření jídel bohatých na tuk nebo na velkém množství tuku nebo oleje jídlo vždy sledujte.
-Na varné zóny nepokládejte kovové předměty jako kuchyňské náčiní (nože, vidličky, naběračky, pokličky apod.), protože by se mohly zahřát.
-Do prostoru pod spotřebič je nutné vložit oddělovací panel, který není součástí vybavení.
-Jestliže se povrch varné desky poškodí (prasklé nebo proražené sklo), spotřebič nepoužívejte a ihned se obraťte na servisní středisko.
-Spotřebič není zkonstruován k zapnutí pomocí vnějšího časovače nebo samostatného systému dálkového ovládání.
DŮLEŽITÉ BEZPEČNOSTNÍ POKYNY
Toto je symbol nebezpečí, který je důležitý pro zachování bezpečnosti a upozorňuje na možná nebezpečí pro uživatele a pro další osoby.
Před každým upozorněním týkajícím se bezpečnosti najdete tento symbol nebezpečí a následující výrazy:
NEBEZPEČÍOznačuje nebezpečnou situaci, kterou je třeba odvrátit, jinak způsobí vážná poranění.
VAROVÁNÍOznačuje nebezpečnou situaci, kterou je třeba odvrátit, jinak by mohla způsobit vážné poranění.
Návod k použití Strana
CZ83
Likvidace obalového materiálu
Obal je ze 100% recyklovatelného materiálu a je označen recyklačním symbolem (). Obalový materiál proto nevyhazujte s domácím odpadem, ale zlikvidujte ho
podle platných místních předpisů.
Likvidace spotřebiče
Tento spotřebič je označen v souladu s evropskou směrnicí 2002/96/ES o likvidaci elektrického a elektronického zařízení (WEEE).
Zajištěním správné likvidace tohoto výrobku pomůžete zabránit případným negativním důsledkům na životní prostředí a lidské zdraví.
Symbol na spotřebiči nebo příslušných dokladech udává, že tento výrobek nepatří do domácího odpadu, ale je nutné ho odevzdat do příslušného sběrného centra
pro recyklaci elektrických a elektronických zařízení.
Úspora energie
Chcete-li dosáhnout nejlepších výsledků:
•Používejte nádoby s průměrem dna stejným, jako je průměr varné zóny.
•Používejte pouze hrnce a pánve s rovným dnem.
•Je-li to možné, používejte při vaření pokličku.
•Používejte ještě více energie a času vám ušetří tlakový hrnec.
•Hrnec postavte do středu varné oblasti vyznačené na varné desce.
-Tento spotřebič je určen ke kontaktu s potravinami, je v souladu se směrnicí () č. 1935/2004 a byl zkonstruován, vyroben a dodán na trh v souladu s
bezpečnostními požadavky směrnice “Nízké napětí“ 2006/95/ES (která nahrazuje 73/23/EHS a její další znění) a s požadavky na ochranu směrnice “EMC“ 2004/
108/ES.
Ke kontrole vhodnosti nádoby pro indukční varnou desku použijte magnet: jestliže nádoby nereagují na magnet, nejsou pro tuto desku vhodné.
-Přesvědčte se, zda dno hrnce není drsné, protože by mohlo poškrábat povrch varné desky. Zkontrolujte nádobí.
-Nikdy nestavte horké hrnce a pánve na povrch ovládacího panelu varné desky. Mohl by se poškodit.
RADY K OCHRANĚ ŽIVOTNÍHO PROSTŘEDÍ
PROHLÁŠENÍ O SOULADU S PŘEDPISY
PŘED POUŽITÍM
DŮLEŽITÉ UPOZORNĚNÍ: Jestliže hrnce nemají správné rozměry, varné zóny se nezapnou. Používejte pouze hrnce se symbolem “INDUKČNÍ SYSTÉM”
(viz vedlejší obrázek). Před zapnutím varné desky postavte nádobu na požadovanou varnou zónu.
STARÉ NÁDOBY
DOPORUČENÉ PRŮMĚRY DNA NÁDOBY
NEANO
Ø
28 cm
XL
Ø
17 cm 28 cm
Ø
21 cm
L
Ø
15 cm 21 cm
Ø
18 cm
M
Ø
14,5 cm
S
Ø
12 cm 18 cm
Ø
10 cm 14,5 cm
CZ84
Po vybalení spotřebiče se přesvědčte, zda se při dopravě nepoškodil a v případě pochybností se obraťte na prodejce nebo na servis.
PŘÍPRAVA SKŘÍŇKY K VESTAVBĚ
Připojení ke svorkovnici
Pro připojení k elektrické síti použijte typ kabelu H05RR-F podle níže uvedené tabulky.
Důležité upozornění
- Zachovejte nebo odstraňte kovové můstky mezi šrouby svorkovnice L1-L2 a N1-N2 podle schématu připojení (viz obrázek).
- Po připojení kabelů musí být všech šest šroubů svorkovnice utaženo.
Příklad existujícího (vlevo) nebo odstraněného můstku (vpravo). Podrobnosti najdete ve schématu připojení (můstky mohou být mezi L1-L2 a mezi N1-N2).
INSTALACE
VAROVÁNÍ-Pod varnou deskou instalujte
oddělovací panel.
-Dolní část spotřebiče musí být po
provedené instalaci nepřístupná.
-V případě instalace trouby pod
varnou desku se oddělovací panel
neinstaluje.
•Vzdálenost mezi spodní stranou spotřebiče a oddělovacím panelem musí odpovídat rozměrům uvedeným na obrázku.
•Ke správnému fungování spotřebiče nezakrývejte minimální volný prostor mezi pracovní plochou a horní plochou skříňky (min. 5 mm).
•V případě instalace trouby pod varnou desku se přesvědčte, že je vybavena chladicím systémem.
•Neinstalujte varnou desku nad myčku nebo pračku, aby elektronické obvody nebyly v kontaktu s párou nebo vlhkostí a nepoškodily se.
•V případě, že si přejete, aby varná deska byla zcela zapuštěná do pracovní plochy, zavolejte do servisu a požádejte o montáž sady šroubů 4801 211 00112.
•K vyjmutí varné desky z pracovní desky kuchyňské linky použijte šroubovák (není součástí balení), kterým uvolníte pružiny na spodní straně spotřebiče.
PŘIPOJENÍ K ELEKTRICKÉ SÍTI
VAROVÁNÍ-Odpojte spotřebič od elektrické sítě.
-Instalaci musí provést kvalifikovaný odborník podle platných předpisů týkajících se instalace a
bezpečnosti.
-Výrobce odmítá jakoukoli odpovědnost za zranění osob a zvířat nebo poškození majetku vzniklé nedodržením výše uvedených předpisů.
-Napájecí kabel musí být tak dlouhý, aby umožnil varnou desku z pracovní desky vytáhnout.
-Zkontrolujte, zda napětí uvedené na typovém štítku na dně spotřebiče odpovídá napětí ve vašem bytě.
Žlutozelený uzemňovací vodič musí být připojen ke svorce se symbolem .
Tento vodič musí být delší než ostatní vodiče.
1.Sejměte kryt svorkovnice (A) vyšroubováním šroubu a zasuňte kryt do závěsu (B) svorkovnice.
2.Pak napájecí kabel zasuňte do držáku kabelu a vodiče připojte ke svorkovnici, jak je uvedeno na schématu zapojení, umístěném v blízkosti této svorkovnice.
3.Napájecí kabel připevněte pomocí držáku kabelu.
4.Zavřete kryt (C) a přišroubujte ho opět ke svorkovnici pomocí předtím vyšroubovaného šroubu.
Při každém připojení k napájecí síti provede varná deska na několik vteřin automatickou kontrolu.
Pokud je varná deska již vybavena napájecím kabelem, dodržujte pokyny přiložené k napájecímu kabelu. Připojení k pevné síti proveďte pomocí vícepólového vypínače
s minimální vzdáleností mezi kontakty 3 mm.
Popis ovládacího panelu
Ovládací panel
Zapnutí/vypnutí varné desky
K zapnutí varné desky stiskněte na asi 2 vteřiny tlačítko, až se rozsvítí displeje varných zón. Desku vypnete stisknutím stejného tlačítka, až displej zhasne. Vypnou
se všechny varné zóny.
Jestliže jste již varnou desku použili, ukazatel zbytkového tepla “H” bude svítit tak dlouho, dokud se varné zóny neochladí.
Pokud do 10 vteřin po zapnutí varné desky nezvolíte žádnou funkci, deska se automaticky vypne.
Zapnutí a nastavení varné zóny
Po zapnutí varné desky a umístění nádoby na zvolenou zónu nastavte výkon pomocí tlačítka +. Po zapnutí se na displeji zobrazí stupeň 5.
Každá varná zóna má různé stupně výkonu, od “1“ (minimální výkon) do “9“ (maximální výkon). Některé varné zóny mají funkci rychlého varu (Booster), signalizovaný
na displeji písmenem “P“.
Funkce rychlého varu (Booster)
Tuto funkci mají jen některé varné zóny. Funkce umožňuje maximální využití výkonu varné desky (např. k rychlému uvedení vody do varu). K aktivaci funkce stiskněte tlačítko
“+“ , až se na displeji zobrazí “P“, nebo po zapnutí varné desky stiskněte přímo tlačítko “-“ k dané varné zóně. I v tomto případě se na displeji objeví “P“. Po 10 minutách
použití se funkce rychlého varu Booster vypne a varná deska automaticky nastaví zónu na stupeň 9.
Vypnutí varné zóny
Zvolte varnou zónu k vypnutí stisknutím tlačítka “+” nebo “-” (puntík dole vpravo u ukazatele výkonu zobrazený na displeji).
Stiskněte tlačítko “-“, až nastavíte stupeň “0“.
Varnou zónu můžete také vypnout současným stisknutím tlačítek “+“ a “-“. Varná zóna se vypne a objeví se ukazatel “H“ zbytkového tepla.
Zablokování ovládacího panelu
Funkce úplně zablokuje ovládání varné desky, aby nemohlo dojít k náhodnému zapnutí dětmi. Chcete-li zapnout zablokování ovládacího panelu, stiskněte na tři vteřiny tlačítko
: zapnutí je signalizováno zvukovým signálem a světelným ukazatelem pod symbolem klíče. Ovládací panel je zablokovaný s výjimkou funkce vypnutí. Zablokování
ovládacího panelu vypnete zopakováním postupu zapnutí. Světelný puntík zhasne a varná deska je opět aktivní.
Voda z čištění, tekutiny vyteklé z hrnce nebo jakékoli předměty položené na tlačítku pod symbolem mohou způsobit neúmyslné zapnutí nebo zablokování ovládacího
panelu.
NÁVOD K POUŽITÍ
Zablokování ovládacího panelu
Ovladače nastavení varných zón a příslušný displej
Zapnutí/vypnutí
Časovač
symboly nejsou aktivní! Pro
zvolení požadovaných
funkcí se dotkněte
plošek pod nimi.
Tlačítko-
Displej ukazatele výkonu
Ukazatel zvolené varné zóny
Tlačítko+
Umístění varné zóny
CZ86
Časovač
Časovač je vypínač, který umožňuje nastavit dobu vaření na maximální čas 99 minut (1 hodina a 39 minut) pro jednu určitou varnou zónu.
Zvolte varnou zónu, kterou chcete nastavit pomocí časovače (vpravo dole u ukazatele stupně výkonu na displeji se objeví světelný puntík), pak
nastavte požadovaný čas pomocí tlačítek “+” a “-” funkce časovače (viz obrázek nahoře). Za několik vteřin od posledního dotknutí začne časovač
odpočítávat čas (puntík volby varné zóny začne blikat). Po uplynutí nastaveného času zazní zvukový signál a varná zóna se automaticky vypne.
K vypnutí časovače stiskněte tlačítko “-“, až se na displeji objeví “0:0“, nebo stiskněte současně tlačítka “+“ a “-“ časovače.
Důležité upozornění Časovač můžete nastavit vždy jen pro jednu určitou varnou zónu.
Minutka
Minutku lze použít pouze v případě, že není varná deska zapnutá, a umožňuje nastavení maximálního času 99 minut.
Stiskněte tlačítko “+” umístěné pod ukazateli časového spínače.
Zvolte požadovaný čas tlačítky + a -.
Za několik vteřin se spustí odpočítávání nastaveného času a po jeho uplynutí se zapne zvukový signál.
Důležité upozornění Funkci minutky lze použít pouze s vypnutým spotřebičem a zapnutí varné desky má za následek zrušení minutky.
Upozornění ovládacího panelu
Ukazatel zbytkového tepla
Varná deska je vybavena ukazatelem zbytkového tepla pro každou varnou zónu. Tento ukazatel signalizuje, které varné zóny dosud nevychladly na bezpečnou
teplotu.
Jestliže se na displeji zobrazí , je varná zóna ještě teplá. Na varné zóně s tímto ukazatelem můžete například udržet jídlo teplé, nebo rozehřát máslo.
Po ochlazení varné zóny displej zhasne.
Ukazatel nesprávné nebo chybějící nádoby
Varná deska je vybavena automatickým systémem ke zjištění nádoby na všech varných zónách. Jestliže systém nádobu nezjistí, displej se stupněm výkonu
varné zóny bliká. Zkontrolujte, zda je nádoba správně umístěná a zda má požadované vlastnosti uvedené v části ”před použitím”.
DŮLEŽITÉ UPOZORNĚNÍ: Nepoužívejte drsné houbičky nebo drátěnky. Jejich používání by časem mohlo poničit sklo.
•Po každém použití nechte varnou desku vychladnout a odstraňte připečené nečistoty nebo skvrny.
•Cukr nebo potraviny s vysokým obsahem cukru poškozují varnou desku a je nutné je ihned odstranit.
•Sůl, cukr a písek mohou sklo varné desky poškrábat.
•K čištění používejte měkký hadřík, savý kuchyňský papír anebo speciální prostředky na čištění sklokeramických varných desek (řiďte se pokyny výrobce).
•Pozorně si přečtěte a dodržujte pokyny v části ”Pokyny k použití“.
•Zkontrolujte, zda nedošlo k výpadku proudu.
•Po vyčištění varnou desku pečlivě osušte.
•Jestliže se po zapnutí varné desky na displeji zobrazí alfanumerické kódy, postupujte podle následující tabulky.
•Pokud se po použití varné desky nepodaří desku vypnout, ihned ji odpojte od elektrické sítě.
ČIŠTĚNÍ
VAROVÁNÍ-Nepoužívejte čisticí přístroje na páru.
-Před čištěním vždy zkontrolujte, zda jsou varné zóny vypnuté a ukazatel zbytkového tepla (“H”) je
zhasnutý.
JAK ODSTRANIT PORUCHU
CHYBOVÝ KÓDPOPISMOŽNÉ PŘÍČINYODSTRANĚNÍ ZÁVADY
Varná deska se vypne a po 30 vteřinách zní každé
4 vteřiny zvukový signál. Stálý tlak na ovládacím panelu.Voda nebo kuchyňské náčiní na
ovládacím panelu.Vyčistěte ovládací panel.
C81, C82Ovládací panel se vypnul z důvodu
příliš vysoké teploty.
Vnitřní teplota elektronických částí je
příliš vysoká.
Počkejte s dalším vařením, až se
varná deska ochladí.
F42 nebo F43Připojení varné desky nemá správné
napětí.
Čidlo zjistilo jiné napětí, než je připojovací
napětí.
Odpojte varnou desku od elektrické
sítě a zkontrolujte připojení.
F12, F21, F25, F36, F37, F40, F47, F56, F58, F60Zavolejte do servisu a sdělte zobrazený chybový kód.
CZ87
Než zavoláte do servisního střediska
1.Ověřte si, zda nemůžete vyřešit problémy sami pomocí bodů popsaných v “Jak odstranit poruchu“.
2.Vypněte a znovu zapněte spotřebič, abyste zjistili, zda porucha stále trvá.
Jestliže porucha trvá i po provedení výše uvedených kroků, zavolejte do nejbližšího servisu.
Uveďte:
•stručný popis poruchy;
•typ a přesný model spotřebiče;
•servisní číslo (číslo za slovem Service na typovém štítku) umístěné na spodní straně spotřebiče (na kovové destičce). Servisní číslo je uvedeno i na záručním listě;
•svoji úplnou adresu;
•své telefonní číslo s předvolbou.
Jestliže je nutná oprava, obraťte se na autorizované servisní středisko (které je zárukou použití originálních náhradních dílů a správné opravy). Náhradní díly jsou
k dispozici 10 let.
POZNÁMKA:
Na dvojité varné zóně s průměrem 28 cm (je-li k dispozici) doporučujeme pří krátkodobém vaření, které vyžaduje dokonalý rozptyl tepla (např. palačinky), používat nádobí s
průměrem do 24 cm. Pro šetrné vaření, např. rozpouštění čokolády nebo másla) doporučujeme použít samostatné zóny s menším průměrem.
SERVIS
TABULKA VÝKONŮ
Stupeň výkonuZpůsob vařeníPoužití varného stupně
(použití závisí na zkušenostech a kuchařských návycích)
Max. výkon
Boost
(Rychlý var)Rychlý ohřevIdeální k rychlému zvýšení teploty jídla, rychlému uvedení vody do varu nebo rychlému ohřevu
tekutin na vaření.
8-9Smažení - udržení varuIdeální k osmáhnutí do růžova, začátku vaření, smažení mražených výrobků, rychlému varu.
Vysoký výkon
7-8Osmáhnutí do růžova - opečení
- udržení varu - grilováníIdeální k opečení, udržení prudkého varu, vaření a grilování (po krátkou dobu, 5-10 minut)
6-7Osmáhnutí do růžova - vaření -
dušení - opečení - grilování
Ideální k opečení, udržení lehkého varu, vaření a grilování (po středně dlouhou dobu, 10-20 minut,
předehřátí příslušenství
Střední výkon
4-5Vaření - dušení - opečení -
grilováníIdeální k opečení, udržení jemného varu, vaření (po dlouhou dobu). Povaření těstovin s máslem
3-4Vaření - začátek varu -
zahuštění - povaření s máslem
Ideální k delšímu vaření (rýže, omáčky, pečeně, ryby) s tekutinami (např. s vodou, vínem, vývarem,
mlékem), rozpuštění másla na těstovinách.
2-3Ideální k delšímu vaření (rýže, omáčky, pečeně, ryby) s tekutinami (např. s vodou, vínem, vývarem,
mlékem), rozpuštění másla na těstovinách)
Nízký výkon
1-2K udržení teploty - povaření s
máslem
Ideální ke změknutí másla, opatrnému rozpouštění čokolády, rozmrazování malých kousků a k
udržení teploty právě uvařených jídel (např. šťáv, řídkých i hustých polévek)
1Ideální k udržení malých, právě uvařených porcí jídel v teple, zahřátí podávacích talířů, nebo
rozpuštění másla na rizotu)
OFF (VYP)Nulový
výkonOdkladová plochaVarná deska v poloze klidového stavu nebo vypnuto (může být zbytkové teplo z vaření signalizované
ukazatelem H)
Zde nalepte jeden z lepících štítků s údaji o
spotřebiči, který najdete ve dvojím provedení v
záruční příručce.
SK88
VAŠA BEZPEČNOSŤ A BEZPEČNOSŤ INÝCH OSÔB JE VEĽMI DÔLEŽITÁ
V tomto návode a na samotnom spotrebiči sú uvedené dôležité správy týkajúce sa bezpečnosti, ktoré si musíte prečítať a vždy presne dodržiavať.
Všetky správy týkajúce sa bezpečnosti špecifikujú potenciálne nebezpečenstvo, ktorého sa týkajú a uvádzajú, ako znížiť riziko poranení, poškodení a úrazov elektrickým
prúdom a poučujú o správnom používaní spotrebiča. Dôsledne dodržiavajte nasledujúce pokyny:
-Pred akýmkoľvek zásahom pri inštalácii musíte spotrebič odpojiť od elektrického napájania.
-Inštaláciu alebo údržbu smie vykonať iba špecializovaný technik, v súlade s pokynmi výrobcu a za dodržiavania platných vnútroštátnych bezpečnostných
predpisov. Nikdy neopravujte ani nevymieňajte žiadnu časť spotrebiča, ak to nie je uvedené v návode na používanie.
-Uzemnenie spotrebiča je podľa zákona povinné.
-Prívodný elektrický kábel musí byť dostatočne dlhý, aby sa spotrebič, zabudovaný do kuchynskej linky, dal zapojiť do elektrickej siete.
-Aby inštalácia spotrebiča vyhovovala platným normám, treba zapojiť bipolárny spínač s minimálnou vzdialenosťou kontaktov 3 mm.
-Nepoužívajte rozdvojky ani predlžovacie káble.
-Neťahajte za elektrický kábel spotrebiča.
-Po inštalácii spotrebiča nesmú byť jeho elektrické časti prístupné používateľom.
-Spotrebič je určený výhradne na prípravu jedál v domácnosti. Nie je povolené iné používanie (napr. vykurovanie miestností). Výrobca nepreberá žiadnu
zodpovednosť za škody spôsobené neprimeraným používaním alebo nesprávnym nastavením ovládacích prvkov.
-Tento spotrebič nie je určený, aby ho používali osoby (vrátane detí) s obmedzenými fyzickými, zmyslovými alebo rozumovými schopnosťami ani osoby, ktoré
nemajú dostatok skúseností a poznatkov bez toho, že by boli pod dozorom alebo že by boli dostatočne poučené o obsluhe spotrebiča osobou zodpovednou za ich
bezpečnosť.
-Prístupné časti spotrebiča sa počas jeho činnosti môžu veľmi zohriať. Nedovoľte, aby sa deti priblížili ku spotrebiču a dohliadajte, aby sa s ním nehrali.
-Počas a po používaní sa nedotýkajte ohrevných článkov spotrebiča. Nedovoľte, aby sa spotrebič dostal do kontaktu s utierkami alebo iným horľavým materiálom,
kým sa časti spotrebiča dostatočne neochladia.
-Na spotrebič ani v jeho blízkosti nikdy neklaďte horľavý materiál.
-Prehriaty tuk a oleje sa môžu ľahko vznietiť. Pri príprave jedál obsahujúcich veľké množstvo tuku a oleja na ne dohliadajte.
-Na varnú zónu neklaďte kovové predmety, ako kuchynské pomôcky (nože, vidličky, lyžice, pokrievky a pod.), pretože by sa mohli veľmi zohriať.
-V priestore pod spotrebičom musíte nainštalovať oddeľovací panel, ktorý nie je súčasťou výbavy.
-V prípade, že sa povrch varnej dosky poškodí (praskliny alebo rozbitie skla), spotrebič nepoužívajte a zavolajte servisné stredisko.
-Spotrebič sa nesmie zapínať prostredníctvom externého časovača ani samostatným diaľkovým ovládačom.
DÔLEŽITÉ BEZPEČNOSTNÉ POKYNY
Toto je symbol nebezpečenstva týkajúci sa bezpečnosti, ktorý upozorňuje na možné riziká pre používateľa a pre iné osoby.
Všetky správy týkajúce sa bezpečnosti budú označené symbolom nebezpečenstva a nasledujúcimi termínmi:
NEBEZPEČENSTVOOznačuje nebezpečnú situáciu, ktorá, ak sa jej nepredíde, spôsobí vážne poranenia.
VAROVANIEOznačuje nebezpečnú situáciu, ktorá, ak sa jej nepredíde, môže spôsobiť vážne poranenia.
SLOVENSKYInštaláciaStrana2Návod na používanieStrana
SK89
Likvidácia obalu
Materiál obalu je 100% recyklovateľný, ako to potvrdzuje symbol recyklácie (). Rôzne časti obalu nevyhadzujte do odpadu, ale do príslušných nádob na recykláciu
alebo ich odovzdajte v zberných strediskách druhotných surovín, v súlade s miestnymi predpismi
Likvidácia výrobku
Tento spotrebič je označený v súlade s Európskou smernicou 2002/96/ES o likvidácii elektrických a elektronických zariadení (WEEE).
Zabezpečením správnej likvidácie tohto výrobku pomôžete predchádzať potenciálnym negatívnym dopadom na životné prostredie a zdravie ľudí.
Symbol na spotrebiči alebo na sprievodných dokumentoch znamená, že s týmto výrobkom sa nesmie zaobchádzať ako s domovým odpadom, ale treba ho odovzdať
v zbernom stredisku pre elektrické a elektronické zariadenia.
Úspora energie
Aby ste dosiahli čo najlepšie výsledky, odporúčame Vám:
•Používajte hrnce a panvice, ktorých spodný priemer je rovnaký ako priemer varnej zóny.
•Používajte iba panvice a hrnce s rovným dnom.
•Ak je to možné, prikryte hrnce počas varenia pokrievkami.
•Používajte tlakový hrniec, dosiahnete ešte väčšiu úsporu energie a skrátite dobu varenia.
•Hrniec umiestnite do stredu varnej zóny nakreslenej na varnej doske.
-Tento spotrebič, ktorý prichádza do styku s potravinami, vyhovuje nariadeniu () č.1935/2004 a bol navrhnutý, skonštruovaný a uvedený na trh v súlade s
bezpečnostnými požiadavkami smernice „o nízkom napätí“ 2006/95/ES (ktorá nahrádza 73/2 3/EHS v znení nasledujúcich úprav) a s ochrannými požiadavkami
smernice „EMC“ 2004/108/ES.
Aby ste skontrolovali, či je nádoba vhodná na varenie na varnej doske, použite magnet: nádoby nie sú vhodné, ak nepriťahujú magnet.
-Dávajte pozor, aby dno hrncov nebolo drsné, pretože by mohlo poškriabať povrch varnej dosky. Skontrolujte riad.
-Horúce hrnce a panvice nikdy neklaďte na ovládací panel varnej dosky. Mohli by ho poškodiť.
OCHRANA ŽIVOTNÉHO PROSTREDIA
VYHLÁSENIE O ZHODE
PRED POUŽÍVANÍM
DÔLEŽITÉ UPOZORNENIE: ak hrnce nemajú správnu veľkosť, varné zóny sa nezapnú. Používajte výhradne hrnce so symbolom „INDUKČNÝ SYSTÉM“
(Ako na obrázku vedľa). Pred zapnutím varnej dosky položte hrniec na želanú varnú zónu.
NÁDOBY, KTORÉ MÁTE DOMA
ODPORÚČANÉ ROZMERY DNA HRNCA
NIEOK
Ø
28 cm
XL
Ø
17 cm 28 cm
Ø
21 cm
L
Ø
15 cm 21 cm
Ø
18 cm
M
Ø
14,5 cm
S
Ø
12 cm 18 cm
Ø
10 cm 14,5 cm
SK90
Po vybalení spotrebiča skontrolujte, či sa počas prepravy nepoškodil a v prípade problémov zavolajte predajcu alebo servisné stredisko.
Príprava otvoru na zabudovanie
Pripojenie k svorkovnici
Pri elektrickom zapojení použite kábel typu H05RR-F, podľa údajov v tabuľke dolu.
Dôležité upozornenie:
- Nechajte alebo odstráňte mechanické mostíky medzi skrutkami svorkovnice L1-L2 a N1-N2 podľa schémy zapojení (pozri obrázok).
- Uistite sa, že po zapojení káblov ste utiahli všetkých šesť skrutiek svorkovnice.
Príklad existujúceho (vľavo) alebo odstráneného (vpravo) mostíka. Detaily pozrite na schéme zapojenia (mostíky môžu byť medzi L1-L2 a medzi N1-N2).
INŠTALÁCIA
VAROVANIE-Pod varnú dosku nainštalujte
oddeľovací panel.
-Spodná časť spotrebiča nesmie
byť po inštalácii prístupná.
-V prípade, že pod varnou doskou
bude nainštalovaná rúra,
oddeľovací panel neinštalujte.
•Vzdialenosť medzi spodnou stranou spotrebiča a oddeľovacím panelom pod ním musí zodpovedať rozmerom uvedeným na obrázku.
•Aby bola zaručená správna činnosť spotrebiča, nezakrývajte minimálnu medzeru medzi pracovnou plochou a hornou časťou dosky kuchynskej linky (min. 5 mm).
•Ak pod varnú dosku nainštalujete rúru, uistite sa, že je rúra vybavená chladiacim systémom.
•Vyhýbajte sa inštalácii varnej dosky nad umývačkou riadu alebo práčkou, aby elektronické obvody neprichádzali do kontaktu s parou alebo vlhkosťou, pretože
by sa mohli poškodiť.
• V prípade inštalácie, kedy je spotrebič v kontakte, zavolajte servisné stredisko a vyžiadajte si montážnu súpravu skrutiek 4801 211 00112.
•Pri vyberaní varnej dosky z pracovnej plochy použite pri odblokovaní pružín zo spodnej strany spotrebiča skrutkovač (nedodáva sa).
ZAPOJENIE DO ELEKTRICKEJ SIETE
VAROVANIE-Odpojte spotrebič od elektrickej siete.
-Inštaláciu spotrebiča musí vykonať kvalifikovaný technik, ktorý dodržiava všetky bezpečnostné
predpisy a pokyny na inštaláciu.
-Výrobca odmieta akúkoľvek zodpovednosť za poranenie osôb, zvierat a škody na majetku v prípade nedodržania pokynov uvedených v tejto kapitole.
-Prívodný elektrický kábel musí byť dostatočne dlhý, aby sa varná doska dala vybrať z pracovnej plochy.
-Skontrolujte, či napätie uvedené na výrobnom štítku nachádzajúcom sa na spodnej strane spotrebiča zodpovedá napätiu elektrickej siete v domácnosti,
ku ktorej bude spotrebič pripojený.
VodičePočet x veľkosť
230V ~ + 3 x 4 mm2
230 - 240V ~ + 3 x 4 mm2 (iba pre Austráliu)
230V 3 ~ + 4 x 1,5 mm2
400V 3N ~ + 5 x 1,5 mm2
400V 2N ~ + 4 x 1,5 mm2
min 5 mm
min 20 mm
min 5 mm
400 V 3N ~230 V ~230 - 240 V ~ (iba pre Austráliu)
230 V ~ (iba pre Veľkú Britániu)
400 V 2N ~230 V 3 ~ (iba pre Belgicko)400V (iba pre Holandsko)
230 V
230 V
230 V
230 V
230 V
230 V
230 V
230 V
230 V
230 V
230 V
CBA
SK91
Zapojte uzemňovací žlto-zelený vodič ku koncovke so symbolom .
Uvedený vodič musí byť dlhší ako ostatné.
1.Otvorte kryt svorkovnice (A) odskrutkovaním skrutky a vložte kryt do závesu (B) svorkovnice.
2.Potom vsuňte elektrický prívodný kábel do úchytky a zapojte vodiče ku svorkovnici, ako je uvedené v schéme zapojenia zobrazenej vedľa samotnej svorkovnice.
3.Prívodný elektrický kábel upevnite pomocou úchytky.
4.Zatvorte kryt (C) a zaskrutkujte ho ku svorkovnici skrutkou, ktorú ste vybrali.
Po každom zapojení do elektrickej siete varná doska vykoná automatickú kontrolu trvajúcu niekoľko sekúnd.
V prípade, že varná doska je už vybavená prívodným elektrickým káblom, postupujte podľa pokynov na prívodnom elektrickom kábli. Spotrebič zapojte k elektrickej
sieti prostredníctvom multipolárneho spínača s minimálnou vzdialenosťou kontaktov 3 mm.
Popis ovládacieho panela
Ovládací panel
Zapnutie/vypnutie varnej dosky
Aby ste varnú dosku zapli, stlačte na približne 2 sekundy tlačidlo, kým sa nerozsvieti displej varných zón. Aby ste varnú dosku vypli, dotknite sa toho istého tlačidla,
kým displej nezhasne Všetky varné zóny sa vypnú.
Po použití varnej dosky indikátor zvyškového tepla „H” ostane svietiť, kým varná zóna nevychladne.
Ak do 10 sekúnd po zapnutí varnej dosky nezvolíte žiadnu funkciu, varná doska sa automaticky vypne.
Aktivácia a regulácia varných zón
Po zapnutí varnej dosky a položení hrnca na zvolenú varnú zónu nastavte výkon tlačidlom +. Pri zapnutí sa na displeji zobrazí úroveň 5.
Každá varná zóna má k dispozícii rôzne úrovne výkonu, ktoré sa dajú nastaviť tlačidlami +/-, a to od „1“: minimálna úroveň výkonu po „9”: maximálna úroveň výkonu.
Niektoré varné zóny sú vybavené funkciou rýchleho varu (Booster), ktorá sa zobrazuje na displeji písmenom „P“.
Funkcia rýchleho varu (Booster)
Funkcia je k dispozícii iba pre niektoré varné zóny a umožňuje maximálne využiť výkon varnej dosky (napríklad na rýchle zovretie vody). Aby ste funkciu aktivovali, podržte
stlačené tlačidlo „+“, až kým sa na displeji nezobrazí „P“ alebo, po zapnutí varnej dosky, stlačte priamo tlačidlo „-“ pre zvolenú varnú zónu. Aj v tomto prípade sa na displeji
zobrazí „P“. Po 10 minútach používania funkcie prídavného ohrevu booster spotrebič automaticky nastaví úroveň varnej zóny na 9.
Vypnutie varných zón
Stlačením tlačidla „+“ alebo „-“ zvoľte varnú zónu, ktorú chcete vypnúť (na displeji vpravo dolu sa zobrazí bodka úrovne výkonu).
Podržte stlačené tlačidlo „-“, až kým nedosiahnete „0“.
Varnú zónu môžete vypnúť aj súčasným stlačením tlačidiel „+“ a „-”. Varná zóna sa vypne a zobrazí sa indikátor zvyškového tepla “H“.
Zablokovanie ovládacieho panela
Funkcia blokuje ovládacie prvky varnej dosky, aby sa predišlo tomu, že deti náhodne zapnú varnú dosku. Aby ste ovaládací panel zablokovali, zapnite varnú dosku a tri sekundy
podržte stlačené tlačidlo : aktiváciu signalizujú zvukový signál a svetelná kontrolka pod symbolom kľúča. Ovládací panel je zablokovaný, s výnimkou funkcie vypnutia. Aby
ste zablokovanie funkcií zrušili, zopakujte postup ako pri aktivácii. Svetelná kontrolka zhasne a ovládací panel bude znovu aktívny.
Prítomnosť vody po čistení varnej dosky, vykypená kvapalina z hrncov alebo akýkoľvek predmet položený na tlačidle pod symbolom môžu spôsobiť náhodnú aktiváciu
alebo vypnutie ovládačov zablokovania panela.
NÁVOD NA POUŽITIE
Zablokovanie ovládacieho panela
Ovládacie prvky varných zón a príslušný displej
Vypínač
Časomer
symboly nie sú aktívne! Aby
ste nastavili želané funkcie,
dotýkajte sa
oblasti pod nimi.
Tlačidlo-
Displej indikátora výkonu
Indikácia zvolenej varnej zóny
Tlačidlo+
Poloha varnej zóny
SK92
Časomer
Časomer je časový vypínač, ktorý umožňuje nastavenie doby varenia na maximálne 99 minút (1hodinu a 39minút) a ktorý možno nastaviť iba
s jednou varnou zónou.
Zvoľte varnú zónu, s ktorou chcete použiť časomer (na displeji sa vedľa indikátora výkonu vpravo dolu zobrazí svetelná bodka), potom nastavte
želanú dobu pomocou tlačidiel „+“ a „-“ (pozrite obrázok hore). Po niekoľkých sekundách od posledného dotyku začne časomer odpočítavať čas
(svetelná bodka varnej zóny začne blikať). Po uplynutí doby zaznie zvukový signál a varná zóna sa automaticky vypne.
Aby ste časomer zrušili, podržte stlačené tlačidlo “-“, až kým sa na displeji nezobrazí “0:0“ alebo stlačte súčasne tlačidlá “+“ a “-“ časomeru.
Dôležité upozornenie: Časomer možno nastaviť naraz iba pre jednu varnú zónu.
Minútky
Môžete použiť pri vypnutej varnej doske na odpočítavanie doby po max. 99 min.
Stlačte tlačidlo „+” pod indikátormi časomeru: na displeji sa zobrazia minúty na nastavenie.
Želanú dobu nastavte tlačidlami + a -.
Po niekoľkých sekundách sa začne odpočítavanie času, po uplynutí nastavenej doby zaznie zvukový signál.
Dôležité upozornenie: Funkciu minútok možno používať iba s vypnutým spotrebičom, zapnutie varnej dosky bude znamenať vynulovanie minútok.
Upozornenia ovládacieho panelu
Indikátor zvyškového tepla.
Varná doska je vybavená indikátorom zvyškového tepla pre každú varnú zónu. Uvedený indikátor signalizuje, ktoré varné zóny sú ešte horúce.
Ak sa na displeji zobrazuje, varná zóna je ešte horúca. Na uvedenej varnej zóne môžete, napríklad, nechať jedlo, aby ostalo teplé alebo použiť ju na
rozpustenie masla
Po ochladení varnej zóny displej zhasne.
Indikátor nevhodnej alebo chýbajúcej nádoby.
Varná doska je vybavená automatickým systémom zisťovania prítomnosti nádoby účinným pre všetky varné zóny. Ak systém nádobu nezistí, displej s
úrovňou výkonu varnej zóny bude blikať. Skontrolujte správnu polohu nádoby a či spĺňa požiadavky uvedené v časti „Pred používaním”.
DÔLEŽITÉ UPOZORNENIE: nepoužívajte abrazívne špongie ani drôtenky. Ich používanie by časom mohlo zničiť sklo.
•Po každom použití nechajte varnú dosku ochladiť a očistite ju, aby ste odstránili zvyšky jedál a škvrny od jedál.
•Cukor alebo potraviny s vysokým obsahom cukru varnú dosku poškodia, preto ich treba ihneď odstrániť.
•Soľ, cukor a piesok by mohli poškriabať povrch skla.
•Používajte mäkkú utierku, papierové kuchynské utierky alebo špecifické výrobky určené na čistenie varnej dosky (dodržiavajte pokyny výrobcu).
•Prečítajte si a dodržiavajte pokyny uvedené v časti „Pokyny na používanie“.
•Skontrolujte, či nedošlo k prerušeniu dodávky elektriny.
•Po čistení povrch varnej dosky dôkladne osušte.
•Ak sa po zapnutí varnej dosky na displeji zobrazi alfanumerické kódy, postupujte podľa pokynov v tabuľke.
•Ak varnú dosku po použití nedokážete vypnúť, odpojte ju od elektrickej siete.
ČISTENIE
VAROVANIE-Na čistenie spotrebiča nikdy nesmiete použiť prístroje pôsobiace prúdom pary.
-Pred čistením skontrolujte, či sú varné zóny vypnuté a či sa vypol indikátor zvyškového tepla („H“).
PRÍRUČKA NA ODSTRAŇOVANIE PROBLÉMOV
KÓD CHYBYPOPISMOŽNÉ PRÍČINYODSTRÁNENIE CHYBY
Varná doska sa vypne a po 30 sekundách zaznie
zvukový signál, vždy po 4 sekundách.
Neustály tlak na oblasť s ovládacími
prvkami
Voda alebo kuchynské pomôcky na
oblasti s ovládacími prvkamiOčistite oblasť s ovládacími prvkami
C81, C82Oblasť s ovládacími prvkami sa vypne
následkom príliš vysokej teploty
Vnútorná teplota elektronických častí je
príliš vysoká
Pred opätovným použitím varnej
dosky počkajte, kým nevychladne
F42 alebo F43Varná doska nie je zapojená do siete
so správnym napätím
Senzor zistil napätie odlišné od napätia
na zapojenie
Odpojte varnú dosku a skontrolujte
zapojenie
F12, F21, F25, F36, F37, F40, F47, F56, F58, F60Zavolajte servisné stredisko a oznámte kód chyby
SK93
Skôr ako zavoláte servis
1.Skontrolujte, či problém neviete vyriešiť sami podľa bodov popísaných v kapitole “Príručka na odstraňovanie problémov“.
2.Vypnite a znovu zapnite spotrebič, skontrolujte, či sa problém neodstránil.
Ak porucha pretrváva aj po hore uvedených kontrolách, spojte sa s najbližším servisným strediskom.
Nahláste tieto údaje:
•krátky popis poruchy;
•presný typ a model varnej dosky;
•servisné číslo (t.j. číslo uvedené po slove „Service“ na výrobnom štítku), umiestnenom pod varnou doskou (na kovovej platničke). Servisné číslo sa uvádza aj na
záručnom liste;
•vašu úplnú adresu;
•Vaše telefónne číslo a smerový kód.
Ak je potrebná oprava, spojte sa s autorizovaným servisným strediskom (aby ste zaručili, že budú použité originálne náhradné diely a že opravy budú vykonané
odborne). Náhradné diely budú k dispozícii počas 10 rokov.
POZNÁMKA:
Na dvojitej zóne s priemerom 28 cm (ak je k dispozícii) na prípravu jedál v krátkej dobe a pri ktorých je nevyhnutné dokonalé rozloženie tepla (napríklad lievance), sa odporúča
používať nádoby s priemerom, ktorý nepresahuje 24 cm. Pri šetrnom spôsobe prípravy jedla (napríklad roztopenie čokolády alebo masla) sa odporúča použiť jednotlivé zóny s
menším priemerom.
SERVIS
TABUĽKA VÝKONOV
Úroveň výkonuDruh vareniaPoužívanie úrovne
(indikácia je iba orientačná, pomôžu vám aj skúsenosti a zvyky pri varení)
Max výkon
BoostRýchly ohrevIdeálny na ohrev jedla v krátkej dobe až do varu a rýchle zovretie vody alebo kvapalín
8-9Smaženie - varenieIdeálne na osmaženie, uvedenie do varu na začiatku prípravy jedla, smaženie mrazených jedál, rýchle
zovretie vody
Vysoký výkon
7-8Osmaženie - opečenie - varenie
- grilovanieIdeálny na osmaženie, udržiavanie silnejšieho varu, varenie a grilovanie (na krátku dobu, 5-10minút)
6-7Osmaženie - varenie - dusenie
- opečenie - grilovanie
Ideálny na osmaženie, udržiavanie mierneho varu, varenie a grilovanie (na strednú dobu,
10-20minút), predohrejte nádoby
Stredný výkon
4-5Varenie - dusenie - opečenie -
grilovanie
Ideálny na dusenie, udržiavanie mierneho varu, varenie (počas dlhej doby). Dovarenie cestovín spolu s
omáčkou
3-4Varenie - pomalý var -
zahustenie - dovarenie
cestovín s omáčkou
Ideálny na dlhé varenie (ryža, omáčky, dusené mäso, ryby) v šťave alebo s prídavkom inej kvapaliny
(napr. voda, víno, vývar, mlieko), dovarenie cestovín
2-3Ideálny na dlhé varenie (ryža, omáčky, dusené mäso, ryby) v šťave alebo s prídavkom inej kvapaliny
(napr. voda, víno, vývar, mlieko)
Nízky výkon
1-2Rozpúšťanie - rozmrazovanie -
udržiavanie v teple - dovarenie
jedla
Ideálny na zmäkčenie masla, pomalé rozpustenie čokolády, rozmrazenie malých kusov potravín a
udržanie tepla práve uvarených jedál (napr. omáčky , husté polievky, zeleninové polievky)
1Ideálny na udržiavanie tepla práve uvareného jedla, dovarenie rizota a udržiavanie tepla jedál pred
podávaním (v nádobe vhodnej pre indukčnú varnú dosku)
VYPNulový
výkonOdkladacia plochaVarná doska v polohe stand-by alebo vypnutá (možná prítomnosť zvyškového tepla na konci varenia,
signalizované písmenom H)
Tu nalepte jednu z nálepiek s údajmi o spotrebiči,
ktoré sa v dvoch výtlačkoch nachádzajú v záručnom
liste.
HU94
AZ ÖN ÉS MÁSOK BIZTONSÁGA RENDKÍVÜL FONTOS
Ez a kézikönyv és maga a készülék fontos biztonsági figyelmeztetéseket nyújt, amelyeket el kell olvasni és mindenkor figyelembe kell venni.
Minden biztonsági figyelmeztetés specifikusan részletezi a meglévő potenciális kockázatot, és jelzi, hogyan kell a készülék helytelen használatából eredő sérülés, kár
és áramütés kockázatát csökkenteni. Gondosan tartsa be a következő utasításokat:
-A készüléket le kell választani az elektromos táphálózatról bármilyen üzembe helyezési munka végzése előtt.
-A készülék üzembe helyezését és karbantartását szakembernek kell végeznie a gyártó utasításaival és a helyi biztonsági előírásokkal összhangban. Ne javítsa
meg, illetve nem cserélje ki a készülék semmilyen alkatrészét, hacsak az a művelet nem szerepel kifejezetten a felhasználói kézikönyvben.
-A készülék földelése kötelező.
-A elektromos kábelnek elég hosszúnak kell lennie a helyére beszerelt készüléknek az elektromos hálózathoz történő csatlakoztatásához.
-Az érvényes biztonsági előírásoknak való megfelelés érdekében a beszerelésnél legalább 3 mm-es érintkezőtávolságú sokpólusú megszakítót kell használni.
-Ne használjon többdugaszos elosztót, illetve hosszabbítót.
-Tilos húzni a készülék hálózati zsinórját.
-A üzembe helyezést követően az elektromos alkatrészeknek hozzáférhetetlennek kell lenniük a felhasználó számára.
-A készülék kizárólag háztartási ételkészítő berendezésként történő használatra készült. Egyéb használat nem megengedett (pl. helyiségek fűtése). A gyártó a
helytelen vagy szabálytalan használatból származó károkért felelősséget nem vállal.
-A készüléket bármilyen fizikai, érzékszervi vagy mentális fogyatékkal élő, illetve kellő tapasztalattal és a készülékre vonatkozó ismeretekkel nem rendelkező
személyek (beleértve a gyerekeket) nem használhatják, kivéve, ha a biztonságukért felelős személy felügyelete alatt teszik, vagy ha ilyen személyek a készülék
használatára nézve instrukciókat adtak.
-Használat közben a készülék hozzáférhető részei nagyon felforrósodhatnak. A kisgyermekeket távol kell tartani a készüléktől, és felügyelettel kell gondoskodni
arról, hogy ne játszanak a készülékkel.
-Használat közben és után ügyeljen arra, hogy ne érjen hozzá a sütő belsejében levő fűtőelemekhez. Ne hagyja, hogy a készülékhez ruhadarabokkal vagy más
gyúlékony anyaggal hozzáérjenek, amíg valamennyi komponens kellőképpen le nem hűlt.
-Ne tegyen gyúlékony anyagot a készülékbe vagy annak közelébe.
-A túlhevített zsírok és olajok könnyen lángra lobbannak. Mindig legyen éber, amikor zsírban vagy olajban gazdag ételt süt.
-Ne tegyen a főzőfelületre olyan fémtárgyakat, mint evőeszközök (kések, villák, kanalak, fedők stb.), mert ezek felforrósodhatnak.
-A készülék alatt található térbe kötelező beszerelni egy elválasztó panelt (nem tartozék).
-Ha a főzőlap felülete megsérül (eltörik vagy megreped az üveg), akkor ne használja tovább a készüléket és forduljon a vevőszolgálathoz.
-Kialakításából adódóan a készülék bekapcsolása nem lehetséges külső időzítő szerkezet vagy külön távirányító útján.
FONTOS BIZTONSÁGI TUDNIVALÓK
Ez a veszély szimbólum a biztonságra vonatkozóan, amely figyelmezteti a felhasználókat az őket és másokat fenyegető lehetséges kockázatokra.
Minden biztonsági figyelmeztetést megelőz a veszély szimbólum és a következő kifejezések egyike:
VESZÉLYVeszélyes helyzetet jelez, amely, ha nem kerülik el, súlyos sérülést okoz.
FIGYELMEZTETÉSVeszélyes helyzetet jelez, amely, ha nem kerülik el, súlyos sérülést okozhat.
MAGYARÜzembe helyezés2.oldalHasználati útmutató oldal
HU95
A csomagolóanyag hulladékba helyezése
A csomagolóanyag 100%-ban újrahasznosítható, és el van látva az újrahasznosítás jelével (). A csomagolóanyagokkal ne szennyezze a környezetet, hanem a helyi
hatóságok utasításai szerint járjon el.
A termék kiselejtezése
A készüléken található jelzés megfelel az elektromos és elektronikus berendezések hulladékairól szóló 2002/96/EK európai irányelvben (WEEE) foglalt előírásoknak.
A hulladékká vált készülék szabályszerű elhelyezésével Ön segít elkerülni a környezetre és az emberi egészségre esetlegesen gyakorolt káros következményeket.
A terméken vagy a kísérő dokumentációban lévő szimbólum azt jelzi, hogy ezt a terméket nem szabad háztartási hulladékként kezelni, hanem el kell szállítani az
elektromos és elektronikus berendezések újrahasznosítását végző megfelelő gyűjtőpontra.
Energiatakarékosság
A legjobb eredmények eléréséhez javasoljuk a következőket:
•Olyan fazekakat és serpenyőket használjon, melyek alsó átmérője megegyezik a főzőterület átmérőjével.
•Csak sík fenekű fazekat és serpenyőt használjon.
•Ha lehetséges, a főzés során fedje le az edényeket.
•A kukta lehetővé teszi, hogy még több energiát és időt takarítson meg.
•A lábost mindig a főzőlapon kialakított főzési zóna közepére helyezze.
-Ez a készülék – amely rendeltetése szerint élelmiszerekkel kerül érintkezésbe – megfelel az 1935/2004 számú rendeletnek (), kialakítása, előállítása és
forgalmazása pedig teljesíti a 2006/95/EK számú (a 73/23/EGK számú irányelv és annak módosításai helyébe lépő) “Kisfeszültség“ irányelv biztonsági
követelményeit és a 2004/108/EK számú “EMC” irányelv védelmi előírásait.
Mágnes segítségével ellenőrizheti azt, hogy az adott edény alkalmas-e az indukciós főzőlapon való használatra: az erre nem alkalmas edények nem vonzzák a mágnest.
-Ügyeljen arra, hogy a lábosok alja ne legyen érdes, mert ellenkező esetben megkarcolhatják a főzőlap felületét. Minden edényt ellenőrizzen.
-Soha nem helyezzen meleg lábosokat vagy serpenyőket a kezelőkapra. Ezek ugyanis sérülést okozhatnak.
Környezetvédelmi tanácsok
MEGFELELŐSÉGI NYILATKOZAT
HASZNÁLAT ELŐTT
FONTOS: A főzőzónák nem kapcsolnak be, ha a lábosok mérete nem megfelelő. Kizárólag “INDUKCIÓS RENDSZER“ jelzéssel ellátott lábosokat
használjon (lásd az ábrát). Mielőtt bekapcsolná a főzőlapot, helyezze a lábost a kívánt főzőzónára.
MÁR MEGLEVŐ EDÉNYEK
A LÁBOSOK ALJÁNAK AJÁNLOTT ÁTMÉRŐI
NEMOK
Ø
28 cm
XL
Ø
17 cm28 cm
Ø
21 cm
L
Ø
15 cm21 cm
Ø
18 cm
M
Ø
14,5 cm
S
Ø
12 cm18 cm
Ø
10 cm14,5 cm
HU96
A kicsomagolást követően ellenőrizze, hogy szállítás közben nem sérült-e meg a készülék, és probléma esetén forduljon a viszonteladóhoz vagy a vevőszolgálathoz.
A BEFOGLALÓ EGYSÉG ELŐKÉSZÍTÉSE
Csatlakoztatás a kapcsolódobozhoz
Az elektromos bekötéshez használja az alábbi táblázat szerinti H05RR-F típusú vezetéket.
Fontos:
- A kapcsolási rajznak megfelelően (lásd az ábrát) tartsa meg vagy távolítsa el a kapocsléc csavarjai közötti fémhidakat (L1-L2 és N1-N2).
- Ügyeljen arra, hogy a vezetékek bekötése után a kapocsléc mind a hat csavarja meg legyen húzva.
Példa a meglevő (bal) és az eltávolított (jobb) hídra. A részleteket lásd a kapcsolási rajzon (a hidak lehetnek az L1 és L2, illetve az N1 és N2 között).
ÜZEMBE HELYEZÉS
FIGYELMEZTETÉS-Építsen be egy elválasztó panelt a
főzőlap alá.
-A beszerelést követően a készülék
alsó része ne legyen
hozzáférhető.
-Ne tegyen be elválasztó panelt,
ha a főzőlap alá sütő kerül
beszerelésre.
•A készülék alsó része és az elválasztó panel közötti távolságot illetően az ábrán feltüntetett méreteket kell betartani.
•A készülék helyes működése érdekében a munkalap és a bútor felső szegélye közötti minimális nyílást nem szabad eltömni (min. 5 mm).
•Ha a főzőlap alá sütő kerül beszerelésre, akkor fontos, hogy a sütőnek legyen hűtése.
•Ne építse be a főzőlapot mosogatógép vagy mosógép fölé, hogy az elektromos áramköröket ne érhesse nedvesség vagy gőz, mivel ez a károsodásukat okozhatja.
•Süllyesztett beépítés esetén forduljon a vevőszolgálathoz, és kérje a 4801 211 00112 számú szerelőkészletet.
•A munkaasztalról az asztallap eltávolításához használjon csavarhúzót (a csomag nem tartalmazza), hogy a készülék alján a rugókat kiengedje.
CSATLAKOZTATÁS AZ ELEKTROMOS HÁLÓZATHOZ
FIGYELMEZTETÉS-Válassza le a készüléket az áramforrásról.
-Az üzembe helyezést szakképzett szerelőnek kell végeznie az érvényes üzembe helyezési és
biztonsági előírások szerint.
-A gyártó nem vállal felelősséget az említett rendelkezések be nem tartása miatt személyekben, állatokban vagy tárgyakban bekövetkező
sérülésekért vagy károkért.
-A hálózati zsinórnak elég hosszúnak kell lennie ahhoz, hogy a főzőlapot ki lehessen venni a munkalapból.
-Ellenőrizze, hogy a készülék alján elhelyezett adattáblán szereplő feszültségérték egyezik-e az üzembe helyezés helyszínén érvényes
hálózati feszültséggel.
VezetékekSzám x méret
230V ~ + 3 x 4 mm2
230-240V ~ + 3 x 4 mm2 (csak Ausztrália esetén)
230V 3 ~ + 4 x 1,5 mm2
400V 3N ~ + 5 x 1,5 mm2
400V 2N ~ + 4 x 1,5 mm2
min. 5 mm
min. 20 mm
min. 5 mm
400V 3N ~230V ~230-240 V ~ (csak Ausztrália esetén)
A sárga/zöld földvezetéket a jelzésű kivezetéshez kell bekötni.
Az említett vezetéknek a többinél hosszabbnak kell lennie.
1.A csavart kicsavarva vegye le a kapocsléc fedelét (A) és illessze be a fedelet a kapocsléc forgópántjába (B)
2.Ezután illessze be a tápvezetéket a kábelszorítóba, majd a kapocsléc mellett elhelyezett kapcsolási rajz utasításait követve kösse be a vezetékeket a kapocslécbe.
3.A tápvezetéket a kábelszorító segítségével rögzítse.
4.Zárja le a fedelet (C), és csavarozza azt rá a kapocslécre az eltávolított csavarral.
Az elektromos hálózatba való bekötések alkalmával a főzőlap mindig automatikusan elvégez egy néhány másodperces ellenőrzést.
Ha a főzőlapnak már van tápvezetéke, akkor kövesse az arra vonatkozó utasításokat. A csatlakoztatást olyan többpólusú megszakítókapcsolóval végezze, amelynél az
érintkezők közötti távolság legalább 3mm.
A kezelőlap bemutatása
Kezelőpanel
A főzőlap bekapcsolása/kikapcsolása
A készülék bekapcsolásához tartsa lenyomva legalább 2 másodpercig a gombot, amíg nem kezdenek világítani a főzőzónák kijelzői. A kikapcsoláshoz addig nyomja
ugyanazt a gombot, amíg ki nem alszanak a kijelzők Ekkor az összes főzőzóna kikapcsolódik.
Amikor a főzőlap már használva volt, a maradványhő “H” jelzése egészen a főzőzónák kihűléséig látható marad.
Ha a főzőlap bekapcsolásától számított 10 másodpercen belül nem történik funkcióválasztás, akkor a készülék automatikusan kikapcsol.
A főzőzónák aktiválása és szabályozása
Miután bekapcsolta a főzőlapot és rátette a lábost az előre kiválasztott zónára, állítsa be a teljesítményt a + gombbal. A bekapcsoláskor a kijelzőn megjelenik az 5.
fokozat.
Az egyes főzőzónákhoz tartozó különböző teljesítmények “1.“ (minimális teljesítmény) és “9.“ (maximális teljesítmény) fokozat között állíthatók a +/- gombbal. Egyes
főzőzónáknak gyorsforralás (booster) funkciójuk is van, amire a kijelzőn látható “P“ betű utal.
Gyorsforralás (booster) funkció
Ez a csak egyes főzőzónáknál elérhető funkció lehetővé teszi a főzőlap teljesítményének maximális kihasználását (például a víz gyors felforralása érdekében). A funkció
aktiválásához a “P“ betű megjelenéséig nyomja a “+“ gombot, vagy - a főzőlap bekapcsolását követően - nyomja meg közvetlenül a kiválasztott zónához tartozó “-“ gombot.
Ebben az esetben is megjelenik a “P“ betű a kijelzőn. A booster funkció 10 perces használatát követően a készülék automatikusan 9. fokozatra állítja a zónát.
A főzőzóna leállítása
A “+” vagy “-” gomb megnyomásával válassza ki a leállítandó főzőzónát (világító pont jelenik meg jobboldalt alul a teljesítményfokozat kijelzésénél).
A “-“ gombot nyomva állíthatja be a “0.“ fokozatot.
A főzőzónát a „+” és a „-” gomb egyidejű megérintésével is le lehet állítani. Ekkor kikapcsolódik a főzőzóna és megjelenik a maradványhő “H“ jelzése.
Kezelőlap zárolása
Ez a funkció lezárja a főzőlap kezelőszerveit, így akadályozva meg a készülék gyermekek által történő véletlen bekapcsolását. A kezelőlep zárolásának aktiválásához kapcsolja be
a főzőlapot és tartsa lenyomva a gombot három másodpercig: az aktiválás megtörténtére hangjelzés és a kulcs szimbólum alatt megjelenő világító pont utal. Ekkor a
kikapcsolási funkció kivételével a kezelőlap le van zárva. A kezelőlap lezárásának feloldásához ismételje meg az aktiválási lépéseket. Ekkor kialszik a világító pont és a főzőlap ismét
használható.
A tisztításhoz használt víz jelenléte, a lábosokból kikerült folyadék vagy a szimbólum alatti gombra helyezett bármilyen tárgy akaratlanul is előidézheti a kezelőlap
zárolása funkció be- vagy kikapcsolását.
HASZNÁLATI UTASÍTÁS
Kezelőlap zárolása
A főzőzónák kezelőszervei és kijelzői
Bekapcsolás/kikapcsolás
Időkapcsoló
és a szimbólumok nem
aktívak! A kívánt funkciók
kiválasztásához érintse
meg az
alattuk levő területet.
- gomb
Teljesítmény kijelző
A kiválasztott főzőzóna jelzése
+ gomb
A főzőzóna pozíciója
HU98
Időzítő (timer)
A timer egy olyan időkapcsoló, amelynek segítségével legfeljebb 99 perc (1 óra és 39 perc) hosszúságú főzési időtartamot lehet beállítani, de
csak egyetlen főzőzónához.
Válassza ki az időkapcsolóhoz hozzárendelendő főzőzónát (világító pont jelenik meg jobboldalt alul a teljesítményfokozat kijelzésénél), majd a
timer funkció “+” és “-” gombjával állítsa be a kívánt hosszúságú időtartamot (lásd a fenti ábrát). Néhány másodperccel az utolsó érintés után
a timer megkezdi a visszaszámlálást (a főzőzóna kiválasztását mutató pont villogni kezd). A beállított időtartam lejáratakor hangjelzés hallható
és a főzőzóna automatikusan kikapcsol.
A timer leállításához a “0:0“ megjelenéséig tartsa lenyomva a “-“ gombot, vagy egyidejűleg nyomja meg a timer “+“ és “-“ gombját.
Fontos: A timer egyszerre csak egy főzőzónához rendelhető hozzá.
Percszámláló
Csak használaton kívüli főzőfelület mellett használható, és maximum 99 perc időtartam állítható be rajta.
Nyomja meg a timer kijelzők alatti “+” gombot: ekkor láthatóvá válik a beállítandó percérték.
A + és - gombokkal kiválaszthatja a kívánt időtartamot.
Néhány másodperc múlva elindul a visszaszámlálás, majd a beállított időtartam elteltével hangjelzés hallható.
Fontos: A percszámlálás funkció csak a készülék kikapcsolt állapotában használható, tehát a főzőfelület bekapcsolása nullázza a percszámláló beállítását.
A kezelőlap figyelmeztetései
A maradványhő kijelzése.
A készülék minden főzőlapjánál külön kijelző mutatja a maradványhőt. Ez a kijelző mutatja, hogy a főzőzónák közül melyiknek magas még a hőmérséklete.
A kijelzőn látható azt jelzi, hogy a főzőzóna még meleg. Az ezt a jelzést mutató főzőzónán lehetőség van - például - az ételt melegen tartani vagy vajat
olvasztani
A főzőzóna kihűlésekor a jelzés kialszik.
Nem megfelelő vagy hiányzó lábos jelzése.
A készülék mindegyik főzőzóna esetében automatikusan jelzi a lábos jelenlétét. Ha a készülék nem érzékeli lábos jelenlétét, akkor villogni kezd az adott
főzőzóna teljesítmény kijelzője. Ellenőrizze, hogy a lábos jól van-e feltéve és hogy rendelkezik-e a „Használat előtt” című részben felsorolt jellemzőkkel.
FONTOS: Ne használjon súrolószivacsokat vagy dörzspárnákat. Ezek ugyanis idővel sérülést okoznának az üvegen.
•A készüléket minden használat után hagyja kihűlni, majd tisztítsa meg a rásült ételmaradékok miatti lerakódásoktól és foltoktól.
•Azonnal távolítsa el az esetlegesen ráfolyó cukrot vagy nagy cukortartalmú ételmaradékokat, mert ezek károsítják a főzőlapot.
•A só, a cukor és a homok megkarcolhatják az üveg felületét.
•A főzőlap tisztításához puha ruhát, konyhai papírtörlőt vagy speciális tisztítószereket használjon (tartsa be a gyártó utasításait).
•Figyelmesen olvassa el és kövesse a “Használati útmutató“ című részben foglaltakat.
•Ellenőrizze, hogy nincsenek-e áramkimaradások.
•A tisztítást követően jól szárítsa meg a főzőlap felületét.
•Ha a főzőlap bekapcsolásakor a kijelzőn alfanumerikus kódok jelennek meg, kövesse az alábbi táblázat utasításait.
•Ha a használat után nem sikerül kikapcsolnia a főzőlapot, akkor csatlakoztassa le a készüléket az elektromos hálózatról.
TISZTÍTÁS
FIGYELMEZTETÉS-Gőztisztító berendezések használata tilos.
-A tisztítási művelet megkezdése előtt ellenőrizze, hogy megtörtént-e a főzőzónák kikapcsolása és hogy
eltűnt-e a maradványhő (“H“) jelzése.
HIBAELHÁRÍTÁSI ÚTMUTATÓ
HIBAKÓDLEÍRÁSLEHETSÉGES OKA HIBA MEGSZÜNTETÉSE
A főzőlap kikapcsol, és 30 másodperc után
hangjelzést hallat 4 másodpercenként Állandó nyomás a kezelőlap területénVíz vagy konyhaeszközök jelenléte a
kezelőlap területénTisztítsa le a kezelőlap területét
C81, C82Magas hőmérséklet esetén kikapcsol
a kezelőlap
Túl magas az elektromos alkatrészek
belső hőmérséklete
Az ismételt használat előtt várjon,
hogy a főzőlap lehűljön
F42 vagy F43A főzőlap csatlakoztatása nem a
helyes feszültségen történt
Az érzékelő szerint a feszültség eltér a
csatlakozási feszültségtől
Válassza le a készüléket az
elektromos hálózatról és ellenőrizze
a csatlakoztatást
F12, F21, F25, F36, F37, F40, F47, F56, F58, F60Forduljon a vevőszolgálathoz és adja meg a hibakódot
HU99
A vevőszolgálat értesítése előtt
1.Ellenőrizze, hogy nem lehet-e a problémát a “Hibakeresési útmutató“ című részben foglalt pontok alapján megoldani.
2.Kapcsolja ki, majd újra be a készüléket, és ellenőrizze, hogy fennáll-e még a hiba.
Ha a fenti ellenőrzések után a hiba még mindig fennáll, lépjen kapcsolatba a legközelebbi vevőszolgálattal.
Mindig adja meg:
•a hiba rövid ismertetését;
•a termék pontos típusa és modellszáma;
•a szervizszám (az adattáblán a Service szó után álló szám) a készülék alján (a fémlapon). A szervizszám a garanciafüzetben is megtalálható;
•a teljes címét;
•a telefonszámát.
Amennyiben a készüléket javítani kell, forduljon javításra felhatalmazott vevőszolgálathoz (ez a garancia arra, hogy a javításhoz eredeti alkatrészeket használnak
fel és a javítási munkát megfelelően elvégzik). A tartalék alkatrészek 10 évig rendelkezésre állnak.
MEGJEGYZÉS:
A gyorsan elkészíthető és tökéletes hőeloszlást igénylő ételek (például palacsinta) céljára szolgáló 28 cm átmérőjű dupla zónához ajánlatos 24 cm-nél nem nagyobb átmérőjű
tartozékokat használni. A kényesebb műveletekhez (például csokoládé vagy vaj olvasztása) ajánlatos az ennél kisebb átmérőjű zónákat használni.
VEVŐSZOLGÁLAT
TELJESÍTMÉNY TÁBLÁZAT
TeljesítményszintA művelet jellegeHasználói szint
(az ételkészítési tapasztalatok és szokások jelzése)
Max.
teljesítmény
BoostGyors melegítésIdeális az étel rövid idő alatti felmelegítéséhez, a víz gyors felforralásához vagy az ételkészítési
folyadékok hirtelen felhevítéséhez
8-9Sütés - forralásIdeális pirításhoz, egy ételkészítés kezdéséhez, gyorsfagyasztott termékek sütéséhez, gyors
forraláshoz
Nagy
teljesítmény
7-8Pirítás - lassú pirítás - forralás -
grillezés
Ideális lassú pirításhoz, erős forrásban tartáshoz, főzéshez és grillezéshez (rövid, 5-10 perc
időtartamra)
6-7Pirítás - főzés - párolás - lassú
pirítás - grillezés
Ideális lassú pirításhoz, közepes forrásban tartáshoz, főzéshez és grillezéshez (közepes, 10-20 perc
Очень удобный режим, дающий возможность жарить на медленном огне, поддерживать интенсивное
кипение, готовить в общем случае и жарить на решетке (в течение небольшого промежутка времени, 5-
10 минут)
6-7
Обжаривание до образования
корочки - приготовление в
общем случае - тушение - жарка
на слабом огне - жарка на
решетке
Очень удобный режим, дающий возможность жарить на медленном огне, поддерживать небольшое
кипение, готовить в общем случае и жарить на решетке (в течение промежутка времени 10-20минут), а
также для предварительного нагрева посуды/принадлежностей
Средняя
мощность
4-5Приготовление в общем случае -
тушение - жарка на слабом огне -
жарка на решетке
Очень удобный режим, дающий возможность тушить, поддерживать слабое кипение, готовить в общем
случае (продолжительное время). Доведение пасты (макаронных изделий) до готовности с
перемешиванием с другими ингредиентами до однородного состояния получившегося соуса
3-4Приготовление в общем случае -
доведение до начала кипения -
загущение - доведение до
кремообразного состояния
Очень удобный режим для блюд, требующих длительного времени приготовления (рис, соусы, жаркое,
рыба), в присутствии жидкости (например, воды, вина, бульона, молока), доведение пасты до готовности
с перемешиванием с другими ингредиентами до однородного состояния получившегося соуса
2-3Очень удобный режим для блюд, требующих длительного времени приготовления (рис, соусы, жаркое,
рыба), в присутствии жидкости (например, воды, вина, бульона, молока)
Низкая
мощность
1-2Растапливание -
размораживание - сохранение
блюда теплым - доведение до
кремообразного состояния
Очень удобный режим, дающий возможность размягчать сливочное масло, постепенно растапливать
шоколад, размораживать продукты небольшого размера и сохранять горячими только что
приготовленные блюда (например, соусы, супы, похлебки)
1
Очень удобный режим, дающий возможность сохранять горячими только что приготовленные блюда,
доводить ризотто до готовности или поддерживать нужную температуру сервировочных блюд (при
применении посуды, годной для приготовления на индукционных варочных панелях)
OFF (ВЫКЛ)Мощность
равна нулю
Использование в качестве
подставки
Варочная панель находится в режиме ожидания или полностью выключена (по окончании
приготовления возможно наличие остаточного тепла, на что указывает буква “Н“ на дисплее)
Приклейте здесь одну из двух наклеек с
техническими данными изделия; эти наклейки
прилагаются в гарантийной книжке.
BG106
ВАШАТА БЕЗОПАСНОСТ И БЕЗОПАСНОСТТА НА ДРУГИТЕ Е ОТ ГОЛЯМО ЗНАЧЕНИЕ
В това ръководство за употреба на уреда е представена важна информация за безопасността, която трябва да се прочете и да се съблюдава винаги.
Всички съобщения, касаещи безопасността, описват потенциалната опасност, за която се отнасят, и указват как да се намалят рисковете от наранявания,
повреди и токови удари вследствие на неправилно използване на уреда. Придържайте се внимателно към следните инструкции:
-Уредът трябва да бъде изключен от електрическата мрежа преди извършване на каквито и да било работи по инсталирането.
-Инсталирането и поддръжката трябва да се извършват от квалифициран техник, в съответствие с инструкциите на производителя и при спазване на
действащата местна нормативна уредба за безопасно използване. Не поправяйте и не заменяйте части от уреда, ако това не е изрично посочено в
ръководството за употреба.
-Заземяването на уреда е задължително.
-Захранващият кабел трябва да бъде достатъчно дълъг, за да позволява свързването на уред, вграден в шкаф, с електрическата мрежа.
-За да се гарантира, че инсталацията отговаря на действащите стандарти за безопасност, трябва да се постави прекъсвач за всички полюси с
минимално разстояние 3 мм между контактите.
-Не използвайте разклонители и удължители.
-Не дърпайте захранващия кабел на уреда.
-След приключване на инсталирането, електрическите компоненти вече не трябва да са достъпни за потребителя.
-Уредът е предназначен единствено за използване като домакински уред за готвене на храна. Не е позволена никаква друга употреба (напр. за
отопление). Производителят не носи никаква отговорност за щети, предизвикани от неправилна употреба или от погрешно зададени команди за
управление.
-Не се позволява използването на уреда от лица (включително деца) с намалени физически, сетивни или умствени възможности или липса на опит или
познания, освен ако не са получили указания за използването на уреда от страна на лица, които са отговорни за тяхната безопасност.
-Достъпните части могат да се нагорещят по време на употреба. Децата трябва да бъдат винаги на разстояние и под надзор, за да не си играят с уреда.
-По време на употреба и след това не се допирайте до нагорещени части на уреда. Не допускайте контакт на дрехи или други запалими материи с
уреда, преди всички негови компоненти да са достатъчно изстинали.
-Не поставяйте запалителни материали върху уреда или в близост до него.
-Прегретите мазнини и олио могат лесно да се възпламенят. Не оставяйте без наблюдение готвенето на храни с използване на мазнина и олио.
-Не поставяйте върху зоната за готвене метални предмети, например кухненски прибори (ножове, вилици, лъжици, капаци и др.), защото рискувате
да се опарите.
-Задължително е в отделението под уреда да се постави разделителен панел (не е включен в доставката на уреда).
-В случай че повърхността на плочата се повреди (пукнатини или счупване на стъклото), не използвайте уреда и се обадете в сервиза за техническа
поддръжка.
-Уредът не е предназначен да работи с външен таймер или с отделна система за дистанционно управление.
ВАЖНИ ИНСТРУКЦИИ ЗА БЕЗОПАСНОСТ
Това е символ на опасност, който предупреждава за потенциални рискове за потребителя и околните.
Пред всички съобщения по отношение на безопасността е поставен този символ за опасност и следните термини:
ОПАСНОСТПоказва опасна ситуация, която, ако не бъде избегната, ще доведе до тежки наранявания.
ПРЕДУПРЕЖДЕНИЕПоказва опасна ситуация, която, ако не бъде избегната, може да доведе до тежки
наранявания.
БЪЛГАРСКИИнсталиране Страница2Инструкции за употребаСтраница
BG107
Изхвърляне на опаковъчните материали
Кашонът на опаковката може да се рециклира 100%, както се потвърждава от символа за рециклиране (). Различните опаковъчни материали не трябва
да се изхвърлят в околната среда, а да се предават в съответствие с всички разпоредби на местните органи.
Изхвърляне на уреда
Този уред е маркиран в съответствие с Европейска директива 2002/96/ЕО “Отпадъци от електрическо и електронно оборудване“ (WEEE).
Като гарантира, че този уред е изхвърлен по правилен начин, потребителят допринася за предотвратяване на потенциални опасни последствия за околната
среда и човешкото здраве.
Символът върху уреда или придружаващата го документация показва, че този уред не трябва да се третира като битов отпадък, а да бъде предаден в
съответния пункт за събиране и рециклиране на електрическо и електронно оборудване.
Икономия на електроенергия
За да постигнете най-добри резултати, се препоръчва и следното:
•Използвайте съдове, чийто диаметър на дъното е равен на диаметъра на зоната за готвене.
•Използвайте само тенджери и тигани с плоско дъно.
•Ако е възможно, по време на готвенето поставяйте капак върху съда за готвене.
•Използването на тенджера под налягане ви позволява още повече да пестите енергия и време.
•Поставяйте съда в центъра на зоната за готвене, означена върху плочата.
-Този уред, предназначен за контакт с хранителни продукти, съответства на нормативната уредба () № 1935/2004 и е проектиран, конструиран и
пуснат за продажба в съответствие с изискванията за безопасност на директивата “Ниско напрежение“ 2006/95/ЕО (която замества 73/23/ЕИО и
последващите изменения и допълнения), както и изискванията за защита на директива “EMC“ 2004/108/ЕО.
За да се уверите, че съдът е подходящ за индукционна зона за готвене, използвайте магнит: съдовете не са подходящи, ако не могат да се привличат с
магнит.
-Уверете се, че дъната на съдовете не са грапави, защото могат да надраскат повърхността на зоната за готвене. Проверявайте ястията.
-Никога не поставяйте горещи тенджери и тигани върху командното табло на плочата. Може да настъпят повреди.
ОПАЗВАНЕ НА ОКОЛНАТА СРЕДА
ДЕКЛАРАЦИЯ ЗА СЪОТВЕТСТВИЕ
ПРЕДИ УПОТРЕБА
ВАЖНО: Ако съдовете не са с подходящи размери, зоните за готвене не се включват. Използвайте само съдове, които носят символа
“ИНДУКЦИОННА СИСТЕМА“ (фигурата встрани). Преди да включите плочата за готвене, поставете съда върху желаната зона за готвене.
СЪДОВЕ В НАЛИЧНОСТ
ПРЕПОРЪЧВАНИ ДИАМЕТРИ НА ДЪНОТО НА ТЕНДЖЕРАТА
НЕДА
Ø
28 cm
XL
Ø
17 cm28 cm
Ø
21 cm
L
Ø
15 cm21 cm
Ø
18 cm
M
Ø
14,5 cm
S
Ø
12 cm18 cm
Ø
10 cm14,5 cm
BG108
След като разопаковате уреда, проверете дали няма настъпили повреди по време на транспортирането и в случай на проблеми се обърнете към търговеца
или Сервиза за поддръжка.
ПОДГОТОВКА НА ШКАФА ЗА ВГРАЖДАНЕ
Свързване към клемореда
За свързване към електрическата мрежа използвайте кабел тип H05RR-F, както е посочено в таблицата по-долу.
Важно:
- Запазете или премахнете металните мостчета между винтовете на клемореда L1-L2 и N1, N2 в съответствие със схемата на свързване (вж. фигурата).
Уверете се, че и шестте винта на клемореда са затегнати след свързването на кабелите.
Пример за налично мостче (вляво) или премахнато мостче (вдясно). Вижте схемата на свързване в подробности (мостчетата могат да бъдат между L1-L2,
както и между N1-N2).
ИНСТАЛИРАНЕ
ПРЕДУПРЕЖДЕНИЕ-Монтирайте разделителен
панел под плочата за
готвене.
-Долните части на уреда не
трябва да са достъпни след
инсталирането.
-В случай че под плочата е
предвидено да се инсталира
фурна, не поставяйте между
тях разделителен панел.
•Разстоянието между долната повърхност на уреда и разделителния панел трябва да бъде в съответствие с размерите, дадени на фигурата.
•За правилна работа на уреда трябва да предвидите минимално свободно пространство между работния плот и горната повърхност на плота на
шкафа (мин. 5 мм).
•В случай на инсталиране на фурна под плота проверете дали фурната е оборудвана с охладителна система.
•Не инсталирайте плочата за готвене близо до съдомиялна или перална машина, за да може електронните схеми да не са в контакт с пара или влага,
което може да ги повреди.
•В случай на проблеми с инсталирането (нестабилност) се обадете на сервиза за поддръжка, за да изискате комплект монтажни винтове 4801 211 00112.
•За да свалите плочата от работния плот, използвайте отверка (не е доставена) и деблокирайте пружините от долната страна на уреда.
СВЪРЗВАНЕ КЪМ ЕЛЕКТРИЧЕСКАТА МРЕЖА
ПРЕДУПРЕЖДЕНИЕ-Изключете уреда от електрическата мрежа.
-Уредът трябва да се инсталира от квалифициран техник, който е напълно запознат с
действащите разпоредби за безопасност и инсталиране.
-Производителят не поема никаква отговорност за евентуални наранявания на лица или животни или за причиняване на имуществени
щети в резултат на неспазване на указанията в тази глава.
-Захранващият кабел трябва да бъде достатъчно дълъг, за да позволи изваждането на плочата за готвене от работния плот.
-Проверете дали напрежението, показано на табелката с данни, поставена на дъното на уреда, съвпада с напрежението във вашия дом.
ПроводнициБрой x размер
230V ~ + 3 x 4 mm2
230-240V ~ + 3 x 4 mm2 (само за Австралия)
230V 3 ~ + 4 x 1,5 mm2
400V 3N ~ + 5 x 1,5 mm2
400V 2N ~ + 4 x 1,5 mm2
мин 5 мм
мин 20 мм
мин 5 мм
400V 3N ~230V ~230-240V ~ (само за Австралия)
230V ~ (само за Великобритания)
400V 2N ~230V 3 ~ (само за Белгия)400V 2N ~ (само за Нидерландия)
230V
230 V
230 V
230 V
230 V
230 V
230 V
230 V
230 V
230 V
230 V
CBA
BG109
Свържете проводника на заземяването жълт/зелен към клемата със символ.
Този проводник трябва да бъде по-дълъг от другите.
1.Махнете капачето на клемореда (A), като развиете винтчетата, и поставете капачето в рамката (B) на клемореда.
2.Поставете захранващия кабел в кабелната скоба и свържете проводниците към клемореда, както е показано на схемата на свързване, означена близо
до самия клеморед.
3.Закрепете кабела на захранването посредством кабелната скоба.
4.Затворете капачето (C) и го затегнете към клемореда със сваления винт.
При всяко свързване към захранващата мрежа плочата за готвене изпълнява автоматична проверка, която трае няколко секунди.
В случай че плочата вече е снабдена със захранващ кабел, следвайте инструкциите, приложени към захранващия кабел. Извършете свързването към
електрозахранване посредством прекъсвач на всички фази с минимална междина на контактите 3 мм.
Описание на командното табло
Командно табло
Включване/Изключване на плочата за готвене
За включване на плочата натиснете за около 2 секунди бутона , докато светне дисплеят на зоната за готвене. За да изключите, натиснете същия бутон до
изгасването на дисплея. Всички зони за готвене се изключват.
Ако плочата вече е била използвана, индикаторът за остатъчна топлина “H“ остава включен до охлаждането на зоната за готвене.
Ако в рамките на 10 секунди след включването на зоната за готвене не бъде избрана функция, зоната се изключва автоматично.
Активиране и регулиране на зоните на готвене
След като плочата за готвене е включена и съдът е поставен върху избраната зона, регулирайте нивото на мощност с бутона +. При включване на дисплея
се показва нивото 5.
Всяка зона за готвене има различни нива на мощност, които могат да се регулират с помощта на бутоните +/- от “1“ (минимална мощност) до “9“
(максимална мощност). Някои зони на готвене разполагат с функция за бързо кипване (усилвател), означена на дисплея с буквата “P“.
Функция за бързо завиране (усилвател)
Тази функция е налична само за някои зони за готвене; тя позволява да се използва максимално мощността на плочата (например за бързо кипване на вода).
За да се активира функцията, натиснете бутона “+“, докато на дисплея се покаже “P“ или, след като сте включили плочата за готвене, натиснете бутона “-“ за
избраната зона. В този случай на дисплея се показва “P“. След 10 минутно използване на функцията усилвател, уредът настройва автоматично зоната на ниво 9.
Изключване на зоните за готвене
Изберете зоната за готвене, която трябва да се изключи, като натиснете бутон “+“ или “-“ (точката долу вдясно от нивото на мощност се показва на дисплея).
Натиснете бутона “-“, докато достигнете ниво “0“.
Възможно е също така зоната за готвене да се изключи, като се докоснат едновременно бутоните “+“ и “-“. Зоната за готвене се изключва и се показва
индикаторът за остатъчна топлина “H“.
Блокиране на командното табло
Функцията блокира управлението на плочата за готвене, за да се предотврати инцидентното й използване от деца. За да активирате функцията за блокиране на
командното табло, включете плочата за готвене и задръжте натиснат за три секунди бутона : звуков сигнал и светлинен индикатор под символа на ключа
сигнализират за настъпилата активация. Командното табло се блокира, с изключение на функцията за изключване. За да изключите блокирането на командното
табло повторете процедурата на включване. Светещата точка изгасва и плочата за готвене е отново активирана.
Наличието на вода от почистването, излята течност от съдовете или предмети от всякакъв вид, поставени върху бутона под символа, могат да предизвикат
нежелано активиране или деактивиране на функцията за блокиране на командното табло.
ИНСТРУКЦИИ ЗА УПОТРЕБА
Блокиране на командното табло
Регулатори на зоната на готвене и съответен дисплей
Включване/изключване
Таймер
символите не са активни!
За да изберете желаните
функции, докоснете
зоните отдолу.
Бутон-
Индикатор за настройка на топлината
Индикатор на избраната зона за готвене
Бутон+
Позициониране на зоната
за готвене
BG110
Таймер
Таймерът е часови прекъсвач, който предлага възможността да се зададе продължителност на готвенето за максимум 99 минути (1
час и 39 минути) на отделна зона за готвене.
Изберете зоната за готвене, за която да се настрои таймерът (долу вдясно от индикатора на нивото на мощността на дисплея светва
точка), а след това задайте времето, което желаете, като използвате бутоните “+“ и “-“ за функцията на таймера (вж. фигурата по-
горе). Няколко секунди след последното натискане таймерът започва да отброява времето (светлинната точка на избраната зона за
готвене започва да мига). При изтичане на времето се включва звуков сигнал и зоната на готвене се изключва автоматично.
За да изключите таймера, натиснете бутона “-“, докато индикаторът на дисплея покаже “0:0“, или натиснете едновременно бутоните “+“ и “-“ на таймера.
Важно:Таймерът може да се задава само за една зона за готвене в даден момент.
Брояч на минути
Може да се използва при изключена плоча за готвене и позволява настройване на максимално време 99 мин.
Натиснете бутона “+“, разположен под под индикаторите на таймера: на дисплея се показват минутите за настройване.
Изберете желаното време, като използвате бутоните + и -.
След няколко секунди се включва обратното броене, след изтичането на което се включва звуков сигнал.
Важно: Възможно е функцията брояч на минути да се използва и при изключен уред, като включването на плочата нулира брояча.
Съобщения на командното табло
Индикаторни лампички за остатъчна топлина.
Плочата е снабдена с индикатор за остатъчна топлина за всяка от зоните за готвене. Този индикатор показва дали има зони за готвене все още с
висока температура.
Ако дисплеят показва , зоната за готвене все още е гореща. Ако индикаторът за остатъчна топлина на дадена зона за готвене свети, тази зона
може да бъде използвана например за поддържане топло на ястие или за разтопяване на масло.
При охлаждането на зоната за готвене дисплеят изгасва.
Индикатор за неподходящ или отсъстващ съд.
Плочата е снабдена с автоматична система за установяване на наличие на съд за всички зони за готвене. Ако не се открие съд, индикаторът за
нивото на мощността на зоната за готвене започва да мига. Проверете дали съдът е правилно поставен и дали притежава характеристиките,
дадени в раздел “Преди употреба“.
ВАЖНО: Не използвайте абразивни гъби и кърпички. С течение на времето употребата на такива може да разруши стъклото.
•След всяка употреба оставяйте плочата да изстине и я почиствайте, за да отстраните нагара и петната, предизвикани от остатъци от храна.
•Захар или продукти с високо съдържание на захар повреждат плочата за готвене и трябва да се отстраняват незабавно.
•Сол, захар и пясък могат да надраскат повърхността на стъклото.
•Използвате влажна кърпа, абсорбираща кухненска хартия или препарати, предназначени за почистване на стъклокерамични плочи (съблюдавайте
указанията на производителя).
•Прочетете и следвайте инструкциите в раздел “Инструкции за употреба“.
•Проверете да няма спиране на тока.
•Подсушавайте добре повърхността на плочата след почистването й.
•Ако след включване на плочата за готвене на дисплея е показан буквено-цифров код, постъпете в съответствие със следващата таблица.
•Ако не сте в състояние да изключите плочата за готвене след употреба, незабавно я изключете от електрозахранващата мрежа.
ПОЧИСТВАНЕ
ПРЕДУПРЕЖДЕНИЕ-Не използвайте уреди за почистване с пара.
-Преди да пристъпите към почистване, уверете се, че зоните за готвене са изключени и не свети
индикатор за остатъчна топлина (“H“).
ОТСТРАНЯВАНЕ НА НЕИЗПРАВНОСТИ
КОД НА ГРЕШКАОПИСАНИЕВЪЗМОЖНИ ПРИЧИНИОТСТРАНЯВАНЕ НА
ГРЕШКАТА
Плочата се изключва и след 30 секунди
започва да се чува звуков сигнал на всеки 4
секунди
Постоянно напрежение в зоната за
управление
Вода или кухненски прибори върху
зоната за управление
Почистете отново зоната за
управление
C81, C82Зоната за управление се изключва
поради твърде висока температура
Вътрешната температура на
електронните части е твърде висока
Изчакайте плочата да се охлади,
преди да я използвате отново
F42 или F43Плочата не е свързана към
необходимото напрежение
Сензорът установява напрежение,
различно от това на свързване
Изключете плочата от мрежата и
проверете свързването
F12, F21, F25, F36, F37, F40, F47, F56, F58, F60Свържете се със Сервиза за поддръжка и посочете кода на грешката.
BG111
Преди да се обадите в Сервиза за поддръжка:
1.Проверете дали не е възможно да разрешите проблема сами на база на пунктовете, описани в глава “Отстраняване на неизправности“.
2.Изключете и включете отново уреда, за да проверите дали проблемът не е отпаднал.
Ако след горните проверки неизправността все още се проявява, се обърнете към най-близкия Сервиз за поддръжка.
Посочете:
•кратко описание на неизправността;
•точния тип и модел на продукта;
•сервизния номер (т. е. номера след думата Service на табелката с данни), който се намира на металната табелка под уреда. Сервизният номер е
посочен и в гаранционната книжка;
•пълния си адрес;
•телефонния си номер.
Когато е необходим ремонт, се обърнете към упълномощен Сервиз за техническа поддръжка (за гаранция, че ще бъдат използвани оригинални
резервни части и че ще бъде извършен правилен ремонт). Резервни части се доставят в разстояние на 10 години.
ЗАБЕЛЕЖКА:
Върху двойната зона с диаметър 28 см (там, където има такава), при кратко готвене, което се нуждае от перфектно разпределение на топлината (напр. палачинки),
се препоръчва използването на принадлежности с диаметър не по-голям от 24 см. За деликатен тип готвене (напр. разтопяване на шоколад или масло), се
препоръчва използването на единични зони с по-малък диаметър.
СЕРВИЗ ЗА ПОДДРЪЖКА
ТАБЛИЦА НА МОЩНОСТИТЕ
Ниво на мощностНачин на готвенеИзползвано ниво
(индикация за подпомагане на формирането на опит и навици за готвене)
Макс. мощностНивоУскорено загряванеИдеално за бързо повишаване на температурата на храната до кипване (за вода или бързо
затопляне на готвените течности)
8-9Пържене – кипенеИдеално за запичане, начало на готвенето, пържене на замразени продукти, бързо кипване
Висока
мощност
7-8Запичане – запържване –
кипене - печене
Идеално за запържване, поддържане на кипене, готвене и печене (за кратка
продължителност, 5-10 минути)
6-7
Запичане – готвене –
задушаване – запържване -
печене
Идеално за запържване, поддържане на леко кипене, готвене и печене (за средна
продължителност, 10-20 минути), предварително загряване на съдове
Средна
мощност
4-5Готвене – задушаване –
запържване - печене
Идеално за задушаване, поддържане на къкрене, готвене (за голяма продължителност).
Размесване на макаронени изделия
3-4Готвене – кипване –
сгъстяване - готвене с
разбъркване
Идеално за продължително готвене (ориз, сосове, печено, риба) с наличие на течности (напр.
вода, вино, бульон, мляко), готвене с разбъркване на макарони
2-3Идеално за продължително готвене (обеми до един литър: ориз, сосове, печено, риба) с
наличие на течности (напр. вода, вино, бульон, мляко)
Ниска мощност
1-2Топене – размразяване -
поддържане на топло –
готвене с разбъркване
Идеално за омекотяване на масло, леко разтапяне на шоколад, размразяване на продукти с
малки размери и поддържане на топло на прясно сготвени храни (напр. сосове, супи, яхнии).
1Идеално за поддържане на топло на прясно сготвени храни, за добавяне на ориз и поддържане
на температурата на ястия (с подбрани индукционни аксесоари)
OFFМощност
нулаПовърхност за поставянеПлочата за готвене е в положение готовност или изключено (с възможно наличие на остатъчна
топлина след завършване на готвенето, което се указва с “H“)
Залепете един от етикетите с дати на
производство, които се намират в книжката за
гаранцията в две копия.
RO112
SIGURANŢA DV. ŞI A CELORLALTE PERSOANE ESTE FOARTE IMPORTANTĂ
Acest manual şi aparatul sunt dotate cu mesaje importante referitoare la siguranţă, care trebuie citite şi respectate întotdeauna.
Toate mesajele referitoare la siguranţă specifică pericolul potenţial la care se referăşi arată cum se pot reduce riscurile de leziuni, pagube şi electrocutare care pot fi
cauzate de o utilizare incorectă a aparatului. Respectaţi cu stricteţe următoarele instrucţiuni:
-Aparatul trebuie să fie deconectat de la reţeaua electrică înainte de a efectua orice operaţie de instalare.
-Instalarea şi întreţinerea trebuie să fie efectuate de către un tehnician calificat, în conformitate cu instrucţiunile producătorului şi cu respectarea normelor locale
în vigoare, referitoare la siguranţă. Nu reparaţi şi nu înlocuiţi nicio piesă a aparatului, dacă acest lucru nu este indicat în mod expres în manualul de utilizare.
-Împământarea aparatului este obligatorie.
-Cablul de alimentare trebuie să fie suficient de lung pentru a putea conecta aparatul la reţeaua electrică, după ce a fost încastrat în mobilă.
-Pentru ca instalarea să fie conformă cu normele de siguranţă în vigoare, este necesar un întrerupător omnipolar cu o distanţă minimă de 3 mm. între contacte.
-Nu utilizaţi prize multiple sau prelungitoare.
-Nu trageţi de cablul de alimentare al aparatului.
-După terminarea instalării, componentele electrice nu trebuie să mai fie accesibile pentru utilizator.
-Aparatul este destinat în exclusivitate uzului casnic, pentru prepararea alimentelor. Orice altă utilizare este interzisă (de ex. pentru încălzirea încăperilor).
Producătorul nu-şi asumă nicio responsabilitate pentru folosirea improprie sau pentru reglarea incorectă a butoanelor.
-Utilizarea acestui aparat nu este permisă persoanelor (inclusiv copii) cu capacităţi fizice, senzoriale sau mentale reduse şi lipsite de experienţă sau de cunoştinţe,
dacă nu au fost instruite în legătură cu folosirea aparatului de către o persoană care răspunde de siguranţa lor.
-Părţile accesibile se pot înfierbânta foarte mult în timpul utilizării. Copiii nu trebuie lăsaţi să se apropie şi trebuie să fie supravegheaţi ca să nu se joace cu aparatul.
-În timpul folosirii şi după aceea, nu atingeţi elementele de încălzire ale aparatului. Aveţi grijă ca aparatul să nu vină în contact cu cârpe sau cu alte materiale
inflamabile până când nu s-au răcit suficient toate componentele.
-Nu puneţi materiale inflamabile pe aparat sau în apropierea sa.
-Grăsimile şi uleiurile supraîncălzite se aprind uşor. Supravegheaţi prepararea alimentelor cu multă grăsime şi mult ulei.
-Nu puneţi pe zonele de gătit obiecte metalice, de ex. ustensile de bucătărie (cuţite, furculiţe, linguri, capace etc.), deoarece se pot încălzi.
-Este obligatoriu să se instaleze un panou despărţitor - care nu este furnizat în dotare - în compartimentul situat dedesubtul aparatului.
-În cazul în care suprafaţa plitei se deteriorează (crăpături sau spargerea sticlei), nu utilizaţi aparatul şi contactaţi Serviciul de Asistenţă Tehnică.
-Aparatul nu trebuie să fie pus în funcţiune prin intermediul unui temporizator extern sau printr-un sistem de comandă la distanţă separat.
INSTRUCŢIUNI IMPORTANTE PRIVIND SIGURANŢA
Acesta este simbolul de pericol, referitor la siguranţă, care vă avertizează despre riscurile potenţiale pentru utilizator şi pentru ceilalţi.
Toate mesajele referitoare la siguranţă vor fi precedate de simbolul de pericol şi de următorii termeni:
PERICOLIndică o situaţie periculoasă care, dacă nu este evitată, va cauza leziuni grave.
AVERTIZAREIndică o situaţie periculoasă care, dacă nu este evitată, ar putea cauza leziuni grave.
ROMÂNĂInstalareaPagina2Instrucţiuni de utilizarePagina
RO113
Reciclarea ambalajului
Materialul de ambalaj este reciclabil 100% şi este marcat cu simbolul de reciclare (). Diferitele părţi ale ambalajului nu trebuie aruncate la întâmplare, ci trebuie
reciclate în conformitate cu normele stabilite de autorităţile locale.
Aruncarea la gunoi a produsului
Acest aparat este marcat în conformitate cu Directiva Europeană 2002/96/CE referitoare la Deşeurile de Echipament Electric şi Electronic (Waste Electrical and Electronic
Equipment - WEEE).
Asigurându-se că acest produs este eliminat în mod corect, utilizatorul contribuie la prevenirea potenţialelor consecinţe negative pentru mediul înconjurător şi pentru
sănătate.
Simbolul de pe produs sau de pe documentaţia care îl însoţeşte indică faptul că acest produs nu poate fi aruncat împreună cu deşeurile menajere, ci trebuie predat
la punctul de colectare corespunzător pentru reciclarea aparatelor electrice şi electronice.
Economisirea energiei
Pentru a obţine cele mai bune rezultate se recomandă următoarele:
•Utilizaţi tigăi şi oale cu diametrul bazei de dimensiuni egale cu cele ale zonei de gătit.
•Utilizaţi numai oale şi tigăi cu baza plată.
•Când gătiţi, pe cât posibil, ţineţi oalele acoperite cu capacul.
•Utilizând oala cu presiune se pot reduce şi mai mult consumul de energie şi durata de preparare.
•Poziţionaţi oala în mijlocul zonei de gătit desenate pe plită.
-Acest aparat, destinat să intre în contact cu produsele alimentare, este conform cu regulamentul () nr. 1935/2004 şi a fost proiectat, construit şi comercializat
în conformitate cu cerinţele de siguranţă din Directiva “Joasă Tensiune” 2006/95/CE (care înlocuieşte directiva 73/23/CEE şi amendamentele succesive), cerinţele
de protecţie din directiva “EMC” 2004/108/CE.
Pentru a verifica dacă recipientul este adecvat pentru plita cu inducţie, folosiţi un magnet: oalele nu sunt adecvate dacă nu atrag magnetul.
-Verificaţi ca baza oalelor să nu fie aspră, deoarece ar putea zgâria suprafaţa plitei. Controlaţi vasele.
-Nu puneţi niciodată oalele şi tigăile calde pe suprafaţa panoului de comandă al plitei. Acesta s-ar putea deteriora.
RECOMANDĂRI PENTRU PROTECŢIA MEDIULUI ÎNCONJURĂTOR
DECLARAŢIE DE CONFORMITATE
ÎNAINTE DE UTILIZARE
IMPORTANT: dacă oalele nu sunt de dimensiunile corecte, zonele de gătit nu pornesc. Utilizaţi numai oale pe care se află simbolul “SISTEM CU
INDUCŢIE” (Figura de alături). Înainte de a porni plita, poziţionaţi oala pe zona de gătit dorită.
RECIPIENTE DEJA EXISTENTE
DIAMETRE RECOMANDATE PENTRU BAZA OALELOR
NUOK
Ø
28 cm
XL
Ø
17 cm 28 cm
Ø
21 cm
L
Ø
15 cm 21 cm
Ø
18 cm
M
Ø
14,5 cm
S
Ø
12 cm 18 cm
Ø
10 cm 14,5 cm
RO114
După ce aţi despachetat produsul, verificaţi dacă nu s-a deteriorat în timpul transportului şi, în caz de probleme, contactaţi vânzătorul sau Serviciul de Asistenţă Clienţi.
PREGĂTIREA MOBILEI PENTRU ÎNCASTRARE
Conectarea la blocul de conexiuni
Pentru conexiunea electrică folosiţi un cablu de tip H05RR-F aşa cum se indică în tabelul de mai jos.
Important:
- Lăsaţi sau scoateţi punţile metalice dintre şuruburile blocului de conexiuni L1-L2 şi N1-N2 în conformitate cu schema de conectare (vezi figura).
- Asiguraţi-vă că toate cele şase şuruburi ale blocului de conexiuni sunt strânse după conectarea cablurilor.
Exemplu de punte prezentă (stânga) sau scoasă (dreapta). A se vedea schema de conectare pentru detalii (punţile se pot afla între L1-L2 şi între N1-N2).
INSTALAREA
AVERTIZARE-Instalaţi un panou despărţitor
sub plită.
-Partea inferioară a produsului nu
trebuie să mai fie accesibilă după
instalare.
-În cazul instalării unui cuptor sub
plită, nu mai introduceţi panoul
despărţitor.
•Distanţa dintre partea inferioară a aparatului şi panoul despărţitor trebuie să respecte dimensiunile indicate în figură.
•Pentru corecta funcţionare a produsului, nu blocaţi deschiderea minimă dintre suprafaţa de lucru şi latura superioară a blatului mobilei (min. 5 mm).
•În cazul instalării unui cuptor sub plită, asiguraţi-vă că acesta este prevăzut cu sistem de răcire.
•Evitaţi să instalaţi plita deasupra maşinii de spălat vase sau rufe, pentru ca circuitele electronice să nu vină în contact cu vaporii şi cu umiditatea şi să se
deterioreze.
•În cazul instalării la nivelul blatului, contactaţi Serviciul de Asistenţă pentru a cere montarea kitului de şuruburi 4801 211 00112.
•Pentru a scoate plita din blatul de lucru folosiţi o şurubelniţă (nu este furnizată în dotare), pentru a debloca arcurile din partea de jos a aparatului.
RACORDAREA LA ELECTRICITATE
AVERTIZARE-Deconectaţi aparatul de la reţeaua electrică.
-Instalarea trebuie efectuată de personal calificat profesional, care să cunoască normele în vigoare
referitoare la instalare şi siguranţă.
-Producătorul nu-şi asumă nicio răspundere pentru pagubele aduse persoanelor sau animalelor şi pentru daunele aduse bunurilor, în cazul
nerespectării indicaţiilor din acest capitol.
-Cablul de alimentare trebuie să fie suficient de lung pentru a permite scoaterea plitei din blatul de lucru.
-Asiguraţi-vă că tensiunea indicată pe plăcuţa cu datele tehnice, situată pe baza aparatului, corespunde cu tensiunea din locuinţa în care va fi instalat.
ConductoareCantitate x dimensiune
230V ~ + 3 x 4 mm2
230-240V ~ + 3 x 4 mm2 (numai Australia)
230V 3 ~ + 4 x 1,5 mm2
400V 3N ~ + 5 x 1,5 mm2
400V 2N ~ + 4 x 1,5 mm2
min. 5 mm
min. 20 mm
min. 5 mm
400V 3N ~230V ~230-240 V ~ (numai Australia)
230 V ~ (numai UK)
400V 2N ~230 V 3 ~ (numai Belgia)400 V 2N ~ (numai Olanda)
230 V
230 V
230 V
230 V
230 V
230 V
230 V
230 V
230 V
230 V
230 V
CBA
RO115
Conectaţi cablul de împământare galben/verde la borna cu simbolul .
Acest cablu trebuie să fie mai lung decât celelalte.
1.Scoateţi capacul blocului de conexiuni (A) deşurubând şurubul şi introduceţi capacul în balamaua (B) a blocului de conexiuni.
2.Introduceţi cablul de alimentare în dispozitivul de fixare şi conectaţi firele la blocul de conexiuni, aşa cum se indică în schema de conectare situată lângă blocul de
conexiuni.
3.Fixaţi cablul de alimentare cu ajutorul dispozitivului de fixare.
4.Închideţi capacul (C) şi înşurubaţi-l pe blocul de conexiuni cu şurubul scos.
La fiecare conectare la alimentarea de la reţea, plita efectuează un control automat timp de câteva secunde.
În cazul în care plita este dotată deja cu un cablu de alimentare, urmaţi instrucţiunile anexate cablului de alimentare. Efectuaţi conexiunea la reţeaua fixă prin
intermediul unui întrerupător multipolar cu o distanţă minimă între contacte de 3 mm.
Descrierea panoului de comandă
Panoul de comandă
Pornirea/oprirea plitei
Pentru a porni plita ţineţi apăsată timp de aprox. 2 secunde tasta , până când se luminează afişajele zonelor de gătit. Pentru a o opri, apăsaţi pe aceeaşi tastă până
când se sting afişajele. Toate zonele de gătit sunt dezactivate.
Dacă plita a fost deja utilizată, indicatorul de căldură reziduală “H” rămâne activ până la răcirea zonelor de gătit.
Dacă, în interval de 10 secunde după pornirea plitei, nu se selectează nici o funcţie, aceasta se dezactivează automat.
Activarea şi reglarea zonelor de gătit
După ce aţi pornit plita şi aţi pus oala pe zona dorită, reglaţi nivelul de putere cu ajutorul tastei +. La pornire, pe afişaj este vizualizat nivelul 5.
Fiecare zonă de gătit are mai multe niveluri de putere, care pot fi reglate cu tastele +/-, care merg de la “1”: putere minimă, la “9”: putere maximă. Unele zone de gătit
au funcţia fierbere rapidă (Booster), care e vizualizată pe afişaj cu litera “P”.
Funcţia fierbere rapidă (Booster)
Funcţia este prezentă doar la unele zone de gătit şi permite exploatarea la maxim a puterii plitei (de exemplu pentru a aduce rapid apa la punctul de fierbere). Pentru a activa
funcţia, apăsaţi pe tasta “+” până când pe afişaj se vede “P” sau, după ce aţi pornit plita, apăsaţi direct pe tasta “-” corespunzătoare zonei selectate. Şi în acest caz pe afişaj
apare “P”. După 10 minute de utilizare a funcţiei Booster, aparatul setează automat zona la nivelul 9.
Dezactivarea zonelor de gătit
Selectaţi zona de gătit pe care o veţi opri apăsând pe tasta “+” sau “-” (punctuleţul de jos, din dreapta nivelului de putere, este vizualizat pe afişaj).
Apăsaţi pe tasta “-” până când ajunge la nivelul “0”.
Se poate dezactiva zona de gătit şi prin atingerea simultană a tastelor “+” şi “-”. Zona de gătit se dezactiveazăşi apare indicatorul “H” pentru căldura reziduală.
Blocarea panoului de comandă
Funcţia blochează comenzile plitei pentru a preveni activarea accidentală a plitei de către copii. Pentru a activa blocarea panoului de comandă, porniţi plita şi apăsaţi timp de trei
secunde tasta : un semnal acustic şi un indicator luminos sub simbolul cheii semnalează efectuarea activării. Panoul de comandă este blocat, cu excepţia funcţiei de oprire.
Pentru a dezactiva blocarea comenzilor repetaţi procedura de activare. Punctuleţul luminos se stinge, iar plita este din nou activă.
Prezenţa apei rămase după curăţare, lichidele revărsate din oale sau obiectele de orice tip puse pe tasta de sub simbol pot provoca activarea sau dezactivarea
accidentală a blocării panoului de comandă.
INSTRUCŢIUNI DE UTILIZARE
Blocarea panoului de comandă
Comenzi pentru reglarea zonei de gătit şi a afişajului respectiv
Pornire/oprire
Timer
Simbolurile nu sunt active!
Pentru a selecta funcţiile
dorite, atingeţi
zonele de dedesubt.
Tasta-
Indicatorul nivelului de putere
Indicator pentru zona de gătit selectată
Tasta+
Poziţia zonei de gătit
RO116
Temporizatorul (Timerul)
Timerul este un întrerupător orar care oferă posibilitatea de a regla o durată de coacere pentru un timp maxim de 99 minute (1 orăşi 39 minute),
care poate fi asociat cu o singură zonă de gătit.
Selectaţi zona de gătit cu care doriţi să asociaţi timerul (un punctuleţ luminos apare în partea de jos, în dreapta indicatorului pentru nivelul de
putere de pe afişaj), reglaţi intervalul de timp dorit cu ajutorul tastelor “+” şi “-” ale funcţiei timer (vezi figura de mai sus). După câteva secunde
de la ultima atingere, timerul începe numărătoarea inversă (punctuleţul luminos al zonei de gătit selectate începe să clipească intermitent). La
terminarea duratei programate se activează un semnal acustic, iar zona de gătit se opreşte automat.
Pentru a dezactiva timerul apăsaţi pe tasta “-” până când apare indicaţia “0:0” pe afişaj sau apăsaţi simultan tastele “+” şi “-” ale timerului.
Important: Timerul poate fi asociat cu o singură zonă de gătit.
Cronometru (minute minder)
Poate fi utilizat doar când cuptorul nu este în funcţiune şi permite programarea unei durate maxime de 99 min.
Apăsaţi pe tasta “+” situată sub indicatoarele timerului: pe afişaj apar minutele ce vor fi reglate.
Selectaţi durata dorită cu ajutorul tastelor + şi -.
După câteva secunde începe numărătoarea inversă, iar la terminarea duratei intră în funcţiune un semnal acustic.
Important: Se poate utiliza funcţia cronometru numai când aparatul este oprit, iar pornirea plitei cauzează anularea funcţiei cronometru.
Indicaţii ale panoului de comandă
Indicator de căldură reziduală.
Plita este dotată cu un indicator al căldurii reziduale pentru fiecare zonă de gătit. Acest indicator semnalează care sunt zonele de gătit care au încă o
temperatură ridicată.
Dacă pe afişaj apare , zona de gătit încă mai este caldă. Dacă zona prezintă această semnalare, se poate menţine caldă mâncarea sau se poate topi untul, de
exemplu.
Când zona de gătit se răceşte, afişajul se stinge.
Indicator pentru oală aşezată incorect sau pentru absenţa oalei.
Plita este dotată cu un sistem automat de detectare a prezenţei oalei, pentru toate zonele de gătit. Dacă aceasta nu este detectată, afişajul cu nivelul de
putere al zonei de gătit clipeşte intermitent. Verificaţi ca oala să fie corect poziţionatăşi să aibă caracteristicile indicate în secţiunea “înainte de utilizare”.
IMPORTANT: Nu folosiţi bureţi abrazivi sau de sârmă. Cu timpul, utilizarea lor poate duce la deteriorarea sticlei.
•După fiecare utilizare, lăsaţi plita să se răceascăşi curăţaţi-o pentru a elimina depunerile şi petele rămase din cauza resturilor de mâncare.
•Zahărul sau alimentele cu un conţinut ridicat de zaharuri deteriorează plita şi trebuie să fie îndepărtate imediat.
•Sarea, zahărul şi nisipul ar putea zgâria suprafaţa sticlei.
•Folosiţi o cârpă moale, hârtie absorbantă de bucătărie sau produse speciale pentru curăţarea plitei (respectaţi indicaţiile Producătorului).
•Citiţi şi urmaţi instrucţiunile din secţiunea “Instrucţiuni de utilizare”.
•Controlaţi să nu fie întreruptă alimentarea cu electricitate.
•Uscaţi bine suprafaţa plitei după ce aţi curăţat-o.
•Dacă, atunci când porniţi plita, pe afişaj apar coduri alfanumerice, procedaţi conform tabelului următor.
•După ce aţi utilizat plita, dacă nu reuşiţi s-o opriţi, deconectaţi-o de la reţeaua electrică.
CURĂŢAREA
AVERTIZARE-Nu folosiţi aparate de curăţat cu jet de vapori.
-Înainte de a începe operaţiunile de curăţare, asiguraţi-vă că zonele de gătit sunt oprite şi că indicatorul
de căldură reziduală (“H”) a dispărut.
GHIDUL DE DETECTARE A DEFECŢIUNILOR
COD EROAREDESCRIERECAUZE POSIBILESOLUŢIE
Plita se opreşte şi, după 30 de secunde, emite un
semnal acustic, o dată la 4 secunde.
Apăsare permanentă pe zona
comenzilor.
Apă sau ustensile de bucătărie pe zona
comenzilor.Curăţaţi zona comenzilor.
C81, C82Zona comenzilor se stinge din cauza
temperaturii prea ridicate.
Temperatura internă a părţilor electronice
este foarte ridicată.
Aşteptaţi ca plita să se răcească
înainte de a o folosi din nou.
F42 sau F43Conexiunea plitei nu are voltajul
corect.
Senzorul detectează o tensiune diferită
de cea de conexiune.
Deconectaţi plita de la reţea şi
controlaţi conexiunea.
F12, F21, F25, F36, F37, F40, F47, F56, F58, F60Contactaţi Serviciul de Asistenţăşi comunicaţi codul de eroare
RO117
Înainte de a contacta Serviciul de Asistenţă Tehnică:
1.Încercaţi să rezolvaţi singuri problema, urmărind punctele descrise în “Ghidul de detectare a defecţiunilor”.
2.Opriţi şi porniţi din nou aparatul pentru a verifica dacă problema s-a rezolvat.
Dacă problema persistăşi după verificările de mai sus, contactaţi cel mai apropiat Serviciu de Asistenţă.
Indicaţi întotdeauna:
•o scurtă descriere a defecţiunii;
•tipul şi modelul exact al plitei;
•numărul de Asistenţă (este numărul care se află după cuvântul “Service” de pe plăcuţa cu datele tehnice), situat sub aparat (pe plăcuţa metalică). Numărul de
Asistenţă este indicat, de asemenea, în foaia de garanţie;
•adresa dv. completă;
•numărul dv. de telefon.
Dacă sunt necesare orice fel de reparaţii, vă rugăm contactaţi un Centru de Asistenţă Tehnică autorizat (pentru a avea garanţia că se folosesc piese de schimb
originale şi că reparaţiile vor fi executate corect). Piesele de schimb sunt disponibile timp de 10 ani.
NOTĂ:
Pe zona dublă cu diametrul de 28 cm (dacă există), pentru preparatele cu durată scurtă de coacere şi care necesită o distribuire perfectă a căldurii (de exemplu clătite), se
recomandă să se utilizeze accesorii care să nu aibă diametrul mai mare de 24 cm. Pentru coacerea delicată (de exemplu topirea ciocolatei sau a untului) se recomandă să se
utilizeze zonele simple, cu diametru mai mic.
SERVICIUL DE ASISTENŢĂ TEHNICĂ
TABEL NIVELURI DE PUTERE
Nivelul de putereTipul de preparareUtilizarea nivelului
(indicaţia poate fi modificată în funcţie de experienţăşi de obiceiurile de a găti)
Putere max.BoostÎncălzire rapidăIdeală pentru a ridica rapid temperatura alimentelor, până la o fierbere rapidă, în cazul apei, sau pentru
încălzirea rapidă a lichidelor de la gătit
8-9Prăjire - fierbereIdeală pentru a rumeni, a începe prepararea, a prăji produse congelate, a fierbe rapid
Putere ridicată
7-8Rumenire - prăjire - fierbere -
frigere la grătar
Ideală pentru a rumeni, a menţine fierberea rapidă, a găti şi a frige la grătar (pentru un interval scurt
de timp, 5-10 minute)
6-7
Rumenire - preparare -
înăbuşire - prăjire - frigere la
grătar
Ideală pentru a rumeni, a menţine fierberea lentă, a găti şi a frige la grătar (pentru un interval de timp
mediu, 10-20 minute), pentru a preîncălzi accesoriile
Putere medie
4-5Preparare - înăbuşire - prăjire -
frigere la grătarIdeală pentru a înăbuşi, a menţine fierberea delicată, a găti (durată lungă). Condimentarea pastelor
3-4Preparare - clocotire -
îngroşare - condimentare
Ideală pentru preparate cu durată lungă de coacere (orez, sosuri, fripturi, peşte), cu lichide (de ex. apă,
vin, supă, lapte), condimentarea pastelor
2-3Ideală pentru preparate cu durată lungă de coacere (volume mai mici de un litru: orez, sosuri, fripturi,
peşte) cu lichide (de ex. apă, vin, supă, lapte)
Putere scăzută
1-2Topire - decongelare -
menţinere la cald -
condimentare
Ideală pentru a înmuia untul, pentru a topi delicat ciocolata, pentru a decongela produse de mici
dimensiuni şi a menţine la cald alimentele după terminarea gătitului (de ex. sosuri, ghiveciuri, ciorbe)
1Ideală pentru a menţine la cald mâncarea după terminarea gătitului, pentru a condimenta rizoto şi a
menţine la cald platourile care vor fi servite la masă (cu un accesoriu adecvat pentru inducţie)
OFF (Oprit)Putere
zeroSuprafaţă de sprijinPlita în poziţie de stand-by sau oprită (este posibil să existe căldură reziduală la terminarea gătitului,
semnalată cu H)
Lipiţi aici unul dintre abţibildurile cu datele
produsului care se află în broşura cu garanţia, în
dublu exemplar.
UK118
ПРИДІЛІТЬ УВАГУ ДЛЯ ЗАБЕЗПЕЧЕННЯ НАЛЕЖНОЇ БЕЗПЕКИ ДЛЯ ВАС САМИХ І ДЛЯ ІНШИХ
В цьому керівництвіі в самому приладі передбачені важливі повідомлення щодо безпеки. Уважно ознайомтеся з ними.
Всі повідомлення щодо небезпеки вказують на потенційний ризик та рекомендують заходи для зменшення цього ризику травмувань, збитків і вражень
електричним струмом внаслідок некоректного користування приладом. Ретельно дотримуйтесь наведених вказівок:
-Перш ніж виконувати монтаж, слід від’єднати прилад від мережі електричного живлення.
-Монтаж або технічне обслуговування приладу має виконуватися фахівцем з дотриманням інструкцій виробника і місцевих норм з техніки безпеки. Не
ремонтуйте і не заміняйте ніяких частин приладу, якщо на це немає чітких вказівок у самому керівництві.
-Згідно із законодавством, заземлення цього приладу є обов’язковим.
-Шнур живлення має бути достатньо довгим, щоб забезпечити під’єднання приладу, вбудованого у меблі, до мережі електричного живлення.
-З метою проведення монтажу відповідно до чинних норм безпеки, необхідно встановити всеполюсний вимикач з мінімальною відстанню у 3 мм між
контактами.
-Забороняється використовувати подовжувачі або трійники.
-Забороняється тягти за шнур живлення приладу.
-Після закінчення монтажу доступ до електричних частин приладу має бути перекритий.
-Прилад призначений виключно для побутового використання з метою готування їжі. Забороняються інші типи використання (напр., для опалення
приміщень). Виробник відхиляє будь-яку відповідальність в разі використання приладу не за призначенням або неправильного завдання команд.
-Забороняється користування приладом особами (включаючи дітей) з обмеженими фізичними, сенсорними або розумовими здібностями, або
особами без належних знань та досвіду, за винятком тих випадків, коли вони отримують вказівки збоку осіб, відповідних за їхню безпеку.
-Доступні користувачеві частини приладу можуть сильно нагріватися під час роботи. Необхідно стежити за дітьми, щоб вони не гралися з приладом і
взагалі перебували від нього на безпечній відстані.
-Не торкатися нагрівальних елементів духовки під час роботи або після неї. Уникати контакту з текстильними виробами або іншими легкозаймистими
матеріалами, поки всі частини приладу не охолонуть.
-Не складувати легкозаймисті матеріали на самому приладі або поблизу від нього.
-Нагріті масло та олія легко займаються. Не залишати без нагляду прилад під час готування з використанням масла та олії.
-Не класти на конфорку металеве кухонне приладдя (ножі, виделки, ложки, кришки, тощо), тому що вони можуть нагріватися.
-У ніші під приладом слід обов’язково встановити захисну панель, придбавши її окремо.
-У разі пошкодження поверхні (тріщини або розколи скла) не використовувати прилад та звернутися по допомогу у Сервісний центр.
-Прилад не призначений для роботи за допомогою зовнішнього таймеру або відокремленої системи дистанційного керування
ВАЖЛИВІ ВКАЗІВКИ З БЕЗПЕКИ
Це - знак небезпеки, який попереджає про потенційні ризики для користувача та інших осіб.
Всі повідомлення щодо небезпеки супроводжуються знаком небезпеки і такими написами:
НЕБЕЗПЕКАВказує на небезпечну ситуацію, яка викликає серйозні травми, якщо її не уникнути.
УВАГАВказує на небезпечну ситуацію, яка може викликати серйозні травми, якщо її не уникнути.
УКРАЇНСЬКАМонтажСторінка2Інструкція з використанняСторінка
UK119
Утилізація упаковки
Матеріал упаковки може перероблятися на 100%, тому від помічений позначкою повторної переробки (). Всі частини упаковки не повинні викидатися у
довкілля. Вони підлягають утилізаціїї відповідно до норм чинного законодавства
Утилізація виробу
Цей прилад має маркування відповідно до Європейської директиви 2002/96/EC щодо відходів з електричного та електронного обладнання (WEEE).
Виконуючи утилізацію коректним способом, користувач вносить свій вклад у попередження негативних наслідків для довкілля і для здоров’я людини.
Позначка на виробі або в супроводній документації вказує на те, що цей виріб не повинен перероблятися як побутовий відхід. Його слід здати у
відповідний пункт прийому для наступної переробки електричної й електронної апаратури.
Заощадження електроенергії
Для отримання кращих результатів рекомендується:
•Використовувати сковороди і каструлі, діаметр днищ котрих дорівнює діаметру конфорки.
•Користуватися кухонним посудом лише з пласким дном.
•Де можливо, накривати кришкою каструлі під час готування.
•Використовувати пароварку, щоб додаткового зменшити споживання електроенергіїі час готування.
•Розташовувати посуд у центрі конфорки, намальованої на варильній поверхні.
-Цей прилад, призначений для контактування з харчовими продуктами, відповідає регламенту () 1935/2004, тому від спроектований, вироблений
і підготовлений до продажу на ринку у відповідності до основних вимог безпеки, визначених Директивою “Про низьку напругу” 2006/95/CE (яка
заміняє норми 73/2 3/CEE з усіма подальшими внесеними змінами), а також до заходів з безпеки, визначених Директивою “Про електромагнітну
сумісність” 2004/108/CE.
Щоб перевірити відповідність посуду варильній індуктивній поверхні, скористайтеся магнітом: якщо каструлі не реагують на магнітні поля, вони не
придатні.
-Дно каструль не має бути шорстким, щоб не подряпати варильну поверхню. Перевіряйте кухонне приладдя.
-Забороняється встановлювати гарячі каструліі сковороди на поверхню панелі керування. Це може призвести до збитків
ЗАХИСТ ДОВКІЛЛЯ
ДЕКЛАРАЦІЯ ПРО ВІДПОВІДНІСТЬ
ПЕРЕД ПОЧАТКОМ ВИКОРИСТАННЯ
ВАЖЛИВО: при невідповідних розмірах кухонного посуду конфорки не увімкнуться. Використовуйте лише посуд, позначений як
“ІНДУКТИВНІ СИСТЕМИ” (див. малюнок поруч). Перш ніж увімкнути варильну поверхню, встановіть посуд на бажану конфорку.
НАЯВНИЙ КУХОННИЙ ПОСУД
РЕКОМЕНДОВАНІ ДІАМЕТРИ ДЛЯ ДНА КАСТРУЛЬ
НІOK
Ø
28 cm
XL
Ø
17 cm28 cm
Ø
21 cm
L
Ø
15 cm21 cm
Ø
18 cm
M
Ø
14,5 cm
S
Ø
12 cm18 cm
Ø
10 cm14,5 cm
UK120
Після розпакування виробу слід перевірити відсутність ушкоджень внаслідок перевезень і, в разі проблем, зв’язатися з продавцем або Клієнтською службою.
ПІДГОТУВАННЯ МЕБЛІВ ДЛЯ ВБУДУВАННЯ
Підключення до клемної коробки
Для електричних підключень знадобиться кабель типу H05RR-F, як вказано у табличці нижче.
Важливо:
- Залишити або вийняти металеві перемички між гвинтами клемної коробки L1-L2 і N1-N2 згідно до схеми під’єднань (див.малюнок).
- Після під’єднання кабелів переконатися, що усі шість гвинтів клемної коробки добре затягнуті.
Приклад наявної перемички (ліворуч) або вийнятої перемички (праворуч). Подробиці див. у схемі під’єднань (перемички можуть бути між L1-L2 і N1-N2).
ВСТАНОВЛЕННЯ
УВАГА-Встановіть захисну панель під
варильною поверхнею.
-Після встановлення нижня
частина виробу має бути
недоступною.
-Якщо під варильною
поверхнею встановлено
духовку, захисна панель не
потрібна.
•Відстань між нижньою частиною приладу і захисною панеллю має відповідати наведеним на малюнку розмірам.
•Для коректної роботи приладу не закривайте мінімальний проміжок між робочою поверхнею і верхньою поверхнею меблі (мін. 5 мм).
•Якщо під варильною поверхнею встановлено духовку, слід переконатися, що духовка оснащена системою охолодження.
•Запобігайте монтажу варильної поверхні понад посудомийними або пральними машинами, щоб уникнути контакту електронних ланцюгів з парою
та вологістю, тому що це призводить до їх ушкодження.
•Для монтажу врівень зі стільницею слід звернутися до Сервісної служби, щоб фахівці з неї встановили комплект гвинтів 4801 211 00112.
•Щоб вийняти варильну поверхню з робочої поверхні, розблокуйте пружини в нижній частині приладу за допомогою викрутки (не входить до комплекту).
ПІДКЛЮЧЕННЯ ДО МЕРЕЖІ ЕЛЕКТРИЧНОГО ЖИВЛЕННЯ
УВАГА-Від’єднайте прилад від мережі електричного живлення.
-Монтаж має проводитися кваліфікованим персоналом, знайомим з чинними нормами з
монтажу та безпеки.
-Виробник відхиляє будь-яку відповідальність за травмування фізичних осіб або тварин, збитки майна внаслідок недотримання
вказівок, наведених в цьому розділі.
-Шнур живлення має бути достатньо довгим, щоб дозволити виймання варильної поверхні з робочої поверхні.
-Переконайтеся, що напруга, вказана на паспортній табличці, яка прикріплена на дні приладу, відповідає напрузі у побутовій мережі
електричного живленні по місцю встановлення приладу.
ПровідникиКількість x розмір
230В ~ + 3 x 4 мм2
230-240В ~ + 3 x 4 мм2 (тільки Австралія)
230В 3 ~ + 4 x 1,5 мм2
400В 3N ~ + 5 x 1,5 мм2
400В 2N ~ + 4 x 1,5 мм2
мін. 5мм
мін. 20мм
мін. 5мм
400В 3N ~230В ~230-240В ~ (тільки Австралія)
230 В ~ (тільки Великобританія)
400В 2N ~230 В 3 ~ (тільки Бельгія)400 В 2N ~ (тільки Голандія)
230В ~
230В ~
230В ~
230В ~
230В ~
230В ~
230В ~
230В ~
230В ~
230В ~
230В ~
CBA
UK121
Під’єднати жовто-зелений провід заземлення до роз’єму, позначеному .
Цей провід буде довшим за інші.
1.Зняти кришку з клемної коробки (A), відпускаючи гвинт, і вставити кришку у шарнірну петлю (B) клемної коробки.
2.Ввести шнур живлення у затискач, під’єднати проводи до клемної коробки згідно до схеми під’єднань, яка розташована поруч з клемною коробкою.
3.Зафіксувати шнур живлення за допомогою затискача.
4.Закрити кришку (C) і прикрутити її на клемну коробку за допомогою попередньо знятого гвинта.
При кожному підключенні до мережі електричного живлення варильна поверхня виконує автоматичний контроль, який триває декілька секунд.
Якщо поверхня вже оснащена шнуром живлення, необхідно дотримуватися інструкцій до самого шнуру живлення. Підключити прилад до мережі
електричного живлення за допомогою багатополюсного вимикача, мінімальна відстань між контактами якого має складати 3мм.
Опис панелі керування
Панель керування
Увімкнення/вимкнення варильної поверхні
Щоб увімкнути варильну поверхню, натисніть протягом 2 секунд на кнопку , поки не загоряться дисплеї конфорок. Вимкнення варильної поверхні
здійснюється натисканням цієї ж кнопки. Всі конфорки припиняють роботу.
Якщо відбулося користування варильною поверхнею, індикатор остаточного тепла “H” горітиме до повного охолодження конфорки.
Якщо протягом 10 секунд після увімкнення варильної поверхні не буде обрано ніяку функцію, поверхня автоматично вимикається.
Увімкнення і регулювання конфорок
Після увімкнення варильної поверхніі встановлення каструлі на обрану конфорку необхідно налаштувати рівень потужності за допомогою кнопки +. У
момент увімкнення на дисплеї з’являється рівень5.
Для кожної конфорки передбачені різні рівні потужності, які можна відрегулювати кнопками +/-. Мінімальна потужність - “1”, максимальна потужність -
“9”. Деякі конфорки мають функцію швидкого нагрівання (Booster), яка позначається на дисплеї літерою “P”.
Функція швидкого нагрівання (Booster)
Ця функція передбачена лише для деяких конфорок і дозволяє використовувати найкращим способом потужність варильної поверхні (наприклад, служить для
швидкого кип’ятіння води). Щоб задіяти функцію, натискайте на кнопку “+” до появи на дисплеї “P”, або після увімкнення варильної поверхні натисніть
безпосередньо на кнопку “-” у відповідній зоні конфорки. І в цьому разі на дисплеї з’явиться “P”. Через 10 хвилин використання функції booster прилад
автоматично встановлює для конфорки рівень потужності 9.
Вимкнення конфорки
За допомогою кнопок “+” або “-” виберіть конфорку для вимкнення (на дисплеї внизу та праворуч від рівня потужності з’являється світлова точка).
За допомогою кнопки “-” встановіть рівень на “0”.
Конфорку можна також вимкнути одночасним натисканням на кнопки “+” і “-”. Конфорка вимикається, на дисплеї з’являється індикатор остаточного тепла “H”.
Блокування панелі керування
Ця функція блокує команди варильної поверхні, щоб уникнути її випадкового увімкнення дітьми. Щоб заблокувати команди, увімкнуть варильну поверхню, натисніть на
три секунди кнопку : звуковий сигнал і світловий індикатор у виді ключа сповіщають про здійснене блокування. Панель керування заблоковано, окрім функції
вимкнення. Щоб розблокувати панель керування, слід повторити процедуру з блокування. Світлова точка згасне, що свідчить про активні команди панелі.
Наявність води, витікших з каструль рідин або сторонніх речей на кнопці під символом можуть викликати випадкове блокування або розблокування панелі
керувіання
КЕРІВНИЦТВО З ВИКОРИСТАННЯ
Блокування панелі керування
Команди регулювання конфорок з відповідним дисплеєм
Увімкнення/вимкнення
Таймер
символи не активні! Щоб
вибрати бажані функції,
доторкніться до
нижніх зон.
Кнопка-
Дисплей індикатора потужності
Індикація обраної конфорки
Кнопка+
Знаходження
конфорки
UK122
Tаймер
Таймер - це вимикач за часом, який надає можливість встановити тривалість готування на максимальний час у 99 хвилин (1година і
39хвилин) для однієї конфорки за раз.
Виберіть конфорку, для якої необхідно задати таймер (на дисплеї внизу та праворуч від рівня потужності з’являється світлова точка),
кнопками “+” і “-” задайте бажаний час для таймеру (див.малюнок зверху). Через декілька секунд після останнього торкання кнопки
таймер розпочинає зворотній відлік часу (розпочне блимати точка вибору конфорки). Після завершення часу лунає звуковий сигнал і
конфорка вимикається.
Для вимкнення таймеру слід натискати на кнопку “-” до появи “0:0” на дисплеї або одночасно натискати на кнопки “+” і “-” таймеру.
Важливо:Таймер можна задавати лише для однієї конфорки за раз.
Лічильник хвилин
Його можна використовувати, коли варильна поверхня не працює, задаючи час до 99 хвилин включно.
Натисніть на кнопку “+” , яка знаходиться під індикаторами таймеру: на дисплеї з’являться хвилини, які можна задати.
Вибрати бажаний час кнопками + і -.
Через декілька секунд розпочнеться зворотній відлік часу, після завершення якого пролунає звуковий сигнал.
Важливо: Функція лічильника хвилин працюватиме лише на вимкненій варильній поверхні. Увімкнення панелі призводить до скасування функції.
Сигналізація на панелі керування
Індикатор остаточного тепла
Варильна поверхня оснащена індикатором остаточного тепла для кожної конфорки. Цей індикатор вказує на ті конфорки, де температура ще
залишається високою.
Поява на дисплеї вказує на високу температуру конфорки. На такій конфорці можна залишити страву, щоб зберегти її гарячою, або розтопити
вершкове масло.
Як тільки конфорка охолоне, індикатор згасне.
Індикатор невідповідної або відсутньої каструлі
Варильна поверхня оснащена автоматичною системою розпізнання каструль, активною для усіх конфорок. Якщо на конфорці немає каструлі,
дисплей з рівнем потужності цієї конфорки розпочне блимати. Перевірте, що каструля правильно розташована і має належні характеристики, див.
розділ “перш ніж розпочати використання”.
ВАЖЛИВО: не використовуйте абразивні губки, металеву віхоть. Їх використання з часом може призвести до ушкодження скла.
•Після кожного використання зачекайте на охолодження поверхніі очистіть її, виводячи налипання і плями від їжі.
•Цукор або продукти з великим вмістом цукру ушкоджують варильну поверхню і мають негайно виводитися .
•Сіль, цукор і пісок можуть подряпати скляну поверхню приладу.
•Для очищення варильної поверхні слід використовувати м’яку ганчірку, паперові кухонні рушники (дотримуйтесь вказівок від виробника).
•Уважно вивчіть інструкції з розділу “Інструкції з використання” і дотримуйтесь їх.
•Перевірте, що не йдеться про перебої в енергопостачанні.
•Витріть досуха поверхню після операцій з очищення.
•Якщо після увімкнення варильної поверхні на дисплеї виводяться літерні-числові коди, перейдіть до наведеної нижче таблиці.
•Якщо після використання не вдається вимкнути варильну поверхню, необхідно відключити її від мережі електричного живлення.
ОЧИЩЕННЯ
УВАГА:-Не використовуйте парові очищувачі.
-Перш ніж розпочати очищення, перевірте, що конфорки вимкненіі відсутня індикация
остаточного тепла (“H”).
ПОШУК І УСУНЕННЯ НЕСПРАВНОСТЕЙ
КОД НЕСПРАВНОСТІОПИСМОЖЛИВІ ПРИЧИНИУСУНЕННЯ
НЕСПРАВНОСТІ
Варильна поверхня вимикається, і через 30
секунд лунає звуковий сигнал з інтервалом у 4
секунди
Безперервне натискання на панель
керуванняВода або кухонне приладдя на панелі
керуванняОчистити панель керування
C81, C82Вимкнення панелі керування через
дуже високу температуруДуже висока внутрішня температура
електронних компонентів
Зачекати на охолодження
поверхні, перш ніж знову
використовувати її
F42 або F43Підключення поверхні має
неправильні значення напруги
Давач виміряв напругу, яка
відрізняється від напруги, необхідної
для підключення
Від’єднати варильну поверхню
від мережі електричного
живлення і перевірити
підключення
F12, F21, F25, F36, F37, F40, F47, F56, F58, F60Звернутися у Сервісний центр і повідомити код несправності
UK123
Перш ніж звернутися по допомогу
1.Переконайтеся, чи не можливо самостійно вирішити проблеми за допомогою пояснень з розділу “Пошук та усунення несправностей”.
2.Вимкніть і знову увімкніть прилад, щоб перевірити, що несправність усунено.
Якщо після всіх перевірок вирішити проблему не вдалося, зверніться до найближчого Сервісного центру.
Необхідно обов’язково повідомити:
•короткий опис несправності;
•тип і точну модель приладу;
•номер Сервісної служби (цей номер знаходиться після слова Service на паспортній табличці), яка закріплена знизу приладу (на металевій пластині).
номер Сервісної служби також вказується у гарантійному свідоцтві;
•Вашу повну адресу;
•Ваш телефонний номер.
Якщо потребується ремонт, зверніться в Авторизований Сервісний центр (який гарантує застосування оригінальних запасних частин і коректно
проведений ремонт). Запасні частини мають чинність протягом 10 років.
N.B.:
У подвійній зоні з діаметром 28 см (де вона передбачена) для готувань, які вимагають короткого часу або рівномірного розповсюдження тепла ( наприклад, для
оладок) рекомендується використовувати приладдя, діаметр котрого не перевищує 24 см. Для делікатних готувань (наприклад, для розплавлення шоколаду або
вершкового масла) рекомендується використовувати одинарні зони з меншим діаметром.
ЦЕНТР ТЕХНІЧНОГО ОБСЛУГОВУВАННЯ
ТАБЛИЦЯ ПОТУЖНОСТЕЙ
Рівень потужностіТип готуванняВикористання рівня
(індикація має доповнюватися досвідом і звичаями готування)
Макс.потужність
BoostШвидко нагрітиІдеальна потужніть для швидкого підвищення температури води до кипіння або швидкого
нагрівання рідин, які використовуються під час готування
8-9Смажити - кип’ятитиІдеальна потужність для підрум’янювання, на початку готування, смаження заморожених
продуктів, швидкого закипання
Висока
потужність
7-8
Підрум’янювати -
підсмажити - кип’ятити-
готувати на грилі
Iдеальна потужність для підсмаження, підтримання кипіння на великому вогні, варіння і
готування на грилі (на короткий час, 5-10хвилин)
6-7
Підрум’янювати - варити -
тушкувати - підсмажити -
готувати на грилі
Iдеальна потужність для підсмаження, підтримання кипіння на малому вогні, варіння і
готування на грилі (на середній час, 10-20хвилин), підігріву приладдя
Середня
потужність
4-5Варити - тушкувати -
смажити - готувати на грилі
Ідеальна потужність для тушкування, підтримання делікатного кипіння, варіння (на
тривалий час). Заправляти макаронні вироби
3-4Варити- кип’ятити -
загущувати - заправляти для
отримання кремової
консистенції
Ідеальна потужність для тривалих готувань (рис, соуси, печеня, риба) при наявних рідинах
(напр., води, віна, бульйону, молока), заправлення макаронних виробів
2-3Ідеальна потужність для тривалих готувань (об’ємом до 1 литру: рис, соуси, печеня, риба)
при наявних рідинах (напр., води, віна, бульйону, молока)
Низька
потужність
1-2Розтоплювати -
розморожувати- зберігати у
теплому стані - заправляти
для отримання кремової
консистенції
Ідеальна потужність для пом’якшення вершкового масла, делікатного розтоплювання
шоколаду, розмороження продуктів невеликих розмірів і зберігання у теплому стані тільки
що зготованих страв (напр., соусів, супів, борщів)
1
Ідеальна потужність для зберігання у теплому стані тільки що зготованих страв,
заправлення ризотто для отримання кремової консистенціїі зберігати температуру страв (з
приладдям, яке може використовуватися для індуктивної панелі)
ВИМКННульова
потужністьОпорна поверхніВарильна поверхня у черговому положенні або вимкнена (можлива наявність остаточного
тепла наприкінці готування, яке позначається літерою H)
Libble takes abuse of its services very seriously. We're committed to dealing with such abuse according to the laws in your country of residence. When you submit a report, we'll investigate it and take the appropriate action. We'll get back to you only if we require additional details or have more information to share.
Product:
Forumrules
To achieve meaningful questions, we apply the following rules:
First, read the manual;
Check if your question has been asked previously;
Try to ask your question as clearly as possible;
Did you already try to solve the problem? Please mention this;
Is your problem solved by a visitor then let him/her know in this forum;
To give a response to a question or answer, do not use this form but click on the button 'reply to this question';
Your question will be posted here and emailed to our subscribers. Therefore, avoid filling in personal details.
Register
Register getting emails for Whirlpool acm 700 ne at:
new questions and answers
new manuals
You will receive an email to register for one or both of the options.
Get your user manual by e-mail
Enter your email address to receive the manual of Whirlpool acm 700 ne in the language / languages: All languages as an attachment in your email.
The manual is 24,29 mb in size.
You will receive the manual in your email within minutes. If you have not received an email, then probably have entered the wrong email address or your mailbox is too full. In addition, it may be that your ISP may have a maximum size for emails to receive.
If you have not received an email with the manual within fifteen minutes, it may be that you have a entered a wrong email address or that your ISP has set a maximum size to receive email that is smaller than the size of the manual.
The email address you have provided is not correct.
Please check the email address and correct it.
Your question is posted on this page
Would you like to receive an email when new answers and questions are posted? Please enter your email address.