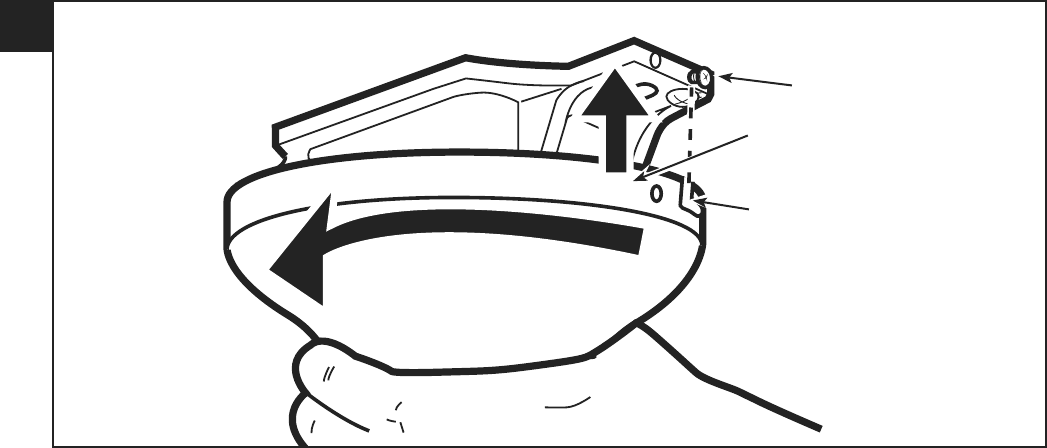
The canopy has two mating slots (1) and two mating holes (2). Position both slots on canopy directly under and in line with two screws in the
mounting bracket (3). Lift the canopy, allowing the two screws to slide into the mating slots. Rotate the canopy until both screws from the mount-
ing bracket drop into the slot recesses. Tighten screws securely.
GB
D
F
I
NL
E
P
N
S
FIN
DK
Die Abdeckung besitzt zwei entsprechende Schlitze (1) und zwei entsprechende Bohrungen (2). Die beiden Schlitze an der Abdeckung direkt unter die
beiden Schrauben in der Deckenplatte (3) positionieren und in einer Linie auf sie ausrichten. Die Abdeckung anheben, damit die beiden Schrauben in
die entsprechenden Schlitze geführt werden können. Die Abdeckung so weit drehen, bis beide Schrauben der Deckenplatte komplett in der Versenkung
der Schlitze liegen. Die Schrauben fest anziehen.
La garniture est munie des deux rainures (1) et deux orifices (2) d'assemblage. Placez les deux rainures de la garniture directement sous les deux vis du
support de montage (3) et alignez-les. Soulevez la garniture de sorte que les deux vis glissent dans les rainures d'assemblage. Faites tourner la garniture
jusqu'à ce que les deux vis du support de montage s'encastrent dans la partie la plus mince de la rainure. Serrez bien les vis. Installez deux vis dans les orifices d'as-
semblage de la garniture et vissez-les afin de fixer la garniture au support de montage.
La calotta è munita di due intagli accoppiati (1) e di due fori accoppiati (2). Posizionare i due intagli presenti sulla calotta direttamente al di sotto e in
squadra con le due viti nella staffa di montaggio (3). Sollevare la calotta, consentendo alle due viti di scivolare negli intagli accoppiati. Ruotare la calotta
fin quando le due viti dalla staffa di montaggio non si inseriscono completamente negli incavi degli intagli. Serrare saldamente le viti.
De plafondkap heeft twee corresponderende sleuven (1) en twee corresponderende gaten (2). Plaats beide sleuven in de plafondkap direct onder en in
lijn met twee schroeven in de montagebeugel (3). Til de plafondkap op en laat de twee schroeven in de corresponderende sleuven glijden. Draai de
plafondkap tot beide schroeven van de montagebeugel in de sleufopeningen vallen. Haal de schroeven stevig aan.
El dosel tiene dos ranuras coincidentes (1) y dos orificios coincidentes (2). Coloque ambas ranuras del dosel directamente abajo y en línea con los dos
tornillos del soporte de montaje (3). Eleve el dosel, permitiendo que los dos tornillos se deslicen dentro de las ranuras. Gire el dosel hasta que ambos
tornillos del soporte de montaje caigan dentro de las ranuras. Apriete los tornillos asegurándolos.
A campânula tem duas ranhuras correspondentes (1) e dois furos correspondentes (2). Coloque ambas as ranhuras da campânula directamente por
baixo e alinhadas com os parafusos do suporte de montagem (3). Levante a campânula, deixando que os dois parafusos deslizem para as ranhuras
respectivas. Rode a campânula até ambos os parafusos do suporte de montagem entrarem nas ranhuras. Aperte os parafusos firmemente.
Canopy-enheten har to sammenpasningsspor (1) og to sammenpasningshull (2). Plasser begge sporene i canopy-enheten direkte under, og på linje
med de to skruene på monteringsbraketten (3). Løft canopy-enheten, slik at de to skruene kan gli inn i sammenpasningssporene. Drei canopy-enheten
med urviseren til begge monteringsskruene faller på plass i sporenes forsenkninger. Trekk skruene godt til.
Armaturkåpan har två L-urtag (1) och två anpassningshål (2). Passa in båda L-urtagen direkt under och inriktade med de två skruvarna in monteringshållaren (3).
Lyft kåpan så att de två skruvarna glider in i L-urtagen. Vrid kåpan tills båda skruvarna på monteringshållaren passats in så långt det går i ändarna på L-urtagen.
Sätt an skruvarna ordentligt.
Kuvussa on kaksi kohdistusuraa (1) ja kaksi kohdistusreikää (2). Aseta kumpikin kuvussa oleva ura suoraan kiinnittimessä (3) olevien ruuvien alle ja niiden
kanssa kohdakkain. Nosta kupua, niin että kumpikin ruuvi liukuu kohdistusuriin. Kierrä kupua, kunnes kumpikin kiinnittimessä oleva ruuvi putoaa urien
syvennyksiin. Kiristä ruuvit hyvin.
Skærmen har to matchende riller (1) og to matchende huller (2). Placer begge riller i skærmen lige under og i flugt med to skruer på monteringsholderen
(3). Løft skærmen for at lade de to skruer glide ind i de tilsvarende riller. Drej skærmen indtil begge skruer fra monteringsholderen falder ind i rille
Libble takes abuse of its services very seriously. We're committed to dealing with such abuse according to the laws in your country of residence. When you submit a report, we'll investigate it and take the appropriate action. We'll get back to you only if we require additional details or have more information to share.
Product:
Forumrules
To achieve meaningful questions, we apply the following rules:
First, read the manual;
Check if your question has been asked previously;
Try to ask your question as clearly as possible;
Did you already try to solve the problem? Please mention this;
Is your problem solved by a visitor then let him/her know in this forum;
To give a response to a question or answer, do not use this form but click on the button 'reply to this question';
Your question will be posted here and emailed to our subscribers. Therefore, avoid filling in personal details.
Register
Register getting emails for Westinghouse Princess Euro at:
new questions and answers
new manuals
You will receive an email to register for one or both of the options.
Get your user manual by e-mail
Enter your email address to receive the manual of Westinghouse Princess Euro in the language / languages: All languages as an attachment in your email.
The manual is 1,41 mb in size.
You will receive the manual in your email within minutes. If you have not received an email, then probably have entered the wrong email address or your mailbox is too full. In addition, it may be that your ISP may have a maximum size for emails to receive.
The manual is sent by email. Check your email
If you have not received an email with the manual within fifteen minutes, it may be that you have a entered a wrong email address or that your ISP has set a maximum size to receive email that is smaller than the size of the manual.
The email address you have provided is not correct.
Please check the email address and correct it.
Your question is posted on this page
Would you like to receive an email when new answers and questions are posted? Please enter your email address.