738689
504
Zoom out
Zoom in
Previous page
1/598
Next page
||
WHEELS AND TYRES
* Option/accessory.
502
WARNING
Check that the jack is not damaged, that the
threads are thoroughly lubricated and that it is
free from dirt.
3.
Take out the jack*, wheel wrench* and tools
for the wheel bolts' plastic caps that are fitted
in the foam block.
Tool for removing the plastic caps on the wheel bolts.
NOTE
The normal car jack is only designed for occa-
sional, short-term use, such as when chang-
ing a wheel after a puncture, changing to win-
ter/summer wheels, etc. Only the jack for the
specific car model may be used to raise the
car. If the car is to be jacked up more often, or
for a longer time than is required just to
change a wheel, use of a garage jack is rec-
ommended. In this instance, follow the
instructions for use that come with the equip-
ment.
4. Place chocks in front of and behind the
wheels which will remain on the ground to
prevent them from rolling. Use heavy wooden
blocks or large stones for example.
5. Screw together the towing eye with the
wheel wrench* to the stop position.
IMPORTANT
The towing eye must be screwed all the way
into the wheel bolt wrench.
6. Remove the plastic caps from the wheel
bolts with the intended tool.
7. Loosen the wheel bolts ½-1 turn anticlock-
wise with the wheel wrench*.
WARNING
Never position anything between the ground
and the jack, nor between the jack and the
car's jacking point.
IMPORTANT
The ground must be firm, smooth and level.
8. When raising the car, it is important that the
jack* or lifting arms are fitted in the intended
points on the car's underbody. The triangle
markings in the plastic cover indicate the
locations of the jacking/lifting points. There
are two jacking points on each side of the
car. There is a recess for the jack at each
point.
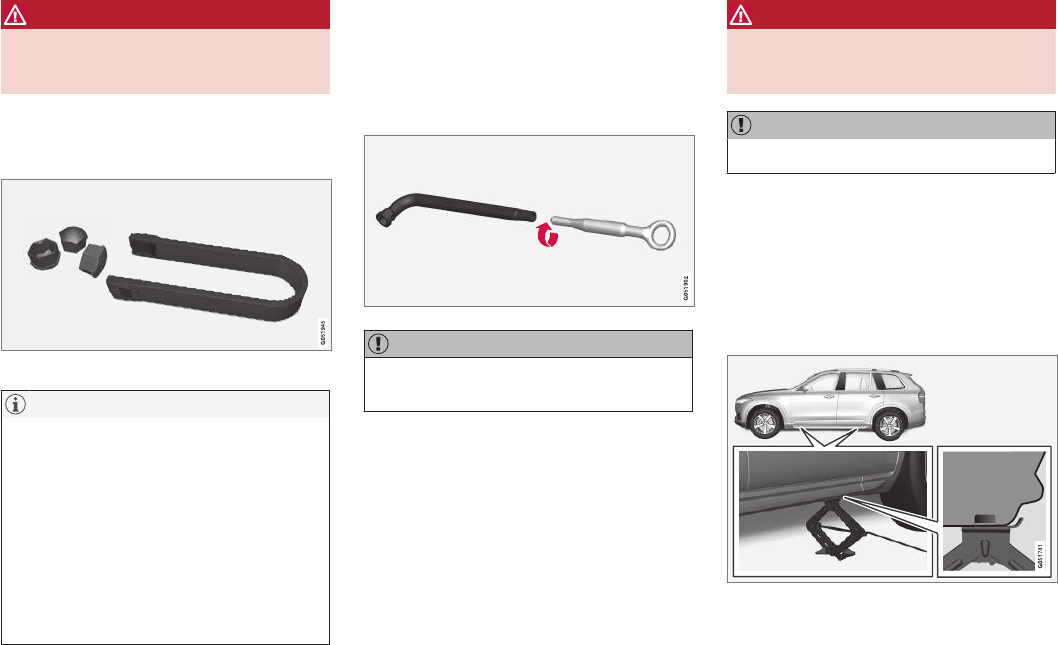
504


Need help? Post your question in this forum.

Forumrules


Report abuse

Libble takes abuse of its services very seriously. We're committed to dealing with such abuse according to the laws in your country of residence. When you submit a report, we'll investigate it and take the appropriate action. We'll get back to you only if we require additional details or have more information to share.

Product:

For example, Anti-Semitic content, racist content, or material that could result in a violent physical act.

For example, a credit card number, a personal identification number, or an unlisted home address. Note that email addresses and full names are not considered private information.

Forumrules

To achieve meaningful questions, we apply the following rules:

Register

Register getting emails for Volvo XC90 2017 at:


You will receive an email to register for one or both of the options.


Get your user manual by e-mail

Enter your email address to receive the manual of Volvo XC90 2017 in the language / languages: English as an attachment in your email.

The manual is 13,5 mb in size.


You will receive the manual in your email within minutes. If you have not received an email, then probably have entered the wrong email address or your mailbox is too full. In addition, it may be that your ISP may have a maximum size for emails to receive.

Others manual(s) of Volvo XC90 2017

Volvo XC90 2017 User Manual - German - 638 pages

Volvo XC90 2017 User Manual - Dutch - 616 pages


The manual is sent by email. Check your email

If you have not received an email with the manual within fifteen minutes, it may be that you have a entered a wrong email address or that your ISP has set a maximum size to receive email that is smaller than the size of the manual.

The email address you have provided is not correct.

Please check the email address and correct it.

Your question is posted on this page

Would you like to receive an email when new answers and questions are posted? Please enter your email address.


Info