301411
7
Zoom out
Zoom in
Previous page
1/196
Next page
BALANCE
USER GUIDE / HANDLEIDING
MANUEL D’UTILISATEUR / BEDIENUNGSANLEITUNG
MANUAL DE USUARIO / MANUAL DO UTILIZADOR
  / INSTRUKCJA OBS£UGI
V1.0 - 03/10
Important
To use ‘Caller ID’ (display caller), this service has to be activated on your phone line. Normally you need a
separate subscription from your telephone company to activate this function. If you don’t have the Caller ID
function on your phone line, the incoming telephone numbers will NOT be shown on the display of your
telephone.
Belangrijk
Om de ‘Nummerweergave’ te kunnen gebruiken, moet deze dienst geactiveerd zijn op uw telefoonlijn. Om
deze dienst te activeren, hebt U hiervoor meestal een apart abonnement van uw telefoonmaatschappij nodig.
Indien U geen nummerweergavefunctie hebt op uw telefoonlijn, zullen de
inkomende telefoonnummers NIET op de display van uw toestel verschijnen.
Important
Pour utiliser la fonction ‘Caller ID/Clip’ (affichage de l’appelant), ce service doit être activé sur votre ligne
téléphonique. Généralement, vous avez besoin d’un abonnement séparé de votre compagnie de téléphone
pour activer cette fonction. Si vous n’avez pas la fonction ‘Caller ID - Affichage Appelant’ sur votre ligne
téléphonique, les numéros de téléphone entrants n’apparaîtront PAS sur l’écran de votre téléphone.
Wichtig
Zur Verwendung der ‘Rufnummernanzeige’ muss dieser Dienst erst für Ihre Telefonleitung freigegeben
werden. Zur Aktivierung dieser Dienstleistung benötigen Sie meistens ein separates Abonnement Ihrer
Telefongesellschaft.Wenn Sie für Ihre Telefonleitung keine Rufnummernanzeigefunktion haben, erscheinen
die eingehenden Telefonnummern NICHT im Display Ihres Gerätes.
Importante
Para poder usar la función “Identificación de llamadas,este servicio tiene que estar dado de alta en su línea
telefónica. Normalmente es necesario abonarse a dicho serviciopara que la compañía telefónica active esta
función. Si su línea telefónica no dispone de la funciónIdentificación de llamadas, la pantalla del aparato no
mostrará los números de teléfono de las llamadas entrantes.
Importante
Para utilizar a função "ID Chamador" (visualizar Chamador), este serviço terá de ser activado na sua linha
telefónica. Normalmente necessita de subscrever este serviço, à parte, com o seu operador de
telecomunicações, para poder activar esta função. Se não tiver contratado este serviço a função ID do
Chamador não estará disponível e por isso os números de telefone das chamadas entrantes não aparecerão no
seu telefone.

      ,      
   .   
      
      .
   
   
   ,        
  .
Uwaga
Aby urzdzenie prezentowao numer przychodzcy, niezbdna jest usuga prezentacji numeru. Usug t
naley aktywowa u lokalnego operatora telekomunikacyjnego. Jeeli usuga prezentacji numeru nie jest
wczona, numery przychodzcych pocze nie bd prezentowane.
UK The features described in this manual are published with reservation to modifications.
NL De in deze handleiding beschreven mogelijkheden worden gepubliceerd onder voorbehoud van
wijzigingen.
F Les possibilités décrites dans ce manuel sont publiées sous réserve de modifications.
D Die in dieser Bedienungsanleitung umschriebenen Möglichkeiten, werden vorbehaltlich
Änderungen publiziert.
ES Las características descritas en este manual pueden ser objeto de futuras modificaciones.
PT As características descritas neste manual são publicadas sob reserva de modificação.
GR       ,    
.
PL Waciwoci opisane w niniejszej instrukcji obsugi s publikowane z zatrzeeniem prawa wprow-
adzenia zmian.
UK To be connected to the public analogue telephone network.
NL Geschikt voor aansluiting op het openbare analoog geschakelde telefoonnetwerk.
F Il est destiné à être raccordé au réseau de télécommunication public.
D Kompatibel für den analogen Telefonanschluss.
ES Conexión a la red telefónica analógica
PT Para efectuar a ligação com a rede pública analógica.
GR         .
PL Do podczenia do publicznej analogowej sieci telefonicznej.
UK The CE symbol indicates that the unit complies with the essential requirements of the R&TTE
directive.
NL Het toestel voldoet aan de basiseisen van de R&TTE-richtlijn. Dit wordt bevestigd door de CE-
markering.
F La conformité de l’appareil avec les exigences fondamentales de la directive européenne R&TTE
relative aux terminaux, est confirmée par le label CE.
D Die Übereinstimmung des Gerätes mit den grundlegenden Anforderungen der R&TTE-Directive ist
durch das CE-Kennzeichen bestätigt.
ES El sello CE
corrobora la conformidad del equipo con los requerimientos básicos de la directiva
R&TTE.
PT O símbolo CE indica que esta unidade cumpre com os requisitos essenciais da directiva R&TTE.
GR  CE          
R&TTE.
PL Symbol CE oznacza, e urzdzenie spenia istotne wymogi dyrektywy R&TTE.
3
4
5
6
7
8
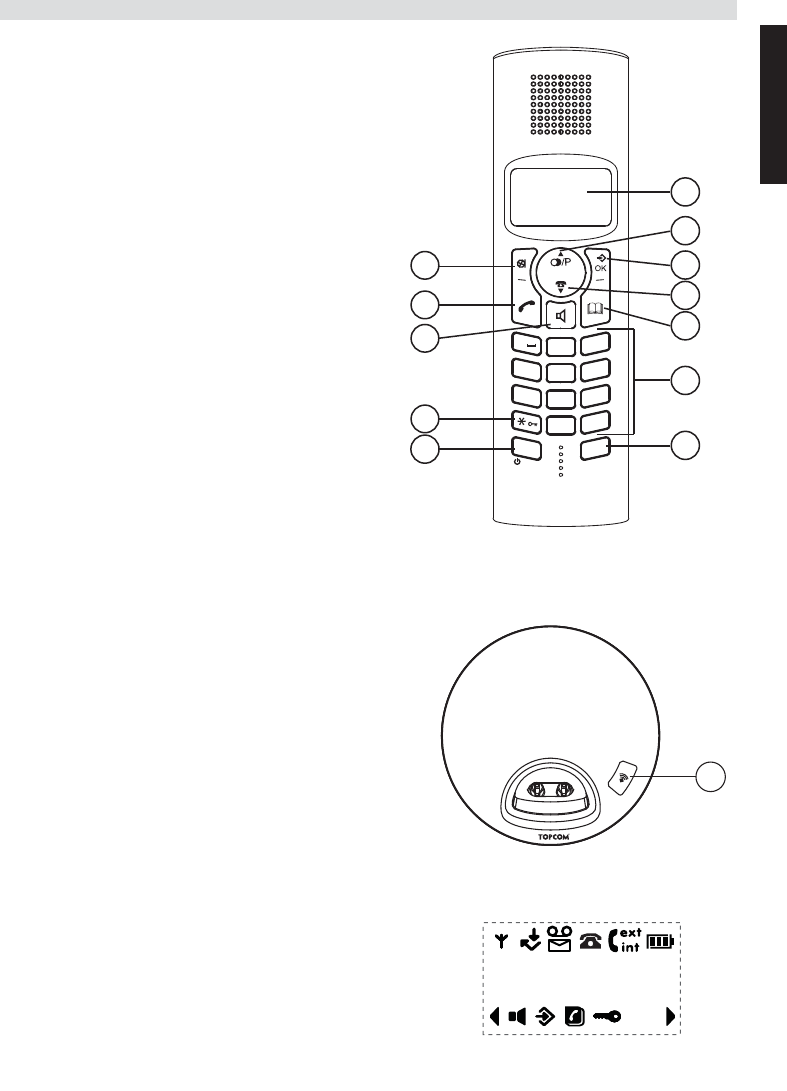
1
9
12
11
2
10
1
2
ABC
3
DEF
4
GHI
5
JKL
6
MNO
7
PQRS
8
TUV
9
WXYZ
0
#
INT
R
- 2C Handset -
13
- 2D Base -
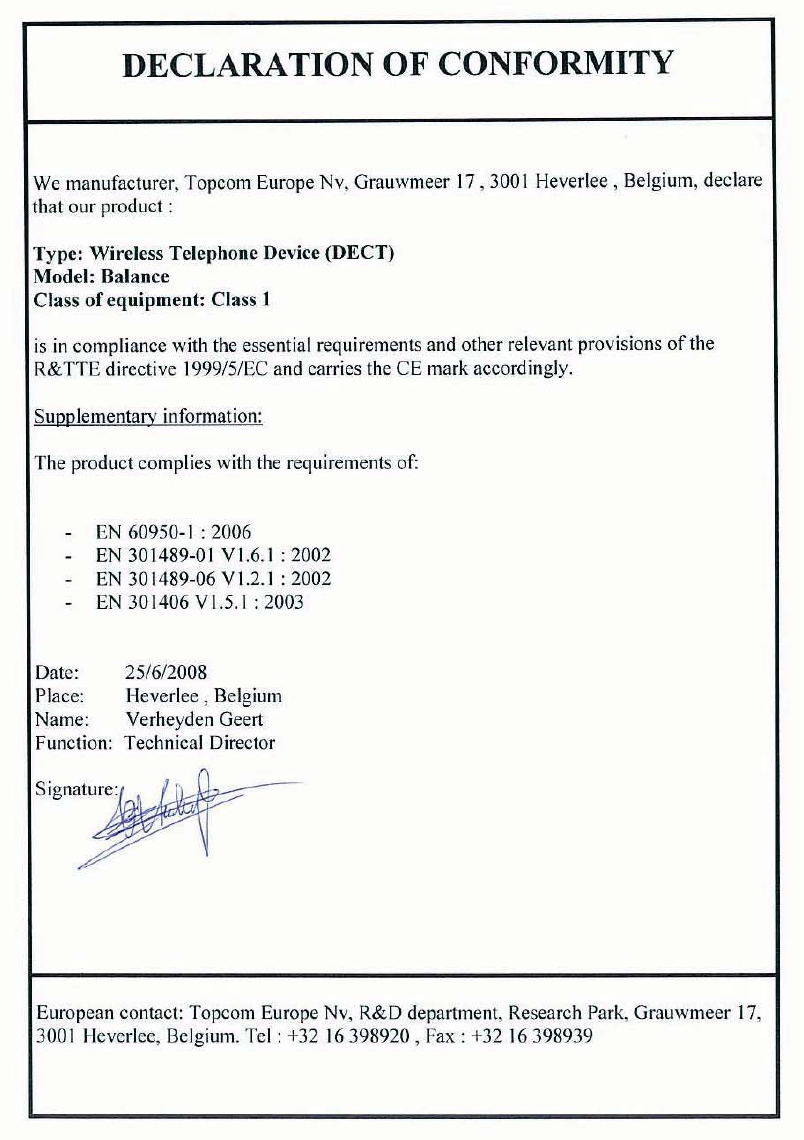
UK Hereby, TOPCOM EUROPE N.V., declares that this device is in compliance with the essential
requirements and other relevant provisions of Directive 1999/5/EC. The Declaration of conformity
can be found on:
NL Hierbij verklaart TOPCOM EUROPE N.V. dat het toestel in overeenstemming is met de essentiële
eisen en de andere relevante bepalingen van richtlijn 1999/5/EG. De conformiteitsverklaring kan
gevonden worden op:
FR Par la présente TOPCOM EUROPE N.V. déclare que l'appareil est conforme aux exigences essen-
tielles et aux autres dispositions pertinentes de la directive 1999/5/CE. La déclaration de conformité
peut être consultée sur :
DE Hiermit erklärt TOPCOM EUROPE N.V., dass sich das Gerät in Übereinstimmung mit den
grundlegenden Anforderungen und den übrigen einschlägigen Bestimmungen der Richtlinie 1999/
5/EG befindet. Die Konformitätserklärung finden Sie an der folgenden Stelle:
ES Por medio de la presente TOPCOM EUROPE N.V. declara que el dispositivo cumple con los requi-
sitos esenciales y cualesquiera otras disposiciones aplicables o exigibles de la Directiva 1999/5/CE.
Puede encontrarse la Declaración de conformidad en:
PT
TOPCOM EUROPE N.V. declara que este equipamento está conforme com os requisitos essenciais e
outras disposições da Directiva 1999/5/CE. A Declaração de Conformidade pode ser encontrada em:
GR     topcom europe n.v.        
          1999/5/.   
   :
PL Niniejszym TOPCOM EUROPE N.V. oswiadcza, ze wyrobu jest zgodny z zasadniczymi
wymogami oraz pozostalymi stosownymi postanowieniami Dyrektywy 1999/5/EC. Deklaracj
zgodnoci mona znale w:
http://www.topcom.net/cedeclarations.asp
UK This product works with rechargeable batteries only. If you put non-rechargeable batteries
in the handset and place it on the base, the handset will be damaged and this in NOT covered
under the warranty conditions.
NL Dit product werkt alleen op herlaadbare batterijen. Als u niet herlaadbare batterijen in de handset stopt
en deze op de basis plaatst, zal de handset beschadigd raken. Deze beschadiging wordt NIET gedekt door de
garantie.
FR Ce produit fonctionnement uniquement avec des piles rechargeables. Si vous mettez des piles non
rechargeables dans le combiné et si vous le placez sur la base, le combiné sera endommagé et ceci ne sera
PAS couvert par la garantie.
DE Dieses Gerät darf nur mit Akkus betrieben werden. Wenn Sie das Mobilteil mit nicht wiederaufladbaren
Batterien bestücken und es auf die Basisstation stellen, wird das Mobilteil beschädigt und fällt nicht unter
die Garantie.
ES Este producto solo funciona con pilas recargables. Si pone pilas no recargables en el terminal y lo pone
en la base, el terminal se dañará, lo que NO está incluido en la garantía.
PT Este produto trabalha apenas com baterias recarregáveis. Se colocar baterias não recarregáveis no
portátil e o colocar sobre a base, este ficará danificado. Estes danos não são cobertos pelas condições da
garantia.
GR       .   
        ,    
       
 .
PL Urzdzenie to dziaa tylko z akumulatorkami nadajcymi si do adowania. W przypadku woenia do
suchawki zwykych, nienadajcych si do adowania baterii, a nastpnie pooenia jej na bazie, suchawka
ulegnie uszkodzeniu i NIE bedzie to objte przez gwarancj.
HL_Balance-front.fm Page 4 Friday, March 26, 2010 4:02 PM
English
1 Safety instructions ...............................................................................................................15
2 Getting started .....................................................................................................................15
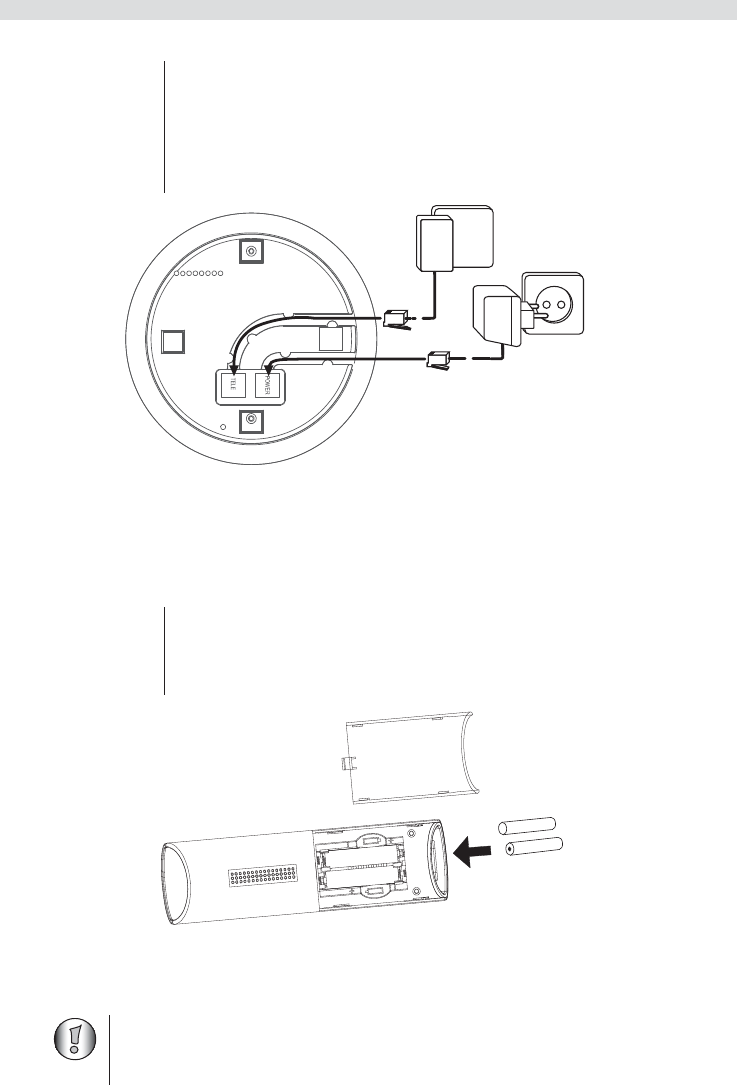
2.1 How to use this user guide................................................................................................... 15
2.2 Installing the base ................................................................................................................ 16
2.3 Installing the handset ........................................................................................................... 16
2.4 Keys / LED’s ....................................................................................................................... 17
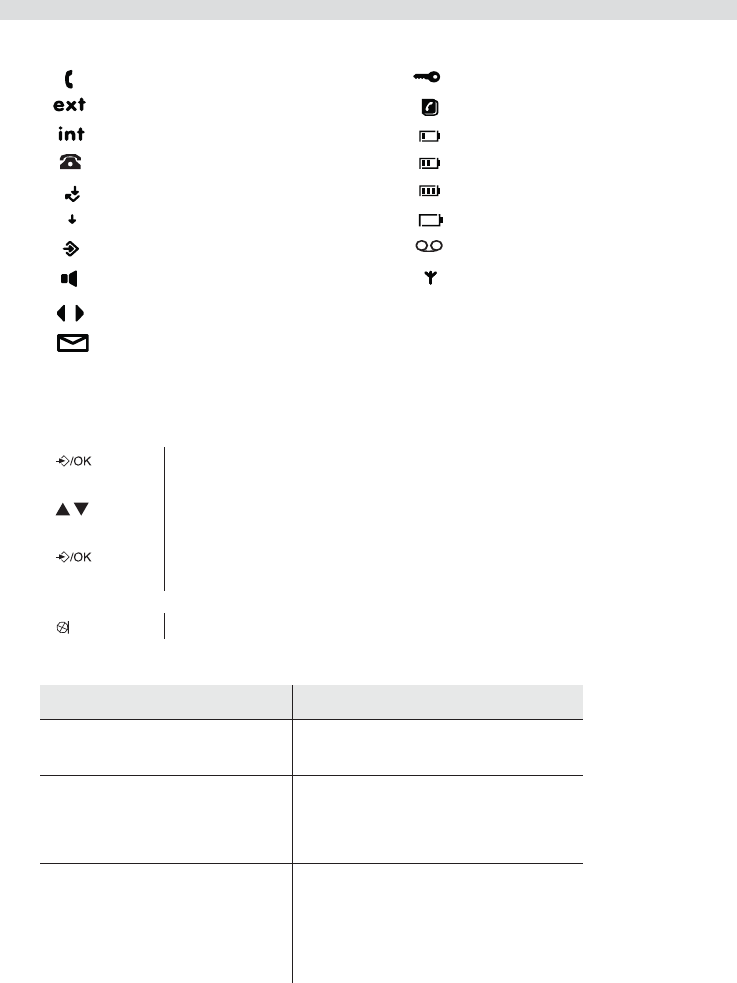
2.5 Symbols ............................................................................................................................... 18
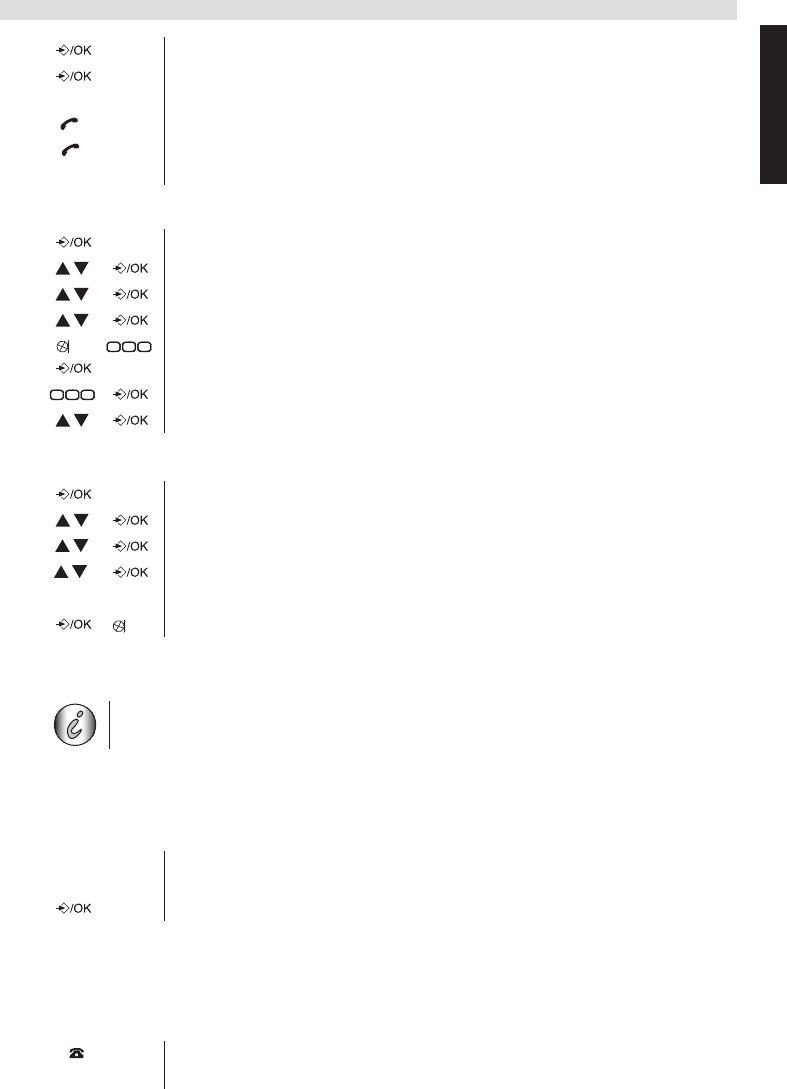
2.6 Navigating the menu............................................................................................................ 18
2.7 Menu overview .................................................................................................................... 18
3 Using the telephone..............................................................................................................19
3.1 Switching the handset on/off ............................................................................................... 19
3.2 Changing the menu language............................................................................................... 19
3.3 Receiving a telephone call ................................................................................................... 19
3.4 Making an external telephone call ....................................................................................... 19
3.5 Making an internal telephone call........................................................................................ 20
3.6 Internal call transfer ............................................................................................................. 20
3.7 Conference call .................................................................................................................... 20
3.8 Handsfree mode ................................................................................................................... 20
3.9 Speaker volume during call ................................................................................................. 20
3.10 Display of call duration........................................................................................................ 21
3.11 Microphone mute................................................................................................................. 21
3.12 Pause key ............................................................................................................................. 21
3.13 Locating a handset (Paging function) .................................................................................. 21
3.14 Redial memory..................................................................................................................... 21
3.15 Using the alphanumerical keypad........................................................................................ 21
4 Phonebook ............................................................................................................................22
4.1 To add an entry into the phonebook .................................................................................... 22
4.2 To dial an entry from the phonebook................................................................................... 22
4.3 To modify a name and number ............................................................................................ 22
4.4 Delete an entry from the phonebook.................................................................................... 23
5 Caller Identification.............................................................................................................23
6 Personalize the handset .......................................................................................................24
6.1 Adjusting the ring volume ................................................................................................... 24
6.2 Choosing the ring melody.................................................................................................... 25
6.3 Activation/deactivation of beeps ......................................................................................... 25
6.4 Handset name....................................................................................................................... 25
6.5 Automatic answer ................................................................................................................ 26
6.6 Reset the handset ................................................................................................................. 26
6.7 Keypad lock ......................................................................................................................... 27
6.8 Setting the time .................................................................................................................... 27
6.9 Setting the alarm .................................................................................................................. 27
7 Base settings .........................................................................................................................27
7.1 Adjusting the ring volume ................................................................................................... 27
7.2 Choosing the ring melody.................................................................................................... 27
7.3 Changing the PIN code ........................................................................................................ 28
7.4 Setting the dialing mode ...................................................................................................... 28
7.5 Flash time duration .............................................................................................................. 28
8 Managing multiple handsets...............................................................................................28
8.1 Adding a new handset.......................................................................................................... 28
8.2 Removing a handset............................................................................................................. 29
HL_Balance D182.book Page 4 Friday, March 26, 2010 2:11 PM
8.3 Setting up a handset on another base ................................................................................... 29
8.4 Selecting a base.................................................................................................................... 30
9 SMS .......................................................................................................................................30
9.1 How to write an SMS........................................................................................................... 30
9.2 Sending an SMS................................................................................................................... 30
9.3 Read and view the list of received messages (Inbox)......................................................... 31
9.4 Multiple users ...................................................................................................................... 31
9.5 SMS settings ........................................................................................................................ 32
10 Troubleshooting ...................................................................................................................34
11 Technical dataTechnical characteristics............................................................................34
12 Topcom Warranty ...............................................................................................................35
12.1 Warranty period ................................................................................................................... 35
12.2 Warranty handling ............................................................................................................... 35
12.3 Warranty exclusions ............................................................................................................ 35
13 Disposal of the device (environment) .................................................................................35
14 Cleaning................................................................................................................................35
Nederlands
1 Veiligheidsinstructies...........................................................................................................36
2 Aan de slag............................................................................................................................36
2.1 Deze gebruikshandleiding gebruiken................................................................................... 36
2.2 Het basisstation installeren .................................................................................................. 37
2.3 De handset installeren.......................................................................................................... 37
2.4 Toetsen / LED’s................................................................................................................... 38
2.5 Symbols ............................................................................................................................... 39
2.6 Door het menu bladeren....................................................................................................... 39
2.7 Menuoverzicht ..................................................................................................................... 39
3 De telefoon gebruiken..........................................................................................................40
3.1 De handset aan- en afzetten ................................................................................................. 40
3.2 De menutaal veranderen ...................................................................................................... 40
3.3 Een oproep ontvangen ......................................................................................................... 40
3.4 Een externe oproep doen...................................................................................................... 41
3.5 Een interne oproep doen ...................................................................................................... 41
3.6 Een interne oproep doorschakelen....................................................................................... 41
3.7 Conferentiegesprek .............................................................................................................. 41
3.8 Handenvrij-modus ............................................................................................................... 42
3.9 Luidsprekervolume tijdens het gesprek ............................................................................... 42
3.10 Weergave van de duur van het gesprek ............................................................................... 42
3.11 Microfoon uitschakelen ....................................................................................................... 42
3.12 Pauze-toets ........................................................................................................................... 42
3.13 Een handset vinden (paging-functie) ................................................................................... 42
3.14 Nummerherhalingsgeheugen ............................................................................................... 42
3.15 Het alfanumerieke toetsenbord gebruiken........................................................................... 43
4 Telefoonboek ........................................................................................................................43
4.1 Een nummer toevoegen aan het telefoonboek ..................................................................... 43
4.2 Een nummer uit het telefoonboek bellen ............................................................................. 43
4.3 Een naam en nummer wijzigen............................................................................................ 44
4.4 Een nummer uit het telefoonboek verwijderen.................................................................... 44
HL_Balance D182.book Page 5 Friday, March 26, 2010 2:11 PM
5 Nummerweergave oproeper................................................................................................44
6 De handset personaliseren ..................................................................................................45
6.1 Het volume van de beltoon aanpassen................................................................................. 45
6.2 Een beltoon kiezen............................................................................................................... 46
6.3 Inschakelen/uitschakelen van de pieptonen......................................................................... 46
6.4 Naam van de handset ........................................................................................................... 47
6.5 Automatisch antwoorden ..................................................................................................... 47
6.6 De handset resetten .............................................................................................................. 47
6.7 Toetsenbordvergrendeling ................................................................................................... 48
6.8 De tijd instellen.................................................................................................................... 48
6.9 Het alarm instellen ............................................................................................................... 48
7 Basisinstellingen...................................................................................................................49
7.1 Het volume van de beltoon aanpassen................................................................................. 49
7.2 Een beltoon kiezen............................................................................................................... 49
7.3 De pincode wijzigen ............................................................................................................ 49
7.4 De belmodus instellen.......................................................................................................... 49
7.5 Duur van de flashtijd............................................................................................................ 50
8 Meerdere handsets gebruiken ............................................................................................50
8.1 Een nieuwe handset toevoegen ............................................................................................ 50
8.2 Een handset verwijderen...................................................................................................... 51
8.3 Een handset instellen op een ander basisstation .................................................................. 51
8.4 Een basisstation selecteren................................................................................................... 51
9 SMS .......................................................................................................................................52
9.1 Een sms schrijven ................................................................................................................ 52
9.2 Een sms verzenden............................................................................................................... 52
9.3 Lijst met ontvangen berichten (Postvak IN) lezen en bekijken .......................................... 52
9.4 Meerdere gebruikers ............................................................................................................ 53
9.5 Sms-instellingen................................................................................................................... 53
10 Probleemoplossing ...............................................................................................................55
11 Technische kenmerken ........................................................................................................56
12 Topcom-garantie..................................................................................................................56
12.1 Garantieperiode.................................................................................................................... 56
12.2 Afwikkeling van garantieclaims .......................................................................................... 56
12.3 Garantiebeperkingen............................................................................................................ 57
13 Het product afvoeren (milieu) ............................................................................................57
14 Reiniging...............................................................................................................................57
Français
1 Instructions de sécurité .......................................................................................................58
2 Pour commencer ..................................................................................................................58
2.1 Comment utiliser ce mode d'emploi ?.................................................................................. 58
2.2 Installation de la base........................................................................................................... 59
2.3 Installation du combiné........................................................................................................ 59
2.4 Touches / voyants ................................................................................................................ 60
2.5 Symboles.............................................................................................................................. 61
2.6 Navigation dans les menus .................................................................................................. 61
2.7 Organisation des menus ....................................................................................................... 61
3 Utilisation du téléphone.......................................................................................................62
3.1 Mise en/hors service du combiné......................................................................................... 62
HL_Balance D182.book Page 6 Friday, March 26, 2010 2:11 PM
3.2 Modification de la langue des menus .................................................................................. 62
3.3 Recevoir un appel ................................................................................................................ 62
3.4 Passer un appel téléphonique externe .................................................................................. 63
3.5 Passer un appel téléphonique interne................................................................................... 63
3.6 Transfert d'appel interne ...................................................................................................... 63
3.7 Conférence téléphonique ..................................................................................................... 63
3.8 Mode mains-libres ............................................................................................................... 64
3.9 Volume du haut-parleur pendant un appel........................................................................... 64
3.10 Affichage de la durée d'un appel.......................................................................................... 64
3.11 sactivation du microphone .............................................................................................. 64
3.12 Touche Pause ....................................................................................................................... 64
3.13 Localisation d'un combiné (fonction Recherche "Paging")................................................. 64
3.14 Mémoire de rappel ............................................................................................................... 64
3.15 Utilisation du clavier alphanumérique................................................................................. 65
4 Répertoire "Phonebook" ....................................................................................................65
4.1 Pour ajouter une entrée dans le répertoire ........................................................................... 65
4.2 Pour composer une entrée à partir du répertoire.................................................................. 65
4.3 Pour modifier un nom et un numéro.................................................................................... 66
4.4 Effacez une entrée dans le répertoire................................................................................... 66
5 Identification de l'appelant .................................................................................................66
6 Personnalisation du combiné ..............................................................................................68
6.1 Réglage du volume de sonnerie ........................................................................................... 68
6.2 Choix de la mélodie de la sonnerie...................................................................................... 68
6.3 Activation / Désactivation des bips ..................................................................................... 68
6.4 Nom du combiné.................................................................................................................. 69
6.5 Réponse automatique........................................................................................................... 69
6.6 Réinitialisation du combiné ................................................................................................. 70
6.7 Verrouillage du clavier ........................................................................................................ 70
6.8 Réglage de l'heure................................................................................................................ 70
6.9 Réglage de l'alarme.............................................................................................................. 71
7 Réglages de la base...............................................................................................................71
7.1 Réglage du volume de sonnerie ........................................................................................... 71
7.2 Choix de la mélodie de la sonnerie...................................................................................... 71
7.3 Modification du code PIN.................................................................................................... 71
7.4 Réglage du mode de numérotation ...................................................................................... 72
7.5 Durée du Flash ..................................................................................................................... 72
8 Gestion de plusieurs combinés............................................................................................72
8.1 Ajout d'un nouveau combiné ............................................................................................... 72
8.2 Suppression d'un combiné ................................................................................................... 73
8.3 Installation d'un combiné sur une autre base ....................................................................... 73
8.4 Sélection d'une base............................................................................................................. 73
9 SMS .......................................................................................................................................74
9.1 Comment rédiger un SMS ................................................................................................... 74
9.2 Envoi d'un SMS ................................................................................................................... 74
9.3 Lecture et consultation de la liste de messages reçus (Boîte de réception) ........................ 74
9.4 Utilisateurs multiples ........................................................................................................... 75
9.5 CONFIG SMS "SMS SETTINGS" ..................................................................................... 76
10 Dépannage ............................................................................................................................77
11 Données et caractéristiques techniques .............................................................................78
12 Garantie Topcom .................................................................................................................78
12.1 Période de garantie............................................................................................................... 78
HL_Balance D182.book Page 7 Friday, March 26, 2010 2:11 PM
12.2 Mise en œuvre de la garantie ............................................................................................... 79
12.3 Exclusions de garantie ......................................................................................................... 79
13 Mise au rebut de l'appareil (environnement)....................................................................79
14 Nettoyage ..............................................................................................................................79
Deutsch
1 Sicherheitshinweise..............................................................................................................80
2 Erste Schritte........................................................................................................................80
2.1 Zum Gebrauch dieser Bedienungsanleitung........................................................................ 80
2.2 Basisstation installieren ....................................................................................................... 81
2.3 Mobilteil installieren............................................................................................................ 81
2.4 Tasten/LEDs ........................................................................................................................ 82
2.5 Symbole ............................................................................................................................... 83
2.6 Durch das Menü navigieren................................................................................................. 83
2.7 Menü-Übersicht ................................................................................................................... 83
3 Benutzen des Telefons .........................................................................................................84
3.1 Mobilteil ein- und ausschalten............................................................................................. 84
3.2 Menüsprache ändern ............................................................................................................ 84
3.3 Einen Anruf annehmen ........................................................................................................ 84
3.4 Einen externen Anruf tätigen............................................................................................... 84
3.5 Einen internen Anruf tätigen................................................................................................ 85
3.6 Interne Anrufweiterleitung .................................................................................................. 85
3.7 Konferenzschaltung ............................................................................................................. 85
3.8 Freisprechmodus.................................................................................................................. 85
3.9 Lautstärke während eines Anrufs einstellen ........................................................................ 86
3.10 Anzeige der Gesprächsdauer ............................................................................................... 86
3.11 Mikrofon stummschalten ..................................................................................................... 86
3.12 Pausen-Taste ........................................................................................................................ 86
3.13 Ein Mobilteil suchen (Paging) ............................................................................................. 86
3.14 Wahlwiederholung............................................................................................................... 86
3.15 Die alphanumerischen Tasten verwenden ........................................................................... 87
4 Telefonbuch ..........................................................................................................................87
4.1 So fügen Sie einen Eintrag im Telefonbuch hinzu .............................................................. 87
4.2 So rufen Sie einen Eintrag aus dem Telefonbuch an........................................................... 87
4.3 So ändern Sie einen Namen und eine Nummer ................................................................... 88
4.4 Einen Eintrag aus dem Telefonbuch löschen....................................................................... 88
5 Anruferkennung ..................................................................................................................88
6 Mobilteil individuell anpassen ............................................................................................90
6.1 Ruftonlautstärke anpassen ................................................................................................... 90
6.2 Ruftonmelodie wählen......................................................................................................... 90
6.3 Signaltöne aktiveren/deaktivieren........................................................................................ 90
6.4 Name des Mobilteils ............................................................................................................ 91
6.5 Automatische Gesprächsannahme ....................................................................................... 91
6.6 Mobilteil zurücksetzen......................................................................................................... 91
6.7 Tastatursperre....................................................................................................................... 92
6.8 Uhrzeit einstellen ................................................................................................................. 92
6.9 Wecker einstellen................................................................................................................. 92
7 Einstellungen der Basisstation............................................................................................93
7.1 Ruftonlautstärke anpassen ................................................................................................... 93
7.2 Ruftonmelodie wählen......................................................................................................... 93
HL_Balance D182.book Page 8 Friday, March 26, 2010 2:11 PM
7.3 PIN-Code ändern ................................................................................................................. 93
7.4 Wahlverfahren einstellen ..................................................................................................... 93
7.5 Flashzeit ............................................................................................................................... 94
8 Mehrere Mobilteile verwalten ............................................................................................94
8.1 Ein neues Mobilteil hinzufügen........................................................................................... 94
8.2 Ein Mobilteil abmelden ....................................................................................................... 95
8.3 Ein Mobilteil an einer anderen Basisstation anmelden........................................................ 95
8.4 Eine Basisstation wählen ..................................................................................................... 96
9 SMS .......................................................................................................................................96
9.1 Eine SMS schreiben............................................................................................................. 96
9.2 Eine SMS senden ................................................................................................................. 96
9.3 Liste empfangener Nachrichten (Eingang) lesen und aufrufen .......................................... 96
9.4 Mehrere Benutzer ................................................................................................................ 97
9.5 SMS-Einstellungen .............................................................................................................. 98
10 Problembeseitigung ...........................................................................................................100
11 Technische Daten ...............................................................................................................100
12 Topcom-Garantie...............................................................................................................101
12.1 Garantiezeit........................................................................................................................ 101
12.2 Garantieabwicklung ........................................................................................................... 101
12.3 Garantieausschlüsse ........................................................................................................... 101
13 Entsorgung des Geräts (Umweltschutz) ..........................................................................101
14 Reinigung............................................................................................................................101
Español
1 Instrucciones de seguridad................................................................................................102
2 Introducción .......................................................................................................................102
2.1 Uso del manual del usuario................................................................................................ 102
2.2 Instalación de la base ......................................................................................................... 103
2.3 Instalación del terminal...................................................................................................... 103
2.4 Teclas/Pantalla ................................................................................................................... 104
2.5 Símbolos ............................................................................................................................ 105
2.6 Navegación por el menú .................................................................................................... 105
2.7 Vista general de los menús ................................................................................................ 105
3 Uso del teléfono ..................................................................................................................106
3.1 Activación / desactivación del terminal............................................................................. 106
3.2 Cambio del idioma de los menús....................................................................................... 106
3.3 Recepción de una llamada telefónica................................................................................. 106
3.4 Realización de una llamada telefónica externa.................................................................. 106
3.5 Realización de una llamada telefónica interna .................................................................. 107
3.6 Transferencia interna de una llamada ................................................................................ 107
3.7 Conferencia........................................................................................................................ 107
3.8 Modo manos libres............................................................................................................. 107
3.9 Volumen del altavoz durante la llamada............................................................................ 108
3.10 Visualización de la duración de una llamada..................................................................... 108
3.11 Micrófono silenciado ......................................................................................................... 108
3.12 Tecla Pausa ........................................................................................................................ 108
3.13 Localización de un terminal (función de búsqueda).......................................................... 108
3.14 Memoria de rellamada ....................................................................................................... 108
3.15 Uso de las teclas alfanuméricas ......................................................................................... 108
HL_Balance D182.book Page 9 Friday, March 26, 2010 2:11 PM
4 Agenda (Phonebook) .........................................................................................................109
4.1 Grabación de una entrada en la agenda.............................................................................. 109
4.2 Marcación de una entrada de la agenda ............................................................................. 109
4.3 Modificación de un nombre y un número.......................................................................... 110
4.4 Eliminación de una entrada de la agenda........................................................................... 110
5 Identificación de llamadas ................................................................................................110
6 Personalización del terminal.............................................................................................111
6.1 Ajuste del volumen del timbre........................................................................................... 111
6.2 Selección de la melodía del timbre .................................................................................... 112
6.3 Activación / Desactivación de pitidos ............................................................................... 112
6.4 Nombre del terminal .......................................................................................................... 113
6.5 Contestación automática .................................................................................................... 113
6.6 Reinicio del terminal.......................................................................................................... 113
6.7 Bloqueo del teclado ........................................................................................................... 114
6.8 Ajuste de la hora ................................................................................................................ 114
6.9 Ajuste de la alarma ............................................................................................................ 115
7 Config. base (Base settings)...............................................................................................115
7.1 Ajuste del volumen del timbre........................................................................................... 115
7.2 Selección de la melodía del timbre .................................................................................... 115
7.3 Cambio del código PIN...................................................................................................... 115
7.4 Ajuste del modo de marcación........................................................................................... 116
7.5 Duración del tiempo flash.................................................................................................. 116
8 Gestión de múltiples terminales .......................................................................................116
8.1 Adición de un terminal ...................................................................................................... 116
8.2 Desvinculación de un terminal .......................................................................................... 117
8.3 Configuración de un terminal en otra base ........................................................................ 117
8.4 Selección de una base ........................................................................................................ 118
9 Mensajes .............................................................................................................................118
9.1 Cómo escribir un mensaje SMS......................................................................................... 118
9.2 Enviar un SMS................................................................................................................... 118
9.3 Leer y ver la lista de mensajes recibidos (buzón Entrada)................................................ 119
9.4 Varios usuarios: ................................................................................................................. 119
9.5 Configuración de mensajes SMS....................................................................................... 120
10 Solución de problemas.......................................................................................................121
11 Datos técnicos / Características técnicas..........................................................................122
12 Garantía Topcom...............................................................................................................122
12.1 Período de garantía ............................................................................................................ 122
12.2 Tratamiento de la garantía ................................................................................................. 123
12.3 Limitaciones de la garantía ................................................................................................ 123
13 Reciclaje del dispositivo (medio ambiente)......................................................................123
14 Limpieza .............................................................................................................................123
Português
1 Instruções de segurança ....................................................................................................124
2 Iniciar..................................................................................................................................124
2.1 Como utilizar este manual do utilizador ............................................................................ 124
2.2 Instalar a base..................................................................................................................... 125
2.3 Instalar o terminal .............................................................................................................. 125
2.4 Teclas/LEDs....................................................................................................................... 126
HL_Balance D182.book Page 10 Friday, March 26, 2010 2:11 PM
2.5 Símbolos ............................................................................................................................ 127
2.6 Navegar no menu ............................................................................................................... 127
2.7 Descrição do menu............................................................................................................. 127
3 Utilizar o telefone...............................................................................................................128
3.1 Ligar e desligar o terminal ................................................................................................. 128
3.2 Alterar o idioma do menu .................................................................................................. 128
3.3 Receber uma chamada telefónica ...................................................................................... 128
3.4 Fazer uma chamada telefónica externa.............................................................................. 128
3.5 Fazer uma chamada telefónica interna............................................................................... 129
3.6 Transferência de chamada interna ..................................................................................... 129
3.7 Chamada em conferência................................................................................................... 129
3.8 Modo Mãos-livres.............................................................................................................. 129
3.9 Volume do altifalante durante a chamada.......................................................................... 130
3.10 Apresentação da duração da chamada ............................................................................... 130
3.11 Microfone em silêncio ....................................................................................................... 130
3.12 Tecla Pausa ........................................................................................................................ 130
3.13 Localizar um terminal (função Paging) ............................................................................. 130
3.14 Memória de remarcação..................................................................................................... 130
3.15 Utilizar o teclado alfanumérico.......................................................................................... 130
4 Agenda ................................................................................................................................131
4.1 Adicionar uma entrada à lista telefónica............................................................................ 131
4.2 Marcar um número a partir da lista telefónica................................................................... 131
4.3 Alterar um nome ou número.............................................................................................. 132
4.4 Apagar um nome da lista telefónica .................................................................................. 132
5 Identificação do autor da chamada..................................................................................132
6 Personalizar o terminal .....................................................................................................133
6.1 Ajustar o volume de toque ................................................................................................. 133
6.2 Definir a melodia do toque ................................................................................................ 134
6.3 Activação/desactivação de tons de aviso........................................................................... 134
6.4 Nome do telefone............................................................................................................... 135
6.5 Resposta automática .......................................................................................................... 135
6.6 Reinicializar o terminal...................................................................................................... 135
6.7 Bloqueio do teclado ........................................................................................................... 136
6.8 Acertar o relógio ................................................................................................................ 136
6.9 Acertar o alarme................................................................................................................. 136
7 Configuração da Base........................................................................................................136
7.1 Ajustar o volume de toque ................................................................................................. 136
7.2 Definir a melodia do toque ................................................................................................ 137
7.3 Alterar o código PIN.......................................................................................................... 137
7.4 Definir o modo de marcação.............................................................................................. 137
7.5 Duração do tempo Flash .................................................................................................... 137
8 Gerir vários telefones ........................................................................................................138
8.1 Adicionar um telefone novo .............................................................................................. 138
8.2 Remover um telefone......................................................................................................... 138
8.3 Configurar um telefone noutra base................................................................................... 139
8.4 Seleccionar uma base......................................................................................................... 139
9 SMS .....................................................................................................................................139
9.1 Como escrever uma mensagem SMS ................................................................................ 139
9.2 Enviar uma mensagem SMS.............................................................................................. 140
9.3 Leia e visualizar a lista de mensagens recebidas (Caixa de entrada)................................ 140
9.4 Utilizadores múltiplos........................................................................................................ 140
9.5 Configuração dos SMS ...................................................................................................... 141
HL_Balance D182.book Page 11 Friday, March 26, 2010 2:11 PM
10 Diagnóstico de avarias.......................................................................................................143
11 Características técnicas .....................................................................................................143
12 Garantia Topcom...............................................................................................................144
12.1 Período de garantia ............................................................................................................ 144
12.2 Modo de funcionamento da garantia ................................................................................. 144
12.3 Exclusões de garantia......................................................................................................... 144
13 Eliminação do dispositivo (ambiente) ..............................................................................145
14 Limpeza ..............................................................................................................................145

1   ............................................................................................................146
2    ..............................................................................................................146
2.1     ................................................................................... 146
2.2    .................................................................................................... 146
2.3   ........................................................................................... 147
2.4 /  (LED)................................................................................. 148
2.5 ............................................................................................................................. 149
2.6    ........................................................................................................ 149
2.7   ...................................................................................................... 149
3   .......................................................................................................150
3.1 /  .................................................................... 150
3.2    ............................................................................................... 150
3.3    ............................................................................................... 150
3.4    ............................................................................... 151
3.5    ............................................................................... 151
3.6        .......................................... 151
3.7   ........................................................................................................ 152
3.8    ....................................................................................... 152
3.9          ............................................ 152
3.10   .............................................................................................. 152
3.11   ........................................................................................................... 152
3.12  
................................................................................................................ 152
3.13   ( )........................................................... 153
3.14  ....................................................................................................... 153
3.15    ..................................................................... 153
4 E ...........................................................................................................................154
4.1        ......................................................... 154
4.2        ......................................................... 154
4.3        ......................................................................... 154
4.4      ....................................................................... 154
5   .....................................................................................................155
6    ...........................................................................................156
6.1   ..................................................................................... 156
6.2     ................................................................................... 157
6.3 /  ............................................................................. 157
6.4  ............................................................................................................. 158
6.5   .......................................................................................................... 158
6.6    .............................................................................................. 158
6.7  .................................................................................................. 159
6.8    .............................................................................................................. 159
HL_Balance D182.book Page 12 Friday, March 26, 2010 2:11 PM
6.9  ............................................................................................................ 159
7  .................................................................................................................159
7.1   ..................................................................................... 159
7.2     ................................................................................... 160
7.3   PIN......................................................................................................... 160
7.4   ............................................................................................. 160
7.5   flash........................................................................................................ 160
8   .................................................................................161
8.1   .............................................................................................. 161
8.2  ..................................................................................................... 162
8.3     ................................................................................... 162
8.4   ................................................................................................................... 162
9 SMS .....................................................................................................................................163
9.1   SMS ................................................................................................. 163
9.2   SMS .............................................................................................. 163
9.3         ()......... 163
9.4  ............................................................................................................ 164
9.5  SMS................................................................................................................... 165
10   ............................................................................................166
11     ...................................................................167
12  Topcom ...............................................................................................................167
12.1    .......................................................................................... 167
12.2       .............................................................. 168
12.3  .......................................................................................................... 168
13    (     )..................168
14  ........................................................................................................................168
Polski
1 Instrukcja bezpieczestwa ................................................................................................169
2 Rozpoczcie pracy..............................................................................................................169
2.1 Jak korzysta z tej instrukcji.............................................................................................. 169
2.2 Instalacja aparatu bazowego .............................................................................................. 170
2.3 Instalacja suchawki........................................................................................................... 170
2.4 Klawisze/Diody ................................................................................................................. 171
2.5 Symbole ............................................................................................................................. 172
2.6 Poruszanie si po menu...................................................................................................... 172
2.7 Przegld menu.................................................................................................................... 172
3 Uywanie telefonu..............................................................................................................173
3.1 Wczanie/wyczanie suchawki ...................................................................................... 173
3.2 Zmiana jzyka menu.......................................................................................................... 173
3.3 Odbieranie poczenia telefonicznego ............................................................................... 173
3.4 Wykonywanie zewntrznych pocze telefonicznych ..................................................... 174
3.5 Wykonywanie wewntrznych pocze telefonicznych.................................................... 174
3.6 Przekierowanie rozmowy wewntrznej ............................................................................. 174
3.7 Rozmowa konferencyjna ................................................................................................... 174
3.8 Tryb gonomówicy ......................................................................................................... 175
3.9 Gono podczas rozmowy............................................................................................... 175
3.10 Wywietlanie czasu trwania poczenia ............................................................................ 175
3.11 Wyczenie mikrofonu....................................................................................................... 175
HL_Balance D182.book Page 13 Friday, March 26, 2010 2:11 PM
3.12 Klawisz pauzy.................................................................................................................... 175
3.13 Lokalizowanie suchawki (funkcja przywoywania) ......................................................... 175
3.14 Pami ponownego wybierania ......................................................................................... 175
3.15 Uywanie klawiatury alfanumerycznej ............................................................................. 176
4 Ksika telefoniczna ..........................................................................................................176
4.1 Dodawanie wpisu do ksiki telefonicznej........................................................................ 176
4.2 Dzwonienie przy wykorzystaniu wpisu w ksice telefonicznej....................................... 176
4.3 Modyfikacja nazwiska lub numeru.................................................................................... 177
4.4 Kasowanie wpisu z ksiki telefonicznej .......................................................................... 177
5 Identyfikacja rozmówcy....................................................................................................177
6 Personalizacja suchawki ..................................................................................................179
6.1 Regulacja gonoci dzwonka............................................................................................ 179
6.2 Wybieranie melodii dzwonka ............................................................................................ 179
6.3 Wczanie/wyczanie dwików ...................................................................................... 179
6.4 Nazwa suchawki ............................................................................................................... 180
6.5 Automatyczne odbieranie .................................................................................................. 180
6.6 Reset suchawki ................................................................................................................. 180
6.7 Blokowanie klawiatury ...................................................................................................... 181
6.8 Ustawianie czasu................................................................................................................ 181
6.9 Ustawianie budzika............................................................................................................ 181
7 Ustawienia aparatu bazowego ..........................................................................................182
7.1 Regulacja gonoci dzwonka............................................................................................ 182
7.2 Wybieranie melodii dzwonka ............................................................................................ 182
7.3 Zmiana kodu PIN............................................................................................................... 182
7.4 Ustawianie trybu wybierania ............................................................................................. 182
7.5 Czas flash (przerwa w poczeniu) .................................................................................... 183
8 Zarzdzanie wieloma suchawkami .................................................................................183
8.1 Dodawanie nowej suchawki ............................................................................................. 183
8.2 Usuwanie suchawki .......................................................................................................... 184
8.3 Przypisanie suchawki do innej bazy................................................................................. 184
8.4 Wybieranie aparatu bazowego........................................................................................... 184
9 SMS .....................................................................................................................................185
9.1 Pisanie wiadomoci SMS................................................................................................... 185
9.2 Wysyanie wiadomoci SMS ............................................................................................. 185
9.3 Czytanie i wywietlanie listy odebranych wiadomoci (Przychodzce) .......................... 185
9.4 Wielu uytkowników......................................................................................................... 186
9.5 Ustawienia SMS ................................................................................................................ 186
10 Wyszukiwanie i usuwanie usterek....................................................................................188
11 Dane techniczne Charakterystyka techniczna ................................................................189
12 Gwarancja Topcom ...........................................................................................................189
12.1 Okres gwarancji ................................................................................................................. 189
12.2 Obsuga gwarancji ............................................................................................................. 189
12.3 Wyjtki od gwarancji......................................................................................................... 190
13 Utylizacja urzdzenia (rodowisko) .................................................................................190
14 Czyszczenie.........................................................................................................................190
HL_Balance D182.book Page 14 Friday, March 26, 2010 2:11 PM
English
15
Safety instructions
English
1 Safety instructions
Only use the charger plug supplied. Do not use other chargers as this may damage the battery
cells.
Only insert rechargeable batteries of the same type. Never use ordinary, non-rechargeable
batteries. Insert rechargeable batteries so they connect to the right poles (indicated in the
battery compartment of the handset).
Do not touch the charger and plug contacts with sharp or metal objects.
The operations of some medical devices may be affected.
The handset may cause an unpleasant buzzing sound in hearing aids.
Do not place the basic unit in a damp room or at a distance of less then 1.5 m away from a
water source. Keep water away from the handset.
Do not use the telephone in environments where there is a risk of explosions.
Dispose of the batteries and maintain the telephone in an environment-friendly manner.
As this telephone cannot be used in case of a power cut, you should use a mains-independent
telephone for emergency calls, e.g. a mobile phone.
2 Getting started
2.1 How to use this user guide
In this user guide, following method is used to clarify the instructions:
Key to press.
Text....... “DISPLAY”.
Text that appears on the display of the phone is shown in the right column
between quotation marks.
HL_Balance D182.book Page 15 Friday, March 26, 2010 2:11 PM
16
Getting started
2.2 Installing the base
- 2A Back view of base -
A. Telephone wall outlet
B. Power cable
C. Telephone cord
2.3 Installing the handset
- 2B Back view of handset -
A. Cover
B. Rechargeable batteries
1 Plug one end of the adaptor into the outlet and the other end into the adaptor
jack on the bottom of the base.
2 Connect one end of the telephone cord with the wall phone jack and the
other end to the bottom of the base.
3 Put the telephone- and AC power line cord in the base guides as shown on
picture 2A.
1 Open the battery compartment as shown on picture 2B.
2 Insert the batteries respecting the polarity (+ and -).
3 Close the battery compartment.
4 Leave the handset on the base unit for 20 hours.
Before you use the telephone for the first time, you must first make sure the battery
is charged for 20 hours. If you do not do this, the telephone will not work optimally.
A
B
C
+
-
-
+
A
B
HL_Balance D182.book Page 16 Friday, March 26, 2010 2:11 PM
English
17
Getting started
2.4 Keys / LED’s
Handset
1. Display
2. Redial / pause / up key
3. Menu / OK key
4. Call log / down key
5. Phonebook key
6. Alphanumeric keys
7. INT key
8. On / off / flash key
9. Keypad lock
10. Handsfree key
11. On-hook / off-hook key
12. Mute / delete / esc key
Base
13. Paging key
Display
In standby mode, the display shows the time and the
handset number:
12-05 HS1
3
4
5
6
7
8
1
9
12
11
2
10
1
2
ABC
3
DEF
4
GHI
5
JKL
6
MNO
7
PQRS
8
TUV
9
WXYZ
0
#
INT
R
- 2C Handset -
13
- 2D Base -
- 2E Display -
HL_Balance D182.book Page 17 Friday, March 26, 2010 2:11 PM
18
Getting started
2.5 Symbols
2.6 Navigating the menu
The Topcom Balance has a menu system which is easy to use. Each menu leads to a list of options.
The menu map is shown on the following paragraph.
2.7 Menu overview
Off hook; you are online Handset keypad locked
External call You are in the phonebook
Internal call Battery low
New numbers in call list Battery medium
Answered call Battery full
Unanswered call Battery empty
Your are in the menu New voice mail
Handsfree Handset within base range
Indicates that the displayed number is
longer than the screen (12 digits)
The antenna flashes when the handset is
not registered on the base
New SMS message
1 When the handset is switched on and in standby, press the menu key to open
the main menu.
2 Scroll to the desired menu option. The menu options scroll in a loop (you
return to the first after the last).
3 Press the OK key to view further options or to confirm the setting displayed.
Press the delete key to return to the previous level in the menu.
Menu Submenu items
PHONEBOOK
ADD ENTRY
MODIFY ENTRY
DELETE ENTRY
SMS
INBOX
PERSONAL SMS
WRITE
DELETE ALL
SMS SETTINGS
SETUP
BASE VOLUME
BASE MELODY
DEL HANDSET
PIN CODE
DIAL MODE
DEFAULT
HL_Balance D182.book Page 18 Friday, March 26, 2010 2:11 PM
English
19
Using the telephone
3 Using the telephone
3.1 Switching the handset on/off
3.2 Changing the menu language
3.3 Receiving a telephone call
To take the call:
3.4 Making an external telephone call
Direct dialing
HANDSET
BEEP
INT RING VOL
EXT RING VOL
INT MELODY
EXT MELODY
AUTO ANSWER
NAME
LANGUAGE
KEYLOCK?
DATE - TIME
DATE SET
CLOCK SET
ALARM SET
REGISTER
SELECT BASE
REG BASE
1 Press and hold the on/off key for 8 seconds on the handset. The handset will
search the base.
2 Press and hold the on/off key for 8 seconds. The display will go off.
1 Enter the menu
2 Select “HANDSET” and confirm.
3 Select “LANGUAGE” and confirm.
4 Select a language and confirm.
1 Press the off-hook key.
OR
Lift the handset off its base if you have activated “Automatic answer”.
(See “6.5 Automatic answer”)
You are connected to your correspondent.
2 Press the on-hook key to hang up or put the handset back on the base.
1 Press the off-hook key to start the call.
2 Dial the telephone number.
3 Press the on-hook key to hang up or put the handset back on the base.
To correct a number use the delete key to delete an entered digit.
Menu Submenu items
4
GHI
6
MNO
5
JKL
HL_Balance D182.book Page 19 Friday, March 26, 2010 2:11 PM
20
Using the telephone
Pre-dialing
3.5 Making an internal telephone call
3.6 Internal call transfer
Transfer an external call to an other handset.
3.7 Conference call
Only possible when more then one handset are registered to the base!
You can converse simultaneously with an internal correspondent and an external correspondent.
During an external call:
3.8 Handsfree mode
You can speak with your correspondent without picking up the handset.
3.9 Speaker volume during call
1 Dial the telephone number.
2 Press the off-hook key to start the call.
3 Press the on-hook key to hang up or put the handset back on the base.
1 Press the internal call key.
2 Enter the number of the internal handset (1 to 5).
3 Press the on-hook key to hang up or put the handset back on the base.
1 Press the internal call key.
2 Enter the number of the internal handset (1 to 5), the external caller is put
on hold.
3 When the other handset picks up, press the on-hook key to hang up and
transfer the call.
If the internal correspondent does not pick-up, press the Internal call key again
to reconnect to the external caller on line.
4 Press the on-hook key to hang up or put the handset back on the base.
1 Press the internal call key.
2 Enter the number of the internal handset (1 to 5).
3 When the other handset picks up, press and hold the ‘ key.
If the internal correspondent does not pick-up, press the Internal call key again
to reconnect to the external caller on line.
4 Press the on-hook key to hang up or put the handset back on the base.
1 Press the handsfree key during a call to activate or deactivate the handsfree
mode.
1 During a conversation, press the up or down key to change the volume
accordingly.
The handsfree volume is also adjusted together with the receiver in the handset as
above described.
4
GHI
6
MNO
5
JKL
INT
4
GHI
6
MNO
5
JKL
INT
4
GHI
6
MNO
5
JKL
INT
INT
4
GHI
6
MNO
5
JKL
#
INT
HL_Balance D182.book Page 20 Friday, March 26, 2010 2:11 PM
English
21
Using the telephone
3.10 Display of call duration
The call duration is displayed after 15 seconds, in minutes - seconds.
At the end of each call, the total call duration is displayed for 5 seconds.
3.11 Microphone mute
It is possible to mute the microphone during a conversation.
3.12 Pause key
When dialing a number you can add a pause between two digits:
3.13 Locating a handset (Paging function)
3.14 Redial memory
You can redial up to 10 of the last numbers called. If you have stored a name in the phonebook to
go with the number, the name will be displayed instead.
3.15 Using the alphanumerical keypad
With your telephone, you can also enter alphanumeric characters. This is useful for entering a
name into the phonebook, giving a name to the handset, ...
To select a letter, press the corresponding key as many times as necessary.
For example, to select an ‘A’, press ‘2’ once. To select a ‘B’, press ‘2’ twice and so on.
To select ‘A’ and then ‘B’ consecutively, press ‘2’ once, wait until the cursor moves on to the next
character, then press ‘2’ twice.
1 Press the mute key. You can talk freely without being heard by the calling
party.
“MUTE” is displayed.
2 Press the mute key again to return to normal mode.
1 Press the redial/pause key for 2 seconds.
1 Press the paging key on the base.
All handsets registered with the base will ring.
2 Press any key on the handset to stop the ringing.
1 Press the redial key.
2 Select a number. If the number is in the phonebook, the name will be
shown.
When the name is displayed, you can toggle between the name and the number
by pressing the OK key!
3 Press the off-hook key to start the call.
4 Press the on-hook key to return to standby.
Press ‘1’ to select a space.
Press the delete key to delete a character.
4
GHI
6
MNO
5
JKL
HL_Balance D182.book Page 21 Friday, March 26, 2010 2:11 PM
22
Phonebook
The keypad characters are as follows:
Key First Second Third Fourth Fifth
press press press press press
1space- 1
2A B C 2
3D E F 3
4G H I 4
5J K L 5
6M N O 6
7P Q R S 7
8T U V 8
9W X Y Z 9
00
4 Phonebook
Each handset can store up to 50 telephone numbers and names. Names can be up to 12 characters
long and numbers up to 20 digits.
To enter alphanumerical characters, refer to the section “3.15 Using the alphanumerical keypad”.
4.1 To add an entry into the phonebook
4.2 To dial an entry from the phonebook
4.3 To modify a name and number
1 Enter the menu.
2 Select “PHONEBOOK” and confirm.
3 Select “ADD ENTRY” and confirm.
4 Enter the name and confirm.
Press the phonebook key to exit the menu without taking any modifications
into account.
5 Enter the number and confirm.
6 Select a ring melody (1-10) and confirm.
1 Press the phonebook key.
2 Select a name or enter the first letter of the name. (The list scrolls in
alphabetical order.)
Press the OK key if you first like to see the telephone number.
If the telephone number is longer then 12 digits, press the OK key again to see
the complete number.
3 Press the off-hook key to start the call.
4 Press the on-hook key to hang up or put the handset back on the base.
1 Enter the menu.
2 Select “PHONEBOOK” and confirm.
3 Select “MODIFY ENTRY” and confirm.
4 Select the name to modify and confirm.
4
GHI
6
MNO
5
JKL
4
GHI
6
MNO
5
JKL
HL_Balance D182.book Page 22 Friday, March 26, 2010 2:11 PM
English
23
Caller Identification
4.4 Delete an entry from the phonebook
5 Caller Identification
When you receive an external call, the telephone number of the caller appears on the handset
display. The telephone can receive calls in both FSK and DTMF. You can also see his or her name
if it is transmitted by the network. If the name is programmed in the phonebook, the name in the
phonebook is displayed!
The telephone can store 40 calls in a Call List (received and missed calls) that can be reviewed
later. This function is only available if your are subscribed to the caller ID information.
When the memory is full, the new calls automatically replace the oldest calls in the memory.
To consult the list of calls:
5 Delete the unwanted characters and enter the new name.
Confirm.
6 Enter the new number and confirm.
7 Select a ring melody (1-10) and confirm.
1 Enter the menu
2 Select “PHONEBOOK” and confirm.
3 Select “DELETE ENTRY” and confirm.
4 Select a name or enter the first letter of the name and confirm.
“CONFIRM” appears on the display.
5 Confirm or cancel.
This service only works when you have a Caller ID/Clip subscription. Please con-
tact your telephone company.
The caller identity is replaced by the call duration after 15 seconds in
communication. It is still possible to display the caller’s identity after this time
by pressing the OK key repeatedly for the name and number.
New or missed calls are signaled by a blinking icon on the display.
1 Press the call log key.
If there are no calls in the list “EMPTY” will appear.
2 Scroll through the calls. The callers names will be shown if the name is send
by the network or is stored in the phonebook. If you are at the end of the list
you will hear a beep tone.
When is shown, this call is been answered. When is shown, the call is
unanswered
3 Press the OK key to see the telephone number.
If the telephone number is longer then 12 digits, press the OK key again to see
the complete number.
4 Press the OK key again to see the time and date when the call is received.
4
GHI
6
MNO
5
JKL
4
GHI
6
MNO
5
JKL
HL_Balance D182.book Page 23 Friday, March 26, 2010 2:11 PM
24
Personalize the handset
You can delete each entry separately:
To delete all entries at ones:
6 Personalize the handset
6.1 Adjusting the ring volume
Handset ring volume internal/external calls
The handset ring volume for internal or external calls can be set separately. You can choose from
5 handset ringer volume levels and “OFF”.
5 Press the OK key to add this entry to the phonebook if it’s not already
stored:
Press OK when “ADD” is shown on the display. Enter or modify the name
and press OK. Enter or modify the telephonenumber and press OK. Select
the melody (1-10) which will be heard when this number is calling by
means of the up/down keys and press OK. The entry will be stored in the
phonebook.
6 Press the off-hook key to call back a correspondent, when their telephone
number or name are displayed.
1 Scroll to the call you want to delete and delete.
”DELETE” appears on the screen.
2 Confirm or cancel.
1 Press the delete key long (2 seconds).
“DELETE ALL” appears on the screen.
2 Confirm or cancel.
Every programmation is confirmed at the end by a double or single long beep. A
double beep confirms the validation of your choice. A long beep signifies that the
modification has not been taken into account.
When the handset is inside the base, the base will not ring during incoming call. So
when the handset ring volume is turned off and handset is inside the base, your
phone will not ring anymore!
1 Enter the menu
2 Select “HANDSET” and confirm.
3 Select “INT RING VOL” to change the internal volume or
“EXT RING VOL” to change the external volume and confirm.
4 Select a volume (1 to 5 or “OFF”).
5 Confirm or return to the previous menu.
HL_Balance D182.book Page 24 Friday, March 26, 2010 2:11 PM
English
25
Personalize the handset
6.2 Choosing the ring melody
The base and each handset can ring with a different melody. The handsets can ring with a different
melody according to whether the call is internal or external. You can choose from 10 different
ringer melodies:
6.3 Activation/deactivation of beeps
The handsets can emit a beep tone when a key is pressed, when the batteries are low or when the
handset is out of range.
Key pressed beep tone on/off
Low battery
Handset out of range
6.4 Handset name
You can change the name displayed on the handset (max. 9 characters). This function allows you
to personalize each handset.
1 Enter the menu
2 Select “SETUP” and confirm.
3 Select “HANDSET” and confirm.
4 Select “INT MELODY” to change the internal melody or
“EXT MELODY” to change the internal melody and confirm.
5 Select a melody (1 to 10).
6 Press the OK key to confirm or return to the previous menu.
1 Enter the menu
2 Select “HANDSET” and confirm.
3 Select “BEEP” and confirm.
4 Select “KEYTONE” and confirm.
5 Select “ON” to activate or “OFF” to deactivate and confirm.
1 Enter the menu
2 Select “HANDSET” and confirm.
3 Select “BEEP” and confirm.
4 Select “LOW BATTERY” and confirm.
5 Select “ON” to activate or “OFF” to deactivate and confirm.
1 Enter the menu
2 Select “HANDSET” and confirm.
3 Select “BEEP” and confirm.
4 Select “OUT RANGE” and confirm.
5 Select “ON” to activate or “OFF” to deactivate and confirm.
1 Enter the menu
2 Select “HANDSET” and confirm.
3 Select “NAME” and confirm.
HL_Balance D182.book Page 25 Friday, March 26, 2010 2:11 PM
26
Personalize the handset
6.5 Automatic answer
When there is a incoming call and the handset is on the base, the phone automatically takes the
line when lifted. This is the default setting, but can be set off:
6.6 Reset the handset
It is possible to return the phone to the original default configuration. This is the configuration
which was installed when you first received the telephone.
To return to default settings:
Default parameters are:
Low battery beeps On
Out of range warning beeps Off
Key tone On
Auto answer On
Internal melody 1
Internal volume 3
External melody 3
External volume 3
Ear volume 3
Phonebook Empty
Call log list Empty
Redial list Empty
PIN code 0000
Dial mode DTMF
Keypad lock Off
4 Enter the name you want and confirm.
Press the delete key to delete a character. Press and hold the phonebook key to
exit the menu without taking any modifications into account.
1 Enter the menu
2 Select “HANDSET” and confirm.
3 Select “AUTO ANSWER” and confirm.
4 Select “ON” to activate or “OFF” to deactivate and confirm.
1 Enter the menu
2 Select “SETUP” and confirm.
3 Select “DEFAULT” and confirm.
4 Enter the 4 digit PIN code (default =0000) and confirm.
Returning to default settings will delete all entries in the phonebook and call log.
The PIN code will also be reset to 0000.
4
GHI
6
MNO
5
JKL
4
GHI
6
MNO
5
JKL
HL_Balance D182.book Page 26 Friday, March 26, 2010 2:11 PM
English
27
Base settings
6.7 Keypad lock
The keypad can be locked so that no settings can be changed or no telephone number can be dialed.
The icon will appear on the screen when keypad is locked.
Locking the keypad
Unlock the keypad
6.8 Setting the time
6.9 Setting the alarm
7 Base settings
7.1 Adjusting the ring volume
Base ring volume
You can choose from 5 ringer volume levels and “OFF”.
7.2 Choosing the ring melody
The base and each handset can ring with a different melody. To set the base melody:
1 Press and hold the ‘ key for 3 seconds. The keypad will be locked.
1 Press any key, “PRESS ” will appear on the screen.
2 Press the ‘ key within 3 seconds.
1 Enter the menu
2 Select “DATE - TIME” and confirm.
3 Select “CLOCK SET” and confirm.
4 Enter the time (24h format) and confirm.
1 Enter the menu
2 Select “DATE - TIME” and confirm.
3 Select “ALARM SET” and confirm.
4 Select “ON” to turn on the alarm and confirm.
Enter the time (24h format) when the alarm must be activated and confirm.
OR
Select “OFF” to turn off the alarm and confirm.
1 Enter the menu
2 Select “SETUP” and confirm.
3 Select “BASE VOLUME” and confirm.
4 Select a volume (“OFF” or 1 to 5).
5 Confirm or return to the previous menu.
1 Enter the menu
2 Select “SETUP” and confirm.
3 Select “BASE MELODY” and confirm.
4 Select a melody (1 to 5).
5 Confirm or return to the previous menu.
4
GHI
6
MNO
5
JKL
4
GHI
6
MNO
5
JKL
HL_Balance D182.book Page 27 Friday, March 26, 2010 2:11 PM
28
Managing multiple handsets
7.3 Changing the PIN code
Certain functions are only available to users who know the PIN code.
By default the PIN code is 0000. To change the PIN code:
7.4 Setting the dialing mode
There are two types of dialing mode: DTMF/Tone dialing (most common) and pulse dialing (for
older installations).
To change the dialing mode:
7.5 Flash time duration
Press the flash key ‘
R
’ (key 7 - picture 2C Handset) to use certain services on your external line
such as “call waiting” (if your phone company offers this feature); or to transfer calls if you use a
telephone exchange (PABX). The Flash key ‘R’ is a brief interruption of the line. You can set the
flash time to 100ms or 250ms.
8 Managing multiple handsets
8.1 Adding a new handset
You can register new handsets on the base if these handsets support the DECT GAP protocol.
The base can support a maximum of 5 handsets. If you already have 5 handsets, and you wish to
add another one or change one handset, you must first delete a handset, then associate the new
handset.
Putting the base into registration mode:
1 Enter the menu
2 Select “SETUP” and confirm.
3 Select “PIN CODE” and confirm.
4 Enter the old 4 figure PIN code and confirm.
5 Enter a new 4 figure PIN code and confirm.
6 Enter the new PIN code a second time and confirm.
1 Enter the menu
2 Select “SETUP” and confirm.
3 Select “DIAL MODE” and confirm.
4 Select the dialing mode and confirm.
1 Enter the menu
2 Select “SETUP” and confirm.
3 Select “RECALL” and confirm.
4 Choose “RECALL1” for short flash time (100ms) or “RECALL2” for long
flash time (250ms) and confirm.
Only needed when you have deregistered a handset or when you bought a new one.
1 Press and hold the paging key on the base for 6 seconds. The base will then
emit a beep tone.
4
GHI
6
MNO
5
JKL
4
GHI
6
MNO
5
JKL
4
GHI
6
MNO
5
JKL
HL_Balance D182.book Page 28 Friday, March 26, 2010 2:11 PM
English
29
Managing multiple handsets
Register the new handset:
If your additional handset is a Topcom Balance
If your handset is another model
After starting the registration procedure on the base, refer to the handset manual to find out how
to register the handset. The handset must be GAP compatible.
The icon and the text "NOT REG" flashes on the display when the handset is not associated
with the base.
When a handset is associated with a base, it is attributed a handset number by the base. It is this
number that is displayed on the handset after the name and must be used for internal calls.
8.2 Removing a handset
This procedure needs to be carried out on a different handset then the one you want to remove.
8.3 Setting up a handset on another base
If you want to use a Topcom Balance handset with a base of another model. The base must be GAP
compatible.
2 Enter the menu
3 Select “REGISTER” and confirm.
4 Select “REG BASE” and confirm.
5 Enter the number of the base to be associated with the handset (1-4) and
confirm. (The flashing numbers are already in use.)
6 Enter the base PIN code (0000 by default) and confirm.
The handset will start searching for the DECT base. If the handset has located
the base, it will display the base identification number.
7 Confirm or stop.
If the handset does not locate the base, it will return to the standby mode after
a few seconds. Try again by changing the base number and check that you are
not in an environment with interference. Move closer to the base.
DECT GAP Profile only guarantees that basic calling-functions will work correctly
between different brands/types. There’s a possibility that certain services (like
CLIP) will not work correctly.
1 Enter the menu
2 Select “SETUP” and confirm.
3 Select “DEL HANDSET” and confirm.
4 Enter the base PIN code (0000 by default) and confirm.
5 Select the handset to be removed and confirm.
1 Put the base in registration mode, refer to the base manual.
2 Enter the menu
3 Select “REGISTER” and confirm.
4 Select “REG BASE” and confirm.
5 Enter the number of the base to be associated with the handset and confirm.
6 Enter the base PIN code and confirm.
4
GHI
6
MNO
5
JKL
4
GHI
6
MNO
5
JKL
4
GHI
6
MNO
5
JKL
4
GHI
6
MNO
5
JKL
4
GHI
6
MNO
5
JKL
HL_Balance D182.book Page 29 Friday, March 26, 2010 2:11 PM
30
SMS
8.4 Selecting a base
You can switch your handset between bases. The handsets can be registered up to 4 bases
simultaneously. When selecting the base, the current selected base is indicated by a blinking base
number.
If you select “AUTO” the handset will automatically search for another base when you are out of
range. The handset must first be registered with each base individually.
9SMS
You can send and receive SMS with your Topcom Balance telephone. This section tells you how
to use the SMS feature.You can store a total of 15 SMS messages sent and received, each with up
to 160 characters.
9.1 How to write an SMS
The method is the same as entering a name in the phonebook (See “3.15 Using the alphanumerical
keypad”).
To enter a space press ‘1’.
9.2 Sending an SMS
The handset will start searching for the DECT base. If the handset has located
the base, it will display the base identification number.
7 Confirm or stop.
1 Enter the menu
2 Select “REGISTER” and confirm.
3 Select “SELECT BASE” and confirm.
4 Select a base or select “AUTO” and confirm.
When you have activated Automatic base selection and the handset is out of range
on the current base, the handset will only search for the strongest base in standby
(not during communication).
Before sending and receiving SMS text messages you need to set the telephone
number of your Network’s SMS centre for outgoing and incoming messages
(See “ SMS service centre numbers”).
1 Enter the menu
2 Select “SMS” and confirm.
3 Select “WRITE” and confirm.
4 Start writing the message and confirm.
5 Enter the telephone number and confirm to send the message.
The SMS will be sent out automatically.
4
GHI
6
MNO
5
JKL
4
GHI
6
MNO
5
JKL
HL_Balance D182.book Page 30 Friday, March 26, 2010 2:11 PM
English
31
SMS
9.3 Read and view the list of received messages (Inbox)
Your Topcom Balance display indicates the number of new messages you have received. is
shown on the screen. The SMS LED on the base is blinking.
A beep indicates you have just received a new message.
9.4 Multiple users
With your Topcom Balance telephone you can register up to 5 handsets on one base. Each handset
has it’s own handset number (1-5) which is also the terminal number to send Personal messages.
All handset have standard terminal number ‘0’ as well. In order to receive personal SMS
messages, you must give your correspondents the user Terminal Number that they need to add to
your standard telephonenumber (See below). For example, when you have a 2nd handset (Handset
2) this handset will have terminal number = 2.
If no terminal number is add to you telephone number or ‘0’, all handset will receive these
messages.
You can can change the terminal number to another one but only from 6-9 (See “ Setting the
terminal number”).
Receiving personal user SMS
When the number of new messages is indicated on the display.
1 Press the OK key. The telephone number of the most recent message is
listed first.
When the number of new messages is not displayed.
1 Enter the menu
2 Select “SMS” and confirm.
3 Select “INBOX” and confirm.
The telephone number of the most recent message is listed first.
Scroll through all messages and press OK to read the message.
Messages with ‘*’ before the telephone number are unread messages.
Scroll through the whole message and press OK when the whole message is
read.
Scroll to select one of the next options:
Reply: Edit the message using the alphanumeric keypad and save it.
Forward: Forward the stored message to another user. Follow the same
instructions as for sending an SMS message (See “9.2 Sending an SMS”).
Delete ?: Delete the message. Press OK again to confirm.
Details: To see the phonenumber, date and time of the message. Press OK to
confirm.
Press the mute key to return to the inbox menu
You correspondents will need to add your Terminal Number to your telephone
number when they want to send personal SMS.
E.g. If your personal Terminal Number is "1" and your telephone number is
123456789, your correspondents should send their SMS messages to:1234567891!
This is the number you need to remember and give to your correspondents.
HL_Balance D182.book Page 31 Friday, March 26, 2010 2:11 PM
32
SMS
Reading personal user SMS
When a new message comes in, your Topcom Balance emits a beep. The screen shows and the
number of new messages.
OR
9.5 SMS settings
Set SMS alert tone ON/OFF
Your handset can play a melody to announce a new text message.
SMS service centre numbers
To send and receive SMS text messages you need the telephone number of your Network’s SMS
centre. These numbers have been pre-loaded into the Topcom Balance. If you accidentally delete
the SEND or RECEIVE SMS service centre numbers you will need to re-enter them in order for
your SMS service to work.
The Topcom Balance can store 2 SEND SMS service centre numbers and 2 RECEIVING SMS
service centre numbers.
To set the SMS sending centres numbers
To set the SMS receiving centres numbers
Press the OK key
In the SMS list, private messages are flagged with the key icon on the
screen.
1 Enter the menu
2 Select “SMS” and confirm.
3 Select “PERSONAL SMS” and confirm. The telephone number of the most
recent message is listed first.
1 Enter the menu
2 Select “SMS” and confirm.
3 Select “SMS SETTINGS” and confirm.
4 Select “MSG ALERT” and confirm.
5 Select “ON” or “OFF” and confirm.
6 Select the desired melody and confirm and go back to previous menu.
1 Enter the menu
2 Select “SMS” and confirm.
3 Select “SMS SETTINGS” and confirm.
4 Select “SEND CENTRE” and confirm.
5 Select “SEND 1” or “SEND 2” and confirm.
6 Enter the telephone number of the SMS server
1 Enter the menu
2 Select “SMS” and confirm.
3 Select “SMS SETTINGS” and confirm.
4 Select “RCV CENTRE” and confirm.
5 Select “RECEIVE 1” or “RECEIVE 2” and confirm.
6 Enter the telephone number of the SMS server
4
GHI
6
MNO
5
JKL
4
GHI
6
MNO
5
JKL
HL_Balance D182.book Page 32 Friday, March 26, 2010 2:11 PM
English
33
SMS
Select the SMS centre to send SMS
Because you can set 2 SMS sending centres, you have to select one of both before sending you
messages:
Setting the terminal number
Each handset has terminal number ‘0’ and terminal number = handset number (1-5). You can
change the terminal number to another number (6-9) if needed:
Memory full
When the memory is full, you get the screen message "Memory Full". You can no longer send or
receive SMSs. To continue to receive SMSs, you can delete some or all of the messages. To delete
all the messages stored in the “INBOX” or “PERSONAL SMS:
1 Enter the menu
2 Select “SMS” and confirm.
3 Select “SMS SETTINGS” and confirm.
4 Select “SEND SERVICE” and confirm.
5 Select “SEND 1” or “SEND 2” and confirm.
1 Enter the menu
2 Select “SMS” and confirm.
3 Select “SMS SETTINGS” and confirm.
4 Select “TERMINAL NO” and confirm.
5 Delete the old terminal number and enter the new one (0, 6-9).
6 Press OK to confirm.
1 Enter the menu
2 Select “SMS” and confirm.
3 Select “SMS SETTINGS” and confirm.
4 Select “DELETE ALL” and confirm.
5 Select “INBOX” or “PERSONAL SMS” and confirm.
6 “CONFORM ?” appears.
7 Confirm or cancel.
4
GHI
6
MNO
5
JKL
HL_Balance D182.book Page 33 Friday, March 26, 2010 2:11 PM
34
Troubleshooting
10 Troubleshooting
11 Technical dataTechnical characteristics
Symptom Possible cause Solution
No display Batteries uncharged Check the position of the
batteries
Recharge the batteries
Handset turned off Turn on the handset
No tone Telephone cord badly connected Check the telephone cord
connection
The line is occupied by another
handset
Wait until the other handset
hangs up
The icon flashes
Handset out of range Bring the handset closer to the
base
The base has no power supply Check the mains connection
to the base
The handset is not registered on
the base
Register the handset on the
base
Base or handset do not ring The ringing volume is off or low Adjust the ringing volume
Tone is good, but there is no
communication
The dialing mode is wrong Adjust the dialing mode
(pulse/tone)
Not possible to transfer a call
on PABX
The flash time is too short or too
long
Change the flash time
Telephone does not react
when pressing the keys
Manipulation error Remove the batteries and put
them back in place
Standard DECT (Digital Enhanced Cordless Telecommunications)
GAP (Generic Access Profile)
Frequency range 1880 MHz to 1900 MHz
Number of channels 120 duplex channels
Modulation GFSK
Speech coding 32 kbit/s
Emission power 10 mW (average power per channel)
Range maximum 300m in open space / 10-50m in-house
Number of handsets Up to 5
Base power supply 230V / 50 Hz / 7,5V DC 300mA
Handset Batteries 2 rechargeable batteries AAA, NiMh 1,2V, 550mAh
Handset autonomy 200 hours in standby
Handset talk time 10 hours
Normal conditions of use +5 °C to +45 °C
Dialing mode Pulse / Tone
Flash time 100 or 250 ms
HL_Balance D182.book Page 34 Friday, March 26, 2010 2:11 PM
English
35
Topcom Warranty
12 Topcom Warranty
12.1 Warranty period
The Topcom units have a 24-month warranty period. The warranty period starts on the day the new
unit is purchased. There is no warranty on standard or rechargeable batteries (AA/AAA type).
Consumables or defects causing a negligible effect on operation or value of the equipment are not
covered.
The warranty has to be proven by presentation of the original or copy of the purchase receipt, on
which the date of purchase and the unit-model are indicated.
12.2 Warranty handling
A faulty unit needs to be returned to a Topcom service centre including a valid purchase note and
a filled in service card.
If the unit develops a fault during the warranty period, Topcom or its officially appointed service
centre will repair any defects caused by material or manufacturing faults free of charge, by either
repairing or exchanging the faulty units or parts of the faulty units. In case of replacement, colour
and model can be different from the original purchased unit.
The initial purchase date shall determine the start of the warranty period. The warranty period is
not extended if the unit is exchanged or repaired by Topcom or its appointed service centre.
12.3 Warranty exclusions
Damage or defects caused by incorrect treatment or operation and damage resulting from use of
non-original parts or accessories are not covered by the warranty.
The warranty does not cover damage caused by outside factors, such as lightning, water and fire,
nor any damage caused during transportation. No warranty can be claimed if the serial number on
the units has been changed, removed or rendered illegible.
Any warranty claims will be invalid if the unit has been repaired, altered or modified by the buyer.
This appliance may only be used with rechargeable batteries. If you want to replace the originally
included batteries, please check whether the batteries you use are suitable and rechargeable.
Alkaline batteries may under NO circumstances be used in the handsets. If you use Alkaline
batteries and place the handset on the basis, the batteries will heat up and may explode. Any damage
which may be caused cannot be recovered from the manufacturer and the damage thus caused to
the appliance is not covered by the warranty conditions. Any repairs will be charged to you.
13 Disposal of the device (environment)
At the end of the product lifecycle, you should not throw this product into the normal
household garbage but bring the product to a collection point for the recycling of
electrical and electronic equipments. The symbol on the product, user guide and/or
box indicate this.
Some of the product materials can be re-used if you bring them to a recycling point.
By re-using some parts or raw materials from used products you make an important contribution
to the protection of the environment. Please contact your local authorities in case you need more
information on the collection points in your area.
14 Cleaning
Clean the telephone with a slightly damp cloth or with an anti-static cloth. Never use cleaning
agents or abrasive solvents.
HL_Balance D182.book Page 35 Friday, March 26, 2010 2:11 PM
36
Veiligheidsinstructies
Nederlands
1 Veiligheidsinstructies
Gebruik uitsluitend de meegeleverde adapter. Gebruik geen andere laders, omdat dit de
batterijcellen kan beschadigen.
Gebruik uitsluitend oplaadbare batterijen van hetzelfde type. Gebruik nooit gewone,
niet-oplaadbare batterijen. Let bij het plaatsen van de oplaadbare batterijen op de polariteit
(aangeduid in het batterijvak van de handset).
Raak de laad- en stekkercontacten niet aan met scherpe of metalen voorwerpen.
De werking van sommige medische instrumenten kan worden beïnvloed.
De handset kan een onaangenaam zoemend geluid veroorzaken in hoorapparaten.
Plaats het basisstation niet in een vochtige ruimte of op minder dan 1,5 m van een waterbron.
De handset niet in aanraking brengen met water.
Gebruik de telefoon niet in omgevingen met explosiegevaar.
Recycleer de batterijen en onderhoud de telefoon op een milieuvriendelijke manier.
Omdat deze telefoon niet kan worden gebruikt tijdens een stroomuitval, moet u een telefoon
gebruiken die niet afhankelijk is van het elektriciteitsnet bij noodgevallen, bv. een mobiele
telefoon.
2 Aan de slag
2.1 Deze gebruikshandleiding gebruiken
In deze gebruikshandleiding is de volgende methode gebruikt om de instructies te verduidelijken:
In te drukken toets.
Tekst....... “DISPLAY”.
De tekst die verschijnt op de display van de telefoon wordt tussen
aanhalingstekens getoond in de rechterkolom.
HL_Balance D182.book Page 36 Friday, March 26, 2010 2:11 PM
Nederlands
37
Aan de slag
2.2 Het basisstation installeren
- 2A Onderaanzicht van het basisstation -
A. Telefoonstopcontact
B. Stroomkabel
C. Telefoonkabel
2.3 De handset installeren
- 2B Onderaanzicht van de handset -
A. Deksel
B. Oplaadbare batterijen
1 Steek de stroomstekker van de adapter in het stopcontact en de stroomplug
in de aansluiting aan de onderkant van het basisstation.
2 Steek de telefoonstekker in het telefoonstopcontact en de telefoonplug in de
connector aan de onderkant van het basisstation.
3 Plaats de telefoon- en stroomkabel in de aansluitingen van het basisstation,
zoals weergegeven in afbeelding 2A.
1 Open het batterijvak zoals weergegeven in afbeelding 2B.
2 Plaats de batterijen en let daarbij op de polariteit (+ en -).
3 Sluit het batterijvak.
4 Laat de handset 20 uur in het basisstation staan.
Voordat u de telefoon voor het eerst gebruikt, moet u controleren of de batterij
20 uur is opgeladen. De telefoon zal niet optimaal werken als u dit niet doet.
A
B
C
+
-
-
+
A
B
HL_Balance D182.book Page 37 Friday, March 26, 2010 2:11 PM
38
Aan de slag
2.4 Toetsen / LED’s
Handset
1. Display
2. Nummerherhalings-/pauze-/
omhoog-toets
3. Toets Menu / OK
4. Oproeplog-/omlaag-toets
5. Telefoonboek-toets
6. Alfanumerieke toetsen
7. INT-toets
8. Aan-/uit-/flash-toets
9. Toetsenbordvergrendeling
10. Voicemail-toets
11. Handenvrij-toets
12. Opleggen-/opnemen-toets
13. Microfoon uit-/wissen-/esc-toets
Basisstation
14. Paging-toets
Display
In de stand-bymodus toont de display de tijd en het
nummer van de handset:
12-05 HS1
- 2C Handset -
3
4
5
6
7
8
1
9
13
12
2
11
10
1
2
ABC
3
DEF
4
GHI
5
JKL
6
MNO
7
PQRS
8
TUV
9
WXYZ
0
#
INT
R
1
EXIT
- 2D Basis -
14
- 2E Display -
HL_Balance D182.book Page 38 Friday, March 26, 2010 2:11 PM
Nederlands
39
Aan de slag
2.5 Symbols
2.6 Door het menu bladeren
De Topcom Balance heeft een gebruiksvriendelijk menusysteem. Elk menu toont een lijst met
opties. De menukaart staat in de volgende paragraaf.
2.7 Menuoverzicht
Opgenomen, u bent verbonden Toetsenbord van handset vergrendeld
Externe oproep U bevindt zich in het telefoonboek
Interne oproep Batterij bijna leeg
Nieuwe nummers in de oproeplijst Batterij halfleeg
Beantwoorde oproep Batterij vol
Onbeantwoorde oproep Batterij leeg
U bevindt zich in het menu Nieuwe voicemail
Handenvrij
Handset binnen bereik van het
basisstation. De antenne knippert
wanneer de handset niet in het
basisstation is geregistreerd
Geeft aan dat het getoonde nummer
langer is dan het scherm (12 cijfers)
Nieuw sms-bericht
1 Wanneer de handset aan en in stand-by staat, drukt u op de menu-toets om
het hoofdmenu te openen.
2 Blader naar de gewenste menuoptie. U kunt in een lus de menuopties
doorlopen (na de laatste keert u terug naar de eerste).
3 Druk op de OK-toets om meer opties te zien of de getoonde instelling te
bevestigen.
Druk op de Wissen-toets om naar het vorige menuniveau terug te keren.
Menu Opties van het submenu
TELEFOONBOEK
(PHONEBOOK)
TOEVOEGEN (ADD ENTRY)
BEWERKEN (MODIFY ENTRY)
WISSEN (DELETE ENTRY)
SMS (SMS)
POSTVAK IN (INBOX)
PERSOONL SMS (PERSONAL SMS)
AANMAKEN (WRITE)
WIS ALLE (DELETE ALL)
SMS INSTELL. (SMS SETTINGS)
INSTELLINGEN (SETUP)
BASIS VOLUME (BASE VOLUME)
BS MELODIE (BASE MELODY)
HS VERWIJDER (DEL HANDSET)
PINCODE (PIN CODE)
KIESMODE (DIAL MODE)
FAB INSTELL (DEFAULT)
HL_Balance D182.book Page 39 Friday, March 26, 2010 2:11 PM
40
De telefoon gebruiken
3 De telefoon gebruiken
3.1 De handset aan- en afzetten
3.2 De menutaal veranderen
3.3 Een oproep ontvangen
Om de oproep aan te nemen:
HANDSET (HANDSET)
BIEP (BEEP)
INT BELVOLUM (INT RING VOL)
EXT BELVOLUM (EXT RING VOL)
INT MELODIE (INT MELODY)
EXT MELODIE (EXT MELODY)
AUTO ANTWDEN (AUTO ANSWER)
NAAM (NAME)
TAAL (LANGUAGE)
SNELTOETSEN (HOT KEYS)
KLAVIERVERG? (KEYLOCK?)
DATUM - TIJD (DATE - TIME)
DATUM INST. (DATE SET)
TIJD INSTELL (CLOCK SET)
ALARM INST (ALARM SET)
AANMELDEN (REGISTER)
BASIS SELECT (SELECT BASE)
BS AANMELDEN (REG BASE)
1 Houd de aan/uit-toets op de handset 8 seconden ingedrukt. De handset zoekt
nu het basisstation.
2 Houd de aan/uit-toets 8 seconden ingedrukt. De display schakelt zich uit.
1 Open het menu
2 Kies "HANDSET" (HANDSET) en bevestig.
3 Kies "TAAL" (LANGUAGE) en bevestig.
4 Kies een taal en bevestig.
1 Druk op de opnemen-toets.
OF
Neem de handset van het basisstation als u de "Automatisch antwoorden"-
functie hebt geactiveerd. (Zie “6.5 Automatisch antwoorden”)
U bent verbonden met uw correspondent.
2 Druk op de opleggen-toets om te eindigen of zet de handset terug op het
basisstation.
Menu Opties van het submenu
HL_Balance D182.book Page 40 Friday, March 26, 2010 2:11 PM
Nederlands
41
De telefoon gebruiken
3.4 Een externe oproep doen
Direct kiezen
Voorkiezen
3.5 Een interne oproep doen
3.6 Een interne oproep doorschakelen
Een externe oproep doorschakelen naar een andere handset
3.7 Conferentiegesprek
Alleen mogelijk wanneer meer dan een handset op het basisstation is aangemeld!
U kunt gelijktijdig converseren met een interne en externe gesprekspartner.
Tijdens een externe oproep:
1 Druk op de opnemen-toets om het nummer te bellen.
2 Voer het telefoonnummer in.
3 Druk op de opleggen-toets om te eindigen of zet de handset terug op het
basisstation.
Om een nummer te corrigeren gebruikt u de wissen-toets om een ingevoerd
cijfer te wissen.
1 Voer het telefoonnummer in.
2 Druk op de opnemen-toets om het nummer te bellen.
3 Druk op de opleggen-toets om te eindigen of zet de handset terug op het
basisstation.
1 Druk op de interne oproep-toets.
2 Voer het nummer van de interne handset in (1 tot 5).
3 Druk op de opleggen-toets om te eindigen of zet de handset terug op het
basisstation.
1 Druk op de interne oproep-toets.
2 Voer het nummer van de interne handset in (1 tot 5). Uw externe
correspondent wordt nu in de wacht geplaatst.
3 Wanneer de andere handset opneemt, druk dan op de opleggen-toets om op
te hangen en de oproep door te schakelen.
Wanneer de interne correspondent niet opneemt, drukt u opnieuw op de interne
oproep-toets om uw externe correspondent aan de lijn te krijgen.
4 Druk op de opleggen-toets om te eindigen of zet de handset terug op het
basisstation.
1 Druk op de interne oproep-toets.
2 Voer het nummer van de interne handset in (1 tot 5).
3 Wanneer de andere handset opneemt, houd u de ‘ -toets ingedrukt.
Wanneer de interne correspondent niet opneemt, drukt u opnieuw op de interne
oproep-toets om uw externe correspondent aan de lijn te krijgen.
4 Druk op de opleggen-toets om te eindigen of zet de handset terug op het
basisstation.
4
GHI
6
MNO
5
JKL
4
GHI
6
MNO
5
JKL
INT
4
GHI
6
MNO
5
JKL
INT
4
GHI
6
MNO
5
JKL
INT
INT
4
GHI
6
MNO
5
JKL
#
INT
HL_Balance D182.book Page 41 Friday, March 26, 2010 2:11 PM
42
De telefoon gebruiken
3.8 Handenvrij-modus
U kunt met uw gesprekspartner praten zonder de handset vast te houden.
3.9 Luidsprekervolume tijdens het gesprek
3.10 Weergave van de duur van het gesprek
De gespreksduur wordt na 15 seconden in minuten en seconden getoond.
Bij het einde van elke oproep wordt de totale gespreksduur gedurende 5 seconden getoond.
3.11 Microfoon uitschakelen
Het is mogelijk om de microfoon tijdens een gesprek uit te schakelen.
3.12 Pauze-toets
Wanneer u een nummer invoert, kunt u een pauze invoeren tussen twee cijfers:
3.13 Een handset vinden (paging-functie)
3.14 Nummerherhalingsgeheugen
U kunt maximaal 10 van de laatste oproepen terugbellen. Als u een naam in het telefoonboek hebt
opgeslagen die bij het nummer hoort, zal de naam worden weergegeven.
1 Druk tijdens een gesprek op de handenvrij-toets om de handenvrij-modus
in of uit te schakelen.
1 Tijdens het gesprek drukt u op de omhoog/omlaag-toets om het volume aan
te passen.
Het volume voor handenvrij bellen wordt samen met de ontvanger in de handset
afgesteld zoals hierboven wordt beschreven.
1 Druk op de microfoon uit-toets. U kunt vrijuit spreken zonder dat uw
correspondent u hoort.
Op de display verschijnt "MIC UIT" (MUTE).
2 Druk opnieuw op de microfoon uit-toets om terug te keren naar de normale
modus.
1 Houd de nummerherhalings-/pauze-toets 2 seconden ingedrukt.
1 Druk op de paging-toets op het basisstation.
Alle handsets die bij het basisstation zijn aangemeld, zullen nu rinkelen.
2 Druk op een willekeurige toets op de handset om het rinkelen te stoppen.
1 Druk op de nummerherhalingstoets.
2 Kies een nummer. Als het nummer in het telefoonboek staat, wordt de naam
weergegeven.
Wanneer de naam verschijnt, kunt u kiezen tussen de naam of het nummer
door op de OK-toets te drukken!
3 Druk op de opnemen-toets om het nummer te bellen.
4 Druk op de opleggen-toets om terug te keren naar de stand-bymodus.
4
GHI
6
MNO
5
JKL
HL_Balance D182.book Page 42 Friday, March 26, 2010 2:11 PM
Nederlands
43
Telefoonboek
3.15 Het alfanumerieke toetsenbord gebruiken
Met uw telefoon kunt u ook alfanumerieke tekens invoeren. Dit is handig om een naam in het
telefoonboek te plaatsen, een naam te geven aan de handset enz.
Om een letter te selecteren, drukt u zo vaak als nodig op de bijbehorende toets.
Bijvoorbeeld: druk eenmaal op "2" om "A" te kiezen. Druk tweemaal op "2" om "B" te kiezen enz.
Druk eenmaal op "2" en wacht totdat de cursor naar het volgende teken gaat en druk tweemaal op
"2" om eerst "A" en vervolgens "B" te kiezen.
De tekens op het toetsenbord zijn als volgt verdeeld:
Toets Eerste Tweede Derde Vierde Vijfde
druk druk druk druk druk
1 spatie - 1
2ABC2
3D E F 3
4GHI 4
5J K L 5
6MNO6
7P Q R S 7
8TUV8
9WXYZ9
00
4 Telefoonboek
Elke handset kan tot 50 telefoonnummers en namen opslaan. Namen kunnen 12 tekens en
nummers 20 cijfers lang zijn.
Voor het invoeren van alfanumerieke karakters, zie sectie “3.15 Het alfanumerieke toetsenbord
gebruiken”.
4.1 Een nummer toevoegen aan het telefoonboek
4.2 Een nummer uit het telefoonboek bellen
Druk op "1" om een spatie te kiezen.
Druk op de wissen-toets om een teken te wissen.
1 Kies het menu.
2 Kies "TELEFOONBOEK" (PHONEBOOK) en bevestig.
3 Kies "TOEVOEGEN" (ADD ENTRY) en bevestig.
4 Voer de naam in en bevestig.
Druk op de telefoonboek-toets en verlaat het menu zonder de wijzigingen op te
slaan.
5 Voer het nummer in en bevestig.
6 Kies een belmelodie (1-10) en bevestig.
1 Druk op de telefoonboek-toets.
2 Kies een naam of voer de eerste letter van de naam in. (De lijst scrolt in
alfabetische volgorde.)
Om eerst het telefoonnummer te zien, drukt u op de OK-toets.
4
GHI
6
MNO
5
JKL
4
GHI
6
MNO
5
JKL
HL_Balance D182.book Page 43 Friday, March 26, 2010 2:11 PM
44
Nummerweergave oproeper
4.3 Een naam en nummer wijzigen
4.4 Een nummer uit het telefoonboek verwijderen
5 Nummerweergave oproeper
Wanneer u een externe oproep ontvangt, verschijnt het nummer van de beller op de display van de
handset. De telefoon kan oproepen ontvangen in zowel FSK als DTMF. U kunt ook zijn of haar
naam zien als deze wordt verzonden door het netwerk. Als de naam in het telefoonboek is
geprogrammeerd, zal de naam uit het telefoonboek worden weergegeven!
De telefoon kan 40 oproepen opslaan in de oproeplijst (ontvangen en gemiste oproepen), die later
bekeken kunnen worden. Deze functie is alleen beschikbaar wanneer u geabonneerd bent op een
dienst voor nummerweergave.
Als het geheugen vol is, zullen de nieuwe oproepen automatisch de oudste oproepen in het
geheugen vervangen.
Wanneer het telefoonnummer uit meer dan 12 cijfers bestaat, drukt u opnieuw
op de OK-toets om het volledige nummer te zien.
3 Druk op de opnemen-toets om het nummer te bellen.
4 Druk op de opleggen-toets om te eindigen of zet de handset terug op het
basisstation.
1 Kies het menu.
2 Kies "TELEFOONBOEK" (PHONEBOOK) en bevestig.
3 Kies "BEWERKEN" (MODIFY ENTRY) en bevestig.
4 Kies de naam die u wilt wijzigen en bevestig.
5 Wis de ongewenst tekens en voer de nieuwe naam in.
Bevestig.
6 Voer het nieuwe nummer in en bevestig.
7 Kies een belmelodie (1-10) en bevestig.
1 Open het menu
2 Kies "TELEFOONBOEK" (PHONEBOOK) en bevestig.
3 Kies "WISSEN" (DELETE ENTRY) en bevestig.
4 Kies een naam of voer de eerste letter van de naam in en bevestig.
De display toont "BEVESTIGEN?" (CONFIRM?).
5 Bevestig of annuleer.
Deze dienst werkt alleen als u bent geabonneerd op een dienst met
nummerherkenning van de oproeper (CLIP). Neem hiervoor contact op met uw
telefoonmaatschappij.
Na 15 seconden verbinding wordt de naam van de beller vervangen door de
gespreksduur. U kunt de naam van de beller ook langer tonen door
herhaaldelijk op de OK-toets te drukken voor de naam en het nummer.
Nieuwe of gemiste oproepen worden aangeduid door een knipperend
pictogram op de display.
4
GHI
6
MNO
5
JKL
4
GHI
6
MNO
5
JKL
HL_Balance D182.book Page 44 Friday, March 26, 2010 2:11 PM
Nederlands
45
De handset personaliseren
De oproeplijst raadplegen:
U kunt elk nummer afzonderlijk verwijderen:
Om alle items gelijktijdig te wissen:
6 De handset personaliseren
6.1 Het volume van de beltoon aanpassen
Belvolume van de handset voor interne/externe oproepen
U kunt het belvolume afzonderlijk instellen voor de interne of externe oproepen. U kunt voor de
handset kiezen uit 5 belvolumeniveaus en "UIT" (OFF).
1 Druk op de oproeplog-toets.
Wanneer er geen oproepen zijn, verschijnt in de lijst "LEEG" (EMPTY).
2 Doorloop de oproepen. De namen van de bellers worden getoond wanneer
de naam door het netwerk wordt doorgestuurd of in het telefoonboek is
opgeslagen. Wanneer u aan het eind van de lijst komt, hoort u een pieptoon.
Wanneer verschijnt, wordt de oproep beantwoord. Wanneer verschijnt,
blijft de oproep onbeantwoord.
3 Druk op de OK-toets om het telefoonnummer te zien.
Wanneer het telefoonnummer uit meer dan 12 cijfers bestaat, drukt u opnieuw
op de OK-toets om het volledige nummer te zien.
4 Druk opnieuw op de OK-toets om de tijd en datum te zien waarop de oproep
is ontvangen.
5 Druk op de OK-toets om het eventueel nieuwe nummer aan het
telefoonboek toe te voegen.
Druk op OK wanneer “TOEVOEGEN?” (ADD?) op de display verschijnt.
Voer de naam in, of wijzig hem en druk op OK. Voer het telefoonnummer
in, of wijzig het en druk op OK. Kies met de omhoog/omlaag-toets de
melodie (1-10) die u wenst te horen wanneer dit nummer u belt en druk op
OK. Het nummer zal in het telefoonboek worden opgeslagen.
6 Druk op de opnemen-toets om een correspondent terug te bellen, wanneer
het nummer of de naam worden getoond.
1 Kies de oproep die u wenst te wissen en wis hem.
Op de display verschijnt "WISSEN" (DELETE).
2 Bevestig of annuleer.
1 Houd de wissen-toets 2 secondeningedrukt.
Op het scherm verschijnt "ALLES WISSEN" (DELETE ALL).
2 Bevestig of annuleer.
Elke programmering wordt aan het einde bevestigd door een dubbele of een enkele
lange pieptoon. Een dubbele pieptoon geeft de bevestiging van uw keuze aan. Een
lange pieptoon betekent dat de wijziging niet is doorgevoerd.
HL_Balance D182.book Page 45 Friday, March 26, 2010 2:11 PM
46
De handset personaliseren
6.2 Een beltoon kiezen
U kunt voor het basisstation en elke handset een verschillende beltoon instellen. U kunt de handset
ook instellen om voor interne of externe oproepen met een andere beltoon te rinkelen. U kunt
kiezen uit 10 verschillende beltonen.
6.3 Inschakelen/uitschakelen van de pieptonen
De handsets kunnen een pieptoon geven wanneer u op een toets drukt, wanneer het batterijniveau
laag is of wanneer de handset buiten bereik is.
Pieptoon toetsdruk aan/uit
Batterij bijna leeg
Wanneer de handset op het basisstation staat, zal het basisstation niet rinkelen bij
een inkomende oproep. Wanneer het belvolume van de handset uitgeschakeld is en
de handset staat in het basisstation, dan zal uw telefoon niet meer rinkelen!
1 Open het menu
2 Kies "HANDSET" (HANDSET) en bevestig.
3 Kies “INT BELVOLUM” (INT RING VOL) om het interne volume te
wijzigen of “EXT BELVOLUM” (EXT RING VOL) om het externe
volume te wijzigen en bevestig.
4 Kies een volumeniveau (1 tot 5 of “UIT” (OFF)).
5 Bevestig of keer terug naar het vorige menu.
1 Open het menu
2 Kies "INSTELLINGEN" (SETUP) en bevestig.
3 Kies "HANDSET" (HANDSET) en bevestig.
4 Kies "INT MELODIE" (INT MELODY) om de interne beltoon of
"EXT MELODIE" (EXT MELODY) om de externe beltoon te wijzigen en
bevestig.
5 Kies een beltoon (1 tot 10).
6 Druk op de OK-toets om te bevestigen of naar het vorige menu terug te
keren.
1 Open het menu
2 Kies "HANDSET" (HANDSET) en bevestig.
3 Kies "BIEP" (BEEP) en bevestig.
4 Kies "TOETSTOON" (KEYTONE) en bevestig.
5 Kies "AAN" (ON) om in te schakelen of "UIT" (OFF) om uit te schakelen
en bevestig.
1 Open het menu
2 Kies "HANDSET" (HANDSET) en bevestig.
3 Kies "BIEP" (BEEP) en bevestig.
4 Kies "BAT LAAG" (LOW BATTERY) en bevestig.
5 Kies "AAN" (ON) om in te schakelen of "UIT" (OFF) om uit te schakelen
en bevestig.
HL_Balance D182.book Page 46 Friday, March 26, 2010 2:11 PM
Nederlands
47
De handset personaliseren
Handset is buiten bereik
6.4 Naam van de handset
U kunt de naam die op de handset wordt weergegeven, veranderen (max. 9 tekens). Met deze
functie kunt u elke handset personaliseren.
6.5 Automatisch antwoorden
Wanneer er een inkomende oproep is en de handset staat in het basisstation, neemt de telefoon
automatisch de lijn wanneer u hem opneemt. Dit is de standaardinstelling. U kunt deze
uitschakelen.
6.6 De handset resetten
U kunt de standaardinstellingen voor de telefoon terugzetten. Dit zijn de instellingen die zijn
geïnstalleerd wanneer u de telefoon aankoopt.
Om naar de standaardinstellingen terug te keren:
De standaardparameters zijn:
Pieptoon bij laag batterijniveau Aan
Pieptonen bij buiten bereik Uit
Toetstoon Aan
Automatisch antwoorden Aan
Interne melodie 1
Intern volume 3
1 Open het menu
2 Kies "HANDSET" (HANDSET) en bevestig.
3 Kies "BIEP" (BEEP) en bevestig.
4 Kies "BUIT BEREIK" (OUT RANGE) en bevestig.
5 Kies "AAN" (ON) om in te schakelen of "UIT" (OFF) om uit te schakelen
en bevestig.
1 Open het menu
2 Kies "HANDSET" (HANDSET) en bevestig.
3 Kies "NAAM" (NAME) en bevestig.
4 Voer de gewenste naam in en bevestig.
Druk op de wissen-toets om een teken te wissen. Houd de telefoonboek-toets
ingedrukt en verlaat het menu zonder de wijzigingen op te slaan.
1 Open het menu
2 Kies "HANDSET" (HANDSET) en bevestig.
3 Kies "AUTO ANTWDEN" (AUTO ANSWER) en bevestig.
4 Kies "AAN" (ON) om in te schakelen of "UIT" (OFF) om uit te schakelen
en bevestig.
1 Open het menu
2 Kies "INSTELLINGEN" (SETUP) en bevestig.
3 Kies "FAB INSTELL" (DEFAULT) en bevestig.
4 Voer de 4-cijferige pincode in (standaard = 0000) en bevestig.
4
GHI
6
MNO
5
JKL
4
GHI
6
MNO
5
JKL
HL_Balance D182.book Page 47 Friday, March 26, 2010 2:11 PM
48
De handset personaliseren
Externe melodie 3
Extern volume 3
Ontvangvolume 3
Telefoonboek Leeg
Oproeplog Leeg
Nummerherhalingslijst Leeg
Pincode 0000
Belmodus DTMF
Toetsenbordvergrendeling Uit
6.7 Toetsenbordvergrendeling
Het toetsenbord kan worden vergrendeld zodat er geen instellingen kunnen worden gewijzigd en
geen telefoonnummers kunnen worden gevormd. Wanneer het toetsenbord vergrendeld is,
verschijnt het -pictogram.
Het toetsenbord vergrendelen
Het toetsenbord ontgrendelen.
6.8 De tijd instellen
6.9 Het alarm instellen
Wanneer u terugkeert naar de standaardinstellingen, worden alle items in
het telefoonboek en de oproeplog verwijderd. De pincode wordt ook teruggezet
op 0000.
1 Houd de ‘ ’-toets 3 seconden ingedrukt. Het toetsenbord zal worden
vergrendeld.
1 Druk op een willekeurige toets, "DRUK " (PRESS) verschijnt op het
scherm.
2 Houd de ' '-toets 3 seconden ingedrukt.
1 Open het menu
2 Kies "DATUM - TIJD" (DATE - TIME) en bevestig.
3 Kies "TIJD INSTELL" (CLOCK SET) en bevestig.
4 Voer de tijd in (24-uurweergave) en bevestig.
1 Open het menu
2 Kies "DATUM - TIJD" (DATE - TIME) en bevestig.
3 Kies "ALARM INST" (ALARM SET) en bevestig.
4 Kies "AAN" (ON) om het alarm aan te zetten en bevestig.
Voer het tijdstip in (24-uurweergave) waarop het alarm moet afgaan en
bevestig.
OF
Kies "UIT" (OFF) om het alarm af te zetten en bevestig.
4
GHI
6
MNO
5
JKL
4
GHI
6
MNO
5
JKL
HL_Balance D182.book Page 48 Friday, March 26, 2010 2:11 PM
Nederlands
49
Basisinstellingen
7 Basisinstellingen
7.1 Het volume van de beltoon aanpassen
Belvolume van het basisstation
U kunt kiezen uit 5 belvolumeniveaus en "UIT" (OFF).
7.2 Een beltoon kiezen
U kunt voor het basisstation en elke handset een verschillende beltoon instellen. Om de melodie
van het basisstation in te stellen:
7.3 De pincode wijzigen
Bepaalde functies zijn alleen beschikbaar voor gebruikers die de pincode kennen.
De standaardpincode is 0000. Om de pincode te wijzigen:
7.4 De belmodus instellen
Er zijn twee belmodi: DTMF/Toonkiezen (meest gebruikelijke) en pulskiezen (voor oudere
installaties).
De belmodus veranderen:
1 Open het menu
2 Kies "INSTELLINGEN" (SETUP) en bevestig.
3 Kies "BASIS VOLUME" (BASE VOLUME) en bevestig.
4 Kies een volumeniveau ("UIT" (OFF) of 1 tot 5).
5 Bevestig of keer terug naar het vorige menu.
1 Open het menu
2 Kies "INSTELLINGEN" (SETUP) en bevestig.
3 Kies "BASIS MELODIE" (BASE MELODY) en bevestig.
4 Kies een beltoon (1 tot 5).
5 Bevestig of keer terug naar het vorige menu.
1 Open het menu
2 Kies "INSTELLINGEN" (SETUP) en bevestig.
3 Kies "PINCODE" (PIN CODE) en bevestig.
4 Voer de oude 4-cijferige pincode in en bevestig.
5 Voer een nieuwe 4-cijferige pincode in en bevestig.
6 Voer de nieuwe pincode een tweede keer in en bevestig.
1 Open het menu
2 Kies "INSTELLINGEN" (SETUP) en bevestig.
3 Kies "KIESMODE" (DIAL MODE) en bevestig.
4 Kies de belmodus en bevestig.
4
GHI
6
MNO
5
JKL
4
GHI
6
MNO
5
JKL
4
GHI
6
MNO
5
JKL
HL_Balance D182.book Page 49 Friday, March 26, 2010 2:11 PM
50
Meerdere handsets gebruiken
7.5 Duur van de flashtijd
Druk op de Flash-toets ‘
R
’ (toets 7 – afbeelding 2C Handset) om bepaalde diensten op uw externe
lijn te gebruiken, zoals “tweede oproep” (wanneer uw telefoonbedrijf deze dienst aanbiedt); of om
oproepen door te schakelen wanneer u een telefooncentrale gebruikt (PABX). De Flash-toets '
R
'
is een korte onderbreking van de lijn. U kunt de flashtijd instellen tot 100 ms of 250 ms..
8 Meerdere handsets gebruiken
8.1 Een nieuwe handset toevoegen
U kunt twee handsets aanmelden op het basisstation wanneer deze handsets het DEC GAP-
protocol ondersteunen.
Het basisstation kan tot 5 handsets ondersteunen. Wanneer u reeds 5 handsets hebt en u wenst een
bijkomende handset toe te voegen of een handset te vervangen, moet u eerst een handset
verwijderen en vervolgens de nieuwe aanmelden.
Het basisstation in de aanmeldingsmodus plaatsen
Register the new handset:
Aanmelden van een handset type Topcom Balance
Handsets van andere typen aanmelden
Na het starten van de procedure voor aanmelding op het basisstation volgt u de aanwijzingen voor
het aanmelden in de handleiding van de handset. De handset moet GAP-compatibel zijn.
Op de display knipperen het pictogram en de tekst "NT AANGEMELD" (NOT REG) wanneer
1 Open het menu
2 Kies "INSTELLINGEN" (SETUP) en bevestig.
3 Selecteer "FLASHTIJD" (RECALL) en bevestig.
4 Kies "FLASH1" (RECALL1) voor een korte flashtijd (100 ms) of
"FLASH2" (RECALL2) voor een lange flashtijd (250 ms) en bevestig.
Alleen nodig wanneer u de aanmelding van een handset hebt verwijderd of wanneer
u zich een nieuwe hebt aangeschaft.
1 Houd de paging-toets op het basisstation 6 seconden ingedrukt. Het
basisstation geeft een pieptoon.
2 Open het menu
3 Kies "AANMELDEN" (REGISTER) en bevestig.
4 Kies "BS AANMELDEN" (REG BASE) en bevestig.
5 Kies het nummer van het basisstation dat aan de handset (1 - 4) moet worden
gekoppeld en bevestig. (De knipperende nummers zijn reeds in gebruik.)
6 Voer de pincode van het basisstation in (standaard 0000) en bevestig.
De handset zoekt nu het DECT-basisstation. Wanneer de handset het basis-
station heeft gevonden, toont hij het identificatienummer van het basisstation.
7 Bevestig of stop.
Wanneer de handset het basisstation niet vindt, keert hij na enkele seconden
terug naar de stand-bymodus. Probeer het nummer van het basisstation te
wijzigen en ga na of er geen storingsbronnen zijn in de omgeving. Ga dichter
bij het basisstation staan.
4
GHI
6
MNO
5
JKL
4
GHI
6
MNO
5
JKL
HL_Balance D182.book Page 50 Friday, March 26, 2010 2:11 PM
Nederlands
51
Meerdere handsets gebruiken
de handset niet aan het basisstation is gekoppeld.
Wanneer een handset aan een basisstation is gekoppeld, krijgt hij van het basisstation een
handsetnummer. Dit is het nummer dat op de handset achter de naam staat en moet worden
gebruikt voor interne oproepen.
8.2 Een handset verwijderen
Deze procedure moet worden uitgevoerd op een andere handset dan die welke u wilt verwijderen.
8.3 Een handset instellen op een ander basisstation
Wanneer u een Topcom Balance-handset gebruikt op een basisstation van een ander model. Het
basisstation moet GAP-compatibel zijn.
8.4 Een basisstation selecteren
U kunt uw handset tussen basisstations wisselen. De handsets kunnen tot op 4 basisstations
tegelijkertijd worden aangemeld. Wanneer u het basisstation kiest, wordt het huidige gekozen
basisstation aangeduid door een knipperend basisstationnummer. Wanneer u "AUTO" (AUTO)
kiest, zal de handset automatisch naar een ander basisstation zoeken wanneer u zich buiten bereik
bevindt. De handset moet eerst apart worden aangemeld bij elk basisstation.
Het DECT GAP-profiel zorgt er alleen voor dat de basistelefoonfuncties correct
werken tussen de verschillende merken/typen. Het is mogelijk dat sommige diensten
(zoals CLIP – nummerweergave oproeper) niet correct werken.
1 Open het menu
2 Kies "INSTELLINGEN" (SETUP) en bevestig.
3 Selecteer "HS VERWIJDER" (DEL HANDSET) en bevestig.
4 Voer de pincode van het basisstation in (standaard 0000) en bevestig.
5 Kies de handset die u wilt verwijderen en bevestig.
1 Plaats het basisstation in de aanmeldingsmodus en volg de handleiding van
het basisstation.
2 Open het menu
3 Kies "AANMELDEN" (REGISTER) en bevestig.
4 Kies "BS AANMELDEN" (REG BASE) en bevestig.
5 Voer het nummer van het basisstation in dat aan de handset moet worden
gekoppeld en bevestig.
6 Voer de pincode van het basisstation in en bevestig.
De handset zoekt nu het DECT-basisstation. Wanneer de handset het basis-
station heeft gevonden, toont hij het identificatienummer van het basisstation.
7 Bevestig of stop.
1 Open het menu
2 Kies "AANMELDEN" (REGISTER) en bevestig.
3 Kies "BASIS SELECT" (SELECT BASE) en bevestig.
4 Kies een basisstation of kies "AUTO" (AUTO) en bevestig.
Als u automatische basisselectie hebt geselecteerd en de handset buiten bereik is
van het huidige basisstation, zal de handset alleen zoeken naar het sterkste
basisstation in de stand-bymodus (niet tijdens verbindingen).
4
GHI
6
MNO
5
JKL
4
GHI
6
MNO
5
JKL
4
GHI
6
MNO
5
JKL
HL_Balance D182.book Page 51 Friday, March 26, 2010 2:11 PM
52
SMS
9SMS
U kunt een sms verzenden en ontvangen met uw Topcom Balance-telefoon. Dit hoofdstuk gaat
over het gebruik van sms. U kunt in totaal 15 verzonden en ontvangen sms'jes opslaan, elk met
maximaal 160 tekens.
9.1 Een sms schrijven
De methode is dezelfde als voor het invoeren van een naam in het telefoonboek (Zie “3.15 Het
alfanumerieke toetsenbord gebruiken”).
Druk op '1' om een spatie toe te voegen.
9.2 Een sms verzenden
9.3 Lijst met ontvangen berichten (Postvak IN) lezen en bekijken
Uw Topcom Balance-display geeft aan hoeveel nieuwe berichten u hebt ontvangen. verschijnt
op het scherm. De sms-LED op het basisstation knippert.
Een pieptoon geeft aan dat u zojuist een nieuw bericht hebt ontvangen.
Voor u sms-tekstberichten kunt versturen of ontvangen, dient u het telefoonnummer
van het sms-center van uw provider voor uitgaande en inkomende berichten in te
stellen (Zie “ Nummers sms-diensten”).
1 Open het menu
2 Kies "SMS" (SMS) en bevestig.
3 Kies "AANMAKEN" (WRITE) en bevestig.
4 Begin een bericht te schrijven en bevestig.
5 Voer het telefoonnummer in en bevestig om het bericht te verzenden.
De sms wordt automatisch verzonden.
Wanneer het aantal nieuwe berichten op de display wordt weergegeven.
1 Druk op de OK-toets. Het telefoonnummer van het meest recente bericht
verschijnt eerst.
Wanneer het aantal nieuwe berichten niet op de display wordt weergegeven.
1 Open het menu
2 Kies "SMS" (SMS) en bevestig.
3 Selecteer "POSTVAK IN" (INBOX) en bevestig.
Het telefoonnummer van het meest recente bericht verschijnt eerst.
Doorloop alle berichten en druk op OK om het bericht te lezen.
Berichten met '*' voor het telefoonnummer zijn ongelezen.
Doorloop het hele bericht en druk op OK wanneer u het hele bericht hebt
gelezen.
Scrol naar een van de volgende opties:
Beantwoorden (Reply): Bewerk het bericht met het alfanumerieke toetsenbord
en sla het op.
Doorsturen (Forward): Stuur het opgeslagen bericht naar een andere gebruiker
door. Volg dezelfde instructies als voor het verzenden van een sms-bericht (Zie
“9.2 Een sms verzenden”).
4
GHI
6
MNO
5
JKL
4
GHI
6
MNO
5
JKL
HL_Balance D182.book Page 52 Friday, March 26, 2010 2:11 PM
Nederlands
53
SMS
9.4 Meerdere gebruikers
Met uw Topcom Balance-telefoon kunt u tot 5 handsets op één basisstation aanmelden. Elke
handset beschikt over een eigen handsetnummer (1-5) dat ook het terminalnummer is om
persoonlijke berichten te versturen. Alle handsets hebben eveneens het standaardterminalnummer
‘0’. Om persoonlijke sms'jes te kunnen ontvangen, moet u uw gesprekspartners het
terminalnummer voor gebruikers geven dat zij aan uw standaardtelefoonnummer moeten
toevoegen (zie verder). Wanneer u bijvoorbeeld een 2e handset (Handset 2) hebt, heeft die handset
het terminalnummer 2.
Als er aan uw telefoonnummer geen terminalnummer of het nummer "0" werd toegevoegd,
ontvangen alle handsets deze berichten.
U kunt het terminalnummer ook wijzigen, maar het nummer moet liggen tussen 6-9 (Zie “ Het
terminalnummer instellen”).
Persoonlijke sms'jes ontvangen
Persoonlijke sms'jes lezen
Wanneer u een nieuw bericht ontvangt, geeft uw Topcom Balance een pieptoon. Op het scherm
verschijnt en het aantal nieuwe berichten.
OF
9.5 Sms-instellingen
Waarschuwingstoon sms aan-/uitzetten
Uw handset kan een melodie spelen om een nieuw tekstbericht aan te kondigen.
Wissen? (Delete?): Wis het bericht. Druk opnieuw op
OK
om te bevestigen.
Details (Details): Bekijk het telefoonnummer, de datum en het tijdstip van het
bericht. Druk op OK om te bevestigen.
Druk op de microfoon uit-toets om terug te keren naar het menu Postvak IN
Uw gesprekspartners dienen het terminalnummer aan uw telefoonnummer toe te
voegen als ze een persoonlijke sms willen sturen.
Als uw terminalnummer bv. "1" is en uw telefoonnummer is 123456789, dan dient
de verzender de sms'jes te verzenden naar: 1234567891! Dit is het nummer dat u
moet onthouden en door moet geven aan uw gesprekspartners.
Druk op de OK-toets
In de sms-lijst zijn privéberichten bovenaan op het scherm gemarkeerd
met het sleutel-pictogram .
1 Open het menu
2 Kies "SMS" (SMS) en bevestig.
3 Kies "PERSOONL SMS" (PERSONAL SMS) en bevestig. Het
telefoonnummer van het meest recente bericht verschijnt eerst.
1 Open het menu
2 Kies "SMS" (SMS) en bevestig.
3 Selecteer "SMS INSTELL." (SMS SETTINGS) en bevestig.
4 Selecteer "BER SIGNTOON" (MSG ALERT) en bevestig.
5 Selecteer "AAN" (ON) of "UIT" (OFF) en bevestig.
6 Kies de gewenste melodie, bevestig en keer terug naar het vorige menu.
HL_Balance D182.book Page 53 Friday, March 26, 2010 2:11 PM
54
SMS
Nummers sms-diensten
Om sms-tekstberichten te verzenden en te ontvangen, hebt u het telefoonnummer nodig van het
sms-center van uw provider. Deze nummers zijn voorgeprogrammeerd in de Topcom Balance.
Als u per ongeluk alle telefoonnummers voor het verzenden en ontvangen van sms'jes van uw
sms-dienst wist, dient u ze opnieuw in te voeren, anders kunt u niet sms'en.
De Topcom Balance kan 2 telefoonnummers van de sms-diensten voor het verzenden en
2 telefoonnummers van de sms-diensten voor het ontvangen van sms'jes opslaan.
Nummers sms-diensten voor verzenden instellen
Nummers sms-diensten voor ontvangen instellen
Selecteer het sms-center om een sms te verzenden.
Omdat u 2 sms-centra voor het verzenden kunt instellen, moet u een van beide selecteren voordat
u berichten verzendt:
Het terminalnummer instellen
Elke handset heeft een terminalnummer "0" en het terminalnummer = het handsetnummer (1-5).
U kunt het terminalnummer indien nodig in een ander nummer (6-9) veranderen:
1 Open het menu
2 Kies "SMS" (SMS) en bevestig.
3 Selecteer "SMS INSTELL." (SMS SETTINGS) en bevestig.
4 Selecteer "CENTRA VERZ." (SEND CENTRE) en bevestig.
5 Kies "VERZEND 1" (SEND 1) of "VERZEND 2" (SEND 2) en bevestig.
6 Voer het telefoonnummer van de sms-server in.
1 Open het menu
2 Kies "SMS" (SMS) en bevestig.
3 Selecteer "SMS INSTELL." (SMS SETTINGS) en bevestig.
4 Selecteer "CENTRA ONTV." (RCV CENTRE) en bevestig.
5 Kies "ONTVANGS 1" (RECEIVE 1) of "ONTVANGS 2" (RECEIVE 2)
en bevestig.
6 Voer het telefoonnummer van de sms-server in.
1 Open het menu
2 Kies "SMS" (SMS) en bevestig.
3 Selecteer "SMS INSTELL." (SMS SETTINGS) en bevestig.
4 Selecteer "VERZ.DIENST" (SEND SERVICE) en bevestig.
5 Kies "VERZEND 1" (SEND 1) of "VERZEND 2" (SEND 2) en bevestig.
1 Open het menu
2 Kies "SMS" (SMS) en bevestig.
3 Selecteer "SMS INSTELL." (SMS SETTINGS) en bevestig.
4 Selecteer "TERMINAL NR." (TERMINAL NO) en bevestig.
5 Wis het oude terminalnummer en voer het nieuwe (0, 6-9) in.
6 Druk op OK om te bevestigen.
4
GHI
6
MNO
5
JKL
4
GHI
6
MNO
5
JKL
4
GHI
6
MNO
5
JKL
HL_Balance D182.book Page 54 Friday, March 26, 2010 2:11 PM
Nederlands
55
Probleemoplossing
Geheugen vol
Wanneer het geheugen vol is, verschijnt op het scherm "GEHEUGEN VOL" (MEMORY FULL).
U kunt niet langer sms'jes verzenden of ontvangen. Om sms'jes te kunnen blijven ontvangen, kunt
u enkele of alle berichten wissen. Alle berichten in het "POSTVAK IN" (INBOX) of de
"PERSOONL SMS
"
(PERSONAL SMS) wissen:
10 Probleemoplossing
1 Open het menu
2 Kies "SMS" (SMS) en bevestig.
3 Selecteer "SMS INSTELL." (SMS SETTINGS) en bevestig.
4 Selecteer "ALLES WISSEN" (DELETE ALL) en bevestig.
5 Kies "POSTVAK IN" (INBOX) of "PERSOONL SMS" (PERSONAL
SMS) en bevestig.
6 "BEVESTIGEN?" (CONFIRM?) verschijnt.
7 Bevestig of annuleer.
Symptoom Mogelijke oorzaak Oplossing
Geen weergave Batterijen zijn leeg Controleer de plaatsing van de
batterijen
Laad de batterijen op
Handset uitgeschakeld Schakel de handset in
Geen toon Telefoonkabel is slecht
aangesloten
Controleer de aansluiting van
de telefoonkabel
De lijn is bezet door een andere
handset
Wacht totdat de andere
handset het gesprek heeft
beëindigd
Het pictogram knippert
Handset is buiten bereik Breng de handset dichter in de
buurt van het basisstation
Het basisstation heeft geen
stroom
Controleer de aansluiting van
de stroomkabel bij het
basisstation
De handset is niet aangemeld op
het basisstation
Meld de handset aan bij het
basisstation
Basisstation of handset laat
geen beltoon horen
Het beltoonvolume staat uit of is
te laag
Pas het volume van de beltoon
aan
De toon is goed, maar er is
geen verbinding
De belmodus is fout De belmodus aanpassen
(puls/toon)
Niet mogelijk om een gesprek
naar de binnencentrale
(PABX) door te schakelen
De flashtijd is te kort of te lang De flashtijd wijzigen
De telefoon reageert niet op
het indrukken van de toetsen
Gebruikersfout Verwijder de batterijen en
plaats ze weer terug
HL_Balance D182.book Page 55 Friday, March 26, 2010 2:11 PM
56
Technische kenmerken
11 Technische kenmerken
12 Topcom-garantie
12.1 Garantieperiode
Op de Topcom-toestellen wordt een garantie van 24 maanden verleend. De garantieperiode gaat
in op de dag waarop het nieuwe toestel wordt gekocht. Er is geen garantie op standaard of
oplaadbare batterijen (type AA/AAA).
Kleine onderdelen of defecten die een verwaarloosbaar effect hebben op de werking of waarde van
het toestel zijn niet gedekt door de garantie.
De garantie moet worden bewezen door voorlegging van het originele aankoopbewijs of kopie
waarop de datum van aankoop en het toesteltype staat.
12.2 Afwikkeling van garantieclaims
Een defect toestel moet, samen met een geldig aankoopbewijs worden teruggestuurd naar een
Topcom-hersteldienst.
Als het toestel tijdens de garantieperiode een defect vertoont, zal Topcom of diens officieel
erkende hersteldienst eventuele defecten te wijten aan materiaal- of productiefouten gratis
herstellen, door defecte toestellen of onderdelen van defecte toestellen ofwel te herstellen ofwel te
vervangen. In het geval dat het toestel wordt vervangen, kan de kleur en het model verschillend
zijn van het oorspronkelijk gekochte toestel.
De oorspronkelijke aankoopdatum is bepalend voor het begin van de garantieperiode. De
garantieperiode wordt niet verlengd als het toestel wordt vervangen of hersteld door Topcom of
diens officieel erkende hersteldienst.
Standaard
DECT
(
D
igital
E
nhanced
C
ordless
T
elecommunications)
GAP
(
G
eneric
A
ccess
P
rofile)
Frequentiebereik 1880 MHz tot 1900 MHz
Aantal kanalen 120 duplexkanalen
Modulatie GFSK
Spraakcodering 32 Kbit/s
Emissievermogen 10 mW (gemiddeld vermogen per kanaal)
Bereik maximaal 300 m in open ruimte / 10-50 m binnenshuis
Aantal handsets Maximaal 5
Netspanning basisstation 230 V / 50 Hz / 7,5 V gelijkstroom 300 mA
Batterijen van de handset 2 oplaadbare batterijen AAA, NiMh 1,2 V, 550 mAh
Autonomie van handset 200 uur in stand-by
Gesprekstijd van handset 10 uur
Normale gebruiksomstandigheden +5 °C tot +45 °C
Belmodus Puls/Toon
Flashtijd 100 of 250 ms
HL_Balance D182.book Page 56 Friday, March 26, 2010 2:11 PM
Nederlands
57
Het product afvoeren (milieu)
12.3 Garantiebeperkingen
Schade of defecten te wijten aan onoordeelkundig gebruik of bediening en schade te wijten aan
het gebruik van niet-originele onderdelen of accessoires worden niet gedekt door de garantie.
De garantie dekt geen schade te wijten aan externe factoren, zoals bliksem, water en brand, noch
enige transportschade.
Er kan geen garantie worden ingeroepen als het serienummer op het toestel is gewijzigd,
verwijderd of onleesbaar gemaakt.
Garantieclaims zijn ongeldig indien het toestel hersteld, gewijzigd of aangepast werd door de
koper.
Dit toestel mag uitsluitend gebruikt worden met herlaadbare batterijen. Indien U de meegeleverde
batterijen wenst te vervangen moet U nagaan of de gebruikte batterijen wel geschikt en
herlaadbaar zijn. In GEEN enkel geval mogen Alkaline batterijen in de handsets gebruikt worden.
Indien U Alkaline batterijen gebruikt en de handset op de basis plaatst, dan zullen deze batterijen
opwarmen en mogelijk exploderen. Eventuele schade die hierdoor ontstaat is niet verhaalbaar op
de fabrikant en tevens is de schade aan het toestel niet gedekt door de garantievoorwaarden.
Eventuele herstelkosten zullen U aangerekend worden.
13 Het product afvoeren (milieu)
Na afloop van de levenscyclus van het product mag u het niet met het normale
huishoudelijke afval weggooien, maar moet u het naar een inzamelpunt brengen voor
recycling van elektrische en elektronische apparatuur. Dit wordt aangeduid door het
symbool op het product, in de handleiding en/of op de verpakking.
Sommige materialen waaruit het product is vervaardigd, kunnen worden hergebruikt
als u ze naar een inzamelpunt brengt. Door onderdelen of grondstoffen van gebruikte producten te
hergebruiken, levert u een belangrijke bijdrage aan de bescherming van het milieu. Wend u tot de
plaatselijke overheid voor meer informatie over de inzamelpunten bij u in de buurt.
14 Reiniging
Reinig de telefoon met een vochtige of antistatische doek. Gebruik nooit reinigingsmiddelen of
agressieve oplosmiddelen.
HL_Balance D182.book Page 57 Friday, March 26, 2010 2:11 PM
58
Instructions de sécurité
Français
1 Instructions de sécurité
Utilisez uniquement la fiche du chargeur fournie. N'utilisez pas d'autres chargeurs, au risque
d'abîmer les éléments de batterie.
Insérez uniquement des piles rechargeables du même type. N'utilisez jamais de piles ordinaires
non-rechargeables. Insérez des piles rechargeables en respectant la polarité (indiquée dans le
compartiment à piles du combiné).
Ne touchez pas les contacts du chargeur et de la fiche avec des objets pointus ou métalliques.
Le fonctionnement de certains appareils médicaux pourrait être altéré.
Le combiné peut provoquer un bourdonnement désagréable dans les prothèses auditives.
N'installez pas la base dans une pièce humide ou à moins d'1,5 m d'une source d'eau. Veillez à
ce que le combiné reste sec.
N'utilisez pas le téléphone dans un environnement exposé à des risques d'explosion.
Jetez les piles et entretenez le téléphone dans le strict respect de l'-environnement.
Comme ce téléphone est indisponible en cas de coupure de courant, vous devez utiliser un
téléphone autonome -pour les appels urgents, un téléphone mobile par exemple.
2 Pour commencer
2.1 Comment utiliser ce mode d'emploi ?
Ce mode d'emploi adopte les règles suivantes pour clarifier les instructions :
Touche à enfoncer.
Texte....... « ECRAN ».
Le texte qui apparaît sur l'écran du téléphone est indiqué dans la colonne de
droite entre guillemets.
HL_Balance D182.book Page 58 Friday, March 26, 2010 2:11 PM
Français
59
Pour commencer
2.2 Installation de la base
- 2A Vue arrière de la base -
A. Prise murale du téléphone
B. Câble d'alimentation
C. Câble téléphonique
2.3 Installation du combiné
- 2B Vue arrière du combiné -
A. Couvercle
B. Piles rechargeables
1 Branchez une extrémité de l'adaptateur dans la prise de courant et l'autre
extrémité dans la prise d'adaptateur en dessous de la base.
2 Branchez une extrémité du câble téléphonique dans la prise téléphonique
murale et l'autre extrémité en dessous de la base.
3 Placez le câble téléphonique et le câble d'alimentation AC dans les guides
de la base comme indiqué sur la figure 2A.
1 Ouvrez le compartiment à piles comme illustré sur la figure 2B.
2 Insérez les piles en respectant les polarités (+ et –).
3 Refermez le compartiment à piles.
4 Laissez le combiné sur la base pendant 20 heures.
Avant la première utilisation du téléphone, assurez-vous au préalable que les piles
ont pu se charger pendant 20 heures. À défaut, le téléphone ne fonctionnera pas de
manière optimale.
A
B
C
+
-
-
+
A
B
HL_Balance D182.book Page 59 Friday, March 26, 2010 2:11 PM
60
Pour commencer
2.4 Touches / voyants
Combiné
1. Écran
2. Touche Recomposition / Pause /
Haut
3. Touche menu / OK
4. Touche Journal des appels / Bas
5. Touche Répertoire / EXIT
6. Touches Alphanumériques
7. Touche INT
8. Touche Marche/Arrêt / Flash
9. Verrouillage du clavier
10. Touche Boîte vocal
11. Touche Mains-libres
12. Touche Prise d'appel / Fin d'appel
13. Touche Muet / Effacer / Esc
Base
14. Touche Recherche (Paging)
Écran
En mode veille, l'écran affiche l'heure et le numéro du
combiné :
12-05 HS1
3
4
5
6
7
8
1
9
13
12
2
11
10
1
2
ABC
3
DEF
4
GHI
5
JKL
6
MNO
7
PQRS
8
TUV
9
WXYZ
0
#
INT
R
1
EXIT
- 2C Combiné -
14
- 2D Base -
- 2E Écran -
HL_Balance D182.book Page 60 Friday, March 26, 2010 2:11 PM
Français
61
Pour commencer
2.5 Symboles
2.6 Navigation dans les menus
Le système Topcom Balance intègre un système de menus très convivial. Chaque menu aboutit à
une série d'options. L'arborescence des menus est illustrée au paragraphe suivant.
2.7 Organisation des menus
Prise d'appel ; vous êtes en ligne Le clavier du combiné est verrouillé.
Appel externe Vous êtes dans le répertoire
Appel interne Pile épuisée
Nouveaux numéros de la liste d'appels Piles moyennement chargées
Appel suivi d'une réponse Piles totalement chargées
Appel sans réponse Piles déchargées
Vous êtes dans le menu. Nouveau message vocal
Mains-libres Combiné à portée de la base
Indique que le numéro affiché déborde
de l'écran (12 chiffres).
L'antenne clignote quand le combiné
n'est pas enregistré sur la base.
Nouveau message SMS
1 Le combiné étant allumé et en mode de veille, appuyez sur la touche
contextuelle pour accéder au menu principal.
2 Faites défiler l'écran jusqu'à l'option de menu souhaitée. Les options du
menu défilent en boucle (la première s'affiche à nouveau après la dernière).
3 Appuyez sur la touche OK pour afficher d'autres options ou pour valider le
réglage affiché.
4 Appuyez sur la touche Effacer pour revenir au niveau précédent dans le
menu.
Menu Sous-menus
RÉPERTOIRE "PHONEBOOK"
AJOUTER "ADD ENTRY"
MODIFIER "MODIFY ENTRY"
SUPPRIMER "DELETE ENTRY"
SMS
RECEPTION "INBOX"
PERS SMS "PERSONAL SMS"
ECRIRE "WRITE"
EFFACER TOUT "DELETE ALL"
CONFIG SMS "SMS SETTINGS"
RÉGLAGES "SETUP"
VOLUM E B A S E "BAS E VO L U M E"
MÉLODIE BASE "BASE MELODY"
SUPP COMBINÉ "DEL HANDSET"
CODE PIN "PIN CODE"
NUMÉROTATION "DIAL MODE"
RÉGL. DÉFAUT "DEFAULT"
HL_Balance D182.book Page 61 Friday, March 26, 2010 2:11 PM
62
Utilisation du téléphone
3 Utilisation du téléphone
3.1 Mise en/hors service du combiné
3.2 Modification de la langue des menus
3.3 Recevoir un appel
Pour prendre l'appel :
COMBINÉ "HANDSET"
BIPS "BEEP"
VOL SON INT "INT RING VOL"
VOL SON EXT "EXT RING VOL"
MÉLODIE INT "INT MELODY"
MÉLODIE EXT "EXT MELODY"
RÉPONSE AUTO "AUTO ANSWER"
NOM COMBINÉ "NAME"
LANGUE "LANGUAGE"
MEM DIRECTES "HOT KEYS"
VERR CLAVIER "KEYLOCK?"
DATE - HEURE "DATE -
TIME"
RÉGLAGE DATE "DATE SET"
RÉGL. HEURE "CLOCK SET"
RÉGL. RÉVEIL "ALARM SET"
DÉCLARER "REGISTER"
CHOIX BASE "SELECT BASE"
DÉCL. BASE "REG BASE"
1 Appuyez sur la touche Marche/Arrêt du combiné et maintenez-la enfoncée
pendant 8 secondes. Le combiné se met à chercher la base.
2 Appuyez sur la touche Marche/Arrêt et maintenez-la enfoncée pendant
8 secondes. L'écran s'éteint.
1 Ouvrez le menu.
2 Sélectionnez COMBINE "HANDSET" et validez.
3 Sélectionnez LANGUE "Language" et validez.
4 Sélectionnez la langue de votre choix et validez.
1 Appuyez sur la touche Prise d'appel.
OU
Retirez le combiné de sa base si vous avez activé la fonction Réponse auto
"Auto answer". (Se reporter à “6.5 Réponse automatique”)
Vous êtes en communication avec votre correspondant.
2 Appuyez sur la touche Fin d'appel pour raccrocher ou replacez le combiné
sur sa base.
Menu Sous-menus
HL_Balance D182.book Page 62 Friday, March 26, 2010 2:11 PM
Français
63
Utilisation du téléphone
3.4 Passer un appel téléphonique externe
Composition directe
Précomposition
3.5 Passer un appel téléphonique interne
3.6 Transfert d'appel interne
Transfert d'un appel externe vers un autre combiné.
3.7 Conférence téléphonique
Cette fonction n'est disponible que si plusieurs combinés sont enregistrés sur la base !
Vous pouvez alors converser simultanément avec un correspondant interne et un correspondant
externe.
Pendant un appel externe :
1 Appuyez sur la touche Prise d'appel pour lancer l'appel.
2 Composez le numéro de téléphone.
3 Appuyez sur la touche Fin d'appel pour raccrocher ou replacez le combiné
sur sa base.
P
our corriger un numéro, utilisez la touche Effacer pour effacer un chiffre erroné.
1 Composez le numéro de téléphone.
2 Appuyez sur la touche Prise d'appel pour lancer l'appel.
3 Appuyez sur la touche Fin d'appel pour raccrocher ou replacez le combiné
sur sa base.
1 Appuyez sur la touche Appel interne.
2 Saisissez le numéro du combiné interne (entre 1 et 5).
3 Appuyez sur la touche Fin d'appel pour raccrocher ou replacez le combiné
sur sa base.
1 Appuyez sur la touche Appel interne.
2 Sélectionnez le numéro du combiné interne (1 à 5), l'appelant externe est
mis en attente.
3 Dès que l'autre combiné prend l'appel, appuyez sur la touche Fin d'appel
pour raccrocher de votre côté et transférer l'appel.
Si le correspondant interne ne décroche pas, appuyez de nouveau sur la touche
Appel interne pour reprendre la conversation avec l'appelant externe en ligne.
4 Appuyez sur la touche Fin d'appel pour raccrocher ou replacez le combiné
sur sa base.
1 Appuyez sur la touche Appel interne.
2 Saisissez le numéro du combiné interne (entre 1 et 5).
3 Dès que l'autre combiné prend l'appel, appuyez sur la touche .
Si le correspondant interne ne décroche pas, appuyez de nouveau sur la touche
Appel interne pour reprendre la conversation avec l'appelant externe en ligne.
4 Appuyez sur la touche Fin d'appel pour raccrocher ou replacez le combiné
sur sa base.
4
GHI
6
MNO
5
JKL
4
GHI
6
MNO
5
JKL
INT
4
GHI
6
MNO
5
JKL
INT
4
GHI
6
MNO
5
JKL
INT
INT
4
GHI
6
MNO
5
JKL
#
INT
HL_Balance D182.book Page 63 Friday, March 26, 2010 2:11 PM
64
Utilisation du téléphone
3.8 Mode mains-libres
Vous pouvez parler à votre correspondant sans décrocher le combiné.
3.9 Volume du haut-parleur pendant un appel
3.10 Affichage de la durée d'un appel
La durée de l'appel est affichée après 15 secondes. Elle est exprimée en minutes et secondes.
A la fin de chaque appel, la durée totale est affichée pendant 5 secondes.
3.11 Désactivation du microphone
Il est possible de désactiver le micro pendant une conversation.
3.12 Touche Pause
Lors de la numérotation d'un numéro, vous pouvez ajouter une pause entre deux chiffres :
3.13 Localisation d'un combiné (fonction Recherche "Paging")
3.14 Mémoire de rappel
Vous pouvez recomposer un numéro quelconque parmi les 10 derniers numéros appelés. Si vous
avez mémorisé un nom dans le répertoire pour l'associer au numéro, c'est le nom qui sera affiché
à la place.
1 Appuyez sur la touche Mains-libres pendant un appel pour activer ou
désactiver le mode mains-libres.
1 Au cours d'une conversation, appuyez sur la touche Haut ou Bas pour
modifier le volume en conséquence.
Le volume en mode mains-libres est également ajusté en même temps que le
récepteur du combiné comme décrit ci-avant.
1 Appuyez sur la touche Muet. Vous pouvez parler librement sans être
entendu par l'appelant.
L'écran affiche MICRO COUPE (MUTE).
2 Appuyez de nouveau sur la touche Désactivation Microphone pour repasser
en mode normal.
1 Appuyez pendant 2 secondes sur la touche Rappel / Pause.
1 Appuyez sur la touche Recherche "Paging" de la base.
Tous les combinés déclarés avec la base sonneront.
2 Appuyez sur une touche quelconque du combiné pour interrompre la
sonnerie.
1 Appuyez sur la touche Recomposition.
2 Sélectionnez un numéro. Si le numéro est dans le répertoire, le nom associé
s'affichera.
Quand le nom s'affiche, vous pouvez basculer entre le nom et le numéro en
appuyant sur la touche OK !
3 Appuyez sur la touche Prise d'appel pour lancer l'appel.
4 Appuyez sur la touche Fin d'appel pour revenir au mode de veille.
4
GHI
6
MNO
5
JKL
HL_Balance D182.book Page 64 Friday, March 26, 2010 2:11 PM
Français
65
Répertoire "Phonebook"
3.15 Utilisation du clavier alphanumérique
Avec votre téléphone, vous pouvez également saisir des caractères alphanumériques. Cette
fonction peut vous servir pour saisir un nom dans le répertoire, attribuer un nom au combiné, etc.
Pour sélectionner une lettre, appuyez sur la touche correspondante autant de fois que nécessaire.
Par exemple, pour sélectionner A, appuyez sur 2 une seule fois. Pour écrire un B, appuyez sur
2 deux fois de suite, etc.
Pour écrire A puis B consécutivement, appuyez sur 2 une seule fois, attendez que le curseur avance
d'une position, puis appuyez sur 2 deux fois.
Les caractères accessibles au clavier sont les suivants :
Touche Première Deuxième Troisième Quatrième Cinquième
pression pression pression pression pression
1espace- 1
2ABC2
3D E F 3
4GHI 4
5J K L 5
6MNO6
7P Q R S 7
8TUV8
9WXYZ9
00
4 Répertoire "Phonebook"
Chaque combiné peut mémoriser jusqu'à 50 noms et numéros. Les noms peuvent comprendre
jusqu'à 12 caractères et les numéros, jusqu'à 20 chiffres.
Pour saisir des caractères alphanumériques, reportez-vous à la section “3.15 Utilisation du clavier
alphanumérique”.
4.1 Pour ajouter une entrée dans le répertoire
4.2 Pour composer une entrée à partir du répertoire
Appuyez sur 1 pour insérer un espace.
Appuyez sur la touche Effacer pour effacer un caractère.
1 Accédez au menu.
2 Sélectionnez REPERTOIRE "PHONEBOOK" et validez.
3 Sélectionnez AJOUTER "ADD ENTRY" et validez.
4 Saisissez un nom et validez.
Appuyez sur la touche Répertoire pour sortir du menu sans prendre en compte
les modifications.
5 Saisissez le numéro et validez.
6 Sélectionnez une mélodie (1-10) et validez.
1 Appuyez sur la touche Répertoire.
2 Sélectionnez un nom ou saisissez la première lettre du nom. (La liste défile
dans l'ordre alphabétique.)
4
GHI
6
MNO
5
JKL
4
GHI
6
MNO
5
JKL
HL_Balance D182.book Page 65 Friday, March 26, 2010 2:11 PM
66
Identification de l'appelant
4.3 Pour modifier un nom et un numéro
4.4 Effacez une entrée dans le répertoire
5 Identification de l'appelant
Quand vous recevez un appel externe, le numéro de téléphone de l'appelant s'affiche sur l'écran du
combiné. Le téléphone peut recevoir des appels de type FSK et DTMF. Vous pouvez aussi voir le
nom de l'appelant s'il est transmis par le réseau. Si le nom est programmé dans le répertoire, c'est
le nom du répertoire qui est affiché.
Le téléphone peut mémoriser 40 appels dans la liste d'appels (reçus et manqués) que vous pouvez
consulter ultérieurement. Cette fonction n'est disponible que si vous avez demandé la fonction
d'identification de l'appelant.
Appuyez sur la touche OK si vous voulez d'abord afficher le numéro de
téléphone.
Si le numéro de téléphone compte plus de 12 chiffres, appuyez encore sur OK
pour voir le numéro complet.
3 Appuyez sur la touche Prise d'appel pour lancer l'appel.
4 Appuyez sur la touche Fin d'appel pour raccrocher ou replacez le combiné
sur sa base.
1 Accédez au menu.
2 Sélectionnez REPERTOIRE "PHONEBOOK" et validez.
3 Sélectionnez MODIFIER "MODIFY ENTRY" et validez.
4 Sélectionnez le nom à modifier et validez.
5 Effacez les caractères non voulus et saisissez le nouveau nom.
Confirmez.
6 Saisissez le nouveau numéro et validez.
7 Sélectionnez une mélodie (1-10) et validez.
1 Ouvrez le menu.
2 Sélectionnez REPERTOIRE "PHONEBOOK" et validez.
3 Sélectionnez SUPPRIMER "DELETE ENTRY" et validez.
4 Sélectionnez un nom ou saisissez la première lettre du nom et validez.
CONFIRMER "CONFIRM" s'affiche à l'écran.
5 Validez ou annulez.
Cette fonction n'est disponible que si vous avez souscrit au service de présentation
du numéro. Au besoin, veuillez prendre contact avec votre compagnie de téléphone.
L'identité de l'appelant est remplacée par la durée de l'appel après 15 secondes
de communication. Il est toujours possible d'afficher l'identité de l'appelant
après cette période en appuyant plusieurs fois sur la touche OK pour obtenir le
nom et le numéro.
4
GHI
6
MNO
5
JKL
4
GHI
6
MNO
5
JKL
HL_Balance D182.book Page 66 Friday, March 26, 2010 2:11 PM
Français
67
Identification de l'appelant
Quand la mémoire est pleine, les nouveaux appels remplacent automatiquement les plus anciens
appels conservés en mémoire.
Pour consulter la liste d'appels :
Vous pouvez effacer chaque entrée séparément :
Pour supprimer toutes les entrées en même temps :
Les nouveaux appels ou les appels manqués sont signalés par une icône
clignotante sur l'écran.
1 Appuyez sur la touche Journal des appels.
Si la liste ne contient aucun appel, l'écran affiche VIDE "EMPTY".
2 Parcourez la liste des appels. Le nom des appelants sera indiqué si celui-ci
a été envoyé par le réseau ou a été mémorisé dans le répertoire. Si vous
atteignez la fin de la liste, vous entendez un signal sonore.
Le symbole indique que l'appel a été suivi d'une réponse. Le symbole
indique que l'appel est resté sans réponse.
3 Appuyez sur la touche OK pour afficher le numéro de téléphone.
Si le numéro de téléphone compte plus de 12 chiffres, appuyez encore sur OK
pour voir le numéro complet.
4 Appuyez une nouvelle fois sur OK pour voir l'heure et la date auxquelles
l'appel a été reçu.
5 Appuyez sur la touche OK pour ajouter cette entrée dans le répertoire si elle
n'y est pas déjà stockée :
Appuyez sur OK quand l'écran affiche AJOUTER "ADD". Saisissez ou
modifiez le nom et appuyez sur OK. Saisissez ou modifiez le numéro de
téléphone et appuyez sur OK. Avec les touches Haut / Bas, sélectionnez la
mélodie (1-10) qui sera diffusée lorsque ce numéro vous appelle, puis
appuyez sur OK. L'entrée est mémorisée dans le répertoire.
6 Appuyez sur la touche Prise d'appel pour rappeler un correspondant,
lorsque son numéro de téléphone ou son nom s'affiche.
1 Parcourez jusqu'à l'appel que vous voulez effacer et effacez-le.
L'écran affiche EFFACER "DELETE".
2 Validez ou annulez.
1 Appuyez longtemps sur la touche de suppression (2 secondes).
L'écran affiche EFFACER TOUT "DELETE ALL".
2 Validez ou annulez.
HL_Balance D182.book Page 67 Friday, March 26, 2010 2:11 PM
68
Personnalisation du combiné
6 Personnalisation du combiné
6.1 Réglage du volume de sonnerie
Volume de sonnerie du combiné pour les appels internes/externes
Le volume de sonnerie du combiné peut être réglé distinctement pour les appels externes et
internes. Vous pouvez choisir parmi 5 niveaux de volume de sonnerie du combiné, voire même
couper totalement le volume.
6.2 Choix de la mélodie de la sonnerie
La base et chaque combiné peuvent chacun émettre une mélodie différente. Les combinés peuvent
sonner avec une mélodie différente selon que l'appel est interne ou externe. Vous pouvez choisir
parmi 10 mélodies de sonnerie différentes :
6.3 Activation / Désactivation des bips
Les combinés peuvent émettre un signal sonore à chaque pression de touche, quand les batteries
atteignent un niveau faible ou quand ils se trouvent hors de portée.
Touche enfoncée pour activer/désactiver le bip
Chaque programmation est confirmée à la fin par un double bip ou un simple bip
prolongé. Un double bip confirme la validation de votre choix. Un bip prolongé
signifie que la modification n'a pas été prise en compte.
Lorsque le combiné se trouve dans la base, celle-ci ne sonne pas lors d'un appel
entrant. Par conséquent, si la sonnerie du combiné est désactivée et que le combiné
se trouve dans la base, votre téléphone ne sonne plus du tout !
1 Ouvrez le menu.
2 Sélectionnez COMBINE "HANDSET" et validez.
3 Sélectionnez VOL SON INT "INT RING VOL" pour modifier le volume
interne ou sur VOL SON EXT "EXT RING VOL" pour modifier le volume
externe et validez.
4 Sélectionnez un volume (1 à 5 ou DESACTIVE "OFF").
5 Validez ou retournez au menu précédent.
1 Ouvrez le menu.
2 Sélectionnez REGLAGES "SETUP" et validez.
3 Sélectionnez COMBINE "HANDSET" et validez.
4 Sélectionnez MELODIE INT "INT MELODY" pour modifier la mélodie
interne ou sur MELODIE EXT "EXT MELODY" pour modifier la mélodie
externe et validez.
5 Sélectionnez une mélodie (1 à 10).
6 Appuyez sur OK pour confirmer ou pour revenir au menu précédent.
1 Ouvrez le menu.
2 Sélectionnez COMBINE "HANDSET" et validez.
3 Sélectionnez BIPS "BEEP" et validez.
4 Sélectionnez BIP TOUCHE "KEYTONE" et validez.
HL_Balance D182.book Page 68 Friday, March 26, 2010 2:11 PM
Français
69
Personnalisation du combiné
Niveau faible de la pile
Combiné hors de portée
6.4 Nom du combiné
Vous pouvez modifier le nom affiché sur le combiné (max. 9 caractères). Cette fonction vous
permet de personnaliser chaque combiné.
6.5 Réponse automatique
Lorsque vous recevez un appel entrant et que le combiné est sur la base, le téléphone prend
automatiquement la ligne dès qu'il est soulevé. Cette fonctionnalité est activée par défaut mais elle
peut être désactivée :
5 Sélectionnez ACTIVE "ON" pour activer ou DESACTIVE "OFF" pour
désactiver et validez.
1 Ouvrez le menu.
2 Sélectionnez COMBINE "HANDSET" et validez.
3 Sélectionnez BIPS "BEEP" et validez.
4 Sélectionnez BATT FAIBLE "LOW BATTERY" et validez.
5 Sélectionnez ACTIVE "ON" pour activer ou DESACTIVE "OFF" pour
désactiver et validez.
1 Ouvrez le menu.
2 Sélectionnez COMBINE "HANDSET" et validez.
3 Sélectionnez BIPS "BEEP" et validez.
4 Sélectionnez HORS PORTEE "OUT RANGE" et validez.
5 Sélectionnez ACTIVE "ON" pour activer ou DESACTIVE "OFF" pour
désactiver et validez.
1 Ouvrez le menu.
2 Sélectionnez COMBINE "HANDSET" et validez.
3 Sélectionnez NOM COMBINE "NAME" et validez.
4 Saisissez le nom que vous voulez et validez.
Appuyez sur la touche Effacer pour effacer un caractère. Appuyez sur la
touche du répertoire et maintenez-la enfoncée pour sortir du menu sans
prendre en compte les modifications.
1 Ouvrez le menu.
2 Sélectionnez COMBINE "HANDSET" et validez.
3 Sélectionnez REPONSE AUTO "AUTO ANSWER" et validez.
4 Sélectionnez ACTIVE "ON" pour activer ou DESACTIVE "OFF" pour
désactiver et validez.
4
GHI
6
MNO
5
JKL
HL_Balance D182.book Page 69 Friday, March 26, 2010 2:11 PM
70
Personnalisation du combiné
6.6 Réinitialisation du combiné
Il est possible de ramener le téléphone à sa configuration d'origine. Il s'agit de la configuration
définie lorsque vous avez déballé le téléphone après son achat.
Pour rétablir les paramètres par défaut :
Les paramètres par défaut sont les suivants :
Bips de batterie faible Activés
Bips d'avertissement Hors de portée Désactivés
Tonalité touche Activée
Réponse auto Activée
Mélodie interne 1
Volume interne 3
Mélodie externe 3
Volume externe 3
Volume sonore 3
Répertoire Vide
Liste Journal des appels Vide
Liste des derniers numéros composés Vide
Code PIN 0000
Mode Appel DTMF
Verrouillage du clavier Désactivé
6.7 Verrouillage du clavier
Le clavier peut être verrouillé de façon à empêcher toute modification des paramètres et toute
composition d'un numéro. L'icône s'affiche sur l'écran quand le clavier est verrouillé.
Verrouillage du clavier
Déverrouillage du clavier
6.8 Réglage de l'heure
1 Ouvrez le menu.
2 Sélectionnez RÉGLAGES "Setup" et validez.
3 Sélectionnez REGL DEFAUT "DEFAULT" et validez.
4 Saisissez le code PIN à 4 chiffres (0000 par défaut) et validez.
Le rétablissement des paramètres par défaut efface toutes les entrées du répertoire
et du journal des appels. Le code PIN est également réinitialisé à 0000.
1 Appuyez sur la touche ‘ ’et maintenez-la enfoncée pendant 3 secondes. Le
clavier est alors verrouillé.
1 Appuyez sur une touche, PRESSER "PRESS" s'affiche sur l'écran.
2 Appuyez sur la touche pendant 3 secondes.
1 Ouvrez le menu.
2 Sélectionnez DATE - HEURE "DATE - TIME" et validez.
3 Sélectionnez REGL HEURE "CLOCK SET" et validez.
4 Saisissez l'heure (format 24 h) et validez.
4
GHI
6
MNO
5
JKL
4
GHI
6
MNO
5
JKL
HL_Balance D182.book Page 70 Friday, March 26, 2010 2:11 PM
Français
71
Réglages de la base
6.9 Réglage de l'alarme
7 Réglages de la base
7.1 Réglage du volume de sonnerie
Volume de sonnerie de la base
Vous pouvez choisir parmi 5 niveaux de volume de sonnerie, voire même couper totalement le
volume.
7.2 Choix de la mélodie de la sonnerie
La base et chaque combiné peuvent chacun émettre une mélodie différente. Pour régler la mélodie
de la base :
7.3 Modification du code PIN
Certaines fonctions ne sont accessibles qu'aux utilisateurs connaissant le code PIN.
Par défaut, le code PIN est 0000. Pour modifier le code PIN :
1 Ouvrez le menu.
2 Sélectionnez DATE - HEURE "DATE - TIME" et validez.
3 Sélectionnez REGL REVEIL "ALARM SET" et validez.
4 Sélectionnez ACTIVE "ON" pour activer l'alarme et validez.
Saisissez l'heure (au format 24 heures) à laquelle l'alarme doit retentir et
validez.
OU
Sélectionnez DESACTIVE "OFF" pour éteindre l'alarme et validez.
1 Ouvrez le menu.
2 Sélectionnez REGLAGES "SETUP" et validez.
3 Sélectionnez VOLUME BASE "BASE VOLUME" et validez.
4 Sélectionnez un volume (1 à 5 ou DESACTIVE "OFF").
5 Validez ou retournez au menu précédent.
1 Ouvrez le menu.
2 Sélectionnez REGLAGES "SETUP" et validez.
3 Sélectionnez MELODIE BASE "BASE MELODY" et validez.
4 Sélectionnez une mélodie (1 à 5).
5 Validez ou retournez au menu précédent.
1 Ouvrez le menu.
2 Sélectionnez REGLAGES "SETUP" et validez.
3 Sélectionnez CODE PIN "PIN CODE" et validez.
4 Saisissez l'ancien code PIN à 4 chiffres et validez.
5 Saisissez un nouveau code PIN à 4 chiffres et validez.
6 Saisissez le nouveau code PIN une deuxième fois et validez.
4
GHI
6
MNO
5
JKL
4
GHI
6
MNO
5
JKL
4
GHI
6
MNO
5
JKL
4
GHI
6
MNO
5
JKL
HL_Balance D182.book Page 71 Friday, March 26, 2010 2:11 PM
72
Gestion de plusieurs combinés
7.4 Réglage du mode de numérotation
Il existe deux types de modes de numérotation : Numérotation DTMF/tonalités (la plus courante)
et composition à impulsions (pour des installations antérieures).
Pour changer le mode de numérotation :
7.5 Durée du Flash
Appuyez sur la touche Flash
R
(touche 7 - Figure 2C) pour utiliser certains services sur votre ligne
extérieure, tels que « appel en attente » (si ce service est proposé par votre opérateur de téléphone),
ou pour transférer les appels téléphoniques lorsque vous utilisez un autocommutateur privé
(PABX). La touche Flash
R
produit une brève interruption de la ligne. Vous pouvez régler le flash
à 100 ms ou 250 ms..
8 Gestion de plusieurs combinés
8.1 Ajout d'un nouveau combiné
Vous pouvez enregistrer de nouveaux combinés sur la base si ces combinés prennent en charge le
protocole DECT GAP.
La base peut gérer un maximum de 5 combinés. Si vous possédez déjà 5 combinés et que vous
souhaitez en ajouter un autre ou changer l'un d'eux, vous devez d'abord supprimer un combiné,
puis associer le nouvel exemplaire.
Placer la base en mode d'enregistrement :
Enregistrer le nouveau combiné :
si votre combiné supplémentaire est un Topcom Balance
1 Ouvrez le menu.
2 Sélectionnez REGLAGES "SETUP" et validez.
3 Sélectionnez NUMEROTATION "DIAL MODE" et validez.
4 Sélectionnez le mode de numérotation et validez.
1 Ouvrez le menu.
2 Sélectionnez REGLAGES "SETUP" et validez.
3 Sélectionnez la TOUCHE R "RECALL" et validez.
4 Sélectionnez REGLAGE 1 "RECALL1" pour un flash court (100 ms) ou
REGLAGE 2 "RECALL2" pour un flash long (250 ms) et validez.
Cette opération n'est nécessaire que si vous avez supprimé l'enregistrement d'un
combiné ou si vous en avez acheté un nouveau.
1 Appuyez sur la touche de recherche qui se trouve sur la base et maintenez-
la enfoncée pendant 6 secondes. La base émet alors un signal sonore.
2 Ouvrez le menu.
3 Sélectionnez DECLARER "REGISTER" et validez.
4 Sélectionnez DECL BASE "REG BASE" et validez.
5 Entrez le numéro de la base à associer au combiné (1-4) et validez. (Les
numéros clignotants sont déjà en service.)
6 Saisissez le code PIN de la base (0000 par défaut) et validez.
Le combiné se met à rechercher la base DECT. Si le combiné a localisé la base,
il affiche le numéro d'identification de la base.
4
GHI
6
MNO
5
JKL
4
GHI
6
MNO
5
JKL
HL_Balance D182.book Page 72 Friday, March 26, 2010 2:11 PM
Français
73
Gestion de plusieurs combinés
Si votre combiné correspond à un autre modèle
Après avoir lancé la procédure d'enregistrement sur la base, consultez le manuel du combiné pour
savoir comment enregistrer le combiné. Le combiné doit être compatible GAP.
L'icône et le message PAS DECLARE "NOT REG" clignotent sur l'écran quand le combiné
n'est pas associé avec la base.
Quand un combiné est associé avec une base, celle-ci lui attribue un numéro de combiné. C'est ce
numéro qui est affiché sur le combiné derrière le nom et qui doit être utilisé dans le cadre des
appels internes.
8.2 Suppression d'un combiné
Cette procédure doit être réalisée sur un combiné différent de celui que vous souhaitez supprimer.
8.3 Installation d'un combiné sur une autre base
Si vous souhaitez utiliser un combiné Topcom Balance avec une base d'un autre modèle. Assurez-
vous que le combiné est bien compatible GAP.
8.4 Sélection d'une base
Vous pouvez basculer votre combiné d'une base vers une autre. Les combinés peuvent être
enregistrés simultanément sur 4 bases au maximum. Lors de la sélection de la base, la base
actuellement sélectionnée est indiquée par un numéro de base clignotant.
7 Confirmez ou arrêtez.
Si le combiné n'a pas localisé la base, il revient en mode veille au bout de
quelques secondes. Retentez l'opération en modifiant le numéro de la base et
assurez-vous de ne pas vous trouver dans un environnement soumis à des
interférences. Au besoin, rapprochez-vous de la base.
Le Profil DECT GAP garantit uniquement le bon fonctionnement des fonctions
d'appel essentielles entre des marques ou modèles différents. Il est toujours possible
que certains services (CLIP par exemple) ne fonctionnent pas correctement.
1 Ouvrez le menu.
2 Sélectionnez REGLAGES "SETUP" et validez.
3 Sélectionnez SUPP COMBINE "DEL HANDSET" et validez.
4 Saisissez le code PIN de la base (0000 par défaut) et validez.
5 Sélectionnez le combiné à supprimer et validez.
1 Placez la base en mode d'enregistrement, consultez le manuel d'utilisation
de cette base.
2 Ouvrez le menu.
3 Sélectionnez DECLARER "REGISTER" et validez.
4 Sélectionnez DECL BASE "REG BASE" et validez.
5 Entrez le numéro de la base à associer au combiné et validez.
6 Saisissez le code PIN de la base et validez.
Le combiné se met à rechercher la base DECT. Si le combiné a localisé la base,
il affiche le numéro d'identification de la base.
7 Confirmez ou arrêtez.
4
GHI
6
MNO
5
JKL
4
GHI
6
MNO
5
JKL
4
GHI
6
MNO
5
JKL
HL_Balance D182.book Page 73 Friday, March 26, 2010 2:11 PM
74
SMS
Si vous sélectionnez AUTO "AUTO", le combiné cherchera automatiquement une autre base
lorsque vous vous trouvez hors de portée. Le combiné doit, au préalable, être enregistré
individuellement sur chaque base.
9SMS
Vous pouvez envoyer et recevoir des SMS avec votre téléphone Topcom Balance. Ce chapitre
vous explique comment utiliser la fonction SMS. Vous pouvez mémoriser jusqu'à 15 messages
SMS envoyés et reçus, comptant chacun jusqu'à 160 caractères.
9.1 Comment rédiger un SMS
La procédure est similaire à la saisie d'un nom dans le répertoire (se reporter à “3.15 Utilisation du
clavier alphanumérique”).
Pour insérer un espace, appuyez sur "1".
9.2 Envoi d'un SMS
9.3 Lecture et consultation de la liste de messages reçus (Boîte de réception)
L'écran de votre téléphone Topcom Balance indique le nombre de nouveaux messages que vous
avez reçus. Il affiche également l'icône . Le voyant SMS de la base clignote.
Un bip vous signale l'arrivée d'un nouveau message.
1 Ouvrez le menu.
2 Sélectionnez DECLARER "REGISTER" et validez.
3 Sélectionnez CHOIX BASE "SELECT BASE" et validez.
4 Sélectionnez une base ou sélectionnez AUTO "AUTO" et validez.
Si vous avez activé la sélection de base automatique et que le combiné se trouve
hors de portée de la base actuelle, il ne cherchera à s'associer à la base la plus
proche qu'en mode de veille (pas pendant une communication).
Avant d'envoyer et de recevoir des messages de texte SMS, vous devez spécifier le
numéro de téléphone du centre SMS de votre réseau pour les messages entrants et
sortants (se reporter à “ Numéros de centres de services SMS”).
1 Ouvrez le menu.
2 Sélectionnez “SMS” et validez.
3 Sélectionnez ECRIRE "WRITE" et validez.
4 Commencez à écrire votre message.
5 Saisissez le numéro de téléphone et confirmez-le pour envoyer le message.
Le SMS sera envoyé automatiquement.
Quand le nombre de nouveaux messages est affiché sur l'écran :
1 Appuyez sur la touche OK. Le numéro de téléphone du dernier message
reçu apparaît en début de liste.
Quand le nombre de nouveaux messages n'est pas affiché :
1 Ouvrez le menu.
2 Sélectionnez “SMS” et validez.
3 Sélectionnez RECEPTION "INBOX" et validez.
Le numéro de téléphone du dernier message reçu apparaît en début de liste.
4
GHI
6
MNO
5
JKL
4
GHI
6
MNO
5
JKL
HL_Balance D182.book Page 74 Friday, March 26, 2010 2:11 PM
Français
75
SMS
9.4 Utilisateurs multiples
Votre téléphone Topcom Balance vous permet d'enregistrer jusqu'à 5 combinés sur une même
base. Chaque combiné possède son propre numéro (de 1 à 5) qui est aussi le numéro de terminal
pour l'envoi de messages personnels. Tous les combinés possèdent également le numéro de
terminal standard "0". Pour recevoir des messages SMS personnels, vous devez fournir à vos
correspondants le numéro de terminal utilisateur qu'ils devront ajouter à votre numéro de
téléphone standard (voir plus loin). Par exemple, si vous possédez un deuxième combiné
(Combiné 2), celui-ci aura le numéro de terminal 2.
Si aucun numéro de terminal n'est ajouté à votre numéro de téléphone ou si vous y ajoutez
simplement "0", tous les combinés recevront ces messages.
Vous pouvez changer le numéro de terminal et opter pour un autre numéro entre 6 et 9 (se reporter
à “ Réglage du numéro de terminal”).
Réception d'un SMS personnel
Lecture d'un SMS personnel
Lors de l'arrivée d'un nouveau message, votre Topcom Balance émet un bip. L'écran affiche l'icône
et le nombre de nouveaux messages.
OU
Faites défiler les messages et appuyez sur OK pour lire le message.
Les messages dont le numéro de téléphone est précédé de * sont des messages
qui n'ont pas encore été lus.
Faites défiler le contenu du message et appuyez sur OK quand vous l'avez lu
entièrement.
Sélectionnez une des options suivantes :
Répondre "Reply" : Pour modifier le message à l'aide du clavier
alphanumérique, puis l'enregistrer.
Transférer "Forward" : Pour transmettre le message mémorisé à un autre
utilisateur. Suivez les mêmes instructions que pour l'envoi d'un message SMS
(se reporter à “9.2 Envoi d'un SMS”).
Effacer "Delete ?" : Pour effacer le message. Appuyez encore sur OK
pour
confirmer.
Détails "Details" : Pour afficher le numéro de téléphone, la date et l'heure du
message. Appuyez sur OK pour confirmer.
Appuyez sur la touche Muet pour revenir au menu de réception
Vos correspondants devront ajouter votre numéro de terminal à votre numéro de
téléphone s'ils veulent vous envoyer des SMS personnels.
Par exemple, si votre numéro de terminal personnel est "1" et que votre numéro de
téléphone est le 01.23.45.67.89, vos correspondants devront envoyer leurs SMS au
numéro 01234567891. C'est ce numéro que vous devrez vous rappeler de fournir à
vos correspondants.
Appuyez sur la touche OK.
Dans la liste des SMS, les messages privés sont signalés par une icône de
clé sur l'écran.
1 Ouvrez le menu.
2 Sélectionnez “SMS” et validez.
3 Sélectionnez SMS PRIVE “PERSONAL SMS” et validez. Le numéro de
téléphone du dernier message reçu apparaît en début de liste.
HL_Balance D182.book Page 75 Friday, March 26, 2010 2:11 PM
76
SMS
9.5 CONFIG SMS "SMS SETTINGS"
Activer/désactiver le signal d'arrivée de SMS
Votre combiné peut jouer une mélodie pour annoncer l'arrivée d'un nouveau message.
Numéros de centres de services SMS
Pour envoyer et recevoir des messages de texte SMS, vous devez spécifier le numéro de téléphone
du centre SMS de votre réseau. Ces numéros ont été pré-enregistrés dans le téléphone Topcom
Balance. Si vous supprimez accidentellement les numéros des centres de services d'EMISSION
SMS ou de RECEPTION SMS, vous devrez les ressaisir pour pouvoir profiter de votre service
SMS.
Le Topcom Balance peut mémoriser 2 numéros de centres de services d'EMISSION SMS et 2
numéros de centres de services de RECEPTION SMS.
Pour définir les numéros des centres d'émission SMS
Pour définir les numéros de centres de réception SMS
Sélection du centre pour l'envoi de SMS
Puisque vous pouvez définir 2 centres d'émission de SMS, vous devez en choisir un avant
d'envoyer vos messages :
1 Ouvrez le menu.
2 Sélectionnez “SMS” et validez.
3 Sélectionnez CONFIG SMS "SMS SETTINGS" et validez.
4 Sélectionnez ALERTE SMS “MSG ALERT” et validez.
5 Sélectionnez ACTIVE "ON' ou DESACTIVE "OFF" et validez.
6 Sélectionnez la mélodie de votre choix, confirmez-la et revenez au menu
précédent.
1 Ouvrez le menu.
2 Sélectionnez “SMS” et validez.
3 Sélectionnez CONFIG SMS "SMS SETTINGS" et validez.
4 Sélectionnez N EMISSION “SEND CENTRE” et validez.
5 Sélectionnez EMISSION 1 “SEND 1” ou EMISSION 2 “SEND 2” et
validez.
6 Saisissez le numéro de téléphone du serveur SMS.
1 Ouvrez le menu.
2 Sélectionnez “SMS” et validez.
3 Sélectionnez CONFIG SMS "SMS SETTINGS" et validez.
4 Sélectionnez N RECEPTION “RCV CENTRE” et validez.
5 Sélectionnez RECEPTION 1 “RECEIVE 1” ou RECEPTION 2
“RECEIVE 2” et validez.
6 Saisissez le numéro de téléphone du serveur SMS.
1 Ouvrez le menu.
2 Sélectionnez “SMS” et validez.
3 Sélectionnez CONFIG SMS "SMS SETTINGS" et validez.
4 Sélectionnez CHOIX SERV “SEND SERVICE” et validez.
5 Sélectionnez EMISSION 1 “SEND 1” ou EMISSION 2 “SEND 2” et
validez.
4
GHI
6
MNO
5
JKL
4
GHI
6
MNO
5
JKL
HL_Balance D182.book Page 76 Friday, March 26, 2010 2:11 PM
Français
77
Dépannage
Réglage du numéro de terminal
Chaque combiné possède un numéro de terminal "0" et le numéro de terminal correspond au
numéro de combiné (1-5). Au besoin, vous pouvez changer le numéro de terminal et opter pour un
autre numéro (6-9):
Mémoire pleine
Quand la mémoire est pleine, vous obtenez le message MEM PLEINE "MEMORY FULL" à
l'écran. Vous ne pouvez plus envoyer ou recevoir des SMS. Pour continuer à recevoir des SMS,
vous pouvez effacer certains ou tous les messages. Pour supprimer tous les messages enregistrés
dans RECEPTION "INBOX" ou SMS PRIVE "PERSONAL SMS
"
:
10 Dépannage
1 Ouvrez le menu.
2 Sélectionnez “SMS” et validez.
3 Sélectionnez CONFIG SMS "SMS SETTINGS" et validez.
4 Sélectionnez NUM DE TERM “TERMINAL NO” et validez.
5 Supprimez l'ancien numéro de terminal et saisissez le nouveau (0, 6 à 9).
6 Appuyez sur OK pour confirmer.
1 Ouvrez le menu.
2 Sélectionnez “SMS” et validez.
3 Sélectionnez CONFIG SMS "SMS SETTINGS" et validez.
4 Sélectionnez EFFACER TOUT “DELETE ALL” et validez.
5 Sélectionnez RECEPTION “INBOX” ou SMS PRIVE “PERSONAL
SMS” et validez.
6 CONFIRMER ? “CONFORM ?” s'affiche.
7 Validez ou annulez.
Symptôme Cause possible Solution
Aucun affichage Piles déchargées Vérifiez la position des piles.
Rechargez les piles.
Combiné désactivé Activez le combiné
Pas de tonalité Câble téléphonique mal
raccordé
Vérifiez la connexion du câble
téléphonique
La ligne est occupée par un
autre combiné
Attendez que l'autre combiné soit
raccroché.
L'icône clignote
Combiné hors de portée Rapprochez le combiné de la base
La base n'est pas alimentée Vérifiez le raccordement
électrique de la base
Le combiné n'est pas
enregistré sur la base
Enregistrez le combiné sur la base
La base ou le combiné ne
sonne pas
Le volume de la sonnerie est
désactivé ou faible
Réglez le volume de la sonnerie
4
GHI
6
MNO
5
JKL
HL_Balance D182.book Page 77 Friday, March 26, 2010 2:11 PM
78
Données et caractéristiques techniques
11 Données et caractéristiques techniques
12 Garantie Topcom
12.1 Période de garantie
Les appareils Topcom bénéficient d'une période de garantie de 24 mois. La période de garantie
prend effet le jour de l'achat du nouvel appareil. Il n'y a aucune garantie sur les piles standard ou
rechargeables (de type AA/AAA).
Les accessoires et les défauts qui ont un effet nuisible sur le fonctionnement ou la valeur de
l'appareil ne sont pas couverts.
La garantie s'applique uniquement sur présentation du reçu d'achat original ou une copie de celui-
ci sur lequel figurent la date de l'achat et le modèle de l'appareil.
La tonalité est bonne mais il
n'y a pas de communication
Le mode de numérotation est
incorrect
Réglez le mode de numérotation
(impulsions/tonalités)
Impossible de transférer un
appel sur PABX
Le flash est trop court ou trop
long
Modifiez le flash
Le téléphone ne répond pas
lorsque vous appuyez sur
les touches
Erreur de manipulation Retirez les piles et remettez-les en
place.
Norme
DECT
(
D
igital
E
nhanced
C
ordless
T
elecommunications)
GAP
(
G
eneric
A
ccess
P
rofile)
Plage de fréquence 1880 MHz à 1900 MHz
Nombre de canaux 120 canaux duplex
Modulation GFSK
Codage de la parole 32 kbit/s
Puissance d'émission 10 mW (puissance moyenne par canal)
Portée 300 m maximum en zone dégagée ou 10 à 50 m
maximum en intérieur
Nombre de combinés Jusqu'à 5
Alimentation de la base 230 V / 50 Hz/ 7,5 V CC 300 mA
Piles pour le combiné 2 piles rechargeables AAA, NiMh 1,2 V, 550 mAh
Autonomie du combiné 200 heures en veille
Temps de conversation avec le combiné 10 heures
Conditions normales d'utilisation +5 °C à +45 °C
Mode de numérotation Impulsion/tonalité
Durée de flash 100 ou 250 ms
Symptôme Cause possible Solution
HL_Balance D182.book Page 78 Friday, March 26, 2010 2:11 PM
Français
79
Mise au rebut de l'appareil (environnement)
12.2 Mise en œuvre de la garantie
Tout appareil défectueux doit être retourné à un centre de service après-vente Topcom,
accompagné d'un ticket d'achat valable et d'une fiche de service dûment complétée.
En cas de panne pendant la période de garantie, Topcom ou son centre de service après-vente
officiel réparera gratuitement les dysfonctionnements dus à un vice de matière ou de fabrication,
en réparant ou en remplaçant les appareils ou les pièces défectueux. En cas de remplacement, la
couleur et le modèle peuvent être différents de ceux de l'appareil acheté initialement.
La date d'achat initiale détermine le début de la période de garantie. La période de garantie n'est
pas prolongée si l'appareil est remplacé ou réparé par Topcom ou son centre de service après-vente
officiel.
12.3 Exclusions de garantie
Les dommages et les pannes causés par un mauvais traitement ou une utilisation incorrecte et les
dommages qui résultent de l'utilisation de pièces et d'accessoires non originaux ne sont pas
couverts par la garantie.
La garantie ne couvre pas les dommages causés par des éléments extérieurs tels que la foudre, l'eau
et le feu, ni les dommages provoqués par le transport.
Aucune garantie ne pourra être invoquée si le numéro de série indiqué sur les appareils a été
modifié, supprimé ou rendu illisible.
Aucune garantie ne peut non plus être invoquée si l'appareil a été réparé ou modifié par l'acheteur.
Cet appareil doit être utilisé avec des piles rechargeables uniquement. Si vous voulez remplacer
les piles fournies avec l'appareil, veuillez vérifier que les piles que vous utilisez sont adaptées et
rechargeables. N'utilisez PAS de piles alcalines dans les combinés.
Si vous utilisez des piles alcalines et que vous placez le combiné sur la base, les piles vont chauffer
et risquent d'exploser. Le fabricant ne sera pas tenu responsable des dommages provoqués et ceux
causés sur l'appareil ne seront pas pris en charge par la garantie. Toutes les réparations seront à
vos frais.
13 Mise au rebut de l'appareil (environnement)
Au terme du cycle de vie de ce produit, ne le jetez pas avec les déchets ménagers
ordinaires mais déposez-le dans un point de collecte pour le recyclage des
équipements électriques et électroniques. Le symbole indiqué sur ce produit, sur le
mode d'emploi et/ou sur la boîte est là pour vous le rappeler.
Certains matériaux qui composent le produit peuvent être réutilisés s'ils sont déposés
dans un point de recyclage. En permettant le recyclage de certaines pièces ou matières premières
de produits usagés, vous contribuez fortement à la protection de l'environnement. Pour toute
information supplémentaire sur les points de collecte dans votre région, contactez les autorités
locales.
14 Nettoyage
Nettoyez le téléphone à l'aide d'un chiffon légèrement humide ou antistatique. N'utilisez jamais de
détergents ou de solvants abrasifs.
HL_Balance D182.book Page 79 Friday, March 26, 2010 2:11 PM
80
Sicherheitshinweise
Deutsch
1 Sicherheitshinweise
Nur den mitgelieferten Anschluss für das Ladegerät verwenden. Verwenden Sie keine fremden
Ladegeräte, da die Akkuzellen beschädigt werden könnten.
Verwenden Sie nur Akkus des gleichen Typs. Verwenden Sie niemals normale,
nicht-aufladbare Batterien. Achten Sie beim Einlegen der Akkus auf die richtige Polarität
(wie im Akkufach des Geräts angegeben).
Die Lade- und Steckerkontakte nicht mit spitzen oder metallischen Gegenständen berühren.
Medizinische Geräte können in ihrer Funktion beeinflusst werden.
Das Mobilteil kann in Hörgeräten einen unangenehmen Brummton verursachen.
Stellen Sie das Basisgerät nicht in einem feuchten Raum oder in einem Abstand von weniger
als 1,5 m von einem Wasseranschluss auf. Lassen Sie kein Wasser an das Mobilteil kommen.
Verwenden Sie das Telefon nicht in Umgebungen, in denen Explosionsgefahr besteht.
Entsorgen Sie die Akkus und pflegen Sie das Telefon auf umweltfreundliche Weise.
Da bei Stromausfall das Telefonieren mit diesem Gerät nicht möglich ist, verwenden Sie bitte
im Falle eines Notrufs ein stromnetzunabhängiges Telefon, z. B. ein Handy.
2 Erste Schritte
2.1 Zum Gebrauch dieser Bedienungsanleitung
In dieser Bedienungsanleitung werden die einzelnen Bedienschritte folgendermaßen verdeutlicht:
Zu drückende Taste.
Text ....... „DISPLAY“.
Der Text, der im Display des Telefons erscheint, ist in der rechten Spalte in
Anführungszeichen dargestellt.
HL_Balance D182.book Page 80 Friday, March 26, 2010 2:11 PM
Deutsch
81
Erste Schritte
2.2 Basisstation installieren
- 2A Rückseite der Basisstation -
A. Telefonwandanschluss
B. Netzkabel
C. Telefonkabel
2.3 Mobilteil installieren
- 2B Rückseite des Mobilteils -
A. Abdeckung
B. Akkus
1 Stecken Sie das eine Ende des Netzteils in die Steckdose und das andere
Ende in die Buchse auf der Unterseite der Basisstation.
2 Verbinden Sie das eine Ende des Telefonkabels mit dem
Telefonwandanschluss und das andere Ende mit dem Anschluss auf der
Unterseite der Basisstation.
3 Befestigen Sie das Telefon- und das Netzkabel wie in Abbildung 2A
dargestellt.
1 Öffnen Sie das Akkufach wie in Abbildung 2B dargestellt.
2 Legen Sie die Akkus ein. Achten Sie dabei auf die Polarität (+ und -).
3 Schließen Sie das Akkufach.
4 Lassen Sie das Mobilteil 20 Stunden in der Basisstation.
Bevor Sie das Telefon zum ersten Mal benutzen, stellen Sie sicher, dass die Akkus
20 Stunden aufgeladen wurden. Andernfalls funktioniert das Telefon nicht optimal.
A
B
C
+
-
-
+
A
B
HL_Balance D182.book Page 81 Friday, March 26, 2010 2:11 PM
82
Erste Schritte
2.4 Tasten/LEDs
Mobilteil
1. Display
2. Wahlwiederholungs-/
Pausen-/Nach-oben-Taste
3. Menü/OK-Taste
4. Anrufliste/Nach-unten-Taste
5. Telefonbuch
6. Alphanumerische Tasten
7. INT-Taste
8. Ein-/Aus-/Flash-Taste
9. Tastatursperre
10. Freisprechtaste
11. Auflegen/Gespräch
annehmen
12. Stumm-/Löschen-/
Escape-Taste
Basisstation
13. Paging-Taste
Display
Im Standby-Modus wird die Uhrzeit und die Nummer
des Mobilteils angezeigt:
12-05 HS1
3
4
5
6
7
8
1
9
12
11
2
10
1
2
ABC
3
DEF
4
GHI
5
JKL
6
MNO
7
PQRS
8
TUV
9
WXYZ
0
#
INT
R
- 2C Mobilteil -
13
- 2D Basisstation -
- 2E Display -
HL_Balance D182.book Page 82 Friday, March 26, 2010 2:11 PM
Deutsch
83
Erste Schritte
2.5 Symbole
2.6 Durch das Menü navigieren
Das Topcom Balance verfügt über ein leicht zu bedienendes Menü-System. Jeder Menüpunkt
besteht aus einer Reihe von Unterpunkten. Die Menü-Übersicht finden Sie im folgenden
Abschnitt.
2.7 Menü-Übersicht
Gespräch angenommen; Verbindung ist
Tastatur am Mobilteil gesperrt
Externer Anruf Sie befinden sich im Telefonbuch
Interner Anruf Akku schwach
Neue Nummern in der Anrufliste Akku halbvoll
Angenommener Anruf Akku voll
Nicht angenommener Anruf Akku leer
Sie befinden sich im Me Neue Mailbox-Nachricht
Freisprechmodus aktiviert
Mobilteil innerhalb der Reichweite der
Gibt an, dass die angezeigte Nummer
länger ist als der Bildschirm
Die Antenne blinkt, wenn das Mobilteil
nicht an der Basisstation angemeldet ist
Neue SMS-Nachricht
1 Um das Hauptmenü aufzurufen, drücken Sie die Menütaste bei
eingeschaltetem Mobilteil im Standby-Modus.
2 Blättern Sie zum gewünschten Menüpunkt. Sie können die Menüpunkte in
einer Schleife durchblättern (nach der letzten Option kehren Sie zur ersten
zurück).
3 Drücken Sie die OK-Taste zum Aufrufen weiterer Unterpunkte oder zum
Bestätigen der angezeigten Einstellung.
Drücken Sie die Löschen-Taste, um zur nächsthöheren Menüebene
zurückzukehren.
Menü Untermenüpunkte
TELEFONBUCH (PHONEBOOK)
HINZUFUEGEN (ADD ENTRY)
AENDERN (MODIFY ENTRY)
LOESCHEN (DELETE ENTRY)
SMS
EINGANG (INBOX)
PERS. SMS (PERSONAL SMS)
SCHREIBEN (WRITE)
ALL LOESCHEN (DELETE ALL)
SMS EINSTELL (SMS SETTINGS)
EINSTELLUNG (SETUP)
BASIS-LAUTST (BASE VOLUME)
BASIS-MEL. (BASE MELODY)
MT-ABMELDEN (DEL HANDSET)
PIN CODE (PIN CODE)
WAHLVERF. (DIAL MODE)
WERKSEINST. (DEFAULT)
HL_Balance D182.book Page 83 Friday, March 26, 2010 2:11 PM
84
Benutzen des Telefons
3 Benutzen des Telefons
3.1 Mobilteil ein- und ausschalten
3.2 Menüsprache ändern
3.3 Einen Anruf annehmen
Gehen Sie folgendermaßen vor, um den Anruf anzunehmen:
3.4 Einen externen Anruf tätigen
Direkt wählen
MOBILTEIL (HANDSET)
TOENE (BEEP)
INT RUF LAUT (INT RING VOL)
EXT RUF LAUT (EXT RING VOL)
INT MELODIE (INT MELODY)
EXT MELODIE (EXT MELODY)
AUTO ANNAHME (AUTO ANSWER)
NAME
SPRACHE (LANGUAGE)
TASTENSPERRE (KEYLOCK?)
DATUM - ZEIT (DATE - TIME)
DATUM EINST. (DATE SET)
UHR EINST (CLOCK SET)
WECKER EINST (ALARM SET)
ANMELDEN (REGISTER)
BASIS-WAHL (SELECT BASE)
BASIS ANMELD (REG BASE)
1 Halten Sie die Ein-/Aus-Taste am Mobilteil 8 Sekunden lang gedrückt. Das
Mobilteil sucht die Basisstation.
2 Halten Sie die Ein-/Aus-Taste 8 Sekunden lang gedrückt. Die Anzeige
erlischt.
1 Rufen Sie das Menü auf.
2 Wählen Sie „MOBILTEIL (HANDSET)“ und bestätigen Sie.
3 Wählen Sie „SPRACHE (LANGUAGE)“ und bestätigen Sie.
4 Wählen Sie die gewünschte Sprache und bestätigen Sie die Auswahl.
1 Drücken Sie die Taste für Gespräch annehmen.
ODER
Nehmen Sie das Mobilteil von der Basisstation, wenn Sie die „AUTO
ANNAHME (AUTO ANSWER)“ aktiviert haben.
(Siehe “6.5 Automatische Gesprächsannahme”)
Sie sind mit Ihrem Gesprächspartner verbunden.
2 Drücken Sie die Auflegen-Taste oder stellen Sie das Mobilteil in die
Basisstation, um das Gespräch zu beenden.
1 Drücken Sie die Taste für Gespräch annehmen, um das Gespräch zu
beginnen.
2 Geben Sie die Telefonnummer ein.
3 Drücken Sie die Auflegen-Taste oder stellen Sie das Mobilteil in die
Basisstation, um das Gespräch zu beenden.
Um eine Nummer zu korrigieren, löschen Sie die eingegebenen Ziffern mit der
Löschen-Taste.
Menü Untermenüpunkte
4
GHI
6
MNO
5
JKL
HL_Balance D182.book Page 84 Friday, March 26, 2010 2:11 PM
Deutsch
85
Benutzen des Telefons
Vorwählen
3.5 Einen internen Anruf tätigen
3.6 Interne Anrufweiterleitung
Ein externes Gespräch an ein anderes Mobilteil weiterleiten.
3.7 Konferenzschaltung
Diese Funktion ist nur möglich, wenn mehrere Mobilteile an der Basisstation angemeldet sind!
Sie können gleichzeitig mit einem internen und einem externen Gesprächspartner telefonieren.
Während eines externen Gesprächs:
3.8 Freisprechmodus
Sie können mit Ihrem Gesprächspartner sprechen, ohne das Mobilteil abzunehmen.
1 Geben Sie die Telefonnummer ein.
2 Drücken Sie die Taste für Gespräch annehmen, um das Gespräch zu
beginnen.
3 Drücken Sie die Auflegen-Taste oder stellen Sie das Mobilteil in die
Basisstation, um das Gespräch zu beenden.
1 Drücken Sie die INT-Taste.
2 Geben Sie die interne Nummer des gewünschten Mobilteils ein (1 bis 5).
3 Drücken Sie die Auflegen-Taste oder stellen Sie das Mobilteil in die
Basisstation, um das Gespräch zu beenden.
1 Drücken Sie die INT-Taste.
2 Geben Sie die interne Nummer des gewünschten Mobilteils ein (1 bis 5), der
externe Anruf wird gehalten.
3 Wird das Gespräch am anderen Mobilteil angenommen, drücken Sie die
Auflegen-Taste, um aufzulegen, und das Gespräch weiterzuleiten.
Nimmt der interne Gesprächspartner den Anruf nicht an, drücken Sie die INT-
Taste erneut, um den externen Anruf zurückzuholen.
4 Drücken Sie die Auflegen-Taste oder stellen Sie das Mobilteil in die
Basisstation, um das Gespräch zu beenden.
1 Drücken Sie die INT-Taste.
2 Geben Sie die interne Nummer des gewünschten Mobilteils ein (1 bis 5).
3 Wird das Gespräch am anderen Mobilteil angenommen, halten Sie die ‚ ‘-
Taste gedrückt.
Nimmt der interne Gesprächspartner den Anruf nicht entgegen, drücken Sie
die INT-Taste erneut, um den externen Anruf zurückzuholen.
4 Drücken Sie die Auflegen-Taste oder stellen Sie das Mobilteil in die
Basisstation, um das Gespräch zu beenden.
1 Um den Freisprechmodus zu aktivieren oder zu deaktivieren, drücken Sie
während des Gesprächs die Freisprechtaste.
4
GHI
6
MNO
5
JKL
INT
4
GHI
6
MNO
5
JKL
INT
4
GHI
6
MNO
5
JKL
INT
INT
4
GHI
6
MNO
5
JKL
INT
HL_Balance D182.book Page 85 Friday, March 26, 2010 2:11 PM
86
Benutzen des Telefons
3.9 Lautstärke während eines Anrufs einstellen
3.10 Anzeige der Gesprächsdauer
Die Gesprächsdauer wird nach 15 Sekunden in Minuten und Sekunden angezeigt.
Nach Beenden eines Gesprächs wird die gesamte Gesprächsdauer 5 Sekunden lang angezeigt.
3.11 Mikrofon stummschalten
Sie können das Mikrofon während eines Gesprächs stummschalten.
3.12 Pausen-Taste
Wenn Sie eine Nummer wählen, können Sie eine Pause zwischen zwei Ziffern einfügen:
3.13 Ein Mobilteil suchen (Paging)
3.14 Wahlwiederholung
Sie können die letzten 10 gewählten Nummern erneut wählen. Wenn Sie im Telefonbuch einen
Namen mit dieser Nummer gespeichert haben, wird statt der Nummer der jeweilige Name
angezeigt.
1 Drücken Sie während eines Gesprächs die Nach-oben- oder Nach-unten-
Taste, um die Lautstärke entsprechend einzustellen.
Die Lautstärke des Freisprechmodus wird wie oben beschrieben zusammen mit dem
Empfänger im Mobilteil eingestellt.
1 Drücken Sie die Stummschalttaste. Nun können Sie sprechen, ohne von
Ihrem Gesprächspartner am Telefon gehört zu werden.
„STUMM (MUTE)“ wird angezeigt.
2 Drücken Sie die Stummschalttaste erneut, um das Mikrofon wieder zu
aktivieren.
1 Halten Sie die Taste Wahlwiederholung/Pause 2 Sekunden lang gedrückt.
1 Drücken Sie die Paging-Taste an der Basisstation.
Alle an der Basisstation angemeldeten Mobilteile klingeln.
2 Drücken Sie eine beliebige Taste am Mobilteil, um das Klingeln zu
beenden.
1 Drücken Sie die Wahlwiederholungstaste.
2 Wählen Sie eine Nummer. Wenn die Nummer im Telefonbuch gespeichert
ist, wird der Name angezeigt.
Wenn der Name angezeigt wird, können Sie mit der OK-Taste zwischen dem
Namen und der Nummer wechseln!
3 Drücken Sie die Taste für Gespräch annehmen, um das Gespräch zu
beginnen.
4 Drücken Sie die Auflegen-Taste, um in den Standby-Modus
zurückzukehren.
4
GHI
6
MNO
5
JKL
HL_Balance D182.book Page 86 Friday, March 26, 2010 2:11 PM
Deutsch
87
Telefonbuch
3.15 Die alphanumerischen Tasten verwenden
Sie können mit Ihrem Telefon auch alphanumerische Zeichen eingeben. Dies ist nützlich für die
Eingabe von Namen in das Telefonbuch, zum Benennen des Mobilteils, ...
Zur Auswahl eines Buchstabens drücken Sie die entsprechende Taste so oft wie nötig.
Drücken Sie z. B. für den Buchstaben ‚A‘ die Taste ‚2‘ einmal. Für den Buchstaben ‚B‘ drücken
Sie die Taste ‚2‘ zweimal usw.
Um die Buchstaben ‚A‘ und ‚B‘ hintereinander einzugeben, drücken Sie die Taste ‚2‘ einmal,
warten Sie, bis der Cursor zur nächsten Stelle springt, und drücken Sie dann die Taste ‚2‘ zweimal.
Die Tastatur verfügt über folgende Zeichen:
Taste Einmal Zweimal Dreimal Viermal Fünfmal
drücken drücken drücken drücken drücken
1 Leerzeichen - 1
2ABC2
3D E F 3
4GHI 4
5J K L 5
6MNO6
7P Q R S 7
8TUV8
9WXYZ9
00
4 Telefonbuch
Jedes Mobilteil kann bis zu 50 Namen und Telefonnummern speichern. Namen können bis zu
12 Zeichen und Telefonnummern bis zu 20 Ziffern lang sein.
Wie Sie alphanumerische Zeichen eingeben, erfahren Sie im Abschnitt “3.15 Die
alphanumerischen Tasten verwenden”.
4.1 So fügen Sie einen Eintrag im Telefonbuch hinzu
4.2 So rufen Sie einen Eintrag aus dem Telefonbuch an
Drücken Sie die Taste ‚1‘, um eine Leerstelle einzufügen.
Drücken Sie die Löschen-Taste, um ein Zeichen zu löschen.
1 Rufen Sie das Menü auf.
2 Wählen Sie „TELEFONBUCH (PHONEBOOK)“ und bestätigen Sie.
3 Wählen Sie „HINZUFUEGEN (ADD ENTRY)“ und bestätigen Sie.
4 Geben Sie den Namen ein und bestätigen Sie.
Drücken Sie die Telefonbuch-Taste, um das Menü ohne Änderungen zu
verlassen.
5 Geben Sie die Nummer ein und bestätigen Sie.
6 Wählen Sie eine Ruftonmelodie (1–5) und bestätigen Sie.
1 Drücken Sie die Telefonbuch-Taste.
2 Wählen Sie einen Namen oder geben Sie den ersten Buchstaben des
Namens ein. (Die Liste wird in alphabetischer Reihenfolge durchblättert.)
4
GHI
6
MNO
5
JKL
4
GHI
6
MNO
5
JKL
HL_Balance D182.book Page 87 Friday, March 26, 2010 2:11 PM
88
Anruferkennung
4.3 So ändern Sie einen Namen und eine Nummer
4.4 Einen Eintrag aus dem Telefonbuch löschen
5 Anruferkennung
Wenn Sie einen externen Anruf erhalten, wird die Telefonnummer des Anrufers im Display des
Mobilteils angezeigt. Das Telefon kann Anrufe im FSK- und DTMF-Modus empfangen. Sie
können auch den Namen sehen, wenn dieser übertragen wird. Wenn der Name im Telefonbuch
gespeichert ist, wird dieser Name im Display angezeigt.
Drücken Sie die OK-Taste, wenn Sie sich zunächst die Telefonnummer
anzeigen lassen möchten.
Ist die Telefonnummer länger als 12 Ziffern, drücken Sie die OK-Taste erneut,
um die vollständige Nummer anzuzeigen.
3 Drücken Sie die Taste für Gespräch annehmen, um das Gespräch zu
beginnen.
4 Drücken Sie die Auflegen-Taste oder stellen Sie das Mobilteil in die
Basisstation, um das Gespräch zu beenden.
1 Rufen Sie das Menü auf.
2 Wählen Sie „TELEFONBUCH (PHONEBOOK)“ und bestätigen Sie.
3 Wählen Sie „AENDERN (MODIFY ENTRY)“ und bestätigen Sie.
4 Wählen Sie den Namen, den Sie ändern möchten und bestätigen Sie.
5 Löschen Sie nicht gewünschte Zeichen und geben Sie den neuen Namen
ein.
Bestätigen Sie die Änderung.
6 Geben Sie die Nummer ein und bestätigen Sie.
7 Wählen Sie eine Ruftonmelodie (1–5) und bestätigen Sie.
1 Rufen Sie das Menü auf.
2 Wählen Sie „TELEFONBUCH (PHONEBOOK)“ und bestätigen Sie.
3 Wählen Sie „LOESCHEN (DELETE ENTRY)“ und bestätigen Sie.
4 Wählen Sie einen Namen oder geben Sie den ersten Buchstaben des
Namens ein und bestätigen Sie.
„BESTÄTIGEN (CONFIRM)“ erscheint im Display.
5 Bestätigen Sie oder brechen Sie den Vorgang ab.
Dieser Dienst muss von Ihrem Telefonnetzanbieter aktiviert werden. Bitte setzen Sie
sich mit Ihrem Netzanbieter in Verbindung.
Die Telefonnummer des Anrufers wird 15 Sekunden lang angezeigt, danach
erscheint die Gesprächsdauer im Display. Sie können sich die Telefonnummer
des Anrufers danach noch einmal anzeigen lassen, indem Sie die OK-Taste
wiederholt drücken, um nacheinander Name und Nummer anzuzeigen.
4
GHI
6
MNO
5
JKL
4
GHI
6
MNO
5
JKL
HL_Balance D182.book Page 88 Friday, March 26, 2010 2:11 PM
Deutsch
89
Anruferkennung
Das Telefon kann 40 Anrufe in der Anrufliste (entgegengenommene und entgangene Anrufe)
speichern, die Sie später anzeigen lassen können. Diese Funktion ist nur verfügbar, wenn Sie für
den Dienst Anruferkennung angemeldet sind.
Wenn der Speicher voll ist, überschreiben neue Anrufe automatisch die ältesten Einträge im
Speicher.
So zeigen Sie die Anrufliste an:
Sie können jeden Eintrag einzeln löschen:
So löschen Sie alle Einträge auf einmal:
Neue oder entgangene Anrufe werden mit einem blinkenden Symbol im
Display angezeigt.
1 Drücken Sie die Anrufliste-Taste.
Sind keine Anrufe in der Liste, wird „LEER (EMPTY)“ angezeigt.
2 Durchsuchen der Liste. Die Namen der Anrufer werden angezeigt, wenn
der Name über das Netz übertragen wird oder wenn er im Telefonbuch
gespeichert ist. Sind Sie am Ende der Liste angekommen, ertönt ein
Signalton.
Wenn angezeigt wird, wurde dieser Anruf angenommen. Wenn
angezeigt wird, wurde dieser Anruf nicht angenommen.
3 Drücken Sie die OK-Taste, um die Telefonnummer anzuzeigen.
Ist die Telefonnummer länger als 12 Ziffern, drücken Sie die OK-Taste erneut,
um die vollständige Nummer anzuzeigen.
4 Drücken Sie die OK-Taste erneut, um Uhrzeit und Datum des Anrufs
anzuzeigen.
5 Drücken Sie die OK-Taste, um diesen Eintrag dem Telefonbuch
hinzuzufügen, falls er noch nicht gespeichert wurde:
Drücken Sie OK, wenn „HINZUFUEGEN? (ADD?)“ angezeigt wird.
Geben Sie den Namen ein oder ändern Sie ihn und drücken Sie OK. Geben
Sie die Telefonnummer ein oder ändern Sie sie und drücken Sie OK.
Wählen Sie mit den Nach-oben-/Nach-unten-Tasten die Melodie (1–10),
die abgespielt werden soll, wenn diese Nummer anruft, und drücken Sie
OK. Der Eintrag wird im Telefonbuch gespeichert.
6 Drücken Sie die Taste „Gespräch annehmen“, um den Anrufer
zurückzurufen, wenn die Telefonnummer oder der Name angezeigt wird.
1 Blättern Sie zu dem Anruf, den Sie löschen möchten, und drücken Sie die
Löschen-Taste.
„LOESCHEN? (DELETE?)“ wird im Display angezeigt.
2 Bestätigen Sie oder brechen Sie den Vorgang ab.
1 Halten Sie die Löschen-Taste 2 Sekunden lang gedrückt.
„ALLE LOESCH? (DELETE ALL?)“ wird im Display angezeigt.
2 Bestätigen Sie oder brechen Sie den Vorgang ab.
HL_Balance D182.book Page 89 Friday, March 26, 2010 2:11 PM
90
Mobilteil individuell anpassen
6 Mobilteil individuell anpassen
6.1 Ruftonlautstärke anpassen
Ruftonlautstärke des Mobilteils für interne/externe Anrufe
Die Ruftonlautstärke des Mobilteils kann für interne und externe Anrufe separat eingestellt
werden. Sie können 5 Ruftonlautstärken einstellen und den Rufton ausschalten.
6.2 Ruftonmelodie wählen
Die Basisstation und jedes Mobilteil können mit unterschiedlichen Ruftonmelodien klingeln. Die
Mobilteile können mit verschiedenen Melodien klingeln, je nachdem, ob es sich um einen internen
oder externen Anruf handelt. Sie können 10 verschiedene Ruftonmelodien wählen:
6.3 Signaltöne aktiveren/deaktivieren
Das Mobilteil kann einen Signalton erzeugen, wenn eine Taste gedrückt wird, wenn die Akkus
schwach sind oder wenn sich das Mobilteil außer Reichweite befindet.
Tastenton ein/aus
Jede Programmierung wird am Ende mit einem doppelten oder einfachen langen
Signalton bestätigt. Ein doppelter Signalton bestätigt Ihre Einstellung. Ein langer
Signalton gibt an, dass die Änderung nicht vorgenommen wurde.
Befindet sich das Mobilteil auf der Basisstation, klingelt die Basisstation bei einem
ankommenden Anruf nicht. Wenn also die Ruftonlautstärke ausgeschaltet ist und sich
das Mobilteil auf der Basisstation befindet, klingelt Ihr Telefon überhaupt nicht!
1 Rufen Sie das Menü auf.
2 Wählen Sie „MOBILTEIL (HANDSET)“ und bestätigen Sie.
3 Wählen Sie „INT RUF LAUT (INT RING VOL)“, um die Lautstärke für
interne Anrufe zu ändern oder „EXT RUF LAUT (EXT RING VOL)“, um
die Lautstärke für externe Anrufe zu ändern und bestätigen Sie.
4 Wählen Sie eine Lautstärke (1 bis 5 oder „AUS (OFF)“).
5 Bestätigen Sie oder kehren Sie zum vorherigen Menüpunkt zurück.
1 Rufen Sie das Menü auf.
2 Wählen Sie „EINSTELLUNG (SETUP)“ und bestätigen Sie.
3 Wählen Sie „MOBILTEIL (HANDSET)“ und bestätigen Sie.
4 Wählen Sie „INT MELODIE (INT MELODY)“, um die Melodie für
interne Anrufe zu ändern oder „EXT MELODIE (EXT MELODY)“, um
die Melodie für externe Anrufe zu ändern und bestätigen Sie.
5 Wählen Sie eine Melodie (1 bis 10).
6 Drücken Sie die OK-Taste zum Bestätigen oder kehren Sie zum vorherigen
Menüpunkt zurück.
1 Rufen Sie das Menü auf.
2 Wählen Sie „MOBILTEIL (HANDSET)“ und bestätigen Sie.
3 Wählen Sie „TOENE (BEEP)“ und bestätigen Sie.
4 Wählen Sie „TASTENTON (KEYTONE)“ und bestätigen Sie.
HL_Balance D182.book Page 90 Friday, March 26, 2010 2:11 PM
Deutsch
91
Mobilteil individuell anpassen
Akku leer
Mobilteil außer Reichweite
6.4 Name des Mobilteils
Sie können den im Display des Mobilteils angezeigten Namen ändern (max. 9 Zeichen). Mit dieser
Funktion können Sie jedes Mobilteil personalisieren.
6.5 Automatische Gesprächsannahme
Steht das Mobilteil bei einem ankommenden Anruf auf der Basisstation, so wird das Gespräch
automatisch angenommen, sobald das Mobilteil von der Basisstation abgehoben wird. Diese
Funktion ist voreingestellt, kann jedoch geändert werden:
6.6 Mobilteil zurücksetzen
Sie können das Telefon auf die Werkseinstellungen zurücksetzen. Dies ist die Konfiguration, in
der sich das Telefon bei Lieferung befand.
So stellen Sie die Werkseinstellungen wieder her:
5 Wählen Sie „EIN (ON)“ zum Aktivieren oder „AUS (OFF)“ zum
Deaktivieren und bestätigen Sie.
1 Rufen Sie das Menü auf.
2 Wählen Sie „MOBILTEIL (HANDSET)“ und bestätigen Sie.
3 Wählen Sie „TOENE (BEEP)“ und bestätigen Sie.
4 Wählen Sie „AKKU LEER (LOW BATTERIE)“ und bestätigen Sie.
5 Wählen Sie „EIN (ON)“ zum Aktivieren oder „AUS (OFF)“ zum
Deaktivieren und bestätigen Sie.
1 Rufen Sie das Menü auf.
2 Wählen Sie „MOBILTEIL (HANDSET)“ und bestätigen Sie.
3 Wählen Sie „TOENE (BEEP)“ und bestätigen Sie.
4 Wählen Sie „REICHWEITE (OUT RANGE)“ und bestätigen Sie.
5 Wählen Sie „EIN (ON)“ zum Aktivieren oder „AUS (OFF)“ zum
Deaktivieren und bestätigen Sie.
1 Rufen Sie das Menü auf.
2 Wählen Sie „MOBILTEIL (HANDSET)“ und bestätigen Sie.
3 Wählen Sie „NAME (NAME)“ und bestätigen Sie.
4 Geben Sie den Namen ein und bestätigen Sie.
Drücken Sie die Löschen-Taste, um ein Zeichen zu löschen. Halten Sie die
Telefonbuch-Taste gedrückt, um das Menü ohne Änderungen zu verlassen.
1 Rufen Sie das Menü auf.
2 Wählen Sie „MOBILTEIL (HANDSET)“ und bestätigen Sie.
3 Wählen Sie „AUTO ANNAHME (AUTO ANSWER)“ und bestätigen Sie.
4 Wählen Sie „EIN (ON)“ zum Aktivieren oder „AUS (OFF)“ zum
Deaktivieren und bestätigen Sie.
1 Rufen Sie das Menü auf.
2 Wählen Sie „EINSTELLUNG (SETUP)“ und bestätigen Sie.
4
GHI
6
MNO
5
JKL
HL_Balance D182.book Page 91 Friday, March 26, 2010 2:11 PM
92
Mobilteil individuell anpassen
Die Voreinstellungen sind:
Signalton, wenn Akku leer Ein
Signalton, wenn außer Reichweite Aus
Tastenton Ein
Automatische Gesprächsannahme Ein
Interne Melodie 1
Interne Lautstärke 3
Externe Melodie 3
Externe Lautstärke 3
Ohr-Lautstärke 3
Telefonbuch Leer
Anrufliste Leer
Wahlwiederholungsliste Leer
PIN-Code 0000
Wahlverfahren DTMF
Tastatursperre Aus
6.7 Tastatursperre
Die Tastatur kann gesperrt werden, so dass keine Einstellungen geändert und keine
Telefonnummer gewählt werden kann. Wenn die Tastatur gesperrt ist, wird das Symbol im
Display angezeigt.
Tastatur sperren
Tastatur entsperren
6.8 Uhrzeit einstellen
6.9 Wecker einstellen
3 Wählen Sie „WERKSEINST. (DEFAULT)“ und bestätigen Sie.
4 Geben Sie den vierstelligen PIN-Code (voreingestellt 0000) ein und
bestätigen Sie.
Wenn Sie zu den Werkseinstellungen zurückkehren, werden alle Einträge im Telefonbuch
und in der Anrufliste gelöscht. Der PIN-Code wird auf 0000 zurückgesetzt.
1 Halten Sie die Taste ‚ 3 Sekunden lang gedrückt. Die Tastatur wird
gesperrt.
1 Drücken Sie eine beliebige Taste, „ DRUECKEN (PRESS )“ wird im
Display angezeigt.
2 Drücken Sie die Taste ‚ innerhalb von 3 Sekunden.
1 Rufen Sie das Menü auf.
2 Wählen Sie „DATUM - ZEIT (DATE - TIME)“ und bestätigen Sie.
3 Wählen Sie „UHR EINST (CLOCK SET)“ und bestätigen Sie.
4 Geben Sie die Uhrzeit ein (24-Std.-Format) und bestätigen Sie.
1 Rufen Sie das Menü auf.
2 Wählen Sie „DATUM - ZEIT (DATE - TIME)“ und bestätigen Sie.
3 Wählen Sie „WECKER EINST (ALARM SET)“ und bestätigen Sie.
4
GHI
6
MNO
5
JKL
4
GHI
6
MNO
5
JKL
HL_Balance D182.book Page 92 Friday, March 26, 2010 2:11 PM
Deutsch
93
Einstellungen der Basisstation
7 Einstellungen der Basisstation
7.1 Ruftonlautstärke anpassen
Ruftonlautstärke der Basisstation
Sie können 5 Ruftonlautstärken einstellen und den Rufton ausschalten.
7.2 Ruftonmelodie wählen
Die Basisstation und jedes Mobilteil können mit unterschiedlichen Ruftonmelodien klingeln. So
stellen Sie die Ruftonmelodie der Basisstation ein:
7.3 PIN-Code ändern
Einige Funktionen stehen nur zur Verfügung, wenn der Benutzer den PIN-Code kennt.
Der voreingestellte PIN-Code lautet 0000. So ändern Sie den PIN-Code:
7.4 Wahlverfahren einstellen
Es gibt zwei Wahlverfahren: DTMF/Tonwahlverfahren (das meistgenutzte) und das Impuls-
Wahlverfahren (bei älteren Anlagen).
So ändern Sie das Wahlverfahren:
4 Wählen Sie „EIN (ON)“, um den Wecker einzuschalten und bestätigen Sie.
Geben Sie die Uhrzeit (24-Std.-Format) ein, wann der Wecker klingeln soll,
und bestätigen Sie.
ODER
Wählen Sie „AUS (OFF)“, um den Wecker auszuschalten, und bestätigen
Sie.
1 Rufen Sie das Menü auf.
2 Wählen Sie „EINSTELLUNG (SETUP)“ und bestätigen Sie.
3 Wählen Sie „BASIS-LAUTST (BASE VOLUME)“ und bestätigen Sie.
4 Wählen Sie eine Lautstärke (1 bis 5 oder „AUS (OFF)“).
5 Bestätigen Sie oder kehren Sie zum vorherigen Menüpunkt zurück.
1 Rufen Sie das Menü auf.
2 Wählen Sie „EINSTELLUNG (SETUP)“ und bestätigen Sie.
3 Wählen Sie „BASIS-MELODY (BASE MELODY)“ und bestätigen Sie.
4 Wählen Sie eine Melodie (1 bis 5).
5 Bestätigen Sie oder kehren Sie zum vorherigen Menüpunkt zurück.
1 Rufen Sie das Menü auf.
2 Wählen Sie „EINSTELLUNG (SETUP)“ und bestätigen Sie.
3 Wählen Sie „PIN CODE (PIN CODE)“ und bestätigen Sie.
4 Geben Sie den alten vierstelligen PIN-Code ein und bestätigen Sie.
5 Geben Sie den neuen vierstelligen PIN-Code ein und bestätigen Sie.
6 Geben Sie den neuen PIN-Code erneut ein und bestätigen Sie.
1 Rufen Sie das Menü auf.
2 Wählen Sie „EINSTELLUNG (SETUP)“ und bestätigen Sie.
4
GHI
6
MNO
5
JKL
4
GHI
6
MNO
5
JKL
4
GHI
6
MNO
5
JKL
4
GHI
6
MNO
5
JKL
HL_Balance D182.book Page 93 Friday, March 26, 2010 2:11 PM
94
Mehrere Mobilteile verwalten
7.5 Flashzeit
Drücken Sie die Flashtaste ‚
R
‘ (Taste 7 - Abbildung 2c Mobilteil), um verschiedene Dienste wie
„Anklopfen“ (wenn dieser Dienst von Ihrem Telefonanbieter unterstützt wird) zu nutzen oder um
Anrufe weiterzuleiten, wenn Sie eine Telefonanlage (PABX) verwenden. Die Flashtaste ‚
R
unterbricht kurzzeitig die Verbindung. Sie können die Flashzeit auf 100 ms oder 250 ms
einstellen..
8 Mehrere Mobilteile verwalten
8.1 Ein neues Mobilteil hinzufügen
Sie können neue Mobilteile an der Basisstation anmelden, wenn diese Mobilteile das DECT-GAP-
Protokoll unterstützen.
Die Basisstation unterstützt bis zu 5 Mobilteile. Wenn Sie bereits 5 Mobilteile angemeldet haben
und Sie möchten ein weiteres Mobilteil hinzufügen oder ein Mobilteil wechseln, dann müssen Sie
erst ein Mobilteil abmelden, um dann das neue Mobilteil anmelden zu können.
Die Basisstation in den Anmeldemodus setzen:
Neues Mobilteil anmelden:
Wenn Ihr neues Mobilteil ein Topcom Balance ist
3 Wählen Sie „WAHLVERF. (DIAL MODE)“ und bestätigen Sie.
4 Wählen Sie das Wahlverfahren und bestätigen Sie.
1 Rufen Sie das Menü auf.
2 Wählen Sie „EINSTELLUNG (SETUP)“ und bestätigen Sie.
3 Wählen Sie „FLASHZEIT (RECALL)“ und bestätigen Sie.
4 Wählen Sie „FLASH 1 (RECALL 1)“ für eine kurze Flashzeit (100 ms)
oder „FLASH 2 (RECALL 2)“ für eine lange Flashzeit (250 ms) und
bestätigen Sie.
Diese Funktion brauchen Sie nur, wenn Sie ein Mobilteil abgemeldet oder ein neues
Mobilteil gekauft haben.
1 Halten Sie die Paging-Taste an der Basisstation 6 Sekunden lang gedrückt.
Die Basisstation erzeugt einen Signalton.
2 Rufen Sie das Menü auf.
3 Wählen Sie „ANMELDEN (REGISTER)“ und bestätigen Sie.
4 Wählen Sie „BASIS ANMELD (REG BASE)“ und bestätigen Sie.
5 Wählen Sie die Nummer der Basisstation, an der Sie das Mobilteil
anmelden möchten (1 bis 4), und bestätigen Sie. (Blinkende Nummern sind
bereits vergeben.)
6 Geben Sie den PIN-Code der Basisstation (voreingestellt 0000) ein und
bestätigen Sie.
Das Mobilteil beginnt, nach der DECT-Basisstation zu suchen. Hat das Mobilteil
die Basisstation gefunden, erscheint die Nummer der Basisstation im Display.
7 Bestätigen Sie oder brechen Sie den Vorgang ab.
4
GHI
6
MNO
5
JKL
4
GHI
6
MNO
5
JKL
HL_Balance D182.book Page 94 Friday, March 26, 2010 2:11 PM
Deutsch
95
Mehrere Mobilteile verwalten
Wenn es sich bei Ihrem Mobilteil um ein anderes Modell handelt
Nachdem Sie den Anmeldevorgang an der Basisstation gestartet haben, lesen Sie in der
Bedienungsanleitung des Mobilteils nach, wie das Mobilteil angemeldet wird. Das Mobilteil muss
GAP-kompatibel sein.
Das Symbol ‚ ‘ und „N ANGEMELD. (NOT REG)“ blinken im Display, wenn das Mobilteil
nicht an der Basisstation angemeldet wurde.
Wurde ein Mobilteil an der Basisstation angemeldet, wird ihm von der Basisstation eine
Mobilteilnummer zugewiesen. Diese Nummer wird im Display des Mobilteils hinter dem Namen
angezeigt und muss für interne Anrufe verwendet werden.
8.2 Ein Mobilteil abmelden
Die folgenden Schritte müssen Sie an einem Mobilteil durchführen, das Sie nicht abmelden
möchten.
8.3 Ein Mobilteil an einer anderen Basisstation anmelden
Wenn Sie ein Topcom Balance-Mobilteil an der Basisstation eines anderen Modells anmelden
möchten. Die Basisstation muss GAP-kompatibel sein.
Findet das Mobilteil die Basisstation nicht, kehrt es nach einigen Sekunden
wieder in den Standby-Modus zurück. Versuchen Sie es erneut und ändern Sie
die Nummer der Basisstation. Stellen Sie sicher, dass Sie sich nicht in einer
Umgebung mit Störsignalen befinden. Gehen Sie näher an die Basisstation
heran.
Nur das DECT-GAP-Profil garantiert, dass grundlegende Anruf-Funktionen
korrekt zwischen verschiedenen Marken/Typen funktionieren. Es besteht die
Möglichkeit, dass bestimmte Dienste (z. B. CLIP) nicht richtig funktionieren.
1 Rufen Sie das Menü auf.
2 Wählen Sie „EINSTELLUNG (SETUP)“ und bestätigen Sie.
3 Wählen Sie „MT-ABMELDEN (DEL HANDSET)“ und bestätigen Sie.
4 Geben Sie den PIN-Code der Basisstation (voreingestellt 0000) ein und
bestätigen Sie.
5 Wählen Sie das Mobilteil, das Sie entfernen möchten, und bestätigen Sie.
1 Setzen Sie die Basisstation in den Anmeldemodus. Lesen Sie dazu in der
Bedienungsanleitung der Basisstation.
2 Rufen Sie das Menü auf.
3 Wählen Sie „ANMELDEN (REGISTER)“ und bestätigen Sie.
4 Wählen Sie „BASIS ANMELD (REG BASE)“ und bestätigen Sie.
5 Wählen Sie die Nummer der Basisstation, an der Sie das Mobilteil
anmelden möchten, und bestätigen Sie.
6 Geben Sie den PIN-Code der Basisstation ein und bestätigen Sie.
Das Mobilteil beginnt, nach der DECT-Basisstation zu suchen. Hat das
Mobilteil die Basisstation gefunden, wird die Nummer der Basisstation
angezeigt.
7 Bestätigen Sie oder brechen Sie den Vorgang ab.
4
GHI
6
MNO
5
JKL
4
GHI
6
MNO
5
JKL
4
GHI
6
MNO
5
JKL
HL_Balance D182.book Page 95 Friday, March 26, 2010 2:11 PM
96
SMS
8.4 Eine Basisstation wählen
Sie können Ihr Mobilteil an verschiedenen Basisstationen benutzen. Die Mobilteile können an bis
zu 4 Basisstationen gleichzeitig angemeldet werden. Wenn Sie eine Basisstation auswählen, wird
die aktuell ausgewählte Basisstation durch die blinkende Nummer der Basisstation angezeigt.
Wenn Sie „AUTO (AUTO)“ wählen, sucht das Mobilteil automatisch nach einer anderen
Basisstation, wenn es sich außer Reichweite befindet. Das Mobilteil muss zunächst an allen
Basisstationen einzeln angemeldet werden.
9SMS
Mit Ihrem Topcom Balance-Telefon können Sie SMS-Berichte senden und empfangen. Dieser
Abschnitt beschreibt, wie Sie die SMS-Funktion verwenden können. Sie können insgesamt
15 gesendete und empfangene SMS mit jeweils bis zu 160 Zeichen speichern.
9.1 Eine SMS schreiben
Das Verfahren entspricht dem der Eingabe von Namen in das Telefonbuch (siehe “3.15 Die
alphanumerischen Tasten verwenden”).
Um eine Leerstelle einzugeben, drücken Sie die Taste ‚1‘.
9.2 Eine SMS senden
9.3 Liste empfangener Nachrichten (Eingang) lesen und aufrufen
Im Display Ihres Topcom Balance wird die Zahl der neuen empfangenen Nachrichten angezeigt.
erscheint im Display. Die SMS-LED an der Basisstation blinkt.
Ein Signalton zeigt an, dass Sie gerade eine neue Nachricht empfangen haben.
1 Rufen Sie das Menü auf.
2 Wählen Sie „ANMELDEN (REGISTER)“ und bestätigen Sie.
3 Wählen Sie „BASIS-WAHL (SELECT BASE)“ und bestätigen Sie.
4 Wählen Sie eine Basisstation oder „AUTO (AUTO)“ und bestätigen Sie.
Wenn Sie die Basisstation automatisch auswählen lassen und das Mobilteil außer
Reichweite der derzeitigen Basisstation gelangt, sucht das Mobilteil nur nach der
stärksten Basisstation im Standby-Modus (nicht während eines Gesprächs).
Vor dem Senden und Empfangen einer SMS, müssen Sie für ausgehende und
eingehende Nachrichten die Telefonnummer des SMS-Zentrums Ihres Netzwerkes
einstellen. (Siehe “ Nummern des SMS-Zentrums”).
1 Rufen Sie das Menü auf.
2 Wählen Sie „SMS“ und bestätigen Sie.
3 Wählen Sie „SCHREIBEN (WRITE)“ und bestätigen Sie.
4 Schreiben Sie die Nachricht und bestätigen Sie.
5 Geben Sie die Telefonnummer ein und bestätigen Sie, um die Nachricht zu
senden.
Die SMS wird automatisch versendet.
Wenn die Zahl neuer Nachrichten im Display angezeigt wird.
1 Drücken Sie die OK-Taste. Die Telefonnummer der letzten Nachricht wird
zuerst angezeigt.
4
GHI
6
MNO
5
JKL
4
GHI
6
MNO
5
JKL
HL_Balance D182.book Page 96 Friday, March 26, 2010 2:11 PM
Deutsch
97
SMS
9.4 Mehrere Benutzer
Mit Ihrem Topcom Balance-Telefon können Sie bis zu 5 Mobilteile an einer Basisstation
anmelden. Jedes Mobilteil hat eine eigene Nummer (1 bis 5), die auch die Terminalnummer ist,
um persönliche Nachrichten zu versenden. Alle Mobilteile haben auch die Standard-
Terminalnummer ‚0‘. Um persönliche SMS-Nachrichten empfangen zu können, müssen Sie Ihren
Gesprächspartnern die Terminalnummer mitteilen, die an Ihre Standard-Telefonnummer
(siehe unten) angehängt werden muss. Wenn Sie beispielsweise ein zweites Mobilteil haben
(Mobilteil 2), dann hat dieses Mobilteil die Terminalnummer 2.
Wenn keine Terminalnummer oder ‚0‘ angehängt wird, werden diese Nachrichten von allen
Mobilteilen empfangen.
Sie können für Ihre Terminalnummer zwischen den Ziffern 6 bis 9 wählen (siehe “ Wenn Sie
„AUTO (AUTO)“ wählen, sucht das Mobilteil automatisch nach einer anderen Basisstation, wenn
es sich außer Reichweite befindet. Das Mobilteil muss zunächst an allen Basisstationen einzeln
angemeldet werden.”).
Persönliche SMS empfangen
Wenn die Zahl neuer Nachrichten nicht angezeigt wird
1 Rufen Sie das Menü auf.
2 Wählen Sie „SMS“ und bestätigen Sie.
3 Wählen Sie „EINGANG (INBOX)“ und bestätigen Sie.
Die Telefonnummer der letzten Nachricht wird zuerst angezeigt.
Blättern Sie durch die Nachrichten und drücken Sie auf OK, um eine
Nachricht zu lesen.
Nachrichten mit einem ‚*‘ vor der Telefonnummer sind ungelesene
Nachrichten.
Blättern Sie durch die Nachrichten und drücken Sie auf OK, wenn Sie die
Nachricht gelesen haben.
Blättern Sie, um eine der nächsten Optionen auszuwählen:
ANTWORT (REPLY): Bearbeiten Sie die Nachricht mit den
alphanumerischen Tasten und speichern Sie sie.
WEITERLEITEN (FORWARD): Leiten Sie gespeicherte Nachrichten an
einen anderen Benutzer weiter. Folgen Sie denselben Anweisungen wie für das
Senden einer SMS (siehe “9.2 Eine SMS senden”).
LOESCHEN ? (DELETE ?): Löschen Sie die Nachricht. Drücken Sie zur
Bestätigung erneut OK.
DETAILS (DETAILS): Zur Anzeige der Telefonnummer, des Datums und der
Uhrzeit der Nachricht. Drücken Sie zur Bestätigung OK.
Drücken Sie die Stummschalttaste, um wieder zum Menü „EINGANG
(INBOX)“ zurückzukehren.
Ihre Gesprächspartner müssen Ihre Terminalnummer an Ihre Telefonnummer
anhängen, wenn sie persönliche SMS-Nachrichten senden möchten.
Falls z. B. Ihre persönliche Terminalnummer „1“ ist und Ihre Telefonnummer
123456789 lautet, müssen Ihre Gesprächspartner ihre SMS-Nachrichten an
1234567891 senden! Diese Nummer müssen Sie sich merken und Ihren
Gesprächspartnern mitteilen.
HL_Balance D182.book Page 97 Friday, March 26, 2010 2:11 PM
98
SMS
Persönliche SMS lesen
Wenn eine neue Nachricht ankommt, sendet Ihr Topcom Balance ein Signalton aus. Im Display
werden und die Anzahl der neuen Nachrichten angezeigt.
ODER
9.5 SMS-Einstellungen
An-/Abschalten des SMS-Benachrichtigungstons
Ihr Mobilteil kann eine Melodie spielen, um Sie auf den Empfang einer neuen Textnachricht
hinzuweisen.
Nummern des SMS-Zentrums
Vor dem Senden und Empfangen von SMS-Nachrichten benötigen Sie die Telefonnummer des
SMS-Zentrums Ihres Netzwerkes. Diese Nummern wurden bereits im Topcom Balance
gespeichert. Falls Sie versehentlich die Nummern des SMS-Zentrums zum SENDEN oder
EMPFANGEN von SMS-Nachrichten löschen, müssen Sie diese Nummern erneut eingeben,
damit der SMS-Dienst funktioniert.
Das Topcom Balance kann 2 Nummern des SMS-Zentrums zum Senden und 2 Nummern zum
Empfangen speichern.
So stellen Sie die Nummern des SMS-Zentrums zum Senden ein
Drücken Sie die OK-Taste.
In der SMS-Liste sind private SMS mit dem Schlüsselsymbol im
Display gekennzeichnet.
1 Rufen Sie das Menü auf.
2 Wählen Sie „SMS“ und bestätigen Sie.
3 Wählen Sie „PERS. SMS (PERSONAL SMS)“ und bestätigen Sie.
Die Telefonnummer der letzten Nachricht wird zuerst angezeigt.
1 Rufen Sie das Menü auf.
2 Wählen Sie „SMS“ und bestätigen Sie.
3 Wählen Sie „SMS EINSTELL (SMS SETTINGS)“ und bestätigen Sie.
4 Wählen Sie „SMS TON (MSG ALERT)“ und bestätigen Sie.
5 Wählen Sie „EIN (ON)“ oder „AUS (OFF)“ und bestätigen Sie die
Auswahl
6 Wählen Sie die gewünschte Melodie und kehren Sie zum vorherigen Menü
zurück.
1 Rufen Sie das Menü auf.
2 Wählen Sie „SMS“ und bestätigen Sie.
3 Wählen Sie „SMS EINSTELL (SMS SETTINGS)“ und bestätigen Sie.
4 Wählen Sie „SENDEZENTR. (SEND CENTRE)“ und bestätigen Sie die
Auswahl.
5 Wählen Sie „SENDEN 1 (SEND 1)“ oder „SENDEN 2 (SEND 2)“ und
bestätigen Sie.
6 Geben Sie die Telefonnummer des SMS-Zentrums ein
4
GHI
6
MNO
5
JKL
HL_Balance D182.book Page 98 Friday, March 26, 2010 2:11 PM
Deutsch
99
SMS
So stellen Sie die Nummern des SMS-Zentrums zum Empfangen ein
Wählen Sie das SMS-Zentrum, um eine SMS zu senden
Da Sie 2 SMS-Zentren zum Senden einstellen können, müssen Sie eins davon auswählen, bevor
Sie Nachrichten senden:
Einstellen der Terminalnummer
Jedes Mobilteil hat die Terminalnummer ‚0‘ und die Terminalnummer = Mobilteilnummer
(1 bis 5). Sie können ggf. die Terminalnummer auf die Zahlen 6 bis 9 ändern:
Speicher voll
Wenn der Speicher voll ist, wird im Display „SPEICH. VOLL (MEMORY FULL)“ angezeigt. Sie
können keine SMS mehr senden oder empfangen. Um weiterhin SMS zu empfangen, können Sie
einige oder alle Nachrichten löschen. So löschen Sie alle Nachrichten im „EINGANG (INBOX)“
oder unter „PERS. SMS (PERSONAL SMS)“:
1 Rufen Sie das Menü auf.
2 Wählen Sie „SMS“ und bestätigen Sie.
3 Wählen Sie „SMS EINSTELL (SMS SETTINGS)“ und bestätigen Sie.
4 Wählen Sie „SEMPFANGSZEN. (RCV CENTRE)“ und bestätigen Sie die
Auswahl.
5 Wählen Sie „EMPFANGEN 1 (RECEIVE 1)“ oder „EMPFANGEN 2
(RECEIVE 2)“ und bestätigen Sie.
6 Geben Sie die Telefonnummer des SMS-Zentrums ein
1 Rufen Sie das Menü auf.
2 Wählen Sie „SMS“ und bestätigen Sie.
3 Wählen Sie „SMS EINSTELL (SMS SETTINGS)“ und bestätigen Sie.
4 Wählen Sie „SERVICEZENT. (SEND SERVICE)“ und bestätigen Sie die
Auswahl.
5 Wählen Sie „SENDEN 1 (SEND 1)“ oder „SENDEN 2 (SEND 2)“ und
bestätigen Sie.
1 Rufen Sie das Menü auf.
2 Wählen Sie „SMS“ und bestätigen Sie.
3 Wählen Sie „SMS EINSTELL (SMS SETTINGS)“ und bestätigen Sie.
4 Wählen Sie „TERMINALNR. (TERMINAL NO)“ und bestätigen Sie.
5 Löschen Sie die alte Terminalnummer und geben Sie die neue ein
(0 oder 6 bis 9).
6 Drücken Sie zur Bestätigung OK.
1 Rufen Sie das Menü auf.
2 Wählen Sie „SMS“ und bestätigen Sie.
3 Wählen Sie „SMS EINSTELL (SMS SETTINGS)“ und bestätigen Sie.
4 Wählen Sie „ALL LOESCHEN (DELETE ALL)“ und bestätigen Sie.
5 Wählen Sie „EINGANG (INBOX)“ oder „PERS. SMS (PERSONAL
SMS)“ und bestätigen Sie.
6 „BESTAETIGEN (CONFORM ?)“ wird angezeigt.
7 Bestätigen Sie oder brechen Sie den Vorgang ab.
4
GHI
6
MNO
5
JKL
4
GHI
6
MNO
5
JKL
HL_Balance D182.book Page 99 Friday, March 26, 2010 2:11 PM
100
Problembeseitigung
10 Problembeseitigung
11 Technische Daten
Störung Mögliche Ursache Lösung
Kein Display Akkus nicht geladen Position der Akkus überprüfen
Akkus aufladen
Mobilteil ist ausgeschaltet Mobilteil einschalten
Kein Ton Telefonkabel nicht richtig
angeschlossen
Verbindung des Telefonkabels
überprüfen
Die Leitung ist von einem
anderen Mobilteil besetzt
Warten, bis das andere Mobilteil
aufgelegt wird
Das Symbol blinkt
Mobilteil außer Reichweite Mobilteil in die Reichweite der
Basisstation bringen
Die Basisstation hat keine
Stromzufuhr
Stromverbindung zur Basisstation
überprüfen
Das Mobilteil ist nicht an der
Basisstation angemeldet
Mobilteil an der Basisstation
anmelden
Basisstation oder Mobilteil
klingeln nicht
Die Ruftonlautstärke ist
ausgeschaltet oder zu leise
Ruftonlautstärke anpassen
Der Ton ist gut, aber es besteht
keine Verbindung
Falscher Wählmodus Wählmodus (Impuls/Ton)
einstellen
Es ist nicht möglich, einen
Anruf auf PABX weiterzuleiten
Die Flashzeit ist zu kurz oder zu
lang
Flashzeit ändern
Das Telefon reagiert nicht auf
Tastendrücke
Bedienfehler Akkus herausnehmen und wieder
einsetzen
Standard DECT (Digital Enhanced Cordless Telecommunications)
GAP (Generic Access Profile)
Frequenzbereich 1.880 MHz bis 1.900 MHz
Anzahl der Kanäle 120 Duplexkanäle
Modulation GFSK
Codiergeschwindigkeit 32 Kbit/s
Emissionsleistung 10 mW (durchschnittliche Leistung pro Kanal)
Reichweite maximal 300 m im freien Gelände/10 bis 50 m im Gebäude
Anzahl der Mobilteile Bis zu 5
Stromversorgung der Basisstation 230 V/50 Hz/7,5V DC 300 mA
Mobilteil-Akkus 2 Akkus AAA, NiMh 1,2 V, 550 mAh
Mobilteil-Bereitschaft 200 Stunden im Standby-Modus
Mobilteil-Sprechzeit 10 Stunden
Unter normalen Gebrauchsbedingungen +5 °C bis + 45 °C
Wahlverfahren Impuls/Ton
Flashzeit 100 oder 250 ms
HL_Balance D182.book Page 100 Friday, March 26, 2010 2:11 PM
Deutsch
101
Topcom-Garantie
12 Topcom-Garantie
12.1 Garantiezeit
Topcom-Geräte haben eine 24-monatige Garantiezeit. Die Garantiezeit beginnt an dem Tag, an
dem das neue Gerät erworben wird. Die Garantie gilt nicht für normale Batterien oder Akkus
(Typen AA/AAA).
Verbrauchsmaterialien und Schäden, die unbedeutende Auswirkungen auf den Betrieb oder den
Wert des Geräts haben, sind nicht abgedeckt. Der Garantieanspruch muss durch Vorlage des
Originalkaufbelegs oder einer Kopie des Kaufbelegs, aus dem das Kaufdatum und das
Gerätemodell ersichtlich sind, nachgewiesen werden.
12.2 Garantieabwicklung
Senden Sie das fehlerhafte Gerät mit dem gültigen Kaufbeleg und einer ausgefüllten Service-
Karte an ein Topcom Service-Zentrum.
Tritt ein Gerätefehler innerhalb der Garantiezeit auf, übernimmt Topcom oder ein autorisiertes
Service-Zentrum unentgeltlich die Reparatur jedes durch einen Material- oder Herstellungsfehler
aufgetretenen Defekts mittels Reparatur oder Austausch des fehlerhaften Geräts oder von Teilen
des fehlerhaften Geräts. Im Falle eines Austauschs können die Farbe und das Modell von dem
ursprünglich erworbenen Gerät abweichen.
Das ursprüngliche Kaufdatum legt den Beginn der Garantiezeit fest. Die Garantiezeit verlängert
sich nicht, wenn das Gerät von Topcom oder einem seiner autorisierten Service-Zentren
ausgetauscht oder repariert wird.
12.3 Garantieausschlüsse
Schäden oder Defekte, die durch unsachgemäße Handhabung oder unsachgemäßen Betrieb
verursacht werden, sowie Defekte, die durch die Verwendung von Nicht-Originalteilen oder -
zubehör entstehen, fallen nicht unter die Garantie.
Die Garantie deckt weder Schäden durch äußere Einflüsse, wie Blitzschlag, Wasser und Feuer,
noch Transportschäden ab.
Wenn die Seriennummer des Geräts verändert, entfernt oder unleserlich gemacht wurde, kann
keine Garantie in Anspruch genommen werden. Alle Garantieansprüche erlöschen, wenn das
Gerät vom Käufer repariert, verändert oder umgebaut wurde.
13 Entsorgung des Geräts (Umweltschutz)
Verbrauchte und defekte Geräte sollten Sie nicht in den normalen Hausmüll werfen,
sondern an einer Sammelstelle für die Aufbereitung von elektrischen und
elektronischen Geräten abgeben. Das Symbol am Gerät, in der Bedienungsanleitung
und/oder auf der Verpackung weist darauf hin.
Einige der Materialien des Geräts können wiederverwertet werden, wenn man sie an
einer Aufbereitungsstelle abgibt. Mit der Wiederverwertung einiger Teile oder Rohmaterialien aus
gebrauchten Produkten liefern Sie einen wichtigen Beitrag zum Umweltschutz. Wenden Sie sich
bitte an Ihre Behörden vor Ort, wenn Sie weitere Informationen über die Sammelstellen in Ihrer
Umgebung benötigen.
14 Reinigung
Reinigen Sie das Telefon mit einem leicht feuchten Lappen oder mit einem antistatischen Tuch.
Verwenden Sie niemals Reinigungs- oder Scheuermittel.
HL_Balance D182.book Page 101 Friday, March 26, 2010 2:11 PM
102
Instrucciones de seguridad
Español
1 Instrucciones de seguridad
Utilice solo el cargador suministrado. El uso de otros cargadores podría dañar las pilas.
Inserte solo pilas recargables del mismo tipo. No use nunca pilas normales no recargables.
Introduzca las pilas recargables de manera que conecten con los polos correctos (indicados en
el compartimiento de las pilas del aparato).
No toque los contactos del cargador ni del enchufe con objetos afilados o metálicos.
El funcionamiento de ciertos dispositivos médicos podría verse afectado.
El teléfono puede causar un desagradable zumbido en audífonos.
No ponga la unidad base en una habitación húmeda o a menos de 1,5 m de una fuente de agua.
Mantenga el teléfono lejos del agua.
No use el teléfono en lugares donde haya riesgo de explosiones.
Tire las pilas y realice el mantenimiento del teléfono de manera respetuosa con el medio
ambiente.
Dado que este teléfono no se puede utilizar en caso de corte del suministro eléctrico, para
realizar llamadas de emergencia debería emplearse un teléfono independiente de la red eléctrica
como, por ejemplo, un teléfono móvil.
2Introducción
2.1 Uso del manual del usuario
En este manual del usuario, se utiliza el siguiente método para aclarar las instrucciones:
Tecla que debe pulsarse.
Texto....... «PANTALLA».
El texto que aparece en la pantalla del teléfono se muestra en la columna de la
derecha entre comillas.
HL_Balance D182.book Page 102 Friday, March 26, 2010 2:11 PM
Español
103
Introducción
2.2 Instalación de la base
- 2A Vista trasera de la base -
A. Roseta de teléfono
B. Cable de alimentación
C. Cable de teléfono
2.3 Instalación del terminal
- 2B Vista trasera del terminal -
A. Tapa
B. Pilas recargables
1 Conecte un extremo del adaptador de corriente a un enchufe y el otro
extremo a la conexión situada en la parte inferior de la base (B).
2 Conecte un extremo del cable de teléfono a la roseta de teléfono situada en
la pared (A) y el otro extremo a la conexión situada en la parte inferior de
la base (C).
3 Coloque el cable telefónico y el cable de alimentación de CA en las guías
de la base, tal y como se muestra en la imagen 2A.
1 Abra el compartimiento de las pilas tal y como se muestra en la imagen 2B.
2 Inserte las pilas respetando la polaridad (+ y -).
3 Cierre el compartimiento de las pilas.
4 Deje el terminal en la unidad base durante 20 horas.
Antes de utilizar el teléfono por primera vez, debe asegurarse de que las pilas han
estado cargándose durante 20 horas. De lo contrario, el teléfono no funcionará
correctamente.
A
B
C
+
-
-
+
A
B
HL_Balance D182.book Page 103 Friday, March 26, 2010 2:11 PM
104
Introducción
2.4 Teclas/Pantalla
Terminal
1. Pantalla
2. Tecla Rellamada / Pausa /
Arriba
3. Tecla Menú / OK
4. Tecla de registro de llamadas
/ Abajo
5. Tecla Agenda
6. Teclas alfanuméricas
7. Tecla INT
8. Tecla Activar / Desactivar /
Flash
9. Bloqueo del teclado
10. Tecla de manos libres
11. Tecla Colgar / Descolgar
12. Tecla Secreto / Borrar / Esc
Base
13. Tecla Búsqueda
Pantalla
En modo de espera, la pantalla muestra la hora y el
número de terminal:
12-05 1
3
4
5
6
7
8
1
9
12
11
2
10
1
2
ABC
3
DEF
4
GHI
5
JKL
6
MNO
7
PQRS
8
TUV
9
WXYZ
0
#
INT
R
- 2C Terminal -
13
- 2D Base -
- 2E Pantalla -
HL_Balance D182.book Page 104 Friday, March 26, 2010 2:11 PM
Español
105
Introducción
2.5 Símbolos
2.6 Navegación por el menú
El Topcom Balance cuenta con un sistema de menús muy fácil de usar. Cada uno de los menús
lleva a una lista de opciones. La estructura de menús se muestra a continuación.
2.7 Vista general de los menús
Descolgar; en línea Teclado de terminal bloqueado
Llamada externa Agenda
Llamada interna La pila se está agotando.
Números nuevos en la lista de llamadas Batería media
Llamada contestada Batería llena
Llamada no contestada Batería agotada
Menú Nuevo mensaje de voz
Manos libres Terminal dentro del alcance de la base
El número mostrado es más largo que la
pantalla (12 dígitos).
La antena parpadea cuando el terminal
no está registrado en la base.
Mensaje SMS nuevo
1 Cuando el terminal esté encendido y en modo de espera, pulse la tecla Menú
para abrir el menú principal.
2 Desplácese hasta la opción del menú deseada. Las opciones del menú se
recorren en un ciclo cerrado (es decir, se regresa a la primera tras alcanzar
la última).
3 Pulse la tecla OK para ver más opciones o para confirmar el ajuste mostrado.
Pulse la tecla Borrar para regresar al nivel anterior del menú.
Menú Opciones del submenú
AGENDA (PHONEBOOK)
GRABAR (ADD ENTRY)
MODIFICAR (MODIFY ENTRY)
BORRAR (DELETE ENTRY)
MENSAJES (SMS)
B. COMÚN (INBOX)
B. ENTRADA (PERSONAL SMS)
ESCRIBIR (WRITE)
BORRAR TODO (DELETE ALL)
CONFIGURAR (SMS SETTINGS)
CONFIGURAR (SETUP)
VOLUMEN BASE (BASE VOLUME)
MELODIA BASE (BASE MELODY)
DESINST TERM (DEL HANDSET)
CODIGO PIN (PIN CODE)
MODO MARCAR (DIAL MODE)
FLASH (RECALL)
VAL DEFECTO (DEFAULT)
HL_Balance D182.book Page 105 Friday, March 26, 2010 2:11 PM
106
Uso del teléfono
3 Uso del teléfono
3.1 Activación / desactivación del terminal
3.2 Cambio del idioma de los menús
3.3 Recepción de una llamada telefónica
Para contestar a la llamada:
3.4 Realización de una llamada telefónica externa
Marcación directa
TERMINAL (HANDSET)
TONOS (BEEP)
VOL TIMB INT (INT RING VOL)
VOL TIMB EXT (EXT RING VOL)
MELODIA INT (INT MELODY)
MELODIA EXT (EXT MELODY)
DESC AUTOM (AUTO ANSWER)
NOMBRE (NAME)
IDIOMA (LANGUAGE)
TECL BLOQ? (KEYLOCK?)
FECHA - HORA (DATE - TIME)
AJUSTE FECHA (DATE SET)
CONF RELOJ (CLOCK SET)
CONF ALARMA (ALARM SET)
INSTALAR (REGISTER)
SELECC BASE (SELECT BASE)
INSTAL BASE (REG BASE)
1 Mantenga presionada la tecla Activar / Desactivar del terminal durante
8 segundos. El terminal buscará la base.
2 Mantenga presionada la tecla Activar / Desactivar durante 8 segundos. La
pantalla se apagará.
1 Acceda al menú.
2 Seleccione «TERMINAL» («HANDSET») y confirme la selección.
3 Seleccione «IDIOMA» («LANGUAGE») y confirme la selección.
4 Seleccione un idioma y confirme la selección.
1 Pulse la tecla Descolgar.
O
Saque el terminal de la base si ha activado la opción «DESC AUTOM»
(«AUTO ANSWER») (véase “6.5 Contestación automática”).
Ya puede comunicarse con el interlocutor.
2 Pulse la tecla Colgar para finalizar la llamada o coloque el terminal otra vez
en la base.
1 Pulse la tecla Descolgar para iniciar la llamada.
2 Marque el número de teléfono.
3 Pulse la tecla Colgar para finalizar la llamada o coloque el terminal otra vez
en la base.
Para corregir un número utilice la tecla Borrar para borrar el dígito introducido.
Menú Opciones del submenú
4
GHI
6
MNO
5
JKL
HL_Balance D182.book Page 106 Friday, March 26, 2010 2:11 PM
Español
107
Uso del teléfono
Premarcación
3.5 Realización de una llamada telefónica interna
3.6 Transferencia interna de una llamada
Para transferir una llamada externa a otro terminal.
3.7 Conferencia
Solo es posible cuando hay más de un terminal registrados en la base.
Puede conversar a la vez con un interlocutor interno y uno externo.
Durante una llamada externa:
3.8 Modo manos libres
Ahora podrá hablar con su interlocutor sin tener que coger el auricular.
1 Marque el número de teléfono.
2 Pulse la tecla Descolgar para iniciar la llamada.
3 Pulse la tecla Colgar para finalizar la llamada o coloque el terminal otra vez
en la base.
1 Pulse la tecla de llamada interna.
2 Introduzca el número del terminal interno (del 1 al 5).
3 Pulse la tecla Colgar para finalizar la llamada o coloque el terminal otra vez
en la base.
1 Pulse la tecla de llamada interna.
2 Introduzca el número del terminal interno (del 1 al 5); la llamada externa se
pondrá en espera.
3 Cuando el usuario del otro terminal descuelgue, pulse la tecla Colgar para
colgar y transferir la llamada.
Si el interlocutor interno no descuelga, vuelva a pulsar la tecla de llamada
interna para volver a comunicar con el interlocutor externo en línea.
4 Pulse la tecla Colgar para finalizar la llamada o coloque el terminal otra vez
en la base.
1 Pulse la tecla de llamada interna.
2 Introduzca el número del terminal interno (del 1 al 5).
3 Cuando el usuario del otro terminal descuelgue, presione la tecla « ».
Si el interlocutor interno no descuelga, vuelva a pulsar la tecla de llamada
interna para volver a comunicar con el interlocutor externo en línea.
4 Pulse la tecla Colgar para finalizar la llamada o coloque el terminal otra vez
en la base.
1 Presione la tecla de manos libres durante la llamada para activar o
desactivar el modo manos libres.
4
GHI
6
MNO
5
JKL
INT
4
GHI
6
MNO
5
JKL
INT
4
GHI
6
MNO
5
JKL
INT
INT
4
GHI
6
MNO
5
JKL
INT
HL_Balance D182.book Page 107 Friday, March 26, 2010 2:11 PM
108
Uso del teléfono
3.9 Volumen del altavoz durante la llamada
3.10 Visualización de la duración de una llamada
La duración de la llamada se mostrará pasados 15 segundos, en minutos - segundos.
Al final de cada llamada, la duración total se mostrará durante 5 segundos.
3.11 Micrófono silenciado
Cabe la posibilidad de silenciar el micrófono durante una conversación.
3.12 Tecla Pausa
Cuando marque un número, puede añadir una pausa entre dos dígitos:
3.13 Localización de un terminal (función de búsqueda)
3.14 Memoria de rellamada
Puede volver a marcar como máximo los 10 últimos números a los que haya llamado. Si ha
guardado un nombre en la agenda junto con el número, aparecerá el nombre en lugar del número.
3.15 Uso de las teclas alfanuméricas
Con su teléfono, también puede introducir caracteres alfanuméricos. Esto resulta útil a la hora de
introducir un nombre en la agenda, dar un nombre al terminal, etcétera.
Para seleccionar una letra, pulse la tecla correspondiente las veces que sea necesario.
Por ejemplo, para seleccionar la «A», pulse «2» una vez. Para seleccionar la «B» pulse «2» dos
veces, y así sucesivamente.
1 En el transcurso de una conversación, pulse la tecla Arriba o Abajo para
subir o bajar el volumen.
El volumen de manos libres se ajusta con el receptor del auricular del modo
descrito anteriormente.
1 Pulse la tecla de secreto. Puede hablar libremente sin que le oiga la persona
que llama.
Se mostrará «SECRETO» («MUTE»).
2 Vuelva a pulsar la tecla de secreto para regresar al modo normal.
1 Pulse la tecla Rellamada / Pausa durante 2 segundos.
1 Pulse la tecla Búsqueda de la unidad base.
Todos los terminales registrados en la base sonarán.
2 Pulse cualquier tecla del terminal para detener la señal sonora.
1 Pulse la tecla Rellamada.
2 Seleccione un número. Si el número está en la agenda, aparecerá el nombre.
Cuando se muestre el nombre, puede alternar entre el nombre y el número
pulsando la tecla OK.
3 Pulse la tecla Descolgar para iniciar la llamada.
4 Pulse la tecla Colgar para regresar al modo de espera.
4
GHI
6
MNO
5
JKL
HL_Balance D182.book Page 108 Friday, March 26, 2010 2:11 PM
Español
109
Agenda (Phonebook)
Para seleccionar «A» y «B» consecutivamente pulse «2» una vez, espere a que el cursor se
desplace al siguiente carácter y pulse «2» dos veces.
Los caracteres del teclado son los siguientes:
Tecla Primera Segunda Tercera Cuarta Quinta
pulsación pulsación pulsación pulsación pulsación
1espacio- 1
2A B C 2
3D E F 3
4G H I 4
5J K L 5
6M N O 6
7P Q R S 7
8T U V 8
9W X Y Z 9
00
4 Agenda (Phonebook)
Cada terminal puede almacenar hasta 50 nombres y números de teléfono. Los nombres pueden
tener un máximo de 12 caracteres y los números pueden contener hasta 20 dígitos.
Para introducir caracteres alfanuméricos, consulte la sección “3.15 Uso de las teclas
alfanuméricas”.
4.1 Grabación de una entrada en la agenda
4.2 Marcación de una entrada de la agenda
Para seleccionar un espacio, pulse «1».
Pulse la tecla Borrar para borrar un carácter.
1 Acceda al menú.
2 Seleccione «AGENDA» («PHONEBOOK») y confirme la selección.
3 Seleccione «GRABAR» («ADD ENTRY») y confirme la selección.
4 Escriba el nombre y confírmelo.
Pulse la tecla Agenda para salir del menú sin grabar ninguna modificación.
5 Escriba el número y confírmelo.
6 Seleccione una melodía de timbre (1-10) y confirme la selección.
1 Presione la tecla de agenda.
2 Seleccione un nombre o introduzca la primera letra de este (la lista está en
orden alfabético).
Pulse la tecla OK si desea ver primero el número de teléfono.
Si el número de teléfono tiene más de 12 dígitos, vuelva a pulsar la tecla OK
para ver el número completo.
3 Pulse la tecla Descolgar para iniciar la llamada.
4 Pulse la tecla Colgar para finalizar la llamada o coloque el terminal otra vez
en la base.
4
GHI
6
MNO
5
JKL
4
GHI
6
MNO
5
JKL
HL_Balance D182.book Page 109 Friday, March 26, 2010 2:11 PM
110
Identificación de llamadas
4.3 Modificación de un nombre y un número
4.4 Eliminación de una entrada de la agenda
5 Identificación de llamadas
Cuando reciba una llamada externa, el número de teléfono de la persona que llama aparecerá en
la pantalla del terminal. El teléfono puede recibir llamadas tanto en FSK como en DTMF. También
puede ver el nombre de la persona que le llama si la red lo transmite. Si el nombre está programado
en la agenda, aparecerá el nombre que figura en ella.
El teléfono puede guardar 40 llamadas en una lista de llamadas (recibidas y perdidas) que puede
visualizar más tarde. Esta función solo está disponible si ha contratado el servicio de identificación
de llamadas.
Cuando la memoria está llena, las llamadas nuevas sustituyen automáticamente a las antiguas en
la memoria.
Para consultar la lista de llamadas:
1 Acceda al menú.
2 Seleccione «AGENDA» («PHONEBOOK») y confirme la selección.
3 Seleccione «MODIFICAR» («MODIFY ENTRY») y confirme la
selección.
4 Seleccione el nombre que desee modificar y confirme la selección.
5 Borre los caracteres no deseados e introduzca el nombre nuevo.
Confírmelo.
6 Escriba el número nuevo y confírmelo.
7 Seleccione una melodía de timbre (1-10) y confirme la selección.
1 Acceda al menú.
2 Seleccione «AGENDA» («PHONEBOOK») y confirme la selección.
3 Seleccione «BORRAR» («DELETE ENTRY») y confirme la selección.
4 Seleccione un nombre o introduzca la primera letra del nombre y confirme
la selección.
En la pantalla aparecerá «CONFIRMAR?» («CONFIRM?»).
5 Confirme o cancele la selección.
Este servicio solo funciona si ha contratado el servicio de identificación de
llamadas. Para ello, póngase en contacto con su compañía telefónica.
La visualización de la identificación de la llamada se sustituye por la de la
duración de la llamada al cabo de 15 segundos de comunicación. Cabe la
posibilidad de visualizar la identificación de la llamada transcurrido este tiempo
pulsando la tecla OK repetidamente para obtener el nombre y el número.
Las llamadas recibidas o perdidas nuevas se señalizan con un icono
parpadeante en la pantalla.
1 Presione la tecla Registro de llamadas.
Si no hay llamadas en la lista, aparecerá «VACÍO» («EMPTY»).
4
GHI
6
MNO
5
JKL
4
GHI
6
MNO
5
JKL
HL_Balance D182.book Page 110 Friday, March 26, 2010 2:11 PM
Español
111
Personalización del terminal
Puede borrar cada entrada por separado:
Para eliminar todas las entradas a la vez:
6 Personalización del terminal
6.1 Ajuste del volumen del timbre
Volumen del timbre del terminal para llamadas internas / externas
El volumen del timbre del terminal para llamadas internas o externas puede ajustarse por separado.
Puede elegir entre 5 volúmenes de timbre diferentes, además de la opción «VOLUMEN NULO»
(«VOLUME OFF»).
2 Desplácese por las llamadas. Los nombres de las personas que llaman se
mostrarán si los envía la red o están guardados en la agenda. Si alcanza el
final de la lista oirá un pitido.
El icono indica que se ha contestado a la llamada. El icono indica que
no se ha contestado a la llamada.
3 Pulse la tecla OK para ver el número de teléfono.
Si el número de teléfono tiene más de 12 dígitos, vuelva a pulsar la tecla OK
para ver el número completo.
4 Vuelva a pulsar la tecla OK para ver la hora y la fecha de recepción de la
llamada.
5 Pulse la tecla OK para grabar esta entrada en la agenda si aún no está
almacenada:
Pulse OK cuando se muestre «GRABAR?» («ADD?») en la pantalla.
Introduzca o modifique el nombre y pulse OK. Introduzca o modifique el
número de teléfono y pulse OK. Seleccione mediante las teclas
Arriba / Abajo la melodía (1-10) que se oirá cuando reciba una llamada de
este número y pulse OK. La entrada se guardará en la agenda.
6 Pulse la tecla Descolgar para devolver la llamada a un interlocutor, cuando
se muestren su nombre o número de teléfono.
1 Desplácese a la llamada que quiere borrar y bórrela.
En la pantalla aparecerá «BORRAR?» («DELETE?»).
2 Confirme o cancele la selección.
1 Mantenga pulsada la tecla Borrar durante 2 segundos.
En la pantalla aparecerá «BORRAR TODO?» («DELETE ALL?»).
2 Confirme o cancele la selección.
Cada programación se confirma mediante un pitido largo o un pitido doble. Un
pitido doble confirma la validación de su elección. Un pitido largo significa que la
modificación no se ha tenido en cuenta.
Cuando el terminal está en la base, la base no sonará al recibir una llamada
entrante. De este modo, cuando el volumen del timbre del terminal inalámbrico se
apaga y el terminal está en la base, el teléfono no sonará.
HL_Balance D182.book Page 111 Friday, March 26, 2010 2:11 PM
112
Personalización del terminal
6.2 Selección de la melodía del timbre
La base y cada terminal pueden sonar con una melodía diferente. Los terminales pueden sonar con
una melodía diferente según si la llamada es interna o externa. Puede elegir entre 10 melodías
diferentes:
6.3 Activación / Desactivación de pitidos
Los terminales pueden emitir un pitido cuando están fuera de cobertura, cuando se pulsa una tecla
o cuando la carga de las pilas está baja.
Activación / Desactivación de pitido por tecla pulsada
Batería baja
1 Acceda al menú.
2 Seleccione «TERMINAL» («HANDSET») y confirme la selección.
3 Seleccione «VOL TIMB INT» («INT RING VOL») para cambiar el
volumen interno o «VOL TIMB EXT» («EXT RING VOL») para cambiar
el volumen externo y confirme la selección.
4 Seleccione un volumen de 1 a 5 o «VOLUMEN NULO» («VOLUME
OFF»).
5 Confirme la selección o regrese al menú anterior.
1 Acceda al menú.
2 Seleccione «TERMINAL» («HANDSET») y confirme la selección.
3 Seleccione «MELODIA INT» («INT MELODY») para cambiar la melodía
interna o «MELODIA EXT» («EXT MELODY») para cambiar la melodía
externa y confirme la selección.
4 Seleccione una melodía (de 1 a 10).
5 Pulse la tecla OK para confirmar la selección o regrese al menú anterior.
1 Acceda al menú.
2 Seleccione «TERMINAL» («HANDSET») y confirme la selección.
3 Seleccione «TONOS» («BEEP») y confirme la selección.
4 Seleccione «TONO TECLADO» («KEYTONE») y confirme la selección.
5 Seleccione «ACTIVAR» («ON») para activar o «DESACTIVAR»
(«OFF») para desactivar y confirme la selección.
1 Acceda al menú.
2 Seleccione «TERMINAL» («HANDSET») y confirme la selección.
3 Seleccione «TONOS» («BEEP») y confirme la selección.
4 Seleccione «BATERIA BAJA» («LOW BATTERY») y confirme la
selección.
5 Seleccione «ACTIVAR» («ON») para activar o «DESACTIVAR»
(«OFF») para desactivar y confirme la selección.
HL_Balance D182.book Page 112 Friday, March 26, 2010 2:11 PM
Español
113
Personalización del terminal
Terminal fuera de cobertura.
6.4 Nombre del terminal
Puede cambiar el nombre que se muestra en la pantalla del terminal (9 caracteres como máximo).
Esta función le permite personalizar cada terminal.
6.5 Contestación automática
Cuando hay una llamada entrante y el terminal se encuentra en la base, este se conecta a la línea
de forma automática cuando se separa de la base. Esta es la opción predeterminada, pero puede
desactivarla:
6.6 Reinicio del terminal
Cabe la posibilidad de volver a ajustar el teléfono según la configuración predeterminada original.
Es la configuración que tenía el teléfono cuando lo recibió.
Para regresar a las opciones predeterminadas:
1 Acceda al menú.
2 Seleccione «TERMINAL» («HANDSET») y confirme la selección.
3 Seleccione «TONOS» («BEEP») y confirme la selección.
4 Seleccione «SIN COBERT» («OUT RANGE») y confirme la selección.
5 Seleccione «ACTIVAR» («ON») para activar o «DESACTIVAR»
(«OFF») para desactivar y confirme la selección.
1 Acceda al menú.
2 Seleccione «TERMINAL» («HANDSET») y confirme la selección.
3 Seleccione «NOMBRE» («NAME») y confirme la selección.
4 Escriba el nombre que desee y confirme la selección.
Pulse la tecla Borrar para borrar un carácter. Mantenga pulsada la tecla Agenda
para salir del menú sin grabar ninguna modificación.
1 Acceda al menú.
2 Seleccione «TERMINAL» («HANDSET») y confirme la selección.
3 Seleccione «DESC AUTOM» («AUTO ANSWER») y confirme la
selección.
4 Seleccione «ACTIVAR» («ON») para activar o «DESACTIVAR»
(«OFF») para desactivar y confirme la selección.
1 Acceda al menú.
2 Seleccione «CONFIGURAR» («SETUP») y confirme la selección.
3 Seleccione «VAL DEFECTO» («DEFAULT») y confirme la selección.
4 Introduzca el código PIN de 4 dígitos
(valor predeterminado = 0000) y confírmelo.
4
GHI
6
MNO
5
JKL
4
GHI
6
MNO
5
JKL
HL_Balance D182.book Page 113 Friday, March 26, 2010 2:11 PM
114
Personalización del terminal
Los parámetros predeterminados son:
Pitidos de nivel bajo de batería Activados
Pitidos de aviso de fuera de cobertura Desactivados
Tono de pulsación de tecla Activado
Contestación automática Activada
Melodía interna 1
Volumen interno 3
Melodía externa 3
Volumen externo 3
Volumen del auricular 3
Agenda Vacía
Lista de registro de llamadas Vacía
Lista de rellamada Vacía
Código PIN 0000
Marcación DTMF
Bloqueo del teclado Desactivado
6.7 Bloqueo del teclado
El teclado puede bloquearse para que no se modifique ninguna opción ni se marque ningún
número involuntariamente. Cuando se bloquee el teclado, aparecerá el icono en la pantalla.
Bloqueo del teclado
Desbloqueo del teclado
6.8 Ajuste de la hora
Si se regresa a las opciones predeterminadas, se borrarán todas las entradas de la
agenda y el registro de llamadas. El código PIN también volverá a ser 0000.
1 Mantenga presionada la tecla « » durante 3 segundos. Se bloqueará el
teclado.
1 Pulse cualquier tecla y aparecerá «MARCAR » («PRESS ») en la
pantalla.
2 Pulse la tecla « ».
1 Acceda al menú.
2 Seleccione «FECHA - HORA» («DATE - TIME») y confirme la selección.
3 Seleccione «CONF RELOJ» («CLOCK SET») y confirme la selección.
4 Introduzca la hora (formato 24 h) y confírmela.
4
GHI
6
MNO
5
JKL
HL_Balance D182.book Page 114 Friday, March 26, 2010 2:11 PM
Español
115
Config. base (Base settings)
6.9 Ajuste de la alarma
7 Config. base (Base settings)
7.1 Ajuste del volumen del timbre
Volumen del timbre de la base
Puede elegir entre 5 niveles de volumen de timbre diferentes, además de la opción
«DESACTIVAR» («OFF»).
7.2 Selección de la melodía del timbre
La base y cada terminal pueden sonar con una melodía diferente. Para ajustar la melodía de la base:
7.3 Cambio del código PIN
Algunas funciones solo están disponibles para los usuarios que conocen el código PIN.
Por defecto el código PIN es 0000. Para cambiarlo:
1 Acceda al menú.
2 Seleccione «FECHA - HORA» («DATE - TIME») y confirme la selección.
3 Seleccione «CONF ALARMA» («ALARM SET») y confirme la selección.
4 Seleccione «ACTIVAR» («ON») para activar la alarma y confirme la
selección.
Introduzca la hora (formato 24 h) a la que deba activarse la alarma y
confírmela.
O
Seleccione «DESACTIVAR» («OFF») para desactivar la alarma y
confirme la selección.
1 Acceda al menú.
2 Seleccione «CONFIGURAR» («SETUP») y confirme la selección.
3 Seleccione «VOLUMEN BASE» («BASE VOLUME») y confirme la
selección.
4
Seleccione un volumen de 1 a 5 o «VOLUMEN NULO» («VOLUME OFF»).
5 Confirme la selección o regrese al menú anterior.
1 Acceda al menú.
2 Seleccione «CONFIGURAR» («SETUP») y confirme la selección.
3 Seleccione «MELODIA BASE» («BASE MELODY») y confirme la
selección.
4 Seleccione una melodía (de 1 a 5).
5 Confirme la selección o regrese al menú anterior.
1 Acceda al menú.
2 Seleccione «CONFIGURAR» («SETUP») y confirme la selección.
3 Seleccione «CODIGO PIN» («PIN CODE») y confirme la selección.
4 Introduzca el código PIN antiguo de 4 cifras y confirme la selección.
5 Introduzca un nuevo código PIN de 4 cifras y confirme la selección.
6 Introduzca el nuevo código PIN otra vez y confírmelo.
4
GHI
6
MNO
5
JKL
4
GHI
6
MNO
5
JKL
4
GHI
6
MNO
5
JKL
4
GHI
6
MNO
5
JKL
HL_Balance D182.book Page 115 Friday, March 26, 2010 2:11 PM
116
Gestión de múltiples terminales
7.4 Ajuste del modo de marcación
Hay dos modos de marcación: DTMF / Marcación por tonos (la más empleada) y marcación por
pulsos (para instalaciones más antiguas).
Para cambiar el modo de marcación:
7.5 Duración del tiempo flash
Pulse la tecla Flash «
R
» (tecla 7 de la imagen 2C Terminal) para utilizar determinados servicios
de su línea externa, como la llamada en espera (si su compañía telefónica ofrece esta opción), o
para transferir llamadas si utiliza una centralita telefónica (PABX). La tecla Flash «
R
» es una
breve interrupción de la línea. Puede ajustar el tiempo flash a 100 o 250 ms..
8 Gestión de múltiples terminales
8.1 Adición de un terminal
Puede registrar nuevos terminales en la base si estos admiten el protocolo DECT GAP.
La base puede admitir un máximo de 5 terminales. Si ya tiene 5 terminales y desea añadir otro o
cambiar uno, tiene que dar uno de baja para poder asociar el nuevo.
Para poner la base en modo de registro:
Para registrar un terminal nuevo:
Si el terminal adicional es un Topcom Balance
1 Acceda al menú.
2 Seleccione «CONFIGURAR» («SETUP») y confirme la selección.
3 Seleccione «MODO MARCAR» («DIAL MODE») y confirme la selección.
4 Seleccione el modo de marcación y confirme la selección.
1 Acceda al menú.
2 Seleccione «CONFIGURAR» («SETUP») y confirme la selección.
3 Seleccione «FLASH» («RECALL») y confirme la selección.
4 Seleccione «RELLAMADA 1» («RECALL 1») para obtener un tiempo
flash corto (100 ms) o «RELLAMADA 2» («RECALL 2») para obtener un
tiempo flash largo (250 ms) y confirme la selección.
Esta operación solo es necesaria si ha dado de baja un terminal o si ha comprado
uno nuevo.
1 Mantenga presionada la tecla Búsqueda de la base durante 6 segundos. La
base emitirá un pitido.
2 Acceda al menú.
3 Seleccione «INSTALAR» («REGISTER») y confirme la selección.
4 Seleccione «INSTAL BASE» («REG BASE») y confirme la selección.
5 Introduzca el número de la base que desee asociar al terminal (1-4) y
confirme la selección (los números que parpadean están actualmente en uso).
6 Introduzca el código PIN de la base (0000 de forma predeterminada) y
confírmelo.
El terminal empezará a buscar la base DECT. Si localiza la base, mostrará el
número de identificación de esta.
4
GHI
6
MNO
5
JKL
4
GHI
6
MNO
5
JKL
HL_Balance D182.book Page 116 Friday, March 26, 2010 2:11 PM
Español
117
Gestión de múltiples terminales
Si el terminal es otro modelo
Tras iniciar el procedimiento de registro en la base, consulte el manual del terminal para
informarse sobre cómo registrarlo. El terminal debe ser compatible con GAP.
El icono y el texto «NO ASOC» («NOT REG») parpadea en la pantalla cuando el terminal no
está asociado a la base.
Cuando un terminal está asociado a una base, la base le atribuye un número de terminal. Se trata
del número que figura en el terminal después del nombre y debe usarse para llamadas internas.
8.2 Desvinculación de un terminal
Este procedimiento debe llevarse a cabo desde un terminal diferente al que desea dar de baja.
8.3 Configuración de un terminal en otra base
Puede usar un terminal Topcom Balance con la base de otro modelo. La base debe ser compatible
con GAP.
7 Confirme o detenga la selección.
Si el terminal no localiza la base, regresará al modo de espera transcurridos unos
segundos. Inténtelo otra vez cambiando el número de la base y asegúrese de no
estar en un lugar con interferencias. Acérquese a la base.
El Perfil DECT GAP solo garantiza el funcionamiento correcto de las funciones
básicas de llamada entre distintas marcas o tipos. Cabe la posibilidad de que
determinados servicios (como CLIP) no funcionen correctamente.
1 Acceda al menú.
2 Seleccione «CONFIGURAR» («SETUP») y confirme la selección.
3 Seleccione «DESINST TERM» («DEL HANDSET») y confirme la
selección.
4 Introduzca el código PIN de la base (0000 de forma predeterminada) y
confírmelo.
5 Seleccione el terminal que desee dar de baja y confirme la selección.
1 Ponga la base en modo de registro y consulte el manual de la base.
2 Acceda al menú.
3 Seleccione «INSTALAR» («REGISTER») y confirme la selección.
4 Seleccione «INSTAL BASE» («REG BASE») y confirme la selección.
5 Introduzca el número de la base que desee asociar al terminal y confirme la
selección.
6 Introduzca el código PIN de la base y confirme la selección.
El terminal empezará a buscar la base DECT. Si localiza la base, mostrará el
número de identificación de esta.
7 Confirme o detenga la selección.
4
GHI
6
MNO
5
JKL
4
GHI
6
MNO
5
JKL
4
GHI
6
MNO
5
JKL
HL_Balance D182.book Page 117 Friday, March 26, 2010 2:11 PM
118
Mensajes
8.4 Selección de una base
Puede registrar el terminal en diferentes bases. Los terminales pueden registrarse en un máximo
de 4 bases a la vez. Cuando se selecciona la base, la base seleccionada actual se indica mediante
un número de base parpadeante.
Si selecciona «AUTOMATICO» («AUTO»), el terminal buscará automáticamente otra base
cuando esté fuera de cobertura. El terminal debe registrarse primero en cada una de las bases.
9Mensajes
Puede enviar y recibir mensajes con su teléfono Topcom Balance siempre y cuando su operador
de telefonía disponga de esta funcionalidad. En esta sección se detalla el funcionamiento de los
mensajes SMS. Puede almacenar un total de 15 mensajes SMS enviados y recibidos, cada uno de
los cuales puede tener como máximo 160 caracteres.
9.1 Cómo escribir un mensaje SMS
El método es el mismo que el utilizado para escribir un nombre en la agenda (véase “3.15 Uso de
las teclas alfanuméricas”).
Para seleccionar un espacio, pulse 1.
9.2 Enviar un SMS
1 Acceda al menú.
2 Seleccione «INSTALAR» («REGISTER») y confirme la selección.
3 Seleccione «SELECC BASE» («SELECT BASE») y confirme la selección.
4 Seleccione una base o la opción «AUTOMATICO» («AUTO») y confirme
la selección.
Cuando haya activado la selección automática de la base y el terminal esté fuera
del alcance de la base actual, el terminal solo buscará la base con la señal más
potente cuando esté en modo de espera (no durante la comunicación).
Antes de enviar y recibir mensajes de texto SMS, debe configurar el número de
teléfono del centro SMS de su red para los mensajes salientes y entrantes
(véase “ Números del centro de servicio SMS”).
Los números del Centro de envío y recepción de mensajes para la red de telefonía
fija NO SON LOS MISMOS que se utilizan en la red de telefonía móvil.
1 Acceda al menú.
2 Seleccione «MENSAJES» («SMS») y confirme la selección.
3 Seleccione «ESCRIBIR» («WRITE») y confirme la selección.
4 Empiece a escribir el mensaje y confirme la selección.
5 Introduzca el número de teléfono y confírmelo para enviar el mensaje.
El mensaje SMS se enviará automáticamente.
4
GHI
6
MNO
5
JKL
4
GHI
6
MNO
5
JKL
HL_Balance D182.book Page 118 Friday, March 26, 2010 2:11 PM
Español
119
Mensajes
9.3 Leer y ver la lista de mensajes recibidos (buzón Entrada)
En la pantalla de su Topcom Balance aparecerá el número de mensajes nuevos que ha recibido.
se visualizará en la pantalla. El LED de mensaje SMS de la base parpadeará.
Un pitido le indicará que ha recibido un mensaje nuevo.
9.4 Varios usuarios:
Gracias a su Topcom Balance, puede vincular hasta 5 terminales a una sola base. Cada terminal
tiene su propio número (1-5), que también es el número del terminal para enviar mensajes
personales. Además, todos los terminales tienen el «0» como número de terminal estándar. Para
recibir mensajes SMS personales, debe proporcionar a los remitentes de sus mensajes el número
del terminal que deben añadir a su número de teléfono normal (véase a continuación). Por ejemplo,
el número de terminal del segundo terminal (terminal 2) será el 2.
Si no se asigna ningún número de terminal a su número de teléfono o si es «0», todos los terminales
recibirán los mensajes.
Puede cambiar el número de su terminal por otro entre 6-9 (véase “ Ajuste del número de terminal”).
Recibir mensajes SMS personales de otros usuarios
Si el número de mensajes nuevos aparece en la pantalla.
1 Pulse la tecla OK. El número de teléfono del mensaje más reciente se
mostrará en primer lugar.
Si el número de mensajes nuevos no aparece en la pantalla.
1 Acceda al menú.
2 Seleccione «MENSAJES» («SMS») y confirme la selección.
3 Seleccione «B.COMÚN» («INBOX») y confirme la selección.
El número de teléfono del mensaje más reciente se mostrará en primer lugar.
Desplácese por todos los mensajes y pulse OK para leer el mensaje.
Los mensajes en los que aparezca «*» delante del número de teléfono son
mensajes sin leer.
Desplácese por todo el mensaje y pulse OK cuando ya haya leído el mensaje.
Desplácese para seleccionar una de las siguientes opciones:
«Responder» («Reply»): escriba el mensaje con el teclado alfanumérico y
guárdelo.
«Reenviar» («Forward»): para reenviar el mensaje almacenado a otro usuario.
Siga el mismo procedimiento descrito para enviar un mensaje SMS (véase “9.2
Enviar un SMS”).
«Borrar?» («Delete?»): para eliminar el mensaje. Pulse el botón OK para
confirmar.
«Detalles» («Details»): para visualizar el número de teléfono, la fecha y la
hora del mensaje. Pulse OK para confirmar.
Pulse la tecla de secreto para volver al menú del buzón.
Los remitentes de sus mensajes deberán añadir el número de terminal a su número de
teléfono para poder enviarle mensajes SMS personales.
Por ejemplo, si su número de terminal personal es el 1 y su número de teléfono es el
123456789, las personas que deseen enviarle mensajes SMS deberán enviárselos al
número 1234567891. Este es el número que deberá recordar y proporcionar a sus
contactos.
HL_Balance D182.book Page 119 Friday, March 26, 2010 2:11 PM
120
Mensajes
Leer mensajes SMS personales de otros usuarios
Cuando se recibe un mensaje nuevo, Topcom Balance lo indicará mediante un pitido. La pantalla
mostrará y el número de mensajes nuevos.
O
9.5 Configuración de mensajes SMS
Activación y desactivación del tono de aviso de los mensajes SMS
Su terminal puede emitir un sonido para indicar que se ha recibido un mensaje de texto nuevo.
Números del centro de servicio SMS
Para poder enviar y recibir mensajes de texto SMS, necesita el número de teléfono del centro SMS
de su red. Si accidentalmente borra los números del centro de servicio de envío o recepción de
mensajes SMS, deberá volver a introducirlos para poder utilizar el servicio SMS.
El Topcom Balance puede almacenar un número del centro de servicio de envío de SMS y un
número del centro de servicio de recepción de SMS.
Para establecer el número del centro de envío de SMS
Pulse la tecla OK.
En la lista de mensajes SMS, los mensajes privados se identifican con el
símbolo en la pantalla.
1 Acceda al menú.
2 Seleccione «MENSAJES» («SMS») y confirme la selección.
3 Seleccione «B. ENTRADA» («PERSONAL SMS») y confirme la
selección. El número de teléfono del mensaje más reciente se mostrará en
primer lugar.
1 Acceda al menú.
2 Seleccione «MENSAJES» («SMS») y confirme la selección.
3 Seleccione «CONFIGURAR» («SMS SETTINGS») y confirme la
selección.
4 Seleccione «ALERTA MSJ.» («MSG ALERT»)y confirme la selección.
5 Seleccione «ACTIVAR» («ON») o «DESACTIVAR» («OFF») y confirme
la selección.
6 Seleccione la melodía deseada, confirme la selección y vuelva al menú
anterior.
1 Acceda al menú.
2 Seleccione «MENSAJES» («SMS») y confirme la selección.
3 Seleccione «CONFIGURAR» («SMS SETTINGS») y confirme la
selección.
4 Seleccione «CENTRO ENV.» («SEND CENTRE») y confirme la
selección.
5 Seleccione «ENVIO 1» («SEND 1») confirme la selección.
6 Teclee el número de teléfono del servidor SMS.
4
GHI
6
MNO
5
JKL
HL_Balance D182.book Page 120 Friday, March 26, 2010 2:11 PM
Español
121
Solución de problemas
Para establecer el número del centro de recepción de SMS
Ajuste del número de terminal
Todos los terminales tienen el número de terminal «0» y el número de terminal del aparato (1-5).
Si fuera necesario, puede cambiar el número de su terminal por otro entre 6-9:
Memoria llena
Si la memoria está llena, se mostrará en pantalla el mensaje «Mem llena» («Memory full»). Ya no
puede enviar ni recibir mensajes SMS. Para continuar recibiendo mensajes SMS, borre alguno de
los mensajes o todos. Para borrar todos los mensajes almacenados en el «B. COMÚN»
(«INBOX») o en «B. ENTRADA» («PERSONAL SMS»):
10 Solución de problemas
1 Acceda al menú.
2 Seleccione «MENSAJES» («SMS») y confirme la selección.
3 Seleccione «CONFIGURAR» («SMS SETTINGS») y confirme la selección.
4 Seleccione «CENTRO REC.» («RCV CENTRE») y confirme la selección.
5 Seleccione «RECEPCION 1» («RECEIVE 1») y confirme la selección.
6 Teclee el número de teléfono del servidor SMS.
1 Acceda al menú.
2 Seleccione «MENSAJES» («SMS») y confirme la selección.
3 Seleccione «CONFIGURAR» («SMS SETTINGS») y confirme la selección.
4 Seleccione «EXT. COMUN» («TERMINAL NO») y confirme la selección.
5 Borre el número de terminal antiguo e introduzca el nuevo (0, 6-9).
6 Pulse OK para confirmar.
1 Acceda al menú.
2 Seleccione «MENSAJES» («SMS») y confirme la selección.
3 Seleccione «CONFIGURAR» («SMS SETTINGS») y confirme la
selección.
4 Seleccione «BORRAR TODO» («DELETE ALL») y confirme la selección.
5 Seleccione «B. COMÚN» («INBOX») o «B. ENTRAD
(«PERSONAL SMS») y confirme la selección.
6 Aparecerá «CONFIRMAR?» («CONFIRM?»).
7 Confirme o cancele la selección.
Problema Posible causa Solución
Pantalla vacía. Pilas descargadas. Compruebe la posición de las pilas.
Recargue las pilas.
Terminal apagado. Encienda el terminal.
Ausencia de tono de
marcado.
Cable telefónico mal conectado Compruebe la conexión del cable
telefónico.
La línea está ocupada por otro
terminal.
Espere hasta que el otro terminal
cuelgue.
4
GHI
6
MNO
5
JKL
4
GHI
6
MNO
5
JKL
HL_Balance D182.book Page 121 Friday, March 26, 2010 2:11 PM
122
Datos técnicos / Características técnicas
11 Datos técnicos / Características técnicas
12 Garantía Topcom
12.1 Período de garantía
Las unidades de Topcom tienen un período de garantía de 24 meses. El período de garantía entra
en vigor el día en que se adquiere la nueva unidad. No existe ninguna garantía sobre las pilas
estándar o recargables (tipo AA/AAA).
La garantía no cubre los consumibles ni los defectos que tengan un efecto insignificante en el
funcionamiento o en el valor del equipo.
El icono « » parpadea.
Terminal fuera de cobertura. Acerque el terminal a la base.
La base no recibe alimentación
eléctrica.
Compruebe la conexión de la toma
de corriente de la base.
El terminal no está registrado en
la base.
Registre el terminal en la base.
Ausencia de timbre en
la base o el terminal.
El volumen del timbre está
desactivado o muy bajo.
Ajuste el volumen del timbre.
El tono es normal, pero
no hay comunicación.
El modo de marcación es
erróneo.
Ajuste el modo de marcación a
"Marcación por Tonos (MF)".
No se puede transferir
una llamada desde la
centralita (PABX).
El tiempo flash es demasiado
corto o demasiado largo.
Cambie el tiempo flash.
El teléfono no responde
al pulsar las teclas.
Error de manipulación. Quite las pilas y vuelva a colocarlas.
Estándar Telecomunicaciones inalámbricas mejoradas
digitalmente (
DECT
por sus siglas en inglés)
Perfil de acceso genérico
(
GAP
por sus siglas en inglés)
Intervalo de frecuencia De 1880 MHz a 1900 MHz
Número de canales 120 canales dúplex
Modulación GFSK
Codificación de habla 32 kb/s
Potencia de emisión 10 mW (potencia media por canal)
Alcance 300 m en espacios abiertos / 10-50 m en interiores como
máximo
Número de terminales Hasta 5
Suministro de alimentación de la base 230 V / 50 Hz / 7,5 V CC 300 mA
Pilas del terminal 2 pilas recargables AAA NiMh de 1,2 V 550 mAh
Autonomía del terminal 200 horas en espera
Tiempo de conversación del terminal 10 horas
Condiciones normales de uso +5 °C a +45 °C
Modo de marcación Pulsos / Tonos
Tiempo flash 100 o 250 ms
Problema Posible causa Solución
HL_Balance D182.book Page 122 Friday, March 26, 2010 2:11 PM
Español
123
Reciclaje del dispositivo (medio ambiente)
La garantía debe demostrarse presentando el comprobante original de compra o una copia de este,
en el que constarán la fecha de la compra y el modelo de la unidad.
12.2 Tratamiento de la garantía
Los aparatos averiados deberán remitirse a un servicio técnico de Topcom junto con un
comprobante de compra válido y una tarjeta de servicio técnico cumplimentada.
Si la unidad tiene una avería durante el período de garantía, Topcom o su centro de servicio oficial
repararán sin cargo alguno cualquier avería causada por defectos de material o fabricación, ya sea
reparando o sustituyendo las unidades defectuosas o partes de las mismas. En caso de sustitución,
el color y el modelo pueden variar respecto a los de la unidad adquirida inicialmente.
La fecha de compra inicial determinará el comienzo del período de garantía. El período de garantía
no se ampliará si Topcom o sus centros de servicio autorizados sustituyen o reparan la unidad.
12.3 Limitaciones de la garantía
Los daños o defectos ocasionados por un tratamiento o funcionamiento incorrectos, así como los
daños resultantes del uso de piezas o accesorios no originales, no estarán cubiertos por esta
garantía.
La garantía no cubre los daños ocasionados por factores externos tales como relámpagos, agua o
fuego como tampoco los daños causados durante el transporte.
La garantía no será válida si el número de serie de las unidades se cambia, se elimina o resulta
ilegible.
Cualquier reclamación de la garantía se invalidará si la unidad ha sido reparada, alterada o
modificada por el comprador.
Esta aplicación solo debe utilizarse con pilas recargables. Si desea sustituir las pilas incluidas
originalmente, compruebe que las pilas que utilice sean adecuadas y recargables. Bajo NINGUNA
circunstancia debe utilizar pilas alcalinas en los terminales.
Si utiliza pilas alcalinas y pone el terminal en la base, las pilas se calentarán y podrían explotar.
Los daños que ello pueda causar no podrán recuperarse del fabricante, y los daños ocasionados en
el aparato no están cubiertos por la garantía. Usted deberá hacerse cargo del coste de cualquier
reparación.
13 Reciclaje del dispositivo (medio ambiente)
Al final de su vida útil, este producto no debe ser desechado en un contenedor normal,
sino en un punto de recogida destinado al reciclaje de aparatos eléctricos y
electrónicos. Así lo indica el símbolo en el producto, en el manual de usuario y/o en
la caja.
Si los lleva a un punto de reciclaje, algunos de los materiales del producto podrán
reutilizarse. La reutilización de algunas de las piezas o materias primas de los productos usados
supone una importante contribución a la protección del medio ambiente. Si necesita más
información sobre los puntos de reciclaje existentes en su zona, póngase en contacto con las
autoridades locales correspondientes.
14 Limpieza
Limpie el teléfono con un paño ligeramente humedecido o con un paño antiestático. No utilice
nunca detergentes ni disolventes abrasivos.
HL_Balance D182.book Page 123 Friday, March 26, 2010 2:11 PM
124
Instruções de segurança
Português
1 Instruções de segurança
Utilize apenas a ficha de carregador fornecida. Não utilize outros carregadores, pois poderá
danificar as pilhas.
Utilize apenas pilhas recarregáveis do mesmo tipo. Nunca utilize pilhas normais
não-recarregáveis. Coloque as pilhas recarregáveis ligadas aos pólos correctos (tal como
indicado no compartimento das pilhas do telefone).
Não toque no carregador e nos contactos da ficha com objectos afiados ou metálicos.
O funcionamento de alguns dispositivos médicos pode ser afectado.
O telefone pode causar um ruído desagradável em aparelhos auditivos.
Não coloque a unidade de base numa sala húmida ou a uma distância inferior a 1,5 m de água.
Mantenha o telefone afastado da água.
Não utilize o telefone em ambientes onde haja risco de explosão.
Elimine as pilhas e mantenha o telefone de uma-forma ecológica.
Como este telefone não pode ser utilizado em caso de corte de corrente, deve utilizar um
telefone independente-da rede eléctrica para chamadas de emergência, por exemplo, um
telemóvel.
2Iniciar
2.1 Como utilizar este manual do utilizador
Neste manual do utilizador é utilizado o seguinte método para clarificar as instruções:
Tecla a premir .
Texto....... “VISOR”.
O texto no visor do telefone é apresentado na coluna da direita entre aspas.
HL_Balance D182.book Page 124 Friday, March 26, 2010 2:11 PM
Português
125
Iniciar
2.2 Instalar a base
- 2A Vista posterior da base -
A. Tomada telefónica de parede
B. Fio eléctrico
C. Fio do telefone
2.3 Instalar o terminal
- 2B Vista posterior do terminal -
A. Tampa
B. Pilhas recarregáveis
1 Ligue uma extremidade do transformador à tomada e a outra à entrada do
transformador, na parte inferior da base.
2 Ligue uma extremidade do fio do telefone à ficha do telefone na parede e a
outra extremidade à entrada na parte inferior da base.
3 Coloque o fio do telefone e o fio eléctrico AC nas guias da base tal como
indicado na imagem 2A.
1 Abra o compartimento de pilhas como apresentado na imagem 2B.
2 Coloque as pilhas respeitando a polaridade (+ e -).
3 Feche o compartimento das pilhas.
4 Mantenha o telefone na unidade de base durante 20 horas.
Antes de utilizar o telefone pela primeira vez, deve certificar-se de que as pilhas
foram carregadas durante 20 horas. Se não o fizer, o telefone não funcionará
correctamente.
A
B
C
+
-
-
+
A
B
HL_Balance D182.book Page 125 Friday, March 26, 2010 2:11 PM
126
Iniciar
2.4 Teclas/LEDs
Telefone
1. Visor
2. Tecla Remarcação / Pausa /
Para Cima
3. Tecla Menu/OK
4. Tecla Registo de Chamadas /
Para baixo
5. Botão da Lista Telefónica
6. Teclas alfanuméricas
7. Tecla INT
8. Tecla On / Off / Flash
9. Bloqueio do teclado
10. Tecla Mãos-livres
11. Tecla Levantado/Pousado
12. Tecla Mute/ Apagar / Esc
Base
13. Tecla Paging (busca)
Visor
No modo de espera, o visor apresenta as horas e o
número do telefone:
12-05 HS1
3
4
5
6
7
8
1
9
12
11
2
10
1
2
ABC
3
DEF
4
GHI
5
JKL
6
MNO
7
PQRS
8
TUV
9
WXYZ
0
#
INT
R
- 2C Portátil -
13
- 2D Base -
- 2E Visor -
HL_Balance D182.book Page 126 Friday, March 26, 2010 2:11 PM
Português
127
Iniciar
2.5 Símbolos
2.6 Navegar no menu
O telefone Topcom Balance tem um sistema de menus fácil de utilizar. Cada menu conduz a uma
lista de opções. O mapa dos menus é apresentado no parágrafo seguinte.
2.7 Descrição do menu
Levantado; está em linha Teclado do terminal bloqueado
Chamada externa Está na lista telefónica
Chamada interna Pilha fraca
Números novos na lista de chamadas Pilha a Meio
Chamada atendida Pilha carregada
Chamada não atendida Pilhas descarregadas
Está no menu Nova mensagem de correio de voz
Mãos-livres Terminal com cobertura da base
Indica que o número apresentado é mais
longo que o ecrã (12 dígitos)
A antena pisca quando o terminal não
está registado no base
Nova mensagem SMS
1 Quando o terminal está ligado e em modo de espera, prima a tecla de menu
para abrir o menu principal.
2 Percorra o menu até à opção pretendida. As opções de menu encontram-se
num circuito fechado (após a última segue-se a primeira).
3 Prima a tecla OK para ver mais opções ou para confirmar a configuração
apresentada.
Prima a tecla Apagar para voltar ao nível anterior no menu.
Menu Itens do submenu
AGENDA (PHONEBOOK)
ADIC NOME (ADD ENTRY)
MODIF NOME (MODIFY ENTRY)
APAGAR NOME (DELETE ENTRY)
SMS
CAIX ENTRADA (INBOX)
MSG PRIVADA (PERSONAL SMS)
ESCREVER (WRITE)
APAGAR TUDO (DELETE ALL)
CONFIGURACAO (SMS SETTINGS)
CONFIG (SETUP)
VOLUME BASE (BASE VOLUME)
MELODIA BASE (BASE MELODY)
APAGAR TERM (DEL HANDSET)
CÓDIGO PIN (PIN CODE)
MODO MARC (DIAL MODE)
CONFIG ORIGEM (DEFAULT)
HL_Balance D182.book Page 127 Friday, March 26, 2010 2:11 PM
128
Utilizar o telefone
3 Utilizar o telefone
3.1 Ligar e desligar o terminal
3.2 Alterar o idioma do menu
3.3 Receber uma chamada telefónica
Atender a chamada:
3.4 Fazer uma chamada telefónica externa
Marcação directa
TELEFONE (HANDSET)
TOQUE (BEEP)
VOL TOQUE IN (INT RING VOL)
VOL TOQUE EX (EXT RING VOL)
MELODIA INT (INT MELODY)
MELODIA EXT (EXT MELODY)
RESP. AUTO
NOME (NAME)
IDIOMA (LANGUAGE)
TEC BLOQ? (KEYLOCK?)
DATA - HORA (DATE - TIME)
ACERT DATA (DATE SET)
ACERT RELOG (CLOCK SET)
ACERT ALARM (ALARM SET)
REGISTO (REGISTER)
SELEC BASE (SELECT BASE)
BASE REGIST (REG BASE)
1 Prima e mantenha premida a tecla on/off durante 8 segundos. O telefone
procura a base.
2 Prima e mantenha premida a tecla de on/off durante 8 segundos. O visor
desliga.
1 Entre no menu
2 Seleccione “TERMINAL” (HANDSET) e confirme.
3 Seleccione “IDIOMA” (LANGUAGE) e confirme.
4 Seleccione um idioma e confirme.
1 Prima a tecla Levantado.
OU
Retire o terminal da base se o “atendimento automático” estiver activado.
(Consulte "6.5 Resposta automática")
É estabelecida a ligação com o correspondente.
2 Prima a tecla Pousado para desligar o telefone ou volte a colocar o terminal
na base.
1 Prima a tecla Levantado para iniciar a chamada.
2 Marque o número de telefone.
3 Prima a tecla Pousado para desligar o telefone ou volte a colocar o terminal
na base.
Menu Itens do submenu
4
GHI
6
MNO
5
JKL
HL_Balance D182.book Page 128 Friday, March 26, 2010 2:11 PM
Português
129
Utilizar o telefone
Pré-marcação
3.5 Fazer uma chamada telefónica interna
3.6 Transferência de chamada interna
Transferir uma chamada externa para outro terminal
3.7 Chamada em conferência
Só é possível se um ou mais terminais estiverem registados na base!
É possível conversar em simultâneo com um correspondente interno e com um correspondente
externo.
Durante uma chamada externa:
3.8 Modo Mãos-livres
Pode falar com o seu correspondente sem ter que segurar no terminal.
Para corrigir um número, utilize a tecla Eliminar para apagar um dígito
introduzido
1 Marque o número de telefone.
2 Prima a tecla Levantado para iniciar a chamada.
3 Prima a tecla Pousado para desligar o telefone ou volte a colocar o terminal
na base.
1 Prima a tecla de chamada interna.
2 Introduza o número do terminal interno (1 a 5)
3 Prima a tecla Pousado para desligar o telefone ou volte a colocar o terminal
na base.
1 Prima a tecla de chamada interna.
2 Introduza o número do terminal interno (1 a 5), o autor da chamada externa
é colocado em espera.
3 Quando o outro terminal atender, prima a tecla Pousado para desligar e
transferir a chamada.
Se o correspondente interno não atender, prima novamente a tecla de chamada
interna para retomar a chamada externa em linha.
4 Prima a tecla Pousado para desligar o telefone ou volte a colocar o terminal
na base.
1 Prima a tecla de chamada interna.
2 Introduza o número do terminal interno (1 a 5)
3 Quando o outro terminal atender, prima e mantenha premida a tecla ‘ .
Se o correspondente interno não atender, prima novamente a tecla de chamada
interna para retomar a chamada externa em linha.
4 Prima a tecla Pousado para desligar o telefone ou volte a colocar o terminal
na base.
1 Prima a tecla mãos-livres durante uma chamada para activar ou desactivar
o modo de mãos-livres.
4
GHI
6
MNO
5
JKL
INT
4
GHI
6
MNO
5
JKL
INT
4
GHI
6
MNO
5
JKL
INT
INT
4
GHI
6
MNO
5
JKL
INT
HL_Balance D182.book Page 129 Friday, March 26, 2010 2:11 PM
130
Utilizar o telefone
3.9 Volume do altifalante durante a chamada
3.10 Apresentação da duração da chamada
A duração da chamada é apresentada passados 15 segundos, em minutos - segundos.
No final de cada chamada, a duração total da chamada é apresentada durante 5 segundos.
3.11 Microfone em silêncio
É possível silenciar o microfone durante uma conversa.
3.12 Tecla Pausa
Ao marcar um número, é possível adicionar uma pausa entre dois dígitos:
3.13 Localizar um terminal (função Paging)
3.14 Memória de remarcação
Pode remarcar um dos últimos 10 números marcados. Se tiver armazenado um nome na lista de
telefones com o número, será apresentado o nome.
3.15 Utilizar o teclado alfanumérico
Com o seu telefone também é possível introduzir caracteres alfanuméricos. Isto é útil para
introduzir um nome na lista de telefones, dar um nome ao terminal,…
Para seleccionar uma letra, prima a tecla correspondente tantas vezes quantas for necessário.
Por exemplo, para seleccionar um ‘A’, prima ‘2’ uma vez. Para seleccionar um ‘B’, prima ‘2’ duas
vezes, e assim por diante.
1 Durante a conversa, prima a tecla para cima ou para baixo para mudar o
volume em conformidade.
O volume do modo de mãos-livres também é ajustado em conjunto com o receptor
no telefone, tal como descrito em cima.
1 Prima a tecla Mute. Desta forma, pode falar livremente sem que a pessoa do
outro lado da linha o ouça.
“MUTE” é apresentado.
2 Prima a tecla Mute novamente para voltar ao modo normal.
1 Mantenha a tecla Remarcação/Pausa premida durante 2 segundos.
1 Prima a tecla Paging na base.
Todos os terminais registados na base tocarão.
2 Prima qualquer tecla do terminal para interromper o toque.
1 Prima a tecla de remarcação.
2 Seleccione um número. Se o número existir na lista de telefones, será
apresentado o nome.
Quando o nome é apresentado, pode alternar entre o nome e o número,
premindo a tecla OK!
3 Prima a tecla Levantado para iniciar a chamada.
4 Prima a tecla Pousado para voltar ao modo de espera.
4
GHI
6
MNO
5
JKL
HL_Balance D182.book Page 130 Friday, March 26, 2010 2:11 PM
Português
131
Agenda
Para seleccionar ‘A’ e, em seguida, ‘B’ consecutivamente, seleccione ‘2’ uma vez, espere até que
o cursor avance para o carácter seguinte e, em seguida, prima ‘2’ duas vezes.
Os caracteres do teclado são os seguintes:
Tecla Primeira Segunda Terceira Quarta Quinta
pressão pressão pressão pressão pressão
1espaço- 1
2A BC 2
3D E F 3
4G HI 4
5J KL 5
6M NO 6
7P QR S 7
8T UV 8
9W XY Z 9
00
4 Agenda
Cada terminal pode armazenar até 50 nomes e números. Os nomes podem ter até 12 caracteres e
os números até 20 dígitos.
Para introduzir caracteres alfanuméricos, consulte a secção "3.15 Utilizar o teclado alfanumérico".
4.1 Adicionar uma entrada à lista telefónica
4.2 Marcar um número a partir da lista telefónica
Prima ‘1’ para seleccionar um espaço.
Prima de novo a tecla Apagar para apagar um carácter.
1 Entre no menu.
2 Seleccione “LISTA TELEF” (PHONEBOOK) e confirme.
3 Seleccione “ADIC NOME” (ADD ENTRY) e confirme.
4 Introduza o nome e confirme.
Prima a tecla da lista de telefones para sair do menu sem efectuar quaisquer
modificações a esta conta.
5 Introduza o número e confirme.
6 Seleccione uma melodia de toque (1 a 10) e confirme.
1 Prima a tecla da lista telefónica.
2 Seleccione um nome ou introduza a primeira letra do nome. (A lista é
percorrida por ordem alfabética.)
Prima a tecla OK para ver o número de telefone.
Se o número de telefone tiver mais de 12 dígitos, prima OK novamente para
ver o número completo.
3 Prima a tecla Levantado para iniciar a chamada.
4 Prima a tecla Pousado para desligar o telefone ou volte a colocar o terminal
na base.
4
GHI
6
MNO
5
JKL
4
GHI
6
MNO
5
JKL
HL_Balance D182.book Page 131 Friday, March 26, 2010 2:11 PM
132
Identificação do autor da chamada
4.3 Alterar um nome ou número
4.4 Apagar um nome da lista telefónica
5 Identificação do autor da chamada
Ao receber uma chamada externa, o número do autor da chamada surge no visor quando o terminal
toca. O telefone pode receber chamadas em FSK e DTMF. Pode ainda ver o nome do autor da
chamada se este for transmitido pela rede. Se o nome estiver programado na agenda telefónica, o
nome que consta na agenda telefónica é apresentado!
O telefone pode armazenar até 40 chamadas numa Lista de Chamadas (recebidas e não atendidas)
que poderão ser consultadas posteriormente. Esta função só está disponível se tiver subscrito a
informação de ID do autor da chamada.
Quando a memória está cheia, as novas chamadas substituem automaticamente as chamadas
antigas na memória.
Para consultar a lista de chamadas:
1 Entre no menu.
2 Seleccione “LISTA TELEF” (PHONEBOOK) e confirme.
3 Seleccione “MODIF NOME” (MODIFY ENTRY) e confirme.
4 Introduza o nome a alterar e confirme.
5 Apague os caracteres indesejados e introduza o nome novo.
Confirme.
6 Introduza o número novo e confirme.
7 Seleccione uma melodia de toque (1 a 10) e confirme.
1 Entre no menu
2 Seleccione “LISTA TELEF” (PHONEBOOK) e confirme.
3 Seleccione “APAGAR NOME” (DELETE ENTRY) e confirme.
4 Seleccione um nome ou introduza a primeira letra do nome e confirme.
“CONFIRMAR” (CONFIRM) é apresentado no visor.
5 Confirme ou cancele.
Este serviço só funcionará se tiver uma subscrição de CLIP/ID de Autor de
Chamada. Contacte o seu fornecedor de serviços de telecomunicações.
A identidade do autor da chamada é substituída pela duração da chamada
passados 15 segundos de comunicação. Continua a ser possível visualizar a
identidade do autor da chamada passado esse tempo, premindo a tecla OK
repetidamente para obter o nome e o número.
As chamadas novas ou não atendidas são assinaladas por um ícone
intermitente no visor.
1 Prima a tecla de registo de chamadas.
Se não existirem chamadas na lista, é apresentado “VAZIO” (EMPTY).
2 Percorra as chamadas. São apresentados os nomes dos autores das
chamadas, se o nome for enviado pela rede ou se estiver guardado na lista
telefónica. Quando chegar ao fim da lista, soará um tom de aviso.
4
GHI
6
MNO
5
JKL
4
GHI
6
MNO
5
JKL
HL_Balance D182.book Page 132 Friday, March 26, 2010 2:11 PM
Português
133
Personalizar o terminal
É possível apagar cada entrada separadamente:
Para apagar todas as entradas:
6 Personalizar o terminal
6.1 Ajustar o volume de toque
Volume de toque do terminal para chamadas internas/externas
O volume de toque do terminal para chamadas internas ou externas pode ser configurado
separadamente. Pode escolher entre 5 níveis de volume do toque do terminal e “DESLIGADO”
(OFF).
Se for apresentado , a chamada foi atendida. Se for apresentado , a
chamada não foi atendida.
3 Prima a tecla OK para ver o número de telefone.
Se o número de telefone tiver mais de 12 dígitos, prima OK novamente para
ver o número completo.
4 Prima OK novamente para ver a hora e a data em que a chamada foi
recebida
5 Premir OK novamente permite adicionar esta entrada à lista telefónica, se
ainda não tiver sido guardada:
Prima OK, quando “ADICIONAR” (ADD) for apresentado no visor.
Introduza ou modifique o nome e prima OK. Introduza ou modifique o
número de telefone e prima OK. Seleccione a melodia (1-10), que tocará
quando este número estiver a chamar, com as teclas para cima/para baixo e
prima OK. A entrada será armazenada na lista telefónica.
6 Para telefonar a um correspondente, basta premir a tecla Levantado quando
o número de telefone ou o nome forem apresentados.
1 Percorra a lista até à chamada que pretende apagar e apague-a.
“APAGAR” (DELETE) é apresentado no visor.
2 Confirme ou cancele.
1 Prima a tecla apagar (2 segundos).
“APAGAR TUDO” (DELETE ALL) é apresentado no visor.
2 Confirme ou cancele.
Cada programação é confirmada no final com um tom de aviso duplo ou longo. Um
tom duplo confirma que a sua escolha foi validada. Um tom longo significa que a
modificação não foi levada em conta.
Quando o terminal se encontra na base, a base não toca ao receber uma chamada.
Portanto, quando o volume de toque do terminal está desligado e o terminal está na
base, o seu telefone deixa de tocar!
1 Entre no menu
2 Seleccione “TERMINAL” (HANDSET) e confirme.
3 Seleccione “VOL TOQUE IN” (INT RING VOL) para alterar o volume
interno ou “VOL TOQUE EX” (EXT RING VOL) para alterar o volume
externo e confirme.
HL_Balance D182.book Page 133 Friday, March 26, 2010 2:11 PM
134
Personalizar o terminal
6.2 Definir a melodia do toque
A base e cada telefone podem tocar com melodias diferentes. Os telefones podem tocar com uma
melodia diferente conforme a chamada é interna ou externa. É possível escolher entre 10 melodias
de toque diferentes.
6.3 Activação/desactivação de tons de aviso
Os terminais podem emitir tons de aviso quando se prime uma tecla, quando as pilhas estão fracas
ou quando o terminal está fora de cobertura.
Ligar/desligar tons de teclado
Pilha fraca
Telefone fora de cobertura
4 Seleccione o volume pretendido (1 a 5 ou “DESLIGADO” (OFF))
5 Confirme ou volte ao menu anterior.
1 Entre no menu
2 Seleccione “CONFIG” (SETUP) e confirme.
3 Seleccione “TERMINAL” (HANDSET) e confirme.
4 Seleccione “MELODIA INT” (INT MELODY) para alterar a melodia
interna ou “MELODIA EXT” (EXT MELODY) para alterar a melodia
externa e confirme.
5 Seleccione uma melodia (1 a 10).
6 Prima a tecla OK para confirmar ou voltar ao menu anterior.
1 Entre no menu
2 Seleccione “TERMINAL” (HANDSET) e confirme.
3 Seleccione “TOQUE” (BEEP) e confirme.
4 Seleccione “TONS TECLAS” (KEYTONE) e confirme.
5 Seleccione “LIGADO” (ON) para activar ou “DESLIGADO” (OFF) para
desactivar e confirme.
1 Entre no menu
2 Seleccione “TERMINAL” (HANDSET) e confirme.
3 Seleccione “TOQUE” (BEEP) e confirme.
4 Seleccione “BAT FRACA” (LOW BATTERY) e confirme.
5 Seleccione “LIGADO” (ON) para activar ou “DESLIGADO” (OFF) para
desactivar e confirme.
1 Entre no menu
2 Seleccione “TERMINAL” (HANDSET) e confirme.
3 Seleccione “TOQUE” (BEEP) e confirme.
4 Seleccione “FORA ALCANCE” (OUT RANGE) e confirme.
5 Seleccione “LIGADO” (ON) para activar ou “DESLIGADO” (OFF) para
desactivar e confirme.
HL_Balance D182.book Page 134 Friday, March 26, 2010 2:11 PM
Português
135
Personalizar o terminal
6.4 Nome do telefone
Pode alterar o nome apresentado no terminal (máx. 9 caracteres). Esta função permite personalizar
cada terminal.
6.5 Resposta automática
Quando se recebe uma chamada e o terminal está na base, o telefone atende automaticamente
quando é levantado. Esta é a predefinição, que pode ser desligada:
6.6 Reinicializar o terminal
É possível repor a configuração predefinida original do telefone. Esta é a configuração instalada
quando recebeu o telefone.
Para repor as configurações predefinidas:
Os parâmetros predefinidos são:
Tons de aviso de pilha fraca Ligado
Tons de aviso de fora de cobertura Desligado
Tom de teclado Ligado
Resposta automática Ligado
Melodia interna 1
Volume interno 3
Melodia externa 3
Volume externo 3
Volume de audição 3
Lista telefónica Vazia
Lista de registo de chamadas Vazia
Lista de remarcação Vazia
Código PIN 0000
Modo de marcação DTMF
Bloqueio do teclado Desligado
1 Entre no menu
2 Seleccione “TERMINAL” (HANDSET) e confirme.
3 Seleccione “NOME” (NAME) e confirme.
4 Introduza o nome que pretende e confirme.
Prima de novo a tecla Apagar para apagar um carácter. Prima e mantenha
premida a tecla da lista de telefones para sair do menu sem efectuar quaisquer
modificações a esta conta.
1 Entre no menu
2 Seleccione “TERMINAL” (HANDSET) e confirme.
3 Seleccione “ATEND AUTO” (AUTO ANSWER) e confirme.
4 Seleccione “LIGADO” (ON) para activar ou “DESLIGADO” (OFF) para
desactivar e confirme.
1 Entre no menu
2 Seleccione “CONFIG” (SETUP) e confirme.
3 Seleccione “CONF ORIGEM” (DEFAULT) e confirme.
4 Introduza o código PIN de 4 dígitos (predefinição = 0000) e confirme.
4
GHI
6
MNO
5
JKL
4
GHI
6
MNO
5
JKL
HL_Balance D182.book Page 135 Friday, March 26, 2010 2:11 PM
136
Configuração da Base
6.7 Bloqueio do teclado
O teclado pode ser bloqueado para que não seja possível modificar as configurações nem possam
ser marcados números de telefone. O ícone é apresentado no visor quando o teclado está
bloqueado.
Bloquear o teclado
Desbloquear o teclado
6.8 Acertar o relógio
6.9 Acertar o alarme
7 Configuração da Base
7.1 Ajustar o volume de toque
Volume de toque da base
Pode escolher entre 5 níveis de volume do toque e “DESLIGADO”.(OFF).
Repor as configurações predefinidas apagará todas as entradas na lista telefónica
e no registo de chamadas. O código PIN também é reposto para 0000.
1 Prima e mantenha premida a tecla ‘ durante 3 segundos. O teclado será
bloqueado.
1 Prima qualquer tecla, “PRIMA ” (PRESS) é apresentado no visor.
2 Prima a tecla ‘ nos 3 segundos seguintes.
1 Entre no menu
2 Seleccione “DATA - HORA” (DATE - TIME) e confirme.
3 Seleccione “ACERT RELOG” (CLOCK SET) e confirme.
4 Introduza as horas (formato de 24h) e confirme.
1 Entre no menu
2 Seleccione “DATA - HORA” (DATE - TIME) e confirme.
3 Seleccione “ACERT ALARM” (ALARM SET) e confirme.
4 Seleccione “LIGADO” (ON) para ligar o alarme e confirme.
Introduza as horas (formato de 24h) a que o alarme deve ser activado e
confirme.
OU
Seleccione “DESLIGADO” (OFF) para desligar o alarme e confirme.
1 Entre no menu
2 Seleccione “CONFIG” (SETUP) e confirme.
3 Seleccione “VOLUME BASE” (BASE VOLUME) e confirme.
4 Seleccione o volume pretendido (“DESLIGADO” (OFF) ou 1 a 5)
5 Confirme ou volte ao menu anterior.
4
GHI
6
MNO
5
JKL
4
GHI
6
MNO
5
JKL
HL_Balance D182.book Page 136 Friday, March 26, 2010 2:11 PM
Português
137
Configuração da Base
7.2 Definir a melodia do toque
A base e cada telefone podem tocar com melodias diferentes. Para configurar a melodia da base:
7.3 Alterar o código PIN
Certas funções só estão disponíveis para utilizadores que conhecem o código PIN.
Por predefinição, o código PIN é 0000. Para alterar o código PIN:
7.4 Definir o modo de marcação
Existem dois tipos de modo de marcação: Marcação DTMF/por tons (mais comum) e marcação
por impulsos (para instalações mais antigas).
Para alterar o modo de marcação:
7.5 Duração do tempo Flash
Prima a tecla Flash ‘R’ (Tecla 7 - Imagem 2c do terminal) para utilizar determinados serviços na
linha externa como, por exemplo, “chamada em espera” (se a empresa de telecomunicações
fornecer esta funcionalidade) ou para transferir chamadas se estiver a utilizar uma central (PABX).
A tecla Flash ‘R’ efectua uma breve interrupção da linha. Pode configurar o tempo flash para
100ms ou 250ms.
1 Entre no menu
2 Seleccione “CONFIG” (SETUP) e confirme.
3 Seleccione “MELODIA BASE” (BASE MELODY) e confirme.
4 Seleccione uma melodia (1 a 5).
5 Confirme ou volte ao menu anterior.
1 Entre no menu
2 Seleccione “CONFIG” (SETUP) e confirme.
3 Seleccione “CODIGO PIN” (PIN CODE) e confirme.
4 Introduza o código PIN antigo de 4 dígitos e confirme.
5 Introduza um novo código PIN de 4 dígitos e confirme.
6 Introduza novamente o código PIN novo e confirme.
1 Entre no menu
2 Seleccione “CONFIG” (SETUP) e confirme.
3 Seleccione “MODO MARC” (DIAL MODE) e confirme.
4 Seleccione o modo de marcação e confirme.
1 Entre no menu
2 Seleccione “CONFIG” (SETUP) e confirme.
3 Seleccione “RECALL” e confirme.
4 Seleccione “RECALL1” para um tempo flash breve (100ms) ou
“RECALL2” para um tempo flash longo (250ms) e confirme.
4
GHI
6
MNO
5
JKL
4
GHI
6
MNO
5
JKL
4
GHI
6
MNO
5
JKL
HL_Balance D182.book Page 137 Friday, March 26, 2010 2:11 PM
138
Gerir vários telefones
8 Gerir vários telefones
8.1 Adicionar um telefone novo
É possível registar telefones novos na base se esses telefones suportarem o protocolo DECT GAP.
A base pode suportar um máximo de 5 telefones. Se já tiver 5 telefones e pretender adicionar outro,
ou modificar um telefone, primeiro deve apagar um telefone e, em seguida, associar o telefone
novo.
Para colocar a base no modo de registo:
Registar um terminal novo:
Se o seu terminal adicional for um Topcom Balance
Se o terminal for de outro modelo
Depois de iniciar o procedimento de registo na base, consulte o manual do telefone para obter
informações sobre como registar o telefone. O telefone deve ser compatível com GAP.
O ícone e o texto "NOT REG" pisca no visor, quando o telefone não está associado à base.
Quando um telefone está associado a uma base, é-lhe atribuído um número de telefone pela base.
É este número que é apresentado no telefone depois do nome e que deve ser utilizado para
chamadas internas.
8.2 Remover um telefone
Este procedimento deverá ser efectuado num terminal diferente do que pretende remover.
Este procedimento só é necessário se tiver anulado o registo de um terminal ou se
tiver comprado um terminal novo.
1 Prima e mantenha premida a tecla Paging na base durante 6 segundos. A
base emite então um tom de aviso.
2 Entre no menu
3 Seleccione “REGISTO” (REGISTER) e confirme.
4 Seleccione “BASE REGIST” (REG BASE) e confirme.
5 Seleccione o número da base que pretende associar ao terminal (1-4) e
confirme. (Os números a piscar já estão em uso.)
6 Introduza o código PIN da base (0000 por predefinição) e confirme.
O terminal começa a procurar a base DECT Se o terminal localizar a base, é
apresentado o número de identificação da base.
7 Confirmar ou parar.
Se o telefone não localizar a base, regressa ao modo de espera passados alguns
segundos. Tente novamente, alterando o número da base e certifique-se de que
não está num ambiente com interferência. Coloque-se mais próximo da base.
O perfil DECT GAP só garante que as funções básicas de chamada funcionam
correctamente entre diferentes marcas/modelos. Existe a possibilidade de
determinados serviços (como CLIP) não funcionarem correctamente.
1 Entre no menu
2 Seleccione “CONFIG” (SETUP) e confirme.
3 Seleccione “APAGAR TERM” (DEL HANDSET) e confirme.
4
GHI
6
MNO
5
JKL
4
GHI
6
MNO
5
JKL
HL_Balance D182.book Page 138 Friday, March 26, 2010 2:11 PM
Português
139
SMS
8.3 Configurar um telefone noutra base
Caso pretenda utilizar um terminal Topcom Balance com uma base de outro modelo. O telefone
deve ser compatível com GAP.
8.4 Seleccionar uma base
Pode mudar o terminal entre bases. Os terminais podem ser registados em até 4 bases em
simultâneo. Ao seleccionar a base, a base seleccionada actualmente é indicada através de um
número de base a piscar.
Se seleccionar “AUTO”, o terminal procura automaticamente outra base quando estiver fora de
cobertura. O terminal tem primeiro de ser registado em cada base individualmente.
9SMS
Pode enviar e receber SMS com o seu telefone Topcom Balance. Esta secção indica-lhe como
utilizar a funcionalidade de SMS. Pode armazenar um total de 15 mensagens SMS enviadas e
recebidas, cada uma com até 160 caracteres.
9.1 Como escrever uma mensagem SMS
O método é semelhante a introduzir um nome na agenda telefónica (Ver "3.15 Utilizar o teclado
alfanumérico").
Para introduzir um espaço prima ‘1’.
4 Introduza o código PIN da base (0000 por predefinição) e confirme.
5 Seleccione o terminal a ser removido e confirme.
1 Para colocar a base no modo de registo, consulte o manual de utilizador da
base.
2 Entre no menu
3 Seleccione “REGISTO” (REGISTER) e confirme.
4 Seleccione “BASE REGIST” (REG BASE) e confirme.
5 Seleccione o número da base que pretende associar ao terminal e confirme.
6 Introduza o PIN da base e confirme.
O terminal começa a procurar a base DECT Se o terminal localizar a base, é
apresentado o número de identificação da base.
7 Confirmar ou parar.
1 Entre no menu
2 Seleccione “REGISTO” (REGISTER) e confirme.
3 Seleccione “SELEC BASE” (SELECT BASE) e confirme.
4 Seleccione uma base ou seleccione “AUTO” e confirme.
Quando tem a selecção automática da base e o terminal está fora da cobertura da
base actual, o terminal procura a base mais forte em modo de espera (não o faz
durante uma conversação).
Antes enviar e receber mensagens de texto SMS tem de definir o número de telefone
do Centro SMS da sua rede para as mensagens enviadas e recebidas.
(Consulte " Números do centro de serviço SMS").
4
GHI
6
MNO
5
JKL
4
GHI
6
MNO
5
JKL
4
GHI
6
MNO
5
JKL
HL_Balance D182.book Page 139 Friday, March 26, 2010 2:11 PM
140
SMS
9.2 Enviar uma mensagem SMS
9.3 Leia e visualizar a lista de mensagens recebidas (Caixa de entrada)
O visor do telefone Topcom Balance indica o número de mensagens novas recebidas. é
apresentado no visor. O LED SMS fica a piscar.
Um sinal sonoro indica que recebeu uma mensagem.
9.4 Utilizadores múltiplos
Com o seu telefone Topcom Balance, pode registar até 5 telefones terminais numa única base.
Cada telefone terminal tem o seu próprio número de telefone (1-5) o qual é também o número do
terminal para onde enviar mensagens pessoais. Todos os telefones têm também o número de
terminal standard ‘0’. Para receber mensagens SMS pessoais, é necessário dar aos seus
correspondentes o Número do Terminal (0-9) que eles têm de adicionar ao número de telefone
standard (ver abaixo). Por exemplo, se tiver um segundo telefone (Terminal 2) este terá o número
de terminal = 2.
Caso não seja adicionado o número de terminal ao seu número de telefone, ou se tiver sido
adicionado ‘0’, todos os telefones recebem as mensagens.
1 Entre no menu
2 Seleccione “SMS” e confirme.
3 Seleccione “ESCREVER” (WRITE) e confirme.
4 Comece a escrever a mensagem e confirme.
5 Introduza o número de telefone e confirme que pretende enviar a
mensagem.
A mensagem SMS é enviada automaticamente.
Quando o número de mensagens novas é indicado no visor.
1 Prima a tecla OK. O número de telefone da mensagem mais recente é
apresentado em primeiro lugar.
Quando o número de mensagens novas não é apresentado.
1 Entre no menu
2 Seleccione “SMS” e confirme.
3 Seleccione “CAIX ENTRADA” (INBOX) e confirme.
O número de telefone da mensagem mais recente é apresentado em primeiro
lugar.
Percorra todas as mensagens e prima OK para ler a mensagem.
As mensagens marcadas com ‘*’ antes do número de telefone são mensagens
não lidas.
Percorra a mensagem e prima OK depois de a ter lido toda.
Avance de modo a seleccionar uma das opções seguintes:
Responder: Editar a mensagem utilizando o teclado alfanumérico e enviá-la.
Reencaminhar: Reencaminhar a mensagem guardada para outro utilizador.
Siga as instruções que se aplicam ao envio de uma mensagem SMS (Ver "9.2
Enviar uma mensagem SMS").
Apagar ?: Apagar a mensagem. Prima OK novamente para confirmar.
Detalhes: Para ver o número de telefone, a data e a hora da mensagem. Prima
OK para validar.
Prima a tecla MUTE para regressar ao menu da caixa de entrada
4
GHI
6
MNO
5
JKL
4
GHI
6
MNO
5
JKL
HL_Balance D182.book Page 140 Friday, March 26, 2010 2:11 PM
Português
141
SMS
Pode alterar o número de terminal para outro, mas apenas pode escolher números entre 6-9 (Ver
" Configurar o número de terminal").
Receber SMS pessoais
Ler SMS pessoais
Quando uma nova mensagem é recebida, o seu Topcom Balance emite um sinal sonoro. O visor
mostra e o número de mensagens novas.
OU
9.5 Configuração dos SMS
Ligar/desligar sinal de alerta de SMS
O seu telefone pode tocar uma melodia para anunciar a recepção de uma mensagem de texto.
Números do centro de serviço SMS
Para enviar e receber mensagens de texto SMS é necessário o número de telefone do Centro de
SMS da sua Rede. Este números foram carregados previamente no telefone Topcom Balance. Se
eliminar acidentalmente os números do Centro de Serviços de ENVIAR ou RECEBER SMS, será
necessário introduzi-los novamente para que o Serviço SMS funcione.
O Topcom Balance pode armazenar 2 números de centro de serviços ENVIAR SMS e 2 números
de centro de serviços para RECEBER SMS.
Para definir os números do centro de serviços para enviar SMS
Os seus correspondentes necessitarão de adicionar o seu Número de Terminal ao
número de telefone quando pretenderem enviar mensagens SMS pessoais.
Por exemplo, se o seu Número de Terminal pessoal for "1" e o seu número de
telefone for 123456789, os seus correspondentes deveriam enviar as mensagens
SMS para o:1234567891! Este é o número que tem de memorizar e dar aos seus
correspondentes.
Prima a tecla OK
Na lista de SMS, as mensagens pessoais privadas são identificadas com o
ícone de chave no visor.
1 Entre no menu
2 Seleccione “SMS” e confirme.
3 Seleccione “MSG PRIVADA” (PERSONAL SMS) e confirme. O número
de telefone da mensagem mais recente é apresentado em primeiro lugar.
1 Entre no menu
2 Seleccione “SMS” e confirme.
3 Seleccione “CONFIGURAÇÃO” (SMS SETTINGS) e confirme.
4 Seleccione “MSG ALERTA” (MSG ALERT) e confirme.
5 Seleccione “LIGADO” (ON) ou “DESLIGADO” (OFF) e confirme.
6 Seleccione a melodia pretendida e confirme, regressando ao menu anterior.
1 Entre no menu
2 Seleccione “SMS” e confirme.
3 Seleccione “CONFIGURAÇÃO” (SMS SETTINGS) e confirme.
4 Seleccione “CENTRO ENVIO” (SEND CENTRE) e confirme.
HL_Balance D182.book Page 141 Friday, March 26, 2010 2:11 PM
142
SMS
Para definir os números do centro de serviços receber SMS
Seleccione o centro de SMS para enviar SMS
Dado que pode configurar 2 centros de envio de SMS, terá de seleccionar um deles antes de enviar
as suas mensagens:
Configurar o número de terminal
Cada terminal tem o número de terminal ‘0’ e o número de terminal = número do terminal (1-5).
Caso seja necessário, pode alterar o número de terminal para outro número (6-9):
Memória cheia
Quando a memória fica cheia, o visor apresenta a mensagem "MEM CHEIA" (MEMORY FULL).
Deixa de poder enviar ou receber SMS. Para continuar a receber SMS, pode apagar algumas ou
todas as mensagens. Para apagar todas as mensagens na “CAIX ENTRADA” (INBOX) ou “MSG
PRIVADA (PERSONAL SMS):
5 Seleccione “ENVIAR 1” (SEND 1) ou “ENVIAR 2” (SEND 2) e confirme.
6 Introduza o número de telefone do servidor de SMS
1 Entre no menu
2 Seleccione “SMS” e confirme.
3 Seleccione “CONFIGURAÇÃO” (SMS SETTINGS) e confirme.
4 Seleccione “CENTRO RECEP” (RCV CENTRE) e confirme.
5 Seleccione “RECEB. 1” (SEND 1) ou “RECEB. 2” (SEND 2) e confirme.
6 Introduza o número de telefone do servidor de SMS
1 Entre no menu
2 Seleccione “SMS” e confirme.
3 Seleccione “CONFIGURAÇÃO” (SMS SETTINGS) e confirme.
4 Seleccione “CENTRO MSG” (SEND CENTRE) e confirme.
5 Seleccione “ENVIAR 1” (SEND 1) ou “ENVIAR 2” (SEND 2) e confirme.
1 Entre no menu
2 Seleccione “SMS” e confirme.
3 Seleccione “CONFIGURAÇÃO” (SMS SETTINGS) e confirme.
4 Seleccione “TERMINAL NR” (TERMINAL NO) e confirme.
5 Apague o número de terminal antigo e introduza o novo número de terminal
(0, 6-9).
6 Prima OK para validar.
1 Entre no menu
2 Seleccione “SMS” e confirme.
3 Seleccione “CONFIGURAÇÃO” (SMS SETTINGS) e confirme.
4 Seleccione “APAGAR TUDO” (DELETE ALL) e confirme.
5 Seleccione “CAIX ENTRADA” (INBOX) ou “MSG PRIVADA”
(PERSONAL SMS) e confirme.
6 “CONFIRMAR ?” (CONFIRM ?) é apresentado.
7 Confirme ou cancele.
4
GHI
6
MNO
5
JKL
4
GHI
6
MNO
5
JKL
4
GHI
6
MNO
5
JKL
HL_Balance D182.book Page 142 Friday, March 26, 2010 2:11 PM
Português
143
Diagnóstico de avarias
10 Diagnóstico de avarias
11 Características técnicas
Sintoma Causa possível Solução
O visor não funciona As pilhas não estão carregadas Verifique a posição das pilhas
Recarregue as pilhas
Telefone desligado Ligue o telefone
Sem som Fio do telefone mal ligado Verifique a ligação do fio do
telefone
A linha foi ocupada por outro
telefone
Espere até que o outro telefone
desligue
O ícone está a piscar
Telefone fora de cobertura Aproxime o telefone da base
A base está sem alimentação
eléctrica
Verifique a ligação da rede
eléctrica à base
O telefone não está registado na
base
Registe o telefone na base
A base ou o telefone não toca O volume de toque está desligado
ou baixo
Regule o volume de toque
O som está bom, mas não há
comunicação
O modo de marcação está mal Ajuste o modo de marcação
(impulsos/MF)
Não é possível transferir uma
chamada da central telefónica
O tempo Flash é demasiado curto
ou longo
Altere o tempo Flash
O telefone não reage quando
se primem as teclas
Erro de manuseio Retire as pilhas e volte a colocá-
las
Norma DECT(Digital Enhanced Cordless Telecommunications,
Telecomunicações Sem Fios Digitais Melhoradas)
GAP (Generic Access Profile - Perfil de Acesso Genérico)
Intervalo de frequências 1880 MHz a 1900 MHz
Número de canais 120 canais duplex
Modulação GFSK
Codificação de voz 32 kbit/s
Potência de emissão 10 mW (potência média por canal)
Alcance máximo 300 m em espaço aberto / 10-50m em interiores
Número de terminais Até 5
Fonte de alimentação
eléctrica da base
230V / 50 Hz / 7,5V DC 300mA
Pilhas do Terminal 2 pilhas recarregáveis, tipo AAA, NiMh 1,2V, 550mAh
Autonomia do terminal 200 horas em modo de espera
Tempo de conversação do
telefone
10 horas
HL_Balance D182.book Page 143 Friday, March 26, 2010 2:11 PM
144
Garantia Topcom
12 Garantia Topcom
12.1 Período de garantia
As unidades Topcom têm um período de garantia de 24 meses. O período de garantia entra em
efeito a partir da data de compra da unidade. Não há nenhuma garantia em pilhas padrão ou
recarregáveis (tipo AA/AAA).
Consumíveis e defeitos que causem um efeito negligenciável sobre o funcionamento ou o valor do
equipamento não se encontram cobertos por esta garantia.
A prova de garantia terá de ser dada com a apresentação da respectiva confirmação de compra, ou
uma cópia da mesma, na qual apareçam indicados a data de compra e o modelo da unidade.
12.2 Modo de funcionamento da garantia
Uma unidade defeituosa necessita de ser devolvida aos serviços centrais da Topcom juntamente
com uma nota de compra válida e um cartão de assistência ao cliente devidamente preenchido.
Caso a unidade desenvolva um defeito durante o período de garantia, a Topcom ou um centro de
serviços oficialmente por ela designado reparará qualquer defeito derivado de material ou falhas
de fabrico, reparando ou substituindo as unidades ou as peças defeituosas, sem qualquer custo
adicional. No caso de substituição, a cor e o modelo poderão ser diferentes dos da unidade
adquirida originalmente.
A data inicial de compra determinará o início do período de garantia. O período de garantia não
será prolongado no caso da unidade ser trocada ou reparada pela Topcom ou por qualquer um dos
seus centros de reparação.
12.3 Exclusões de garantia
Danos ou defeitos causados pelo tratamento ou operação incorrectos e danos resultantes da
utilização de peças ou acessórios não originais não são abrangidos pela garantia.
A garantia não cobre danos causados por factores externos, como relâmpagos, água e fogo, nem
quaisquer danos causados durante o transporte.
Não se poderá reclamar os direitos de garantia se o número de série que se encontra na unidade
tiver sido alterado, retirado ou tornado ilegível.
Qualquer reclamação de garantia não será válida se a unidade tiver sido reparada, alterada ou
modificada pelo comprador.
Este dispositivo apenas deve ser utilizado com pilhas recarregáveis. Se pretende substituir as
pilhas incluídas originalmente, verifique se as pilhas novas são adequadas e recarregáveis. NÃO
devem utilizar-se pilhas alcalinas nos telefones, em quaisquer circunstâncias.
Se utilizar pilhas alcalinas nos telefones, estas irão aquecer quando colocar o telefone na base e
poderão explodir. Qualquer dano causado não poderá ser recuperado pelo fabricante, e como tal
não se encontra coberto pelas condições da garantia. Quaisquer despesas de reparação ser-lhe-ão
facturadas.
Condições normais de
utilização
+5 °C to +45 °C
Modo de marcação Impulsos/Tons
Tempo Flash 100 ou 250 ms
HL_Balance D182.book Page 144 Friday, March 26, 2010 2:11 PM
Português
145
Eliminação do dispositivo (ambiente)
13 Eliminação do dispositivo (ambiente)
Quando o ciclo de vida do produto chega ao fim, não deve eliminar este produto
juntamente com os resíduos domésticos. Deve levá-lo a um ponto de recolha de
equipamentos eléctricos e electrónicos. O símbolo presente no produto, no manual
do utilizador e/ou na caixa dá essa indicação.
Alguns dos materiais do produto podem ser reutilizados se os colocar num ponto de
reciclagem. Ao reutilizar algumas das partes ou das matérias-primas dos produtos
utilizados, contribui de forma importante para a protecção do meio ambiente. Contacte as
autoridades locais se necessitar de mais informações sobre os pontos de recolha existentes na sua
área.
14 Limpeza
Limpe o telefone com um pano ligeiramente humedecido ou com um pano anti-estático. Nunca
utilize produtos de limpeza nem solventes abrasivos.
HL_Balance D182.book Page 145 Friday, March 26, 2010 2:11 PM
146
 

1  
      .   
        .
      .   
,   .   
        (   
  ).
             .
       .
          .
              1,5 m
  .      .
         .
            .
            ,
            
     , ..   .
2   
2.1     
           
:
    .
2.2   
....... “DISPLAY”.
         
  .
1             
       .
2          
   
     .
3         
       2A.
HL_Balance D182.book Page 146 Friday, March 26, 2010 2:11 PM

147
  
- 2A    -
A.  
B.  
C.  
2.3   
- 2B    -
A. 
B.  
1         2.
2       (+  -).
3       .
4        20 .
      ,    
  20 . ,     
.
A
B
C
+
-
-
+
A
B
HL_Balance D182.book Page 147 Friday, March 26, 2010 2:11 PM
148
  
2.4 / 
(LED)

1. 
2.  /
/ 
3.   / OK
4.  
/ 
5.  
6.  
7.  Int
8.  /
/ flash
9.  
10.  

11.  
 / 

12.   /
/ 

13.  

  ,     
   
:
12-05 HS1
3
4
5
6
7
8
1
9
12
11
2
10
1
2
ABC
3
DEF
4
GHI
5
JKL
6
MNO
7
PQRS
8
TUV
9
WXYZ
0
#
INT
R
- 2C  -
13
- 2D  -
- 2E  -
HL_Balance D182.book Page 148 Friday, March 26, 2010 2:11 PM

149
  
2.5 
2.6   
 Topcom Balance     .      
.       .
2.7   
 . 
  
    
   
       
   
   
     
 
  
   
    
    
   

  SMS
1         
,          .
2     .    
   (     ).
3    OK     
  
    .
         
 .
  
E (PHONEBOOK)
 (ADD ENTRY)
 (MODIFY ENTRY)
 (DELETE ENTRY)
SMS (SMS)
 (INBOX)
 (PERSONAL SMS)
 (WRITE)
  (DELETE ALL)
 SMS (SMS SETTINGS)
 (SETUP)
  (BASE VOLUME)
  (BASE MELODY)
. . (DEL HANDSET)
PIN (PIN CODE)
  (DIAL MODE)
 (DEFAULT)
HL_Balance D182.book Page 149 Friday, March 26, 2010 2:11 PM
150
  
3   
3.1 / 
3.2    
3.3   
    :
 (HANDSET)
 (BEEP)
   (INT RING VOL)
   (EXT RING VOL)
   (INT MELODY)
   (EXT MELODY)
  (AUTO ANSWER)
 (NAME)
 (LANGUAGE)
.  (KEYLOCK?)
/ -  (DATE - TIME)
./ (DATE SET)
  (CLOCK SET)
  (ALARM SET)
 (REGISTER)
  (SELECT BASE)
  (REG BASE)
1       /
    8 .   
  .
2       /
  8 .    .
1   
2  “” (HANDSET)  .
3  “” (LANGUAGE)  .
4     .
1     .
    
“ ”, 
     .
(. “6.5  ”.)
    .
2           
     .
  
HL_Balance D182.book Page 150 Friday, March 26, 2010 2:11 PM

151
  
3.4   
 
 
3.5   
3.6        
     .
1     ,    
.
2    .
3           
     .
    ,      
    .
1    .
2     ,    
.
3           
     .
1     .
2        
 (1
 5).
3           
     .
1     .
2         
(1  5).       .
3     ,  
 
     .
     ,    
         
  .
4           
     .
4
GHI
6
MNO
5
JKL
4
GHI
6
MNO
5
JKL
INT
4
GHI
6
MNO
5
JKL
INT
4
GHI
6
MNO
5
JKL
INT
HL_Balance D182.book Page 151 Friday, March 26, 2010 2:11 PM
152
  
3.7  
          !
        .
     :
3.8   
           .
3.9         
3.10   
       15 ,   - .
   ,       5 .
3.11  
         .
3.12  
          :
1     .
2         
(1  5).
3     ,     
 ‘ .
     ,    
 
       
  .
4           
     .
1          
        
.
1 
   ,        
   .
           
   .
1    .    ,  
     .
 
 “” (MUTE).
2          
.
1    /  2 .
INT
4
GHI
6
MNO
5
JKL
#
INT
HL_Balance D182.book Page 152 Friday, March 26, 2010 2:11 PM

153
  
3.13   ( )
3.14  
       10   .  
        ,   
.
3.15    
        .
           , 
    , .
    ,       .
 ,      ‘A’,    ‘2’  .  
   ‘B’,    ‘2’     .
     ‘A’      ‘B’,    ‘2’ 
,            
   ‘2’  .
   
  :


1  - 1
2A B C 2
3D E F 3
4G H I 4
5J K L 5
6M N O 6
7P Q R S 7
8T U V 8
9W X Y Z 9
00
1        .
       .
2         
.
1    .
2   .      
,
   .
  ,        
   OK!
3     ,    
.
4         
 .
   ‘1’     .
 
      .
4
GHI
6
MNO
5
JKL
HL_Balance D182.book Page 153 Friday, March 26, 2010 2:11 PM
154
E
4 E
  ,     50   .  
     12      20 .
    ,    “3.15  
 ”.
4.1       
4.2        
4.3       
4.4     
1   .
2  “” (PHONEBOOK)  .
3  “” (ADD ENTRY)  .
4     .
             
,    .
5     .
6    (1-10)  .
1  
 .
2          .
(      .)
      ,    OK.
       12 ,   
 OK        .
3     ,    
.
4           
     .
1   .
2  “” (PHONEBOOK)  .
3  “” (MODIFY ENTRY)  .
4        .
5  
     .
.
6     .
7    (1-10)  .
1   
2  “” (PHONEBOOK)  .
3  “” (DELETE ENTRY)  .
4
GHI
6
MNO
5
JKL
4
GHI
6
MNO
5
JKL
4
GHI
6
MNO
5
JKL
4
GHI
6
MNO
5
JKL
HL_Balance D182.book Page 154 Friday, March 26, 2010 2:11 PM

155
 
5
    ,       
  .         FSK  DTMF.
       ,      
.       ,     
  .
     40      (
 ),      .    
        .
    ,         
.
     :
4           
.
     “” (CONFIRM).
5   .
          
 .      
.
  15      
     .     
        ,  
   OK    .
         
  .
1     .
     ,      
“KVO” (EMPTY).
2    .     
,         
   .      , 
  .

   ,    .   
 ,   .
3    OK      .
       12 ,   
 OK        .
4     OK         
.
HL_Balance D182.book Page 155 Friday, March 26, 2010 2:11 PM
156
  
     :
      :
6   
6.1   
     / 
            
  .    5     
“” (OFF).
5          
 ,     :
 OK   “” (ADD)  .
        
 OK.       
    OK.    (1-10)  
        ,  
 /   OK.     
.
6         
         
 .
1          .
     “” (DELETE).
2   .
1      ( 2 ).
     “  ” (DELETE ALL).
2   .
         
 .         .
         .
      ,
     
  . ,     
         , 
     .
1   
2  “” (HANDSET)  .
3  “ I ” (INT RING VOL)     
   “  ” (EXT RING VOL)  
       .
4    [1  5  “”(OFF)].
5      .
HL_Balance D182.book Page 156 Friday, March 26, 2010 2:11 PM

157
  
6.2    
        .     
 ,          .  
   10  .
6.3 /  
          ,     
        .
/    
  
    
1   
2  “” (SETUP)  .
3  “” (HANDSET)  .
4  “ I ” (INT RING)     
   “  ” (EXT MELODY)  
       .
5    (  1   10).
6    OK      
.
1   
2  “” (HANDSET)  .
3
 “” (BEEP)  .
4  “ .” (KEYTONE)  .
5  “” (ON)     “” (OFF)   
   .
1   
2  “” (HANDSET)  .
3  “” (BEEP)  .
4  “ ” (LOW BATTERY)  .
5  “” (ON)     “” (OFF)  

   .
1   
2  “” (HANDSET)  .
3  “” (BEEP)  .
4  “ ” (OUT RANGE)  .
5  “” (ON)     “” (OFF)   
   .
HL_Balance D182.book Page 157 Friday, March 26, 2010 2:11 PM
158
  
6.4  
         ( 9 ).
        .
6.5  
,      ,      ,
        .    
,       :
6.6   
       .   
     .
     :
   :
   
    
  
  
   1
   3
   3
   3
 
  3
 
   
  
 PIN 0000
   (DTMF)
  
1   
2  “” (HANDSET)  .
3  “” (NAME)  .
4     .
        . 
          
 ,
      .
1   
2  “” (HANDSET)  .
3  “ ” (AUTO ANSWER)  .
4  “” (ON)     “” (OFF)   
   .
1   
2  “” (SETUP)  .
3  “” (SETUP)  .
4  
4  PIN (0000  ) 
.
4
GHI
6
MNO
5
JKL
4
GHI
6
MNO
5
JKL
HL_Balance D182.book Page 158 Friday, March 26, 2010 2:11 PM

159
 
6.7  
              
   .        
   .
  
  
6.8   
6.9  
7  
7.1   
  
   5      “” (OFF).
           
    . ,     
PIN  0000.
1       ‘  3 . 
  .
1   ,     “ ”
(PRESS )  .
2    ‘  3 
1   
2  “/-” (DATE - TIME)  .
3  “ ” (CLOCK SET)  .
4    ( 24 )  .
1   
2  “/-” (DATE - TIME)  .
3  “ ” (ALARM SET)  .
4  “” (ON)      .
   ( 24 )    
  .
 “” (OFF)      
.
1   
2  “” (SETUP)  .
3  “ ” (BASE VOLUME)  .
4   [“”(OFF)  1  5].
5      .
4
GHI
6
MNO
5
JKL
4
GHI
6
MNO
5
JKL
HL_Balance D182.book Page 159 Friday, March 26, 2010 2:11 PM
160
 
7.2    
        .      :
7.3   PIN
          PIN.
 ,   PIN  0000.      PIN:
7.4   
    : DTMF/  ()  
 (  ).
     :
7.5   flash
   flash “R” ( 7 -  2C )   
     ,  “ ” (  
    )        
   (PABX).   flash R    .
     flash 
100ms  250ms..
1   
2  “” (SETUP)  .
3  “ ” (BASE MELODY)  .
4    (  1   5).
5      .
1   
2  “” (SETUP)  .
3  “” (PIN CODE)  .
4    4  PIN  .
5  
 4  PIN  .
6     PIN   .
1   
2  “” (SETUP)  .
3  “ ” (DIAL MODE)  .
4      .
1   
2  “” (SETUP)  .
3  “” (RECALL)  .
4  “ 1” (RECALL1)    flash (100ms)
 “
 2” (RECALL2)    flash (250ms) 
.
4
GHI
6
MNO
5
JKL
4
GHI
6
MNO
5
JKL
4
GHI
6
MNO
5
JKL
HL_Balance D182.book Page 160 Friday, March 26, 2010 2:11 PM

161
  
8   
8.1   
           
 DECT GAP.
       5 .    5 , 
         ,     
       .
 
     :
   :
      Topcom Balance
      
      ,    
        .     
  
 GAP.
     “ /” (NOT REG)    
       .
      ,      .  
            

.
           
 .
1         6
  .      .
2   
3  “” (REGISTER)  .
4  “ ” (REG BASE)  .
5          
 (1-4)  . (    
  .)
6    PIN  (0000  ) 
.
         DECT.
     ,      .
7   .
      ,    
    .    
           
.     .
  DECT GAP        
  
 /.   
  (     - CLIP)  
 .
4
GHI
6
MNO
5
JKL
4
GHI
6
MNO
5
JKL
HL_Balance D182.book Page 161 Friday, March 26, 2010 2:11 PM
162
  
8.2  
             
.
8.3     
      Topcom Balance    . 
        GAP.
8.4  
       .    
     4 .     ,  
        .
  “” (AUTO)        
  .   
      .
1   
2  “” (SETUP)  .
3  “. O” (DEL HANDSET)  .
4    PIN  (0000  ) 
.
5 Ǽ       .
1      .   
.
2 
 
3  “” (REGISTER)  .
4  “ ” (REG BASE)  .
5          
  .
6    PIN    .
        DECT.    
 ,   
  .
7   .
1   
2  “” (REGISTER)  .
3  “ ” (SELECT BASE)  .
4    “” (AUTO)  .
          
    ,        
      (   
).
4
GHI
6
MNO
5
JKL
4
GHI
6
MNO
5
JKL
4
GHI
6
MNO
5
JKL
HL_Balance D182.book Page 162 Friday, March 26, 2010 2:11 PM

163
SMS
9SMS
       SMS    Topcom Balance.  
        SMS.   
 15     SMS,      160
.
9.1   SMS
           (. “3.15  
 ”).
   ,   “1”.
9.2   SMS
9.3        
()
   Topcom Balance          . 
    .    SMS   .
       .
        SMS    
    SMS      
. (. “    SMS”).
1   
2  “SMS”  .
3  “” (WRITE)  .
4     .
5         
.
SMS   .
       .
1   
OK.      
  .
      .
1   
2  “SMS”  .
3  “” (INBOX)  .
        .
       OK    
.

  ‘*’       
 .
       OK   
  .
4
GHI
6
MNO
5
JKL
4
GHI
6
MNO
5
JKL
HL_Balance D182.book Page 163 Friday, March 26, 2010 2:11 PM
164
SMS
9.4  
   Topcom Balance      5    .
        (1-5)     
    .       
  ‘0’.      SMS,   
   
  ,      
    ( ).  ,   2 
( 2),        = 2.
      ‘0’    ,    
   .
  
  ,       6-9 (. “ 
  ”).
 SMS  
 SMS  
   ,  Topcom Balance   .    
    .
        :
ǹʌȐȞIJȘıȘ (Reply):       
   .
ȆȡȠȫșȘıȘ (Forward):      
.         
SMS (. “9.2   SMS”).
ǻȚĮȖȡĮijȒ? ’ (Delete ?):   .  OK
 
.
ȁİʌIJȠȝȑȡİȚİȢ (Details):      ,  
    .    .
         
           
         SMS.
..         “1”   
  
 123456789,        
 SMS  1234567891.          
   .
   OK.
  SMS,        
  .
1   
2  “SMS”  .
3  “” (PERSONAL SMS)
 . 
       .
HL_Balance D182.book Page 164 Friday, March 26, 2010 2:11 PM

165
SMS
9.5  SMS
    SMS  /  (ON/OFF)
               
.
   SMS
        SMS     
 SMS   .       
Topcom Balance.
           SMS, 
          SMS.
 Topcom Balance    2    SMS  2 
  SMS.
       SMS
        SMS
 
 SMS   SMS
   2   SMS, ,       
   :
1   
2  “SMS”  .
3  “ SMS” (SMS SETTINGS)  .
4  “ ” (MSG ALERT)  .
5  “” (ON)  “” (OFF)  .
6    ,   

 .
1   
2  “SMS”  .
3  “ SMS” (SMS SETTINGS)  .
4  “ ” (SEND CENTRE)  .
5  “ 1” (SEND 1)  “ 2” (SEND 2) 
.
6       SMS
1   
2  “SMS”  .
3  “ SMS” (SMS SETTINGS)  .
4  “ ” (RCV CENTRE)  .
5
 “ 1” (RECEIVE 1)  “ 2” (RECEIVE 2) 
.
6       SMS
1   
2  “SMS”  .
3  “ SMS” (SMS SETTINGS)  .
4    (“SEND SERVICE”)  .
4
GHI
6
MNO
5
JKL
4
GHI
6
MNO
5
JKL
HL_Balance D182.book Page 165 Friday, March 26, 2010 2:11 PM
166
 
   
      ‘0’    =   (1-
5).          (6-9)  :
 
    ,    “ ” (Memory Full)  . 
       SMS.   
  SMS,
       .       
   “” (INBOX)   “” (PERSONAL
SMS):
10  
5  “ 1” (SEND 1)  “ 2” (SEND 2) 
.
1   
2  “SMS”  .
3  “ SMS” (SMS SETTINGS)  .
4  “ ” (TERMINAL NO)  .
5           (0, 6-
9).
6    .
1   
2  “SMS”  .
3  “ SMS” (SMS SETTINGS)  .
4 
“ ” (DELETE ALL)  .
5  “” (PERSONAL SMS)  .
6    “?” (CONFIRM ?).
7   .
   
       

  
   

  
      
  
   
  
   
  
   
  
 
  

   

    

   
   
4
GHI
6
MNO
5
JKL
HL_Balance D182.book Page 166 Friday, March 26, 2010 2:11 PM

167
   
11    
12  Topcom
12.1    
  Topcom     24 .    
        .   
      ( AA/AAA).
            
    .
           
 ,           .
  
  
  
 
     

   
  
   

   ,  
 
       
(/)
    
  PABX
  flash  
   
   flash
  
   
     

   

DECT
(
D
igital
E
nhanced
C
ordless
T
elecommunications)
GAP
(
G
eneric
A
ccess
P
rofile)
  1880 MHz  1900 MHz
  120  
 GFSK
  32 kbit/s
  10 mW (    )
  300 .    /10-50 .   
   5
  230V / 50 Hz / 7,5V DC 300mA
  2   AAA, NiMh 1,2V,
550mAh
  200    
   10 
   +5 °C  +45 °C
   / 
 flash 100  250 ms
   
HL_Balance D182.book Page 167 Friday, March 26, 2010 2:11 PM
168
   (  
12.2      
           Topcom
          .
           ,  
   Topcom          
   ,        
      .   ,
              .
            
.       ,     
   Topcom     .
12.3  
             
,           
        .
         ,  .. 
,   ,       . 
      ,       
,      .
         ,    
  ,      .
         .
       ,   
       .   
        . 
        ,   
    .        
           
     .      .
13    (    
)
      ,       
           
      .   
      ,    / 
.
         ,    
     .    
      ,    
 .         
    ,
    .
14 
        .   
,    .
HL_Balance D182.book Page 168 Friday, March 26, 2010 2:11 PM
Polski
169
Instrukcja bezpieczestwa
Polski
1 Instrukcja bezpieczestwa
Korzystaj tylko z zaczonej adowarki. Nie wolno uywa innych adowarek, gdy moe
nastpi uszkodzenie ogniw akumulatora.
Naley uywa baterii tego samego typu. Nie wolno uywa zwykych baterii jednorazowego
uytku. Baterie naley wkada zgodnie z biegunami polaryzacji (oznaczonymi wewntrz
komory na baterie w suchawce).
Nie dotykaj adowarki ani styków wtyczki ostrymi lub metalowymi obiektami.
Moe zosta zakócone dziaanie niektórych urzdze medycznych.
Suchawka moe wywoywa nieprzyjemne odgosy w aparatach suchowych.
Nie umieszcza urzdzenia w wilgotnym pomieszczeniu lub w odlegoci mniejszej ni 1,5 m
od róda wody. Suchawk trzyma z dala od wody.
Nie uywa telefonu w miejscu, gdzie istnieje zagroenie wybuchem.
Pozbywanie si akumulatorów i konserwacja telefonu powinny odbywa si w sposób
przyjazny rodowisku.
Poniewa ten telefon nie moe by uywany w sytuacji braku prdu, w celu poczenia
z numerem alarmowym naley skorzysta z telefonu niezalenego od zasilania z sieci
elektrycznej, np. z telefonu komórkowego.
2 Rozpoczcie pracy
2.1 Jak korzysta z tej instrukcji
W tej instrukcji uyto nastpujcego sposobu oznaczania polece:
Klawisz do wcinicia.
Tekst....... „DISPLAY”.
Tekst, który pojawia si na wywietlaczu telefonu pokazuje si w prawej
kolumnie ujty w cudzysów.
HL_Balance D182.book Page 169 Friday, March 26, 2010 2:11 PM
170
Rozpoczcie pracy
2.2 Instalacja aparatu bazowego
- 2A Aparat bazowy, widok z tyu -
A. Gniazdko telefoniczne
B. Przewód zasilajcy
C. Kabel telefoniczny
2.3 Instalacja suchawki
- 2B Suchawka, widok z tyu -
A. Pokrywa
B. Akumulatorki
1 Podczy wtyczk zasilacza do gniazdka elektrycznego, a wtyczk na
drugim kocu przewodu do zcza na spodzie aparatu bazowego.
2 Podczy jeden koniec kabla telefonicznego do gniazdka telefonicznego
w cianie, a drugi do gniazdka na spodzie aparatu bazowego.
3 Uoy przewód telefoniczny i zasilajcy w rowkach prowadzcych na
spodzie aparatu bazowego, tak jak pokazano na rysunku 2A.
1 Otworzy komor akumulatorów, jak pokazano na rysunku 2B.
2 Woy akumulatory zgodnie z polaryzacj (+ i –).
3 Zamkn komor baterii.
4 Pozostawi suchawk na aparacie bazowym na 20 godzin.
Przed pierwszym uyciem telefonu naley upewni si, e akumulatory byy
adowane przez 20 godzin. W przeciwnym razie telefon nie bdzie dziaa
optymalnie.
A
B
C
+
-
-
+
A
B
HL_Balance D182.book Page 170 Friday, March 26, 2010 2:11 PM
Polski
171
Rozpoczcie pracy
2.4 Klawisze/Diody
Suchawka
1. Wywietlacz
2. Klawisz ponownego
wybierania/ pauza/ do góry
3. Menu/Klawisz OK
4. Klawisz dziennika rozmów/
w dó
5. Klawisz ksiki telefonicznej
6. Klawisze alfanumeryczne
7. Klawisz INT
8. W./ wy./ klawisz Flash
9. Blokowanie klawiatury
10. Klawisz funkcji
gonomówicej
11. Klawisz podnoszenia /
odkadania suchawki
12. Wyciszenie/ kasowanie/
wyjcie
Aparat bazowy
13. Klawisz przywoywania
Wywietlacz
W trybie czuwania wywietlacz pokazuje czas i numer
suchawki:
12-05 HS1
3
4
5
6
7
8
1
9
12
11
2
10
1
2
ABC
3
DEF
4
GHI
5
JKL
6
MNO
7
PQRS
8
TUV
9
WXYZ
0
#
INT
R
- 2C Suchawka -
13
- 2D Aparat bazowy -
- 2E Wywietlacz -
HL_Balance D182.book Page 171 Friday, March 26, 2010 2:11 PM
172
Rozpoczcie pracy
2.5 Symbole
2.6 Poruszanie si po menu
Telefon Topcom Balance posiada atwy w obsudze system menu. Kade menu zawiera list opcji.
Mapa menu jest przedstawiona w nastpnym podpunkcie.
2.7 Przegld menu
Suchawka podniesiona; trwa
Klawiatura suchawki zablokowana
Poczenie zewntrzne Jest uywana ksika telefoniczna
Poczenie wewntrzne
Niski poziom naadowania
Nowe numery na licie pocze
redni poziom naadowania
Odebrane poczenie Akumulatory naadowane
Nieodebrane poczenie Akumulatory rozadowane
Jest uywane menu Nowa poczta gosowa
Tryb gonomówicy Suchawka w zasigu bazy
Wskazanie, e wywietlany numer jest
duszy ni ekran (12 cyfr)
Antena miga, gdy suchawka nie jest
zarejestrowana w bazie
Nowa wiadomo SMS
1 Gdy suchawka jest wczona i w stanie czuwania, naley wcisn klawisz
menu, aby otworzy menu gówne.
2 Naley przewin list do
danej opcji menu. Opcje menu przewijaj si
w ptli (po przejciu do ostatniej opcji wraca si do pierwszej).
3 Naley nacisn klawisz OK, aby wywietli dalsze opcje lub potwierdzi
wywietlone ustawienia.
Wcisn klawisz kasowania, aby wróci do poprzedniego poziomu menu.
Menu Elementy podmenu
KSIKA TELEFONICZNA
DODAJ WPIS
ZMODYFIKUJ WPIS
USU WPIS
SMS
INBOX
PERSONAL SMS
WRITE
DELETE ALL
SMS SETTINGS
USTAWIENIA
GONO APARATU BAZOWEGO
MELODIA DZWONKA APARATU
BAZOWEGO
USU SUCHAWK
KOD PIN
TRYB WYBIERANIA
DOMYLNE
HL_Balance D182.book Page 172 Friday, March 26, 2010 2:11 PM
Polski
173
Uywanie telefonu
3 Uywanie telefonu
3.1 Wczanie/wyczanie suchawki
3.2 Zmiana jzyka menu
3.3 Odbieranie poczenia telefonicznego
Aby odebra poczenie:
SUCHAWKA
DWIKI
GONO DZWONKA PO. WEWN.
GONO DZWONKA PO. ZEWN.
MELODIA DZWONKA PO. WEWN.
MELODIA DZWONKA PO. ZEWN.
AUTOMATYCZNE ODBIERANIE
NAZWA
JZYK
BLOKADA KLAWIATURY?
DATA - CZAS
USTAWIENIE DATY
USTAWIENIE ZEGARA
USTAWIENIE BUDZIKA
REJESTRACJA
WYBÓR BAZY
REJESTRACJA BAZY
1 Wcinij i przytrzymaj przez 8 sekund klawisz w./wy. suchawki.
Suchawka bdzie szuka bazy.
2 Wcinij i przytrzymaj klawisz w./wy. przez 8 sekund. Wywietlacz
wyczy si.
1 Wejd do menu.
2 Wybierz „HANDSET” i potwierd.
3 Wybierz menu „LANGUAGE” i potwierd.
4 Wybierz jzyk i potwierd.
1 Wcinij klawisz podniesienia suchawki.
LUB
Podnie suchawk z aparatu bazowego, jeli jest wczona opcja
„Automatyczne odbieranie".
(Patrz “6.5 Automatyczne odbieranie”)
Zostaniesz poczony z rozmówc.
2 Nacinij klawisz odkadania suchawki lub poó suchawk z powrotem na
bazie.
Menu Elementy podmenu
HL_Balance D182.book Page 173 Friday, March 26, 2010 2:11 PM
174
Uywanie telefonu
3.4 Wykonywanie zewntrznych pocze telefonicznych
Wybieranie bezporednie
Wybieranie wstpne
3.5 Wykonywanie wewntrznych pocze telefonicznych
3.6 Przekierowanie rozmowy wewntrznej
Przekierowanie poczenia zewntrznego na inn suchawk.
3.7 Rozmowa konferencyjna
Jest moliwa tylko wtedy, gdy w bazie jest zarejestrowanych wicej suchawek ni jedna!
Mona rozmawia jednoczenie z rozmówc wewntrznym i zewntrznym.
W trakcie poczenia zewntrznego:
1 Nacinij klawisz podnoszenia suchawki, aby rozpocz dzwonienie.
2 Wybierz numer telefonu.
3 Nacinij klawisz odkadania suchawki lub poó suchawk z powrotem na
bazie.
Do poprawienia numeru uyj klawisza kasowania, aby usun wprowadzon
cyfr.
1 Wybierz numer telefonu.
2 Nacinij klawisz podnoszenia suchawki, aby rozpocz dzwonienie.
3 Nacinij klawisz odkadania suchawki lub poó suchawk z powrotem na
bazie.
1 Wcinij klawisz poczenia wewn
trznego.
2 Wprowad numer suchawki (1 do 5).
3 Nacinij klawisz odkadania suchawki lub poó suchawk z powrotem na
bazie.
1 Wcinij klawisz poczenia wewntrznego.
2 Wprowad numer suchawki (1 do 5), zewntrzny rozmówca zostanie
przeczony w tryb oczekiwania.
3 Gdy inna suchawka zostanie podniesiona, wcinij klawisz odkadania
suchawki, aby zawiesi i przekierowa poczenie.
Jeli wewntrzny rozmówca nie odbiera poczenia, wcinij ponownie klawisz
poczenia wewntrznego, aby przywróci poczenie zewntrzne.
4 Nacinij klawisz odkadania suchawki lub poó suchawk z powrotem na
bazie.
1 Wcinij klawisz poczenia wewntrznego.
2 Wprowad numer suchawki (1 do 5).
3 Gdy inna suchawka zostanie podniesiona, wcinij i przytrzymaj klawisz ‘ ’.
Jeli wewntrzny rozmówca nie odbiera poczenia, wcinij ponownie klawisz
poczenia wewntrznego, aby przywróci poczenie zewntrzne.
4
GHI
6
MNO
5
JKL
4
GHI
6
MNO
5
JKL
INT
4
GHI
6
MNO
5
JKL
INT
4
GHI
6
MNO
5
JKL
INT
INT
4
GHI
6
MNO
5
JKL
INT
HL_Balance D182.book Page 174 Friday, March 26, 2010 2:11 PM
Polski
175
Uywanie telefonu
3.8 Tryb gonomówicy
Umoliwia prowadzenie rozmowy z rozmówc bez podnoszenia suchawki .
3.9 Gono podczas rozmowy
3.10 Wywietlanie czasu trwania poczenia
Dugo trwania poczenia jest wywietlana po 15 sekundach, w minutach i sekundach.
Cakowity czas trwania poczenia jest wywietlany przez 5 sekund po zakoczeniu rozmowy.
3.11 Wyczenie mikrofonu
Mona wyczy mikrofon podczas rozmowy.
3.12 Klawisz pauzy
Podczas wybierania numeru mona wstawi odstp pomidzy dwie cyfry:
3.13 Lokalizowanie suchawki (funkcja przywoywania)
3.14 Pami ponownego wybierania
Mona oddzwoni do 10 ostatnio wybieranych numerów. Jeli wraz z numerem zapamita
si nazwisko w ksice telefonicznej, bdzie si ono wywietla zamiast numeru.
4 Nacinij klawisz odkadania suchawki lub poó suchawk z powrotem
na bazie.
1 Aby wczy lub wyczy tryb gonomówicy, nacinij klawisz trybu
gonomówicego podczas poczenia.
1 W trakcie rozmowy wcinij klawisz ze strzak w gór lub w dó, aby
odpowiednio zmieni gono.
Poziom gono w trybie gonomówicym jest nastawiany razem ze stacja bazow
w suchawce, tak jak opisano powyej.
1 Wcinij klawisz wyciszenia. Mona rozmawia swobodnie i nie by
syszanym przez rozmówc telefonicznego.
Wywietla si „MUTE”.
2 Powtórnie wcinij klawisz wyciszenia, aby powróci do zwykego trybu.
1 Wcinij klawisz ponownego wybierania/pauzy przez 2 sekundy.
1 Nacinij klawisz przywoywania na aparacie bazowym.
Wszystkie suchawki zarejestrowane w bazie zaczn dzwoni.
2 Wcinij klawisz na suchawce, aby przerwa dzwonienie.
1 Nacinij klawisz ponownego wybierania.
2 Wybierz numer. Jeli numer jest w ksice telefonicznej, zostanie
wywietlone nazwisko.
Gdy jest wywietlane nazwisko, mona przecza si pomidzy nazwiskiem
a numerem, przyciskajc klawisz OK!
3 Nacinij klawisz podnoszenia suchawki, aby rozpocz dzwonienie.
4 Nacinij klawisz odk
adania suchawki, aby wróci do stanu czuwania.
4
GHI
6
MNO
5
JKL
HL_Balance D182.book Page 175 Friday, March 26, 2010 2:11 PM
176
Ksika telefoniczna
3.15 Uywanie klawiatury alfanumerycznej
Na tym telefonie mona równie wprowadza znaki alfanumeryczne. Jest to uyteczne przy
wprowadzaniu nazwisk do ksiki telefonicznej, podawaniu nazwy suchawki itp.
Aby wybra liter, naley wcisn odpowiedni klawisz tyle razy, ile to konieczne.
Na przykad, aby wybra „A”, wcinij klawisz „2”jeden raz. Aby wybra „B”, wcinij
klawisz „2” dwa razy itd.
Aby wybra „A”, a nastpnie „B”, wcinij „2” jeden raz, odczekaj, a kursor przesunie si do
nastpnego znaku, wtedy wcinij klawisz „2” dwa razy.
Klawiatura zawiera nastpujce znaki:
Klawisz Pierwsze Drugie Trzecie Czwarte Pite
nacinicienacinicienacinicie nacinicie nacinicie
1 spacja - 1
2A B C 2
3D E F 3
4G H I 4
5J K L 5
6M N O 6
7P Q R S 7
8T U V 8
9W X Y Z 9
00
4 Ksika telefoniczna
W kadej suchawce mona zapisa do 50 numerów telefonów i nazwisk. Nazwiska mog
zawiera do 12 znaków, a numery do 20 cyfr.
Wprowadzanie znaków alfanumerycznych, patrz rozdzia “3.15 Uywanie klawiatury
alfanumerycznej”.
4.1 Dodawanie wpisu do ksiki telefonicznej
4.2 Dzwonienie przy wykorzystaniu wpisu w ksice telefonicznej
Nacinij klawisz „1”, aby wybra spacj.
Wcinij klawisz kasowania, aby usun znak.
1 Wejd do menu.
2 Wybierz menu „PHONEBOOK” i potwierd.
3 Wybierz „ADD ENTRY” i potwierd.
4 Wprowad nazwisko i potwierd.
Wcinij klawisz ksiki telefonicznej, aby wyj z menu bez zmodyfikowania
danych.
5 Wprowad numer i potwierd.
6 Wybierz melodi dzwonka (1-10) i potwierd.
1 Wcinij klawisz ksiki telefonicznej.
2 Wybierz nazwisko lub wprowad pierwsz liter nazwiska.
(elementy listy przewijaj si w kolejnoci alfabetycznej).
4
GHI
6
MNO
5
JKL
4
GHI
6
MNO
5
JKL
HL_Balance D182.book Page 176 Friday, March 26, 2010 2:11 PM
Polski
177
Identyfikacja rozmówcy
4.3 Modyfikacja nazwiska lub numeru
4.4 Kasowanie wpisu z ksiki telefonicznej
5 Identyfikacja rozmówcy
Podczas odbierania poczenia zewntrznego numer telefonu dzwonicego pokazuje si na
wywietlaczu suchawki. Telefon odbiera poczenia w obu trybach: FSK i DTMF. Numer mona
zobaczy take wtedy, gdy poczenie odbywa si przez sie. Jeli nazwisko jest zapisane w
ksice telefonicznej, jest take wywietlane na wywietlaczu!
Telefon moe przechowa na licie pocze 40 pocze (odebranych i nieodebranych), które
mona wywietli póniej. Ta funkcja jest dostpna tylko wtedy, gdy u operatora jest zamówiona
usuga identyfikacji rozmówcy.
Gdy pami jest pena, nowe poczenia automatycznie zastpuj najstarsze przechowywane
w pamici.
Wcinij klawisz OK, jeli wolisz najpierw widzie numer telefonu.
Jeli numer telefonu jest duszy ni 12 cyfr, wcinij ponownie klawisz OK,
aby zobaczy numer w caoci.
3 Nacinij klawisz podnoszenia suchawki, aby rozpocz dzwonienie.
4 Nacinij klawisz odkadania suchawki lub poó suchawk z powrotem
na bazie.
1 Wejd do menu.
2 Wybierz menu „PHONEBOOK” i potwierd.
3 Wybierz menu „MODIFY ENTRY” i potwierd.
4 Wybierz nazwisko do zmodyfikowania i potwierd.
5 Skasuj niepotrzebne znaki i wprowad nowe nazwisko.
Potwierdzenie.
6 Wprowad nowy numer i potwierd.
7 Wybierz melodi dzwonka (1-10) i potwierd.
1 Wejd do menu.
2 Wybierz menu „PHONEBOOK” i potwierd.
3 Wybierz „DELETE ENTRY” i potwierd.
4 Wybierz nazwisko lub wprowad pierwsz liter nazwiska i potwierd.
Na wywietlaczu pokae si „CONFIRM”.
5 Potwierd lub anuluj.
Ta usuga jest dostpna jedynie wtedy, gdy jest zamówiona u operatora
telefonicznego. Prosz skontaktowa si z odpowiednim operatorem telefonicznym.
Identyfikacja rozmówcy jest po 15 sekundach poczenia zastpowana czasem
trwania rozmowy. Dzwonicego mona zidentyfikowa równie po tym
czasie, naciskajc wielokrotnie klawisz OK dla nazwiska lub numeru.
Nowe lub nieodebrane poczenia s sygnalizowane przez ikon migajc
na wywietlaczu.
4
GHI
6
MNO
5
JKL
4
GHI
6
MNO
5
JKL
HL_Balance D182.book Page 177 Friday, March 26, 2010 2:11 PM
178
Identyfikacja rozmówcy
Sprawdzanie listy pocze:
Kady wpis mona skasowa osobno:
Aby skasowa wszystkie wpisy jednoczenie:
1 Wcinij klawisz listy pocze.
Jeli nie byo adnych pocze, na licie wywietli si „EMPTY”.
2 Przewijaj list pocze. Nazwiska dzwonicych poka si, jeli byy
wysane przez sie lub s zapisane w ksice telefonicznej. Jeli osigniesz
koniec listy, usyszysz krótki dwik.
Jeli wywietli si symbol , to oznacza, e to poczenie byo odbierane.
Jeli wywietli si symbol , to oznacza, e to poczenie nie byo odbierane.
3 Wcinij klawisz OK, aby zobaczy numer telefonu.
Jeli numer telefonu jest duszy ni 12 cyfr, wcinij ponownie klawisz OK,
aby zobaczy numer w caoci.
4 Ponownie wcinij klawisz OK, aby zobaczy dat i czas odebrania
poczenia.
5 Wcinij klawisz OK, aby doda wpis do ksiki telefonicznej, jeli numer
nie by jeszcze zapisany.
Wcinij OK, jeli na wywietlaczu jest pokazane „ADD”. Wprowad lub
zmodyfikuj nazwisko i wcinij OK. Wprowad lub zmodyfikuj numer
telefonu i wcinij OK. Za pomoc klawiszy strzaek w gór/w dó wybierz
melodi dzwonka (1-10), który bdzie odtwarzana, gdy nadejdzie
poczenie z tego numeru. Wpis zostanie zapamitany w ksice
telefonicznej.
6 Wcinij klawisz podnoszenia suchawki, aby oddzwoni do rozmówcy,
gdy jest wy
wietlony numer telefonu lub nazwisko.
1 Przewi list do poczenia, które chcesz skasowa i usu je.
Na wywietlaczu pokae si „DELETE”.
2 Potwierd lub anuluj.
1 Wcinij klawisz kasowania na duej (2 sekundy).
Na wywietlaczu pokae si „DELETE ALL”.
2 Potwierd lub anuluj.
HL_Balance D182.book Page 178 Friday, March 26, 2010 2:11 PM
Polski
179
Personalizacja suchawki
6 Personalizacja suchawki
6.1 Regulacja gonoci dzwonka
Gono dzwonka suchawki dla pocze wewntrznych/zewntrznych
Gono dzwonka suchawki dla pocze wewntrznych i zewntrznych moe by ustawiana
oddzielnie. Mona wybra sporód 5 poziomów gonoci lub „OFF” (wyczenie).
6.2 Wybieranie melodii dzwonka
Aparat bazowy i kada suchawka mog odtwarza inn melodi dzwonka. Suchawki mog
odtwarza róne melodie, w zalenoci od tego, czy poczenie jest wewntrzne, czy zewntrzne.
Mona wybiera sporód 10 rónych melodii dzwonka:
6.3 Wczanie/wyczanie dwików
Suchawka moe wydawa dwik przy wciskaniu klawisza, gdy jest niski poziom naadowania
akumulatorów lub suchawka jest poza zasigiem.
Wczanie/wyczanie dwiku wydawanego przy wciskaniu klawisza
Kade zaprogramowane ustawienie jest potwierdzane przez podwójny lub
pojedynczy dugi dwik. Podwójny dwik potwierdza dokonanie wyboru.
Dugi dwik oznacza, e nie zostay zmodyfikowane adne dane.
Jeli suchawka znajduje si na aparacie bazowym, nie bdzie on dzwoni, gdy
nadejdzie poczenie. Wic jeli dzwonek suchawki jest wyczony i suchawka
znajduje si na aparacie bazowym, telefon nie bdzie w ogóle dzwoni!
1 Wejd do menu.
2 Wybierz „HANDSET” i potwierd.
3 Wybierz „INT RING VOL”, aby zmieni gono dzwonka dla pocze
wewntrznych lub „EXT RING VOL”, aby zmieni gono dzwonka dla
pocze zewntrznych, i potwierd.
4 Wybierz poziom gonoci (od 1 do 5 lub „OFF”).
5 Potwierd lub wró do poprzedniego menu.
1 Wejd do menu.
2 Wybierz menu „SETUP” i potwierd.
3 Wybierz „HANDSET” i potwierd.
4 Wybierz „INT MELODY”, aby zmieni melodi dla pocze
wewntrznych lub „EXT MELODY”, aby zmieni melodi dla pocze
zewntrznych, i potwierd.
5 Wybierz melodi dzwonka (1 do 10).
6 Wcinij klawisz OK, aby potwierdzi lub wró do poprzedniego menu.
1 Wejd do menu.
2 Wybierz „HANDSET” i potwierd
.
3 Wybierz „BEEP” i potwierd.
4 Wybierz „KEYTONE” i potwierd.
5 Wybierz „ON”, aby wczy, lub „OFF”, aby wyczy, i potwierd.
HL_Balance D182.book Page 179 Friday, March 26, 2010 2:11 PM
180
Personalizacja suchawki
Niski poziom baterii
Suchawka poza zasigiem
6.4 Nazwa suchawki
Mona zmieni nazw wywietlan na suchawce (maks. 9 znaków). Ta funkcja zapewnia
personalizacj kadej suchawki.
6.5 Automatyczne odbieranie
Jeli nadejdzie poczenie w czasie, gdy suchawka jest w aparacie bazowym, poczenie zostanie
automatycznie odebrane w momencie podniesienia suchawki. Jest to ustawienie domylne,
ale mona je wyczy:
6.6 Reset suchawki
Mona wróci do fabrycznej konfiguracji ustawie. Jest to konfiguracja, która bya ustawiona,
gdy byo odbierane pierwsze poczenie.
Aby wróci do ustawie domylnych:
1 Wejd do menu.
2 Wybierz „HANDSET” i potwierd.
3 Wybierz „BEEP” i potwierd.
4 Wybierz „LOW BATTERY” i potwierd.
5 Wybierz „ON”, aby wczy, lub „OFF”, aby wyczy, i potwierd.
1 Wejd do menu.
2 Wybierz „HANDSET” i potwierd.
3 Wybierz „BEEP” i potwierd.
4 Wybierz „OUT RANGE” i potwierd.
5 Wybierz „ON”, aby wczy, lub „OFF”, aby wyczy, i potwierd.
1 Wejd do menu.
2 Wybierz „HANDSET” i potwierd.
3 Wybierz „NAME” i potwierd.
4 Wprowad nazw i potwierd.
Wcinij klawisz kasowania, aby usun
znak. Wcinij i przytrzymaj klawisz
ksiki telefonicznej, aby wyj z menu bez zmodyfikowania danych.
1 Wejd do menu.
2 Wybierz „HANDSET” i potwierd.
3 Wybierz „AUTO ANSWER” i potwierd.
4 Wybierz „ON”, aby wczy, lub „OFF”, aby wyczy, i potwierd.
1 Wejd do menu.
2 Wybierz „SETUP” i potwierd.
3 Wybierz „DEFAULT” i potwierd.
4 Wprowad 4 cyfry kodu PIN (domylnie 0000) i potwierd.
4
GHI
6
MNO
5
JKL
4
GHI
6
MNO
5
JKL
HL_Balance D182.book Page 180 Friday, March 26, 2010 2:11 PM
Polski
181
Personalizacja suchawki
Parametry domyslne:
Dwik niskiego poziomu zasilania W.
Dwik ostrzeenia poza zasigiem Wy.
Dwik klawiszy W.
Automatyczne odbieranie W.
Melodia dzwonka dla poczenia wewntrznego1
Gono dla poczenia wewntrznego 3
Melodia dzwonka dla poczenia zewntrznego3
Gono dla poczenia zewntrznego 3
Gono gonika 3
Ksika telefoniczna Pusta
Lista pocze Pusta
Lista ponownego wybierania Pusta
Kod PIN 0000
Tryb wybierania DTMF
Blokada klawiatury Wy.
6.7 Blokowanie klawiatury
Klawiatura moe zosta zablokowana, co spowoduje, e nie bdzie mona zmienia adnych
ustawie i wybiera numerów. Gdy klawiatura zostanie zablokowana, na wywietlaczu pojawi si
ikona .
Blokowanie klawiatury
Odblokowanie klawiatury
6.8 Ustawianie czasu
6.9 Ustawianie budzika
Powrót do ustawie domylnych spowoduje skasowanie wszystkich wpisów w ksice
telefonicznej i listy pocze. Równie kod PIN zostanie zresetowany do 0000.
1 Wcinij i przytrzymaj klawisz ’ przez 3 sekundy. Klawiatura zostanie
zablokowana.
1 Wcinij jakikolwiek klawisz, na ekranie pojawi si „PRESS ”.
2 Wcinij ‘ ’ na 3 sekundy.
1 Wejd do menu.
2 Wybierz menu „DATE - TIME” i potwierd.
3 Wybierz „CLOCK SET” i potwierd.
4 Wprowad czas (w formacie 24-godzinnym) i potwierd.
1 Wejd do menu.
2 Wybierz menu „DATE - TIME” i potwierd.
3 Wybierz „ALARM SET” i potwierd.
4 Wybierz „ON”, aby wczy alarm, i potwierd.
Wprowad czas (w formacie 24-godzinnym), w którym ma si wczy
alarm, i potwierd.
LUB
Wybierz „OFF”, aby wyczy alarm, i potwierd.
4
GHI
6
MNO
5
JKL
4
GHI
6
MNO
5
JKL
HL_Balance D182.book Page 181 Friday, March 26, 2010 2:11 PM
182
Ustawienia aparatu bazowego
7 Ustawienia aparatu bazowego
7.1 Regulacja gonoci dzwonka
Gono dzwonka aparatu bazowego
Mona wybra sporód 5 poziomów gonoci lub „OFF” (wyczony).
7.2 Wybieranie melodii dzwonka
Aparat bazowy i kada suchawka mog odtwarza inn melodi dzwonka. Aby ustawi melodi
dzwonka aparatu bazowego:
7.3 Zmiana kodu PIN
Pewne funkcje s dostpne jedynie dla uytkowników, którzy znaj kod PIN.
Domylnie kod PIN jest ustawiony na 0000. Aby zmieni kod PIN:
7.4 Ustawianie trybu wybierania
Istniej dwa tryby wybierania: DTMF/wybieranie tonowe (bardziej powszechne) i impulsowe
(w starszych instalacjach).
Aby zmieni tryb wybierania:
1 Wejd do menu.
2 Wybierz menu „SETUP” i potwierd.
3 Wybierz „BASE VOLUME” i potwierd.
4 Wybierz poziom gonoci („OFF” lub od 1 do 5 lub ).
5 Potwierd lub wró do poprzedniego menu.
1 Wejd do menu.
2 Wybierz menu „SETUP” i potwierd.
3 Wybierz „BASE MELODY” i potwierd.
4 Wybierz melodi dzwonka (1 do 5).
5 Potwierd lub wró do poprzedniego menu.
1 Wejd do menu.
2 Wybierz menu „SETUP” i potwierd.
3 Wybierz „PIN CODE” i potwierd.
4 Wprowad poprzedni 4-znakowy kod PIN i potwierd.
5 Wprowad nowy 4-znakowy kod PIN i potwierd.
6 Wprowad nowy kod PIN po raz drugi i potwierd.
1 Wejd do menu.
2 Wybierz menu „SETUP” i potwierd.
3 Wybierz „DIAL MODE” i potwierd.
4 Okre
l tryb wybierania i potwierd.
4
GHI
6
MNO
5
JKL
4
GHI
6
MNO
5
JKL
4
GHI
6
MNO
5
JKL
HL_Balance D182.book Page 182 Friday, March 26, 2010 2:11 PM
Polski
183
Zarzdzanie wieloma suchawkami
7.5 Czas flash (przerwa w poczeniu)
Wcinij klawisz flash ‘
R
’ (klawisz 7 - rysunek 2D Suchawka), aby uy pewnych usug linii
zewntrznej, takich jak „oczekiwanie na poczenie” (jeli operator telefoniczny zapewnia t
funkcj); lub przekierowania pocze, jeli korzysta si z centrali telefonicznej (PABX). Klawisz
flash ‘
R
’ wykonuje krótk przerw na linii. Czas flash mona ustawi na 100 lub 250 ms..
8 Zarzdzanie wieloma suchawkami
8.1 Dodawanie nowej suchawki
Now suchawk mona zarejestrowa w aparacie bazowym, jeli obsuguje ona protokó
DECT GAP.
Aparat bazowy moe obsugiwa maksymalnie 5 suchawek. Jeli w aparacie bazowym jest
zarejestrowanych 5 suchawek, a trzeba doda inn lub wymieni, naley najpierw usun jedn
z istniejcych, nastpnie doczy now.
Ustawianie bazy w tryb rejestracji:
Rejestrowanie nowej suchawki:
Jeli dodatkowa suchawka to model Topcom Balance
Jeli suchawka to inny model
Po uruchomieniu rejestracji w bazie, w zalenoci od suchawki naley odszuka w podrczniku,
jak zarejestrowa dan suchawk. Suchawka musi by zgodna ze standardem GAP.
1 Wejd do menu.
2 Wybierz menu „SETUP” i potwierd.
3 Wybierz „RECALL” i potwierd.
4 Wybierz „RECALL1”, aby ustawi krótki czas flash (100 ms), lub
„RECALL2”, aby ustawi dugi czas flash (250 ms).
Potrzebne, gdy suchawka zostaa wyrejestrowana lub zostaa zakupiona nowa.
1 Wcinij i przytrzymaj klawisz przywoywania na aparacie bazowym przez
6 sekund. Aparat bazowy wyemituje krótki dwik.
2 Wejd do menu.
3 Wybierz „REGISTER” i potwierd.
4 Wybierz „REG BASE” i potwierd.
5 Wprowad numer bazy, aby poczy ze suchawk (1-4), i potwierd
(migajce numery s ju uywane).
6 Wprowad kod PIN stacji bazowej (domylnie 0000) i potwierd.
Suchawka rozpocznie wyszukiwanie bazy DECT. Jeli zlokalizuje baz,
pokae na wywietlaczu numer identyfikacyjny.
7 Potwierd lub zatrzymaj.
Jeli suchawka nie zlokalizuje bazy, po kilku sekundach wróci do stanu
czuwania. Spróbuj ponownie zmieniaj
c numer bazy i sprawd, czy nie
znajdujesz si w otoczeniu, w którym wystpuj zakócenia. Przesu si bliej
aparatu bazowego.
4
GHI
6
MNO
5
JKL
4
GHI
6
MNO
5
JKL
HL_Balance D182.book Page 183 Friday, March 26, 2010 2:11 PM
184
Zarzdzanie wieloma suchawkami
Ikona i tekst „NOT REG” migaj na ekranie, gdy suchawka nie jest skojarzona z baz.
Gdy suchawka jest skojarzona z baz, zostanie jej nadany numer przez baz. Jest to numer,
który wywietla si na suchawce po nazwie. Jest on uywany do pocze wewntrznych.
8.2 Usuwanie suchawki
Ta procedura musi by przeprowadzona za pomoc innej suchawki ni ta, któr chcemy usun.
8.3 Przypisanie suchawki do innej bazy
Jeli suchawka Topcom Balance ma by uywana z innym modelem bazy, musi by ona zgodna
ze standardem GAP.
8.4 Wybieranie aparatu bazowego
Suchawk mona przecza midzy aparatami bazowymi. Moe by ona zarejestrowana w 4
bazach jednoczenie. Podczas wybierania bazy, numer biecej bazy miga.
Przy wybraniu opcji „AUTO” suchawka zacznie automatycznie poszukiwa innej bazy, jeli jest
poza zasigiem. Suchawka musi by najpierw zarejestrowana w kadej bazie oddzielnie.
Tylko profil DECT GAP gwarantuje, e podstawowe funkcje pocze bd dziaa
prawidowo pomidzy rónymi markami/modelami. Moliwe jest, e pewne usugi
(np. CLIP) nie bd dziaa poprawnie.
1 Wejd do menu.
2 Wybierz menu „SETUP” i potwierd.
3 Wybierz „DEL HANDSET” i potwierd.
4 Wprowad kod PIN stacji bazowej (domylnie 0000) i potwierd.
5 Wwybierz suchawk do usunicia i potwierd.
1 Ustaw baz w tryb rejestracji, zgodnie z opisem w podrczniku obsugi
aparatu bazowego.
2 Wejd do menu.
3 Wybierz „REGISTER” i potwierd.
4 Wybierz „REG BASE” i potwierd.
5 Wprowad numer bazy, aby skojarzy ze suchawk, i potwierd.
6 Wprowad kod PIN bazy i potwierd.
Suchawka rozpocznie wyszukiwanie bazy DECT. Jeli zlokalizuje baz,
pokae na wywietlaczu numer identyfikacyjny.
7 Potwierd lub zatrzymaj.
1 Wejd do menu.
2 Wybierz „REGISTER” i potwierd.
3 Wybierz „SELECT BASE” i potwierd.
4 Wybierz baz lub opcj „AUTO” i potwierd.
Jeli jest wczone automatyczne wybieranie bazy i suchawka jest poza zasigiem
biecej bazy, bdzie wyszukiwa aparat bazowy o najsilniejszym sygnale, który jest
w stanie czuwania (taki, który nie jest w trakcie rozmowy).
4
GHI
6
MNO
5
JKL
4
GHI
6
MNO
5
JKL
4
GHI
6
MNO
5
JKL
HL_Balance D182.book Page 184 Friday, March 26, 2010 2:11 PM
Polski
185
SMS
9SMS
Telefon Topcom Balance umoliwia wysyanie i odbieranie wiadomoci SMS. Ta sekcja opisuje
w jaki sposób uywa funkcji SMS. Mona zapisa maksymalnie 15 wysanych i odebranych
wiadomoci SMS, do 160 znaków kada.
9.1 Pisanie wiadomoci SMS
Metoda jest taka sama, jak przy wpisywaniu nazwy do ksizki tel. (patrz“3.15 Uywanie
klawiatury alfanumerycznej”).
Aby wstawi spacj, nacisn ‘1’.
9.2 Wysyanie wiadomoci SMS
9.3 Czytanie i wywietlanie listy odebranych wiadomoci (Przychodzce)
Wyswietlacz Topcom Balance pokazuje ilo nowych odebranych wiadomoci. Na ekranie
wywietlane jest . Dioda SMS bazy miga.
Sygna dwikowy informuje o nadejciu nowej wiadomoci.
Aby wysya i odbiera wiadomoci tekstowe SMS, naley ustawi numer telefonu
centrum SMS swojej sieci dla wiadomoci wychodzcych i przychodzcych
(Patrz “ Numery Centrum SMS”)
1 Wejd do menu.
2 Wybierz opcj “SMS” i potwierd.
3 Wybierz opcj “WRITE” i potwierd.
4 Zacznij wpisywa wiadomo i potwierdz.
5 Wprowad numer telefonu i potwierd, aby wysa wiadomo.
Wiadomo SMS zostanie wysana automatycznie.
Gdy na wywietlaczu jest pokazana ilo nowych wiadomoci.
1 Nacinij klawisz OK. Numer telefonu najwieszej wiadomoci jest
pokazany jako pierwszy.
Gdy ilo nowych wiadomoci nie jest wyswietlana.
1 Wejd do menu.
2 Wybierz opcj “SMS” i potwierd.
3 Wybierz opcj “INBOX” i potwierd.
Numer telefonu najwieszej wiadomoci jest pokazany jako pierwszy.
Po wybraniu danej wiadomoci nacinij OK, aby j przeczyta.
Wiadomoci z ‘*’ przed numerem telefonu s nieprzeczytane.
Przewijaj ca wiadomo i nacinij OK po zakoczeniu czytania.
Przewi, aby wybra jedn z poniszych opcji:
Reply: Edycja wiadomoci przy pomocy klawiszy alfanumerycznych i
zapisanie jej.
Forward: Przekazanie zapisanej wiadomoci do innego uytkownika.
Wykonaj takie same czynnoci jak przy wysyaniu wiadomoci SMS
(Patrz “9.2 Wysyanie wiadomoci SMS”).
Delete ?: Usuwanie wiadomoci. Nacinij ponownie OK , aby potwierdzi.
Details: Aby zobaczy numer telefonu, dat i czas wiadomo
ci. Nacinij OK,
aby potwierdzi.
Nacinij klawisz wyciszenia, aby powróci do menu inbox
4
GHI
6
MNO
5
JKL
4
GHI
6
MNO
5
JKL
HL_Balance D182.book Page 185 Friday, March 26, 2010 2:11 PM
186
SMS
9.4 Wielu uytkowników
Telefon Topcom Balance umoliwia zarejestrowanie do 5 uytkowników na jednej bazie. Kada
suchawka ma swój numer (1-5), który jest równie numerem terminalu do wysyania prywatnych
wiadomoci. Wszystkie suchawki maj równie standardowy numer terminalu ‘0’. Aby odbiera
prywatne wiadomoci SMS, podaj swoim korespondentom numer terminala uytkownika, który
musz doda do Twojego standardowego numeru telefonu (patrz niej). Na przykad, gdy
masz 2-g suchawk (Handset 2), numer twojego terminala = 2.
Jeli nie zostanie dodany numer terminala do Twojego numeru telefonu lub zostanie dodane ‘0’,
wiadomo zostanie wysana do wszystkich suchawek.
Moesz zmieni numer terminala na inny z zakresu 6-9 (Patrz “ Ustawianie numeru terminala”).
Odbieranie prywatnych wiadomoci SMS uytkownika
Czytanie prywatnych wiadomoci SMS uytkownika
Twój Topcom Balance wemituje sygna dwiekowy po odebraniu nowej wiadomoci. Na ekranie
pojawi si i liczba nowych wiadomoci.
LUB
9.5 Ustawienia SMS
W./ WY. dwiku alertu SMS
Suchawka moe odtworzy melodi informujc o nowej wiadomoci tekstowej.
Twoi rozmówcy musz doda numer Twojego terminala do Twojego numeru
telefonu, kiedy chc wysa prywatny SMS.
Np. jeli numer Twojego prywatnego terminala to "1", a numer Twojego telefonu to
123456789, Twoi rozmówcy powinni wysya wiadomoci SMS na
numer:1234567891! To jest numer, który musisz zapamita i poda swoim
rozmówcom.
Nacinij klawisz OK
Na licie SMS, wiadomoci prywatne oznaczone s ikon klucza na
ekranie.
1 Wejd do menu.
2 Wybierz opcj “SMS” i potwierd.
3 Wybierz opcj “PERSONAL SMS” i potwierd. Numer telefonu
najwieszej wiadomoci jest pokazany jako pierwszy.
1 Wejd do menu.
2 Wybierz opcj “SMS” i potwierd
.
3 Wybierz opcj “SMS SETTINGS” i potwierd.
4 Wybierz opcj “MSG ALERT” i potwierd.
5 Wybierz opcj “W.” (ON) lub “Wy.” (OFF) i potwierd.
6 Wybierz dn melodi i potwierd, poczym powró do poprzedniego
menu.
HL_Balance D182.book Page 186 Friday, March 26, 2010 2:11 PM
Polski
187
SMS
Numery Centrum SMS
Aby móc wysya i odbiera wiadomoci tekstowe SMS, potrzebujesz numeru telefonu centrum
SMS swojej sieci. Ten numery zostay zaadowane do telefonu Topcom Balance. Jeli
przypadkowo usuniesz numery Centrum SMS, musisz wpisa je ponownie, aby móc wysya i
odbiera wiadomoci SMS.
Telefon Topcom Balance moe przechowywa 2 numery Centrum SMS dla wysyania i
odbierania wiadomoci.
Aby ustawi numery centrum SMS dla wysyania
Aby ustawi numery centrum SMS dla odbierania
Wybierz centrum SMS, aby wysya wiadomoci SMS
Poniewa moesz ustawi 2 numery centrum SMS dla wysyania, musisz wybra jeden z nich
przed wysyaniem wiadomoci:
Ustawianie numeru terminala
Kada suchawka ma numer terminala ‘0’ i numer terminala = numer suchawki (1-5). Moesz
zmieni numer terminala na inny (6-9), jeli zajdzie taka potrzeba:
1 Wejd do menu.
2 Wybierz opcj “SMS” i potwierd.
3 Wybierz opcj “SMS SETTINGS” i potwierd.
4 Wybierz opcj “SEND CENTRE” i potwierd.
5 Wybierz “SEND 1” lub “SEND 2” " i potwierd.
6 Wprowad numer telefonu serwera SMS
1 Wejd do menu.
2 Wybierz opcj “SMS” i potwierd.
3 Wybierz opcj “SMS SETTINGS” i potwierd.
4 Wybierz opcj “RCV CENTRE” i potwierd.
5 Wybierz “RECEIVE 1” lub “RECEIVE 2” " i potwierd.
6 Wprowad numer telefonu serwera SMS
1 Wejd do menu.
2 Wybierz opcj “SMS” i potwierd.
3 Wybierz opcj “SMS SETTINGS” i potwierd.
4 Wybierz opcj “SEND SERVICE” i potwierd.
5 Wybierz “SEND 1” lub “SEND 2” " i potwierd.
1 Wejd do menu.
2 Wybierz opcj “SMS” i potwierd.
3 Wybierz opcj “SMS SETTINGS” i potwierd.
4 Wybierz „TERMINAL NO” i potwierd.
5 Usu stary numer terminala i wprowad nowy (0, 6-9).
6 Naci
nij OK, aby potwierdzi.
4
GHI
6
MNO
5
JKL
4
GHI
6
MNO
5
JKL
4
GHI
6
MNO
5
JKL
HL_Balance D182.book Page 187 Friday, March 26, 2010 2:11 PM
188
Wyszukiwanie i usuwanie usterek
Pami pena
Gdy pami jest pena, na ekranie pojawi si wiadomo "Memory Full". Nie moesz wysya ani
odbiera SMS-ów. Aby dalej odbiera SMS-y, moesz usun niektóre lub wszystkie
wiadomoci. Aby usun wszystkie wiadomoci zapisane w “INBOX” lub “PERSONAL SMS
:
10 Wyszukiwanie i usuwanie usterek
1 Wejd do menu.
2 Wybierz opcj “SMS” i potwierd.
3 Wybierz opcj “SMS SETTINGS” i potwierd.
4 Wybierz opcj “DELETE ALL” i potwierd.
5 Wybierz opcj “INBOX” lub “PERSONAL SMS” i potwierd.
6 Pojawi si “CONFORM ?”.
7 Potwierd lub anuluj.
Objaw Prawdopodobna przyczyna Rozwizanie
Wywietlacz nie dziaa Wyadowane baterie Sprawd pooenie baterii
Doaduj baterie
Suchawka wyczya si. Wcz suchawk.
Brak sygnau Niewaciwie poczony sznur
przyczeniowy
Sprawd podczenie sznura
przyczeniowego
Linia jest zajta przez inn
suchawk
Poczekaj na zako
czenie
rozmowy z drugiej suchawki
Ikona mruga
Suchawka poza zasigiem Umie suchawk bliej
urzdzenia bazowego
Brak zasilania w urzdzeniu
bazowym
Sprawd podczenie sieci do
urzdzenia bazowego
Suchawka nie jest
zarejestrowana w urzdzeniu
bazowym
Zarejestruj suchawk
w urzdzenia bazowym
Urzdzenie bazowe lub
suchawka nie dzwoni
Gono dzwonka jest zbyt
niska lub nie sycha dzwonka
Wyreguluj gono dzwonka
Dwik jest prawidowy, lecz
brak komunikacji.
Tryb wybierania numerów jest
nieprawidowy.
Ustaw tryb wybierania
numerów (impulsowy/
tonowy).
Nie mona przekaza
rozmowy na PABX
Czas flash jest za krótki lub za
dugi.
Zmie
 czas flash.
Telefon nie reaguje na
naciskanie klawiszy.
Bd obsugi Wyjmij baterie i zaó je
ponownie
HL_Balance D182.book Page 188 Friday, March 26, 2010 2:11 PM
Polski
189
Dane techniczne Charakterystyka techniczna
11 Dane techniczne Charakterystyka techniczna
12 Gwarancja Topcom
12.1 Okres gwarancji
Urzdzenia Topcom s objte 24-miesicznym okresem gwarancji. Okres gwarancji rozpoczyna
si w dniu zakupu nowego urzdzenia. Firma Topcom nie udziela adnej gwarancji na baterie
standardowe lub akumulatorki (typu AA/AAA).
Czci eksploatacyjne lub wady nieznacznie wpywajce na dziaanie lub warto sprztu nie s
objte gwarancj.
Gwarancj naley udowodni, przedstawiajc rachunek zakupu orygina lub kopi, na którym
widnieje data zakupu oraz model urzdzenia.
12.2 Obsuga gwarancji
Wadliwe urzdzenie naley zwróci do zakadu serwisowego Topcom wraz z wanym
rachunkiem zakupu oraz wypenion kart serwisow.
Jeeli w urzdzeniu wystpi usterka w trakcie trwania okresu gwarancji, firma Topcom lub jej
autoryzowany zakad serwisowy bezpatnie usunie powsta usterk spowodowan wad
materiaow lub produkcyjn, przez napraw lub wymian urzdzenia lub jego czci. W
przypadku wymiany, kolor i model urzdzenia mog róni si od urzdzenia pierwotnie
zakupionego.
Data pierwotnego zakupu bdzie okrela pocztek okresu gwarancyjnego. Okres gwarancyjny
nie ulega przedueniu, jeeli urzdzenie zostao wymienione lub naprawione przez Topcom lub
autoryzowany zakad serwisowy.
Standard
DECT
(
D
igital
E
nhanced
C
ordless
T
elecommunications)
GAP
(
G
eneric
A
ccess
P
rofile)
Zakres czstotliwoci 1 880 MHz do 1 900 MHz
Liczba kanaów 120 kanaów dupleksowych
Modulacja GFSK
Kodowanie mowy 32 kbit/s
Emitancja 10 mW (rednia moc na kana)
Zasig maks. 300 m na otwartej przestrzeni/ 10-50m w budynku
Liczba suchawek Do 5
Zasilanie aparatu bazowego 230 V/ 50 Hz/ 7,5V DC 300 mA
Akumulatory do suchawki 2 akumulatory typu AAA, NIMH; 1,2 V; 550 mAh
Parametry suchawki 200 godzin w trybie gotowoci
Czas rozmowy ze suchawki 10 godziny
Warunki uytkowania +5 °C do +45 °C
Tryb wybierania numeru Impulsowy / tonowy
Czas Flash 100 lub 250 ms
HL_Balance D182.book Page 189 Friday, March 26, 2010 2:11 PM
190
Utylizacja urzdzenia (rodowisko)
12.3 Wyjtki od gwarancji
Uszkodzenia lub wady spowodowane nieprawidowym obchodzeniem si lub prac z
urzdzeniem oraz uszkodzenia powstae w wyniku zastosowania nieoryginalnych czci lub
akcesoriów nie s objte gwarancj.
Gwarancja nie obejmuje szkód wywoanych przez czynniki zewntrzne, takich jak pioruny, woda
i ogie, ani uszkodze powstaych w czasie transportu. Gwarancja nie ma zastosowania, jeeli
numer seryjny urzdzenia zosta zmieniony, usunity lub nie moe zosta odczytany.
Wszelkie roszczenia gwarancyjne zostan uznane za niewane, jeli urzdzenie byo naprawiane,
zmieniane lub modyfikowane przez uytkownika.
Urzdzenie to moe by uywane tylko z akumulatorkami nadajcymi si do adowania. Jeeli
zamierzasz wymieni oryginalnie dostarczone akumulatorki, prosimy sprawdzi czy nowe
akumulatorki s odpowiednie i nadaj si do adowania. Pod adnym pozorem baterie alkaliczne
NIE mog by uywane w suchawkach. Jeeli uyte zostan baterie alkaliczne i odoysz
suchawk na baz, bateri ulegn rozgrzaniu i mog eksplodowa. Jakiekolwiek powstae w ten
sposób szkody nie mog by pokrywane przez producenta, a take nie s objte gwarancj.
Zostaniesz obciony kosztami takich napraw.
13 Utylizacja urzdzenia (rodowisko)
Na koniec okresu eksploatacji produktu, nie naley go wyrzuca razem ze zwykymi
odpadami domowymi, ale trzeba go zanie do punktu zbiórki, zajmujcego si
recyklingiem sprztu elektrycznego i elektronicznego. Wskazuje na to symbol
umieszczony na produkcie, na instrukcji obsugi i/lub opakowaniu.
Niektóre materiay wchodzce w skad niniejszego produktu mona ponownie
wykorzysta, jeeli zostan dostarczone do punktu zbiórki w celu poddania recyklingowi. Dziki
ponownemu wykorzystaniu niektórych czci lub surowców ze zuytych produktów przyczyniaj
si Pastwo w istotny sposób do ochrony rodowiska. Aby uzyska informacje na temat lokalnych
punktów zbiórki, naley zwróci si do wadz lokalnych.
14 Czyszczenie
Urzdzenie naley czyci lekko zwilon szmatk lub szmatk antystatyczn. Nie naley
stosowa rodków czyszczcych lub ciernych.
HL_Balance D182.book Page 190 Friday, March 26, 2010 2:11 PM
HL_Balance D182.book Page 191 Friday, March 26, 2010 2:11 PM
HL_Balance D182.book Page 192 Friday, March 26, 2010 2:11 PM
HL_Balance D182.book Page 193 Friday, March 26, 2010 2:11 PM
HL_Balance D182.book Page 194 Friday, March 26, 2010 2:11 PM
R00001
SERVICE RETURN CARD - RÜCKSENDEKARTE -
CARTE DE RETOUR SERVICE - RETOURFICHE
RETURN WITH YOUR DEFECT PRODUCT
Name/Vorname/Prénom/Naam:
Surname/Familienname/Nom/Familienaam:
Street/Straße/Rue/Straat:
Country/Land/Pays/Land:
Tel./Tél.:
E-mail:
Model name/Modellbezeichnung/Nom du modèle/Modelnaam:
Serial Nr/Seriennummer/N° série/Serienummer:
Purchase date/Kaufdatum/Date d’achat/Aankoopdatum:
(DD/MM/YYYY) - (TT/MM/JJJJ)
Fault description/Beschreibung des Defekts/Description de la panne/Beschrijving defect:
(Original Proof of Purchase has to be attached to this return card to be valid for warranty)
Model name/Modellbezeichnung/Nom du modèle/Modelnaam:
Serial Nr/Seriennummer/N° série/Serienummer:
Purchase date/Kaufdatum/Date d’achat/Aankoopdatum:
(DD/MM/YYYY) - (TT/MM/JJJJ)
Fault description/Beschreibung des Defekts/Description de la panne/Beschrijving defect:
Nr./N°: Box/Postfach/Boîte/Postbus:
Location/Ort./Lieu/Plaats: Post code/Postleitzahl/Code Postal/Postcode:
HL_Balance D182.book Page 195 Friday, March 26, 2010 2:11 PM
BALANCE
visit our website
www.topcom.net
MD18200242
HL_Balance D182.book Page 196 Friday, March 26, 2010 2:11 PM
7


Need help? Post your question in this forum.

Forumrules


Report abuse

Libble takes abuse of its services very seriously. We're committed to dealing with such abuse according to the laws in your country of residence. When you submit a report, we'll investigate it and take the appropriate action. We'll get back to you only if we require additional details or have more information to share.

Product:

For example, Anti-Semitic content, racist content, or material that could result in a violent physical act.

For example, a credit card number, a personal identification number, or an unlisted home address. Note that email addresses and full names are not considered private information.

Forumrules

To achieve meaningful questions, we apply the following rules:

Register

Register getting emails for Topcom balance at:


You will receive an email to register for one or both of the options.


Get your user manual by e-mail

Enter your email address to receive the manual of Topcom balance in the language / languages: English, German, Dutch, French, Polish, Portuguese, Spanish as an attachment in your email.

The manual is 5,46 mb in size.


You will receive the manual in your email within minutes. If you have not received an email, then probably have entered the wrong email address or your mailbox is too full. In addition, it may be that your ISP may have a maximum size for emails to receive.

The manual is sent by email. Check your email

If you have not received an email with the manual within fifteen minutes, it may be that you have a entered a wrong email address or that your ISP has set a maximum size to receive email that is smaller than the size of the manual.

The email address you have provided is not correct.

Please check the email address and correct it.

Your question is posted on this page

Would you like to receive an email when new answers and questions are posted? Please enter your email address.


Info