11741
7
Zoom out
Zoom in
Previous page
1/32
Next page
- 7 - EN
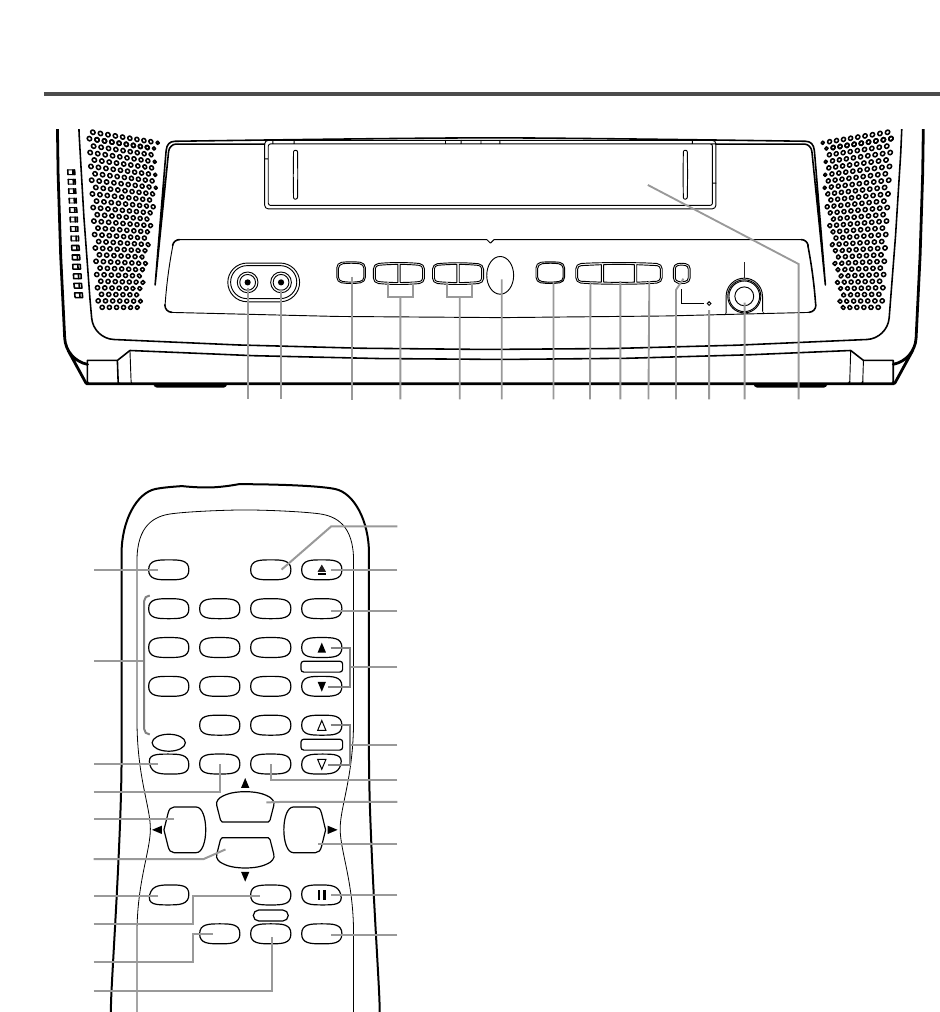
OPERATING CONTROLS AND FUNCTIONS
1 VIDEO input jack– Connect to the Video output
jack of a video camera or VCR.
2 AUDIO input jack– Connect to the Audio output
jack of an audio equipment, video camera or
VCR.
3 POWER button– Hit to turn the unit on and off.
Hit to activate timer recording.
4 VOLUME
XX
/
YY
buttons– Adjust the volume level.
5 CHANNEL
XX
/
YY
buttons– Press to select the
desired channels for viewing or recording.
TRACKING function– Press to minimize video
‘noise’ (lines or dots on screen) during playback
mode. (Refer to page 18.)
6 Remote Sensor Window– Receives the infrared
signals from the remote control.
- REMOTE CONTROL -
L
K
L
K
E DB
C A
VIDEO AUDIO POWER VOLUME CHANNEL STOP/EJECT REW PLAY F.FWD REC/OTR EARPHONE
1 92
3
4 5 6 7 8
1310 11 1412
VOLUME
123
456
789
0 +100
POWER
WAKE-UP
/SLEEP
EJECT
CHANNEL
RETURN
CHANNEL
DISPLAY MUTE
MENU
SPEED PAUSE/STILLRECORD
TIME SEARCH
T-PROG.
CLEAR
COUNTER
RESET
GAME
REW
PLAY
STOP
F.FWD
3
15
5
27
16
8
19
20
21
22
18
26
4
10
9
24
23
25
17
28
7 STOP/EJECT
PP NN
button– Hit to stop the tape
motion. Hit in the stop mode to remove the
cassette from the unit.
8 REW
bb
button– Hit to rewind the tape or to
view the picture rapidly in reverse during play-
back mode. (Rewind Search)
ss
button– (Remote control)
Hit to select a mode from the setting menu.
9 PLAY
OO
button– Hit to start playback.
K button– (Remote control)
Hit to select a mode or figure from the setting
menu.
10 F.FWD
aa
button– Hit to rapidly advance the
tape or to view the picture rapidly in forward dur-
ing playback mode. (Forward Search)
B button– (Remote control)
Hit to determine your selection and proceed to
the next step in the setting menu.
11
REC/OTR button – Hit to start manual recording.
Hit repeatedly to start One Touch Recording
(OTR).
12 Record indicator– Flashes during recording.
Lights up in the stand-by mode for Timer
Recording.
13 EARPHONE jack– Connects to earphones (not
supplied) for personal listening. The size of jack
is 1/8" (3.5mm) monaural.
14 Cassette compartment
15 Number buttons– Press to select desired chan-
nels for viewing or recording. To select a single-
digit channel, hit
[0] first and then [1] to [9].
+100 button– When selecting cable channels
which are higher than 99, hit this button first,
then press the last two digits. (To select channel
125, first hit [+100] button then hit [2] and [5].)
16 MENU button– Hit to enter or exit the setting
menu.
- TV/VCR FRONT PANEL -
7


Need help? Post your question in this forum.

Forumrules


Report abuse

Libble takes abuse of its services very seriously. We're committed to dealing with such abuse according to the laws in your country of residence. When you submit a report, we'll investigate it and take the appropriate action. We'll get back to you only if we require additional details or have more information to share.

Product:

For example, Anti-Semitic content, racist content, or material that could result in a violent physical act.

For example, a credit card number, a personal identification number, or an unlisted home address. Note that email addresses and full names are not considered private information.

Forumrules

To achieve meaningful questions, we apply the following rules:

Register

Register getting emails for Sylvania 6313CEY at:


You will receive an email to register for one or both of the options.


Get your user manual by e-mail

Enter your email address to receive the manual of Sylvania 6313CEY in the language / languages: English as an attachment in your email.

The manual is 0,62 mb in size.


You will receive the manual in your email within minutes. If you have not received an email, then probably have entered the wrong email address or your mailbox is too full. In addition, it may be that your ISP may have a maximum size for emails to receive.

The manual is sent by email. Check your email

If you have not received an email with the manual within fifteen minutes, it may be that you have a entered a wrong email address or that your ISP has set a maximum size to receive email that is smaller than the size of the manual.

The email address you have provided is not correct.

Please check the email address and correct it.

Your question is posted on this page

Would you like to receive an email when new answers and questions are posted? Please enter your email address.


Info