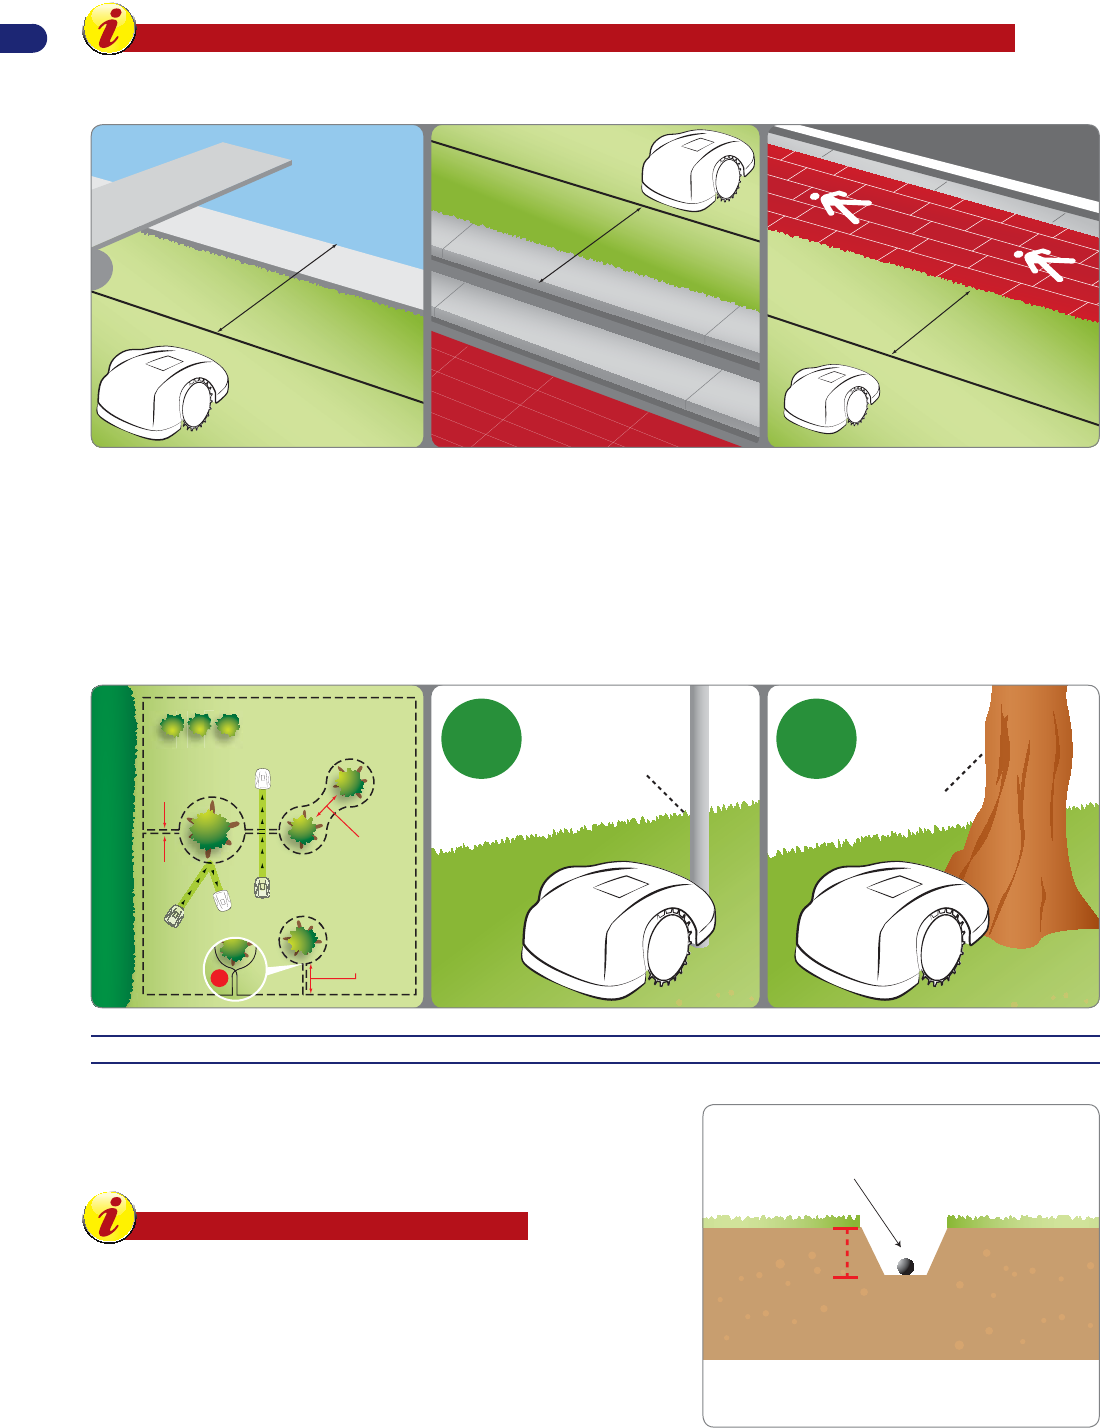
If there is a pool, pond, ravine, ditch, steps or public roads not protected by a wall inside or outside the work area, lay the perimeter wire at least 90
cm (35.43 ") from the edge. To reduce the distance of the perimeter wire for the best set-up and operation of the robot, we recommend installing
an additional fence of at least 15 cm. This will allow laying the perimeter wire at the regular distances described in the previous paragraphs.
Important
Carefully follow the distances and slopes specifi ed in the booklet to guarantee excellent installation and proper functioning
of the robot. Increase the distance by at least 30 cm (11.81 ") in the presence of slopes or slippery ground.
90 cm.
/ 35,44 “
90 cm.
/ 35,44 “
90 cm.
/ 35,44 “
Obstacles resistant to knocks, such as trees, bushes or poles without sharp edges present inside the work area do not need to be delimited. The
robot hits the obstacle and changes direction. If you don’t want the robot to knock into the obstacles and for its safe and silent operation, all the
fi xed obstacles need to be delimited. Slightly sloping obstacles such as fl ower pots, stones or trees with protruding roots must be delimited to
protect the cutting blade and the obstacles themselves.
To mark the boundary of the obstacle, start from the outside point of the perimeter nearest the object to delimit, arrange the perimeter wire so
that it reaches the obstacle, goes around it and then travels back along the previous path, observing the regular distances described in the
previous paragraphs. Overlap the outgoing wire and the incoming wire so that they pass under the same peg, this will allow the robot to go past
the perimeter wire.
For the robot to function correctly, the minimum overlapping length should not be greater than 70 cm (27.56 ") in order to allow the robot to move
regularly.
NO
min. 70 cm
/ 27,56 ”
min. 70 cm
/ 27,56 ”
< 70 cm
/ 27,56 ”
< 70 cm
/ 27,56 ”
0 cm / 0 ”0 cm / 0 ”
plant
pole
OKOK
INSTALLATION OF PERIMETER WIRE
The perimeter wire can be buried or laid on the ground. If you have a
wire trenching machine, it is better to bury the wire for greater protection.
Otherwise, install the wire on the ground with the pegs provided as
described below.
Important
Start laying the perimeter wire from the installation area
of the charging station, leaving a couple of extra meters
so that it can be cut down to size when connecting to the
Libble takes abuse of its services very seriously. We're committed to dealing with such abuse according to the laws in your country of residence. When you submit a report, we'll investigate it and take the appropriate action. We'll get back to you only if we require additional details or have more information to share.
Product:
Forumrules
To achieve meaningful questions, we apply the following rules:
First, read the manual;
Check if your question has been asked previously;
Try to ask your question as clearly as possible;
Did you already try to solve the problem? Please mention this;
Is your problem solved by a visitor then let him/her know in this forum;
To give a response to a question or answer, do not use this form but click on the button 'reply to this question';
Your question will be posted here and emailed to our subscribers. Therefore, avoid filling in personal details.
Register
Register getting emails for Stiga Autoclip 325 at:
new questions and answers
new manuals
You will receive an email to register for one or both of the options.
Get your user manual by e-mail
Enter your email address to receive the manual of Stiga Autoclip 325 in the language / languages: English, German, Dutch, Danish, French, Italian, Polish, Portuguese, Swedish, Spanish, Norwegian, Finnish as an attachment in your email.
The manual is 112,13 mb in size.
You will receive the manual in your email within minutes. If you have not received an email, then probably have entered the wrong email address or your mailbox is too full. In addition, it may be that your ISP may have a maximum size for emails to receive.
The manual is sent by email. Check your email
If you have not received an email with the manual within fifteen minutes, it may be that you have a entered a wrong email address or that your ISP has set a maximum size to receive email that is smaller than the size of the manual.
The email address you have provided is not correct.
Please check the email address and correct it.
Your question is posted on this page
Would you like to receive an email when new answers and questions are posted? Please enter your email address.