15
Detaching and refitting the rails
The rails can be removed for cleaning. The oven must have
cooled down.
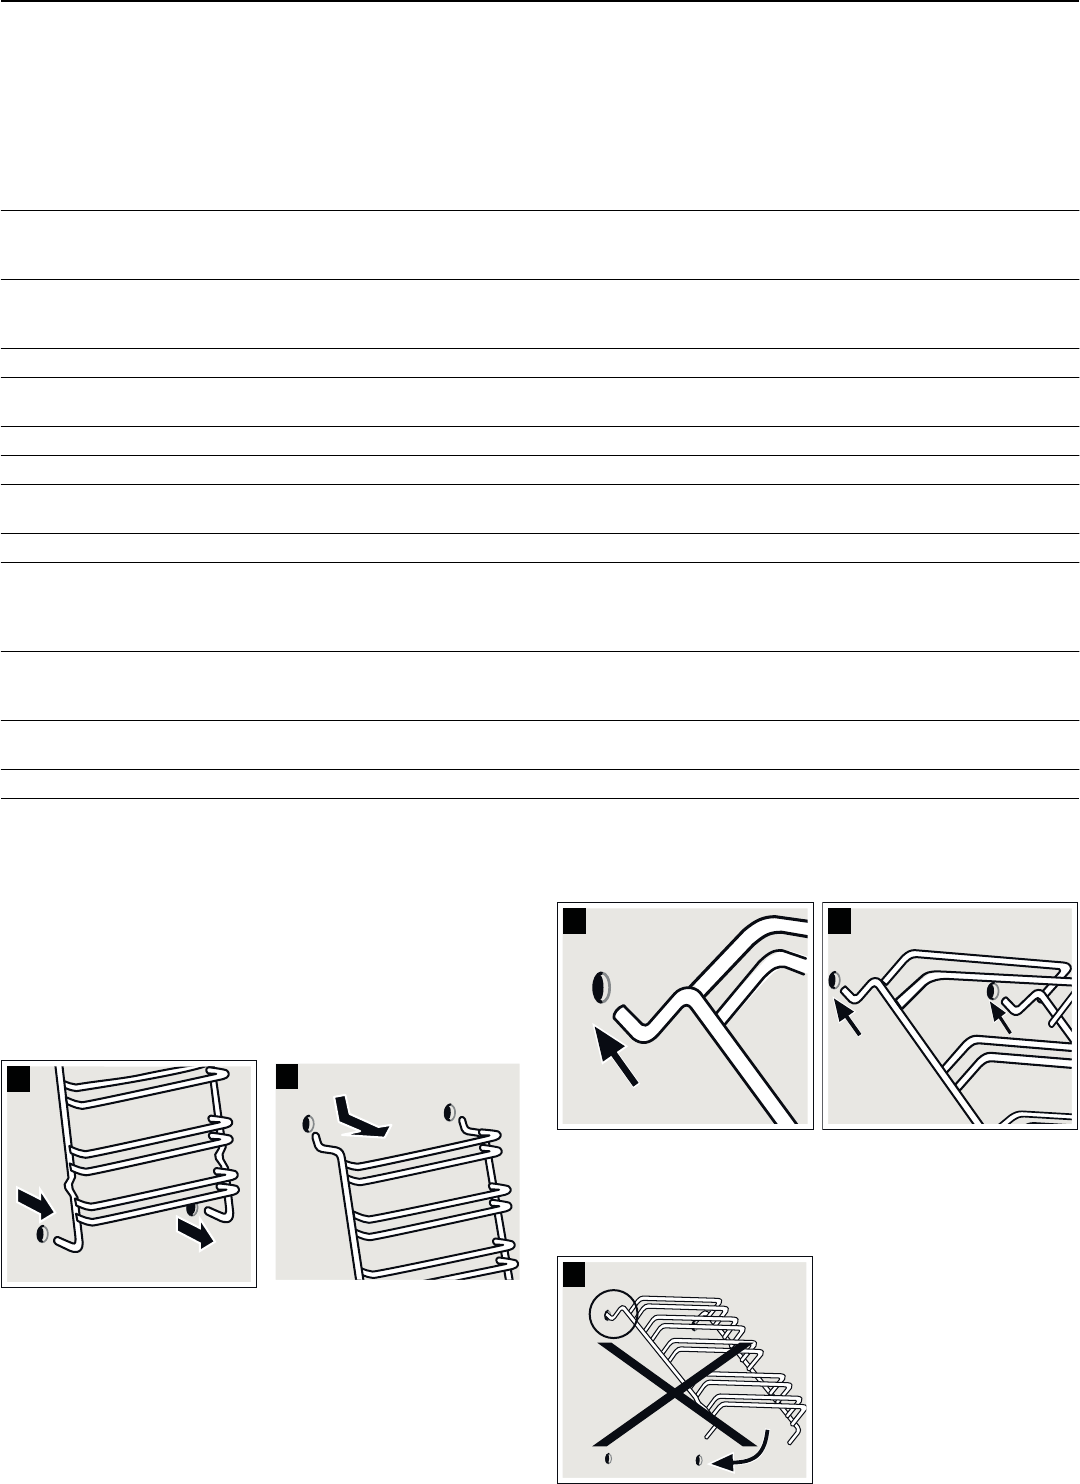
Unhooking the rails
1. Hold the shelf frames from underneath and pull slightly
forward. Pull the extension pins at the bottom of the rails out
of the mounting holes (Fig. A).
2. Then fold the rails upwards and carefully remove them
(Fig. B).
Clean the rails with washing-up liquid and a sponge. For
stubborn deposits of dirt, use a brush.
Installing the frames
1. Insert the two hooks carefully into the upper holes. (Figure A-
B)
: Incorrect assembly!
Never move the frame before the two hooks are fully
anchored in the upper holes. The enamel could be damaged
and may break (figure C).
Burners and steel
grid of the gas burn-
ers
Do not clean in the dishwasher. Remove the wire rack and clean with a sponge, washing-up liquid and
some hot water. Remove the burner cup and cap. Clean with a sponge and some hot water and washing-up
liquid. Ensure that the gas outlets on the burner cups are clean and unobstructed. Brush the igniters with a
small, soft brush. The gas burners only work properly when the igniters are clean. Remove food residue
from the burner shells with some washing-up liquid and a damp cloth. Only use a little water. Water must
not be allowed to enter the appliance. Ensure that the nozzle opening does not become blocked or dam-
aged during cleaning. Dry all parts after cleaning and place the burner cover accurately on the burner cup.
If the parts are not positioned accurately, it will be harder to ignite the burner. The burner covers are coated
with black enamel. Due to the high temperatures, discolouration may occur. This will not impair the function
of the burner. Replace the wire rack in the oven.
Electric hob (option) Clean with the hard side of a scouring sponge and some liquid scouring agent. After cleaning, switch the
hob on briefly to dry it. Wet hobs rust over time. Then apply a care product. Always remove spilt liquids and
food residue immediately.
Metal ring of the
electric hob (option)
The metal ring may discolour with time. However, it is possible restore the original colour. Clean the ring
with the hard side of a scouring sponge and some liquid scouring agent. When doing so, make sure that
you do not scour the adjacent surfaces, as this could damage them.
Knobs Clean with some washing-up liquid and a damp cloth. Dry with a soft cloth.
Door glass Can be cleaned with glass cleaner. Do not use any abrasive cleaning agents or sharp metal objects. These
could scratch and damage the surface of the glass panel.
Seal Wipe with a damp cloth. Dry with a soft cloth.
Oven interior Clean with hot water or vinegar solution. For heavy soiling: Only use oven cleaner on cold surfaces.
Glass cover on the
oven light
Clean with some washing-up liquid and a damp cloth. Dry with a soft cloth.
Accessories Soak in hot soapy water. Clean with a brush or a sponge.
Aluminium baking
tray (option)
Do not clean in the dishwasher. Never use oven cleaner. To avoid scratches, never touch the metal sur-
faces with a knife or similar sharp object. Wipe the surfaces horizontally and without applying pressure with
soapy water and a soft window cloth or a lint-free microfibre cloth. Dry with a soft cloth. Do not use any
abrasive materials, scouring sponges or rough cleaning cloths. They could scratch the baking tray
Childproof lock
(option)
If a childproof lock has been fitted on the oven door, it must be removed before cleaning. Soak all plastic
parts in hot soapy water and wash with a sponge. Dry with a soft cloth. If very dirty, the childproof lock will
not work properly.
Plinth drawer
(option)
Clean with some washing-up liquid and a damp cloth. Dry with a soft cloth.
Accessories Soak in hot soapy water. Clean with a brush or sponge.