144523
5
Zoom out
Zoom in
Previous page
1/30
Next page
LC-19SH7E
LC-26SH7E
LC-32SH7E
LC-42SH7E
LCD COLOUR TELEVISION
LCD-FARBFERNSEHGERÄT
TÉLÉVISEUR COULEUR À ÉCRAN
CRISTAUX LIQUIDES (LCD)
TELEVISORE A COLORI LCD
LCD-KLEURENTELEVISIE
TELEVISIÓN EN COLOR LCD
TELEVISOR LCD A CORES
SHARP ELECTRONICS (Europe) GmbH
Sonnistraße 3, D-20097 Hamburg, Deutschland
SHARP CORPORATION
http://www.sharp-eu.com
Printed in Poland
Gedruckt in Polen
Imprimé en Pologne
Stampato in Polonia
Afgedrukt in Polen
Impreso en Polonia
Impresso na Polónia
LC-19SH7E/LC-26SH7E/LC-32SH7E/LC-42SH7E
OPERATION MANUAL / BEDIENUNGSANLEITUNG / MODE D'EMPLOI / MANUALE DI ISTRUZIONI /
GEBRUIKSAANWIJZING / MANUAL DE MANEJO / MANUAL DO UTILIZADOR
1
OPERATION MANUAL
BEDIENUNGSANLEITUNG
MODE D’EMPLOI
MANUALE DI ISTRUZIONI
GEBRUIKSAANWIJZING
MANUAL DE MANEJO
MANUAL DO UTILIZADOR
PIN
ENGLISHDEUTSCHFRANÇAIS
ITALIANO
NEDERLANDS
ESPAÑOL
PORTUGUESE
P41G7830843 3C
LC-19SH7E / LC-26SH7E / LC-32SH7E
LC-42SH7E
OPERATION MANUAL
Contents
The illustrations and on-screen displays in this operation manual are for explanation purposes and may vary slightly from •
the actual operations.
ENGLISH
Contents ................................................................ 1
Introduction ........................................................... 2
Dear SHARP customer ................................... 2
Important Safety Precautions .......................... 2
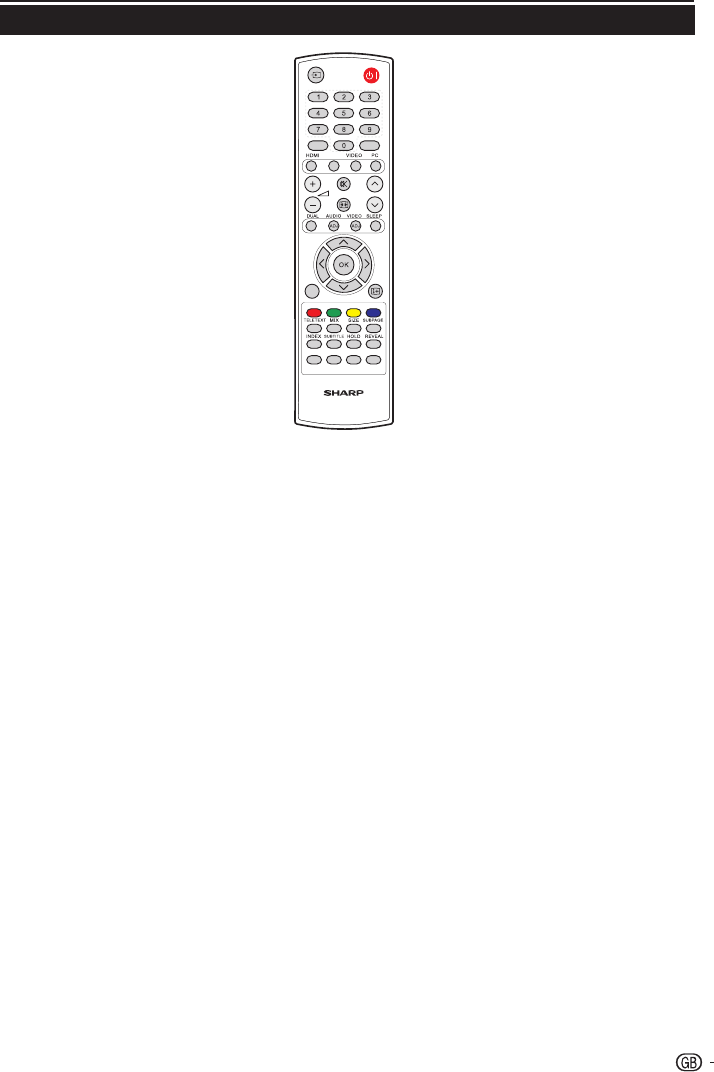
Remote control unit ........................................ 3
TV (Front view) ................................................ 4
TV (Rear view) ................................................. 4
Preparation............................................................ 5
Supplied accessories ...................................... 5
Mount the TV stand ........................................ 5
Wall mounting ................................................. 5
Bundling the cables ........................................ 5
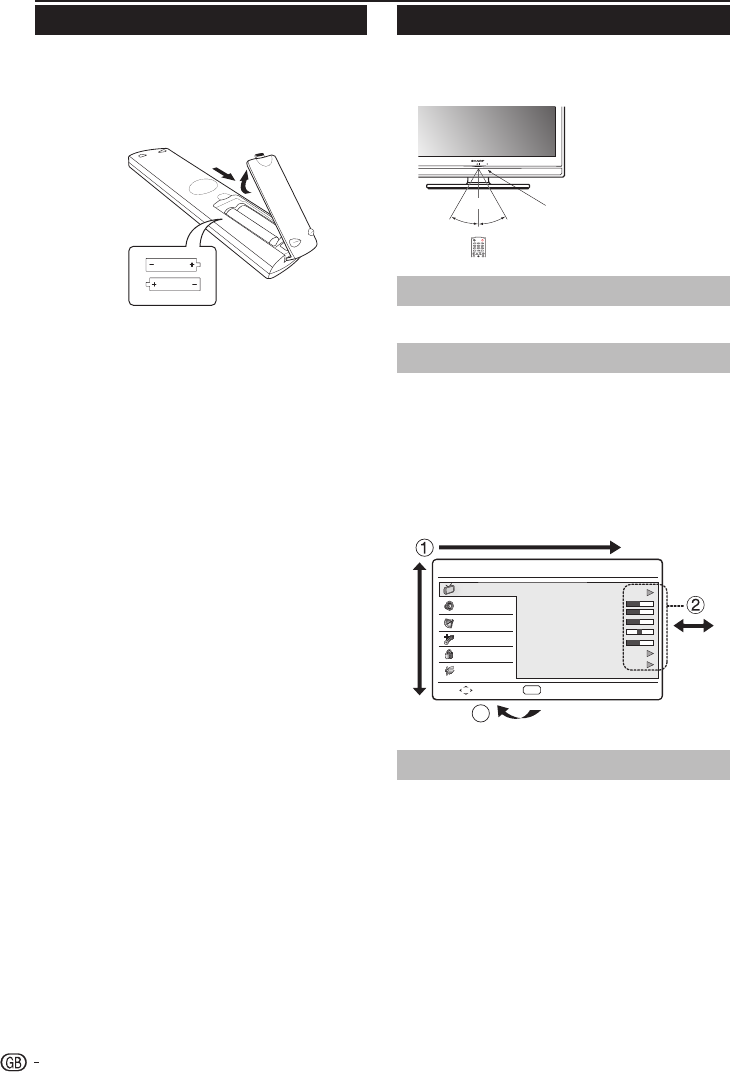
Installation of batteries .................................... 6
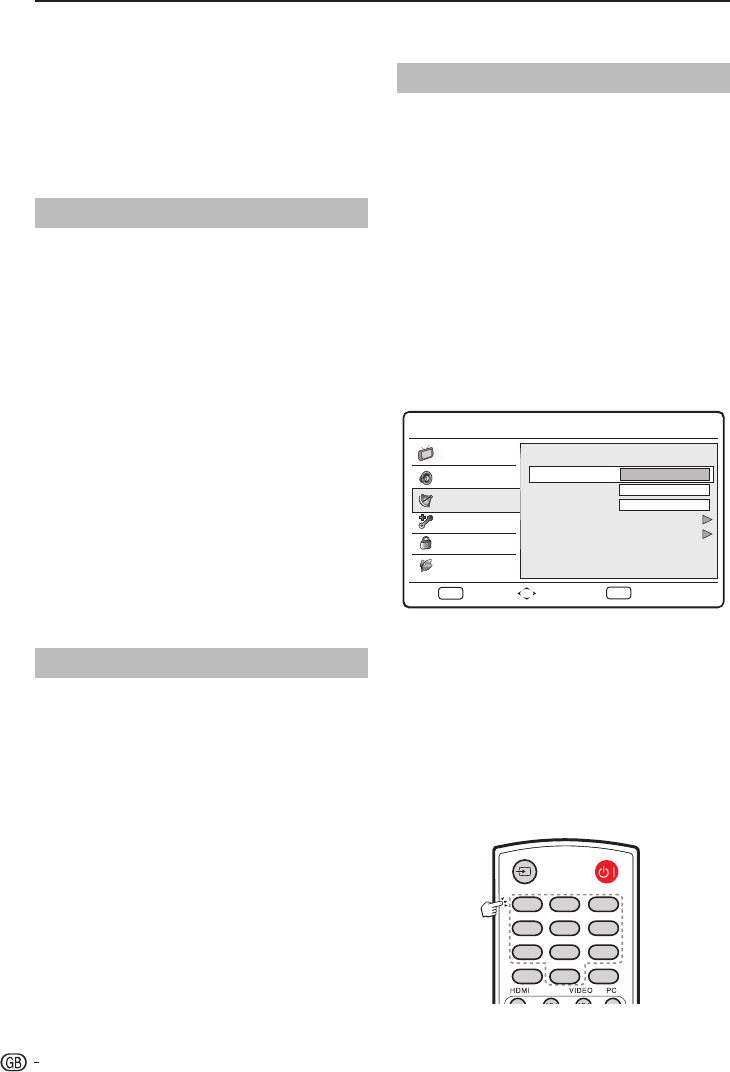
Using the remote control ................................ 6
Quick guide ........................................................... 7
Initial installation overview................................ 7
Watching TV .......................................................... 8
Daily operation ................................................ 8
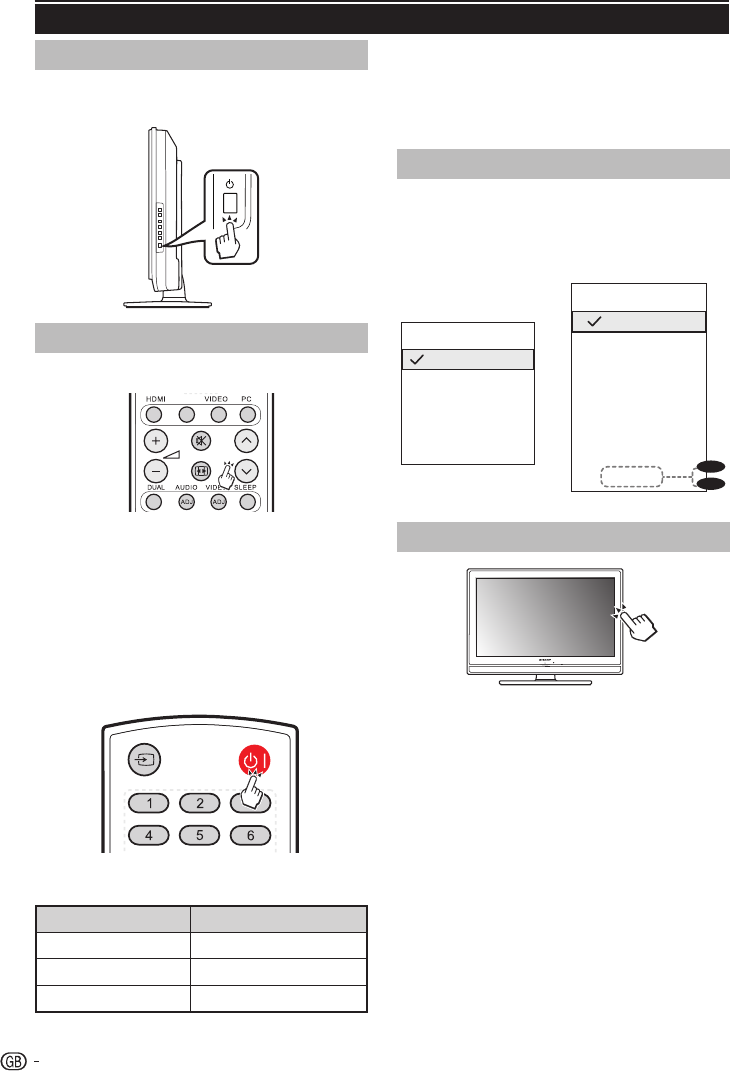
Turning on/off the power ........................... 8
Changing channels ................................... 8
Selecting external video source ................. 8
Operation without a remote control ........... 8
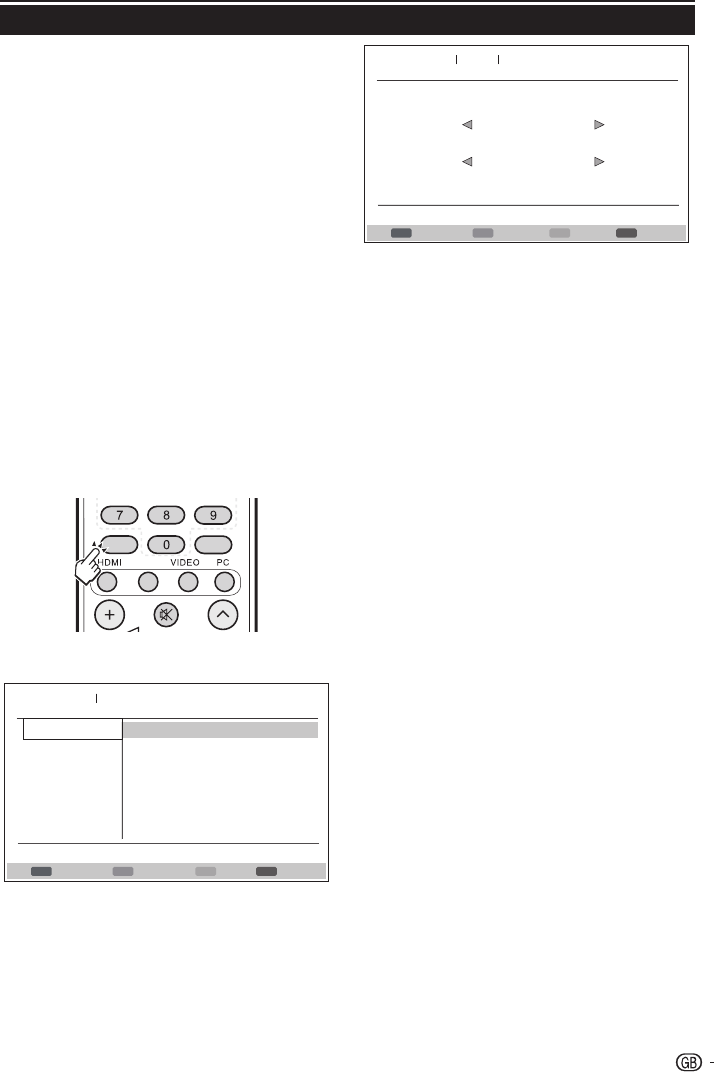
EPG (Electronic Programme Guide) ................ 9
Teletext ......................................................... 10
Select a Teletext language ....................... 10
TV menu .............................................................. 11
Picture .......................................................... 11
Adjust picture settings ............................. 11
Use smart picture .................................... 11
Sound ........................................................... 11
Adjust sound settings.............................. 11
Use Sound Mode .................................... 12
TV ................................................................. 12
Select a digital audio language ................ 12
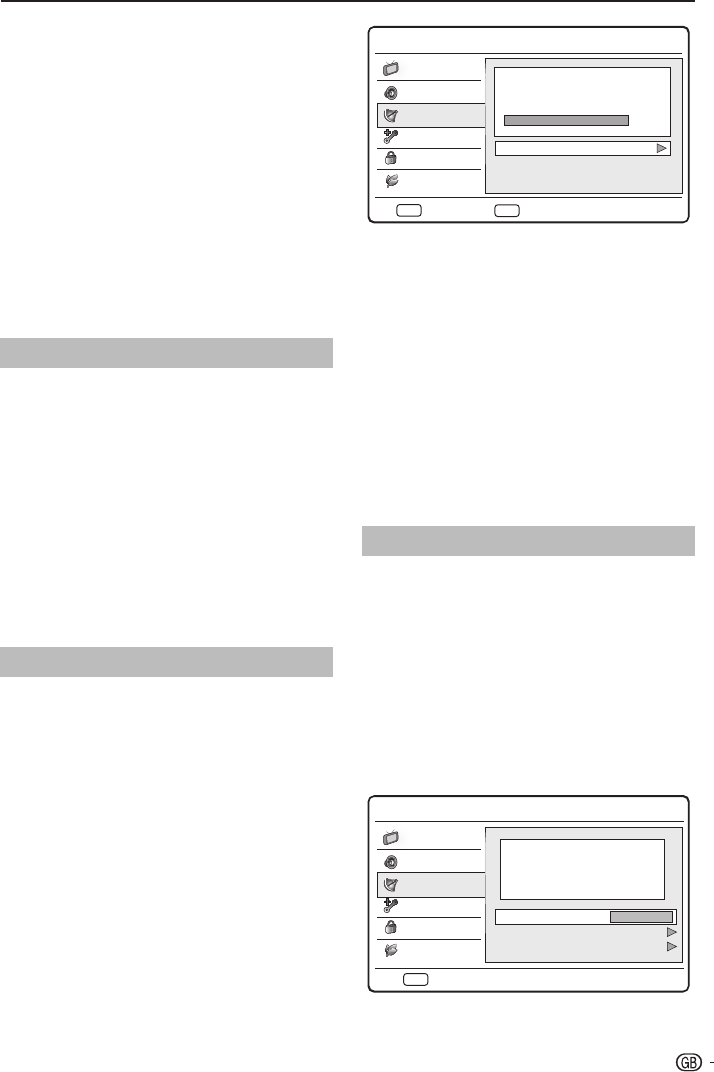
Automatically install channels .................. 12
Update Scan ........................................... 13
Single RF Scan ....................................... 13
Analogue Manual Scan ........................... 13
Channel Skip .......................................... 14
Channel Sort ........................................... 14
Channel Edit ........................................... 14
Analogue Ch Fine Tune ........................... 15
Assign a channel decoder (For ATV) ........ 15
Features ....................................................... 15
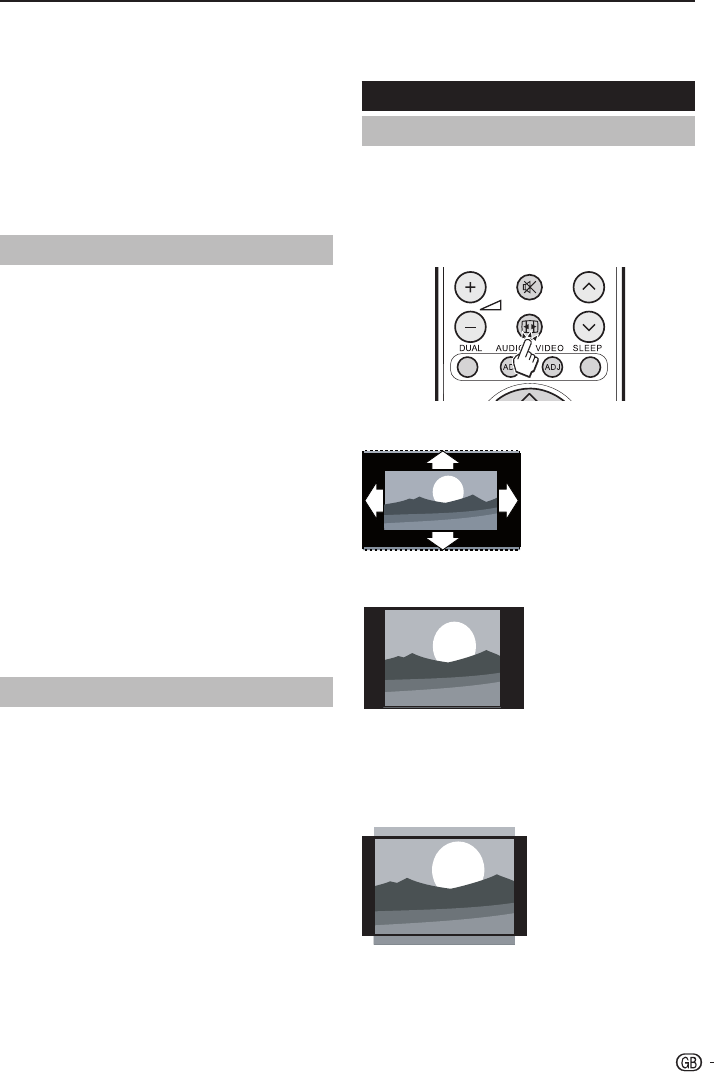
Change picture format ............................ 15
Change the time zone ............................. 16
Set the clock .......................................... 16
Automatically switch the TV off (Off time) . 16
Automatically switch the TV to standby
(Sleep timer) ......................................... 16
Use subtitles ........................................... 17
HDMI overscan ....................................... 17
Reset Default .......................................... 17
Parental .......................................................... 17
Access Parental menu .............................. 17
Lock one or more channels ....................... 18
To set parental ratings ............................... 18
Lock one or more connected devices ....... 18
Set / Change password ............................ 18
Clear all parental settings .......................... 18
Eco ................................................................. 18
Connecting external devices ............................... 19
HDMI connection ............................................ 19
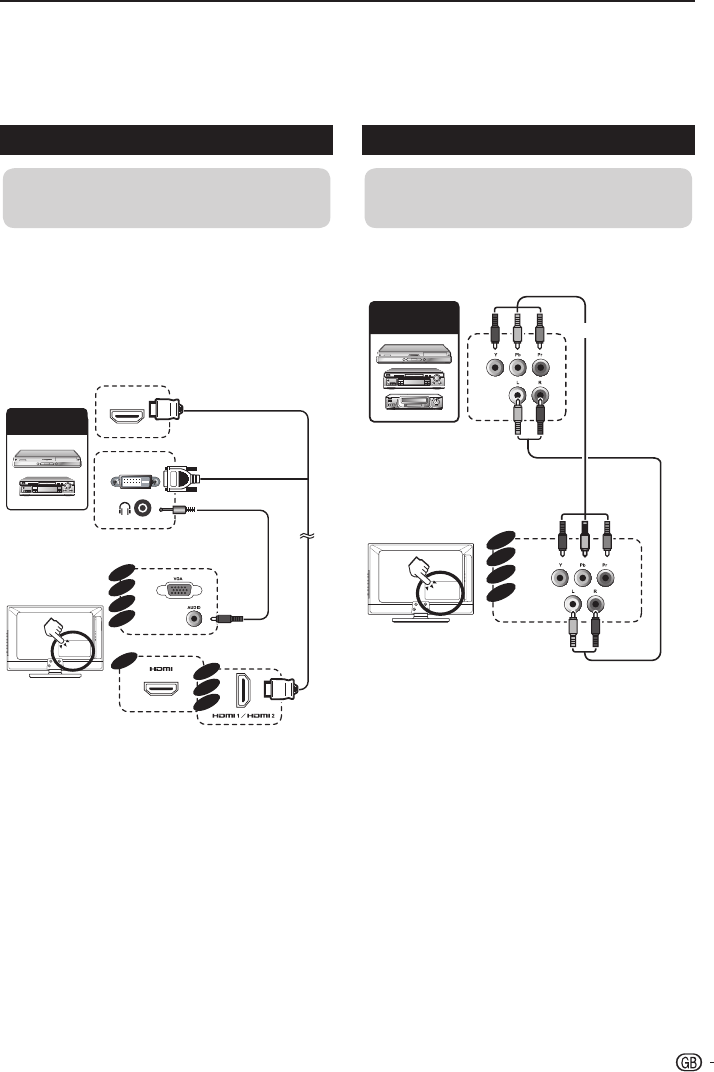
YPbPr (Component connection) ...................... 19
SCART connection ......................................... 20
S-Video connection ........................................ 20
Speaker / Amplifier connection ....................... 21
Inserting a CA Card ........................................ 21
Access CI Module service ......................... 21
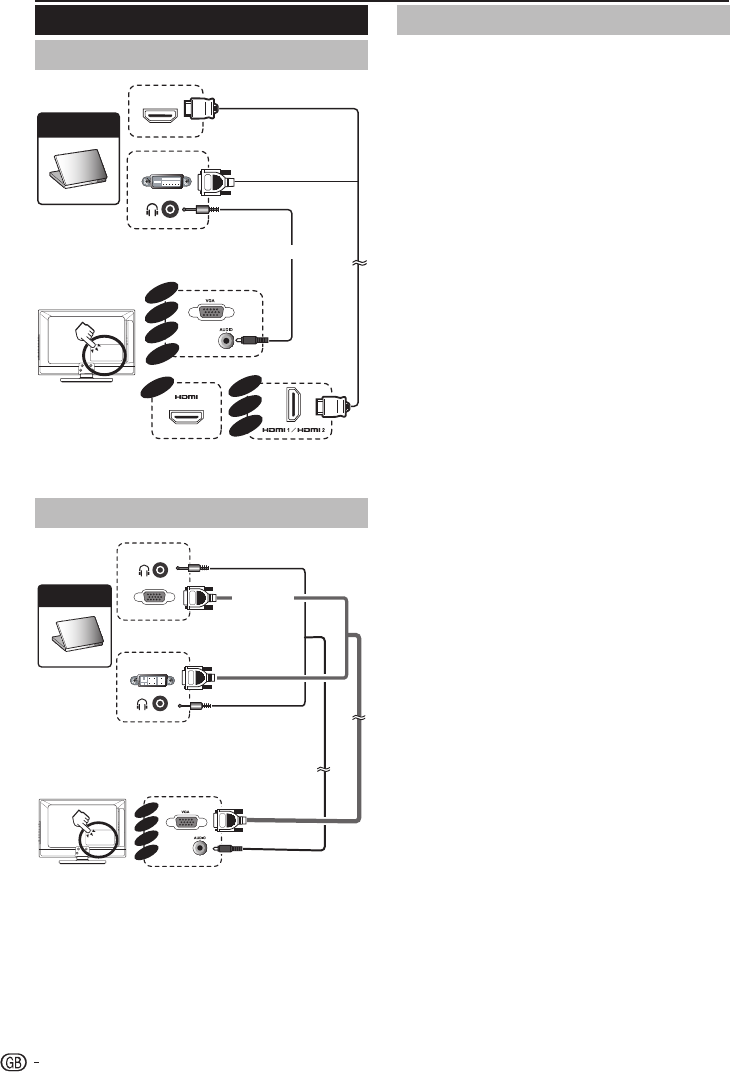
Connecting a PC ............................................ 22
Digital connection ..................................... 22
Analogue connection ................................ 22
Supported display resolutions ................... 22
Appendix ............................................................... 23
Troubleshooting .............................................. 23
Specification ................................................... 24
Environmental specifications ........................... 26
Other information ............................................ 26
Trademarks ..................................................... 27
ENGLISH
1
Cleaning—Unplug the AC cord from the AC outlet before cleaning the product. Use a damp cloth to •
clean the product. Do not use liquid cleaners or aerosol cleaners.
Water and moisture—Do not use the product near water, such as bathtub, washbasin, kitchen sink, •
laundry tub, swimming pool and in a wet basement.
Do not place vases or any other water-filled containers on this product. •
The water may spill onto the product causing fire or electric shock.
Stand—Do not place the product on an unstable cart, stand, tripod or table. Doing so can cause the product to •
fall, resulting in serious personal injuries as well as damage to the product. Use only a cart, stand, tripod, bracket or
table recommended by the manufacturer or sold with the product. When mounting the product on a wall, be sure
to follow the manufacturer’s instructions. Use only the mounting hardware recommended by the
manufacturer.
When relocating the product placed on a cart, it must be moved with utmost care. Sudden stops, •
excessive force and uneven floor surface can cause the product to fall from the cart.
Ventilation—The vents and other openings in the cabinet are designed for ventilation. Do not cover •
or block these vents and openings since insufficient ventilation can cause overheating and/or
shorten the life of the product. Do not place the product on a bed, sofa, rug or other similar surface,
since they can block ventilation openings. This product is not designed for built-in installation; do not place the
product in an enclosed place such as a bookcase or rack, unless proper ventilation is provided or the manufacturer’s
instructions are followed.
The LCD panel used in this product is made of glass. Therefore, it can break when the product is dropped or impact •
applied. If the LCD panel is broken, be careful not to be injured by broken glass.
Heat sources—Keep the product away from heat sources such as radiators, heaters, stoves and •
other heat-generating products (including amplifiers).
To prevent fire, never place any type of candle or naked flames on the top or near the TV set.•
To prevent fire or shock hazard, do not place the AC cord under the TV set or other heavy items.•
Do not display a still picture for a long time, as this could cause an afterimage to remain.•
There is power consumption always if main plug is connected.•
Servicing—Do not attempt to service the product yourself. Removing covers can expose you to high voltage and •
other dangerous conditions. Request a qualified person to perform servicing.
For ventilation, leave at least 4” to 6” free all around the TV. Do not place the TV on a carpet.•
The equipment shall not be exposed to dripping or splashing.•
The equipment shall not be exposed to rain or moisture and objects filled with liquids, such as vases, shall be placed •
on the apparatus.
The appliance coupler is used as the disconnect device of this apparatus, the disconnect device shall remain readily •
operable.
The LCD panel is a very high technology product, giving you fine picture details.
Due to the very large number of pixels, occasionally a few non-active pixels may appear on the screen as a
fixed point of blue, green or red.
This is within product specifications and does not constitute a fault.
Precautions when transporting the TV
When moving the TV, it should always be carried by two people, using both hands, be careful not to apply pressure to
the display.
Wall mounting
Installing the LCD Colour TV requires special skill that should only be performed by qualified service personnel.
Customers should not attempt to do the work themselves. SHARP bears no responsibility for improper mounting or
mounting that results in accident or injury.
Introduction
Thank you for your purchase of the SHARP LCD colour TV product. To ensure safety and many years of trouble-free
operation of your product, please read the Important Safety Precautions carefully before using this product.
Dear SHARP customer
Important Safety Precautions
2
Introduction
BI (POWER)
Press to turn the LCD TV on or
enter standby mode.
Ø (INPUT SOURCE)
Select an input source.
0-9 DIGIT BUTTONS
To select a TV channel directly.
EPG
Press this button to display
electronic programme guide when
watching digital channels.
PRE PR
To display the previous selected TV
channel.
HDMI
Press this button you could select
HDMI (19”) / HDMI 1(26”, 32”, 42”)
/ HDMI 2 (26”, 32”, 42”) / HDMI 3
(32”, 42”).
YPbPr
Press this button you could select
YPbPr.
VIDEO
Press this button you could select
AV / SCART 1 / SCART 2 (26”,
32”, 42”)
PC
Press to direct to the PC mode.
(+/-)
Press to adjust the volume.
¬
Press to toggle audio on and off.
You can also press (+/-) to
restore the previous volume level.
(Picture format)
Select picture format to Auto /
Normal / Zoom 1/ Zoom 2 /
Wide.
P (</>)
Press to select the channel.
DUAL
Select MONO / STEREO / DUAL
1 / DUAL 2 for ATV channel. Select
Audio language for DTV channel.
AUDIO (ADJ)
Press to set the LCD TV to a
predefined sound setting.
Personal / Music / Speech
Remote control unit
VIDEO (ADJ)
Press to set the LCD TV to a
predefined picture setting.
Personal / Standard / Vivid /
Movie / Eco
SLEEP
Press to turn the LCD TV off within
an amount of time. (10 ~ 120
minutes.)
<>≤≥
Press oœpπ to navigate and
confirm your selection.
OK
Press to activate a setting.
MENU / EXIT
Press to activate the LCD TV OSD.
Press again to exit the LCD TV OSD.
Ë
Display programme information, if
available.
R/G/Y/B (COLOUR BUTTON)
Press buttons to select the pictures
with various colours of text. Different
channels display different functions.
TELETEXT
Press this button to activate Teletext.
Press again to turn off Teletext.
MIX
Press this button to activate Teletext
with TV.
SIZE
Press this button to change the
font size: Full screen, Top half and
Bottom half.
SUBPAGE
To select the subpage when the
current page contains subpage(s).
INDEX
Press this button to return to page
100 or the index page; and then
press 0 to 9. The teletext page will
be numbered and added to the page
you select or the secondary item.
SUBTITLE
For DTV, press this button to toggle
off / between available subtitle
languages.
For ATV, press this button to toggle
off / between available subtitle pages
in Teletext.
HOLD
Press this button to stop the
scrolling of pages.
The text decoder stops receiving
data.
REVEAL
Reveal hidden information such as
answers to a quiz.
ECO
Press this button to set the picture
with less brightness for saving
energy.
PR LIST
Press to display a list of channels.
Then press Red button to select
the digital or analogue channel list.
(Only available when your input
source is TV).
FREEZE
Press to freeze a moving image on
the screen. (Only available when
your input source is TV).
Scart output signal will also be
frozen when you are watching digital
channels.
ECO
EPG
YPbPr
PR LIST FREEZE
MENU
/EXIT
P
PRE PR
3
Introduction
TV (Front view)
B
(Standby/On) indicator
Remote control sensor
TV (Rear view)
AC IN
75Ω
19”
75Ω
AC IN
POWER
button
Volume buttons
MENU button
COMMON
INTERFACE
slot
Composite
(AV IN, AV/LR)
Earphone Output
AC IN
COMMON
INTERFACE
slot
Composite
(AV IN, AV/LR)
S-VIDEO
Service socket
HDMI 3
PC IN (VGA / AUDIO)
COMPONENT (VIDEO and
L/R AUDIO INPUT)
SCART (CVBS Tuner out)
AV VIDEO and L/R Audio Output
HDMI
SERVICE
Socket
Tuner Input
75Ω
SPDIF OUT(Digital audio out)
Tuner Input
SCART 1 (CVBS Tuner out)
SCART 2 (CVBS Monitor out)
AV L/R Audio Output
SERVICE
Socket
PC IN (VGA / AUDIO)
COMPONENT (VIDEO and L/R AUDIO INPUT)
HDMI 1
HDMI 2
75Ω
SPDIF OUT
(Digital audio out)
Earphone Output
P ( )
Programme (Channel)
buttons
3
32”
Power conntector
SERVICE
socket
26”
32”
42”
42”
INPUT SOURCE
button
4
Preparation
Supplied accessories
Operation Manual
Quick Setup Guide
Operation Manual Quick Setup Guide
AC cord (x1)
Product shape varies
in some countries
ECO
EPG
YPbPr
PR LIST FREEZE
MENU
/EXIT
P
PRE PR
Remote control (×1)
AAA battery (×2)
Cable clamp (x1)
Attached in back of
the TV.
x 3
19”
x 4
Stand unit and screws
26”
32”
42”
Mount the TV stand
Put the TV face down on a safe surface that is 1.
covered by a soft and smooth cloth.
Adjust the TV stand to the bottom of the TV.2.
Fasten the screws by using a cross-head 3.
screwdriver (Not supplied).
NOTE
To detach the TV stand, perform the steps in reverse •
order.
Wall mounting
W
H
TV
screen
size
( Inches)
VESA-
compatible
wall bracket
(millimeters)
(W x H)
Screw type
19 100 x 100 mm Metric 4 x 10 mm
26” 200 x 100 mm Metric 4 x 10 mm
32” 200 x 200 mm Metric 6 x 10 mm
42” 400 x 200 mm Metric 6 x 10 mm
NOTE
At the time of purchasing wall bracket, please check if •
there is enough space between the wall bracket and TV
terminals for the terminal connection.
Bundling the cables
AC IN
75Ω
5
Preparation
Installation of batteries
Insert two AAA batteries into Remote control. 1.
Make sure (k) and (l) are facing the proper
direction.
Replace the cover.2.
NOTE
If the remote control will not to be used for a long •
time, remove the batteries to avoid remote control
damage.
CAUTION
Improper use of batteries can result in chemical
leakage or explosion. Be sure to follow the instructions
below.
Do not mix batteries of different types. Different •
types of batteries have different characteristics.
Do not mix old and new batteries. Mixing old and •
new batteries can shorten the life of new batteries or
cause chemical leakage in old batteries.
Remove batteries as soon as they have worn out. •
Chemicals that leak from batteries can cause a rash.
If you find any chemical leakage, wipe thoroughly
with a cloth.
The batteries supplied with this product may have a •
shorter life expectancy due to storage conditions.
If you will not be using the remote control unit for •
an extended period of time, remove the batteries
from it.
Note on disposing batteries:
The batteries provided contain no harmful materials
such as cadmium, lead or mercury.
Regulations concerning used batteries stipulate
that batteries may no longer be thrown out with the
household rubbish. Deposit any used batteries free of
charge into the designated collection containers set up
at commercial businesses.
Using the remote control
Use the remote control unit by pointing it towards the
remote control sensor. Objects between the remote
control unit and sensor may prevent proper operation.
30° 30°
Remote control sensor
EPG
YPbPr
P
PRE PR
5m
Display the Menu Screen
Press MENU / EXIT and the menu screen displays.
Select an item by the remote control
Press 1. <>≥ to select the desired menu.
Press 2. ≤≥ to select / adjust the item to the
desired level. The setting on screen is applied
immediately.
Press 3. MENU / EXIT to return to the previous
layer .
Select
Menu
Brightness
Contrast
Colour
Tint
Sharpness
Colour Temperature
Advanced Control
50
50
50
0
3
Normal
Sound
Picture
TV
Features
Parental
Eco
BackEXIT
PersonalSmart Picture
3
Exit the Menu Screen
The operation will exit the menu screen if you press
MENU / EXIT before it is complete.
6
Quick guide
Initial installation overview
Follow the below steps one by one when using the TV for the first time. Some steps may not be necessary
depending on your TV installation and connection.
Preparation
Connect antenna cable to
the antenna terminal.
75Ω
If necessary, insert CA card
into the CI slot to watch
scrambled broadcasts.
Connect the AC cord to the
TV.
1
Power on and run the
auto installation
Turn on the TV power with
a.
MENU
Run the initial auto
installation.
Initial Setup
WELCOME!
Welcome to use the Wizard for
Initial Setup !!
Please press [OK] to start the wizard.
Next
OK
4 Language setting
Initial Setup
Language
Please select your language:
Deutsch
Français
Italiano
Español
Português
Nederlands
NextSelectBack
English
ExitEXIT
4 Country setting
Initial Setup
Country
Please select your country:
NextSelectBack
Belgium
Switzerland
Czech Republic
Germany
Denmark
Spain
Austria
ExitEXIT
2
4 Start searching channels
Initial Setup
Channel Scan
First, please connect antenna.
Start channel scan now?
If you skip this setup, the channel
scan could be performed in Menu.
NextSelectBack
Skip Scan
0 %
Scan
ExitEXIT
Initial Setup
Channel Scan
The channel scan may take a while
to complete.
Status: Scanning.
Analogue Channels: 3
Digital Channels: 10
10 %
CancelEXIT
Watch TV
Congratulations! Now you
can watch TV.
Initial Setup
Channel Scan
Congratulations !!
Completed Initial setup
Please press [OK] to exit the
wizard.
Back
Exit
OK
If necessary, adjust the
antenna to attain maximum
signal reception.
3
AC cord (x1)
Product shape
varies in some
countries.
7
Watching TV
Daily operation
Turning on/off the power
Press B on the TV.
Switch it off by pressing B on the TV.
MENU
Changing channels
With P<>:
YPbPr
P
Standby mode
E
To standby mode
If the TV set is switched on, you can switch it to
standby by pressing B on the remote control.
E
Switching on from standby
From standby, press B on the remote control.
TV indicator status
B indicator
Status
Off Power off
Green Power on
Red Standby
NOTE
If you are not going to use this TV for a long period of •
time, be sure to remove the AC cord from the power
outlet.
A small amount of electric power is still consumed even •
when B is turned off.
Selecting external video source
Once the connection is made, press b to display
the INPUT SOURCE screen, and then press <> to
switch over to the appropriate external source with OK
INPUT SOURCE
YPbPr
AV
SCART
PC
HDMI
TV
19”
INPUT SOURCE
YPbPr
AV
SCART 1
PC
HDMI 1
SCART 2
HDMI 2
TV
HDMI 3
26” / 32” / 42”
32”
42”
Operation without a remote control
This function is useful when there is no remote control
within your reach.
Press 1. MENU briefly to display the direct control
screen.
Press 2. P <> instead of </> or i k/l
instead of ≤≥ to select the item.
Press 3. MENU to confirm the selection.
NOTE
The direct control menu screen will disappear if left •
unattended for several seconds.
8
Watching TV
EPG (Electronic Programme Guide)
EPG is an on-screen guide that displays scheduled
digital TV programmes. This guide is not available with
analogue channels. You can navigate, select and view
programmes.
There are two types of EPG, “Now and Next” and “7
or 8 day” EPG. “Now and Next” is always available
but the “7 or 8 day” EPG is only available in certain
countries.
With the EPG menu you can:
View a list of currently broadcast digital programmes.•
View upcoming programmes.•
Switch on EPG
NOTE
The first time you use EPG, you may be prompted •
to perform an update. If so, follow the on-screen
instructions.
Press 1. EPG on the remote control, the “Now
and Next” EPG will appear and the detailed
information about the current programme is
displayed.
EPG
YPbPr
P
PRE PR
2. Use the colour buttons on the remote control
to activate available actions.
Prev page• (Red): List the previous day’s EPG.
Next page • (Green): List the next day’s EPG.
Detail• (Yellow): Displays the information of your
highlighted programme.
Filter• (Blue): Sets the type of the channel list.
Press 3. EPG or MENU / EXIT to exit .
9
Watching TV
Teletext
What is Teletext?
Teletext broadcasts pages of information and
entertainment to specially equipped television sets.
Your TV receives Teletext signals broadcast by a TV
network, and decodes them into graphical format for
viewing. News, weather and sports information, stock
exchange prices and programme previews are among
the many services available.
Turning on and off Teletext
Select a TV channel or external source 1.
providing a Teletext programme.
Press 2. TELETEXT to display Teletext.
Many stations use the TOP operating system, •
while some use FLOF (e.g. CNN). Your TV
supports both these systems. The pages are
divided into topic groups and topics. After
switching on the teletext, up to 1000 pages are
stored for fast access.
If you select a programme with no Teletext •
signal, “No Teletext ” displays.
The same message displays during other •
modes if no Teletext signal is available.
NOTE
Teletext will not work if the selected signal type is RGB. •
Buttons for teletext operations
Buttons Description
P (rs)
Increase or decrease the page
number.
Colour
(R/G/ Y/B)
Select a group or block of pages
displayed in the coloured brackets
at the bottom of the screen by
pressing the corresponding
Colour (R/G/Y/B) on the remote
control unit.
0 - 9
Directly select any page from 100
to 899 by using 0 - 9.
MIX
Press this button to activate
Teletext with TV.
SIZE
Switch the Teletext image to Top,
Bottom or Full.
INDEX
Press this button to return to page
100 or index page.
HOLD
Stop updating Teletext pages
automatically or release the hold
mode.
REVEAL
Reveal or hide hidden information
such as an answer to a quiz.
Buttons Description
SUBPAGE
Select the subpage when the
current page contains subpage(s).
Press number buttons on the
remote control to access the
subpage directly. (two digits)
Select a Teletext language
Press 1. MENU / EXIT on the remote control and
press Features Teletext Language.
Press 2. OK or to enter Teletext Language
menu and press <> to select one of the
following.
Digital Teletext Lang.•
Decode Page Lang.•
Highlight your selection and press 3. ≤≥ to make
a selection.
Follow the on-screen instructions to exit.4.
Using the MHEG5 application (UK only)
Some services bring you programmes with the MHEG
(Multimedia and Hypermedia Expert Group) application
encoded, letting you experience DTV interactively.
When provided, the MHEG5 application will start when
you press the R button.
Sample MHEG5 screen
10
Use smart picture
Apart from manually adjusting picture settings, you
can use Smart picture to set your TV to a predefined
picture setting.
Press 1. MENU / EXIT on the remote control and
select Picture.
Press 2. OK or to enter Picture and select
Smart Picture.
Press 3. ≤≥ to select one of the following
settings:
• Personal
• Standard
Vivid•
Movie•
Eco•
Follow the on-screen instructions to exit.4.
Sound
Adjust sound settings
This section describes how to adjust sound settings.
Press 1. MENU / EXIT on the remote control and
select Sound.
Press 2. OK or to enter the list.
Press 3. <> to select one of the following
settings:
Equalizer 120Hz (Bass): • Adjusts the amount
of bass.
Equalizer 500Hz (Tenor): • Adjusts the amount
of tenor.
Equalizer 1.5KHz (Neutral): • Adjusts the
amount of neutral.
Equalizer 5KHz (Treble): • Adjusts the amount
of treble.
Equalizer 10KHz (Descant): • Adjusts the
amount of descant.
Picture
Adjust picture settings
Press 1. MENU / EXIT on the remote control and
select Picture.
Press 2. OK or to enter the list.
3. Press o> to select one of the following
settings:
• Brightness: Changes the level of light in the
picture.
Contrast: • Changes the level of bright parts in
the picture keeping the dark parts unchanged.
• Colour: Changes the level of saturation.
Tint: • Changes the colours to reddish or bluish.
Sharpness: • Changes the level of sharpness of
fine details.
Colour temperature:• Sets the colour
temperature to Cool (bluer), Normal
(balanced), Warm (redder).
Advanced Control: • Press to enter and press
<> to select one of the following item:
Noise Reduction:* Filters and reduces the
noise in the picture. Selects the level to Low
/ Medium / High / Auto. Or select Off to
disable this function.
Flesh Tone: * Selects On to set the flesh
colour to be more natural.
Back light: * Adjusts the background brighter
or darker.
DCR (Dynamic contrast ratio):* Enhances
the contrast in the picture as the image on
the screen changes. Press ≤≥ to switch
active control On or Off.
Press 4. ≤≥ to select / adjust the item to the
desired level.
Follow the on-screen instructions to exit.5.
TV menu
11
Balance: • Sets the balance of the left and right
speakers to best fit your listening position.
Virtual Surround: • Automatically switches the
TV to the best surround sound mode available
from a broadcast. Select On or Off.
Digital Audio Out:• Selects the type of digital
audio out to PCM / Off / Dolby Digital.
AVL (Auto volume leveling): • Reduces
sudden volume changes, for example, during
commercials or when switching from one
channel to another. Select On or Off.
Type: • (Only available for Digital channels.)
Selects the type of audio broadcast.
Normal: * Sets regular audio only.
Hard of Hearing: * Sets the mix of hearing
impaired audio with regular audio.
Audio Description: * Sets the mix of visually
impaired audio with regular audio.
Audio Description: • (Only appears when you
select MENU / EXIT > Sound > Type > Audio
Description): Adjusts the volume of visually
impaired audio.
Press 4. ≤≥ to select / adjust the item to the
desired level.
Follow the on-screen instructions to exit.5.
Use Sound Mode
Apart from manually adjusting sound settings, you
can use Sound Mode to set your TV to a predefined
sound setting.
Press 1. MENU / EXIT on the remote control and
select Sound.
Press 2. OK or to enter Sound and select
Sound Mode.
Press 3. ≤≥ to select one of the following
settings:
• Personal
Music•
Speech•
Follow the on-screen instructions to exit.4.
TV menu
TV
The first time you set up your TV, you are prompted to
select an appropriate menu language and to perform
automatic installation of TV and digital radio channels
(If available).
This chapter provides instructions on how to reinstall
channels as well as other useful channel installation
features.
NOTE
Re-installing channels modifies the channel list.•
Select a digital audio language
Press 1. MENU / EXIT on the remote control and
select TV.
Press 2. OK or to enter TV menu.
Press 3. <> to select 1st Audio or 2nd Audio.
Highlight your selection and press 4. ≤≥ to select
an audio language.
Follow the on-screen instructions to exit.5.
NOTE
If your selected audio language is not broadcasted, the •
default audio language will be displayed.
Automatically install channels
This section describes how to search and store
channels automatically. Instructions are for both digital
and analogue channels.
E
Step 1: Select your menu language
Press1. MENU / EXIT on your remote control and
select Features Menu language.
Press 2. ≤≥ to select your language.
Follow the on-screen instructions to exit.3.
E
Step 2: Select your country
Select the country where you are located. The TV
installs and arranges channels according to your
country.
Press 1. MENU / EXIT on the remote control and
select TV Country.
Press 2. ≤≥ or to select your country.
Follow the on-screen instructions to exit.3.
12
TV menu
E
Step 3: Automatic installation
Your TV searches and stores all available digital and
analogue TV channels as well as all available digital
radio channels.
Press 1. MENU / EXIT on the remote control and
select TV Channels.
NOTE
You are prompted to enter current password to enter •
Channels if Channel Block /Parental Guidance /
Input Block in the Parental menu is not the default
setting.
Select 2. Channel Scan and press OK or to
start channel installation. The installation may
take a few minutes.
When complete, follow the on-screen 3.
instructions to exit.
Update Scan
Update Scan has similar function with Channel Scan.
The difference is you could update channel list without
erasing the original information.
Press 1. MENU / EXIT on the remote control and
select TV Channels.
NOTE
You are prompted to enter current password to enter •
Channels if Channel Block /Parental Guidance /
Input Block in the Parental menu is not the default
setting.
Press 2. <> to select Update Scan and press
OK or to start channel update.
When complete, follow the on-screen 3.
instructions to exit.
Single RF Scan
If using digital broadcasts, you can check the quality
and signal strength of digital channels. This allows you
to reposition and test your antenna or satellite dish.
Press 1. MENU / EXIT on the remote control and
select TV Channels.
NOTE
You are prompted to enter current password to enter •
Channels if Channel Block /Parental Guidance /
Input Block in the Parental menu is not the default
setting.
Press 2. <> to select Single RF Scan and press
OK or to enter.
Highlight the 3. RF Channel box, and press ≤≥
to select a channel number you preferred to
scan.
Press 4. OK to start scanning.
When the scan is completed, the result of 5.
signal strength and signal quality appear on the
screen.
Follow the on-screen instructions to exit.6.
NOTE
If the signal quality and strength is poor, reposition •
the antenna or satellite dish and retest.
If you have further problems with the reception of •
your digital broadcast, contact a specialised installer.
Analogue Manual Scan
This section describes how to search and store
analogue TV channels manually.
Press 1. MENU / EXIT on the remote control and
select TV Channels.
NOTE
You are prompted to enter current password to enter •
Channels if Channel Block /Parental Guidance /
Input Block in the Parental menu is not the default
setting.
Press 2. <> to select Analogue Manual Scan
and press OK or to enter.
13
TV menu
In the 3. Start Frequency (MHz) box, enter the
frequency by using the digit buttons on the
remote control.
Press 4. <> to select Scan Up or Scan Down to
scan the next available analogue channel from
the frequency you have entered.
Press 5. OK or to start scanning.
When complete, follow the on-screen 6.
instructions to exit.
Channel Skip
Channel skip allows you to skip one or more channels
when pressing P <> on the remote control to switch
between channels.
Press 1. MENU / EXIT on the remote control and
select TV Channels.
NOTE
You are prompted to enter current password to enter •
Channels if Channel Block /Parental Guidance /
Input Block in the Parental menu is not the default
setting.
Press 2. <> to select Channel Skip and press
OK or to enter the channel list.
Press 3. <> to select one or more channels you
preferred to skip.
Press 4. OK to mark or cancel.
Follow the on-screen instructions to exit.5.
NOTE:
To watch the skipped channels, enter the channel •
numbers by using the digit buttons on the remote
control or select from PR LIST.
Channel Sort
Channel sort allows you to reorder the channels in the
PR LIST.
Press 1. MENU / EXIT on the remote control and
select TV Channels.
NOTE
You are prompted to enter current password to enter •
Channels if Channel Block /Parental Guidance /
Input Block in the Parental menu is not the default
setting.
Press 2. <> to select Channel Sort and press
OK or to enter the channel list.
Press 3. <> to select one channel and press OK
to mark.
Press 4. <> to select another channel and press
OK to mark. The two channels your marked are
exchanged.
Repeat step 3 to 4 to reorder more channels.5.
Follow the on-screen instructions to exit.6.
Channel Edit
Channel edit allows you to change the channel number
or the channel name.
Press 1. MENU / EXIT on the remote control and
select TV Channels.
NOTE
You are prompted to enter current password to enter •
Channels if Channel Block /Parental Guidance /
Input Block in the Parental menu is not the default
setting.
Press 2. <> to select Channel Edit and press
OK or to enter the channel list.
Press 3. <> to select one channel you prefer to
edit.
Press 4. OK to enter.
Press 5. <> to highlight one of the following:
Channel Number:• Enter a new channel
number by using the digit buttons on the
remote control
Channel Name:• Press the digit buttons on
the remote control to rename the channel.
Please refer to the graphic below for available
characters. (Press each button repeatedly to
change between characters.)
0-9 digit buttons with available characters
EPG
YPbPr
ABC1 DEF2 GHI3
JKL4 MNO5
PQR6
STU7 VWX8 YZ9
+-.0
PRE PR
14
TV menu
Features
Change picture format
Change the picture format to suit your content.
Press 1. repeatedly to select one of the
following picture formats. Alternatively, press
MENU / EXIT and select Features > Picture
format.
P
Auto
The Automatic format for
DTV transports streams
with AFD information,
while for ATV and SCART
should be with WSS
information.
Normal (Not for HD)
Displays the classic 4:3
format.
NOTE
Constant use of the • Normal picture format can cause
screen distortion.
Zoom 1 (Not for HD)
Scales the classic 4:3
format to 14:9.
Frequency:• Use digit buttons on the remote
control to enter the frequency. (Only for
analogue channels).
Colour System:• Press ≤≥ to select the colour
system. (Only for analogue channels)
Sound System: • Press ≤≥ to select the sound
system. (Only for analogue channels)
Follow the on-screen instructions to exit.6.
NOTE
The new channel number you have entered can not •
override the exist one.
Analogue Ch Fine Tune
You can manually fine tune analogue channels when
reception is poor.
Press 1. MENU / EXIT on the remote control and
select TV Channels.
NOTE
You are prompted to enter current password to enter •
Channels if Channel Block / Parental Guidance /
Input Block in the Parental menu is not the default
setting.
Press 2. <> to select Analogue Ch Fine Tune
and press OK or to enter the analogue
channel list.
Press 3. <> to select one channel and press OK
to enter.
Press 4. ≤≥ to adjust the frequency.
When complete, press 5. OK to set the frequency.
The fine tuned channel is stored under the
current channel number.
Follow the on-screen instructions to exit.6.
Assign a channel decoder (For ATV)
Decoders that decode channels can be connected
to SCART. You have to assign the TV channel as a
channel to be decodered. Before selecting channels,
make sure your TV is connected to SCART.
Press 1. MENU / EXIT on the remote control and
select TV Channels.
NOTE
You are prompted to enter current password to enter •
Channels if Channel Block /Parental Guidance /
Input Block in the Parental menu is not the default
setting.
Press 2. <> to select Decoder and press OK or
to enter available analogue channel list.
Press 3. <> to select the channel to decode.
Press 4. OK to mark or cancel.
Follow the on-screen instructions to exit.5.
15
Select 4. Auto Synchronization and press ≤≥ to
select:
On:• Sets the clock automatically the same with
the digital signal time. (Only if digital signal is
available).
Off:• Press <> to set your system Date or
system Time manually by using the digit
buttons on your remote control.
When the clock setting is completed, follow the 5.
on-screen instructions to exit.
Automatically switch the TV off (Off time)
Off time switches the TV to standby at a specified time.
NOTE
Before using off time function, you have to set the time •
on your TV correctly. (See page 16 “Set the clock”)
Press 1. MENU / EXIT on the remote control and
select Features Time.
Press 2. OK or to enter Time menu.
Press 3. <> to select Time and press OK or
to enter.
Press 4. > to select Timer and press ≤≥ to
select:
Off: • Disable Timer.
On:• Press > to highlight the Off Time box
and set and power off time by using the digit
buttons on your remote control.
Follow the on-screen instructions to exit.5.
Automatically switch the TV to standby
(Sleep timer)
Sleep timer switches the TV to standby after a defined
period of time.
Press 1. MENU / EXIT on the remote control and
select Features Time.
Press 2. OK or to enter Time.
Press 3. <> to select Sleep Timer.
Press 4. ≤≥ to select the period of time before
TV enters to standby.
Follow the on-screen instructions to exit.5.
NOTE
When you press any button on the remote control with •
less than three minutes left in the countdown, Sleep
timer will be automatically canceled.
TV menu
Zoom 2 (Not for HD)
Scales the classic 4:3
format to 16:9.
Wide
Stretches the classic 4:3
format to 16:9.
NOTE
When source input is PC mode, only Full screen and 4:3 •
are available.
For 4:3 PC input signal, picture format 4:3 and Wide •
screen are available.
For other input signals, only Wide screen is available.•
Change the time zone
Press 1. MENU / EXIT on your remote control and
select Features > Time.
Press 2. OK or to enter Time.
Select 3. Time zone and press ≤≥ to select your
time zone.
Follow the on-screen instructions to exit.4.
Set the clock
Press 1. MENU / EXIT on the remote control and
select Features Time.
Press 2. OK or to enter Time menu.
Press 3. <> to select Time and press OK or
to enter.
16
TV menu
Use subtitles
You can enable subtitles for each TV channel.
Subtitles are broadcasted via teletext or DVB-T digital
broadcasts. With digital broadcasts, you have the
additional option of selecting a preferred subtitle
language.
E
Set analogue subtitles
Press 1. MENU / EXIT on the remote control and
select Features > Subtitle.
Press 2. OK or to enter Subtitle.
Select 3. Analogue Subtitle.
Press 4. ≤≥ to select On to display subtitle
always or On During Mute to display subtitles
only when audio is muted. Select Off to close
subtitles.
Follow the on-screen instructions to exit.5.
E
Select a subtitle language on digital TV
channels
When you select a subtitle language on a digital TV
channel as described below, the preferred subtitle
language set in the TV menu is temporarily overruled.
Press 1. MENU / EXIT on the remote control and
select Features > Subtitle.
Press 2. OK or to enter Subtitle.
Press 3. <> to select 1st Subtitle or 2nd
Subtitle.
Highlight your selection and press 4. ≤≥ to select
a subtitle language.
Follow the on-screen instructions to exit.5.
NOTE
If your selected subtitle language is not broadcasted, the •
default language subtitle will be displayed.
If the • 1st Subtitle language you selected is not
available, the 2nd Subtitle language will be displayed.
E
Select Hearing impaired subtitle
When watching channels with hearing impaired service,
you can enable the subtitle commentary for the hearing
handicapped. For digital channels only.
Press 1. MENU / EXIT on the remote control and
select Features Subtitle.
Press 2. OK or to enter Subtitle.
Press 3. <> to select Subtitle Type.
Press 4. ≤≥ to select Hearing impaired as your
subtitle type.
Follow the on-screen instructions to exit.5.
HDMI overscan
When you watch TV via HDMI input source, you could
use this function to enlarge the picture. It may have few
loss of video content.
Press 1. MENU / EXIT on the remote control and
select Features > HDMI Scan info
Press 2. ≤≥ to select one of the following:
Select• Auto to scan the picture automatically.
Select • Underscan to disable.
Select • Overscan to activate.
Follow the on-screen instructions to exit.3.
Reset Default
When you activate the Reset Default, the TV enters to
first time installation.
Press 1. MENU / EXIT on the remote control and
select Features Reset Default.
Press 2. OK or to enter.
Select 3. OK and press OK on your remote
control to confirm.
Follow the on-screen instructions to reset your 4.
TV settings.
Parental
Lock TV channels or connected devices with a
four digit code to prevent children from watching
unauthorized content.
Access Parental menu
Press 1. MENU / EXIT on the remote control and
select Parental.
Press 2. OK or to highlight the password box.
Enter your password by using the 3. digit buttons
on the remote control. If your password is
correct, the Parental menu appears.
17
NOTE
You have to enter a 4-digit password everytime to •
access Parental menu.
Enter “0000” as the default password.•
If you forget your password, enter “5351” to override •
any existing passwords.
Lock one or more channels
Enter your password to access the 1. Parental
menu. (See page 17 “Access Parental menu”)
Select 2. Channel Block and press OK or to
enter the channel list.
Press 3. <> to select one or more channels you
preferred to lock.
Press 4. OK to lock or unlock the channel you
selected.
Follow the on-screen instructions to exit.5.
NOTE
If you switch to the locked channel, you will be •
prompted to enter your password. (If your password is
correct, the locked channel will be unlocked before the
TV restarts from standby.)
If your country selection is • Italy (see page 12 “Step 2:
Select your country”), you will be prompted to enter
your password every time you access each blocked
channels.
To set parental ratings
Some digital broadcasters rate their programmes
according to age. You can set TV to display only
programmes with age ratings higher than your child’s.
Enter your password to access the 1. Parental
menu. (See page 17 “Access Parental menu”)
Press 2. <> to select Parental Guidance and
press OK or to enter the Age Rating menu.
Press 3. ≤≥ to select an age rating.
Follow the on-screen instructions to exit.4.
Lock one or more connected devices
Enter your password to access the 1. Parental
menu. (See page 17 “Access Parental menu”)
Press 2. <> to select Input Block and press OK
or to enter the input source list
Press 3. <> to select one or more input source.
Press 4. OK to lock or unlock your selected input
source.
Follow the on-screen instructions to exit.5.
TV menu
NOTE
If you switch to the locked input source, you will be •
prompted to enter your password. (If your password is
correct, the locked input source will be unlocked before
the TV restarts from standby.)
If your country selection is • Italy (see page 12 “Step 2:
Select your country”), you will be prompted to enter
your password every time you access each blocked
input sources.
Set / Change password
Enter your password to access the 1. Parental
menu. (See page 17 “Access Parental menu”)
Press 2. <> to select Set Password and press
OK or to enter.
Enter your new password in the 3. New box by
using the digit buttons on the remote control.
Enter your new password again in the 4. Confirm
box.
When complete, the TV reruns to the 5. Parental
menu.
Repeat step 1 to 4 to change password.6.
Clear all parental settings
Reset all the settings in the Parental menu.
Enter your password to access the 1. Parental
menu. (See page 17 “Access Parental menu”)
Press 2. <> to select Clear All and press OK or
to enter.
Select 3. OK and press OK on the remote control
to clear all parental settings.
NOTE
If parental settings are cleared, you do not have to enter
password to access Channels in the TV menu.
Eco
This function enables you to automatically reduce the
backlight brightness in order to decrease the power
consumption and increase the backlight life span.
Off
On
Menu
Sound
Picture
TV
Features
Parental
Eco
Select
BackEXIT
18
Connecting external devices
HDMI connection
Example of connectable devices
E DVD E Blu-ray player/recorder
The HDMI connections (High Definition Multimedia
Interface) permit digital video and audio transmission
via a connection cable from a player/recorder. The
digital picture and sound data are transmitted without
data compression and therefore lose none of their
quality. Analogue/digital conversion is no longer
necessary in the connected devices, which also would
result in quality losses.
HDMI
DVI
19”
26”
32”
PC IN
42”
19”
26”
32”
42”
DVI/HDMI conversion
Using an DVI/HDMI adapter cable, the digital video •
signals of a DVD can also be played via the compatible
HDMI connection. The sound must be fed in additionally.
Both HDMI and DVI use the same HDCP copy •
protection method.
Supported video signal:
576p, 480p, 1080i, 720p, 1080p
See page 22 for PC signal compatibility.
YPbPr (Component connection)
Example of connectable devices
E VCR E DVD E Blue-ray player/recorder
You will enjoy accurate colour reproduction and high
quality images through the (YPbPr) when connecting a
DVD recorder or other recording equipment.
COMPONENT
19”
26”
32”
42”
E
Before connecting ...
Be sure to turn off the TV and any devices before making any connections.•
Firmly connect a cable to a terminal or terminals.•
Carefully read the operation manual of each external device for possible connection types. This also helps you •
get the best possible audiovisual quality to maximise the potential of the TV and the connected device.
HDMI device
HDMI cable
DVI-HDMI cable
Audio cable
(YPbPr) Component
Connection
Component cable
Audio cable
19
SCART connection
Example of connectable devices
E Decoder
E
When using the SCART 1
Full SCART, which transmits RGB, S-Video and CVBS
in, and CVBS tuner out.
SCART
SCART 1
19”
26”
32”
42”
Example of connectable devices
E VCR E DVD recorder
E
When using the SCART 2
Half SCART, which transmits S-Video or CVBS in, and
CVBS monitor out.
SCART 2
26”
32”
42”
Connecting external devices
NOTE
In cases when the decoder needs to receive a signal •
from the TV, make sure to select the appropriate input
source.
Do not connect the decoder to the SCART 2.•
You cannot connect the VCR with Decoder using a fully •
wired SCART cable under the SCART 2 source.
S-Video connection
Example of connectable devices
E VCR E DVD E Blu-ray player/recorder
E Game concole E Camcorder
You can use the S-Video when connecting to a game
console, camcorder, a DVD recorder and some other
equipment.
26”
32”
42”
NOTE
When using a S-video cable, you also need to connect •
an audio cable (R/L).
SCART cable
Decoder
SCART cable
VCD / DVD
recorder
S-Video
connection
Audio cable
S-video cable
20
Connecting external devices
Speaker / Amplifier connection
E
Connecting an amplifier with digital audio
input / analogue audio input
SPDIF OUT
RL
R
L
AUDIO OUT
AUDIO IN
19”
26”
32”
26”
32”
42”
42”
Inserting a CA Card
In order to receive coded digital stations, a Common
Interface Module (CI Module) and a CA Card must be
inserted in the CI slot of your TV set.
The CI Module and the CA Card are not supplied
accessories. They are usually available from your
dealer.
Inserting the CA Card into the CI Module
With the side with the gold coloured contact 1.
chip facing the side of the CI Module marked
with the provider’s logo, push the CA Card
into the CI Module as far as it will go. Note the
direction of the arrow printed on the CA card.
Inserting the CI Module in the CI slot2.
Carefully insert the CI Module in the CI slot with 3.
the contact side forward. The logo on the CI
Module must be facing forward from the rear of
the TV. Do not use excessive force. Make sure
the module is not bent in the process.
Access CI Module service
After inserting and activating the CI Module, make sure
the input source is TV.
Press 1. MENU / EXIT on the remote control.
Go to 2. Features > Common interface.
On-screen applications and content are provided by
your digital TV service operator.
Speaker / Amplifier
connection
Digital audio in
(COAXIAL)
Digital audio cable
Audio cable
21
Digital connection
HDMI
DVI
PC IN
PC
HDMI
19”
26”
32”
19”
26”
32”
42”
42”
Analogue connection
DVI-I
PC
HDMI
VGA
19”
PC IN
26”
32”
42”
Connecting external device
Connecting a PC
Supported display resolutions
Computer formats (PC)
Resolution Refresh rate
640 x 480 60Hz
800 x 600 56Hz
800 x 600 60Hz
1024 x 768 60Hz
1280 x 720 60Hz
1280 x 768 60Hz
1360 x 768 60Hz
1280 x 1024 60Hz (Only for 42”)
1920 x 1080 60Hz (Only for 42”)
Video formats
Resolution Refresh rate
480i 60Hz
480p 60Hz
576i 50Hz
576p 50Hz
720p 50Hz, 60Hz
1080i 50Hz, 60Hz
1080p (HDMI, Component only)
50Hz, 60Hz, 24Hz
HDMI cable
DVI-HDMI cable
Ø 3,5 mm stereo mini jack cable
DVI-I / RGB
Ø 3,5 mm stereo mini jack cable
conversion cable
RGB cable
22
Appendix
Problem Possible Solution
No picture 1. Connect power cord correctly.
2. Turn on power.
3. Connect signal cable correctly.
4. Press any button on the LCD TV.
Abnormal colours Connect signal cable correctly.
Twisted picture 1. Connect signal cable correctly.
2. Please use compatible signal.
Picture too dark Adjust brightness and contrast.
Audio only, no images 1. Please check if input signal is connected correctly.
2. TV-RF signal must not be lower than 50dB.
Picture only, no audio 1. Connect signal cable correctly.
2. Adjust volume to proper level.
3. Connect audio signal cable correctly.
4. TV-RF signal must not be lower than 50dB.
Cannot use remote control 1. Please change battery.
2. Turn off power for 10 seconds; and then restart power.
Cannot receive sufficient channels
through antenna
Please use the Channel scan function to increase the number of
channels not included in memory.
No colour Please adjust the colour setup.
Blinking picture accompanied by
ghost image
1. Check the connection of antenna/signal cable.
2. Check if channel is in play mode.
3. Press signal source and change input mode.
Broken lines or segments Adjust antenna.
Keep the TV away from noise sources, such as automobiles, neon
lights, and hair dryers.
Certain TV channels are blocked
(Hope to acquire some channels)
Please use the Update scan method to add the channels not included
in memory.
Overlapping images or ghost images Please use multi-directional outdoor antenna.
(If your TV is subject to the influence of nearby mountains or buildings).
Cannot use a function If the item you choose turns gray, that item cannot be selected.
Cannot receive programmes Please use the Update scan method to add the channels not included
in memory.
Troubleshooting
23
Appendix
Item
19o LCD COLOUR TV,
Model: LC-19SH7E
26o LCD COLOUR TV,
Model: LC-26SH7E
32o LCD COLOUR TV,
Model: LC-32SH7E
LCD screen size
19o diagonal 26o diagonal 32o diagonal
Number of dots 3,147,264 dots
(1366 g 768 g 3 dots)
3,147,264 dots
(1366 g 768 g 3 dots)
3,147,264 dots
(1366 g 768 g 3 dots)
Video Colour System PAL/SECAM/NTSC 3.58/NTSC 4.43/PAL 60
TV
Function
TV-Standard Analogue CCIR (B/G, I, D/K, L/L’)
Digital DVB-T (2K/8K OFDM)
Receiving
Channel
VHF/UHF ATV : IRA-E69, DVB-T : E5-E69
CATV S-band, S1–S41ch
TV-Tuning System Auto Preset 999 ch, Auto Label, Auto Sort
STEREO/BILINGUAL NICAM/A2
Viewing angles H : 170° V : 160° H : 160° V : 150° H : 176° V : 176°
Audio amplifier
3W g 2 5W g 2 5W g 2
Speaker
(128.8 mm g 40.2 mm) g 2 (164.5 mm g 42 mm) g 2 (164.5 mm g 42 mm) g 2
Rear
Antenna
UHF/VHF 75 q
RS-232C 3 pin connector (For service only)
SCART 1 SCART (AV input, Y/C input, RGB input, TV output )
SCART 2
(Only for 26” and 32”)
SCART (AV input, Y/C input, monitor output [analogue source - ATV, SCART 1, SIDE AV;
digital source - DTV] )
PC IN D-sub 15 pin (AV input), Ø 3.5mm jack (Audio input)
Component Y/Pb(Cb)/Pr(Cr), RCA pin (L/R)
SPDIF Digital audio output
AUDIO OUT RCA pin (L/R)
AV OUT (Only for 19”) RCA pin (AV output)
HDMI 1
HDMI 2 (Only for 26” and 32”)
Side
C. I. (Common Interface) EN50221, R206001
Headphones Ø 3.5mm jack (Audio output)
AV IN RCA pin (AV input).
S-VIDEO ( [Y/C input], Only for 26” and 32”)
HDMI 3 (Only for 32”)
OSD language English, German, French, Italian, Dutch, Spanish, Greek, Portuguese, Swedish, Finnish,
Russian, Polish, Turkish, Hungarian, Czech, Slovak, Danish, Norwegian, Estonian, Latvian,
Lithuanian, Slovenian, Bulgarian, Croatian, Romanian, Serbian, Ukrainian, Gaelic.
Power Requirement AC 220–240 V, 50 Hz
Power Consumption 45W (Standby < 0.3W)
(Method IEC62087)
55W (Standby < 0.3W)
(Method IEC62087)
135W (Standby < 0.3W)
(Method IEC62087)
Weight 3.8 kg (Without stand),
4.0 kg (With stand)
7.3 kg (Without stand),
8.4 kg (With stand)
11.0kg (Without stand),
12.4 kg (With stand)
Operating temperature
0°C to k40°C
Specification
24
Appendix
Item
42o LCD COLOUR TV, Model: LC-42SH7E
LCD screen size
42o diagonal
Number of dots
6,220,800 dots (1920 g 1080 g 3 dots)
Video Colour System PAL/SECAM/NTSC 3.58/NTSC 4.43/PAL 60
TV
Function
TV-Standard Analogue CCIR (B/G, I, D/K, L/L’)
Digital DVB-T (2K/8K OFDM)
Receiving
Channel
VHF/UHF ATV : IRA-E69, DVB-T : E5-E69
CATV S-band, S1–S41ch
TV-Tuning System Auto Preset 999 ch, Auto Label, Auto Sort
STEREO/BILINGUAL NICAM/A2
Viewing angles H : 176° V : 176°
Audio amplifier
10W g 2
Speaker (166 mm x 55mm) x 2
Rear
Antenna
UHF/VHF 75 q
RS-232C 3 pin connector (For service only)
SCART 1 SCART (AV input, Y/C input, RGB input, TV output )
SCART 2 SCART (AV input, Y/C input, monitor output [analogue source - ATV, SCART 1, SIDE AV;
digital source - DTV] )
PC IN D-sub 15 pin (AV input), Ø 3.5mm jack (Audio input)
Component Y/Pb(Cb)/Pr(Cr), RCA pin (L/R)
SPDIF Digital audio output
AUDIO OUT RCA pin (L/R)
HDMI 1
HDMI 2
Side
C. I. (Common Interface) EN50221, R206001
Headphones Ø 3.5mm jack (Audio output)
AV IN RCA pin (AV input). S-VIDEO (Y/C input)
HDMI 3
OSD language English, German, French, Italian, Dutch, Spanish, Greek, Portuguese, Swedish, Finnish,
Russian, Polish, Turkish, Hungarian, Czech, Slovak, Danish, Norwegian, Estonian, Latvian,
Lithuanian, Slovenian, Bulgarian, Croatian, Romanian, Serbian, Ukrainian, Gaelic.
Power Requirement AC 220–240V, 50 Hz
Power Consumption 170 W (Standby < 0.3W)
(Method IEC62087)
Weight 16.5kg (Without stand),
19.1 kg (With stand)
Operating temperature
0°C to k40°C
As a part of policy of continuous improvement, SHARP reserves the right to make design and specification changes •
for product improvement without prior notice. The performance specification figures indicated are nominal values of
production units. There may be some deviations from these values in individual units.
NOTE
Refer to the inside back cover for dimensional drawings.•
Audio cannot be output through the HDMI terminal.•
Specification
25
Information on the software license for this product
Software composition
The software included in this product is comprised of various software components whose individual copyrights
are held by SHARP or by third parties.
Software developed by SHARP and open source software
The copyrights for the software components and various relevant documents included with this product
that were developed or written by SHARP are owned by SHARP and are protected by the Copyright Act,
international treaties, and other relevant laws. This product also makes use of freely distributed software and
software components whose copyrights are held by third parties. These include software components covered
by a GNU General Public License (hereafter GPL), a GNU Lesser General Public License (hereafter LGPL) or
other license agreement.
Acknowledgements
The following open source software components are included in this product:
•linuxkernel•modutils•glibc•zlib•libpng
Appendix
Environmental specifications
Cautions regarding use in high and low temperature environments
When the unit is used in a low temperature space (e.g. room, office), the picture may leave trails or appear slightly •
delayed. This is not a malfunction, and the unit will recover when the temperature returns to normal.
Do not leave the unit in a hot or cold location. Also, do not leave the unit in a location exposed to direct sunlight or •
near a heater, as this may cause the cabinet to deform and the LCD panel to malfunction.
Storage temperature: + 5°C to • e35°C.
Other information
Item 19” 26” 32” 42”
*1 On-Mode (W)
Vivid 40W 53W 114W 152W
*2 Energy-Save-Mode (W)
Eco On
26W 36W 75W 83W
*3 Standby-Mode (W)
0.3W 0.3W 0.3W 0.3W
*4 Off Mode (W)
Power button
0.29W 0.29W 0.29W 0.29W
*5 Annual Energy Consumption (kWh)
58.4kWh 77.4kWh 166.4kWh 221.9kWh
*6 Annual Energy Consumption (kWh)
(Energy-Save-Mode)
Eco On
37.9kWh 52.6kWh 109.5kWh 121.2kWh
*1 Measured according to IEC 62087 Ed. 2
*2 For further information about the Energy Save function, please see related pages in this operation manual
*3 Measured according to IEC 62301 Ed. 1
*4 Measured according to IEC 62301 Ed. 1
*5 Annual energy consumption is calculated on the basis of the On-Mode (Vivid) power consumption, watching TV 4
hours a day, 365 days a year
*6 Annual energy consumption is calculated on the basis of the Energy-Save-Mode power consumption, watching TV 4
hours a day, 365 days a year.
NOTE
The power consumption of On-Mode varies depending on the images the TV displays.•
26
Appendix
Trademarks
“HDMI, the HDMI logo and High-Definition Multimedia Interface are trademarks or registered trademarks •
of HDMI Licensing LLC.”
The “HD ready” Logo is a trademark of EICTA.•
The “HD TV” Logo is a trademark of EICTA.•
The “HD TV 1080p” Logo is a trademark of EICTA.•
The DVB logo is the registered trademark of the Digital Video Broadcasting - DVB - project.•
Manufactured under license from Dolby Laboratories.•
“Dolby” and the double-D symbol are trademarks of Dolby Laboratories.•
27
A. Information on Disposal for Users (private households)
1. In the European Union
Attention: If you want to dispose of this equipment, please do not use the ordinary
dust bin!
Used electrical and electronic equipment must be treated separately and in
accordance with legislation that requires proper treatment, recovery and recycling
of used electrical and electronic equipment.
Following the implementation by member states, private households within the
EU states may return their used electrical and electronic equipment to designated
collection facilities free of charge*. In some countries* your local retailer may also
take back your old product free of charge if you purchase a similar new one.
*) Please contact your local authority for further details.
If your used electrical or electronic equipment has batteries or accumulators, please
dispose of these separately beforehand according to local requirements.
By disposing of this product correctly you will help ensure that the waste undergoes
the necessary treatment, recovery and recycling and thus prevent potential negative
effects on the environment and human health which could otherwise arise due to
inappropriate waste handling.
2. In other Countries outside the EU
If you wish to discard this product, please contact your local authorities and ask for
the correct method of disposal.
For Switzerland: Used electrical or electronic equipment can be returned free of
charge to the dealer, even if you don’t purchase a new product. Further collection
facilities are listed on the homepage of www.swico.ch or www.sens.ch.
B. Information on Disposal for Business Users
1. In the European Union
If the product is used for business purposes and you want to discard it:
Please contact your SHARP dealer who will inform you about the take-back of the
product. You might be charged for the costs arising from take-back and recycling.
Small products (and small amounts) might be taken back by your local collection
facilities.
For Spain: Please contact the established collection system or your local authority
for take-back of your used products.
2. In other Countries outside the EU
If you wish to discard of this product, please contact your local authorities and ask
for the correct method of disposal.
For EU: The crossed-out wheeled bin Implies that used batteries should not be put
to the general household waste ! There is a separate collection system for used
batteries, to allow proper treatment and recycling in accordance with legislation.
Please contact your local authority for details on the collection and recycling
schemes.
For Switzerland: The used battery is to be returned to the selling point.
For other non-EU countries: Please contact your local authority for correct method
of disposal of the used battery.
Attention: Your product is
marked with this symbol. It
means that used electrical
and electronic products
should not be mixed
with general household
waste. There is a separate
collection system for these
products.
28
SPECIAL NOTE FOR USERS IN THE U.K.
The mains lead of this product is fitted with a non-rewireable (moulded) plug incorporating a 5A fuse.
Should the fuse need to be replaced, a BSI or ASTA approved BS 1362 fuse marked or
ASA
and of
the same rating as above, which is also indicated on the pin face of the plug, must be used.
Always refit the fuse cover after replacing the fuse. Never use the plug without the fuse cover fitted.
In the unlikely event of the socket outlet in your home not being compatible with the plug supplied,
cut off the mains plug and fit an appropriate type.
DANGER:
The fuse from the cut-off plug should be removed and the cut-off plug destroyed immediately and
disposed of in a safe manner.
Under no circumstances should the cut-off plug be inserted elsewhere into a 5A socket outlet, as a
serious electric shock may occur.
To fit an appropriate plug to the mains lead, follow the instructions below:
IMPORTANT:
The wires in the mains lead are coloured in accordance with the following code:
Blue: Neutral
Brown: Live
As the colours of the wires in the mains lead of this product may not correspond with the coloured
markings identifying the terminals in your plug, proceed as follows:
•ThewirewhichiscolouredbluemustbeconnectedtotheplugterminalwhichismarkedNor
coloured black.
•ThewirewhichiscolouredbrownmustbeconnectedtotheplugterminalwhichismarkedLor
coloured red.
Ensure that neither the brown nor the blue wire is connected to the earth terminal in your three-pin
plug.
Before replacing the plug cover make sure that:
•Ifthenewttedplugcontainsafuse,itsvalueisthesameasthatremovedfromthecut-offplug.
•Thecordgripisclampedoverthesheathofthemainslead,andnotsimplyovertheleadwires.
IFYOUHAVEANYDOUBT,CONSULTAQUALIFIEDELECTRICIAN.
(
244,8
)
/
[
389,8
]
/
[[
389,8
]]
/ {503,8}
(
66,6
)
/
[
91,6
]
/
[[
91,1
]]
/ {111,6}
(
66.6
)
/
[
91.6
]
/
[[
91.1
]]
/ {111.6}
(
189.8
)
/
[
239.8
]
/
[[
239.8
]]
/ {269.8}
(
189,8
)
/
[
239,8
]
/
[[
239,8
]]
/ {269,8}
(
411,4
)
/
[
578,0
]
/
[[
700,6
]]
/ {933,5}
(
411.4
)
/
[
578.0
]
/
[[
700.6
]]
/ {933.5}
(
232,0
)
/
[
326,0
]
/
[[
395,3
]]
/ {526,2}
(
232.0
)
/
[
326.0
]
/
[[
395.3
]]
/ {526.2}
(
457,3
)
/
[
657,8
]
/
[[
790,5
]]
/ {1015,3}
(
308,1
)
/
[
448,4
]
/
[[
526,8
]]
/ {654,6}
(
308.1
)
/
[
448.4
]
/
[[
526.8
]]
/ {654.6}
(
343,1
)
/
[
491,1
]
/
[[
569,8
]]
/ {705,8}
(
343.1
)
/
[
491.1
]
/
[[
569.8
]]
/ {705.8}
(
35.0
)
/
[
55.35
]
/
[[
55.6
]]
/
{51.2}
(
205.7
)
/
[
286.2
]
/
[[
325.2
]]
/ {398.8}
(
100,0
)
(
100.0
)
(
100,0
)
(
100.0
)
(
59,9
)
/
[
67,9
]
/
[[
67,9
]]
/ {90,9}
(
59.9
)
/
[
67.9
]
/
[[
67.9
]]
/ {90.9}
(
244.8
)
/
[
389.8
]
/
[[
389.8
]]
/ {503.8}
(
457.3
)
/
[
657.8
]
/
[[
790.5
]]
/ {1015.3}
(
205,7
)
/
[
286,2
]
/
[[
325,2
]]
/ {398,8}
75Ω
AC IN
AC IN
75Ω
[
200,0
]
/
[[
200,0
]]
/ {400,0}
[
200.0
]
/
[[
200.0
]]
/ {400.0}
[
100,0
]
/
[[
200,0
]]
/ {200,0}
[
100.0
]
/
[[
200.0
]]
/ {200.0}
19”
26”
32”
42”
( ) : 19"
[ ] : 26"
[[ ]] : 32"
{ } : 42"
5


Need help? Post your question in this forum.

Forumrules


Report abuse

Libble takes abuse of its services very seriously. We're committed to dealing with such abuse according to the laws in your country of residence. When you submit a report, we'll investigate it and take the appropriate action. We'll get back to you only if we require additional details or have more information to share.

Product:

For example, Anti-Semitic content, racist content, or material that could result in a violent physical act.

For example, a credit card number, a personal identification number, or an unlisted home address. Note that email addresses and full names are not considered private information.

Forumrules

To achieve meaningful questions, we apply the following rules:

Register

Register getting emails for Sharp lc 19sh7e bk at:


You will receive an email to register for one or both of the options.


Get your user manual by e-mail

Enter your email address to receive the manual of Sharp lc 19sh7e bk in the language / languages: English as an attachment in your email.

The manual is 6,38 mb in size.


You will receive the manual in your email within minutes. If you have not received an email, then probably have entered the wrong email address or your mailbox is too full. In addition, it may be that your ISP may have a maximum size for emails to receive.

The manual is sent by email. Check your email

If you have not received an email with the manual within fifteen minutes, it may be that you have a entered a wrong email address or that your ISP has set a maximum size to receive email that is smaller than the size of the manual.

The email address you have provided is not correct.

Please check the email address and correct it.

Your question is posted on this page

Would you like to receive an email when new answers and questions are posted? Please enter your email address.


Info