694100
9
Zoom out
Zoom in
Previous page
1/13
Next page
LIMITED EDITION ANNIVERSARYLIMITED EDITION
50
The Polaroid Limited Edition
690 Single Lens Reflex (SLR) Camera
User' s Guide
I
MPORTANT SAFEGUARDS
FCC Notice
Warning: Changes or modifications to this unit not expressly
approved by the party responsible for compliance could void
the user’s authority to operate this equipment.
This equipment has been tested and found to comply with the
limits for a Class B digital device, pursuant to Part 15 of the
FCC Rules.
These limits are designed to provide reasonable protection
against harmful interference in a residential installation. This
equipment generates, uses, and can radiate radio frequency
energy and, if not installed and used in accordance
with the instructions, may cause harmful interference to radio
communications.
However, there is no guarantee that interference will not occur
in a particular installation. If this equipment does cause harmful
interference with radio or television reception, which can be
determined by turning the equipment off and on, the user is
encouraged to try to correct the interference by one or more of
the following measures:
1. Reorient or relocate the receiving antenna of the radio
or television.
2. Increase the separation between the equipment and
the receiver.
3. Consult the dealer for help.
Table of Contents
v Introduction: Polaroid at Fifty 1
v Features of the Polaroid 690 SLR Camera 3
v Camera Parts
Frontal View 4
Rear View 5
v Opening the Camera 6
v Closing the Camera 7
v Compatible Films 8
v Loading Film 9-10
v Taking Photos 11-13
v Additional Camera Features
Flash Override 14
Manual Focus 15
Lighten/Darken Control 16-17
Automatic Time Exposure 18
v Special Maintenance Note 19
v Lifetime Product Warranty 20
Dr. Edwin H. Land
(1911–1991)
Inventor of Instant Photography
&
Founder of Polaroid Corporation
Polaroid at Fifty:
Dr. Edwin H. Land and
His Dream of Instant Photography
Oftentimes, what inspires innovation originates from the
simple question “why can't this be done?” On Christmas
Eve Day in 1943, Dr. Edwin H. Land, the acclaimed
inventor and founder of Polaroid Corporation, was
enjoying an afternoon outing with his three-year-old
daughter, Jennifer.
At some point during this afternoon, little Jennifer asked
her father why she had to wait to see the photographs
he was taking.
Dr. Land contemplated his daughter's simple question.
W
ould it be possible to create an instantly developing
photograph? With his legendary inspiration and focus,
Dr. Land solidified his concept of instant photography
over several hours that same day.
The realization of his concept emerged over several
years of subsequent research and development at his
laboratory in Cambridge, Massachusetts. The breath-
taking result of this experimentation—the world's first
instantly developing photograph—was revealed before
1
Polaroid at Fifty
a meeting of the Optical Society of America in New York
City on February 21, 1947 before a speechless audience
of fellow scientists.
Dr. Land’s invention of Polaroid Instant Photography
made world headlines the next mor
ning. The name
“Polaroid” now was forever synonymous with “instant
photography.”
Now, fifty years later, Polaroid commemorates the 50th
Anniversary of the advent of instant photography with a
numbered Limited Collector’s Edition of the SLR (Single
Lens Reflex) camera. The Polaroid 690 SLR camera is
simply the finest camera that Polaroid has ever produced.
Some would ar
gue the Polaroid 690 SLR camera is the
finest camera available in the world. This Limited
Collector’s Edition faithfully recreates the allure and look
of the original SLR series, while integrating new tech
-
nological features such as a digitally-driven micro-
processor exposure system.
We believe this Limited Collector’s Edition is a fitting
tribute to Polaroid's half-century of contributions to the
world of photography, and to the original daring
dream of Dr
. Land.
Features of The Polaroid 690 SLR Camera
Congratulations! You are now the owner of the finest
single-lens reflex camera in the world. Some of the
important features of your 690 SLR camera include:
v accurate, through-the-lens previewing
v sonar
-driven automatic flash and autofocus system
v 4-element coated glass lens
v close-up capabilities to 10.4 inches
v Lifetime Product Warranty
Please take a moment to familiarize yourself with the
features of your 690 SLR camera by reading the
instructions contained in this book. And please keep
this book for information about your Lifetime Product
Warranty.
If you would like to order a leather carrying case or
close-up lens, or if at any time you have any questions
about your 690 SLR
camera, please contact Polaroid
Corporation toll-free at 1-800-432-5355, or log on to
our website at
www.polaroid.com.
2
3
g
i
h
l
Camera Parts
Frontal View
a
b
c
k
d
e
j
f
a Built-in electronic flash
b T
ransducer (sends and receives sound waves)
c Manual focus switch
d Manual focus wheel
e Shutter button with automatic preview
f Automatic variable speed/aperture shutter system
g Four element, f/8, 116mm glass lens
h Distance scale
i Film door
j Photocell
k Lighten/darken control
l Cover support
4
s
o
r
p
q
m Viewfinder cap
n Viewfinder eyepiece
o Neckstrap connectors
p Picture Counter
q Tripod socket (underside of camera)
r Film door release lever
s Thumb rest
t Flash control switch
u Flash indicator light
5
n
Camera Parts
Rear View
u
m
t
Opening the Camera
Closing the Camera
1
grooved edges
To close the camera,
of your left hand. With your right push the cover support
hand, grip the grooved edges of toward the back of
the viewfinder cap.
Hold the camera flat in the palm
of viewfinder cap
1
the camera.
2
Pull the viewfinder cap
cover
Press down on the viewfinder
straight up until the
support
cap until both sides of the
cover support locks.
2
camera snap shut.
6 7
Compatible Films
You may use any of the following instant films with
your Polaroid 690 SLR camera:
Loading Film
First, make sure you are using an instant film that is
compatible with your 690 SLR Camera.
Push the yellow film door
lever down to open the
film door.
film
1
door lever
2
Holding the film pack by
the edges as shown, slide
the film pack all the way
into the camera.
Make sure to only
touch the edges of the film
pack.
8 9
3
Close the film door.
The camera will automatically
eject the film cover and
the electronic flash will
begin to charge.
The picture counter will
display “10.” Each pack of
film contains 10 photos.
To remove an empty film
pack, pull the colored tab
on the lower front of
the film cartridge.
picture counter
Taking Photos
1
Grasp the camera in your
left hand, making sure to
keep your fingers behind
the film door.
Place your right thumb
on the thumb rest with
your index finger on
the shutter button.
Curl your other fingers
into your palm.
To preview your shot, look
through the viewfinder.
The scene will appear
out of focus.
Lightly press the shutter
button and hold it there.
If the flash bursts and a
photo is ejected, the shutter
button was pressed too firmly.
11 10
Taking Photos
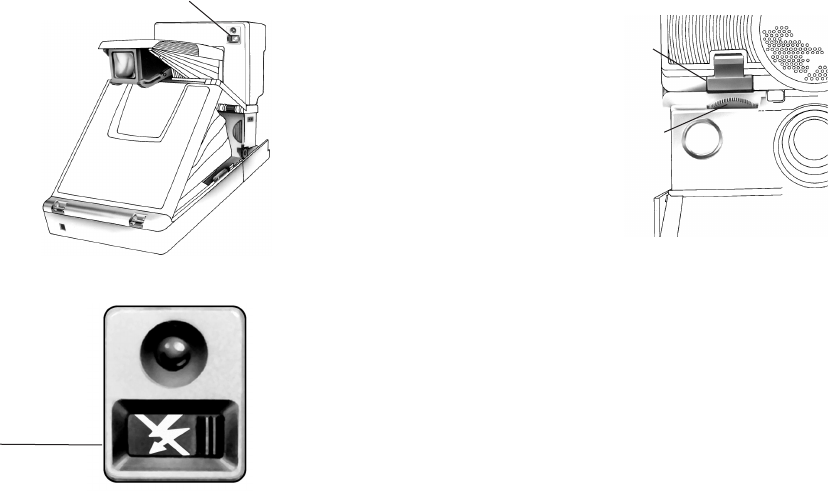
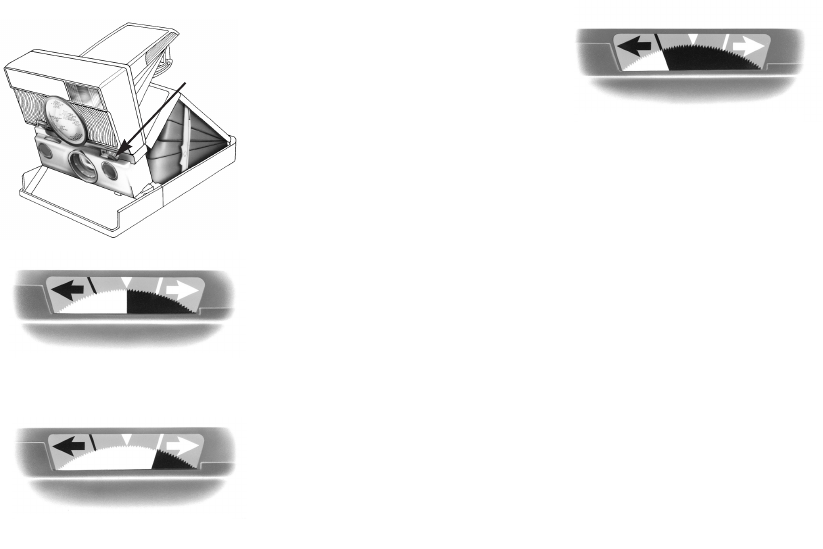
While keeping the shutter button lightly pressed down,
the lens will spin and set, bringing your scene into
sharp focus. If the camera pauses briefly before
focusing the lens, the flash is momentarily charging.
After the lens is brought into focus an accurate preview
of the scene is visible.
You may preview as often as you choose without
depleting the camera’s battery. The battery that powers
the camera is located inside the film pack and is
sufficient to take many previews per each pack of film.
shutter
button
2
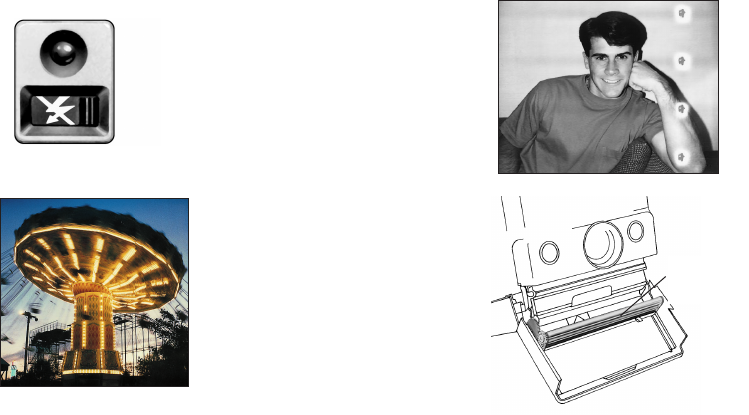
Use the electronic flash for every photo, both
outdoors and indoors. The flash automatically
corrects common lighting problems encountered in
both environments. For best results, position your
subject(s) anywhere from 10 inches to 14 feet away
from the camera.
Maintain a clear path between the camera and your
subject. The camera uses sound waves to determine
the distance between the camera and the photo
subject, and any obstructions will cause your photo
to be incorrectly exposed.
Make sure to keep the sun or other source of light
behind you, or at your side.
Holding the camera steady, press the shutter button
fir
mly. Continue to hold the camera steady until the
photo has ejected from the camera. Release the
shutter button to recharge the flash unit.
Do not shake or expose developing photos to direct
sunlight. Make sure to hold the developing photo by
its white border edges. If the temperature is below
55°
F, place the photo immediately in a warm pocket
or other warm location to develop.
12 13
Additional Camera Features
Flash Override
flash control
switch
In certain circumstances, such
as taking a photograph through
a window or photographing a
metallic surface, it may be
necessary to override the
automatic flash.
To do this, slide the flash
control switch to the right.
The automatic flash is
disabled. You can now take a
photo without the flash by
pressing the shutter button.
flash control
switch in OFF
position
Manual Focus
To override the camera’s
automatic focus, push the
manual focus switch down
so that the red portion of
the switch is visible.
Turn the manual focus
control dial until your
scene is in clear focus.
To take a photo, press and
release the shutter button.
Press the manual focus
switch up to retur
n the
camera to automatic focus.
manual
focus
switch
manual
focus
control
14 15
Lighten/Darken Control
The lighten/darken control
lighten/
darken
control
feature is located on the
front of your camera.
Only use this feature
when retaking a photo to
make it lighter or darker
than the original.
To lighten a photo, move
the control dial so that the
white/black area of the
dial is directly beneath the
white line. This is the
standard lighten setting.
normal setting
Begin with this standard
lighten setting. To lighten
a photo even more, move
the white/black area of
the dial to the right of the
white line.
lighten setting
To darken a photo, move
the control dial so that the
white/black area of the
dial is directly beneath the
black line. This is the
standard darken setting.
Begin with this standard
darken setting. To darken
a photo even more, move
the white/black area of
the dial to the left of the
black line.
Always be sure to return
the contr
ol to the normal
setting position before
taking your next photo.
darken setting
16 17
Automatic Time Exposure
Your 690 SLR camera has the
ability to make automatic time
exposures for up to 13 seconds.
For best results, keep the camera
steady while making the exposure
by using a tripod (tripod socket is
located on underside of camera).
Slide the flash control switch to
the OFF
position. Press the
shutter button for at least one
second, then release it. Your
camera will automatically make
an exposure appropriate for
the environmental settings.
flash
control
switch in
OFF
position
Special Maintenance Note
The spots seen on the
photo to the right have
been caused by dirty
developer rollers.
Dirty developer rollers may
cause repeating spots or
banding to appear on
photos. If this occurs,
thoroughly clean the
developer rollers.
The developer rollers are
located inside the film
door. To clean, dampen a
lint-free cloth with water
and gently wipe both sets
of rollers.
developer
rollers
If there is film in the camera,
clean the developer rollers in a
dimly-lit area.
18 19
Lifetime Product Warranty
Lifetime Warranty Terms: If your camera proves to be
defective in manufacture, labeling or packaging, Polaroid will
without charge repair it or, at our option, replace it with a
camera of the same or equivalent model.
This warranty does not cover damage caused by accident,
misuse, tampering or unauthorized repairs, and a charge will be
made for such repairs. This warranty excludes all
consequential damages except in jurisdictions not
allowing the exclusion of consequential damages, so the
foregoing may not apply to you.
For warranty service, the camera must be returned to and
repaired by an authorized Polaroid Service Center. Return the
camera to a Polaroid camera dealer or call or write Polaroid
Corporation at:
Polaroid National Technical Support Operations
201 Burlington Rd. 1-2A
Bedford, MA 01730
(toll free) 1-800-432-5355
Monday - Friday 8 am to 8 pm (EST)
www.polaroid.com
PU20300M-0 8/98
20
9


Need help? Post your question in this forum.

Forumrules


Report abuse

Libble takes abuse of its services very seriously. We're committed to dealing with such abuse according to the laws in your country of residence. When you submit a report, we'll investigate it and take the appropriate action. We'll get back to you only if we require additional details or have more information to share.

Product:

For example, Anti-Semitic content, racist content, or material that could result in a violent physical act.

For example, a credit card number, a personal identification number, or an unlisted home address. Note that email addresses and full names are not considered private information.

Forumrules

To achieve meaningful questions, we apply the following rules:

Register

Register getting emails for Polaroid 680SLR at:


You will receive an email to register for one or both of the options.


Get your user manual by e-mail

Enter your email address to receive the manual of Polaroid 680SLR in the language / languages: English as an attachment in your email.

The manual is 2,2 mb in size.


You will receive the manual in your email within minutes. If you have not received an email, then probably have entered the wrong email address or your mailbox is too full. In addition, it may be that your ISP may have a maximum size for emails to receive.

The manual is sent by email. Check your email

If you have not received an email with the manual within fifteen minutes, it may be that you have a entered a wrong email address or that your ISP has set a maximum size to receive email that is smaller than the size of the manual.

The email address you have provided is not correct.

Please check the email address and correct it.

Your question is posted on this page

Would you like to receive an email when new answers and questions are posted? Please enter your email address.


Info