470771
11
Zoom out
Zoom in
Previous page
1/44
Next page
11
Voorbereidingen
NL
Een kaartje in de camera zetten en er uit nemen
Overal waar in deze handleiding het woord “kaartje” wordt gebruikt, wordt
een xD-Picture Card bedoeld. De camera heeft dit kaartje nodig om er de
beelden op op te slaan.
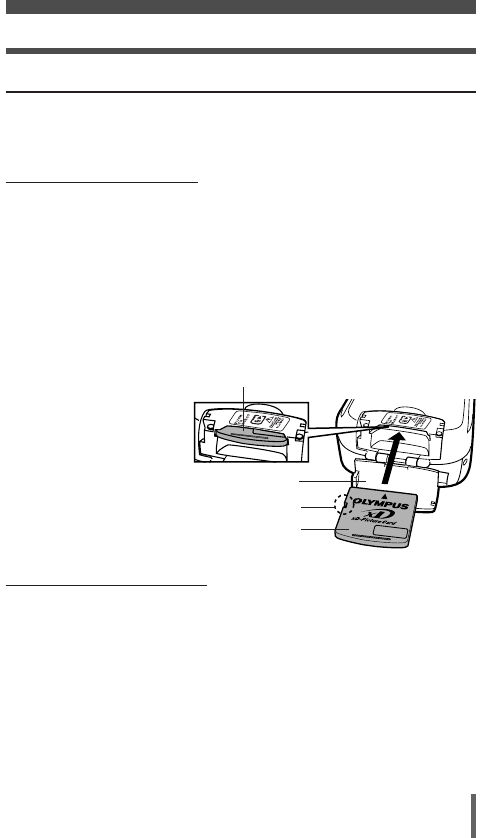
• Kaartje in de camera zetten
1 Overtuig u ervan dat:
• de lenskap gesloten is,
• de LCD-monitor gedoofd is, en
• de LED’s, rechts naast de zoeker, gedoofd zijn.
2 Open het klepje over de kaartsleuf.
3 Houd het kaartje in de juiste stand voor de kaartsleuf en steek het,
als afgebeeld, in de sleuf.
• Steek het kaartje recht in de kaartsleuf.
Als u het kaartje helemaal in de kaartsleuf gestoken heeft, voelt u dat het op zijn
plaats klikt.
• Steekt u het kaartje verkeerd
of scheef in de kaartsleuf,
dan kan dat het contactvlak
van het kaartje beschadigen
of kan het kaartje beklemd
raken.
• Steekt u het kaartje niet
helemaal in de sleuf, dan is
het mogelijk dat u geen
beeldmateriaal kunt opslaan.
4 Sluit het klepje over de
kaartsleuf.
• Kaartje uit de camera nemen
1 Overtuig u ervan dat:
• de lenskap gesloten is,
• de LCD-monitor gedoofd is, en
• de LED’s, rechts van de zoeker, gedoofd zijn.
2 Open het klepje over de kaartsleuf.
3
Ontgrendel het kaartje door het iets verder naar binnen te drukken
en laat het dan langzaam los.
• Het kaartje veert dan iets omhoog en stopt daarna.
4 Trek het kaartje recht uit de kaartsleuf.
5 Sluit het klepje over de kaartsleuf.
Atention:
xD-Picture Card –
refer to page 42.
Inkeping
Zijde met plaats
voor een etiket
Als het kaartje goed in de camera is gezet
Klepje over de
kaartsleuf
11


Need help? Post your question in this forum.

Forumrules


Report abuse

Libble takes abuse of its services very seriously. We're committed to dealing with such abuse according to the laws in your country of residence. When you submit a report, we'll investigate it and take the appropriate action. We'll get back to you only if we require additional details or have more information to share.

Product:

For example, Anti-Semitic content, racist content, or material that could result in a violent physical act.

For example, a credit card number, a personal identification number, or an unlisted home address. Note that email addresses and full names are not considered private information.

Forumrules

To achieve meaningful questions, we apply the following rules:

Register

Register getting emails for Olympus Camedia C 160 at:


You will receive an email to register for one or both of the options.


Get your user manual by e-mail

Enter your email address to receive the manual of Olympus Camedia C 160 in the language / languages: Dutch as an attachment in your email.

The manual is 0,66 mb in size.


You will receive the manual in your email within minutes. If you have not received an email, then probably have entered the wrong email address or your mailbox is too full. In addition, it may be that your ISP may have a maximum size for emails to receive.

The manual is sent by email. Check your email

If you have not received an email with the manual within fifteen minutes, it may be that you have a entered a wrong email address or that your ISP has set a maximum size to receive email that is smaller than the size of the manual.

The email address you have provided is not correct.

Please check the email address and correct it.

Your question is posted on this page

Would you like to receive an email when new answers and questions are posted? Please enter your email address.


Info