68
Batch scan utility
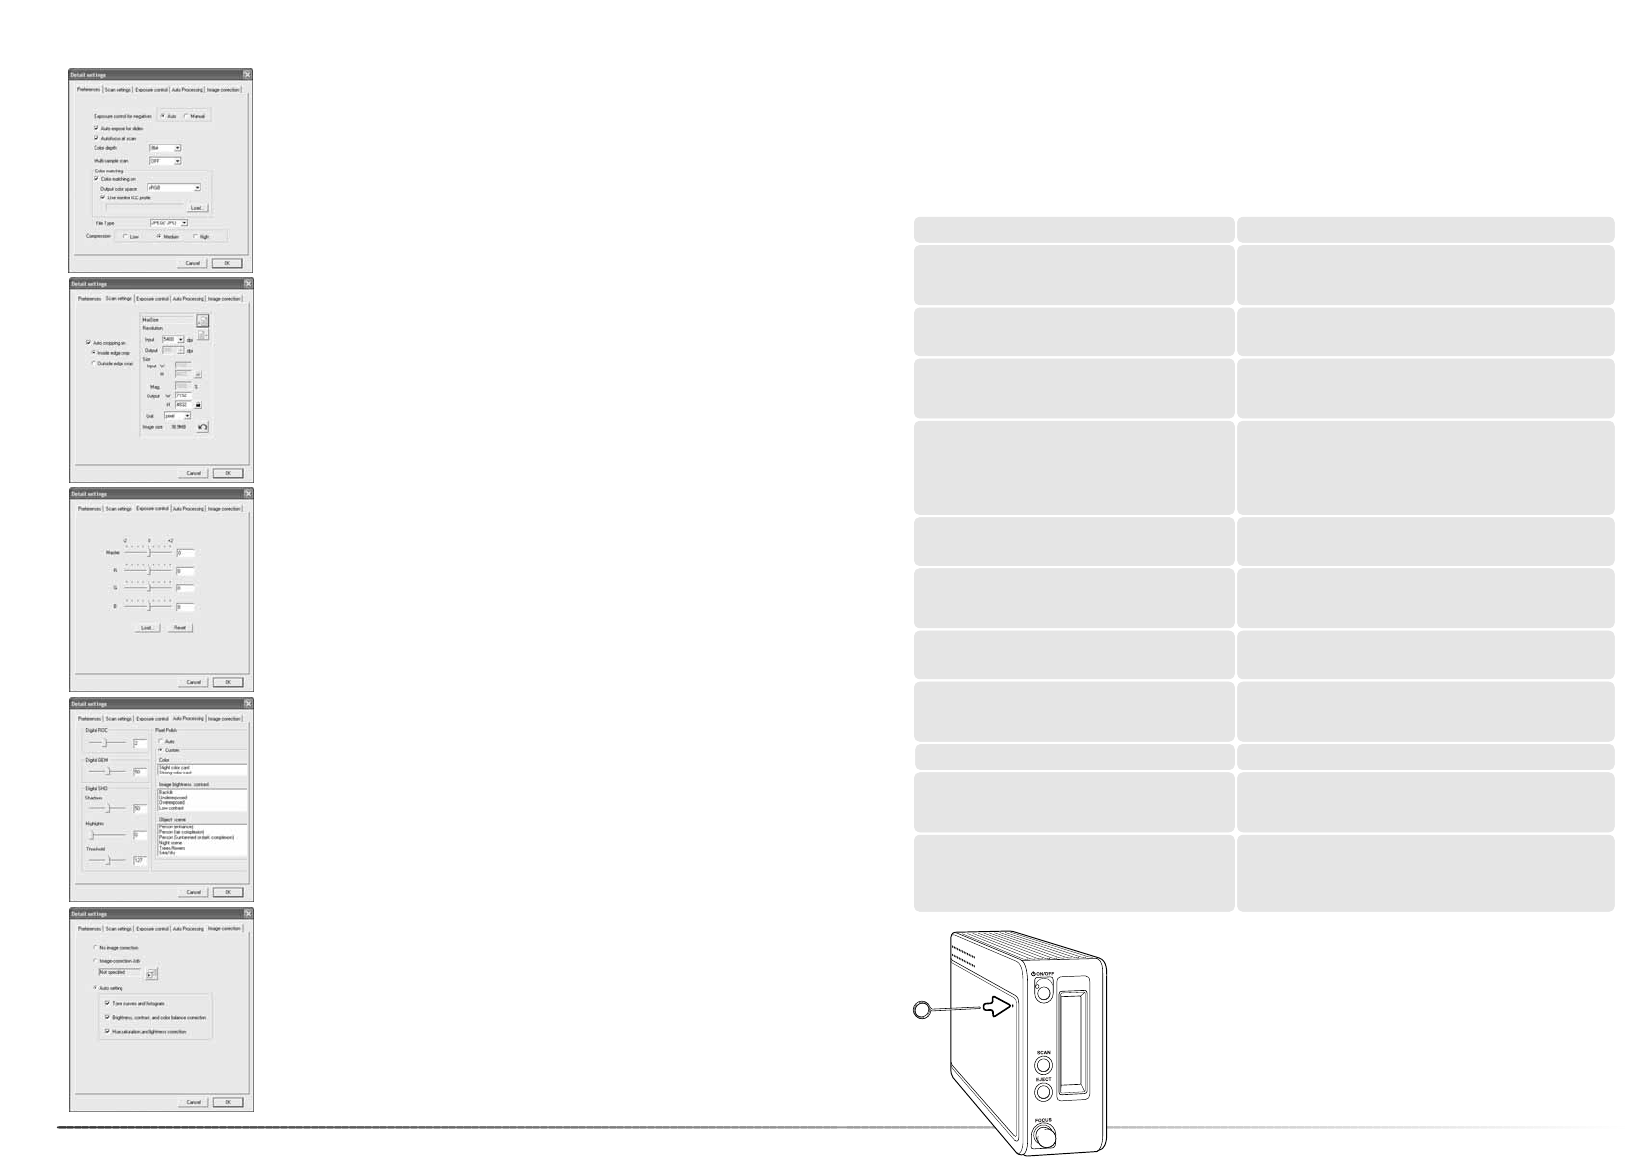
Met de knop Batch Scan setup opent u het Setup-venster, zie 8 op
de vorige bladzijde.
Met de Preferences-tab wijzigt u de scanner-voorkeuren. Meer over
de voorkeuren op blz. 40. Informatie over kleurafstemming op blz.
40.
Slaat u Batch Scan beelden op in het PICT bestandsformaat en is
het bestand breder dan 4096 pixels, dan wordt het bestand automa-
tisch opgeslagen in TIFF bestandsformaat.
In de tab Scan setup kunt u opgeven of de automatische uitsnede
actief is en de outputgrootte en -resolutie instellen.
Kijk op bladzij 31 voor informatie over de automatische uitsnede. Kijk
op bladzij 32 en 46 t/m 49 voor het maken, opslaan en oproepen van
scan-instellingen.
69
In de tab Auto processing geeft u de parameters op voor beeldbe-
werking met Digital ROC (blz. 51), Digital GEM (blz. 52), Digital SHO
(blz. 52) en Pixel Polish (blz. 36).
In de tab Image correction geeft u de beeldbewerking op die wordt
toegepast op gescande beelden.
Kijk op bladzij 64 voor het oproepen van beeldcorrectietaken.
De auto-setting functies corrigeren het gescande beeld automatisch:
de tooncurve- en histogram-optie verbeteren kleur en contrast: de
optie Brightness, contrast and color balance verbetert contrast en
helderheid: de optie Hue, saturation and Lightness verbetert de
kleurverzadiging.
In de tab Exposure control regel u de belichtingsregeling van de
scanner. Kijk op bladzij 42 voor het maken, opslaan en oproepen van
belichtingsinstellingen.
Appendix
Problemen oplossen
Op deze bladzijde vindt u oplossingen voor een aantal eenvoudige problemen. Neem bij een
defect, of als de hier opgegeven oplossingen geen resultaat opleveren, contact op met uw han-
delaar of de Technische Dienst van Konica Minolta.
Vergroot de geheugenruimte voor het beeldbewerkings-
programma. Is er een aantal beelden achter elkaar
gescand, sluit dan het programma voor beeldbewerking en
start het opnieuw op.
De aanduiding 'insufficient memory’ verschijnt.
Plaats de houder opnieuw in de scanner.De melding 'set holder' verschijnt op het scherm.
Scannerdeurtje werd geopend tijdens opstarten. Doe deur-
tje dicht en zet scanner uit. Start scanner opnieuw en
herstart DiMAGE Scan utility.
Het indicatielampje van de scanner knippert snel.
De filmhouder werd tijdens de scan in zijn verplaatsing
belemmerd. Zet de scanner uit, herstart de computer.
Tijdens het scannen verschijnt de melding ‘can-
not verify home position’.
Selecteer een autofocus-optie in de voorkeursinstellingen,
of maak gebruik van Spot-AF (point AF) of handmatig
scherpstellen.
Het gescande beeld is niet scherp.
Controleer of kleurnegatieffilm als filmtype werd gekozen
en scan het beeld opnieuw. Corrigeer de kleurbalans met
behulp van de DiMAGE Scan image processing functies.
Is het probleem daarna niet opgelost, installeer dan de
DiMAGE Scan Utility opnieuw.
Bij het scannen van kleurnegatieffilm ontstaat een
vreemde kleurweergave.
Zet de scanner uit. Sluit het beeldbewerkingsprogramma af
en verhoog de toegewezen geheugenruimte. Start de com-
puter en scanner opnieuw.
De Utility software loopt vast of de scantijd neemt
toe.
Controleer of kabel tussen computer en scanner goed is
aangesloten. Zet computer uit en opnieuw aan. Klik op OK
om te vervolgen.
Bij opstarten van de Utility software verschijnt de
melding ‘could not confirm scanner-connection’.
OPLOSSINGSYMPTOOM of MELDING
Verwijder de filmhouder en sluit de scanopening af met het
deurtje. Druk vervolgens op shift+control+I (Windows) of
command+shift+I (Macintosh) om de scanner te initialise-
ren.
De DiMAGE Scan preview vertoont een ongewo-
ne kleurweergave.
Verlaat alle andere DiMAGE Scan software. Komt het weer
voor, herstart dan de computer.
De melding “Unknown error. Confirm other
DiMAGE Scan software is closed” verschijnt.
Schakel de handmatige scherpstelling in het Preferences-
venster in.
Bij gebruik van het wiel voor de handmatige
scherpstelling is het beeld niet scherp. Schuif ver-
schijnt in vak voor handmatige scherpstelling.
Sluiten van het scannerdeurtje
Sluit het deurtje niet automatisch, dan kan het handmatig worden
gesloten met het meegeleverde reset-hulpmiddel. Steek dit in het
gaatje aan de zijkant van de scanner totdat de vergrendeling van
het deurtje wordt opgeheven. Gebruik het hulpmiddel niet met extra
kracht.