6564
Gevanceerde beeldverwerking
Het is mogelijk beeldcorrecties tijdelijk op te
slaan als een miniatuur naast het weergegeven
beeld. Klik op de Snapshot-knop op de tool-
balk om een miniatuur met de huidige beeld-
correcties op te slaan.
Om terug te keren naar een eerdere beeldcor-
rectie klikt u op de betreffende snapshotminia-
tuur. Het miniatuurbeeld vervangt het huidige
beeld. Wilt u een snapshot wissen, klik dan op
de miniatuur en druk op Delete-toets van het
toetsenbord.
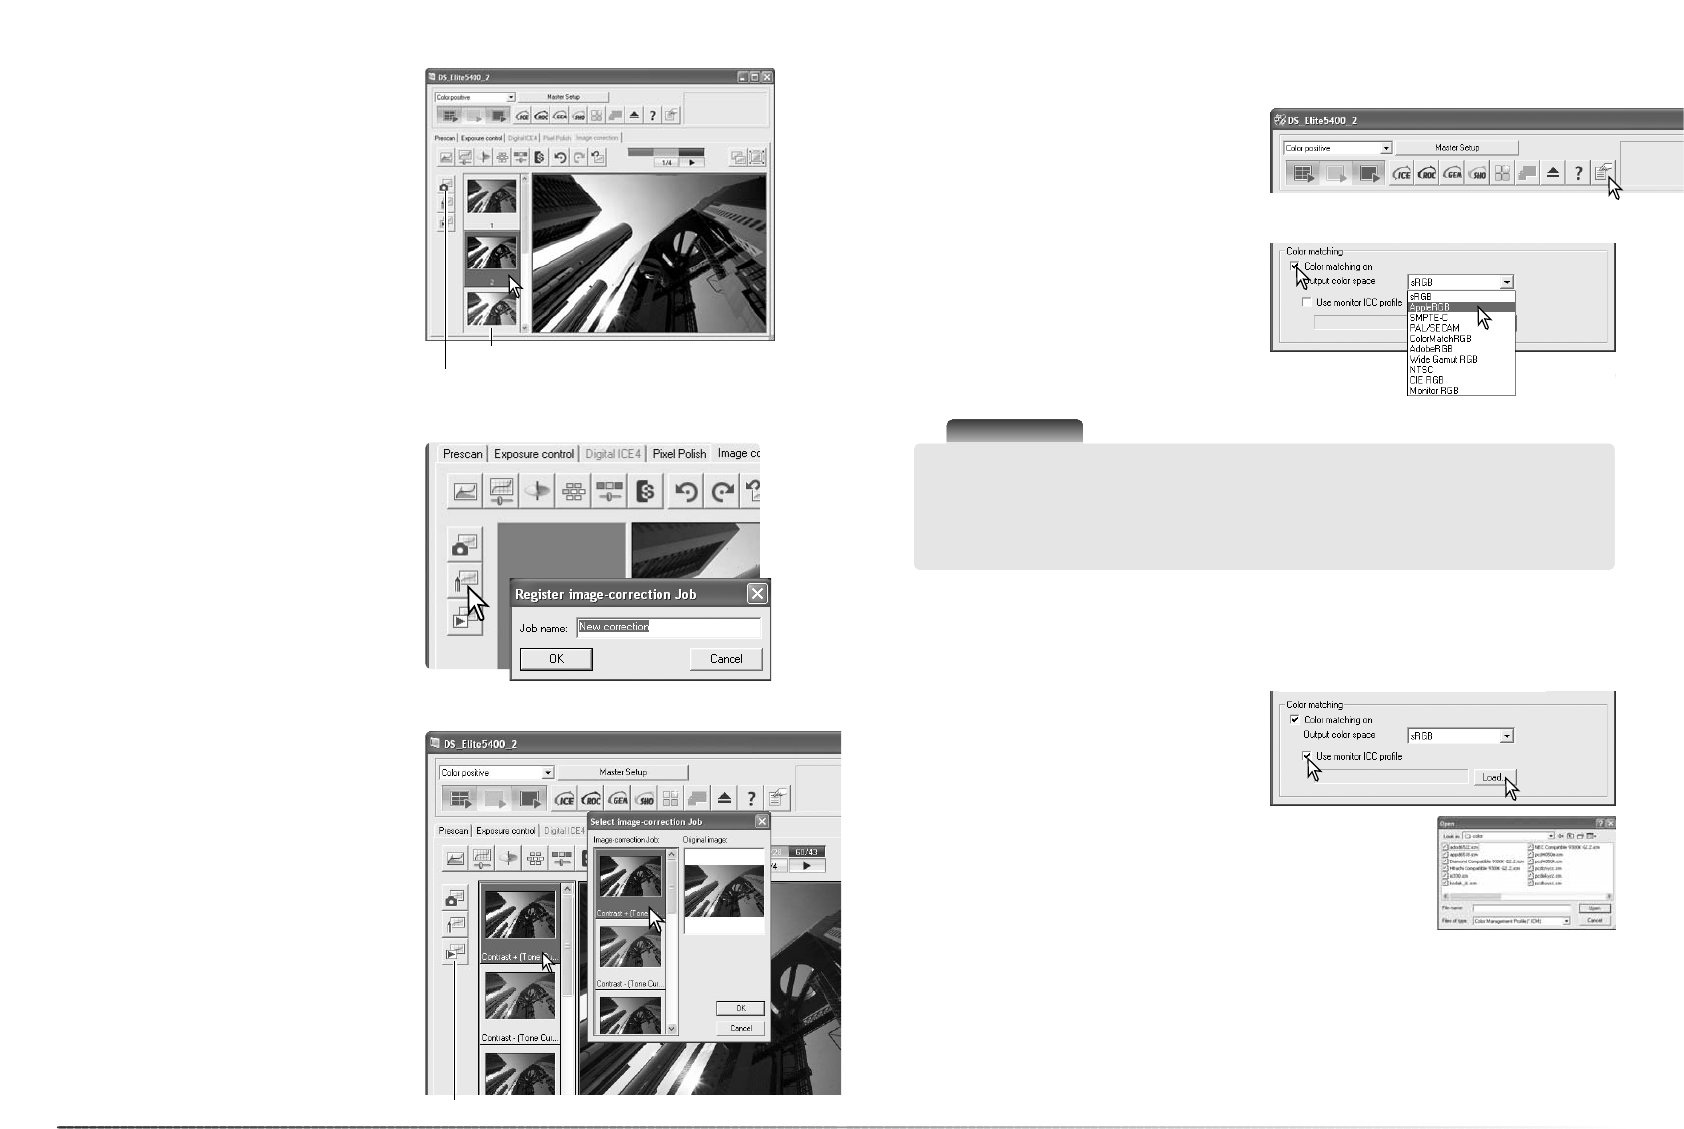
Snapshotveld
Snapshot-knop
Beeldcorrecties opslaan
Beeldcorrectietaken oproepen
Beeldcorrecties die op een beeld zijn toegepast
in de Image correction tab kunnen worden
opgeslagen als een beeldcorrectietaak. Die kunt
u elk moment oproepen wanneer u de correc-
ties op andere beelden wilt toepassen.
Klik op de knop Opslaan beeldcorrectietaak om
de huidige correctie-instellingen te bewaren.
Voer de Taaknaam in. Klik op OK om de instel-
lingen op te slaan.
Zorg dat het te corrigeren beeld te zien is in de
tab Image correction. Klik op de knop
Oproepen beeldcorrectietaak (Load Image cor-
rection Job) om het selectievenster te openen.
Selecteer een beeldcorrectietaak door erop te
klikken. Klik op OK om de taak toe te passen
op het weergegeven beeld. De taken zijn
oproepbaar in het snapshot-venster; klik
gewoon op de miniatuur om de beeld-
correctietaak toe te passen. Meerdere taken
kunnen worden opgeroepen.
Wilt u een taak wissen, open dan het Laad-
venster en markeer de te wissen taak. Druk de
wistoets (Delete) van uw toetsenbord in om het
bestand te wissen.
Snapshotknop
Knop beeldcorrectietaak oproepen
Kleurafstemming
Scanner-info
sRGB - multimedia en internetstandaard.
Apple RGB - Apple weergavestandaard.
SMPTE-C - V.S. televisiestandaard.
PAL/SECAM - Europese televisiestandaard.
ColorMatch RGB - prepress-standaard.
Activeer het vakje Color matching on.
Selecteer de output-kleurruimte in het vakje
Color space. De optie Monitor RGB gebruikt
een gespecifeerd monitorprofiel, zie hieronder.
Klik op de OK-knop in het Preferences-venster
om de handeling te voltooien.
Output-kleurruimte instellen
De output-kleurruimte en het monitor-ICC-pro-
fiel kunnen worden opgegeven in het Prefe-
rences-venster. Klik op de Preferences-knop
om het venster te openen.
Adobe RGB - grafische standaard.
Wide-gamut RGB - speciale kleurruimte.
NTSC - Japanse televisiestandaard.
CIE RGB - speciale kleurruimte.
Monitor RGB - gebruik van het monitorpro-
fiel.
Monitor ICC vindt op de volgende locaties:
Windows 98, 98SE, Me: [Windows] > [System] > [Color]
Windows 2000: [WINNT] > [System32] > [Spool] > [Drivers] > [Color]
Windows XP: [Windows] > [System32] > [Spool] -> [Drivers] > [Color]
Mac OS 9: [Systeem] > [ColorSync profile]
Mac OS X: [Bibliotheek] > [ColorSync] > [Profiles] > [Displays]
Monitor ICC-profiel instellen
U kunt het specifieke ICC-profiel van een monitor opgeven in het kleurafstemmingsgedeelte
(color matching) van het Preferences-venster. Kijk in de gebruiksaanwijzing van de monitor voor
de naam van de monitor. Dit profiel kan woren gebruikt als output-kleurruimte, zie boven.
Klik het vakje voor gebruik van het Monitor
ICC-profiel (Use monitor ICC profile) aan.
Klik op de knop Load ICC profile aan om het
venster voor het openen van bestanden te
openen.
Localiseer en open het ICC profiel van de monitor die u gebruikt. Het
geselecteerde profiel verschijnt in het Preferences-venster. Klik op OK
in het Preferences-venster om de handeling te voltooien.