HOW TO START YOUR MACHINE
STARTING POSITION
Before you start the engine, place the machine on a
ÀDWVXUIDFH
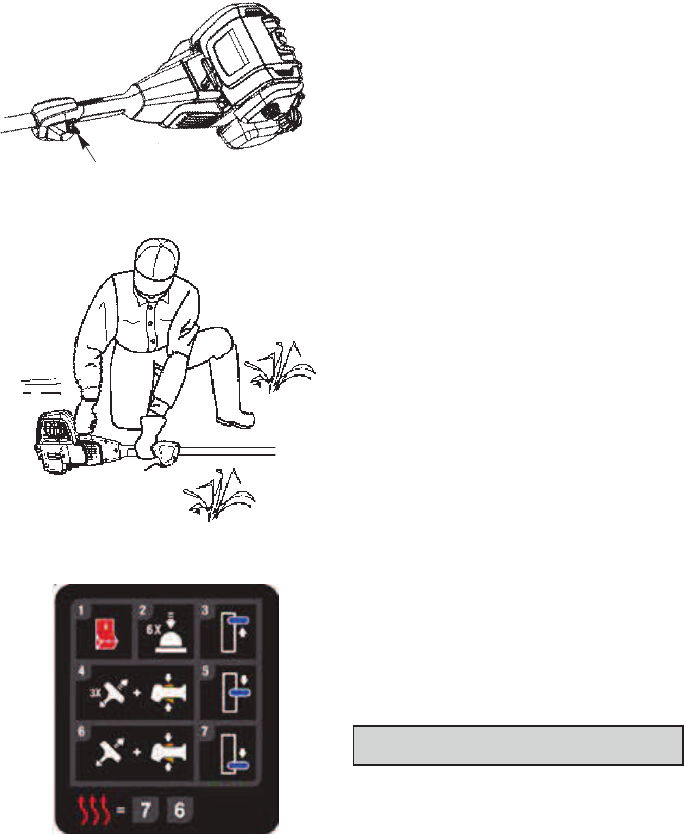
STARTING A COLD ENGINE
1.
Move the ON/STOP switch to the ON position.
2. Slowly press the primer bulb 6 times.
3. Move the choke lever to the FULL CHOKE
position.
NOTE: Squeeze and hold the throttle trigger fully
through all the remaining steps.
4. Pull the starter handle sharply 3 times.
5. Move the choke lever to the HALF CHOKE
position.
6. Pull the starter handle sharply until the engine
runs, but no more than 6 pulls.
NOTE: If the engine does not start after 6 pulls at
the HALF CHOKE position move the choke lever
to the FULL CHOKE position and press the primer
bulb 6 times. Pull the starter handle 2 more times.
Move the choke lever to the HALF CHOKE position
and pull the starter handle until the engine runs,
but no more than 6 pulls. If the engine still does
QRWVWDUWLWLVSUREDEO\ÀRRGHG3URFHHGWR
STARTING A FLOODED ENGINE.
7. Once the engine starts, allow it to run 10 seconds,
WKHQPRYHWKHFKRNHOHYHUWRWKH581SRVLWLRQ
5HOHDVHWKHWKURWWOHWULJJHU
NOTE: If the engine dies with the choke lever in
the RUN position, move the choke lever to the
HALF CHOKE position and pull the starter handle
until the engine runs, but no more than 6 pulls.
Allow the engine to warm up for up to one minute.
STARTING A WARM ENGINE
NOTE: DO NOT squeeze the throttle trigger until
the engine has started and runs.
Follow steps 7 and 6 in the cold starting instructions.
NOTE: If the engine has not started, pull the starter
handle 5 more pulls. If the engine still does not
UXQLWLVSUREDEO\ÀRRGHG
STARTING A FLOODED ENGINE
Flooded engines can be started by placing the choke
OHYHULQWKH581SRVLWLRQDQGSXOOLQJWKHVWDUWHUKDQGOH
to clear the engine of excess fuel. This could require
pulling the starter handle many times depending on
KRZEDGO\WKHPDFKLQHLVÀRRGHG,IWKHPDFKLQH
VWLOOGRHVQRWVWDUWUHIHUWRWKH7528%/(6+227,1*
TABLE or call customer support.
OPERATING THE COUPLER
This machine is equipped with a coupler which
enables optional attachments to be installed. The
optional attachments are:
Description Model
Hedge Cutter MTO001
Cultivator MTO002
Blower MTO003
Edger MTO004
Pole Pruner MTO005
Brushcutter MTO006
a WARNING: Always stop the machine before
removing or installing attachments.
REMOVING THE ATTACHMENT
1. 3ODFHWKHPDFKLQHRQDÀDWVXUIDFHIRUVWDELOLW\
2. Loosen the coupler by turning the knob
counterclockwise.
3. Press and hold the locking/release button.
4. While securely holding the engine and the upper
shaft, pull the attachment straight out of the
coupler.