15375
120
Zoom out
Zoom in
Previous page
1/192
Next page
118 / Detailed guide / Preparation
4. Close the battery compartment cover and turn the
locking lever to the left.
To remove the battery, follow these instructions in
reverse order. The light grey sprung locking catch in
the battery compartment must be pushed to the side
to unlock the battery.
Important: Removing the batteries can result in the
settings you made in the menus being reset
(see p. 122).
With a fully charged battery and the
64 MB SD
memory card supplied, the following recording/review
times are then available:
CChhaarrggee lleevveell ddiissppllaayyss ((22..11..88//22..22..1100))
The charge level of the battery is displayed in the
viewfinder/monitor (1.19/32) (not if the mains/
charging unit is connected, see below).
r
Sufficient capacity
q
Falling capacity
p
Insufficient capacity
o
Replacement or recharging necessary
NNootteess::
Remove the battery, if you will not be using the
camera for a long period of time. When doing so,
turn the camera off using the main switch first.
The date and time must be reset after 24 hours at
the latest after the capacity of a battery in the
camera has expired (see p. 124).
Mains operation
You can also operate the camera from the mains
using the mains/charging unit, so that you will not be
restricted by the battery capacity.
1. Set the main switch (1.26) to
OFF
.
2. Connect the mains lead as described under
“Charging the battery”, p. 116 to the mains/
charging unit.
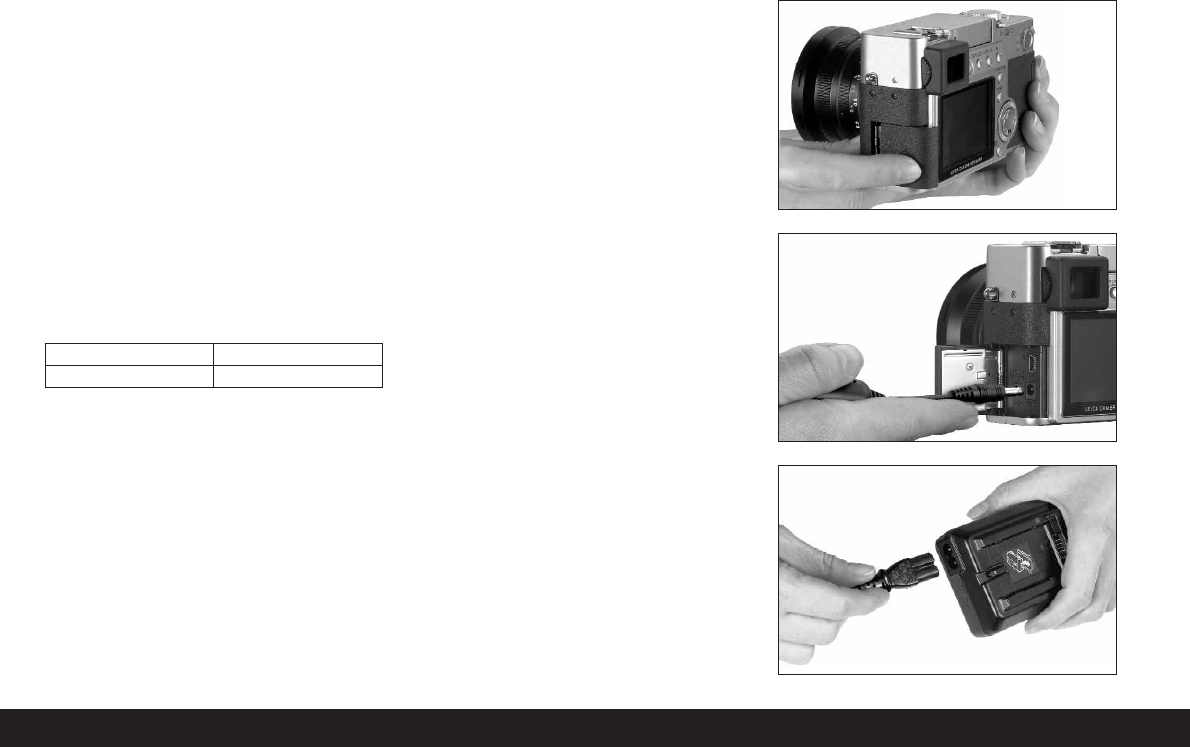
3. Open the locking protective flap (1.17) over the
socket door on the left-hand side of the camera
by pressing/pulling it slightly backwards in the
direction of the arrow. The spring-loaded cover
then opens automatically.
4. Connect the DC connecting lead (E). Any side of it
is plugged into the
DC IN
socket (1.34) of the
camera.
For taking pictures approx.
180 min
For review approx.
350 min
120


Need help? Post your question in this forum.

Forumrules


Report abuse

Libble takes abuse of its services very seriously. We're committed to dealing with such abuse according to the laws in your country of residence. When you submit a report, we'll investigate it and take the appropriate action. We'll get back to you only if we require additional details or have more information to share.

Product:

For example, Anti-Semitic content, racist content, or material that could result in a violent physical act.

For example, a credit card number, a personal identification number, or an unlisted home address. Note that email addresses and full names are not considered private information.

Forumrules

To achieve meaningful questions, we apply the following rules:

Register

Register getting emails for Leica DIGILUX2 at:


You will receive an email to register for one or both of the options.


Get your user manual by e-mail

Enter your email address to receive the manual of Leica DIGILUX2 in the language / languages: English, German as an attachment in your email.

The manual is 1,7 mb in size.


You will receive the manual in your email within minutes. If you have not received an email, then probably have entered the wrong email address or your mailbox is too full. In addition, it may be that your ISP may have a maximum size for emails to receive.

Others manual(s) of Leica DIGILUX2

Leica DIGILUX2 User Manual - English - 96 pages

Leica DIGILUX2 User Manual - German - 96 pages

Leica DIGILUX2 User Manual - French - 97 pages

Leica DIGILUX2 User Manual - Italian - 97 pages

Leica DIGILUX2 User Manual - Spanish - 96 pages


The manual is sent by email. Check your email

If you have not received an email with the manual within fifteen minutes, it may be that you have a entered a wrong email address or that your ISP has set a maximum size to receive email that is smaller than the size of the manual.

The email address you have provided is not correct.

Please check the email address and correct it.

Your question is posted on this page

Would you like to receive an email when new answers and questions are posted? Please enter your email address.


Info