15375
118
Zoom out
Zoom in
Previous page
1/192
Next page
116 / Detailed guide / Preparation
Detailed guide
Preparation
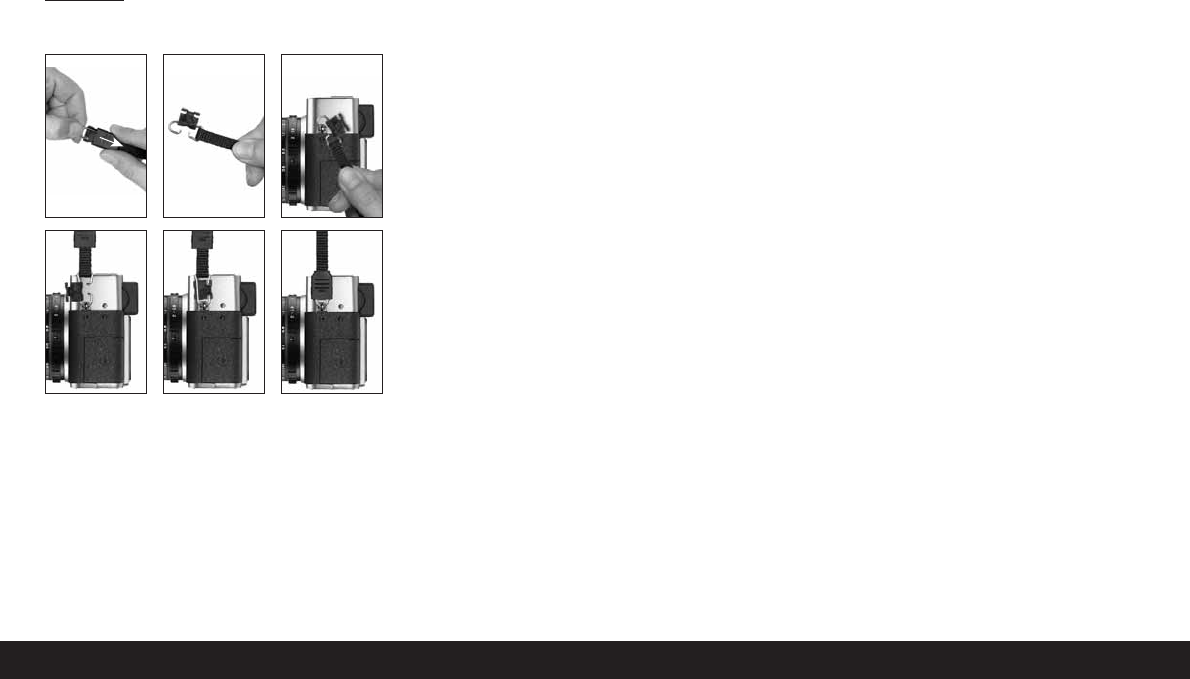
Attaching the carrying strap
Attaching/removing the lens hood
The scope of delivery of the LEICA DIGILUX 2 includes
a removable lens hood ideally tailored to the paths of
the rays. It is attached straight with its guide (1.47)
opposite the corresponding groove in the lens front
mount (1.44). When attaching it, the clips (1.46) of the
lens hood lock it in the corresponding retaining
grooves in the lens front mount (1.36/38). It can be
removed from the lens easily when the locking
buttons (1.45) are pressed.
The lens hood should always be used to minimize
annoying reflections and light coming in from the side
in poor photographic conditions. It provides effective
protection against contrast-reducing stray light and
also against damage and soiling of the front lens, e.g.
from raindrops or accidental fingerprints.
Notes:
In flash photography (see p. 140), in particular
close-up shots, the attached lens hood may cause
shadows.
The LEICA DIGILUX 2 is supplied with two lens caps
(J/K), one for use with, and one for use without the
attached lens hood. One of these caps should
always be attached to protect the front lens when
you are not taking photographs.
Charging the battery
The LEICA DIGILUX 2 is powered by a powerful and
fast-charging lithium-ion battery (A).
Caution:
Only the battery types named and described in
these instructions, or those cited and described by
Leica Camera AG, may be used in the camera.
The batteries may be charged only with the devices
specifically designed for this purpose, and only
precisely as described below.
The use of batteries contrary to these Instructions
and the use of the wrong battery types may lead to
an explosion.
The mains/charging unit supplied should be used
exclusively for charging these batteries and to
power this camera (mains operation, see p. 118).
Do not attempt to use it for any other purposes.
Ensure that the mains outlet used is freely access-
ible.
1. Connect the mains lead (D) to the mains/charging
unit (C), i.e. connect the smaller plug on the mains
lead to the socket marked
AC IN
~ (1.48) and the
mains plug to the wall outlet. The red LED, marked
POWER
(1.50) lights up.
118


Need help? Post your question in this forum.

Forumrules


Report abuse

Libble takes abuse of its services very seriously. We're committed to dealing with such abuse according to the laws in your country of residence. When you submit a report, we'll investigate it and take the appropriate action. We'll get back to you only if we require additional details or have more information to share.

Product:

For example, Anti-Semitic content, racist content, or material that could result in a violent physical act.

For example, a credit card number, a personal identification number, or an unlisted home address. Note that email addresses and full names are not considered private information.

Forumrules

To achieve meaningful questions, we apply the following rules:

Register

Register getting emails for Leica DIGILUX2 at:


You will receive an email to register for one or both of the options.


Get your user manual by e-mail

Enter your email address to receive the manual of Leica DIGILUX2 in the language / languages: English, German as an attachment in your email.

The manual is 1,7 mb in size.


You will receive the manual in your email within minutes. If you have not received an email, then probably have entered the wrong email address or your mailbox is too full. In addition, it may be that your ISP may have a maximum size for emails to receive.

Others manual(s) of Leica DIGILUX2

Leica DIGILUX2 User Manual - English - 96 pages

Leica DIGILUX2 User Manual - German - 96 pages

Leica DIGILUX2 User Manual - French - 97 pages

Leica DIGILUX2 User Manual - Italian - 97 pages

Leica DIGILUX2 User Manual - Spanish - 96 pages


The manual is sent by email. Check your email

If you have not received an email with the manual within fifteen minutes, it may be that you have a entered a wrong email address or that your ISP has set a maximum size to receive email that is smaller than the size of the manual.

The email address you have provided is not correct.

Please check the email address and correct it.

Your question is posted on this page

Would you like to receive an email when new answers and questions are posted? Please enter your email address.


Info