489648
10
Zoom out
Zoom in
Previous page
1/40
Next page
G240 Portable Digital Photo Viewer
User Manual
Kodak and the Kodak trade dress are trademarks of Eastman Kodak Company used under license.
© 2010 Sakar International, Inc. All rights reserved.
WINDOWS and the WINDOWS logo are registered trademarks of Microsoft Corporation. All other trademarks are the
property of their respective companies.
2
Table of Contents
Introduction ....................................................................................................... 3
What’s Included ................................................................................................ 3
Computer System Requirements for Windows OS .............................................. 4
Computer System Requirements for MAC OS .................................................... 4
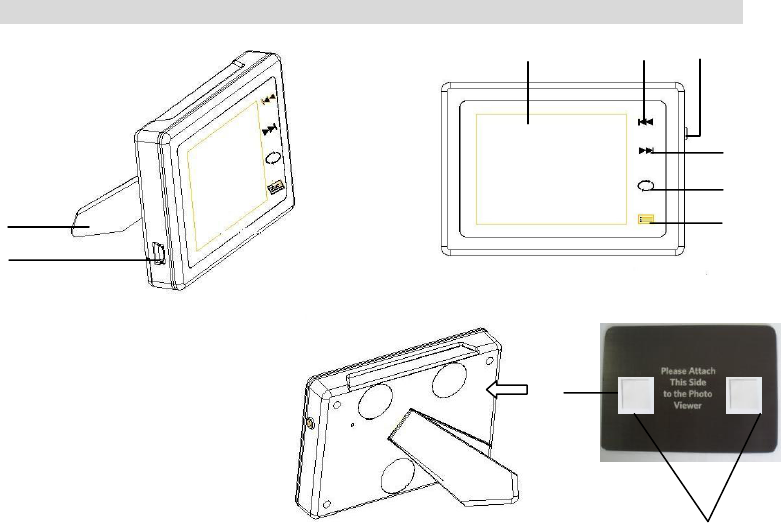
A Quick Look at Your Portable Digital Photo Viewer ........................................... 5
Charging the Battery ......................................................................................... 6
Starting Your Portable Digital Photo Viewer ....................................................... 7
Button Functionality ........................................................................................... 8
Viewing Different Photos On Your Portable Digital Photo Viewer ........................ 9
Exploring the Setting Options .......................................................................... 11
Loading Photos from your PC to your Portable Digital Photo Viewer ................. 20
Loading Photos from your MAC to your Portable Digital Photo Viewer .............. 32
Maintenance of Your Portable Digital Photo Viewer .......................................... 37
Sakar Warranty Card ....................................................................................... 37
Technical Support ........................................................................................... 38
Technical Specifications .................................................................................. 39
Troubleshooting .............................................................................................. 40
3
Introduction
Thank you for purchasing your 2.4’’ KODAK G240 Portable Digital Photo Viewer. The Digital Photo
Viewer battery stays fully charged for up to 3 hours. With your Digital Photo Viewer, you can store and
display up to 50 photos. You can also mount your KODAK Portable Digital Photo Viewer on any metal
surface such as your refrigerator.
Please read this manual carefully first in order to get the most out of your KODAK Portable Digital Photo
Viewer.
What’s Included
Portable Digital Photo Viewer
USB cable
Magnetic Auto Mount Accessory
2 Double Sided Sticker Accessories
User Manual
One year warranty
4
Computer System Requirements for Windows OS
To be able to upload photos from your PC to your Portable Digital Photo Viewer, you will need the
following minimum configuration:
Windows XP (SP 2)/Vista /Win7
Pentium-based PC (or equivalent)
150 MB hard disk free space and 128 MB or more RAM
Available USB Interface
Color display (16 bit or higher recommended)
Screen resolution 1024 X 768
Computer System Requirements for MAC OS
To be able to upload photos from your MAC to your Portable Digital Photo Viewer, you will need the
following minimum configuration:
MAC OS with Intel processor running MAC OS X v10.5 or later
256 MB RAM, 250 MB free disk space
Display: 1024 x 768 or higher-resolution monitor
QUICKTIME 6 or higher
5
10
A Quick Look at Your Portable Digital Photo Viewer
1. LCD screen
2. Previous button
3. Power button
4. Next button
5. AUTO button
6. Menu button
7. USB port
8. Kick Stand
9. Magnetic Auto Mount
10. Double sided stickers
1
3
2
4
5
6
8
7
9
6
Note: You can place your Portable Digital Photo Viewer on any metal surface, such as your refrigerator or door, by
attaching the Magnetic Auto Mount to the Photo Viewer (according to the text shown on Magnetic Auto Mount).
You can also attach the Magnetic Auto Mount to the Photo Viewer using the 2 double sided sticker accessories
(included). Peel off one side of the sticker and attach to the Magnetic Auto Mount (on the side with the text that
attaches to the Photo Viewer). Then peel off the other side and connect to the back of the Photo Viewer.
It is recommended that that the magnet along with the Photo Viewer not be placed in your pocket/pocket book,
since the magnet may erase credit card information.
Charging the Battery
Your Portable Digital Photo Viewer has a built-in rechargeable Lithium battery.
INITIAL USE
Before using and powering on your Photo Viewer for the first time you will need to charge it for one
hour.
CHARGING THE BATTERY
To charge your lithium battery, connect your Photo Viewer to the computer with the USB cable.
LOW BATTERY
A low battery warning icon will flicker on the LCD screen 5 minutes before the battery will run out.
A second low battery icon will then flicker on the LCD screen to indicate that there is no battery power.
After 10 seconds, your Photo Viewer will automatically turn off. Recharge by connecting your Photo
Viewer with the USB cable to your computer.
7
Note: When the battery power runs out, your stored photos are not lost. All stored images remain on
your Portable Digital Photo Viewer.
Starting Your Portable Digital Photo Viewer
Please make sure that your Photo Viewer has sufficient battery power in order to operate properly.
POWERING ON/OFF YOUR DIGITAL PHOTO VIEWER
1. Press and hold the Power button for about 3 seconds to Power On your Digital Photo Viewer.
2. When your Photo Viewer is turned on, press and hold the Power button for about 3 seconds.
Your Photo Viewer will automatically Power Off.
Note:
Your Portable Digital Photo Viewer also has an Auto Shutdown feature that automatically turns off your
Photo Viewer after a specific period of time your Photo Viewer is left idle. This feature can be
customized by selecting the ‘Auto Shutdown’ option from the Main menu.
8
Button Functionality
Button
Function
POWER ON/OFF
Powers on and off the Portable Digital Photo Viewer
PREV
Displays the PREVIOUS Photo
Scrolls through the Main Menu options
NEXT
Displays the NEXT Photo
Scrolls through the Main Menu options
AUTO
Displays all stored photos as a SLIDE SHOW
MENU
Displays the MAIN MENU options
Confirms your selected menu option
To use the buttons, simply touch the desired button/icon on the LCD screen.
Text appears briefly to the left of each button indicating the button function as it goes through the
desired function.
9
Viewing Different Photos On Your Portable Digital Photo Viewer
MANUAL MODE
If multiple photos are loaded on your Photo Viewer, you can press the PREV or NEXT button to
view the different photos on your LCD screen.
After pressing the PREV or NEXT button, the specific photo number being viewed and the total
number of photos loaded to the Digital Photo Viewer appears briefly on the top right corner of the LCD
screen.
Your photos are displayed in a continuous loop:
1. If you are viewing the last photo and press the NEXT button, the next photo that appears will
be your first photo.
2. If you are viewing the first photo and press the PREV button, the previous photo that appears
will be your last photo.
Note: The picture will remain on the Photo Viewer until you manually press the PREV or NEXT
button.
SLIDE SHOW MODE
If multiple photos are loaded on your Photo Viewer and you would like to view them as a continuous
slide show, press the AUTO button.
10
Starting Your Slide Show
Pressing the AUTO button automatically STARTS the slide show and displays each photo with the
default interval of 1 second between photos.
Note: You can customize your slide show interval by setting the time in the Slide Show option from
the Main Menu. (See the ‘Exploring the Setting Options section for more details.)
Stopping Your Slide Show
The Slide Show keeps playing until:
you touch the screen, which STOPS the Slide Show and activates the Manual Mode
you turn off the Photo Viewer
the Photo Viewer turns off automatically (activated by the Auto Shutdown feature)
the battery runs out
10


Need help? Post your question in this forum.

Forumrules


Report abuse

Libble takes abuse of its services very seriously. We're committed to dealing with such abuse according to the laws in your country of residence. When you submit a report, we'll investigate it and take the appropriate action. We'll get back to you only if we require additional details or have more information to share.

Product:

For example, Anti-Semitic content, racist content, or material that could result in a violent physical act.

For example, a credit card number, a personal identification number, or an unlisted home address. Note that email addresses and full names are not considered private information.

Forumrules

To achieve meaningful questions, we apply the following rules:

Register

Register getting emails for Kodak G240 at:


You will receive an email to register for one or both of the options.


Get your user manual by e-mail

Enter your email address to receive the manual of Kodak G240 in the language / languages: English as an attachment in your email.

The manual is 0,95 mb in size.


You will receive the manual in your email within minutes. If you have not received an email, then probably have entered the wrong email address or your mailbox is too full. In addition, it may be that your ISP may have a maximum size for emails to receive.

The manual is sent by email. Check your email

If you have not received an email with the manual within fifteen minutes, it may be that you have a entered a wrong email address or that your ISP has set a maximum size to receive email that is smaller than the size of the manual.

The email address you have provided is not correct.

Please check the email address and correct it.

Your question is posted on this page

Would you like to receive an email when new answers and questions are posted? Please enter your email address.


Info