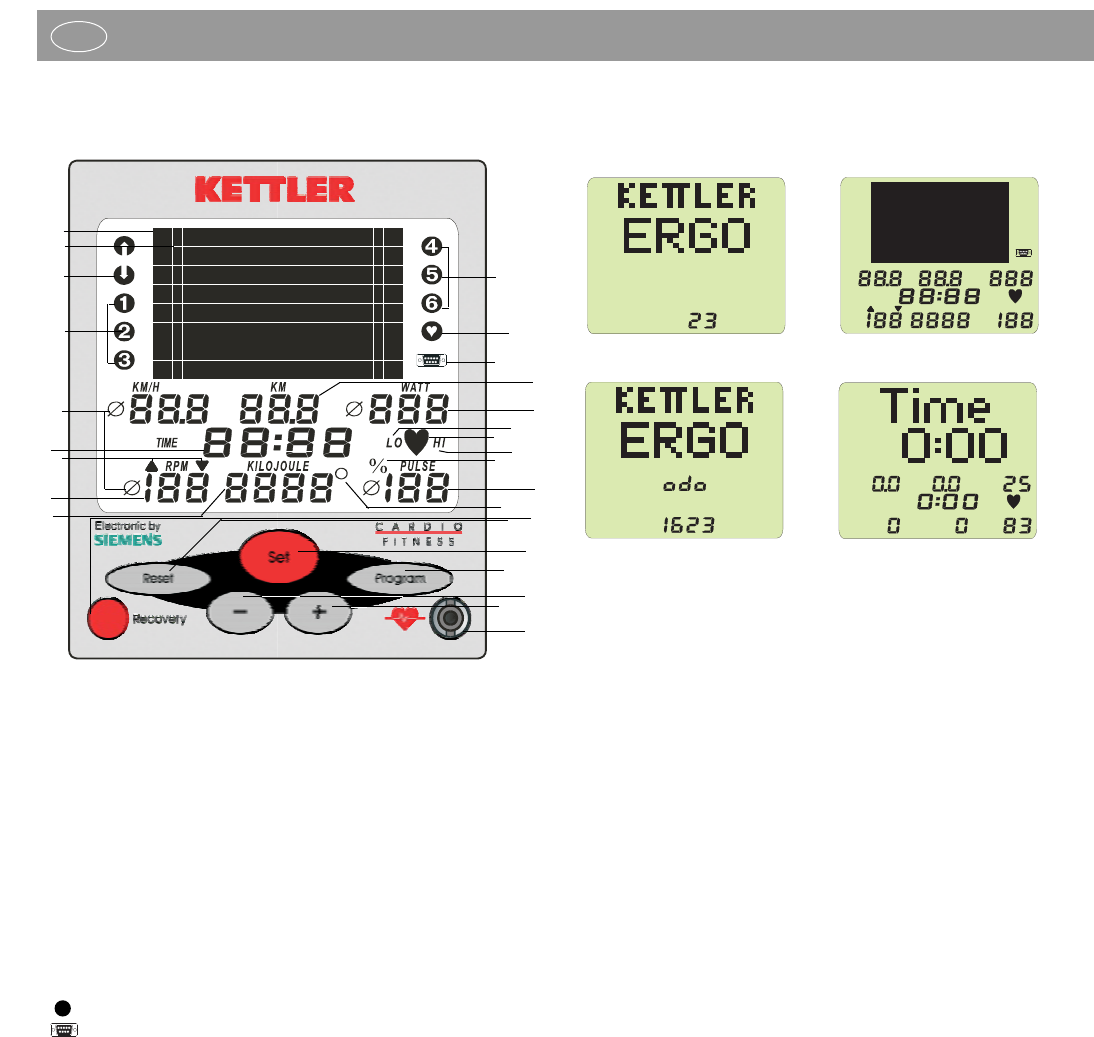
1.0 Displays before training
1. Room temperature Fig. 1 [before and after training]
2. Full display Fig. 2 [after pedalling or key actuation, 1 sec]
3. Total kilometres Fig. 3 [all kilometres covered, 8 sec]
4. Start display Fig. 4 [after key actuation or after 8 seconds]
2.0 Pulse measuring
This display offers two or three (only SX1) possibilities for pulse mea-
suring:
1. with the hand pulse sensors (only SX1)
2. with the ear-clip
3. with the cardio pulse set, article No. 7937-000 (available as an
option from specialised dealers)
Information on pulse measuring
Only one kind of pulse measuring is possible at a time. (Ear-
clip or hand pulse sensors or cardio pulse set)
Select the start display (Fig. 4). Your current pulse is displayed at
position (7).
Pulse measuring with hand pulse sensors
Your hands grasp the hand pulse sensors.
Pulse measuring with the ear-clip
Plug the ear-clip into socket (14).
Rub one ear lob in order to achieve a better blood circulation.
Put the ear-clip at your ear lob.
Pulse measuring with the cardio pulse set
Please refer to the appropriate instructions.
Pulse display
The heart symbol (j) will flash according to your pulse beat.
The pulse beat is displayed as value (7).
3.0 Training without preset training data
Step into the pedals. All values will count up. Count-up mode.
4.0 Training with preset training data
4.1 Program types
The ergometer possesses nine different program types:
• Count-up (count-up mode)
• Count-down (count-down mode)
• 6 programs å-ë (preset training intervals in a given time)
• pulse controlled program (strain control based on your preset pulse value)
After switching on, count-up (Fig. 4) will be automatically activated.
4.2 Selection of programs (Fig. 5-8)
You set the start display (Fig. 8). Press the program key (
11) several
times without pedalling. The programs are shown in the display by flas-
hing program symbols. In case of count-up, count-down and
HRC text is displayed in the graphics field (f). In the programs
➊-➏,
additionally the training profile is shown in graphics field (f) in a com-
pressed form. The training time given by the program will be shown in
the time display (3) (Fig. 7).
Operating instructions for the training computer with digi-
tal display ( GE 22... )
Values
1. KILOJOULE ..energy consumption 0-9999 [KJ]
room temperature 0-50 [°C]
odo total kilometres 0-9999 [km]
2. RPM pedal rotations 20-199 [rotations/min]
3. TIME 0:00-99:59 [min:sec]
4. KM/H velocity 0-99,9 [km/h]
5. KM distance 0-99,9 [km]
6. WATT performance 25-400 [Watt]
7. PULSE pulse beat 0-199 [pulse beats/min]
Symbols
a ▲▼ arrows . . . . . . . . . .change pedal rotations
b Øaverage . . . . . . . . .PPM + km/h + performance + pulse
c
➊-➏ program 1-6 . . . . . .given training programs
d
count-down mode . . .training values count down
e
count-up mode . . . . .training values count up
f
graphic display . . . .multiple display for graphics+values
g heart program . . . . .pulse controlled program
h interface . . . . . . . . .PC mode
i LO low pulse limit . . . . .age-depending low pulse limit
j ❤ pulse beat . . . . . . . .flashes in accordance with pulse beat
k HI high pulse limit . . . .age-depending high pulse limit,
. . . . . . .max. pulse (flashes)
l % per cent . . . . . . . . .% of max. pulse setting
m room temperature . . .degree Celsius
Keys
8 Recovery key function key (recovery pulse and fitness
value calculation)
9 Reset key function key (delete the display contents)
10 Set key function key (acceptance and confirmati
on of inputs)
11 Program key selection of programs and display con
tents in graphics field
12 Minus key reduce values
13 Plus key increase values
Connections (front)
14 Socket for the ear-clip and the plug-in receiver
Connections (board)
15 Plug (4-pole) for the hand pulse sensors
16 Plug (6-pole) for voltage, impulses and control
17 Plug (3-pole) to interface
Connections (rear)
18 Socket interface PC connection
Function and operation of the training computer
GB