Connections / Raccordements / Conexiones / Ligações
13
•Do not connect the changer control cable while
the control unit is turned ON.
•Be sure to press the reset button after installation.
•The model connected to the TO CH2 jacks may
not be recognized immediately after the
connection. In this case, switch the source mode
to TUNER or other source then return to the
changer mode again. This makes operation
possible by dividing the changer more to 1 and 2.
•Leave the TO CH2 terminal capped while it is not
used.
•If the control unit in use does not have the
changer switching function, do not connect
anything to the TO CH2 terminal.
•Do not install an antenna of radio equipment or
distribute the antenna cable near the changer
output cable, for this could cause malfunction with
this unit.
•Ne branchez pas le câble de commande du
changeur aussi longtemps que l'unité de
commande est en service.
•Après l'installation de l'appareil, n'oubliez pas
d'appuyer sur le buton de réinitialisation.
•Le modèle relié aux prises TO CH2 peut ne pas
être reconnu immédiatement après la connexion.
Dans ce cas, choisissez TUNER, ou une autre
possibilité, comme source puis adoptez une
nouvelle fois le mode changeur. Cela permet alors
le fonctionnement en séparant le mode changeur
en deux valeurs, 1 et 2.
•Conservez en place le cache de protection de la
borne TO CH2 lorsque cette borne n'est pas
utilisée.
•Si l'unité de commande utilisée ne possède pas
de fonction de commutation de changeur, ne
reliez rien à la prise TO CH2.
•Sous peine de provoquer une défaillance, ne pas
installer l’antenne d’un équipement radio ou faire
passer le câble d’antenne près du câble de sortie
du changeur.
•No conecte el cable de control del cambiador
mientras está encendida la unidad de control.
•Asegúrese de pulsar el botón de reposición una
vez realizada la instalación.
•El modelo conectado a las tomas TO CH2 tal vez
no sea reconocido inmediatamente después de la
conexión. En este caso, cambie el modo de la
fuente a TUNER o a otra fuente y luego vuelva de
nuevo al modo del cambiador. Esto hará posible la
operación dividiendo más el cambiador a 1 y 2.
•Deje el terminal TO CH2 tapado mientras no lo
utiliza.
•Si la unidad de control que está siendo utilizada no
tiene la función de conmutación de cambiadores,
no conecte nada al terminal TO CH2.
•No instale una antena de un equipo de radio ni los
cables de la antena cerca del cable de salida del
cambiador porque esto podría ser la causa de que
este aparato funcione mal.
•Não conectar o cabo de controle do trocador de
discos enquanto a unidade de controlo estiver
ligada.
•Depois da instalação, não deixar de premer o
botão de rearme.
•O modelo conectado às tomadas ao canal 2 (TO
CH2) podem não ser reconhecidos imediatamente
após a conexão. Neste caso, comutar a fonte ao
modo de sintonizador (TUNER) ou outro qualquer
e, então, retornar ao modo de cambiador. Isto
torna a operação possível pela divisão do
cambiador a mais 1 e 2.
•Deixar o terminal TO CH2 encapado enquanto nã
o está em uso.
•Se a unidade de controle em uso não dispor de
função de comutação de changer, não conecte
nada ao terminal TO CH2.
•Não instale a antena do equipamento de rádio ou
deixe o cabo da antena ficar perto do cabo de
saída do changer, pois isso pode provocar
problemas de mau funcionamento neste aparelho.
2CUIDADO
2PRECAUCIÓN
2ATTENTION
2CAUTION
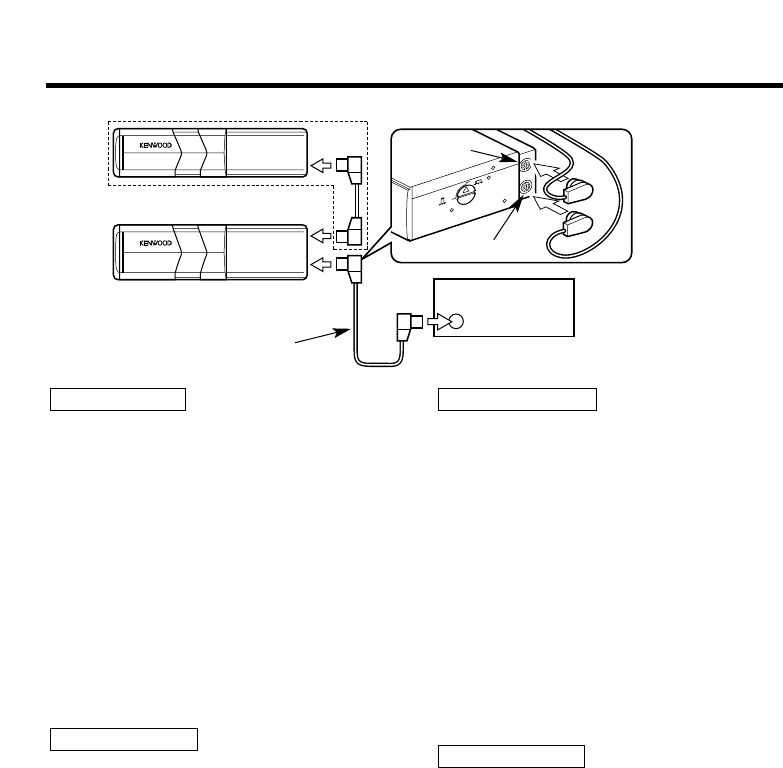
D Changer control cable (5m) /
Câble de commande du changeur (5
m) /
Cable de control de cambiador (5 m) /
Cabo de controle do changer (5 m)
optional / en option / opcional /
opcional
Control unit (optional) /
Unité de commande (en
option) /
Unidad de control (opcional) /
Unidade de controle (opcional)
TO H/U
TO CH2