48
Configuring the DVD600 DVD Changer (Continued)
Selecting Menu Languages
The Menu Language option sets the default
choice for the language that will be used for the
DVD600’s own on-screen menu displays. This
default setting DOES NOT impact the playback
of DVD discs.
To select the Menu Language default, you must
be viewing the Setup Menu (Figure 1), which is
available by pressing the Menu Button z
while the unit is in the Stop mode. At the Setup
Menu, press the
¤
Button until the
Menu’s option is highlighted.
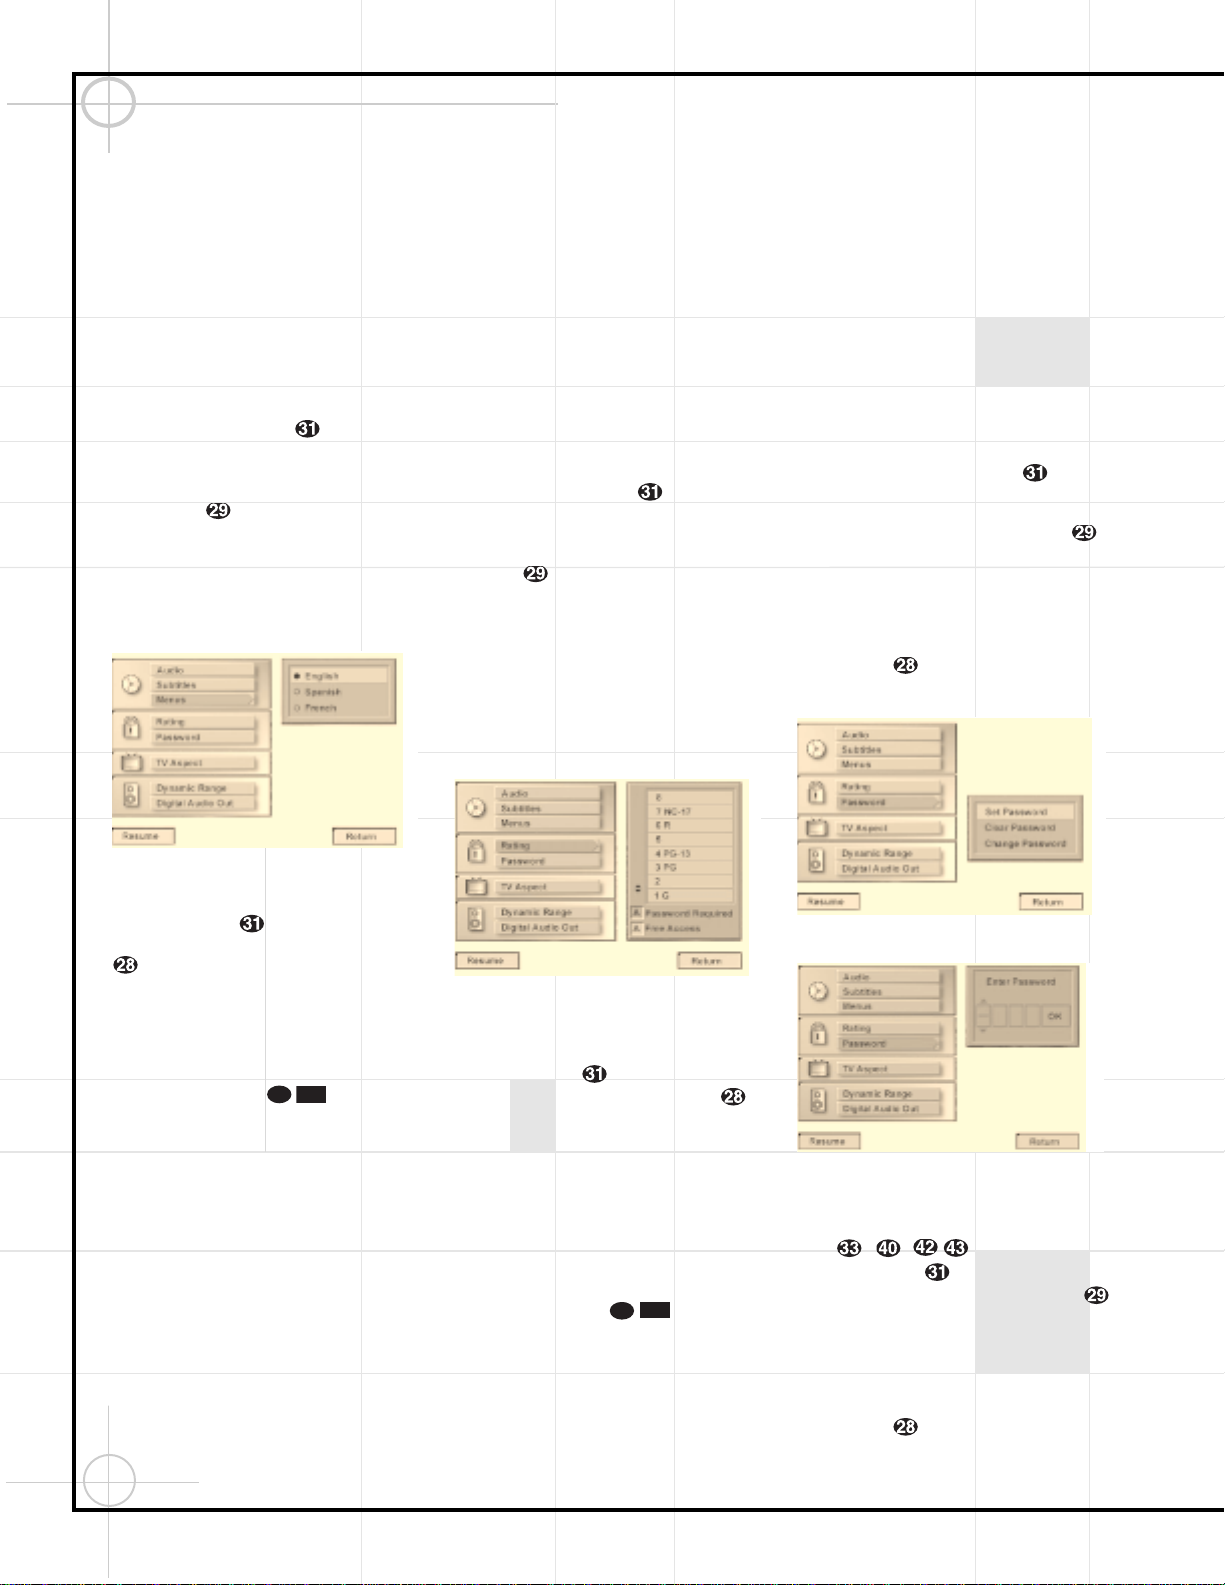
To change the default Menu Language, press
the ›Button and note that the list of
system defaults will be replaced with a list of
the available options, as shown in Figure 4. The
current language choice will be indicated by a
filled-in circle in the list on the right side of
the screen.
Figure 4
To change the default setting, press the
⁄
/
¤
Buttons yuntil the desired choice
is highlighted, and then press the Enter Button
. Note that the circle for your choice will fill
in, and the menu will return to the default listings.
If you have no other changes to make after set-
ting this default, press the Menu Button z
to remove the Setup Menu from the screen, or
press the Play Button to begin or
resume playback.
Parental Lock and Passwords
The DVD600 enables you to control the discs
that are viewed by setting a ratings level. When
a disc that’s ready to play has a rating level
greater than the default, it will not play. To
further protect against unauthorized viewing of
restricted discs, the ratings-level option may be
locked so that only authorized persons (such as
a parent) may change the rating level after a
password is entered.
The ratings system is dependent on information
encoded into the DVD disc being played so,
although most movies will carry an MPAA or
other rating symbol, the disc may or may not
contain that rating in its software. In addition to
the five MPAA ratings of G, PG, PG-13, R and
NC-17, the DVD600 will accommodate a total of
eight ratings steps, as set by the creators of the
DVD format. These additional steps allow for
more critical control of program playback for all
audiences.
To select the permitted ratings values, you must
be viewing the Setup Menu (Figure 1), which is
available by pressing the Menu Button z
while the unit is in the Stop mode. At the Setup
Menu, press the
¤
Button until the
Ratings option is highlighted.
To change the default Ratings setting, press the
›Button and note that the list of system
defaults will be replaced with a list of the
program ratings as shown in Figure 5. Some
ratings will be highlighted in orange, while
others will be highlighted in blue. Discs with a
rating in the orange color band will play without
any further action by the viewer. Discs with
ratings in the blue band will only play after a
password is entered.
Figure 5
To change the range of ratings that may be
viewed without a password, press the
⁄
/
¤
Buttons yuntil the desired range
is set, and then press the Enter Button .
Note that the circle for your choice will fill in,
and the menu will return to the default listings.
The listing in the default settings will show the
highest rated program that may be viewed with-
out entering a password.
If you have no other changes to make after set-
ting this default, press the Menu Button z
to remove the Setup Menu from the screen, or
press the Play Button to begin or
resume playback.
Password Selection and Control Lock
The DVD600’s Password System is used to
control viewing of restricted programs and one’s
capability to change the password itself. The
DVD600 is shipped without a password and
with the settings for the password system
unlocked. The following instructions will show
how to add a password and to lock the settings.
To set a password or lock the password system,
you must be viewing the Setup Menu (Figure 1),
which is available by pressing the Menu Button
zwhile the unit is in the Stop mode. At the
Setup Menu, press the
¤
Button until the
Password option is highlighted.
To enter a password, press the ›Button
and note that the list of system defaults will be
replaced with a list of the three password
options (Figure 6). To enter a password, check to
make certain that the words Set Password are
highlighted in light blue and then press the
Enter Button . The Enter Password screen
will then appear on your video display (Figure 7).
Figure 6
Figure 7
To enter a password, you may either enter the
four-digit number directly, using the Numeric
Keys –,, or you may use the
⁄
/
¤
Buttons yto select the number
for a position, and then press the ›Button
to move to the next position. Note that as each
number is entered, it will turn to a solid circle
when you move to the next position to protect
the password’s privacy. When all four numbers
of the password have been entered, press the
Enter Button .