681364
76
Zoom out
Zoom in
Previous page
1/94
Next page
CT50 -Ex
Mobile Computer
powered by Android™ 6.0 Operating System
User Guide
ii
Disclaimer
Honeywell International Inc. (“HII”) and ecom (ec) reserve the right to make changes in
specifications and other information contained in this document without prior notice, and
the reader should in all cases consult HII an ec to determine whether any such changes
have been made. The information in this publication does not represent a commitment on
the part of HII and ec.
HII an ec shall not be liable for technical or editorial errors or omissions contained herein;
nor for incidental or consequential damages resulting from the furnishing, performance, or
use of this material. HII and ec disclaims all responsibility for the selection and use of
software and/or hardware to achieve intended results.
This document contains proprietary information that is protected by copyright. All rights are
reserved. No part of this document may be photocopied, reproduced, or translated into
another language without the prior written consent of HII and ec.
Trademarks
Android, Google, and other marks are trademarks of Google Inc.
Microsoft, Windows are either registered trademarks or registered trademarks of Microsoft
Corporation in the United States and/or other countries.
The Bluetooth trademarks are owned by Bluetooth SIG, Inc., U.S.A. and licensed to
Honeywell.
Other product names mentioned in this manual may be trademarks or registered
trademarks of their respective companies and are the property of their respective owners.
Patents
For patent information, see www.hsmpats.com.
Contents
iii
Contents
Customer Support. . . . . . . . . . . . . . . . . . . . . . . . . . . . . . . . . . . . . . . . . . . . . . . . . . vii
Product Service and Repair . . . . . . . . . . . . . . . . . . . . . . . . . . . . . vii
Limited Warranty . . . . . . . . . . . . . . . . . . . . . . . . . . . . . . . . . . . . . . vii
Send Feedback . . . . . . . . . . . . . . . . . . . . . . . . . . . . . . . . . . . . . . . viii
1
About the Computer Features . . . . . . . . . . . . . . . . . . . . . . . . . . . . . . . . 1
About the CT50 -Ex Mobile Computer . . . . . . . . . . . . . . . . . . . . . . . . . . . . . . . . 2
About the Battery . . . . . . . . . . . . . . . . . . . . . . . . . . . . . . . . . . . . . . . . . . . . . . . . . . . 6
Charge the Battery . . . . . . . . . . . . . . . . . . . . . . . . . . . . . . . . . . . . . . . . . . . . 6
Charge Before Use . . . . . . . . . . . . . . . . . . . . . . . . . . . . . . . . . . . . . 7
Change the Battery . . . . . . . . . . . . . . . . . . . . . . . . . . . . . . . . . . . . . . . . . . . 8
About the Battery Status Icon . . . . . . . . . . . . . . . . . . . . . . . . . . . . . . . . . . 10
Change the Battery Status LED Behavior . . . . . . . . . . . . . . . . . . . . . . . . . 12
Check the Battery Level . . . . . . . . . . . . . . . . . . . . . . . . . . . . . . . . . . . . . . . 13
About Battery Life and Conservation . . . . . . . . . . . . . . . . . . . . . . . . . . . . . 13
Battery Recommendations and Safety Precautions. . . . . . . . . . . . . . . . . . 14
Enable Airplane Mode . . . . . . . . . . . . . . . . . . . . . . . . . . . . . . . . . . . . . . . . 14
Power On the Computer . . . . . . . . . . . . . . . . . . . . . . . . . . . . . . . . . . . . . . . . . . . . . 15
Unlock the Screen . . . . . . . . . . . . . . . . . . . . . . . . . . . . . . . . . . . . . . . . . . . . . . . . . . 15
Set a PIN to Protect the Computer . . . . . . . . . . . . . . . . . . . . . . . . . . . . . . . . . . . . . 16
Use Gloves with the Touch Screen . . . . . . . . . . . . . . . . . . . . . . . . . . . . . . . . . . . . . 16
About the Good Read LED . . . . . . . . . . . . . . . . . . . . . . . . . . . . . . . . . . . . . . . . . . . 17
Configure the Screen Backlight. . . . . . . . . . . . . . . . . . . . . . . . . . . . . . . . . . . . . . . . 17
About the Audio Features . . . . . . . . . . . . . . . . . . . . . . . . . . . . . . . . . . . . . . . . . . . . 18
Adjust Ringtone and Notification Volume . . . . . . . . . . . . . . . . . . . . . . . . . . 18
Enable Vibrate Mode . . . . . . . . . . . . . . . . . . . . . . . . . . . . . . . . . . . . . . . . . 19
Audio Settings . . . . . . . . . . . . . . . . . . . . . . . . . . . . . . . . . . . . . . . . . . . . . . 20
Insert a microSD Card. . . . . . . . . . . . . . . . . . . . . . . . . . . . . . . . . . . . . . . . . . . . . . . 21
How to Transfer Files. . . . . . . . . . . . . . . . . . . . . . . . . . . . . . . . . . . . . . . . . . . . . . . . 23
How to Browse Files on the Computer . . . . . . . . . . . . . . . . . . . . . . . . . . . . . . . . . . 24
Contents
iv
Accessories for the Computer . . . . . . . . . . . . . . . . . . . . . . . . . . . . . . . . . . . . . . . . . 24
2
About the User Interface and Applications . . . . . . . . . . . . . . . . 27
About the User Interface . . . . . . . . . . . . . . . . . . . . . . . . . . . . . . . . . . . . . . . . . . . . . 28
About the Home Screen . . . . . . . . . . . . . . . . . . . . . . . . . . . . . . . . . . . . . . . 28
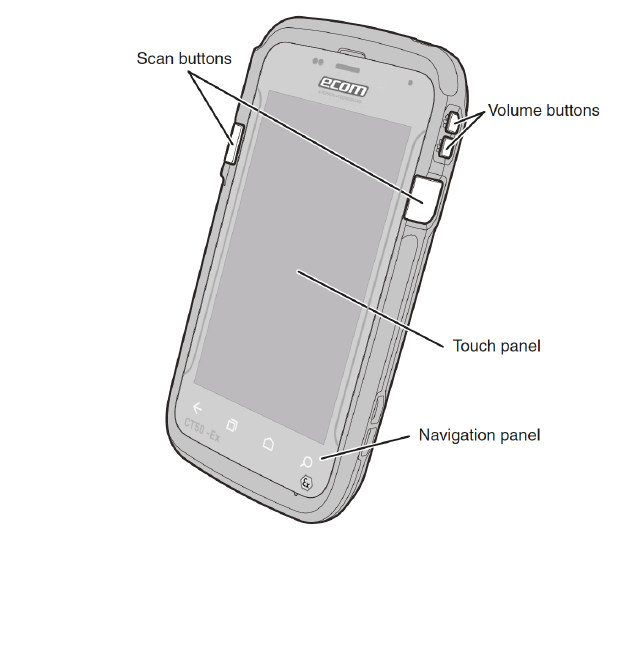
Navigation and Function Buttons . . . . . . . . . . . . . . . . . . . . . . . . . . . . . . . . 29
About Status Bar Icons. . . . . . . . . . . . . . . . . . . . . . . . . . . . . . . . . . . . . . . . 29
Remap a Button . . . . . . . . . . . . . . . . . . . . . . . . . . . . . . . . . . . . . . . . . . . . . 30
View Notifications . . . . . . . . . . . . . . . . . . . . . . . . . . . . . . . . . . . . . . . . . . . . 31
Manage Notifications . . . . . . . . . . . . . . . . . . . . . . . . . . . . . . . . . . . . . . . . . 31
Customize the Home Screen . . . . . . . . . . . . . . . . . . . . . . . . . . . . . . . . . . . 32
Customize the Favorites Tray . . . . . . . . . . . . . . . . . . . . . . . . . . . . . . . . . . . 32
Use Google™ Search . . . . . . . . . . . . . . . . . . . . . . . . . . . . . . . . . . . . . . . . 32
About Screen Gestures . . . . . . . . . . . . . . . . . . . . . . . . . . . . . . . . . . . . . . . 33
Set the Time Zone . . . . . . . . . . . . . . . . . . . . . . . . . . . . . . . . . . . . . . . . . . . 33
About Applications. . . . . . . . . . . . . . . . . . . . . . . . . . . . . . . . . . . . . . . . . 34
Unlock Developer Options. . . . . . . . . . . . . . . . . . . . . . . . . . . . . . . . . . . . . . . . . . . . 36
3
About the Scanner . . . . . . . . . . . . . . . . . . . . . . . . . . . . . . . . . . . . . . . . . . . . 37
About the Scanner . . . . . . . . . . . . . . . . . . . . . . . . . . . . . . . . . . . . . . . . . . . . . . . . . 38
How to Scan Bar Codes as Keyboard Input . . . . . . . . . . . . . . . . . . . . . . . . 38
Change the Scanner Settings . . . . . . . . . . . . . . . . . . . . . . . . . . . . . . . . . . 38
Restore Default Scanner Settings . . . . . . . . . . . . . . . . . . . . . . . . . . . . . . . 38
Scanners Default Settings . . . . . . . . . . . . . . . . . . . . . . . . . . . . . . . . . . . . . 39
Data Processing Settings . . . . . . . . . . . . . . . . . . . . . . . . . . . . . . . 39
Symbology Settings. . . . . . . . . . . . . . . . . . . . . . . . . . . . . . . . . . . . 41
Decode Settings . . . . . . . . . . . . . . . . . . . . . . . . . . . . . . . . . . . . . . 43
Imager Settings . . . . . . . . . . . . . . . . . . . . . . . . . . . . . . . . . . . . . . . 43
Trigger Settings . . . . . . . . . . . . . . . . . . . . . . . . . . . . . . . . . . . . . . . 43
Notification Settings. . . . . . . . . . . . . . . . . . . . . . . . . . . . . . . . . . . . 43
Scan a Bar Code. . . . . . . . . . . . . . . . . . . . . . . . . . . . . . . . . . . . . . . . . . . . . . . . . . . 44
4
Use the Phone . . . . . . . . . . . . . . . . . . . . . . . . . . . . . . . . . . . . . . . . . . . . . . . . . 47
About the Phone . . . . . . . . . . . . . . . . . . . . . . . . . . . . . . . . . . . . . . . . . . . . . . . . . . . 48
Activate the UMTS Phone . . . . . . . . . . . . . . . . . . . . . . . . . . . . . . . . . . . . . 48
Make a Phone Call . . . . . . . . . . . . . . . . . . . . . . . . . . . . . . . . . . . . . . . . . . . 51
Answer the Phone . . . . . . . . . . . . . . . . . . . . . . . . . . . . . . . . . . . . . . . . . . . 52
Switch Apps During a Phone Call . . . . . . . . . . . . . . . . . . . . . . . . . . . . . . . 52
Contents
v
Check Your Voicemail . . . . . . . . . . . . . . . . . . . . . . . . . . . . . . . . . . . . . . . . . . . . . . . 52
Se
t Your Voicemail Number . . . . . . . . . . . . . . . . . . . . . . . . . . . . . . . . . . . . 53
Change Voicemail Settings . . . . . . . . . . . . . . . . . . . . . . . . . . . . . . . . . . . . 53
Make an Emergency Phone Call. . . . . . . . . . . . . . . . . . . . . . . . . . . . . . . . . . . . . . . 53
Switch Between Network Carriers. . . . . . . . . . . . . . . . . . . . . . . . . . . . . . . . . . . . . . 54
Configure Phone Settings . . . . . . . . . . . . . . . . . . . . . . . . . . . . . . . . . . . . . . . . . . . . 54
5
Use the Camera. . . . . . . . . . . . . . . . . . . . . . . . . . . . . . . . . . . . . . . . . . . . . . . . 55
About the Color Camera . . . . . . . . . . . . . . . . . . . . . . . . . . . . . . . . . . . . . . . . . . . . . 56
Adjust the Camera and Video Settings . . . . . . . . . . . . . . . . . . . . . . . . . . . . . . . . . . 56
How to Zoom . . . . . . . . . . . . . . . . . . . . . . . . . . . . . . . . . . . . . . . . . . . . . . . 56
Change Camera Settings . . . . . . . . . . . . . . . . . . . . . . . . . . . . . . . . . . . . . . 56
Take a Photo . . . . . . . . . . . . . . . . . . . . . . . . . . . . . . . . . . . . . . . . . . . . . . . . . . . . . . 57
Record a Video . . . . . . . . . . . . . . . . . . . . . . . . . . . . . . . . . . . . . . . . . . . . . . . . . . . . 57
Change Video Settings . . . . . . . . . . . . . . . . . . . . . . . . . . . . . . . . . . . . . . . . . . . . . . 57
6
Configure the Computer. .
. . . . . . . . . . . . . . . . . . . . . . . . . . . . . . . . . . . . 59
How to Configure the Computer . . . . . . . . . . . . . . . . . . . . . . . . . . . . . . . . . . . . . . . 60
Start the Settings App . . . . . . . . . . . . . . . . . . . . . . . . . . . . . . . . . . . . . . . . 60
About the Structure of the Settings App. . . . . . . . . . . . . . . . . . . . . . . . . . . 61
About Network Communications . . . . . . . . . . . . . . . . . . . . . . . . . . . . . . . . . . . . . . . 64
Connect to a Wi-Fi Network . . . . . . . . . . . . . . . . . . . . . . . . . . . . . . . . . . . . 64
Configure Proxy Settings for a Wi-Fi Network. . . . . . . . . . . . . . . . 65
Disable Wi-Fi Notifications . . . . . . . . . . . . . . . . . . . . . . . . . . . . . . 66
Connect to an Ethernet Network . . . . . . . . . . . . . . . . . . . . . . . . . . . . . . . . 66
How to Connect to Virtual Private Networks . . . . . . . . . . . . . . . . . . . . . . . 67
Add a VPN. . . . . . . . . . . . . . . . . . . . . . . . . . . . . . . . . . . . . . . . . . . 67
Connect to a VPN . . . . . . . . . . . . . . . . . . . . . . . . . . . . . . . . . . . . . 67
About Wireless Security . . . . . . . . . . . . . . . . . . . . . . . . . . . . . . . . . . . . . . . . . . . . . 68
About Certificates. . . . . . . . . . . . . . . . . . . . . . . . . . . . . . . . . . . . . . . . . . . . 68
Load a Certificate . . . . . . . . . . . . . . . . . . . . . . . . . . . . . . . . . . . . . 69
Disable or Remove Certificates. . . . . . . . . . . . . . . . . . . . . . . . . . . 69
About Bluetooth Communications . . . . . . . . . . . . . . . . . . . . . . . . . . . . . . . . . . . . . . 70
Connect a Bluetooth Device. . . . . . . . . . . . . . . . . . . . . . . . . . . . . . . . . . . . 70
Configure Bluetooth Settings . . . . . . . . . . . . . . . . . . . . . . . . . . . . . . . . . . . 71
Contents
vi
Rename or Disconnect a Paired Device. . . . . . . . . . . . . . . . . . . . . . . . . . . 72
About Serial and USB Communications . . . . . . . . . . . . . . . . . . . . . . . . . . . . . . . . . 72
About Near Field Communication (NFC). . . . . . . . . . . . . . . . . . . . . . . . . . . . . . . . . 72
7
Manage and Maintain the CT50 -Ex . . . . . . . . . . . . . . . . . . . . . . . . 75
How to Upgrade the System Software . . . . . . . . . . . . . . . . . . . . . . . . . . . . . . . . . . 76
How to Restart the Computer . . . . . . . . . . . . . . . . . . . . . . . . . . . . . . . . . . . . . . . . . 76
Reset the Computer . . . . . . . . . . . . . . . . . . . . . . . . . . . . . . . . . . . . . . . . . . 77
Clean Boot the Computer. . . . . . . . . . . . . . . . . . . . . . . . . . . . . . . . . . . . . . 78
Clean the Computer . . . . . . . . . . . . . . . . . . . . . . . . . . . . . . . . . . . . . . . . . . . . . . . . 79
A
Specifications. . . . . . . . . . . . . . . . . . . . . . . . . . . . . . . . . . . . . . . . . . . . . . . . . 81
Physical and Environmental Specifications. . . . . . . . . . . . . . . . . . . . . . . . . . . . . . . 82
Customer Support
viii
1
1
About the Computer Features
This chapter introduces the CT50 -Ex Mobile Computer with
the Android 6.0 operating system. Use this chapter to learn
about the
basic computer features, functions, and accessories.
2
C
hap
ter
1 About the Computer Features
About the
ecom
CT50 -Ex Mobile Computer
The ecom CT50 -Ex Mobile Computer is an enterprise-focused
smartphone that uses the Android operating system to provide reliable
and secure management of corporate data and wireless
communications. The CT50 -Ex offers key features such as a large
display, long-lasting battery, bar code imager, and rugged durability.
Throughout this manual, all versions of the mobile computer are
referred to as the CT50 -Ex unless information is specific to a particular
model.
The CT50 -Ex features:
Android 6.0 operating system
2 GB DRAM, 16 GB flash memory
Large, sunlight-readable display with responsive multi-touch screen
Glove operation touch screen
High performance 2D imager with ergonomic scan buttons
Software-definable LTE/UMTS for high speed data and quality voice
support across all network technologies
IEEE 802.11a/b/g/n (ac if supported) radio
Bluetooth 4.0 radio
NFC technology for short-range wireless data exchange
Value-added software components supporting specialized imaging
and OCR functions
Mid-tier rugged specifications with IP67 sealing
Customer-accessible microSD™ slot for removable memory cards
(up to 32 GB)
Integrated GPS receiver (with WWAN radio option)
8-megapixel color camera
Receiver Category 3 in accordance with EN 300 440-1
Chapter 1 — About the Com
puter Features
3
Front View of the CT50 -Ex
Chapter 1 — About the Computer Features
4
Top View of the CT50 -Ex
Chapter 1 — About the Computer Features
5
Back View of the CT50 -Ex
Camera
button
Camera lens
Battery door
latch
microSIM and microSD door
Battery
Chapter 1 — About the Computer Features
6
About the Battery
Charge the Battery
The computer uses a rechargeable 3.6 V Li-ion battery as its main
power source. The battery has a 14.6 watt hour capacity. Several
factors determine the life of your battery, such as display brightness,
display timeout, input device, extreme temperature, and your usage.
ecom recommends that you keep the battery charged at all times to
prevent data loss. When you change the battery, the computer
automatically goes into a power-off state and then cold boots.
Contact your local sales representative for replacement batteries.
Caution: The battery used in this device may present a fire or
chemical burn hazard if it is mistreated. Do not disassemble it,
heat it above 100 °C (212 °F), or incinerate it. Dispose of used
batteries promptly. Keep away from children.
Caution: Only the ex-battery pack AM CT50 -Ex is allowed to be used.
For more detailed information see the separate Safety Instructions.
Warning: The battery pack must not be removed or installed inside
the ex-hazardous area!
The battery may only be charged outside the ex-hazardous area.
For more detailed information please see the additional Safety
Instructions.
Chapter 1 — About the Computer Features
7
Charge Before Use
Make sure you fully charge the battery before you use your computer.
You can charge the battery before or after you install it in the computer. It
takes about 6 hours for the battery to fully charge in any of the
accessories
Insert the battery into a Quad Battery Charger or the battery well of
an eHomeBase.
or
Insert the computer with the battery
installed into an eHomeBase,
ChargeBase, NetBase, Quad Battery Charger, USB Adapter, or
Vehicle Power Adapter.
The battery may only be charged outside the ex-hazardous area!
Chapter 1 — About the Computer Features
8
Change the Battery
If your battery power is low, you need to either charge the battery in
the computer, or replace it with a charged battery. Only outside the
ex-hazardous area.
1 Save your files and close any open applications.
2 Press and hold the Power button. This screen appears:
3 Tap Power off. A screen appears informing you that the computer is
shutting down.
Chapter 1 — About the Computer Features
9
4 Disconnect the handstrap from the bottom of the computer.
5 Press and slide the battery door toward the bottom of the computer
to unlock the door.
Chapter 1 — About the Computer Features
10
6 Lift up on the edge of the battery and remove it from the computer.
7 Insert the charged battery into the computer.
8 Press in on the battery door and slide it into the locked position.
About the Battery Status Icon
Use the battery icon in the Status bar to see the power status of your
battery. The table below only includes some of the icons. If you want
more detailed information on your battery, such as usage time or charge
remaining on the battery, go to Settings > Battery.
Battery Status Icons
Icon Status
The battery charge is at 100%.
The battery charge is at 50%.
The battery is critically low. You need to replace the
battery now.
The computer is connected to external power and the
battery is charging.
There is a battery error. Install another battery. If the
problem persists, call Honeywell Technical Support.
Chapter 1 — About the Computer Features
11
The Battery status LED in the upper right corner of the computer
indicates the charging status of the battery. You can also use the Battery
status LED as a notification LED. For more information on how to use the
LED as a notification LED, see http://developer.android.com/guide/
topics/ui/notifiers/notifications.html.
Out-of-Box Battery Status LED (HSM Battery LED) Descriptions
Connected to
Power LED State Description
No Blinking amber Battery level is below 20%
No Off Battery level is more than 20%
Yes Steady amber Battery level is between 0% and 60%
Yes Blinking green Battery level is between 60% and 95%
Yes Steady green Battery level is above 95%
Either Blinking red Battery error
Chapter 1 — About the Computer Features
12
Change the Battery Status LED Behavior
You can change the behavior of the Battery status LED if the default
behavior for a charging battery (blinking green) is not acceptable to your
environment.
In addition to the out-of-box Battery status LED behavior, you can
choose:
Default Battery LED
No Battery LED
Use the Default Battery LED setting if you want the status LED to turn on
steady amber and then steady green when charging. Select the No
battery LED setting if you want to use the LED as a notification LED for
applications or device management solutions.
1 Tap All Apps > Settings > Battery LED.
2 Select one of these options:
Default Battery LED
HSM Battery LED (Out-of-Box setting)
No Battery LED
Default Battery LED Descriptions
Connected to
Power LED State Description
No Blinking red Battery level is below 15%
No Off Battery level is 15% or more
Yes Steady red Battery level is below 15%
Yes Steady amber Battery level is between 15% and 90%
Yes Steady green Battery level is 90% or more
Chapter 1 — About the Com
puter Features
13
Check the Battery Level
I
n addition to the Battery status icons and the Battery status LED, you
can get the battery status from the Settings app.
1 Tap All Apps > Settings .
2 Tap Battery. The current percentage of battery power remaining and
the amount of usage time left on the battery appear on the screen. A
list shows the battery usage for individual apps and services.
For usage details, tap one of the apps or services in the list.
About Battery Life and Conservation
If you store the batteries outside of the computer for long periods of
time, they slowly discharge. We recommend storing the battery in
a
charger to maintain battery performance.
Battery Conservation Tips
When You Want to: Do this to Save Battery Power:
Us
e the computer and
the low battery status
icon appears or the
battery light turns on.
Press and hold the Power button and then
select Power off from the menu. After the
computer turns off, remove the battery and
insert a fully charged battery.
Stop using the
computer for 5 minutes
or more.
Make sure that the low battery status icon is not
on the screen and that the battery status LED
is not on. Press the Power button to suspend
the computer.
Store the computer for
more than a day.
If you are storing the computer for a few
days (such as over the weekend), install a
charged battery or connect the computer to
a power source.
If you are storing the computer for a longer
period of time, remove and charge th
e
ba
ttery. When the battery is done charging,
store both the battery and the computer is
a
cool location.
If you store the battery for several months,
recharge the battery periodically to keep it at
peak performance.
Store the battery
outside of the
computer.
Store the batteries in a charger.
Chapter 1 — About the Computer Features
14
Battery Recommendations and Safety Precautions
Charge the battery before use. (only outside the ex-hazardous area)
Battery ships with a partial charge only.
See “Charge the Battery” on page 6 or in section 5 in the separate
Safety Instructions for approved charging methods.
Use of this battery in other devices could result in damage to the
device or battery.
Avoid dropping the battery or computer. If you suspect that the
battery or computer is damaged, send it to ecom instruments GmbH
for inspection.
Replace this battery only with the approved ecom battery pack
AM CT50 -Ex (only outside the ex-hazardous area).
Discarded batteries may create a safety hazard. Before disposal,
cover the battery contacts with electrical insulating tape.
Do not modify the battery or attempt to insert foreign objects into it.
Do not solder directly to the battery contacts.
Do not short circuit the battery, and keep it away from metallic items.
Do not drop the battery or apply mechanical shocks or pressure to it.
Do not disassemble or open, crush, bend or deform, puncture, shred
or burn the battery.
Do not immerse the battery in water or get the battery wet.
Enable Airplane Mode
If you do not need to connect to any wireless networks, you can enable
Airplane mode to turn off all the radios and save battery power.
1 Tap All Apps > Settings .
2 In the Wireless & Networks section, tap More.
3 Tap the toggle box to enable Airplane mode.
Chapter 1 — About the Computer Features
15
Power On the Computer
The first time you power on the computer, a Welcome screen appears.
Follow the prompts on the Welcome screen as the setup wizard has you:
set the default language.
set up the Wi-Fi network connections.
set the time, date, and time zone.
personalize (name) the computer.
After you have fully charged and installed a battery, power on the
computer for the first time:
Press and release the Power button.
Unlock the Screen
Every time you power on the computer
, you will need to unlock it.
Swipe up on the screen to unlock it.
Note: Once you complete the Setup Wizard, the Welcome screen no
longer appears when you power on the computer. You will now see the
Lock screen each time you power it on.
Chapter 1 — About the Computer Features
16
Set a PIN to Protect the Computer
After you start using the computer, you should set a PIN to secure apps
and data on the computer.
1 Tap All Apps > Settings > Security.
2 Tap Screen lock. You can choose between these screen lock
settings:
None
Swipe
Patter
n
PIN
Pa
ssword
3 Tap the screen lock of your choice and follow the screens to
configure it.
4 Exit the Settings app.
Use Gloves with the Touch Screen
You can use gloves, including leather, when operating the touch screen
o
n the computer. The gloves can be up to 2 mm (0.08 inches) thick. Use
this procedure to set the touch screen to “glove mode.
1 Press the flat part of the gloved finger to the touch screen.
You want to have approximately 13 mm (0.51 inch) surface area
touching the screen, almost as if taking a fingerprint.
2 Tap the screen subsequently to use it with your gloved hands.
3 Exit “glove mode” by tapping the screen with your bare finger.
Chapter 1 — About the Com
puter Features
17
About the Good Read LED
Th
e Good Read LED indicates the status of the scanner. For more
information on how to scan bar codes, see “Scan a Bar Code” on
page 44
.
Configure the Screen Backlight
Th
e display has an ambient light sensor that automatically adjusts the
ba
cklight intensity to conserve power and ensure the display is readable.
You can set the backlight intensity level as needed for your environment.
1 Tap All Apps > Settings .
2 Tap Display > Brightness level.
3 Tap Adaptive brightness to use the ambient light sensor to
automatically adjust the brightness for your work environment.
Or, adjust the slider to set the brightness level.
Good Read LED Descriptions
LED Color Description
Gr
een Good read of a bar code.
Blinking green The data collection engine is processing or starting up.
Chapter 1 — About the Computer Features
18
About the Audio Features
The CT50 -Ex has a speaker, a microphone, and several software
tools for configuring the volume
of sounds.
Adjust Ringtone and Notification Volume
You can quickly adjust the volume of ringtone and notification sounds by
using the side volume buttons.
1 Press one of the buttons on the right side of the computer. The
Volume slider appears at the top of the screen.
2 Press the volume buttons or adjust the slider to change the volume.
Note: Th
is method of adjusting the volume only affects the volume of
ringtone and notification sounds. To change the volume for other sounds,
open the Settings app and tap Sound > Volumes.
Chapter 1 — About the Computer Features
19
Enable Vibrate Mode
You can switch to Vibrate mode and disable the speaker if necessary for
your working environment.
3 Press and hold the Volume down button until the computer vibrates.
The vibrate mode icon appears in the upper left corner.
Chapter 1 — About the Computer Features
20
Audio Settings
This section describes the audio and sound settings you can configure in
the Settings app. To change audio settings, start the Settings app and
tap Sound & notification.
Audio and Sound Settings
Setting Description
Sound Use the sliders to set the volume for:
music, video, games, and other media.
alarms.
ringtone and notifications. You can also
use the side volume buttons to chang
e
th
e volume.
Do not disturb Select to set which notifications to let
through when you have Do not disturb
turned on and when you want to be left
alone.
Vibrate when ringing Select to enable vibrate mode when the
phone is ringing.
Default notification ringtone Select a notification sound.
Dial pad touch tones Select to enable audio tones when you use
the phone keypad.
Screen locking sound Select to enable an audio tone when the
screen is locked.
Charging sounds Select to enable an audio sound when the
computer is charging.
Touch sounds Select to enable audio sounds when you
use the touch screen.
Vibrate on touch Select to enable vibrate mode when you
touch the screen.
Emergency tone Select to set your emergency tone to Alert,
Vibrate, or Silent.
Chapter 1 — About the Com
puter Features
21
Insert a microSD Card
1 P
ower off the computer.
2 Disconnect the handstrap from the bottom of the computer.
You c
an use a microSD card to increase file storage capacity or to
install software. ecom recommends the use of Single Level Cell (SLC)
industrial grade microSD or microSDHC memory cards with the
computer for maximum performance and durability.
Note: Format the memory card before initial use.
Do not open the device inside the ex-hazardous area.
Chapter 1 — About the Computer Features
22
3 Press and slide the battery door toward the bottom of the computer
to unlock the door.
4 Lift up on the edge of the battery and remove it from the computer.
5 Press down on the SD card door and slide it toward the top of the
computer to open it.
Chapter 1 — About the Com
puter Features
23
6 I
nsert the microSD card into the door.
7 Press down on the SD card door and slide the door toward the
bottom of the computer to lock it.
8 Insert the battery into the computer.
9 Press in on the battery door and slide it into the locked position.
10 Replace the handstrap.
How to Transfer Files
1 Connect the CT50 -Ex to your PC.
You can transfer files between your desktop PC and the computer with
the HomeBase or USB adapter and a standard USB cable. When the
computer is connected through USB, you can browse to it and drag-and-
dr
op to move files back and forth to a Windows PC. If you are
transferring files to and from a Mac, use the Android File Transfer
application (available from www.android.com/filetransfer).
By default, the computer connects using MTP (Media Transfer Protocol).
If you are transferring mainly camera images, you can configure the
connection to use PTP (Picture Transfer Protocol). If your Windows PC
does not support MTP, you may be able to transfer files using PTP
instead.
Note: The CT50 -Ex supports
Hi-Speed USB communications (USB
2.0) with a maximum data transfer rate of 480 Mbps.
Chapter 1 — About the Computer Features
24
2 On the CT50 -Ex, swipe down from the top of the screen to see the
notifications.
3 Tap USB for charging.
4 Select either File transfers or Photo transfer (PTP).
5 Browse to the CT50 -Ex from your PC. You can now copy, delete, or
move files between the CT50 -Ex and your PC.
How to Browse Files on the Computer
You can use the File Browser application in Power Tools to browse the
files on the computer and the microSD card.
1 Touch All Apps > Power Tools > File Browser .
2 Touch a folder name or file name to open it.
Accessories for the Computer
Note: Due to system pe
rmissions, some files cannot be opened.
Depending on the associated application, a choice of applications may
be available to open the file.
The CT50 -Ex is shiped with a rechargeable ex-battery. All other
accessories are ordered and shipped s
eparately.
CT50 -Ex Accessories and Descriptions:
Please see separate accessories guide on www.ecom-ex.com
27
2
About the User Interface and
Applications
Use this chapter to learn about the Android user interface and
how to interac
t with the screen. You can also use this chapter
to learn about the applications on the computer.
Chapter 2 — About the User Interface and Applications
28
About the User Interface
The Android 6.0 operating s
ystem provides a touch-friendly and easy-
to-navigate user interface.
About the Home Screen
When you turn on the mobile computer, the Home screen is the first
screen that appears after language provisioning is complete.
Understand the Home Screen
Item Description
Notifications
panel / Status
bar
Status icons to the left tell you when an app has sent
notifications, such as an arriving message. System
icons to the right display the current wireless and
network connection state and battery level.
Search bar Search the internet or the computer using Google.
Favorites tray App icons in the tray are visible on the Home screen.
The All Apps icon is in the center of the Favorites tray.
Notifications pane
Status bar
Search bar
Favorites tray
Home screen
Chapter 2 — About the User Interface and Applications
29
Navigation and Function Buttons
There are navigation and function buttons below the Favorites tray on the
front panel of the computer.
About Status Bar Icons
Status and notification icons show you the current status of your
network, the battery, notifications, and sounds. Use this table to
understand some of the available status icons.
Navigation and Function Buttons
Button Description Function
Bac
k Takes you back to the previous
screen.
Recent Apps Lets you view and switch between
recently used apps.
Home Returns you to the Home screen
Search Starts a search on the computer or the
internet.
Volume Raises or lowers the volume of the
speaker.
Status and Notification Icons
Icon Description Icon Description
P
ending alarm and
Alarm is set
Vibrate mode is turned on
New text message or
multimedia message
Airplane mode is turned on.
Error with text or
multimedia message
delivery
Bluetooth is turned on.
New email SD card is full
Chapter 2 — About the User Interface and Applications
30
Remap a Button
You can change the default function of the Left Scan, Right Scan, or
Camera buttons as well as the Back, Recent, Home, and Search
function buttons.
1 Tap All Apps > Settings > Key remap.
2 Touch the button you want to remap.
3 Tap KEYS or APP to view the available functions.
4 Select the function you want to assign to the button. The function you
selected now appears under the button name.
Computer is connected
to a PC with a USB cable
Wi-Fi network connected
with full signal strength
Synchronizing data Wi-Fi network connected but
no signal strength
Error with sync or sign-in Phone connected with full
amount of bars.
Computer is connected
with Ethernet
Phone connected with full
amount of bars but no
internet connection.
Status and Notification Icons (continued)
Icon Description Icon Description
Chapter 2 — About the User Interface and Applications
31
View Notifications
You can view the notifications shade to see a list of events on the
computer.
To open the shade, swipe down from the top of the screen.
To close the shade, swipe up from the bottom of the screen, or tap
the Back or Home buttons.
Manage Notifications
When an app sends a notification to the computer, you can easily
respond to it.
1 When a notification icon appears, swipe down from the top of the
screen.
2 To respond to a notification, touch it. The associated app opens so
that you can respond.
To dismiss a notification, swipe it sideways.
Chapter 2 — About the User Interface and Applications
32
Customize the Home Screen
You can add application icons to any Home screen to access them more
easily.
1 Tap All Apps . The All Apps screen appears.
2 To add an app icon to a Home screen, touch and hold the icon for the
app, and then slide your finger to place the icon on one of the Home
screens.
To add a widget icon to a Home screen, press and hold your finger on
an empty part of the Home Screen until three options appear at the
bottom of the screen. Tap WIDGETS, scroll to select the widget you
want, tap and hold the icon for the widget, and then slide your finger
to place the widget icon on one of the Home screens.
3 To remove an app or widget from the Home screen, touch and hold
the icon and slide it over Remove at the top of the screen.
Customize the Favorites Tray
You can add application icons to the Favorites tray to access them more
easily.
1 Tap All Apps . The All Apps screen appears.
2 Tap and hold an icon in the Favorites tray, and slide it over
X Remove at the top of the screen.
3 To add an app or widget icon to the Favorites tray, touch and hold the
icon for the app or widget, and then slide your finger to place the icon
in the Favorites tray.
Use Google™ Search
Use the Google Search field at the top of the Home screen to help you
find anything you need on the computer or on the web.
1 At the top of any Home screen, tap Google to type your search term.
As you type, suggestions from Google web search appear below the
Search box, and results from the computer (such as apps or
contacts) appear below the web search results.
2 Tap a suggestion to search for it immediately, or touch its arrow just
to add the term to the search field without starting to search.
Chapter 2 — About the User Interface and Applications
33
About Screen Gestures
Use your fingers or the stylus to manipulate icons, buttons, menus, the
onscreen keyboard, and other items on the screen.
To select or activate something, tap it.
To type something, such as a name or password, touch where yo
u
w
ant to type. A keyboard appears that lets you type into the field.
Other common gestures include:
Tap or touch and hold: Touch and hold an item by touching it and
lifting your finger until an action occurs.
Drag: Touch and hold an item for a moment. Without lifting your
finger, move your finger on the screen until you reach the target
position. For example, you can drag to reposition shortcuts on th
e
Home
screen.
Swipe or slide: Quickly move your finger across the screen, without
pausing when you first touch. For example, you can slide a Home
screen left or right to view the other Home screens.
Double-tap: Tap quickly twice on a web page, map, or other screen to
zoom in. Double-tap again to zoom out.
Pinch: In some apps, you can zoom in and out by placing two finger
s
o
n the screen at once and pinching them together (to zoom out) or
spreading them apart (to zoom in).
Set the Time Zone
The computer gets the current date and time from its network
connection. You can manually set the time zone for your location.
1 Tap All Apps > Settings .
2 Tap Date & time.
3 Tap Select time zone and select the time zone for your location.
34
C
hapter 2 — About the User Interface and Applications
About Applications
Applications help you troubleshoot and connect your computer to other
devices and networks.
Many of the applications in this table are located
in the Power Tools folder. For more information on Power Tools, look
for Dolphin Power Tools on
www.honeywellaidc.com.
Applications Available on the Computer
Icon Application Description
Conf
igApps Provides a way to disable/enable apps
and uninstall updates.
AutoInstall
Settings
Use to automatically install packages,
APKs, and configure during the boot
sequence.
Configure
Autorun
Configure which applications you want
to run during the boot sequence.
Backup Backup and restore settings and user
data.
BattMon Monitor the charge status of the
battery.
Demo Use ScanDemo to demonstrate how
the scanner works. You can use it to
scan a bar code, set the symbologies
it scans, and determine the computer
response to a scanned bar code.
Diagnostic
Information
Use the DiagnosticInfo app to view
device information, Honeywell Apps,
Radio Information, Battery
Information, Memory Information, and
Scanner Information.
EZConfig Configure device and applications
efficiently with bar code and
configuration files.
File Browser Provides an efficient way to browse
files on the computer.
35
IPConfig Use IPConfig to view network adapter
information.
LogView Displays LogCat and Dmesg
information in real time.
Ping Use Ping to verify communication
links or to make sure a specific IP
address is working.
Route Use Route to view and edit the rules
that govern how packets destined for
various subnets are routed.
Wi-Fi Info Provides Wi-Fi information on the
computer.
C
hapter 2 — About the User Interface and Applications
Applications
Available on the Computer
Icon Application Description
Chapter 2 — About the User Interface and Applications
36
Unlock Developer Options
If you are a developer working with the computer, you can easily unlock
the Developer options. The Developer options allow you to easily test
and debug applications under development for the computer. After you
unlock the developer options, a link to Developer options appears in the
System menu.
1 Tap All Apps > Settings .
2 Tap About phone.
3 Tap Build number seven times. A popup message appears
informing you that you are now a developer.
37
3
About the Scanner
Use this chapter to understand how to scan bar codes and
how to configure the scanner.
Chapter 3 — About the Scanner
38
About the Scanner
The internal scanner can read 1D and 2D bar code symbologies,
composite symbologies, and postal codes. It also supports omni-
directional scanning for greater flexibility in real-world settings. The
image engine can also capture black and white images, such as
signatures and pictures of damaged inventory.
How to Scan Bar Codes as Keyboard Input
The scan wedge feature sends scanned bar code data to an active
application as Android keypad input. To scan a bar code as keyboard
input, open an application that accepts text input and then scan a bar
code. By default, scan wedging is enabled on the computer.
You can use applications that are coded to use the scanner or
applications that receive data through the scan wedge feature. If an
application claims the scanner through the BarcodeReader API, the
scan wedge feature is temporarily disabled. You can find information on
how to create custom applications for the computer in the
Software
Development Kit (SDK) available for download at
www.honeywellaidc.com.
Change the Scanner Settings
Changes you make to the Default profile apply to all applications with no
profile.
1 Tap All Apps > Settings ..
2 Tap Scanning.
3 Tap Internal Scanner > Default Profile.
4 Select Data Processing Settings, Symbology Settings, Decode
Settings, Imager Settings, Trigger Settings, or Notification Settings.
5 Modify the settings to meet your application needs.
Restore Default Scanner Settings
You can easily discard all changes you made to the Default profile and
restore the default values.
Note: When you select to restore the default values of one of the
settings, it also restores the default values of all settings within the
profile.
Chapter 3 — About the Scanner
39
6 Tap in the upper right corner of any of the scan settings screens.
7 Tap Restore all defaults.
Scanners Default Settings
Use these tables to understand the Data Processing Settings,
Symbology Settings, Imager Settings, Trigger Settings, and Notification
Settings.
Data Processing Settings
Use the Data Processing Settings to specify how bar code data is
processed by the computer.
Data Processing Settings
Setting Description Default
Wedge Enable or disable sending the bar code data as Android
KeyEvents when sending data to the active application.
The ENTER_DELAY command may be used to insert a
delay between barcodes when wedging the barcode
data into the keyboard buffer. More specifically, a delay
of ENTER_DELAY is inserted whenever the Wedge
encounters a carriage return, line feed, or tab key. Some
applications, such as Excel, may require additional
processing time when advancing to the next input field.
Without a delay, data may arrive faster than the
application can process the data. You can use the
POSTAMBLE command to add a line feed at the end of
each bar code. The units for ENTER_DELAY are
milliseconds. The default value is 200ms.
Customers set wedge mode configuration commands
using an exm file.
Enabled
Charset Select the character set to use when interpreting the bar
code data into a string. Options include:
ISO-8859-1
US-ASCII
UTF-16
UTF-16BE
UTF-16LE
UTF-8
Corresponds to BarcodeReader property:
PROPERTY_DATA_PROCESSOR_CHARSET
ISO-8859-1
Chapter 3 — About the Scanner
40
Prefix Defines the string added before the decoded bar code
data. Substitutions occur within the Prefix string values
as follows:
\r is replaced by 13
\n is replaced by 10
\t is replaced by 9
\\ is replaced by ‘\’
None
Suffix Defines the string added after the decoded bar code
data. Substitutions occur within the Suffix string values
as follows:
\r is replaced by 13
\n is replaced by 10
\t is replaced by 9
\\ is replaced by ‘\’
None
Wedge as Keys List of character values to wedge as keys, represented
as a comma-separated list of decimal values.
9,10
Data Editing Plugin Specify a Total Freedom data editing plug-in. None
Symbology Prefix Specify a symbology identifier prefix to the bar code
data. Options include:
None
Honeywell
AIM
None
Launch Browser Enable or disable URL bar code handling. If a bar code
starts with http:// or https://, the browser opens using the
bar code data as a URL.
Corresponds to BarcodeReader property:
PROPERTY_DATA_PROCESSOR_LAUNCH-
BROWSER
Enable
Data Processing Settings (continued)
Setting Description Default
Chapter 3 — About the Scanner
41
Symbology Settings
Use the Symbology Settings to enable and disable bar code
symbologies. Tap a symbology to view and modify the symbology
configuration parameters.
Scan to Intent Enable or disable special handling of scan-to-intent bar
codes. Applies to bar codes in one of the following
formats:
‘//’ ACTION
‘//’ ACTION '$' extra-data
Where:
ACTION and extra-data are any string of characters.
Launches an application listening for the intent:
Intent action: “com.honeywell.scantointent.intent.action.
+ A
CTION
Intent extra
“com.honeywell.scantointent.intent.extra.DATA” contains
the remainder of the bar code data after the first ‘$’
character.
Corresponds to BarcodeReader property:
PROPERTY_DATA_PROCESSOR_SCAN_TO_INTENT
Enabled
Launch EZ Config Enable or disable special handling of EZConfig bar
codes. Applies to EZConfig bar codes, which are
encoded with the Aztec symbology and containing
specific header data.
Corresponds to BarcodeReader property:
PROPERTY_DATA_PROCESSOR_LAUNCH_EZ_
CONFIG
Enabled
Data Processing Settings (continued)
Setting Description Default
Symbology Settings
Setting Default
Code 128 Enabled
GS1-128 Enabled
Code 39 Enabled
Datamatrix Enabled
UPC-A Enabled
Chapter 3 — About the Scanner
42
UPC-E Disabled
EAN-8 Disabled
EAN-13 Enabled
Aztec Enabled
China Post Disabled
Codabar Enabled
Codablock A Disabled
Codablock F Disabled
Code 11 Disabled
Code 93 Disabled
Composite Disabled
GS1 Databar Disabled
Han Xin Disabled
IATA 2 of 5 Disabled
Interleaved 2 of 5 Enabled
Korean Post Disabled
Matrix 2 of 5 Disabled
Maxicode Disabled
Micro PDF 417 Disabled
MSI Disabled
PDF 417 Disabled
QR Code Disabled
Standard 2 of 5 Disabled
Telepen Disabled
TLC 39 Disabled
Trioptic Disabled
2D Postal Settings Disabled
OCR Disabled
Symbology Settings (continued)
Setting Default
Chapter 3 — About the Scanner
43
Imager Settings
You should not need to modify the Imager Settings. The Override
Recommended Values setting is disabled by default. The recommended
Imager Settings are designed to work in a wide range of environments
and should only be modified if you have an advanced understanding of
imagers.
Trigger Settings
Use the Trigger Settings to configure how the scan buttons work.
Notification Settings
Use the Notification Settings to configure how your computer responds
when you scan a bar code.
Decode Settings
Use the Decode Settings to scan bar codes that are densely packed.
When enabled, the scanner will only decode a bar code is part of it is at
the center of the aimer. Although you can adjust the Window
dimensions,
we recommend leaving the settings at 50 to define the
“center” area for the bar code.
Decode Settings
Setting Description Default
Center D
ecode Enables the ability for the scanner to
scan only the bar code at the center of
the aimer.
Disabled
Trigger Settings
Setting Description Default
Decode
Timeout Scanning automatically turns off after this
number of seconds if the scan trigger is
pressed and nothing has successfully
decoded.
20
Chapter 3 — About the Scanner
44
Scan a Bar Code
The scanner has an aiming beam to help you correctly frame bar codes.
It also supports omni-directional (360°) scanning to make it easier for
you to scan bar codes.
1 Tap All Apps > Demos > ScanDemo.
2 Point the scanner window at the bar code and hold the computer
steady a few inches from the label.
Notification Settings
Setting Description Default
Good Read Notification Enables or disables a good read notification.
The notification consists of a green blink of the
Good Read LED, a short beep, and an optional
short vibration.
Enabled
Bad Read Notification Enables or disables notification of a failed scan.
The notification consists of a red blink of the
Good Read LED, an error beep, and an optional
short vibration.
Disabled
Vibrate Enabled Enables or disables whether the computer
vibrates when there is a good or bad read.
Disabled
Note: Before you start scanning bar codes, use the Settings app to
enable only the bar code symbologies that you need.
Chapter 3 — About the Scanner
4
5
3 Pr
ess one of the Scan buttons or press Scan on the touch screen.
Make sure the entire bar code is inside of the illumination frame.
When the scanner successfully reads a bar code, you hear a high
beep and the Good Read LED turns on briefly.
Chapter 3 — About the Scanner
46
47
4
Use the Phone
You can use the phone feature to make and receive phone calls
as well as transmit data through wireless wide-area networks
(WWANs).
Chapter 4 — Use the Phone
48
About the Phone
Phone features on the computer include a speaker and a microphone.
You can also use a Bluetooth headset or hands-free kit. The phone
feature is enabled by default.
The WWAN radio in your computer determines the supported network
types:
After you turn on the phone and activate service with your wireless
carrier, you can customize the phone features and network settings in
the Wireless & Networks section of the Settings app.
Activate the UMTS Phone
Activating the UMTS phone (WWAN-versions) on your CT50 -Ex is
done the same way whether your computer has the UMTS/HSPA
+WAN radio.
You use a SIM card to activate the UMTS phone on the CT50 -Ex. You
can purchase the SIM card from your network provider.
Do not open the device inside the ex-hazardous area.
1 Power off the computer.
2 Disconnect the handstrap from the bottom of the computer.
3 Press and slide the battery door toward the bottom of the computer
to unlock the door.
4 Lift up on the edge of the battery and remove it from the computer.
Note: Both WWAN radios support Network Information and Time Zone
(NITZ) messages to automatically set the system time.
Chapter 4 — Use the Phone
49
5 Lift up on the SIM and MicroSD door.
6 Press down and slide the SIM door toward the top of the computer to
open it.
Chapter 4 — Use the Phone
50
7 Insert the SIM card in the door.
8 Close the SIM card door and slide it toward the bottom of the
computer to secure it.
9 Replace the battery, reconnect the handstrap, and press the Power
button to turn on the computer. The phone is now ready to use.
Chapter 4 — Use the Phone
5
1
Make a Phone Call
Once the phone is activated, you can make a phone call.
1 On the Home or All Apps screen, tap .
If the Phone app opens to a list of numbers instead of the keypad,
swipe left or touch to return to the keypad.
2 Touch the keys to enter the number, and then touch below the
keypad to dial.
3 To end a call in progress, tap .
Chapter 4 — Use the Phone
52
Answer the Phone
When you receive a phone call, the Incoming Call screen opens,
showing the caller ID. All incoming calls are recorded in the Call log. If
you miss a call, you receive a notification.
When a call arrives, touch the white phone icon and slide over one of the
icons:
To answer the call:
To send the call to voicemail:
To send a message from a list of default text messages:
Switch Apps During a Phone Call
You can switch apps while a phone call is in progress. For example, you
can use the People app to look up contact information during your call.
During a phone call, tap another app icon on the Home or All Apps
screen to run that application. The green Phone icon appears in the
Status bar while the call is underway.
Check Your Voicemail
When you have a new voicemail message, the voicemail icon appears at
the top left of the screen.
1 Swipe down from the top of the screen to view your notifications. The
voicemail notification shows the number of unread messages and a
number to dial.
2 Touch New voicemail. The phone dials the number. Follow the
instructions to retrieve your messages.
Note: If you have only a WWAN connections, apps that need a data
connection may be unable to access online data while the phone call is
in progress. If simultaneous phone calls and stat connections are not
possible due to provider limitations, voice calls receive priority. Check
with your provider for more information.
Note: Consult your service provider for more information on setting up
your voicemail account.
Chapter 4 — Use the Phone
53
Set Your Voicemail Number
To access your voicemail, you must set your voicemail number in the
Phone app.
1 Tap .
2 Tap and then tap Settings. A list of call settings appears.
3 Tap Voicemail > Setup > Voicemail number.
If you are an AT&T customer, enter your voicemail number.
4 Tap OK.
Change Voicemail Settings
1 Tap on a Home or All Apps screen.
2 Tap and then tap Settings.
3 Tap Calls > Voicemail.
4 Tap the voicemail setting you want to change.
Make an Emergency Phone Call
You can use the phone to make an emergency phone c
all, even if the
SIM card is missing from your UMTS phone. In either case, the phone
shows that you have no service. However, if you dial certain emergency
numbers (such as 112, 911, 000, 08, 118, 119, or 999) the call will go
through.
Note: Th
is procedure does not apply if you are a Verizon customer.
Chapter 4 — Use the Phone
54
Switch Between Network Carriers
If you have a service plan (and a SIM card if required) for a carrier other
than your current provider, you can easily switch between network
carriers with the Carrier Selection app.
1 Tap All Apps > Carrier Selection.
2 Select a carrier from the list and tap APPLY SETTINGS.
Configure Phone Settings
You can customize settings for the phone, including the ringtone,
v
oicemail options, keypad tones, internet call settings, and other options.
1 Tap .
2 Tap and then tap Settings. The Call settings menu appears.
3 Change phone settings as necessary.
55
5
Use the Camera
Use this chapter to learn how to take pictures and record videos
with the color camera.
Chapter 5 — Use the Camera
56
About the Color Camera
The CT50 -Ex contains an 8-megapixel color camera for taking p
ictures
and videos. The camera and flash are located on the back of the
computer.
Use the Photos app
to view photos and videos stored on the CT50 -Ex.
Adjust the Camera and Video Settings
The camera and video settings are adjustable from within the Camera
app.
How to Zoom
The camera zoom is controlled using a pinching motion on the touch
screen. Place two fingers on the screen at the same time, and then:
spread them apart to zoom in (enlarge and object).
pinch them together to zoom out.
Change Camera Settings
You can change the camera settings for best results when taking
pictures.
1 Press the Camera button or tap All Apps and then tap Camera
.
2 Tap to view the options for the camera.
3 Tap one of the icons to change basic camera settings.
Timer: Set the amount of time from when you tap the Camera
icon until it takes a photo. Options for the timer are 3 seconds or
10 seconds.
Grid: Turn on a grid to help frame your photos. Options for the
grid are enabled or disabled.
HDR: When HDR is enabled, the computer automatically
captures multiple photos and combines them into one photo
creating the best quality image possible. Options for HDR are
enabled or disabled.
Flash: Turn on the flash and take photos in low light conditions.
Options for flash are on, off, and automatic.
Chapter 5 — Use the Camera
57
Take a Photo
1 Press the Camera button or tap All Apps and then tap Camera .
2 Using the screen as a viewfinder, move the computer until you see
the image you want to capture.
3 Tap the screen to set the focus. By default, the camera senses the
lighting in the environment and turns the torch on if needed.
4 Press the Camera button or tap to take a photo.
To view the picture, swipe the screen to the left.
To return to the Camera app, swipe the screen to the right.
Record a Video
This section explains how to record video with the camera in the
comp
uter.
1 Press the Camera button or tap All Apps and then tap Camera .
2 Swipe the screen to the right until the camera options appear in the
left column.
3 Tap to select video.
4 Tap to begin recording video. To zoom in or out, pinch or spread
your fingers apart.
5 When you are done recording, tap .
Change Video Settings
You can change the video settings for best results when recording video.
1 Press the Camera
button or tap All Apps and then tap Camera .
2 Tap .
3 Tap to view the options for video.
4 Tap the grid or the flash icon to turn the option on or off.
Chapter 5 — Use the Camera
58
59
6
Configure the Computer
Use this chapter to learn how to configure the computer. You will
also find information on how to configure network
communications and wireless security.
Chapter 6 — Configure the Computer
60
How to Configure the Computer
You can configure many parameters on the computer such as the
bar code symbologies it decodes, or the network settings. The values
you set for these parameters determine how the computer operates.
You configure the computer using the Settings app.
Start the Settings App
The Settings app is located in the All Apps menu.
Tap All Apps > Settings .
Chapter 6 — Configure the Computer
61
About the Structure of the Settings App
Use this section to learn about the structure of the Settings app so you
can find parameters quickly.
Wireless & Networks
Setting Description
Wi-Fi Turns the Wi-Fi radio on and off. When Wi-Fi is turned
on, tap the bar to see a list of Wi-Fi networks.
Bluetooth Turns the Bluetooth radio on and off. when bluetooth is
turned on, tap the bar to see a list of Bluetooth devices
in range.
Ethernet Turns Ethernet on and off. When Ethernet is turned
on, you can change the Ethernet settings and set up a
proxy.
Data usage Displays a list of phone data usage for the current data
usage cycle. Tap the Data usage cycle list to select
another date range.
More... Airplane mode: Turns airplane mode on and off.
NFC: Turns on NFC which allows data exchange when
the computer touches another device.
Android Beam: When NFC is enabled, this feature lets
you beam app content to another NFC-capable device
by holding the devices close together. The app
determines what content gets beamed.
VPN: Sets the password parameters for a virtual
private network (VPN).
Select Default ISO-DEP route: Determines whether
the computer uses the host device or embedded
secure elements for the card emulation mode.
Mobile networks: Includes settings for mobile
networks, including enabling data access and roaming
over mobile networks, selecting access points and
network operators, or selecting only 2G networks (to
save battery life).
Mobile plan: Provides information on your cell phone
plan.
Cell broadcasts: Sets what emergency information you
want to receive and how you want to receive it.
Chapter 6 — Configure the Computer
62
De
vice
Setting Description
Disp
lay Settings for the brightness, wallpaper, sleep, press
Power button for camera, daydream, font size, and
when to rotate the screen.
Sound &
notification
Settings for the phone and notification sounds,
including tones and volume.
Apps Lists downloaded and running apps.
Storage & USB Shows the remaining amount of storage.
Battery Shows battery usage data and the current battery
state.
Memory Shows the average memory use and the memory
used by apps.
Users Shows the users of the computer. You can easily add a
user or profile.
Tap & pay If NFC is enabled, you can use this option to select
your preferred payment app.
Personal
Setting Description
Location Turns location services (Google and GPS
satellite data) on and off.
Security Sets screen lock and administrator privileges.
Accounts
Adds a Corporate or Email account to the CT50 -Ex.
Google Sets up your Google accounts and services.
Language & input Selects the active language and default
keyboard. Sets auto-typing features such as
capitalization and punctuation. Adjusts the
pointer speed for an external mouse or trackpad.
Backup & reset Restores factory default settings.
Chapter 6 — Configure the Computer
63
Honeywell Settings
Setting Description
Key remap Remaps the Left Scan, Right Scan, and Camera
buttons. You can also remap the Back, Recent, Home,
and Search function buttons. For help, see “Remap a
Button” on page 30.
Smart sensors Configures the integrated motion detection sensors for
advanced power management.
Battery LED Configures the battery LED behavior.
Battery Monitor View the battery charge and battery information such
as serial number and internal temperature.
Logger Activates a logging service that creates an Android
logcat log and kernel log for APP and system
troubleshooting.
Scanning Configures the computer imager. For help, see
“Change the Scanner Settings” on page 38
.
Web
applications
Enables the web interface settings and lets you set a
port.
System
Setting Description
Date & time Configures all date and time settings
Accessibility Sets accessibility levels, such as larger display text
and enabling text-to-speech output.
Printing Configure the printing options.
Developer options Enables developer-specific options such as USB
debugging and SD card protection.
About phone Provides information about your phone settings.
Chapter 6 — Configure the Computer
64
About Network Communications
You can use the mobile computer in your wireless or wired data
collection network. You can connect your computer using:
802.11 radio communications.
Ethernet communications.
Bluetooth communications.
USB and serial communications.
Connect to a Wi-Fi Network
The computer has an 802.11 radio to transfer data using wireless
communications. Before you connect to a Wi-Fi network, you need to
know about your network security protocol and its required credentials.
By default, the 802.11 radio is disabled.
1 Tap All Apps > Settings > Wi-Fi.
2 Slide the Wi-Fi switch to On.
A list of discovered networks appears.
Chapter 6 — Configure the Computer
65
3 (Optional) To search for a network not in the list, tap , tap Add
network, type the network name, and then tap SAVE.
4 Tap a network name in the list to view details:
If the network is secured, a list of required information appears (such
as a certificate name, a password, or other credentials). To connect
to the secured network, enter the required information and tap
CONNECT.
To leave a connected network, tap FORGET. For example, y
ou
cou
ld choose to forget a network you no longer use.
To close the network details screen, tap CANCEL.
Configure Proxy Settings for a Wi-Fi Network
If you need to connect to network resources through a proxy server, you
can configure settings for the proxy server for each Wi-Fi network you
add. By default, the Wi-Fi networks you add are not configured to
connect through a proxy server.
Chapter 6 — Configure the Computer
66
1 Tap All Apps > Settings > Wi-Fi. The list of available Wi-Fi
networks appears.
2 Tap and hold the name of a connected network and then tap Modify
network.
3 Tap Advanced options.
4 If the network has no proxy settings, tap None in the Proxy Settings
list, and then tap Manual in that list.
5 Enter the proxy settings for the network.
6 Tap Save.
Disable Wi-Fi Notifications
By default, when Wi-Fi is enabled, you receive notifications in the Status
bar when the computer discovers a wireless network. You can disable
these notifications.
1 Tap All Apps > Settings > Wi-Fi.
2 Tap and then tap Advanced. The Advanced Wi-Fi menu appears.
3 Tap the Network notification slider to disable notifications.
Connect to an Ethernet Network
To connect the computer to an Ethernet network, you need an Ethernet
dock.
1 Make sure the dock is connected to your Ethernet network.
2 Place the computer in the dock.
3 Tap All Apps > Settings > Ethernet and make sure that
the Ethernet slider is in the On position (Ethernet is enabled by
default).
When the switch turns blue, Ethernet is enabled.
4 Tap Ethernet Settings. The Ethernet list shows the name of the
current Ethernet connection. By default, the computer assumes a
DHCP connection, and that your network has assigned an IP
address automatically. If DHCP is working, the Ethernet dock should
indicate that communication with the network is occurring.
Note: Proxy settings apply only to the Wi-Fi network you modify. You
must change proxy settings for each network requiring a proxy server.
Chapter 6 — Configure the Computer
67
5 (Optional) To assign a static IP address, tap the connection name (for
example, eth0). The IP settings dialog box appears.
a Tap DHCP and then select Static from the list.
b Enter the required network information and then tap Apply.
How to Connect to Virtual Private Networks
The computer supports connecting to virtual private networks (VPNs).
This section describes how to add and connect to VPNs. To configure
VPN access, you must obtain details from your network administrator.
You view and change VPN settings in the Settings app.
Add a VPN
Before you can connect to a VPN, you must add VPN information.
1 Tap All Apps > Settings .
2 In the Wireless & Networks section, tap More.
3 Tap VPN.
4 Tap + to open the Edit VPN profile screen.
5 Enter information for the VPN.
6 Tap Save. The VPN name appears in the VPN list.
Connect to a VPN
1 Tap All Apps > Settings .
2 In the Wireless & Networks section, tap More.
3 Tap VPN.
4 Tap the name of the VPN in the list, and enter any necessary
credentials when prompted.
5 Tap Connect. The computer connects to the VPN, and a Status
icon
and notification appear.
To disconnect from the VPN, tap the notification.
Note: Before you can access VPNs, you need to set a lock screen PIN or
password.
Chapter 6 — Configure the Computer
68
About Wireless Security
The computer provides these security solutions for your wireless
network:
Wi-Fi Protected Access 2 (WPA2™)
Wi-Fi Protected Access (WPA)
802.1x
LEAP
WEP
Honeywell recommends WPA2 security with PSK (Personal) or 802.1x
(Enterprise) key management.
Before you set security, you need to enable the radio, set the date, and
set the SSID on your computer. To use 802.1x security, you need to load
a root certificate on your computer. To use transport layer security (TLS)
with 802.1x security, you also need to load a user certificate.
Use the Settings app to access and configure all wireless security
settings.
About Certificates
You can use digital certificates to identify the computer for network
access or authentication to servers. To use a certificate to identify your
device, you must install it in the trusted credential storage on the
computer.
Android supports DER-encoded X.509 certificates saved in files with a
.crt or .cer file extension. To install a valid certificate with a .der or it.
Android also supports X.509 certificates saved in PKCS#12 key store
files with a .p12 or .pfx entension. To install a valid key store file with
another extension, you must change the extension to .p12 or .pfx to
install it. When you install a certificate from a PKCS#12 key store,
Android also installs any accompanying private key or certificate
authority certificates.
Chapter 6 — Configure the Computer
69
Load a Certificate
To use a certificate, you must install it in the trusted credential storage on
the computer.
1 Copy the certificate or key store from your PC to a microSD card.
2 Install the microSD card in the computer and turn the computer on.
3 Start the Settings app and tap Security > Install from SD card.
4 Tap the name of the certificate or key store to install it. If prompted,
enter the key store password and tap OK.
5 Enter a name for the certificate and tap OK.
Disable or Remove Certificates
If a certificate is compromised, or your organization chooses not to trust
it, you can disable or remove it.
1 Start the Settings app and tap Security > Trusted credentials. The
trusted credentials screen has two tabs:
•System shows CA certificates that are installed in the ROM.
•User shows CA certificates you have installed yourself.
2 Tap the name of the certificate to disable or remove. The certificate
details screen appears.
3 Scroll to the bottom of the details screen and tap Disable (for System
certificates) or Remove (for User certificates).
If necessary, you can enable a disabled System certificate from this
location. If you remove a User certificate, you must install it again to
enable it.
4 Tap OK.
Note: Apps such as Email and Browser that support certificates allow
you to install certificates directly from within the app. For more
information, see the Help that comes with the app.
Chapter 6 — Configure the Computer
70
About Bluetooth Communications
The computer is Bluetooth-enabled, which lets you connect to other
Bluetooth devices.
You need to turn on the Bluetooth radio before you can discover and
connect to Bluetooth devices. By default, the radio is turned off.
The Bluetooth radio maintains its current state through a system reset. If
you perform a factory data reset, you must recreate pairings to devices.
The System bar icons indicate Bluetooth status.
Connect a Bluetooth Device
To connect to a Bluetooth device, you must enable Bluetooth and then
select the device from a list of discovered devices.
1 Tap All Apps > Settings > Bluetooth.
2 If Bluetooth is off, slide the Bluetooth switch on. A list of available
Bluetooth devices appears.
76


Need help? Post your question in this forum.

Forumrules


Report abuse

Libble takes abuse of its services very seriously. We're committed to dealing with such abuse according to the laws in your country of residence. When you submit a report, we'll investigate it and take the appropriate action. We'll get back to you only if we require additional details or have more information to share.

Product:

For example, Anti-Semitic content, racist content, or material that could result in a violent physical act.

For example, a credit card number, a personal identification number, or an unlisted home address. Note that email addresses and full names are not considered private information.

Forumrules

To achieve meaningful questions, we apply the following rules:

Register

Register getting emails for Ecom CT50 -Ex - Android at:


You will receive an email to register for one or both of the options.


Get your user manual by e-mail

Enter your email address to receive the manual of Ecom CT50 -Ex - Android in the language / languages: English as an attachment in your email.

The manual is 13,12 mb in size.


You will receive the manual in your email within minutes. If you have not received an email, then probably have entered the wrong email address or your mailbox is too full. In addition, it may be that your ISP may have a maximum size for emails to receive.

The manual is sent by email. Check your email

If you have not received an email with the manual within fifteen minutes, it may be that you have a entered a wrong email address or that your ISP has set a maximum size to receive email that is smaller than the size of the manual.

The email address you have provided is not correct.

Please check the email address and correct it.

Your question is posted on this page

Would you like to receive an email when new answers and questions are posted? Please enter your email address.


Info