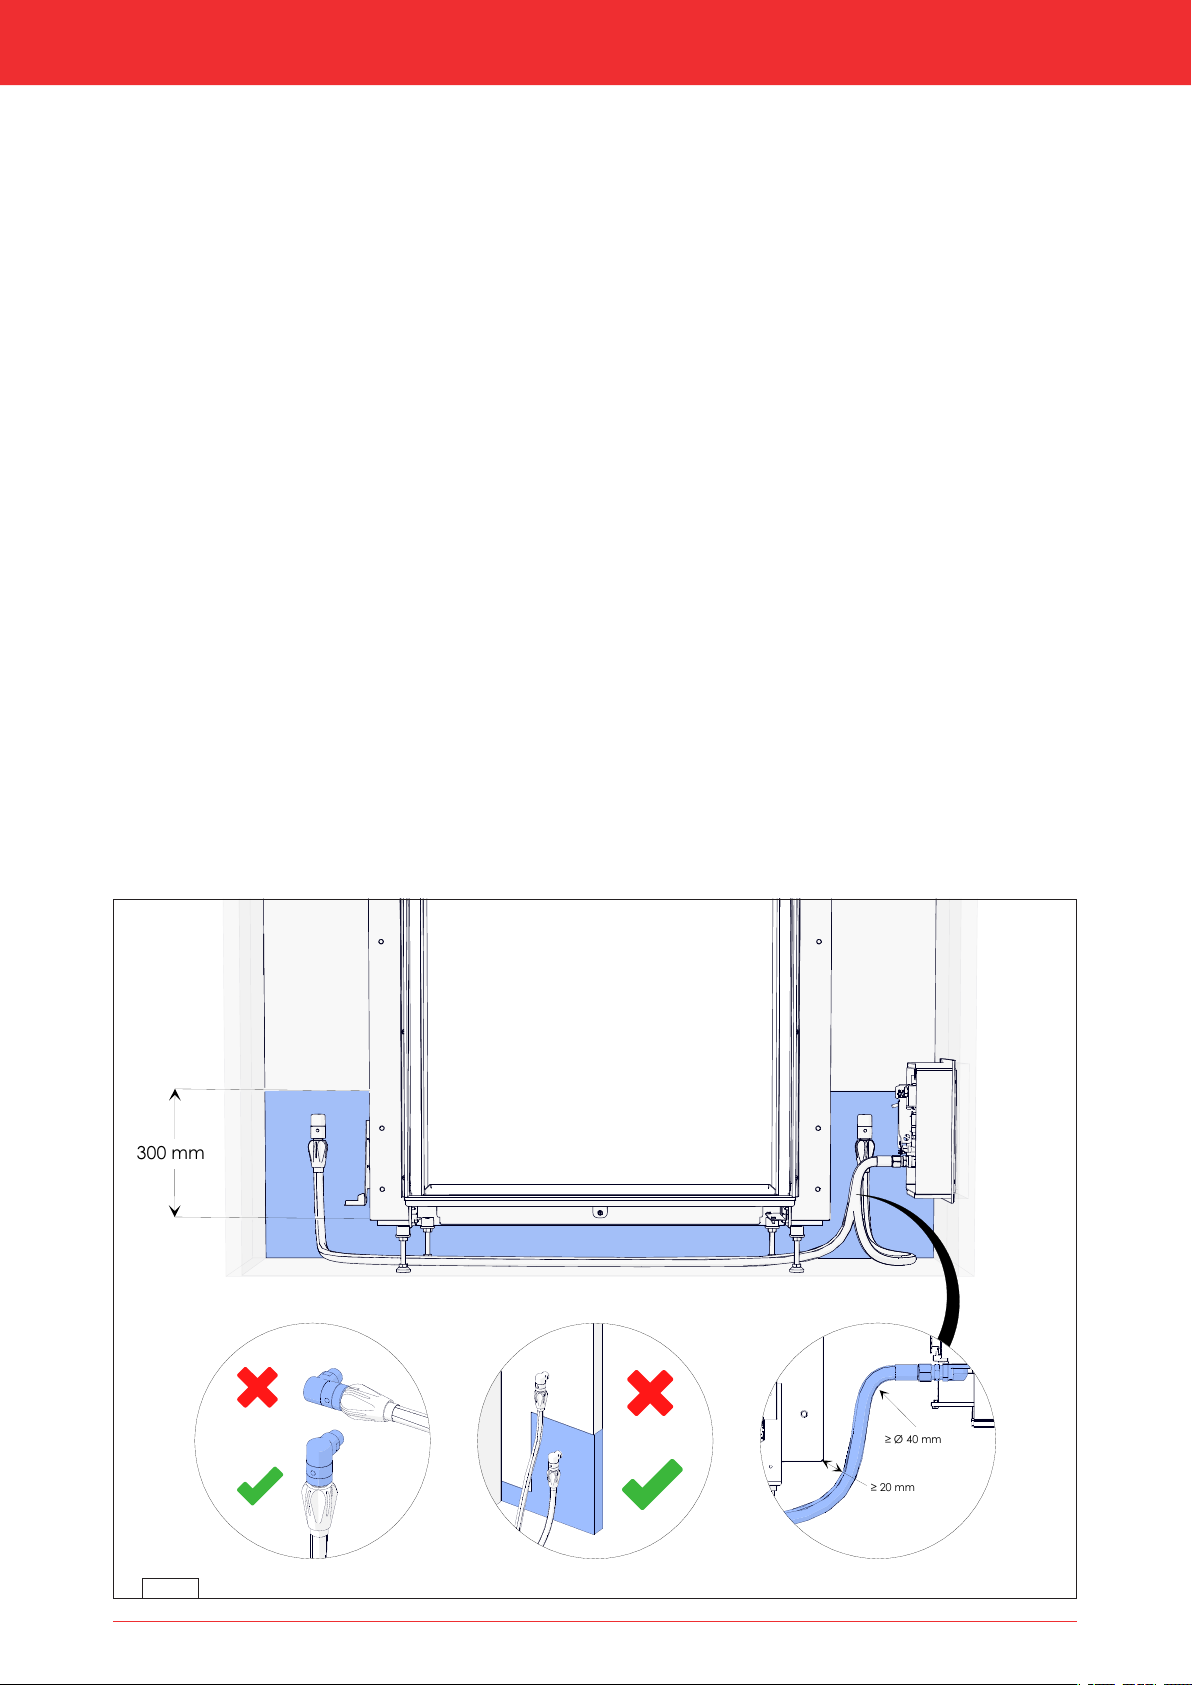
Installation manual96.3.1 Gas hose for gas connectionIn many cases, an EN14800-compliant gas hose for a gas connection can be ordered together with the appliance. The gas hose is mounted to the appliance and has been checked for leak-tightness. This gas hose is available in different lengths.3Take the following into account when installing the gas connection and the appliance (see fig. 6-1):-The gas connection must always be accessible to be able to shut off the gas supply.-The gas connection may only be mounted vertically, so that the gas hose can be connected vertically at the bottom.-The gas connection is permitted in a zone (blue hatched area in fig. 6-1). To the left and right of the appliance to a height of 30 cm above the bottom side of the appliance (the bottom side is the end of the adjustable feet holder, without the feet). Under the appliance in the area between the legs.-The gas connection and gas hose should not be placed behind the appliance.-The gas hose may not get above the bottom side of the appliance (the bottom side is the end of the foot without the adjustable feet)-The minimum bend radius of the hose is 40 mm.-The hose should be placed as low as possible, must have a minimum distance from the appliance of 20 mm and, if possible, should not be placed under the burner.-The entrance of the gas control in which the hose is mounted faces the appliance. Due to the bend radius, the chimney breast width becomes larger on the side of the control hatch. The minimal depth of the control hatch is 270 mm.6.4 Electric connectionIn case of an electrical connection of 230 Volts, always provide sufficient earthing. Place this electrical connection away from the appliance, as low as possible in the chimney breast. Make sure the electrical connection is within reach. This has to do with the temperature development in the chimney breast.3Make sure that it is easy to disconnect the appliance from the power supply after installation: By disconnecting the plug or by means of a 2-core switch installed by a recognised installer in accordance with current regulations.3-Protect the gas control and electric components, hereafter referred to as the gas control, against building dust and moisture!-In the case of appliances made with the CM system®, observe the instructions in the supplied manual for connecting the receiver and control panel.
Libble takes abuse of its services very seriously. We're committed to dealing with such abuse according to the laws in your country of residence. When you submit a report, we'll investigate it and take the appropriate action. We'll get back to you only if we require additional details or have more information to share.
Product:
Forumrules
To achieve meaningful questions, we apply the following rules:
First, read the manual;
Check if your question has been asked previously;
Try to ask your question as clearly as possible;
Did you already try to solve the problem? Please mention this;
Is your problem solved by a visitor then let him/her know in this forum;
To give a response to a question or answer, do not use this form but click on the button 'reply to this question';
Your question will be posted here and emailed to our subscribers. Therefore, avoid filling in personal details.
Register
Register getting emails for DRU Maestro 80-3 RCH at:
new questions and answers
new manuals
You will receive an email to register for one or both of the options.
Get your user manual by e-mail
Enter your email address to receive the manual of DRU Maestro 80-3 RCH in the language / languages: English as an attachment in your email.
The manual is 7.09 mb in size.
You will receive the manual in your email within minutes. If you have not received an email, then probably have entered the wrong email address or your mailbox is too full. In addition, it may be that your ISP may have a maximum size for emails to receive.
If you have not received an email with the manual within fifteen minutes, it may be that you have a entered a wrong email address or that your ISP has set a maximum size to receive email that is smaller than the size of the manual.
The email address you have provided is not correct.
Please check the email address and correct it.
Your question is posted on this page
Would you like to receive an email when new answers and questions are posted? Please enter your email address.