EN
47 VP8336
A
1.Slotnozzle
The is are
pedestals,spacesbetweenupholstery
2.Upholst er yno zzle
T hisupholst er yno zzlea ttachmen tma ybeusedf orsmallerupholst er edar eas .
USING THE APLIANCE
B ef or e using the applianc e , mak e sur e tha t lt ers and the dust c ollec tion bag ar e pr operly positioned and moun t ed .
Un wind the supply cable length y ou need . T he y ello w mark on the supply cable indica t es the optimum cable length. D o
notun windthesupplycablebey ondther edmark!
1.I nser ttheplugin t otheelec tricv oltagesock et .
2.P r esstheON/OFFswit chontheapplianc e .
3.S etupthesuc tionpo w ery ouneedusingtheoutputpo w erc on tr ol .
4.A f t er y ou ha v est oppedv acuuming ,swit chtheapplianc eoanddisc onnec titfr omtheelec tricv oltageoutlet .
5. F or winding up the supply cable , pr ess the winding butt on with one hand and hold the supply cable with the other
handt oa v oidunc on tr olledmo v emen t .
OPER A TING M ANU AL – ASSEMBL Y OF THE V A CUUM CLEANER
NO TE
B ef or exingorr emo vingac c essories ,alw a y spulltheplugoutoftheelec tricalsock et!
1.C onnec tingthee xiblehoset otheapplianc e
I nser tthee xiblehosein t otheapplianc e‘ sairsuc tioninlet .
C on tinue pushing un til y ou hear a click ing sound , which indica t es tha t the c orr ec t
positionhasbeenr eached .
F or r emo ving the e xible hose , pr ess both st opper butt ons and r emo v e the hose
(F ig .1).
T hesuc tionpo w erma ybec on tr olledmanuallyonthehosehandle .
Whentheslidethrottleisclosed,theairo
Slidethrottleinopenposition-weakerairo
2.Attachingthetelescopictubetothehoseadapt
Putthetelescopictubeonthehoseadapt
3.Extendingthetelescopictube
Presstheplasticlat
4.Fixingtheoorattachmen
Insertthetelescopictubeintotheoorattachmentandturnitslightly
The
oors),ortosmoothvacuuming(forcarpets).
(F ig .1)
(F ig .2)
A C CESSORIES
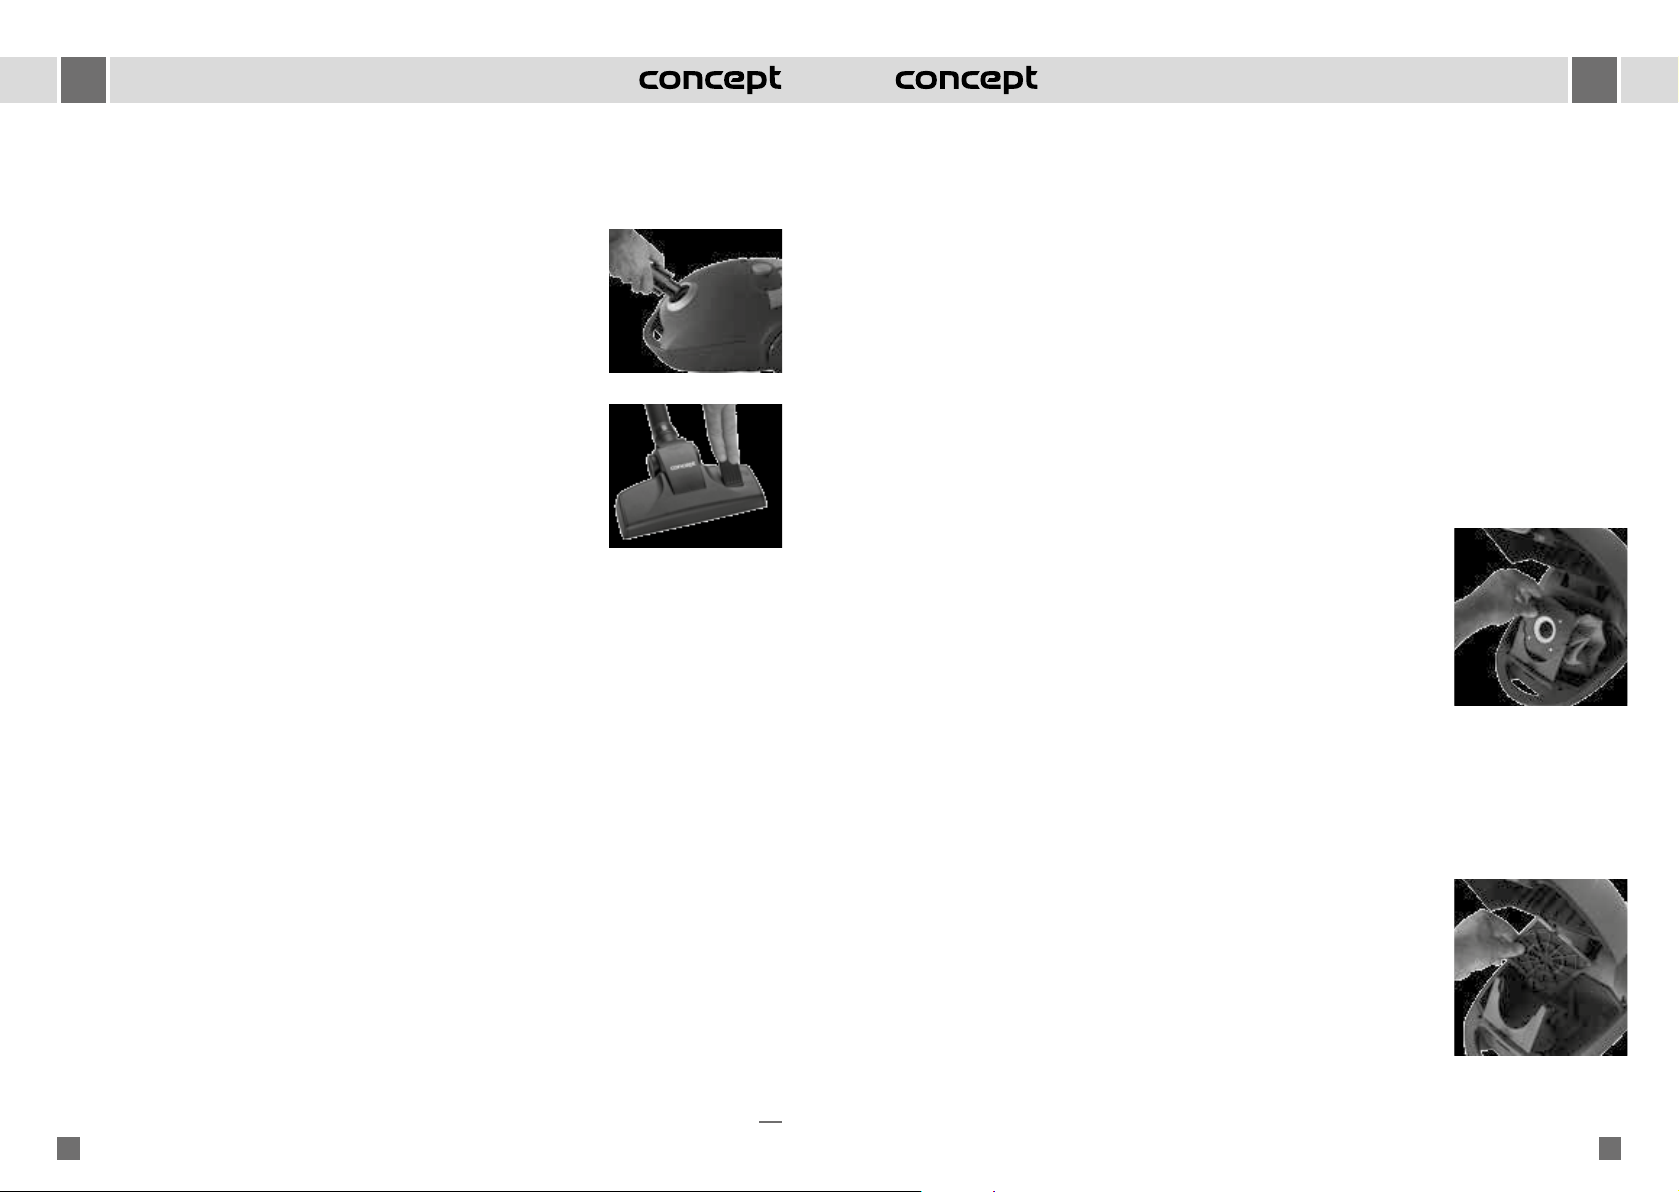
1.Slotno zzle
T he slot no zzle adapt er is used f or v acuuming plac es tha t ar e dicult t o ac c ess , such as r adia t ors , slots , c orners ,
pedestals ,spac esbet w eenupholst er y ,andothers .
2.Upholst er yno zzle
T hisupholst er yno zzlea ttachmen tma ybeusedf orsmallerupholst er edar eas .
USING THE APLIANCE
B ef or e using the applianc e , mak e sur e tha t lt ers and the dust c ollec tion bag ar e pr operly positioned and moun t ed .
Un wind the supply cable length y ou need . T he y ello w mark on the supply cable indica t es the optimum cable length. D o
notun windthesupplycablebey ondther edmark!
1.I nser ttheplugin t otheelec tricv oltagesock et .
2.P r esstheON/OFFswit chontheapplianc e .
3.S etupthesuc tionpo w ery ouneedusingtheoutputpo w erc on tr ol .
4.A f t er y ou ha v est oppedv acuuming ,swit chtheapplianc eoanddisc onnec titfr omtheelec tricv oltageoutlet .
5. F or winding up the supply cable , pr ess the winding butt on with one hand and hold the supply cable with the other
handt oa v oidunc on tr olledmo v emen t .
OPERA
NOTE
Beforexingorremo
1.Connectingtheexiblehosetotheappliance
Inserttheexiblehoseintotheappliance‘sairsuctioninlet.
Continuepushing
positionhasbeenreached.
For
(Fig
T hesuc tionpo w erma ybec on tr olledmanuallyonthehosehandle .
W hentheslidethr ottleisclosed ,theairo wisstr onger .
Slidethr ottleinopenposition-w eak erairo w .
2.A ttachingthet elesc opictubet othehoseadapt er
P utthet elesc opictubeonthehoseadapt erandturnitsligh tly .
3.Ex t endingthet elesc opictube
P r esstheplasticla t chandpullthesmallertubeout w ar ds .
4.F ixingtheoora ttachmen tt othet elesc opictube
I nser tthet elesc opictubein t otheoora ttachmen tandturnitsligh tly .
T he ap (F ig . 2) is used f or setting the oor a ttachmen t t o brushing (f or smooth
oors),ort osmoothv acuuming(f orcarpets).
(F ig .1)
(F ig .2)
27
VP8110, VP8111, VP8112
EN
(Fig
(Fig
26 VP9181
EN
c or dismark edb yay ello wdotonthec or d .D onotun windthepo w ersupplyc or dpastther edmark .
• T heapplianc eisin t endedf orhouseholduseonly(notf orc ommer cialuse).
• D onotv acuuman yburningit emssuchascigar ett es ,ma t ches ,orhotash.
• D o not use the applianc e in w et r ooms; do not v acuum an y w et it ems or liquids , ammable liquids (such as petr ol)
anddonotusetheapplianc einplac eswher ethesesubstanc esma ybepr esen t .
• Nev er v acuum without using the dust c ollec tion bag or the applianc e‘ s lt ers . B ef or e each using the applianc e , mak e
sur ethedustc ollec tionbagandtheapplianc e‘ slt ersar epr operlyinstalled .
• Do not immerse the supply c able , the plug , or the applianc e itself in t o w a t er or an y other liquid .
• Checktheapplianc eandthesupplycabler egularlyf oran ydamage .Nev erturntheapplianc eonifitisdamaged .
• P rior t o cleaning and af t er using the applianc e , turn it o , disc onnec t it fr om the elec tric v oltage outlet and let it
c ool .
• B ef or e using the applianc e , r emo v e an y lar ge or sharp it ems fr om the sur fac e y ou w an t t o v acuum as these it ems ma y
damagethedustc ollec tionbagortheapplianc e‘ slt ers .
• D onotusetheapplianc eifthelt ersar edir t y .
• Nev err epairtheapplianc eb yy ourself .I nst ead ,c on tac tanauthorisedser vic ec en tr ef orr epair .
F ailur e t o f ollo w the manufac tur er ‘ s instruc tions ma y in v alida t e the w arr an t y .
PR ODUC T DESCRIPTION
1. Hose holder
2. T elesc opic tube
3. A ir dischar ge filt er
4. F loor a ttachmen t
5. F le xible hose
6. P o w er c on tr oller
7. P o w er c or d winding butt on
8. D ust c ollec tion bag fill indic a t or
9. ON/OFF butt on
10. C arr ying handle
11. F r on t c o wl clap
12. Rubber- c oa t ed wheels
A C CESSORIES
A Slott edno zzle
B Upholst er yno zzle
CZ
2 VP9181
POPIS VÝ R OBKU
1. D r žadlo hadic e
2. T elesk opick á trubk a
3. F iltr v ý stupu vz duchu
4. P odlaho v á hubic e
5. Ohebná hadic e
6. Regulá t or v ýk onu
7. T lačítk o na víjení k abelu
8. Indik á t or plnosti pr acho v ého sáčku
9. T lačítk o v ypínač e
10. D r žadlo pr o př enášení
11. Klapk a př edního k r ytu
12. P ogumo v aná k ola
P říslušenst ví
A Š t ěrbino v áhubic e
B Hubic enačalounění
• P ř ed použitím spotř ebič e odviň t e odpo vídající délku přív odního k abelu . Žlutá značk a na přív odním k abelu značí
ideálnídélkuk abelu .Neodvíjejt epřív odník abelzač er v enouznačku .
• Spotř ebičjevhodn ýpouz epr opoužitívdomácnosti,neníur č enpr ok omer čnípoužití.
• Nev y sá v ejt enichořícího ,jak ojsoucigar et y ,zápalk ynebohork ýpopel .
• Nepoužív ejt e spotř ebič v e vlhk ý ch místnost ech, nev y sá v ejt e vlhk é v ěci nebo k apalin y , hořla v é k apalin y ( jak o je
benzin)anepoužív ejt espotř ebičvpr ost or ách,k deset yt olá tk ymohouv y sk yt o v a t .
• N ik dy nev y sá v ejt e bez použití pr acho v ého sáčku a ltrů v y sa v ač e . P ři k až dém použití spotř ebič e se ujist ět e , ž e jsou
pr acho v ýsáč ekaltr yv y sa v ač espr á vněnasaz en y .
• Neponořujt e přív odní k abel , zástr čku nebo spotř ebič do v ody ani do jiné k apalin y .
• P r a videlněk on tr olujt espotř ebičipřív odník abelzdův odupošk o z ení.Nezapínejt epošk o z en ýspotř ebič .
• P ř edčišt ěnímapopoužitíspotř ebičv ypnět e ,v ypojt ez ezásuvk yelektrick éhonapětíanech t ev y chladnout .
• P ř ed v y sá v áním odstr aň t e z v y sá v aného po vr chu v elk é či ostr é př edmět y , kt er é b y mohly pošk odit pr acho v ý sáč ek
neboněkt er ýltrv y sa v ač e .
• Nepoužív ejt espotř ebičseznečišt ěn ýmiltr y .
• Neopr a vujt espotř ebičsami.Obr a ťt esenaaut oriz o v an ýser vis .
Nedodr žít e -li pokyn y v ýr obc e , nemůž e b ýt případná opr a v a uznána jak o záruční.
2
1
11
8
5
10
9 3 6
7
B A
26 VP8110, VP8111, VP8112
EN
1. H ose holder
2. T elesc opic tub e
3. A ir dischar ge lt er
4. F lo or a ttachmen t
5. F le xible hose
6. P o w er c or d winding butt on
7. D ust c ollec tion bag ll indic a t or
8. ON/OFF butt on
9. C arr ying handle
10. F r on t c o wl clap
11. Rubb er- c oa t ed wheels
1
2
3
9
12
5
6
8
7
11
10
AB C
4
P říslušenst ví
A Slot no zzle
B Upholst er y no zzle
C No zzle f or w ooden oors
27 VP9181
EN
A C CESSORIES
1.Slotno zzle
T he slot no zzle adapt er is used f or v acuuming plac es tha t ar e dicult t o ac c ess , such as r adia t ors , slots , c orners ,
pedestals ,spac esbet w eenupholst er y ,andothers .
2.Upholst er yno zzle
T hisupholst er yno zzlea ttachmen tma ybeusedf orsmallerupholst er edar eas .
USING THE
Before
Unwindthe
notunwindthesupplycablebeyondther
1.Inserttheplugintotheelec
2.PresstheON/OFFswitchontheapplianc
3.Setupthesuctionpoweryouneedusingtheoutputpowerc
4.Afteryouhav
5.For
handtoavoidunc
OPER A TING M ANU AL – ASSEMBL Y OF THE V A CUUM CLEANER
NO TE
B ef or exingorr emo vingac c essories ,alw a y spulltheplugoutoftheelec tricalsock et!
1.C onnec tingthee xiblehoset otheapplianc e
I nser tthee xiblehosein t otheapplianc e‘ sairsuc tioninlet .
C on tinue pushing un til y ou hear a click ing sound , which indica t es tha t the c orr ec t
positionhasbeenr eached .
F or r emo ving the e xible hose , pr ess both st opper butt ons and r emo v e the hose
(F ig .1).
T hesuc tionpo w erma ybec on tr olledmanuallyonthehosehandle .
W hentheslidethr ottleisclosed ,theairo wisstr onger .
Slidethr ottleinopenposition-w eak erairo w .
2.A ttachingthet elesc opictubet othehoseadapt er
P utthet elesc opictubeonthehoseadapt erandturnitsligh tly .
3.Ex t endingthet elesc opictube
P r esstheplasticla t chandpullthesmallertubeout w ar ds .
4.F ixingtheoora ttachmen tt othet elesc opictube
I nser tthet elesc opictubein t otheoora ttachmen tandturnitsligh tly .
T he ap (F ig . 2) is used f or setting the oor a ttachmen t t o brushing (f or smooth
oors),ort osmoothv acuuming(f orcarpets).
(F ig .1)
(F ig .2)
A C CESSORIES
1.Slotno zzle
T he slot no zzle adapt er is used f or v acuuming plac es tha t ar e dicult t o ac c ess , such as r adia t ors , slots , c orners ,
pedestals ,spac esbet w eenupholst er y ,andothers .
2.Upholst er yno zzle
T hisupholst er yno zzlea ttachmen tma ybeusedf orsmallerupholst er edar eas .
USING THE APLIANCE
B ef or e using the applianc e , mak e sur e tha t lt ers and the dust c ollec tion bag ar e pr operly positioned and moun t ed .
Un wind the supply cable length y ou need . T he y ello w mark on the supply cable indica t es the optimum cable length. D o
notun windthesupplycablebey ondther edmark!
1.I nser ttheplugin t otheelec tricv oltagesock et .
2.P r esstheON/OFFswit chontheapplianc e .
3.S etupthesuc tionpo w ery ouneedusingtheoutputpo w erc on tr ol .
4.A f t er y ou ha v est oppedv acuuming ,swit chtheapplianc eoanddisc onnec titfr omtheelec tricv oltageoutlet .
5. F or winding up the supply cable , pr ess the winding butt on with one hand and hold the supply cable with the other
handt oa v oidunc on tr olledmo v emen t .
OPER A TING M ANU AL – ASSEMBL Y OF THE V A CUUM CLEANER
NO TE
B ef or exingorr emo vingac c essories ,alw a y spulltheplugoutoftheelec tricalsock et!
1.C onnec tingthee xiblehoset otheapplianc e
I nser tthee xiblehosein t otheapplianc e‘ sairsuc tioninlet .
C on tinue pushing un til y ou hear a click ing sound , which indica t es tha t the c orr ec t
positionhasbeenr eached .
F or r emo ving the e xible hose , pr ess both st opper butt ons and r emo v e the hose
(F ig .1).
T hesuc tionpo w erma ybec on tr olledmanuallyonthehosehandle .
W hentheslidethr ottleisclosed ,theairo wisstr onger .
Slidethr ottleinopenposition-w eak erairo w .
2.A ttachingthet elesc opictubet othehoseadapt er
P utthet elesc opictubeonthehoseadapt erandturnitsligh tly .
3.Ex t endingthet elesc opictube
P r esstheplasticla t chandpullthesmallertubeout w ar ds .
4.F ixingtheoora ttachmen tt othet elesc opictube
I nser tthet elesc opictubein t otheoora ttachmen tandturnitsligh tly .
T he ap (F ig . 2) is used f or setting the oor a ttachmen t t o brushing (f or smooth
oors),ort osmoothv acuuming(f orcarpets).
(F ig .1)
(F ig .2)
27
VP8110, VP8111, VP8112
EN
(F ig . 1)
(F ig . 2)
29 VP9181
EN
CLEANING AND REPL A CING THE AIR OUTLET FIL TER
1. Open the air outlet g rid in the applianc e‘ s r ear sec tion (F ig . 5).
2. Remo v e the air outlet lt er . T his t ype of v acuum cleaner is equipped with a
H.E.P .A. lt er in the outlet , which is capable of ca t ching ev en ve r y ne dust
par ticles . Yo u can clean this lt er by tapping i t, then brushing it with a sof t
brush. Af t e r this oper a tion is c omplet e , yo u m ay clean a ve r y dir t y lt er by
w ashing and brushing with a sof t brush in luk ew arm w a te r with no cleaning
agen ts added . It is impor tan t to let the we t par ts dr y thor oughly . A we t lt er
will be damaged by v acuuming! Do not use a hair dr y er to dr y it!
Not e: We t cleaning m ay cause mor e w ear and t ear of the lt er and ,
c onsequen tly , m ay shor t en its ser vic e lif e .
3. I nser t the cleaned or new air outlet lt er i n to the applianc e and close the air
outlet g rid .
TR OUBLESHOO TING
P r oblem C ause S olution
M ot ordoesnotrun.
P luginser t edin t othemainsoutlet
inc orr ec tlyorinsucien tly . Checktheplugc onnec tion.
T hemainsoutletisnotliv e . Checkf orv oltage ,e .g . b yc onnec ting
anotherapplianc e .
M ot orhasst opped
oper a ting .
I mpr operorinsucien tairo w .M ot or
o v erhea tingfuseac tiv a t ed .
D isc onnec t the c able fr om the sock et .
Checkandr eleasetheairsuc tion
anddischar geholes;checkthelt er ’ s
cleanlinessand/orr eplac ethedustbag .
L etthev acuumcleanerc ooldo wn.
Fr o n t c o v ercannotbe
closed D ustbaginser t edinc orr ec tly . Checkthedustlt erinstalla tion.
Reduc edsuc tionpo w er
D ustbagfullorclogged . Replac ethedustbag .
Obstruc t edlt er . Cleanorr eplac ethelt er .
Cloggedno zzle ,tube ,orhose . Checkandcleartheairpassageonthe
suc tionanddischar gesides .
V acuumcleanerhea ts
up Sligh thea tingofthev acuumcleanerisnormalandcannotbec onsider edafailur e .
OPTIONAL A C CESSORIES
Th e f ollo wing applianc e ac c essories can be pur chased additionally :
SMS dust bags (5 units +2 units of mot or lt ers) Or der c ode sms9000 P ric ed ac c or ding to the v alid pric e list
F abric dust bag , 1 O rd. N o. ts9180 P ric e ac c or ding to the applicable pric e list
M ot or lt er Or der c ode44290910 P ric e ac c or ding to the v alid pric e list
H.E.P .A. air outlet lt er Or der c ode 44290911 P ric ed ac c or ding to the v alid pric e list
(F ig .5)
29
VP8110, VP8111, VP8112
EN
(F ig . 5)
CLEANING AND REPL A CING THE AIR OUTLE T FIL TER
1. Open the air outlet g r id in the applianc e‘ s r ear sec tion (F ig . 5).
2. R emo v e the air outlet lt er . Y ou can clean this lt er b y tapping it , then brushing it
with a sof t brush. A f t er this oper a tion is c omplet e , y ou ma y clean a v er y dir t y lt er b y
w ashing and brushing with a sof t brush in lukew ar m w a t er with no cleaning agen ts
added . I t is impor tan t t o let the w et par ts dr y thor oughly . A w et lt er will be dam-
aged b y v acuuming! D o not use a hair dr y er t o dr y it!
N ot e: W et cleaning ma y cause mor e w ear and t ear of the lt er and , c onsequen tly ,
ma y shor t en its ser vic e lif e .
3. I nser t the cleaned or new air outlet lt er in t o the applianc e and close the air outlet
g r i d.
OPTIONAL A C CESSORIES
T he f ollo wing applianc e ac c essor ies can be pur chased additionally :
SMS dust bags (5 units + 2 units of mot or lt ers) Or der c ode sms9000 P r ic ed ac c or ding t o the v alid pr ic e list
F abr ic dust bag , 1 Or der c ode 44291711 P r ic e ac c or ding t o the applicable pr ic e list
M ot or ler Or der c ode 44291704 P r ic e ac c or ding t o the v alid pr ic e list
CHECKING
Whenthedustcollectionbagllindicatorturnsredduringopera
Ifthedustcollectionbagllindicatorisstillredafterthebaghasbeenreplaced
-someoftheairpassages(hoses,telescopictube
-themotorlterisdirty
-theairoutletlterisdirty.
Checkforeach
problemcannotbeidentied,handovertheproducttothenearestser
baglevelindicatoriscomplet
CLEANING AND MAINTENANCE
Y
the
solventsorabrasives!
REPLACING
1. Unplug
andopentheappliancecover
2. Push
bag(Fig.3).
the when handling. If the bag is made of fabric, empty it and close it
carefully - it can be used repeatedly
3. Inserta
bagopeningmustbealignedwiththehoseholeintheappliancecov
4. Never the without dust installed! forto
insert
maybecomedamaged.
5. Closethecover
REPLACING FIL
•The lters should be cleaned or replac when they are visibly dirty, or if the
appliance‘ suc power is r Alway check the lters after using the
appliance.
•Inordertoavoiddamagetotheappliance
lters.
•Beforereplacingthelt
•Y
themanufacturer
CLEANING AND REPLACEMENT OF
1. Disconnecttheexiblehoseandopentheappliancecover
2.Pull
moreeasily
3. Removethe
heavilysoiled,youma
4. Insertthecleanedornewmotorlterintotheapplianceandclosethecover
(F ig .3)
(F ig .4)
28 VP8110, VP8111, VP8112
EN
(Fig
(Fig