555395
48
Zoom out
Zoom in
Previous page
1/60
Next page
es
Puesta en marcha
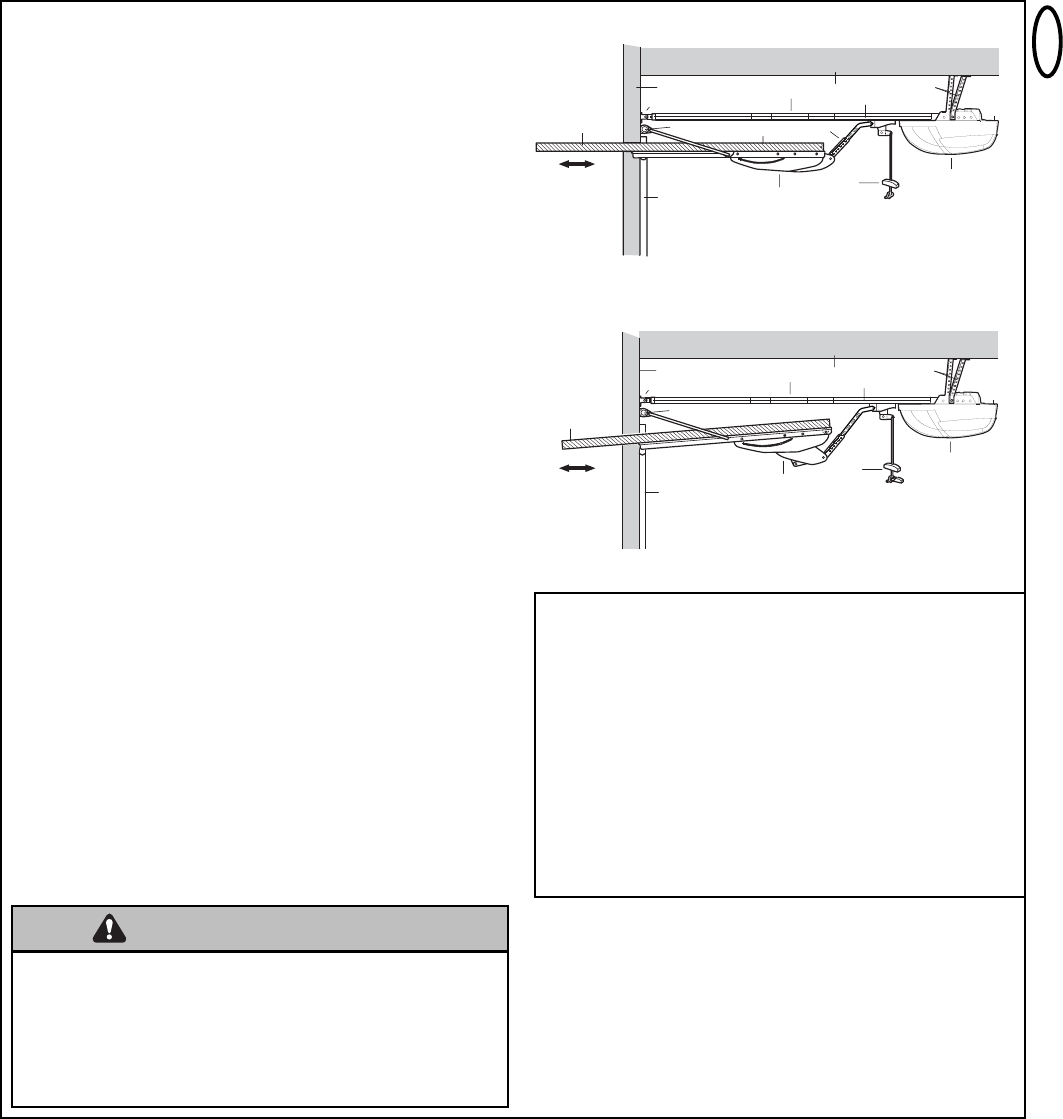
El Chamberlain Arm™ se ha diseñado de tal forma que la puerta
pueda avanzar en combinación con un automatismo de puerta
Chamberlain hasta la posición de abierto por completo. (fig. 16).
No adecuado por:
ML500, HE60, GPD60, GPD65 !
Nota: Probablemente, la puerta se ha diseñado de tal forma que
no deba avanzar hasta la posición de abierto por completo. En
este caso, ajustar el interruptor final de carrera para la posición
de puerta ABIERTO de tal forma que la puerta quede inclinar en
la posición abierta ligeramente hacia abajo.
Nota: Si se debiera instalar un sensor infrarrojo (The Protector
System), respete las indicaciones del manual de usuario antes
de empezar con el ajuste del interruptor final de carrera y el
registro de la fuerza:
Ajuste de interruptor final de carrera y el registro de la
fuerza: Las posiciones finales del carro se ajustan de la
siguiente manera (tener el manual a mano):
1. Avanzar la puerta manualmente a la posición horizontal,
dejando la parte interior y la exterior del carro todavía
desbloqueadas. Señalar el punto en el riel, en el cual se
detiene el extremo del carro más próximo al automatismo.
2. Cerrar la puerta de nuevo manualmente y señalar el punto en
el riel en el cual se detiene el extremo del carro más próximo
a la puerta.
3. Seguir dejando desbloqueadas la parte interior y la exterior del
carro, conectar el automatismo y ajustar el interruptor final de
carrera con ayuda del manual de usuario para el automatismo
para puertas de garaje de tal forma que la parte interna del
carro se detenga en los puntos que se hayan señalado. Lea
en el manual el apartado, Ajuste manual de los interruptores
finales de carrera en el capítulo "¿TIENE ALGÚN
PROBLEMA?"Durante el proceso de ajuste manual de los
interruptores finales de carrera, la puerta y el automatismo de
puerta deberán estar desbloqueados.
4. Volver a conectar la parte interior y la exterior del carro, de tal
forma que la puerta vuelva a estar conectada al automatismo.
5. Una vez concluido el ajuste de los interruptores finales de
carrera, se deberá registrar la fuerza. Lea el apartado nº 26.
6. Volver a poner el automatismo en marcha para asegurarse de
que la puerta se abra y cierra correctamente.
A continuación, atender las indicaciones del manual de
usuarios.
6
8
3
12
2
9
13
11
7
14
15
4
5
10
1
1. Pared del dintel
2. Soporte del cabezal
3. Kit del riel
4. Techo
5. Fijación para techo
6. Carro
7. Brazo de unión
8. Puerta de garaje
9. Muelle
10. Automatismo
11. Desbloqueo manual
12. Brazo de la puerta
13. Guía de deslizamiento
de puerta
14. Estando completamente
abierta, la puerta
basculante "con toldo"
deberá quedar
suspendida en horizontal
15. Efectuar la nivelación
horizontal de la puerta
mediante el ajuste de
límite de rodadura
FIG. 16
No intente adaptar el muelle de la puerta.
Solicite los servicios de un profesional.
Si se utiliza un brazo Chamberlain, se deberá
instalar el sensor infrarrojo The Protector
SystemTM .
ADVERTIMIENTO
6
3
2
9
4
5
10
1
15
14
12
13
11
48


Need help? Post your question in this forum.

Forumrules


Report abuse

Libble takes abuse of its services very seriously. We're committed to dealing with such abuse according to the laws in your country of residence. When you submit a report, we'll investigate it and take the appropriate action. We'll get back to you only if we require additional details or have more information to share.

Product:

For example, Anti-Semitic content, racist content, or material that could result in a violent physical act.

For example, a credit card number, a personal identification number, or an unlisted home address. Note that email addresses and full names are not considered private information.

Forumrules

To achieve meaningful questions, we apply the following rules:

Register

Register getting emails for Chamberlain 1703 at:


You will receive an email to register for one or both of the options.


Get your user manual by e-mail

Enter your email address to receive the manual of Chamberlain 1703 in the language / languages: English, German, Dutch, French, Italian, Portuguese, Spanish as an attachment in your email.

The manual is 8,24 mb in size.


You will receive the manual in your email within minutes. If you have not received an email, then probably have entered the wrong email address or your mailbox is too full. In addition, it may be that your ISP may have a maximum size for emails to receive.

The manual is sent by email. Check your email

If you have not received an email with the manual within fifteen minutes, it may be that you have a entered a wrong email address or that your ISP has set a maximum size to receive email that is smaller than the size of the manual.

The email address you have provided is not correct.

Please check the email address and correct it.

Your question is posted on this page

Would you like to receive an email when new answers and questions are posted? Please enter your email address.


Info