CZ PL
RROOZZDDZZIIAAÄÄ 55
USTAWIANIE I
INSTALACJA
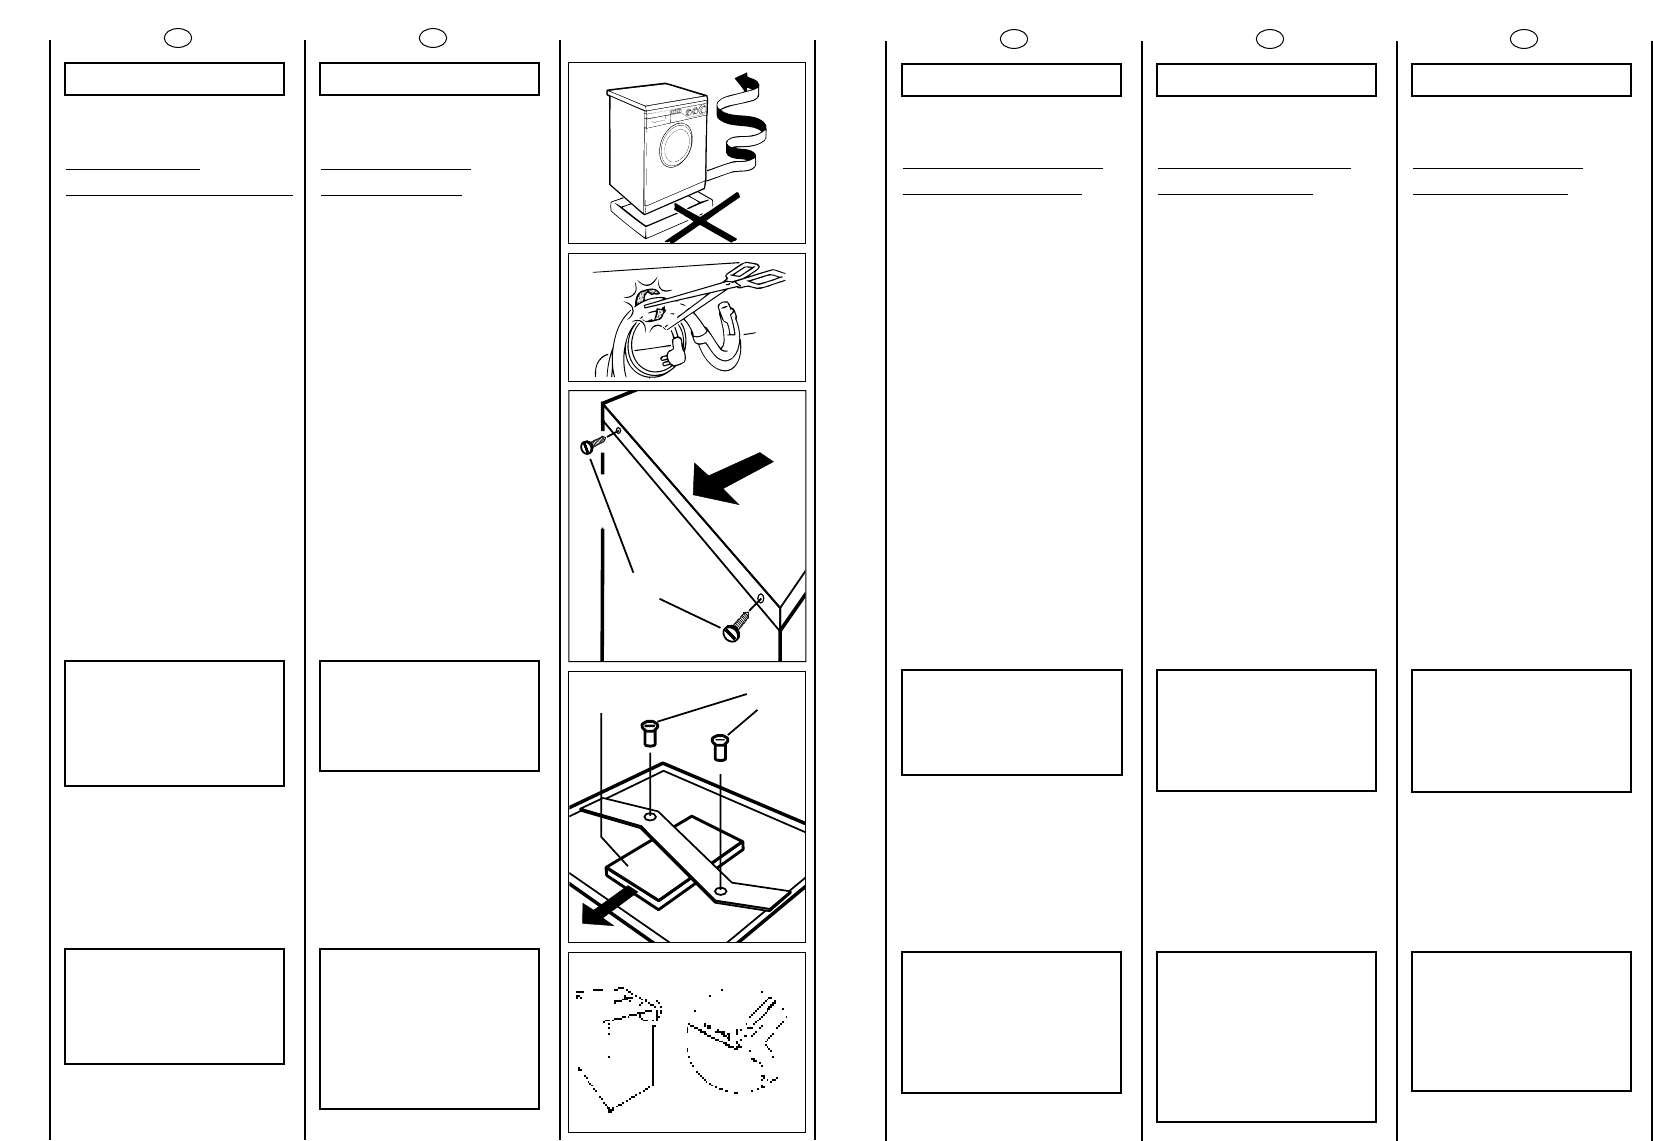
Pralkë przenieéç na palecie
transportowej moãliwie jak
najbliãej ostatecznego
miejsca ustawienia.
Odciåç zaczepy wëãa.
Odkrëciç dwie g
ó
rne éruby
AA
i zdjåç pokrywë, trzymajåc
jå w pozycji poziomej.
Odkrëciç dwie éruby
BB
przytrzymujåce element
blokujåcy (kluczem do
nakrëtek H.19) i usunåç
spod niego polisterynowå
podkäådkë.
UUWWAAGGAA::
NNAAKKÄÄAADDEEKK NNAADD
EELLEEMMEENNTTEEMM
BBLLOOKKUUJJÅÅCCYYMM NNIIEE
ZZDDEEJJMMOOWWAAÇÇ..
Dwiema érubami
AA
przykrëciç z powrotem
pokrywë.
W czasie montaãu blatu
prosimy upewniç sië czy
elementy mocujåce zostaäy
wprowadzone w szczeliny,
jak jest to pokazane na
rysunku.
UUWWAAGGAA::
EELLEEMMEENNTTYY TTEE
PPRRZZEECCHHWWYYWWAAÇÇ WW
MMIIEEJJSSCCUU
NNIIEEDDOOSSTTËËPPNNYYMM DDLLAA
DDZZIIEECCII,, GGDDYYÃÃ SSTTAANNOOWWII
TTOO PPOOTTEENNCCJJAALLNNEE
ZZAAGGRROOÃÃEENNIIEE..
KKAAPPIITTOOLLAA 55
UVEDENÍ DO
PROVOZU INSTALACE
Vybalte praöku a postavte ji
na místo, kde bude stát.
Uvolnëte püívodní kabel a
hadici.
Uvolnë oba dva vrchní
ärouby “
AA
” a odejmëte víko
praöky.
Vyjmëte oba dva zajiät’ovací
ärouby “
BB
” francouzskÿm
klíöem nebo äroubovákem a
odstrañte polystyrenovou
vloïku “C”.
Ärouby uschovejte pro
püípadnÿ transport praöky.
PPOOZZOORR:: BBeezz vvyyjjmmuuttíí
zzaajjiiäätt’’oovvaaccíícchh äärroouubbåå //BB//
mmååïïee ddoojjíítt kk ppooääkkoozzeenníí
pprraaöökkyy..
PPOOZZOORR::
NNEEHHŸŸBBEEJJTTEE SS
PPOOLLYYSSTTYYRREENNOOVVOOUU
VVLLOOÏÏKKOOUU UUMMÍÍSSTTËËNNOOUU
NNAADD KKOOVVOOVVOOUU
ÚÚCCHHYYTTKKOOUU..
Nasuñte a püiäroubujte znovu
víko praöky pomocí obou
dvou äroubå
AA
.
PPOOZZOORR::
OODDSSTTRRAAÑÑTTEE ZZBBYYTTKKYY
OOBBAALLUU ZZ DDOOSSAAHHUU DDËËTTÍÍ,,
MMOOHHLLYY BBYY BBŸŸTT
ZZDDRROOJJEEMM NNEEBBEEZZPPEEÖÖÍÍ..
16
KAPITEL 5
INBETRIEBNAHME
INSTALLATION
Gerät ohne
Verpackungsunterteil in die
Nähe des Aufstellungsortes
bringen.
Lösen Sie die Klammern der
Schlauchbefestigung.
Die oberen 2 Schrauben A
lösen und den Deckel
waagerecht abziehen.
Entfernen Sie die
Schutzabdeckung aus
Pappe.
Die beiden Bolzen B mittels
eines 19er
Schraubenschlüssels
entfernen und das unter der
Querstrebe liegende
Styroporabstandstück C
entfernen.
Achtung, die beiden Bolzen
B nicht mehr montieren!
WICHTIG:
DAS STYROPORAB-
STANDSSTÜCK
OBERHALB DER
QUERSTREBE NICHT
ENTFERNEN.
Den Deckel mit den beiden
Schrauben A wieder
befestigen.
Achten Sie bitte darauf,daß
die Seitenführungen des
Deckels korrekt sitzen,wie in
der Zeichnung abgebildet.
ACHTUNG:
DIE VERPACKUNG IST IN
DEN HÄNDEN VON
KINDERN EINE
GEFAHRENQUELLE. BITTE
ENTSORGEN SIE DAS
VERPACKUNGS-
MATERIAL
ORDNUNGSGEMÄß.
CHAPITRE 5
MISE EN PLACE
INSTALLATION
Placer la machine près du
lieu d’utilisation sans la base
d’emballage.
Couper les bandes
serre-tubes
Dévisser les 2 vis supérieures
A et enlever le couvercle en
le tirant horizontalement.
Enlever le carton
d’emballage.
Dévisser les 2 tirants B sur la
traverse portante (au
moyen d’une clé droite H.
19) et enlever l’entretoise en
polystyrène C placée au-
dessous de la traverse.
ATTENTION: Ne pas remonter
les 2 tirants!
ATTENTION:
NE PAS ENLEVER
L’ENTRETOISE EN
POLYSTYRENE PLACEE
AU-DESSUS DE LA
TRAVERSE.
Remonter le couvercle en le
fixant par les 2 vis A.
S’assurer que les guides
latéraux du couvercle soient
correctement engagés
comme indiqué sur le dessin.
ATTENTION:
NE PAS LAISSER À LA
PORTÉE DES ENFANTS
DES ELEMENTS
D’EMBALLAGE QUI
PEUVENT CAUSER DES
RISQUES.
NL
DE
FR
HOOFDSTUK 5
IN ELKAAR ZETTEN
EN INSTALLEREN
Breng de machine zonder
de onderkant van de
verpakking dicht bij de
plaats waar hij komt te
staan.
Knip het ringetje waarmee
de slang en de snoer vast zit
door.
Draai de twee schroeven
aangegeven door A los en
neem de dekplaat af.
Verwijder de kartonnen
verpakking.
Draai ook de twee moeren
bij B los en verwijder deze.
Dit kan met een sleutel
nummer 19. Neem de plastic
afstandhouder weg die
onder de houder zat.
ATTENTIE:
NEEM NIET DE PLASTIC
AFSTANDHOUDER WEG
DIE BOVEN DE
DWARSBALK ZIT.
Monteer de afdekplaat
weer met de schroeven A.
Controleer bij het monteren
van het bovenblad dat de
gaatjes aan de zijkant van
het bovenblad voor de
Schroefopeningenvallen,
zoals getoond op de
tekening.
WAARSCHUWING:
ZORG ERVOOR DAT HET
VERPAKKINGSMATERI-
AAL BUITEN HET BEREIK
VAN KINDEREN BLIJFT
OMDAT DAT GEVAAR
KAN OPLEVEREN.
17