8
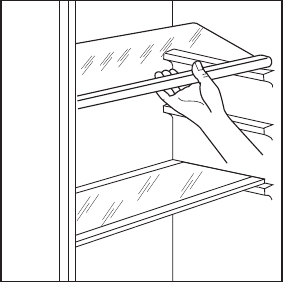
Verstellung der Abstellflächen
• Eine geschlossene Abstellfläche bitte in die
untersten Führungen über die Obst- und Gemü-
seschalen einschieben. Sie muß immer in dieser
Stellung verbleiben. Die Abstellflächen sind
höhenverstellbar:
• Dazu die Abstellfläche soweit nach vorne zie-
hen, bis sie sich nach oben oder unten
abschwenken und herausnehmen läßt.
• Das Einsetzen in eine andere Höhe bitte in
umgekehrter Reihenfolge vornehmen.
Innenausstattung
• Das Geräteinnere und alle Ausstattungsteile bitte
vor Erstinbetriebnahme reinigen (siehe Abschnitt
"Reinigung und Pflege").
Elektrischer Anschluß
Für den elektrischen Anschluß ist eine vorschrifts-
mäßig installierte Schutzkontakt-Steckdose erforder-
lich. Sie sollte so gesetzt sein, daß ein Ziehen des
Netzsteckers möglich ist.
Die elektrische Absicherung muß mindestens 10/16
Ampere betragen.
Ist die Steckdose bei eingebautem Gerät nicht mehr
zugänglich, muß eine geeignete Maßnahme in der
Elektroinstallation sicherstellen, daß das Gerät vom
• Netzstecker in die Steckdose stecken. Die Innen-
beleuchtung leuchtet bei geöffneter Tür. Der
Drehknopf für die Temperaturwahl ist im Kühl-
raum rechts.
Stellung „0“ bedeutet: aus.
Stellung „1“ bedeutet: Höchste Innentemperatur
(wärmste Einstellung).
Stellung „6“ (Endanschlag) bedeutet: Tiefste
Innentemperatur (kälteste Einstellung).
Folgende Einflüsse sind ausschlaggebend für die
Innentemperatur:
– Umgebungstemperatur;
– Menge und Temperatur der eingelagerten
Lebensmittel;
– Häufiges oder langes Öffnen der Tür.
Vor Inbetriebnahme
Netz getrennt werden kann (z. B. Sicherung, LS-
Schalter, Fehlerstrom-Schutzschalter oder derglei-
chen mit einer Kontaktöffnungsweite von mindestens
3 mm).
• Vor Inbetriebnahme am Typschild des Gerätes
überprüfen, ob Anschlußspannung und Stromart
mit den Werten des Stromnetzes am Aufstellort
übereinstimmen.
Z. B.: AC 220 ... 240 V 50 Hz oder
220 ... 240 V~ 50 Hz
(d. h. 220 bis 240 Volt Wechselstrom, 50 Hertz)
Das Typschild befindet sich links im Innenraum des
Kühlraumes.
Inbetriebnahme und Temperaturregelung
Die Temperaturen im Kühlraum und Gefrierraum las-
sen sich nicht getrennt regeln.
Sollten frische Lebensmittel schnell eingefroren wer-
den, kann Stellung „6“ gewählt werden. Achten Sie
darauf, daß die Temperatur im Kühlraum nicht unter
0°C absinkt und stellen Sie den Temperaturregler
rechtzeitig auf Stellung „3“ oder „4“ zurück.
Wichtig!
Hohe Umgebungstemperatur (z. B. an heißen Som-
mertagen) und kalte Einstellung des Temperaturreg-
lers (Stellung „5“ bis „6“) kann zu Dauerbetrieb des
Kompressors führen.
In diesem Fall den Temperaturregler auf eine wärme-
re Einstellung zurückdrehen (Stellung „3“ bis „4“). Bei
dieser Einstellung wird der Kompressor geregelt und
der Abtauvorgang wieder automatisch eingeleitet.
21
• Please clean the appliance interior and all acces-
sories prior to initial start-up (see section: “Clea-
ning and Care”).
Electrical Connection
Any electrical work required to install this appliance
should be carried out by a qualified electrician
or competent person.
WARNING – THIS APPLIANCE MUST BE EARTH-
ED
The manufacturer declines any liability should these
safety measures not be observed.
Before switching on, make sure the electricity supply
voltage is the same as that indicated on the applian-
ce rating plate. The rating plate is inside, on the left.
The appliance is supplied with a 13 amp plug fitted. In
the event of having to change the fuse in the plug
supplied, a 13 amp ASTA approved (BS 1362) fuse
must be used.
Important!
The wires in the mains lead are coloured in accor-
dance with the following code:
• Insert the plug of the connection lead into the
plug socket with protective earth contact. When
the refrigerator compartment door is opened, the
internal lighting is switched on. The temperature
selector knob is located on the RH side of the
refrigerator compartment.
Setting „0“ means: Off.
Setting „1“ means: Hightest temperature, (warmest
setting).
Setting „6“ (end-stop) means: Lowest temperature,
(coldest setting).
However, the exact setting should be chosen keeping
in the mind that the temperature inside the refrigera-
tor depends on:
-the quantity of food stored
-how often the door is opened
Prior to Initial Start–Up
Green and Yellow Earth
Blue Neutral
Brown Live
As the colours of the wires in the mains lead of this
appliance may not correspond with the coloured mar-
kings indentifying the terminals in your plug, proceed
as follows:
1. The wire coloured green and yellow must be
connected to the terminal marked with the letter
„E“ or by the earth symbol or coloured green and
yellow.
2. The wire coloured blue must be connected to the
terminal „N“ or coloured black.
3. The wire coloured brown must be connected to
the terminal marked „L“ or coloured red.
4. Upon completion there must be not cut, or stray
strands of wire present and the cord clamp must
be secure over the outer sheat.
Warning! A cut-off plug inserted into a 13 amp
socket is a serious safety (shock) hazard. Ensure
that the cut-off plug is disposed of safely.
Starting up and temperature regulation
The temperatures in the refrigerator compartment
and freezer co partment cannot be independently
regulated.
If you want the freeze fresh food rapidly, select setting
„6“, ensuring that the temperature in the refrigerator
compartment does not drop blow 0°C. You should
also promptly reset the temperature regulator to set-
ting „3“ or „4“.
Important!
High ambient temperatures (e.g. on hot summer
days) and a cold setting on the temperature regulator
(position"5" to "6") can cause the compressor to run
continuously.
If this happens, turn the temperature regulator back to
a warmer setting (position "3" to "4"). At this setting
the compressor will be switched on and off as usual
and automatic defrosting recommenced.