CAUTION: Do not plug the power supply into a grounded outlet or do not switch the
pool cleaner “ON” if it is not fully immersed in water. Operating the cleaner out of water
will cause severe damage immediately and will result in loss of warranty.
Allow the cleaner to remain in the pool for 15 to 20 minutes following the end of its
cleaning cycle. This will allow the motors to cool adequately. Do not leave the cleaner
in the pool all the time. Always remember to turn the power supply “OFF” and unplug it
from the power outlet before removing the cleaner from the pool.
WARNING: The cleaner must not be used when people are in the water. For use
with swimming pool only
Safety Note
- The unit must be supplied through a residual current device (RCD) having a rated
residual operating current not exceeding 30 mA
- The connection to the branch circuit should be consistent with the local and national
wiring rules (electrical code).
- Mishandling of the unit can result in leakage of lubricants.
- If the supply cord is damaged, it must be replaced by the manufacturer’s service
agent or a qualified and trained person in order to avoid hazards.
Dear Customer,
Thank you for choosing our product to clean your pool. We hope that you will enjoy
using your new robot to maintain your swimming pool for years to come.
Before you begin to use your robot, please take a few minutes to carefully read these
operating instructions.
Again, thank you for choosing our product.
2
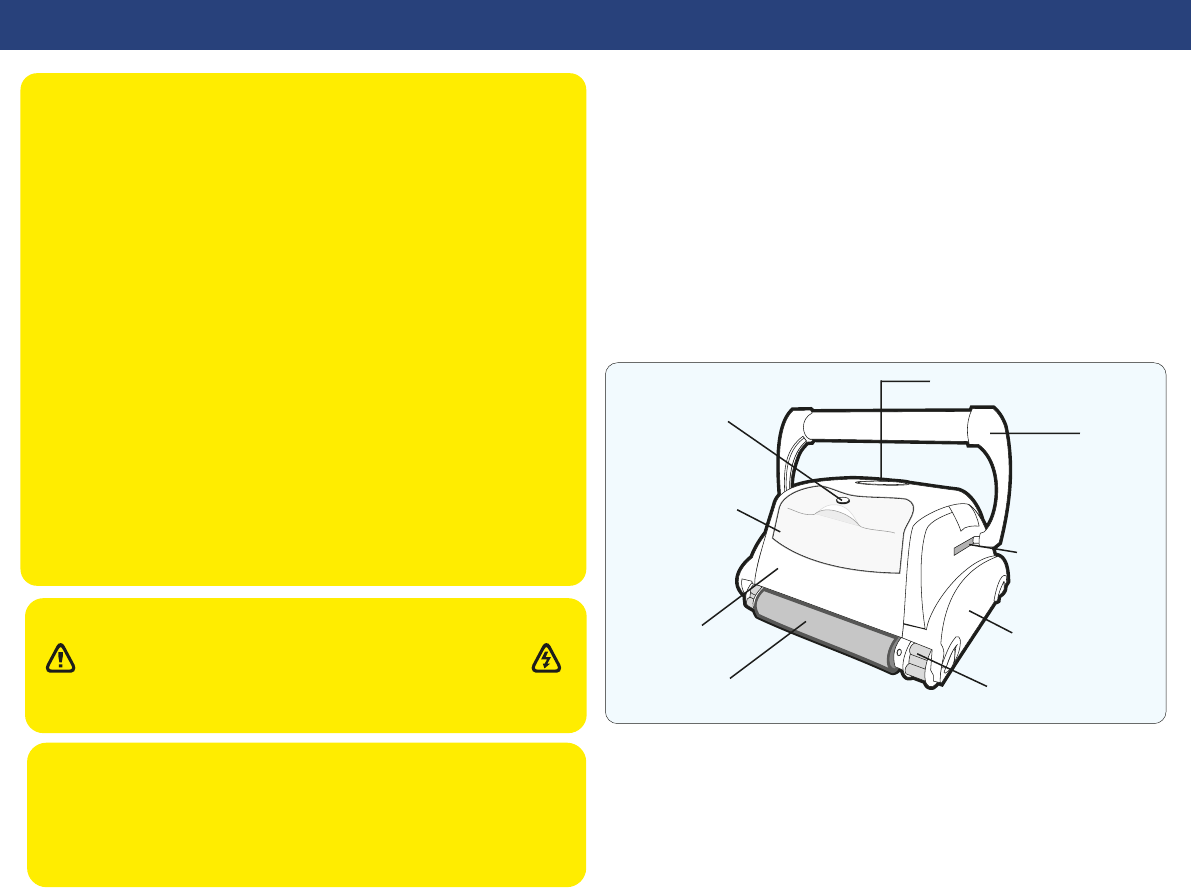
Components
Your new automatic pool cleaner contains:
- The robotic pool cleaner with its floating cable.
- The Power Supply (transformer).
- Caddy
Please read this manual completely before operating your pool cleaner
.
While the appearance of your cleaner and some of its components may differ from those
shown here, the function of the cleaner, operating procedures and maintenance
practices are the same.
WARNING: A Ground Fault Current Interrupter (GFCI-USA) or a Residual Current
Device (RCD-EUROPE) must be installed to protect your electric outlet and prevent
any possible electric shock.
This appliance is not intended for use by persons (including children)
with reduced physical, sensory or mental capabilities, or lack of
experience and knowledge, unless they have been given supervision or
instruction concerning use of the appliance by a person responsible for
their safety. Children should be supervised to ensure that they do not
play with the appliance.
SAVE THESE INSTRUCTIONS
Drive Track
Scrubbing Brush
Unit Body
Filter Top
Access
Handle
FIlter Lock
Release
Outlet Top
Side Plate
Handle Lock
Mechanism
12 cm
(4 inch)
3.6m/11.8ft
1
1a
1. Place the power supply (transformer) at least 3.6 meters / 11.8 feet from the pool and at
least 12 cm / 4 Inch above the surface (fig.1). The transformer will supply low voltage to
the cleaner.
2. Uncoil the cable.(fig.1a)
3.ONLY FOR MODELS WITH FLOATING HANDLE - For proper operation, lock
the moveable handle diagonally across the top of the cleaner's body. Push down
on the handle lock mechanism and slide the handle all the way to the end, then
release the lock. Depending on your model, the handle lock button might be
vertical or horizontal (fig.2a, 2b). The handle will remain fixed in this position.
Repeat this process on the other side of the cleaner.
Remember, the handle must be fixed diagonally (fig.2c)
2b
unit
2c2a
Handle lock vertical
Handle lock horizontal
Operating the pool cleaner
4. Place the unit in the water. Turn the unit
side to side in the water to allow air to
escape from the body and then let the
cleaner sink to the bottom of the pool
(fig.3). Then, spread the cable over the
surface of the pool as evenly as possible
(fig.1).
5. Plug the cable into the power supply.
Make sure the key on the plug corresponds exactly with the key slot on the socket of
the power supply (fig.3a).
Plug the power supply into a grounded outlet. Ensure that the electric outlet has been
properly grounded (fig.3b). The light will glow indicating that the system is “ ON “ and
the pool cleaner will start the cleaning cycle. The unit keeps record of the number of
cleaning cycles. Only an authorized service center can display the accumulated
cleaning cycles. (See details on the next page)
3
3
3b
3a
Operating the pool cleaner
4
A
B
slot
key
C
D
Plugs Type I
To plug the cable (Fig A) into the socket on the power supply (Fig. B), please do the
following:
1.Prepare the plug as seen in (Fig. C) with the key and 3 outside slotsexactly as shown.
2.Fit exactly the key and the slots from cable plug with the corresponding key and slots
from the power supply socket. (Fig. D)
3.Push the plug into the socket of the power supply all the way in.
4.Once the plug is in, rotate the plug to the right to lock it into place(Fig. E).
5.To remove the plug, first rotate the plug to the left to unlock it, then pull it out (Fig. F).
Socket (B)
Cable plug (A)
slot
key
Push and rotate
right to lock
E
Rotate left and
pull to unlock
F
cable
plug
cable
plug
power supply
socket
cable
plug
power supply
socket
5
6
External Timer Capability
This feature will enable the end user to
program the cleaning schedule through
an external timer (sold separately).
1
23
4
Grounding
The power supply must be connected to a grounded 3 conductor socket. The mains power supply
must be connected via a GFCI (ground fault circuit interrupter) or RCD (residual current device)
having a rated residual operating current not greater than 30mA.
Fuse
The fuse must be changed by an authorized service agent or trained and qualified person only.
For continued protection against risk of fire, replace only with the same type and rating of fuse.
Maintenance and safety
The cover should not be removed except by an authorized service agent or trained and qualified
person. No internal adjustment or component replacement can be carried out by the user. The
power cable must be disconnected before removing the cover.
If the power supply cord is damaged, it must be replaced by an authorized service agent or trained
and qualified person. Do not operate the supply if the cord is damaged.
Environmental conditions
The power supply is designed to work both indoors and outdoors. However, the unit should not be
operated in direct sunlight or be exposed to water. The power supply should not be operated in an
ambient temperature in excess of 40ºC.
Physical
Dimensions (W * D * H)
Weight
Electrical
Input rating
Output rating
Storage temperature
Operating temperature
Ingress protection
273mm * 242mm * 90mm
1.9 Kg
100-240V~, 50/60Hz, 210W
29V ,6.3A.
-10° C - 60° C
0° C - 45 ° C
IP54
1. Unit
2. Cable
3. Power supply
4. Power supply plug
5. External timer
6. Outlet
5
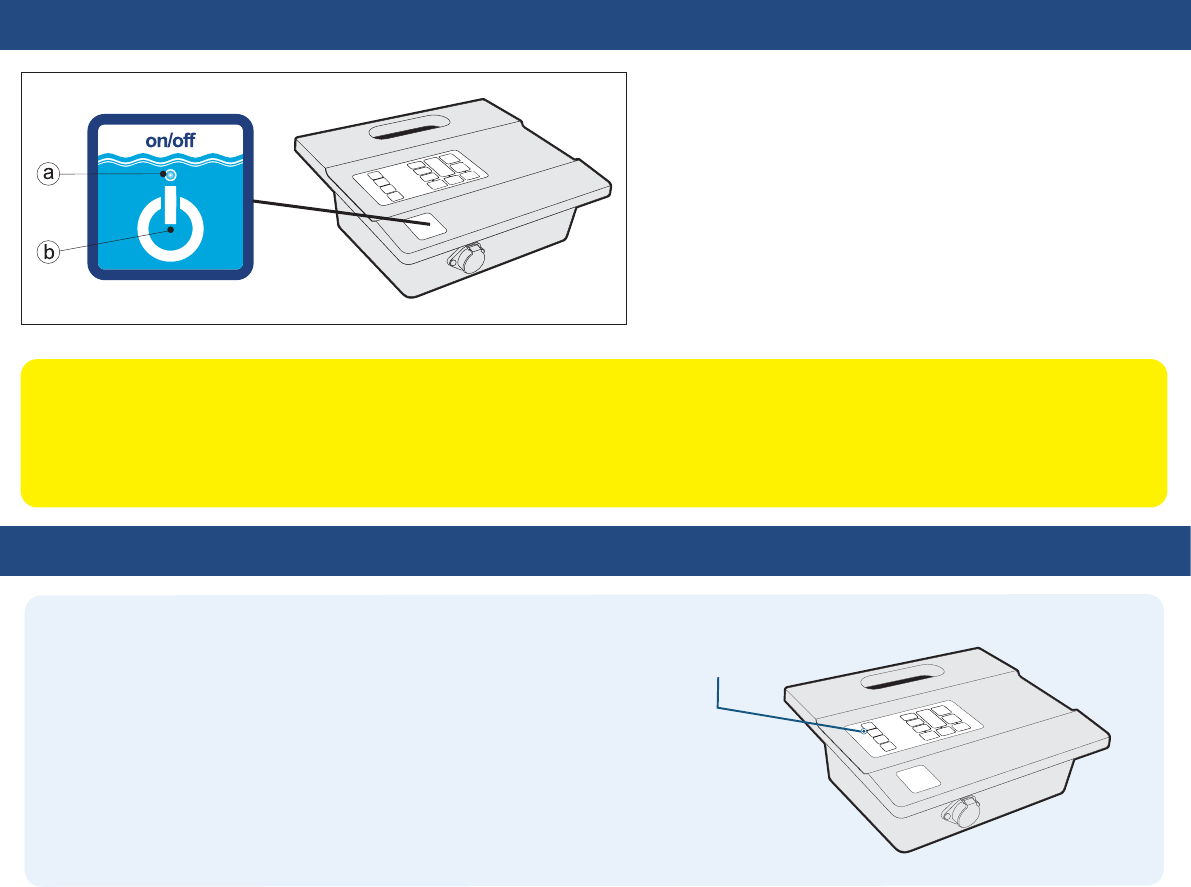
Operating the pool cleaner and power supply
a. Power LED
The blue LED flashes when the power supply is in standby mode and lights
continuously when the pool cleaner is operating.The power button switches
between ON and STANDBY
b. "POWER" button
The button switches between "ON" and "STANDBY".
IMPORTANT- After every cycle the pool cleaner will automatically go to "standby".
In case you want to turn the machine off during the working cycle, press the
"power" button once and the LED will start flashing, indicating that the machine
has stopped running.
IMPORTANT:
Please be sure to always keep your pool cleaner properly stored anywhere between 10 to 40 degrees Celsius (50 to 104 degrees Fahrenheit). This will keep the motors,
plastics and seals protected. Failure to comply will result in loss of warranty.
Robot can be used in water with temperatures ranging from 13°C to 35°C (55°F to 95°F). However, the recommended optimal temperature is between 22°C and 32°C (72°F
and 90°F)
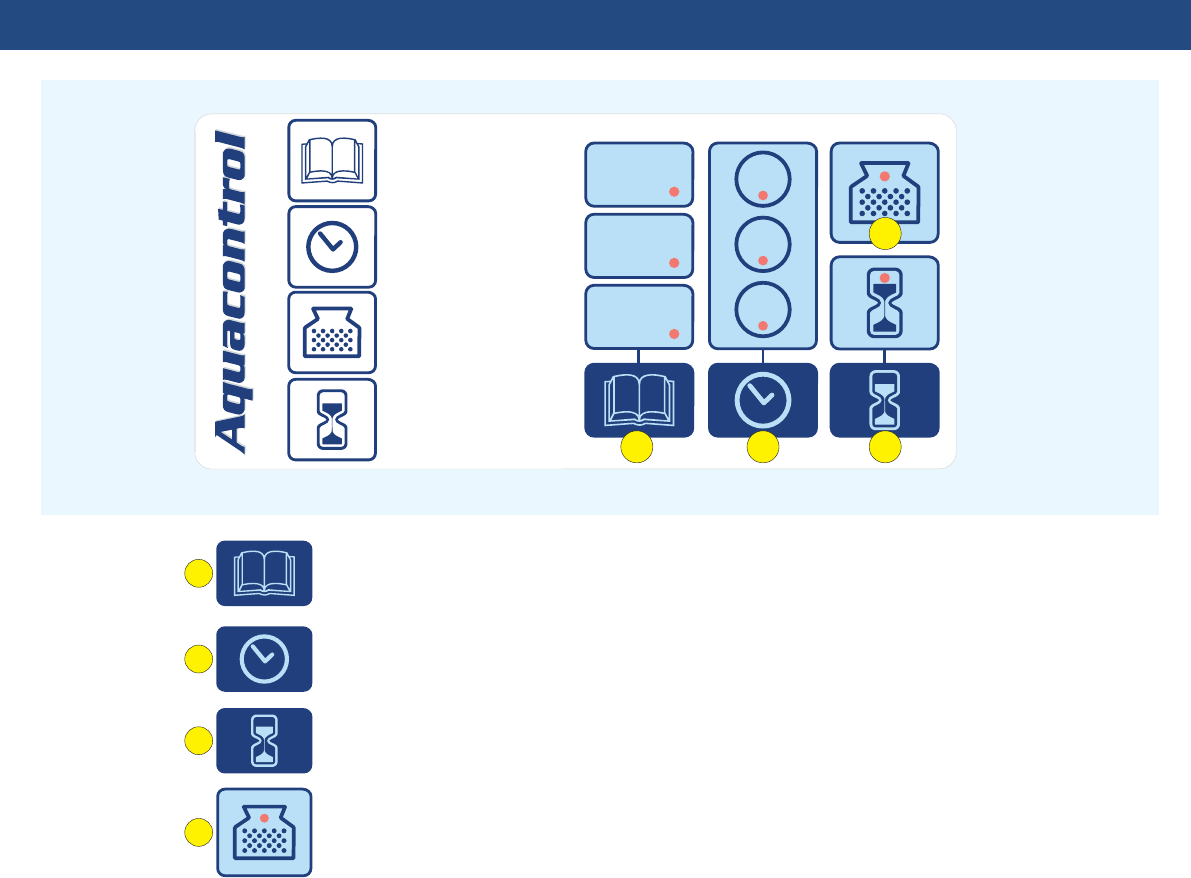
Aquacontrol
Overlay
Aquacontrol
The Aquacontrol is a unique control panel which communicates
directly with the robot. This gives you the option to program the
time so that the pool can always be cleaned per your request.
If you prefer not to select this feature, the robot will work in default
mode and choose the time parameters for you.
6
PROGRAM
02
PROGRAM
03
PROGRAM
01
96h
48h
72h
Cleaning program
Check filter
Internal timer
External timer
1
2
3
4
1. Cleaning program selection:
Program 01 – 1 hour floor cleaning.
Program 02 – 1.5 hour floor and wall cleaning.
Program 03 – 2 hour floor and wall cleaning.
2. Internal timer - Automatic operation option:
Every 48 hours
Every 72 hours
Every 96 hours
4. Check filter
- Illuminated light means the filter bag must be removed, cleaned and properly installed back into the robot to work efficiently.
1
2
3
4
Model 200 - Aquacontrol Smart Premium
3. External timer –
This feature gives the option to the end user to program the cleaning schedule through an external timer (sold separately).
Pressing this button enables and disables this feature.
7
6
4
3
1
2
CLICK!
CLICK!
8
7
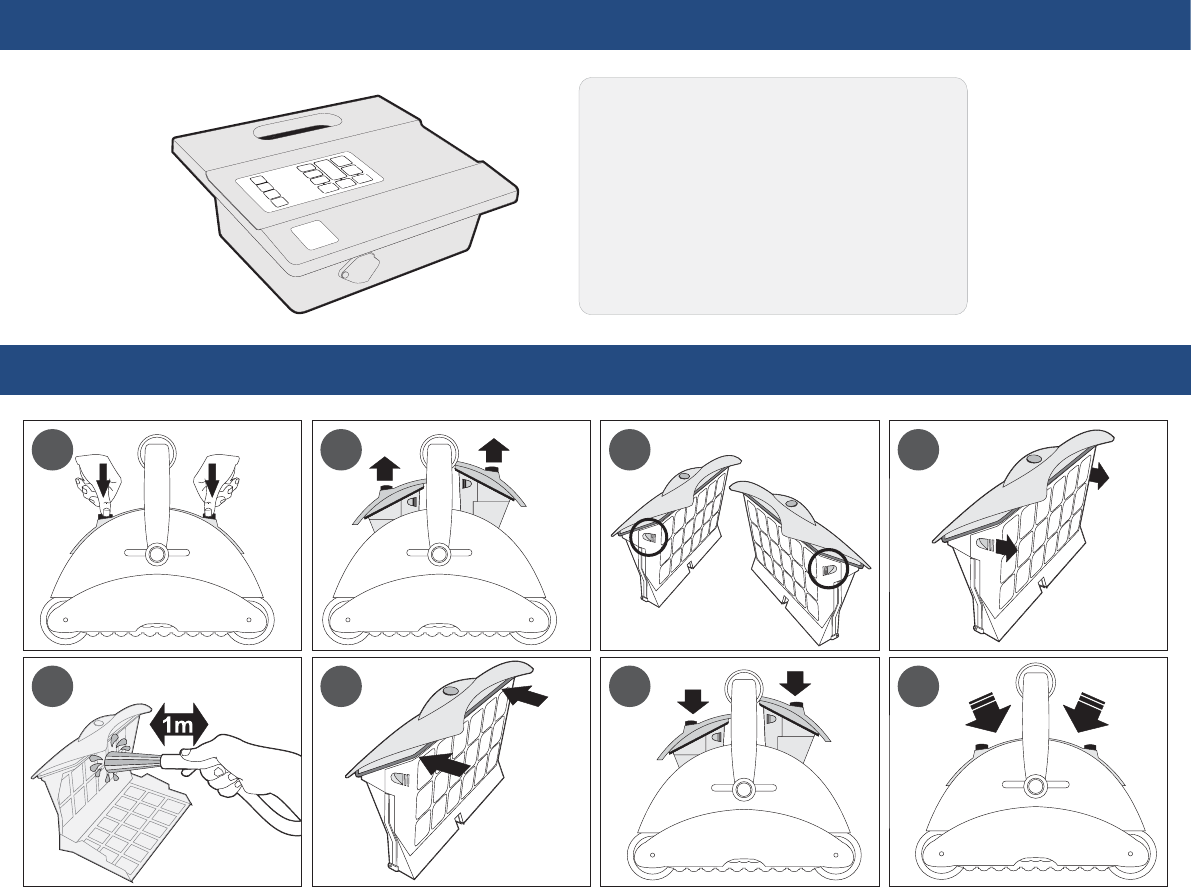
Maintenance and adjustment - Cleaning the filter
5
It is recommended to clean the filter
after each working-cycle
Physical
Dimensions (W * D * H)
Weight
Electrical
Input rating
Output rating
Storage temperature
Operating temperature
Ingress protection
273mm * 242mm * 90mm
1.9 Kg
100-240V~, 50/60Hz, 210W
29V ,6.3A.
-10° C - 60° C
0° C - 45 ° C
IP54
Aquacontrol Power Supply Specifications
Maintenance and adjustment
Cleaning the pump propeller:
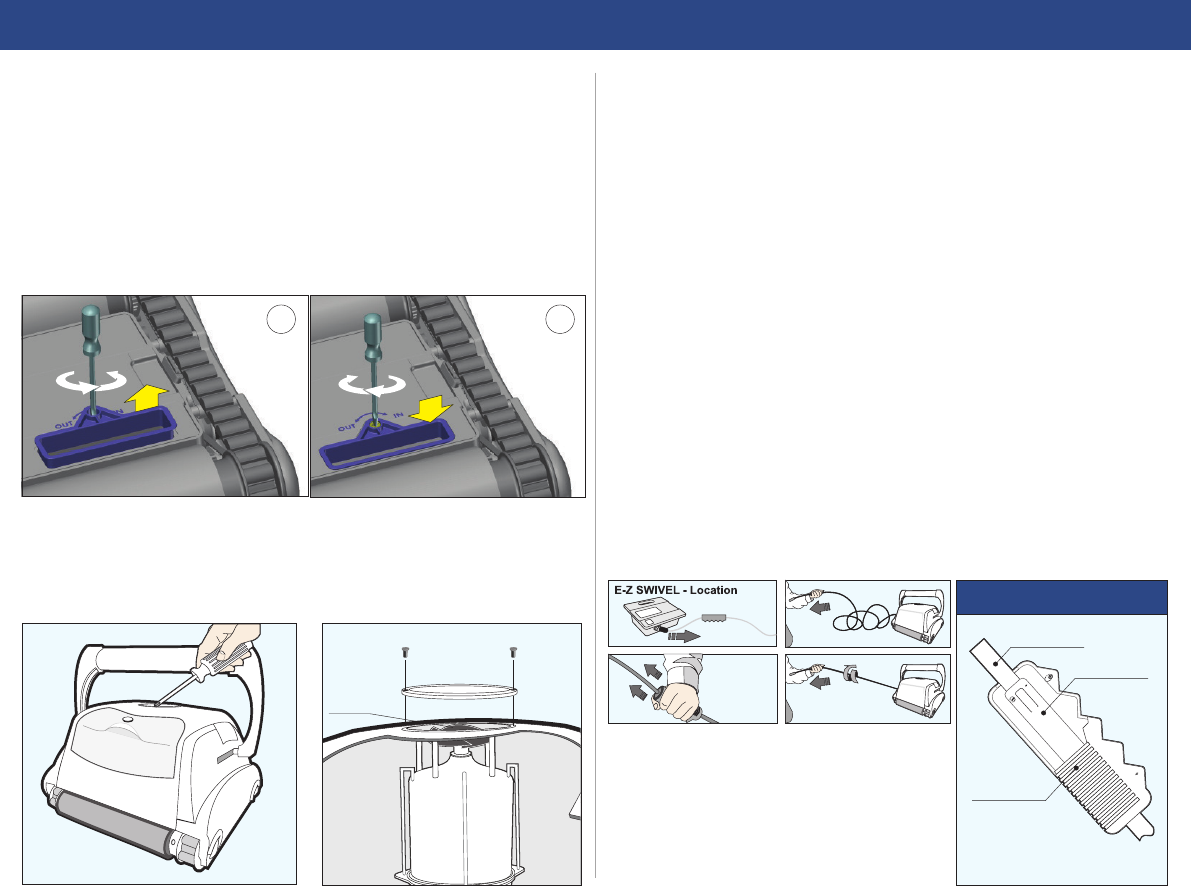
1) Take out the screws from the outlet top
2) Take out the outlet top and remove hair and other debris around propeller
outlet top
propeller
Screws
8
Adjusting the suction valve:
In order to increase suction power, the valves located underneath your cleaner can be
adjusted by pulling out the rim of the valve.
Before lowering the rim of the valve, make sure there is enough clearance and the unit
movements won’t be obstructed by any obstacles on the swimming pool floor or walls,
such as (drains, steps, etc.)
1) To pull out the rim rotate counterclockwise using a screwdriver (Fig. A)
2) To retract the rim rotate clockwise using a screwdriver (Fig. B)
A
B
CABLE CARE
The cable may become twisted after a period of time in use. To correct this condition,
simply lock the moveable handle on the top of the cleaner in the opposite diagonal
direction. The pool cleaner will now travel in the opposite direction while cleaning your
pool and the cable will uncoil. Check the cable periodically for external damage. If the
problem persists, use the E-Z Swivel device.
Place the robot on the ground and unplug the cable
from the transformer. With one hand, holding the E-Z
Swivel, walk away from the robot, pulling the cable to
its full length. The core will rotate inside the cover
and in this way will untangle the cable.
patent pending
Cable Assy
Core
Handle
Cover
E-Z SWIVEL
Shut off and unplug the power supply every time you remove the cleaner from the
water.
Clean the filter bag after every cycle.
Periodically straighten out the floating cable.
Replace worn brushes to ensure maximum cleaning performance
Save your cleaner's packaging for off-season storage or for shipping the unit to
your
dealer if service is required.
Leave your pool cleaner in the water for 15 to 20 minutes after every cleaning cycle.
Do not leave your cleaner in direct sunlight when not in use.
Never leave the power supply in direct sunlight and avoid leaving it in the rain.
Occasionally, you should rinse your cleaner in clean, fresh water. This will lengthen
the service life of the drive belts, drive tracks and scrubbing brushes.
Clean the propeller once a month
CLIMBING UNITS WITH FLOATING HANDLE ONLY
If your unit has floating handle, reverse the diagonal position after every cleaning
cycle to avoid tangling the cable.
Make sure that your pool cleaner positions itself properly on the wall. The machine
handle must rest parallel to the water line upon reaching the surface of the water.
IMPORTANT TIPS:
IMPORTANT:
Please be sure to always keep your pool cleaner properly stored anywhere between
10 to 40 degrees Celsius (50 to 104 degrees Fahrenheit). This will keep the motors,
plastics and seals protected. Failure to comply will result in loss of warranty.
Robot can be used in water with temperatures ranging from 13°C to 35°C (55°F to
95°F). However, the recommended optimal temperature is between 22°C and 32°C
(72°F and 90°F)
IMPORTANT:
The transformer cord can only be replaced with the aid of special tools,
normally available only to authorized dealers, distributors and service centers.
9
Maintenance and adjustment
1
2
3
4
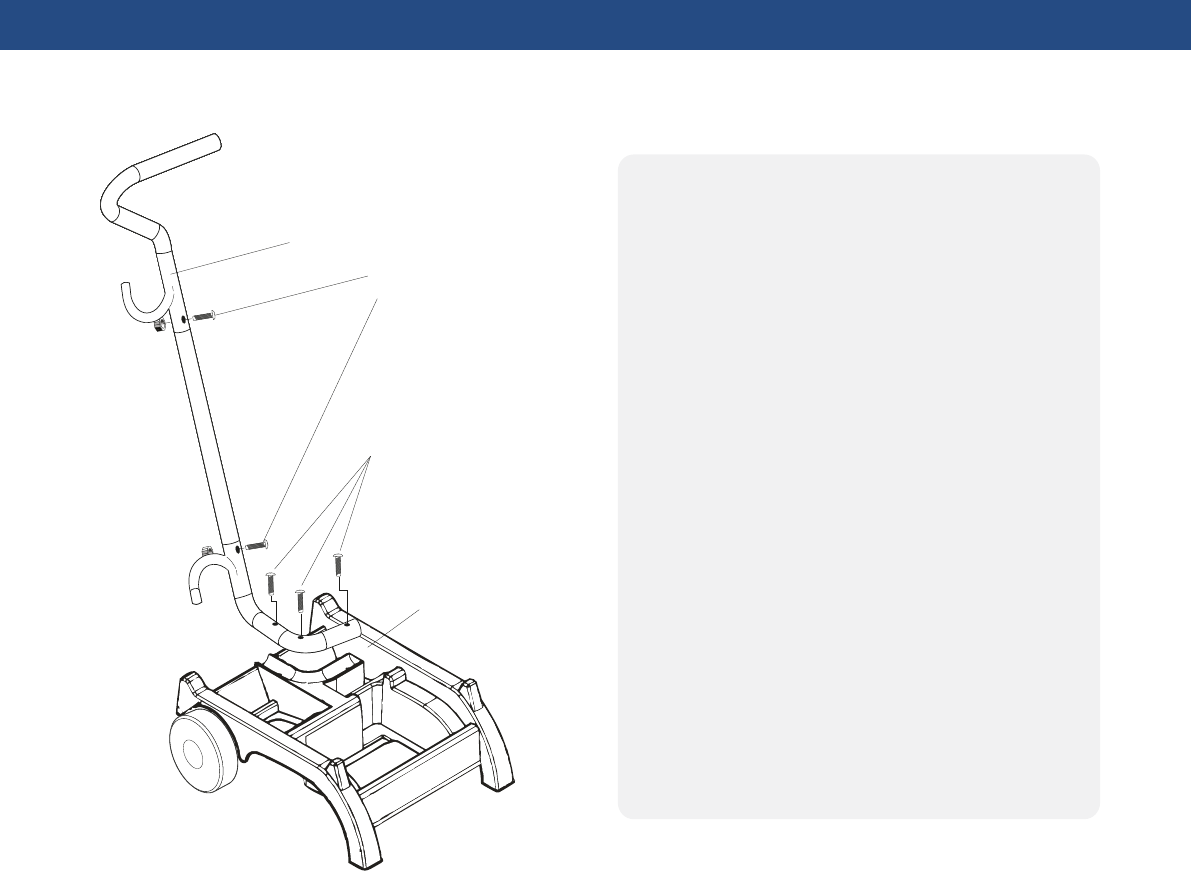
1.Caddy handle
3. Body screws
2. Handle screws
4. Caddy body
Parts
Installation Instructions
Caddy Installation
1. INSTALL THE ENTIRE CADDY
HANDLE using the two handle
screws (2) as is shown in the picture.
2. INSERT THE CADDY HANDLE
into the caddy body special place
and fix it with three body screws (3)
as is shown in the picture.
10
Troubleshooting Guide
11
PLEASE CHECK THE FOLLOWING BEFORE CALLING YOUR SERVICE CENTER
Before troubleshooting, the pool cleaner must be disconnected from the power supply and the power supply must be unplugged from the electrical outlet to prevent damage to the
unit and possible personal injury.
1. Unit does not pump water or move:
a) Check to see if electric outlet has power.
b) Check if transformer is plugged into a grounded outlet and the grey cable
assembly is plugged into the transformer.*
c) Switch the power supply “OFF” and “ON” a few times. Allow 45 seconds
between “ON” and “OFF”.
d) Check for and remove any debris such as hair, string, or leaves that may be
obstructing the free movement of the Drive Tracks.
2. Unit does not pump water at all, or pumps slowly but moves:
a) Check to see if propeller is seized due to accumulation of hair or debris on the
propellers. Remove the top screws on each outlet top and clean the propeller.
When reassembling the top cover, do not overtighten the screws.
b) Check to see if the filter bags are thoroughly clean. Clean as necessary.
c) If a and b are negative, check the pump motors. If they are not functioning
send the unit to your service center.
3. Unit does not move but does pump water:
a) Check to see if forward/reverse motion is obstructed by foreign matter; hair,
debris, etc. on drive tracks or there is an entanglement with the power cord.
b) Check for loose drive motor (3) connections.
c) If a, and b are negative, check the Master motor (and Slave motor if equiped)
motors. If one or the other is not functioning, send the unit to your service
center.
4. Unit does not pick up dirt and debris:
a) Check 2a and 2b of this guide.
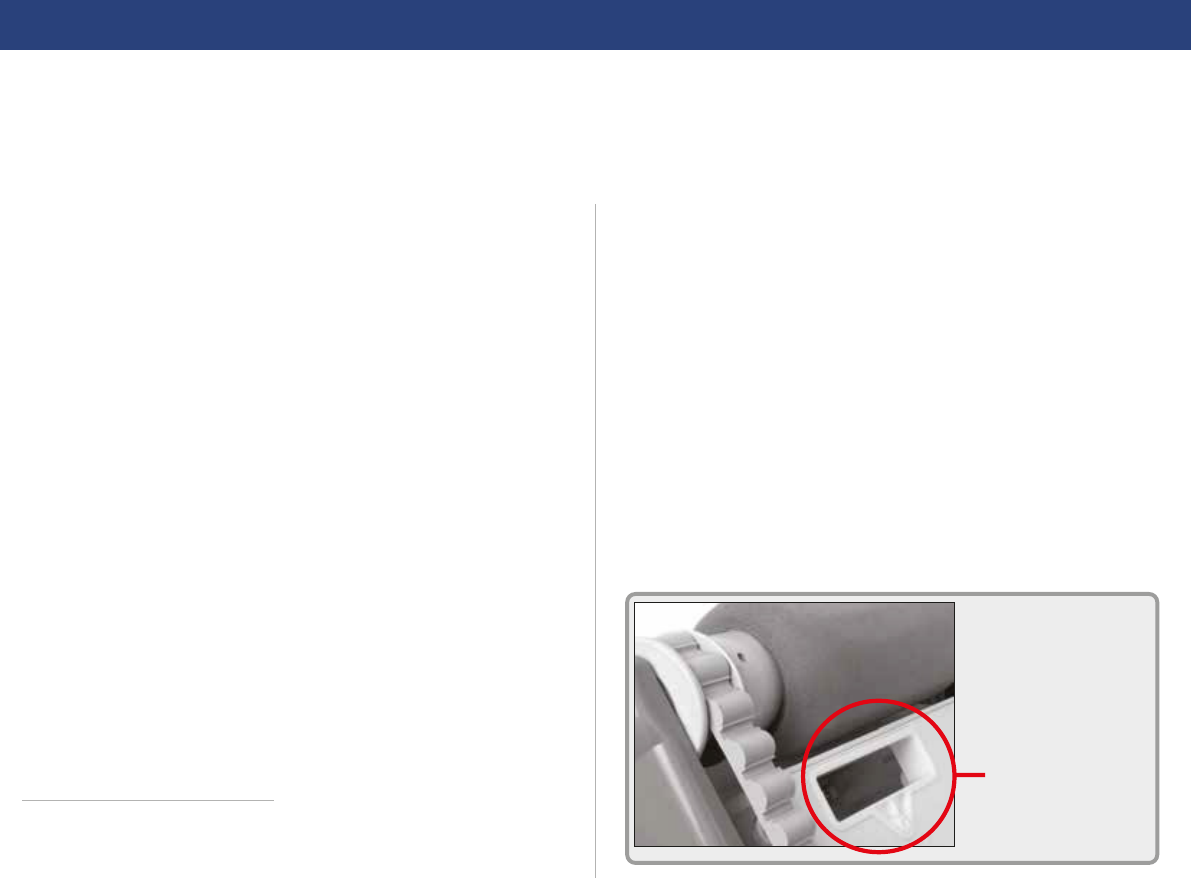
b) Check the Intake Valve Flaps on the underside of your unit (see image
bellow). The Flaps should move freely to open and close. Clean and free the
Valve Flaps if necessary.
c) Check the height of the intake rim. If necessary, adjust the height with a screw
driver (for detailssee previous page)
*The transformer cord can only be replaced with the aid of special purpose tools normally available only to
authorized dealers, distributors and service centers.
5. Unit does not seem to cover the entire pool:
a) Most likely a thorough cleaning of the filter bags is needed.
b) Check to see that the floating cable is properly spread out and is untangled.
c) Allow the unit to run in the pool for the entire cleaning cycle.
d) Make sure that the Floating Handle (if equiped) is locked diagonally across
the top of your unit's body.
e) Check that the Pump Motoris operating. Please refer to the section 2 of this
guide
f) After following all of the above, if there is still a problem, call your dealer for
specific additional assistance.
6. Debris Comes Out Of The Unit When Removing It From Pool
(Top Access Lid Does Not Close Properly)
a) Lock Release - Check that the Lock release mechanism is not damaged. The
lid edges should be aligned with the unit's body. Make sure the lid is
engaged into the lock mechanism and snaps into place when inserted.
b) Intake Valves - Check that the intake valve flaps on the underside of your
unit (see image bellow) move freely to open and close. Clean flaps if
necessary.
Intake Valve
WARRANTY TERMS AND CONDITIONS
12
Astral Pool Australia Pty Ltd (ABN 97 007 284 504) ("Astral Pool") provides the following warranty in relation
to its Robotic Pool Cleaners.
Our goods come with guarantees that cannot be excluded under the Australian Consumer Law. You are
entitled to a replacement or refund for a major failure and for compensation for any other reasonably
foreseeable loss or damage. You are also entitled to have the goods repaired or replaced if the goods fail to
be of acceptable quality and the failure does not amount to a major failure.
The benefits of this warranty are in addition to any rights and remedies imposed by Australian state and
federal legislation that cannot be excluded. Nothing in this warranty is to be interpreted as excluding,
restricting or modifying any state or federal legislation applicable to the supply of goods and services which
cannot be excluded, restricted or modified.
Your Astralpool Robotic Pool Cleaner is covered by a limited 3 year warranty against defect in material and assembly.
Warranty Period
Robot Motor, Drives and Electrical System
Transformer
The rollers, tracks, pulleys, filter cartridge or bag
Caddy (if included)
3 Years
2 Years
1 Year
1 Year
Parts
WARRANTY CLAIMS
13
1.If a fault covered by warranty occurs, the customer must first contact AstralPool at the contact address listed
below, or an Authorised AstralPool Service Agent.
2. Any warranty claim must be accompanied by:
(a) proof of purchase;
(b) full details of the alleged defect; and
(c) appropriate documentation (such as historical and maintenance records).
3. The customer must make the Product available to AstralPool or its Authorised AstralPool Service Agent for
inspection and testing. AstralPool or its Authorised AstralPool Service Agent will attend the premises where the
Product is installed for inspection and testing.
4. If such inspection and testing finds no defect in the Product, the customer must pay AstralPool's usual costs
of service work and testing. If such inspection and testing finds a defect that is not covered by this warranty, the
customer must pay AstralPool's usual costs of service work plus any parts and labour required to repair the
Product, unless recoverable from AstralPool on the failure of any statutory guarantee under the ACL.
5. If your Robot Cleaner needs to be returned to Astralpool the following is required:
6. For Service please return to your nearest AstralPool Trade Centre which can be found at:
http://www.astralpool.com.au/contact
(a) Your Robot Cleaner must be packaged carefully including your name, address and contact
number.
(b) Delivered freight prepaid to your nearest AstralPool Warehouse.
(c) You must also include a copy of your invoice showing date of purchase or date of handover of
your swimming pool.
(d) Description of the fault.
EXCLUSIONS AND LIMITATIONS
14
EXCLUSIONS
The warranty will not apply where:
(a) the customer is in breach of the Terms and Conditions of Sale;
(b) the Product was used for a purpose other than one it was intended for;
(c) the Product was repaired, modified or altered by any person other than AstralPool;
(d) the Product has not been installed, maintained and/or operated in complete compliance with the
installation and operating instructions and any instructions by AstralPool;
(e) the Product has been subject to accident, negligence, alteration, abuse or misuse.
The warranty does not extend to:
a) normal wear and tear;
b) weather and other environmental conditions including but not limited to storm, flood, and/or heat wave
damage; or
c) service and maintenance items.
Examples of exclusions include but are not limited to:
• Incorrect installation
• External power spikes / surge
• Normal wear and tear of consumable parts such as rollers, pulleys, drive belts and filter cartridge/bag
LIMITATIONS
AstralPool makes no express warranties or representations other than set out in this warranty.
The repair or replacement of the Product or part of the Product is the absolute limit of AstralPool's liability under
Libble takes abuse of its services very seriously. We're committed to dealing with such abuse according to the laws in your country of residence. When you submit a report, we'll investigate it and take the appropriate action. We'll get back to you only if we require additional details or have more information to share.
Product:
Forumrules
To achieve meaningful questions, we apply the following rules:
First, read the manual;
Check if your question has been asked previously;
Try to ask your question as clearly as possible;
Did you already try to solve the problem? Please mention this;
Is your problem solved by a visitor then let him/her know in this forum;
To give a response to a question or answer, do not use this form but click on the button 'reply to this question';
Your question will be posted here and emailed to our subscribers. Therefore, avoid filling in personal details.
Register
Register getting emails for Astralpool RTX Robotic Pool Cleaner at:
new questions and answers
new manuals
You will receive an email to register for one or both of the options.
Get your user manual by e-mail
Enter your email address to receive the manual of Astralpool RTX Robotic Pool Cleaner in the language / languages: English as an attachment in your email.
The manual is 7,68 mb in size.
You will receive the manual in your email within minutes. If you have not received an email, then probably have entered the wrong email address or your mailbox is too full. In addition, it may be that your ISP may have a maximum size for emails to receive.
The manual is sent by email. Check your email
If you have not received an email with the manual within fifteen minutes, it may be that you have a entered a wrong email address or that your ISP has set a maximum size to receive email that is smaller than the size of the manual.
The email address you have provided is not correct.
Please check the email address and correct it.
Your question is posted on this page
Would you like to receive an email when new answers and questions are posted? Please enter your email address.