3.2Turn your phone on and off ................................................................................................................................11
3 .8Customise the Main Menu.....................................................................................................................................15
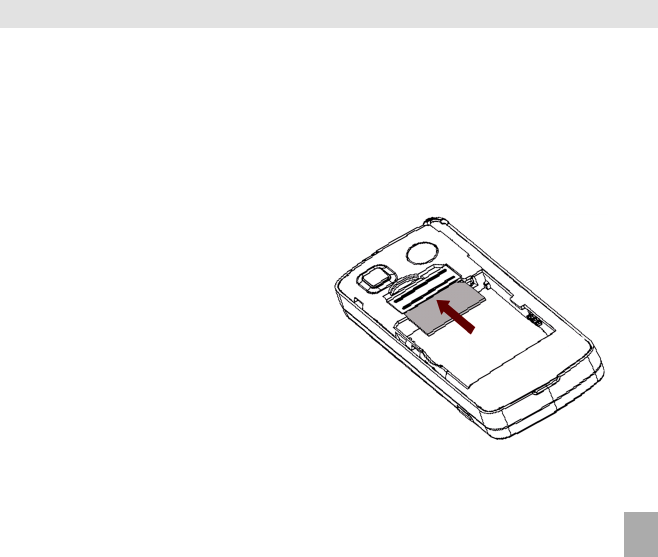
4.1How to insert the USIM Card ..................................................................................................................................19
4.24.2
4.24.2
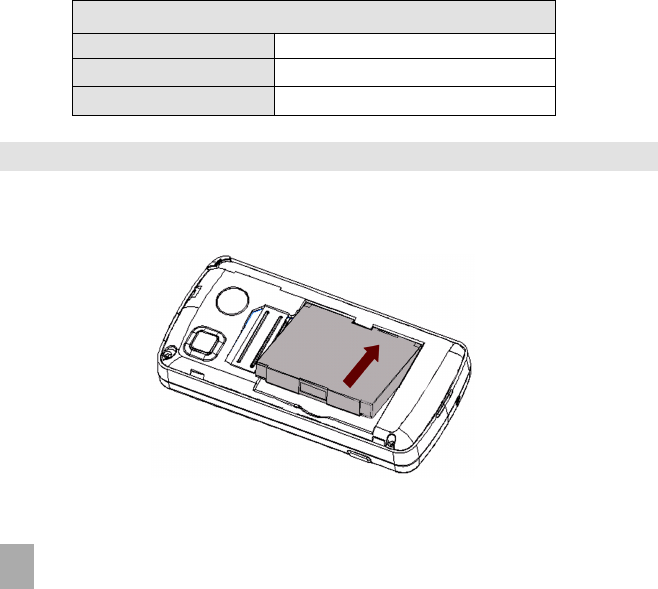
4.2How to insert the battery.......................................................................................................................................20
4.34.3
4.34.3
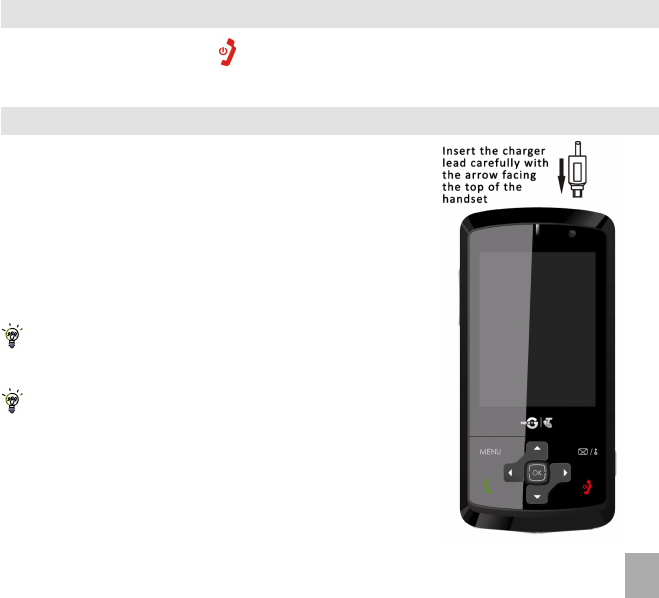
4.3How to switch the phone On or Off......................................................................................................................21
4.44.4
4.44.4
4.4How to connect the charger ..................................................................................................................................21
4.54.5
4.54.5
4 .5Tips about charging and battery life.....................................................................................................................22
4.64.6
4.64.6
4.6How to set the time and date................................................................................................................................22
4.74.7
4.74.7
4.7How to lock/unlock the phone ..............................................................................................................................23
5 .1How to make a voice call........................................................................................................................................24
5.25.2
5.25.2
5 .2How to answer an incoming call...........................................................................................................................24
5.35.3
5.35.3
5 . 3How to send a Text Message (SMS)........................................................................................................................25
6.1How to enter my Contacts.....................................................................................................................................26
6.26.2
6.26.2
6.2How to copy all Contacts from a USIM card........................................................................................................26
6.36.3
6.36.3
6 .3How to search my Contacts...................................................................................................................................26
6.46.4
6.46.4
6.4How to add a Contact from a received call number...........................................................................................27
3
6.56.5
6.56.5
6 .5How to add a Contact from a received SMS (Text Message)...............................................................................27
6.66.6
6.66.6
6.6How to set a dedicated ringtone or image to a Contact .....................................................................................27
6.76.7
6.76.7
6 . 7How to set Speed Dial numbers..............................................................................................................................28
6.86.8
6.86.8
6 . 8How to make a call using Speed Dial.....................................................................................................................28
6.96.9
6.96.9
6 .9How to update an existing Contact.......................................................................................................................28
7 .1How to make a Voice Call.......................................................................................................................................30
7.27.2
7.27.2
7.2How to make a Voice Call from my Contacts.......................................................................................................30
7.37.3
7.37.3
7.3How to view and make a Voice Call from my Call History..................................................................................30
7.47.4
7.47.4
7 .4Call options during an active Voice Call................................................................................................................31
7.57.5
7.57.5
7 . 5How to activate Speakerphone..............................................................................................................................31
7.67.6
7.67.6
7 . 6How to answer a Call...............................................................................................................................................31
7.77.7
7.77.7
7 .7How to use the headphones (Personal Handsfree)..............................................................................................32
7.87.8
7.87.8
7 .8How to make a Video Call.......................................................................................................................................32
7.97.9
7.97.9
7.9Call options during an active Video Call................................................................................................................33
7.107.10
7.107.10
7.10How to answer a Video Call....................................................................................................................................34
7.117.11
7.117.11
7.11How to make Emergency Calls...............................................................................................................................34
8 . 1How to send a Text Message (SMS)........................................................................................................................38
8.28.2
8.28.2
8 . 2How to view a received Text Message (SMS).........................................................................................................39
8.38.3
8.38.3
8.3How to use Predictive Text....................................................................................................................................39
8.48.4
8.48.4
8 . 4Special Characters and SMS Message Length........................................................................................................40
8.58.5
8.58.5
8 . 5How to send a Multimedia Message (MMS)..........................................................................................................41
8.68.6
8.68.6
8 . 6How to receive a Multimedia Message (MMS) and save an attachment............................................................42
8.78.7
8.78.7
8 .7MMS and SMS Advanced Settings.........................................................................................................................42
8 .9How to send an Email.............................................................................................................................................43
8.108.10
8.108.10
8.10How to receive an Email.........................................................................................................................................44
4
8.118.11
8.118.11
8.11How to set up automatic Email Retrieval ..............................................................................................................44
8.128.12
8.128.12
8.12How to create a new Mailbox .................................................................................................................................45
99
99
9
How to Personalise the PhoneHow to Personalise the Phone
How to Personalise the PhoneHow to Personalise the Phone
9.5Switch the Keytones off........................................................................................................................................48
9.69.6
9.69.6
9 .6Change the Backlight Duration..............................................................................................................................48
9.79.7
9.79.7
9 . 7Change the Display Brightness...............................................................................................................................49
9.89.8
9.89.8
9.8Set the Keyboard Light...........................................................................................................................................49
9.12Add a Greeting.........................................................................................................................................................51
9.139.13
9.139.13
9.13What is the PIN Code?.............................................................................................................................................51
9.149.14
9.149.14
9.14What is the Handset Security Code?.....................................................................................................................52
9.159.15
9.159.15
9.15Additional notes on PIN Codes ..............................................................................................................................52
11.2Set Appointments using the Calendar...................................................................................................................56
1212
1212
12
Imaging - Pictures and VideosImaging - Pictures and Videos
Imaging - Pictures and VideosImaging - Pictures and Videos
12.1How to use the Camera...........................................................................................................................................58
12.212.2
12.212.2
12.2How to use the Video Camera ................................................................................................................................59
12.312.3
12.312.3
12.3Viewing pictures and videos ...................................................................................................................................60
13.2Browse and play music files from My Files..........................................................................................................62
13.313.3
13.313.3
13.3Use the Music Player to Play music files ...............................................................................................................62
14.1Use the phone as a Mass Storage Device with a MicroSD Card...........................................................................63
14.214.2
14.214.2
14.2Connect your phone to a computer....................................................................................................................63
14.4Use Join Me to copy photos to your computer..................................................................................................65
14.514.5
14.514.5
14.5Use Join Me to transfer music from a computer .................................................................................................67
14.614.6
14.614.6
14.6Enter Contacts using Join Me .................................................................................................................................69
14.714.7
14.714.7
14.7Copy Contacts from the phone to the computer (create a backup)..................................................................70
14.814.8
14.814.8
14.8Import Contacts from Microsoft Outlook............................................................................................................71
14.914.9
14.914.9
14.9Export Contacts to Outlook...................................................................................................................................71
14.1014.10
14.1014.10
14.10Use Join Me to send an SMS..................................................................................................................................72
14.1114.11
14.1114.11
14.11Import Calendar events from Microsoft Outlook................................................................................................72
14.1214.12
14.1214.12
14.12Use Join Me to connect to the Internet ...............................................................................................................73
14.1314.13
14.1314.13
14.13Connect to a Bluetooth Device.............................................................................................................................74
14.1414.14
14.1414.14
14.14Use Bluetooth to send files to another device....................................................................................................75
14.1514.15
14.1514.15
14.15Connect to a Bluetooth Car Kit or Personal Headset..........................................................................................75
14.1614.16
14.1614.16
14.16Dial Up Networking using USB or Bluetooth.......................................................................................................76
15.9Games and Applications..........................................................................................................................................84
15.11Access Point Settings...............................................................................................................................................85
15.15Your Handset is Network Locked..........................................................................................................................86
16.1Troubleshooting and FAQ’s...................................................................................................................................88
16.4Support Information ...............................................................................................................................................93
16.516.5
16.516.5
16.5Warranty Information ............................................................................................................................................93
12 Imaging - Pictures and Videos12 Imaging - Pictures and Videos
12 Imaging - Pictures and Videos12 Imaging - Pictures and Videos
12 Imaging - Pictures and Videos
12.112.1
12.112.1
12.1
How to use the CameraHow to use the Camera
How to use the CameraHow to use the Camera
How to use the Camera
• From the idle screen long press the camera button to activate the camera.
• Press the camera button to shoot.
• Tap the screen to show the control panel
* The default photo size is low resolution for easy sending by email or MMS. Change if required.
ModeMode
ModeMode
Mode
SettingsSettings
SettingsSettings
Settings
Settings > More…Settings > More…
Settings > More…Settings > More…
Settings > More…
LandscapeBrightnessShutter sound
PortraitFront or Back CameraLocation: Handset or Micro SD Card
VideoWhite BalancePhoto size *
MMS VideoEffect (Normal, Sepia or B&W)Quality
E-mail VideoMore...
59
12.212.2
12.212.2
12.2
How to use the Video CameraHow to use the Video Camera
How to use the Video CameraHow to use the Video Camera
How to use the Video Camera
• From the idle screen long press the camera button to activate the camera.
• Tap the screen to show the Control panel.
• Tap
ModeMode
ModeMode
Mode >
VideVide
VideVide
Vide
oo
oo
o to switch to the
VideVide
VideVide
Vide
oo
oo
o mode.
• Press the camera button to start recording
• When you stop recording the video is automatically saved to
My VideosMy Videos
My VideosMy Videos
My Videos
ModeMode
ModeMode
Mode
SettingsSettings
SettingsSettings
Settings
Settings > MoreSettings > More
Settings > MoreSettings > More
Settings > More
LandscapeBrightnessRecord
PortraitFront or Back CameraLocation: Handset or Micro SD Card
VideoWhite BalanceFormat
MMS VideoEffect (Normal, Sepia or B&W)Quality
E-mail VideoMore...Other
60
12.312.3
12.312.3
12.3
Viewing pictures and videosViewing pictures and videos
Viewing pictures and videosViewing pictures and videos
Viewing pictures and videos
View the file directly from File ManagerView the file directly from File Manager
View the file directly from File ManagerView the file directly from File Manager
View the file directly from File Manager
• From the idle screen, press the
Menu KeyMenu Key
Menu KeyMenu Key
Menu Key to open the main menu.
• Tap
My FileMy File
My FileMy File
My File
s > Phots > Phot
s > Phots > Phot
s > Phot
os > My Photos > My Phot
os > My Photos > My Phot
os > My Phot
os os
os os
os or
My FileMy File
My FileMy File
My File
s > Vides > Vide
s > Vides > Vide
s > Vide
os > My Videos > My Vide
os > My Videos > My Vide
os > My Vide
osos
osos
os.
• Tap your desired picture or video to view.
• Tap
OO
OO
O
penpen
penpen
pen or
PlayPlay
PlayPlay
Play to view in full screen mode.
• Slide left and right to view the next / previous image
View the Picture Gallery (includes Slideshow)View the Picture Gallery (includes Slideshow)
View the Picture Gallery (includes Slideshow)View the Picture Gallery (includes Slideshow)
View the Picture Gallery (includes Slideshow)
• From the idle screen, press the
Menu KeyMenu Key
Menu KeyMenu Key
Menu Key to open the main menu.
• Slide left twice and tap the
Picture GalleryPicture Gallery
Picture GalleryPicture Gallery
Picture Gallery to view your photos
• The application scans the handset for all your picture files and displays them in sequence. You can flick
between each picture or tap Slides to view an automated sequence.
Use the Video Player to view all your video contentUse the Video Player to view all your video content
Use the Video Player to view all your video contentUse the Video Player to view all your video content
Use the Video Player to view all your video content
• From the idle screen, press the
Menu KeyMenu Key
Menu KeyMenu Key
Menu Key to open the main menu.
• Slide left twice and tap the
Video Player Video Player
Video Player Video Player
Video Player to view your video files
• The application scans the handset for all your video files.
61
13 Music13 Music
13 Music13 Music
13 Music
To import music files onto the handset see the following sections:
• Import music files from your computer using Join Me (See
ConnectivityConnectivity
ConnectivityConnectivity
Connectivity)
• Import music files from your computer or other device using Bluetooth (See
ConnectivityConnectivity
ConnectivityConnectivity
Connectivity)
• Import music files from a computer using
Mass StorageMass Storage
Mass StorageMass Storage
Mass Storage mode (See
ConnectivityConnectivity
ConnectivityConnectivity
Connectivity)
• Download music from BigPond Music: Tap
BigPBigP
BigPBigP
BigP
ond ond
ond ond
ond from the idle screen.
– At high volumes, prolonged listening to audio devices can damage hearing.
13.113.1
13.113.1
13.1
FM RadioFM Radio
FM RadioFM Radio
FM Radio
• From the idle screen, press the
Menu KeyMenu Key
Menu KeyMenu Key
Menu Key to open the main menu.
• Slide left twice to select
FM RadioFM Radio
FM RadioFM Radio
FM Radio:
62
• Insert the personal hands free kit (PHF). The headset acts as the antenna for the FM radio.
• Tap
StSt
StSt
St
ationsations
ationsations
ations to show all the channels and
EE
EE
E
ditdit
ditdit
dit the desired channel name and frequency.
• If an incoming call is received, the radio will suspend while you answer the call.
13.213.2
13.213.2
13.2
Browse and play music files from My FilesBrowse and play music files from My Files
Browse and play music files from My FilesBrowse and play music files from My Files
Browse and play music files from My Files
• From the idle screen, press the
Menu KeyMenu Key
Menu KeyMenu Key
Menu Key to open the main menu.
• Tap
My FileMy File
My FileMy File
My File
s > Audios > My Audioss > Audios > My Audios
s > Audios > My Audioss > Audios > My Audios
s > Audios > My Audios.
• Tap your desired music file to start the player.
13.313.3
13.313.3
13.3
Use the Music Player to Play music filesUse the Music Player to Play music files
Use the Music Player to Play music filesUse the Music Player to Play music files
Use the Music Player to Play music files
• From the idle screen, press the
Menu KeyMenu Key
Menu KeyMenu Key
Menu Key to open the main menu.
• Slide left twice and tap
Music Player. Music Player.
Music Player. Music Player.
Music Player. The player will scan the handset and memory card (if fitted)
for all music files.
63
14 Connectivity14 Connectivity
14 Connectivity14 Connectivity
14 Connectivity
14.114.1
14.114.1
14.1
Use the phone as a Mass Storage Device with a MicroSD CardUse the phone as a Mass Storage Device with a MicroSD Card
Use the phone as a Mass Storage Device with a MicroSD CardUse the phone as a Mass Storage Device with a MicroSD Card
Use the phone as a Mass Storage Device with a MicroSD Card
With a memory card fitted, when you connect the handset to a computer you seeWith a memory card fitted, when you connect the handset to a computer you see
With a memory card fitted, when you connect the handset to a computer you seeWith a memory card fitted, when you connect the handset to a computer you see
With a memory card fitted, when you connect the handset to a computer you see
two prompts:two prompts:
two prompts:two prompts:
two prompts:
Mass StorageMass Storage
Mass StorageMass Storage
Mass Storage
modemode
modemode
mode enables the MicroSD Memory card to be connected to the computer as an external
drive. The handset can be used as a USB mass storage device. Files can be transferred to and from the
handset via the USB cable.
PC Suite ModePC Suite Mode
PC Suite ModePC Suite Mode
PC Suite Mode enables the handset to interface with Join Me via the USB cable.
14.214.2
14.214.2
14.2
Connect your phone to a computerConnect your phone to a computer
Connect your phone to a computerConnect your phone to a computer
Connect your phone to a computer
Join Me is an application to connect your phone to a computer. Once installed Join Me is used to manage
contacts, messages and calendar functions. It is also used to connect to the internet and transfer music
/ picture files. Please install the software before connecting your phone.
CompatibilityCompatibility
CompatibilityCompatibility
Compatibility
• The software is
onlyonly
onlyonly
only compatible with Windows 7, Vista, XP and MAC OS 10.5.11 and above but cannot
be guaranteed to run on these systems.
• The software may not run in all environments, or in conjunction with other software.
• Multi-boot systems are not supported.
• The software should be installed and run with the Administrator login.
• Please install the software before connecting your phone and follow the installation steps.
• For installation support please consult our web site FAQ’s http://www.zte.com.au
64
14.314.3
14.314.3
14.3
Installing Join MeInstalling Join Me
Installing Join MeInstalling Join Me
Installing Join Me
Please install the Join Me CD before connecting the phone to the computer.
• Insert the CD provided into the computer
• The CD auto-starts after a few seconds
• If auto run does not start then run Setup.exe from the CD to launch the installation shield
• Please follow the prompts to install the software
• When the installation is complete plug the handset into the computer using the USB lead supplied
• The USB lead is unique and should not be used for other devices (It is not the same as digital camera
leads)
• When the handset is plugged in the computer automatically installs the drivers. If this fails consult our
website for more help or access Windows Device Manager to update the drivers. See http://www.zte.
com.au for instructions
If the phone is connected to the computer before installing the CD then the drivers will not be
installed correctly:
• Unplug the phone, un-install then re-install Join Me
• See http://www.zte.com.au for more assistance
65
14.414.4
14.414.4
14.4
Use Join Me to copy photos to your computerUse Join Me to copy photos to your computer
Use Join Me to copy photos to your computerUse Join Me to copy photos to your computer
Use Join Me to copy photos to your computer
Transfer photos from the handset to your computer using Join Me:
•
Make sure the phone is switched on and connected to the computer and Join MeMake sure the phone is switched on and connected to the computer and Join Me
Make sure the phone is switched on and connected to the computer and Join MeMake sure the phone is switched on and connected to the computer and Join Me
Make sure the phone is switched on and connected to the computer and Join Me
has been installed.has been installed.
has been installed.has been installed.
has been installed.
•
Connect the phoneConnect the phone
Connect the phoneConnect the phone
Connect the phone to the computer
using the USB leadusing the USB lead
using the USB leadusing the USB lead
using the USB lead supplied
•
PC ConnectionPC Connection
PC ConnectionPC Connection
PC Connection needs to be set to
USB.USB.
USB.USB.
USB. Check
MenuMenu
MenuMenu
Menu >
SettingsSettings
SettingsSettings
Settings flick left to
ConnectionConnection
ConnectionConnection
Connection
•
Double-clickDouble-click
Double-clickDouble-click
Double-click the
Join Me iconJoin Me icon
Join Me iconJoin Me icon
Join Me icon on the
desktopdesktop
desktopdesktop
desktop.
• Select the phone type and
press Connectpress Connect
press Connectpress Connect
press Connect.
• Select the
Media tabMedia tab
Media tabMedia tab
Media tab as shown on the next page
•
Double clickDouble click
Double clickDouble click
Double click on
My PhoneMy Phone
My PhoneMy Phone
My Phone in the
bottom left hand cornerbottom left hand corner
bottom left hand cornerbottom left hand corner
bottom left hand corner.
•
Double clickDouble click
Double clickDouble click
Double click on
PhotosPhotos
PhotosPhotos
Photos to expand the folder structure
•
Double clickDouble click
Double clickDouble click
Double click on
My PicturesMy Pictures
My PicturesMy Pictures
My Pictures to see the picture files on the right hand side.
•
Drag*Drag*
Drag*Drag*
Drag* the required file from the list and
Drop*Drop*
Drop*Drop*
Drop* it into the required
destination folderdestination folder
destination folderdestination folder
destination folder on the PC.
• The file is copied to the destination folder (Desktop in the example below).
• Files can only be copied into
Folders Folders
Folders Folders
Folders displayed within Join Me.
The default picture size is very small when viewed on the computer.
**
**
*
Drag and DropDrag and Drop
Drag and DropDrag and Drop
Drag and Drop is a method of copying files. Click on the file, hold down the left mouse button, move
the mouse pointer to the required destination and release the left mouse button to Drop the file to
that location.
AlternativelyAlternatively
AlternativelyAlternatively
Alternatively right click on the file and use
CopyCopy
CopyCopy
Copy and
PastePaste
PastePaste
Paste from the menu.
66
1. Select the
Media TMedia T
Media TMedia T
Media T
abab
abab
ab
2.Select My Pictures folder on
My PhoneMy Phone
My PhoneMy Phone
My Phone
3.
DragDrag
DragDrag
Drag the picture from
My PicturesMy Pictures
My PicturesMy Pictures
My Pictures to a
folder folder
folder folder
folder on the
PCPC
PCPC
PC
4.
AlternativelyAlternatively
AlternativelyAlternatively
Alternatively right click on the file and
use
CopyCopy
CopyCopy
Copy and
PastePaste
PastePaste
Paste from the menu
Files can only be copied into
FoldersFolders
FoldersFolders
Folders
displayed within Join Me. You cannot drag a
file from Join Me directly to your desktop.
Copy files (e.g. Photos) from the phone to the computer using Join Me
67
14.514.5
14.514.5
14.5
Use Join Me to transfer music from a computerUse Join Me to transfer music from a computer
Use Join Me to transfer music from a computerUse Join Me to transfer music from a computer
Use Join Me to transfer music from a computer
Music files can be transferred onto the phone using Join Me.
•
Make sure the phone is switched on and connected to the computer, and Join MeMake sure the phone is switched on and connected to the computer, and Join Me
Make sure the phone is switched on and connected to the computer, and Join MeMake sure the phone is switched on and connected to the computer, and Join Me
Make sure the phone is switched on and connected to the computer, and Join Me
has been installed.has been installed.
has been installed.has been installed.
has been installed.
•The PC Connection on the handset needs to be set to USB
Menu > SettingsMenu > Settings
Menu > SettingsMenu > Settings
Menu > Settings tab right to
ConnectionConnection
ConnectionConnection
Connection
> PC Connection > USB> PC Connection > USB
> PC Connection > USB> PC Connection > USB
> PC Connection > USB
•
Double clickDouble click
Double clickDouble click
Double click the
Join Me iconJoin Me icon
Join Me iconJoin Me icon
Join Me icon on the
desktopdesktop
desktopdesktop
desktop.
• Select the phone type and
press Connectpress Connect
press Connectpress Connect
press Connect.
• Select the
Media tabMedia tab
Media tabMedia tab
Media tab as shown in the picture on the next page.
•
Double click My PhoneDouble click My Phone
Double click My PhoneDouble click My Phone
Double click My Phone in the
bottom left hand cornerbottom left hand corner
bottom left hand cornerbottom left hand corner
bottom left hand corner.
•
Double click AudiosDouble click Audios
Double click AudiosDouble click Audios
Double click Audios to open up the
Audios folderAudios folder
Audios folderAudios folder
Audios folder.
• Locate the
music filesmusic files
music filesmusic files
music files on the computer by browsing through the Windows files in Join Me.
•
DragDrag
DragDrag
Drag the required file from the
top halftop half
top halftop half
top half (computer) and drop it into
My AudiosMy Audios
My AudiosMy Audios
My Audios on the phone.
• The file is copied to the destination folder (as shown below).
Files can only be copied intoFiles can only be copied into
Files can only be copied intoFiles can only be copied into
Files can only be copied into
FoldersFolders
FoldersFolders
Folders.
• Alternatively
Right ClickRight Click
Right ClickRight Click
Right Click on the file, choose
CopyCopy
CopyCopy
Copy, then go to the destination folder and
PastePaste
PastePaste
Paste.
Note:Note:
Note:Note:
Note: DRM protected files that you have downloaded cannot be copied or sent to other devices.
68
Copy files (e.g. Music) from the Computer to the handset using Join Me
Files can only be transferred into
user foldersuser folders
user foldersuser folders
user folders on the
handsethandset
handsethandset
handset.
E.g. Transfer music files into My
Audios, pictures into My Pictures
and java games and applications
into the Others folder All other
folders are write protected.
See image below:
1.Select the Media tab
2.Browse your PC in the upper
window to find the file you wish
to copy to the handset
3.Drag the file from the PC to the
Audios folder on the handset.
69
14.614.6
14.614.6
14.6
Enter Contacts using Join MeEnter Contacts using Join Me
Enter Contacts using Join MeEnter Contacts using Join Me
Enter Contacts using Join Me
Use Join Me to enter new contacts into the phone.
The save position ‘Local’ refers to the computer. Remember to change this if you want to save
contacts directly to the handset or use the copy function to copy contacts from Local to Phone.
There is less storage available on the USIM card so some of the fields are greyed out.
The USIM card can store up to four fields (depending on type).
These are usually Number 1, Number 2, Number 3 and Email
On the phonebook tab enter
Contacts directly using the PC.
Select ‘New Contact’ then complete
the required fields.
Select the Save Position; Local,
Phone, (U)SIM or All
70
14.714.7
14.714.7
14.7
Copy Contacts from the phone to the computer (create a backup)Copy Contacts from the phone to the computer (create a backup)
Copy Contacts from the phone to the computer (create a backup)Copy Contacts from the phone to the computer (create a backup)
Copy Contacts from the phone to the computer (create a backup)
CopyCopy
CopyCopy
Copy one or all of the contacts from
LocalLocal
LocalLocal
Local to
PhonePhone
PhonePhone
Phone using the
same methodsame method
same methodsame method
same method.
1.Select the Phonebook tab in Join
Me
2.Select the (U)SIM Card
3.Select All contacts by checking
the box at the top of the list
4.Drag the complete list to Local
to create a local backup copy.
71
14.814.8
14.814.8
14.8
Import Contacts from Microsoft OutlookImport Contacts from Microsoft Outlook
Import Contacts from Microsoft OutlookImport Contacts from Microsoft Outlook
Import Contacts from Microsoft Outlook
• Launch Microsoft Outlook, have Join Me running and connected to the handset.
• Make sure you are on the Phonebook tab in Join Me, see image in 14.7 above.
•
Right click anywhere on the Contacts gridRight click anywhere on the Contacts grid
Right click anywhere on the Contacts gridRight click anywhere on the Contacts grid
Right click anywhere on the Contacts grid or press
SyncSync
SyncSync
Sync and select
Import From OutlookImport From Outlook
Import From OutlookImport From Outlook
Import From Outlook.
• Only contacts in the
root folderroot folder
root folderroot folder
root folder (Contacts) of Outlook are copied.
• The following fields are imported from Outlook to Join Me as below:
OutlookOutlook
OutlookOutlook
Outlook
Join MeJoin Me
Join MeJoin Me
Join Me
OutlookOutlook
OutlookOutlook
Outlook
Join MeJoin Me
Join MeJoin Me
Join Me
Full NameNameBusiness AddressCompany
Mobile Telephone NumberMobileCompany NameDepartment
Home Telephone NumberTel HomeDepartmentJob Tile
Home FaxFaxJob TileBusiness Fax
Business Telephone NumberTel OfficeBusiness FaxEmail(Public)
Other Telephone NumberMobile(Other)Email AddressEmail(Other)
Home AddressHome AddressEmail Address 2Business Address
14.914.9
14.914.9
14.9
Export Contacts to OutlookExport Contacts to Outlook
Export Contacts to OutlookExport Contacts to Outlook
Export Contacts to Outlook
• Launch Microsoft Outlook, have Join Me running and connected to the handset.
• Make sure you are on the Phonebook tab in Join Me, see image in 13.7 above.
• Select the number you want to export.
•
Right click any selected contactsRight click any selected contacts
Right click any selected contactsRight click any selected contacts
Right click any selected contacts and select
Export to OutlookExport to Outlook
Export to OutlookExport to Outlook
Export to Outlook
• If you select
Default MappingDefault Mapping
Default MappingDefault Mapping
Default Mapping the default items of the selected contacts are exported to Outlook.
• Press
OKOK
OKOK
OK to export the Contacts.
72
14.1014.10
14.1014.10
14.10
Use Join Me to send an SMS Use Join Me to send an SMS
Use Join Me to send an SMS Use Join Me to send an SMS
Use Join Me to send an SMS
• Select the
MessageMessage
MessageMessage
Message tab
• Click the
New MessageNew Message
New MessageNew Message
New Message button to draft an SMS
• The new message window appears. Enter the phone number or…
• Click the
magnifying glassmagnifying glass
magnifying glassmagnifying glass
magnifying glass to select a contact from
LocalLocal
LocalLocal
Local,
PhonePhone
PhonePhone
Phone or
(U)SIM card(U)SIM card
(U)SIM card(U)SIM card
(U)SIM card.
• Tick the box for the chosen Contact, press the right arrow to choose.
• Multiple contacts can be chosen. Click
OKOK
OKOK
OK to continue
• Type your message in the text entry field and press Send when complete.
SMS Messages sent from Join Me are stored in the Local folder of the Message tab.
14.1114.11
14.1114.11
14.11
Import Calendar events from Microsoft Outlook Import Calendar events from Microsoft Outlook
Import Calendar events from Microsoft Outlook Import Calendar events from Microsoft Outlook
Import Calendar events from Microsoft Outlook
• Launch Microsoft Outlook, have Join Me running and connected to the handset.
• Note, at the end of the import process Outlook can shut down. Please save any information beforehand.
• Make sure you are on the Calendar tab in Join Me
• Click
SyncSync
SyncSync
Sync and select
Import Calendar From OutlookImport Calendar From Outlook
Import Calendar From OutlookImport Calendar From Outlook
Import Calendar From Outlook.
• All calendar entries are copied into Join Me
• Select the required entries, or select All
• Copy the imported entries from Local to Phone
73
14.1214.12
14.1214.12
14.12
Use Join Me to connect to the Internet Use Join Me to connect to the Internet
Use Join Me to connect to the Internet Use Join Me to connect to the Internet
Use Join Me to connect to the Internet
You can use the mobile phone as a dial up modem to connect a computer to the internet.
•
Make sure the phone is switched on and connected to the computer and Join MeMake sure the phone is switched on and connected to the computer and Join Me
Make sure the phone is switched on and connected to the computer and Join MeMake sure the phone is switched on and connected to the computer and Join Me
Make sure the phone is switched on and connected to the computer and Join Me
has been installed.has been installed.
has been installed.has been installed.
has been installed.
• Connect the USB lead
•The PC Connection on the handset needs to be set to USB
Menu > SettingsMenu > Settings
Menu > SettingsMenu > Settings
Menu > Settings Flick left to go to
Connection > PC Connection - USBConnection > PC Connection - USB
Connection > PC Connection - USBConnection > PC Connection - USB
Connection > PC Connection - USB
•
Double clickDouble click
Double clickDouble click
Double click the
Join MeJoin Me
Join MeJoin Me
Join Me icon on the
desktopdesktop
desktopdesktop
desktop.
• Select the
Internet tabInternet tab
Internet tabInternet tab
Internet tab as shown below.
• Press
Connect to InternetConnect to Internet
Connect to InternetConnect to Internet
Connect to Internet go online.
74
14.1314.13
14.1314.13
14.13
Connect to a Bluetooth DeviceConnect to a Bluetooth Device
Connect to a Bluetooth DeviceConnect to a Bluetooth Device
Connect to a Bluetooth Device
Bluetooth is used as a wireless connection for headsets, hands free car kits and computers. Not all
applications or devices are supported. Bluetooth is an open forum and manufacturers choose which
functions to implement.
The handset supports Bluetooth 2.1 with Handsfree, Headset, FTP, DUN and PBAP profiles.
Consult the other device for connection instructions and to find the pairing password.
Please follow the process carefully. Connecting to a Bluetooth device first time around requires
authentication. This is where both devices share a password.
When the devices are paired and connected the process is more transparent.
Connect to a Bluetooth Device
Menu > TMenu > T
Menu > TMenu > T
Menu > T
oo
oo
o
ols > Bluetols > Bluet
ols > Bluetols > Bluet
ols > Bluet
oo
oo
o
othoth
othoth
oth
• Tap
Bluet Bluet
Bluet Bluet
Bluet
oo
oo
o
oth Ooth O
oth Ooth O
oth O
n/Ofn/Of
n/Ofn/Of
n/Of
ff
ff
f to switch Bluetooth on. Tap
Visibility OVisibility O
Visibility OVisibility O
Visibility O
nn
nn
n.
• The phone name can be customised if required under Local Attribute
• Tap
Find D Find D
Find D Find D
Find D
ee
ee
e
vicvic
vicvic
vic
ee
ee
e to look for Bluetooth devices nearby.
•
Note:Note:
Note:Note:
Note: The chosen device must be switched on and in pairing mode.
• Available devices are listed in the device list. Tap the required device and tap
YY
YY
Y
ee
ee
e
ss
ss
s to
PP
PP
P
airair
airair
air.
• Enter the
pass codepass code
pass codepass code
pass code for your device usually 0000 or 1234.
• Once the password has been shared and accepted by both devices they are paired.
• Select My Device > Authorise to enable un-prompted, automatic pairing (eg for Headphones)
75
14.1414.14
14.1414.14
14.14
Use Bluetooth to send files to another deviceUse Bluetooth to send files to another device
Use Bluetooth to send files to another deviceUse Bluetooth to send files to another device
Use Bluetooth to send files to another device
Menu > My FilesMenu > My Files
Menu > My FilesMenu > My Files
Menu > My Files
• Browse through the folders to find the file(s) you want to send. Eg My Photos
• Tap
OO
OO
O
ptions > Sendptions > Send
ptions > Sendptions > Send
ptions > Send
via Bluetvia Bluet
via Bluetvia Bluet
via Bluet
oo
oo
o
othoth
othoth
oth
• Check the file(s) you wish to send and tap
OKOK
OKOK
OK
• Select the device you wish to send to or tap
Search Search
Search Search
Search to find a new device
• Enter a
pass codepass code
pass codepass code
pass code and use the same
pass codepass code
pass codepass code
pass code on the other device (eg 0000) if required
Receive files from another device
• When another device sends you a file tap
YY
YY
Y
ee
ee
e
ss
ss
s to authorise the connection
• Tap
YY
YY
Y
ee
ee
e
ss
ss
s to accept the file
14.1514.15
14.1514.15
14.15
Connect to a Bluetooth Car Kit or Personal HeadsetConnect to a Bluetooth Car Kit or Personal Headset
Connect to a Bluetooth Car Kit or Personal HeadsetConnect to a Bluetooth Car Kit or Personal Headset
Connect to a Bluetooth Car Kit or Personal Headset
Follow the manufacturer’s instructions carefully to enable Pairing Mode on the other device. It is not
possible to connect the phone to the other device unless Pairing Mode is enabled. Select the required
device, share a
pass codepass code
pass codepass code
pass code and press
ConnectConnect
ConnectConnect
Connect.
Menu > TMenu > T
Menu > TMenu > T
Menu > T
oo
oo
o
ols > Bluetols > Bluet
ols > Bluetols > Bluet
ols > Bluet
oo
oo
o
oth > Ooth > O
oth > Ooth > O
oth > O
n,n,
n,n,
n,
Visibility O Visibility O
Visibility O Visibility O
Visibility O
n.n.
n.n.
n.
• Make sure Bluetooth is
OnOn
OnOn
On and in
Visibility modeVisibility mode
Visibility modeVisibility mode
Visibility mode and the
other deviceother device
other deviceother device
other device is in
Pairing ModePairing Mode
Pairing ModePairing Mode
Pairing Mode.
• Tap
Find DFind D
Find DFind D
Find D
ee
ee
e
vicvic
vicvic
vic
e e
e e
e to search for available devices nearby
• Tap the required device and press
YY
YY
Y
ee
ee
e
ss
ss
s to
PP
PP
P
airair
airair
air
• Enter the
pass codepass code
pass codepass code
pass code specified in the user guide of the far end device (eg 0000 or 1234)
• When the devices are paired the handset reports the device has been added
76
• Tap
My deMy de
My deMy de
My de
vicvic
vicvic
vic
e e
e e
e and tap the newly added device. Tap
CC
CC
C
onneconnec
onneconnec
onnec
tt
tt
t to enable calls to transfer to the other
device. Tap
Authorise DAuthorise D
Authorise DAuthorise D
Authorise D
ee
ee
e
vicvic
vicvic
vic
e e
e e
e to allow the device to automatically Connect when in range.
• When connected, incoming calls are sent to the Bluetooth device automatically. Press the call button
to answer.
• During a call press
Options > Switch to HandsetOptions > Switch to Handset
Options > Switch to HandsetOptions > Switch to Handset
Options > Switch to Handset to return the call to the handset
14.1614.16
14.1614.16
14.16
Dial Up Networking using USB or Bluetooth Dial Up Networking using USB or Bluetooth
Dial Up Networking using USB or Bluetooth Dial Up Networking using USB or Bluetooth
Dial Up Networking using USB or Bluetooth
Dial Up Networking (DUN) is a method to connect your PC or MAC to the internet using the handset as
a dial up modem.
a) Dial up Networking over USB using the Windows Wizarda) Dial up Networking over USB using the Windows Wizard
a) Dial up Networking over USB using the Windows Wizarda) Dial up Networking over USB using the Windows Wizard
a) Dial up Networking over USB using the Windows Wizard
Make sure Join Me is installed, the handset is on and connected to the PC using the USB lead supplied.
Example for Windows XP
On the PC go
Start > Accessories > Communications > New Connection WizardStart > Accessories > Communications > New Connection Wizard
Start > Accessories > Communications > New Connection WizardStart > Accessories > Communications > New Connection Wizard
Start > Accessories > Communications > New Connection Wizard and follow
the prompts:
Connect to the internet > Set up my connection manually > Connect using a dial upConnect to the internet > Set up my connection manually > Connect using a dial up
Connect to the internet > Set up my connection manually > Connect using a dial upConnect to the internet > Set up my connection manually > Connect using a dial up
Connect to the internet > Set up my connection manually > Connect using a dial up
modemmodem
modemmodem
modem
Select the ZTE USB Modem and uncheck any other modems
The
ISP NameISP Name
ISP NameISP Name
ISP Name can be any name you like eg. T870 Handset
Set the
Phone numberPhone number
Phone numberPhone number
Phone number to *99# > The
Username and PasswordUsername and Password
Username and PasswordUsername and Password
Username and Password must be
blankblank
blankblank
blank >
‘Make this the default Internet connection’ can be unchecked (optional) >
‘Add a shortcut to this connection to my Desktop’ can be checked (optional) >
FinishFinish
FinishFinish
Finish
77
b) Dial Up Networking over Bluetoothb) Dial Up Networking over Bluetooth
b) Dial Up Networking over Bluetoothb) Dial Up Networking over Bluetooth
b) Dial Up Networking over Bluetooth
Bluetooth can be considered as a wireless replacement for the USB connection and is compatible with
any DUN enabled Bluetooth device. Use Bluetooth to connect the handset to a PC or MAC and use Dial
Up Networking to create an internet connection.
1.Both devices must have Bluetooth ON
Handset:Handset:
Handset:Handset:
Handset:
Menu > T Menu > T
Menu > T Menu > T
Menu > T
oo
oo
o
ols > Bluetols > Bluet
ols > Bluetols > Bluet
ols > Bluet
oo
oo
o
oth Ooth O
oth Ooth O
oth O
n,n,
n,n,
n,
Visibility O Visibility O
Visibility O Visibility O
Visibility O
nn
nn
n
PC or MAC:PC or MAC:
PC or MAC:PC or MAC:
PC or MAC: Enable Bluetooth using the appropriate hardware or software settings
2. Set the handset PC Connection to Bluetooth
Menu > Settings > Connection > PC Connection - BluetoothMenu > Settings > Connection > PC Connection - Bluetooth
Menu > Settings > Connection > PC Connection - BluetoothMenu > Settings > Connection > PC Connection - Bluetooth
Menu > Settings > Connection > PC Connection - Bluetooth
3. Create a New Connection on the PC or MAC
Launch the Bluetooth manager software on your PC or MAC. This varies depending on your platform,
hardware and software. Create a new connection and enter the same password, when prompted, on
each device. Select the T870 Handset, the Dial Number is *99# and the Username and Passwords are
blank.
When the Bluetooth manager opens a connection to the handset, accept the incoming connection
by pressing Yes when prompted.
The PC or MAC can now connect to the internet via the handset.
The features described are dependant on external suppliers’ hardware and software and vary
between platforms and components. Consult your system supplier for more information.
78
14.1714.17
14.1714.17
14.17
PC Connection PC Connection
PC Connection PC Connection
PC Connection
Menu > Settings > Connection > PC Connection > BluetoothMenu > Settings > Connection > PC Connection > Bluetooth
Menu > Settings > Connection > PC Connection > BluetoothMenu > Settings > Connection > PC Connection > Bluetooth
Menu > Settings > Connection > PC Connection > Bluetooth
PC Connection specifies how the handset initiates data connections to the PC. It can be set to be via
Bluetooth or via the USB cable. Join Me requires the USB connector, other transfers can operate via
Bluetooth if supported by your system.
If
PC Connection > BluetoothPC Connection > Bluetooth
PC Connection > BluetoothPC Connection > Bluetooth
PC Connection > Bluetooth is selected then
Join Me will not connectJoin Me will not connect
Join Me will not connectJoin Me will not connect
Join Me will not connect to the handset.
Restore the PC Connection to USB to re-enable Join Me.
14.1814.18
14.1814.18
14.18
CC
CC
C
onneconnec
onneconnec
onnec
tions Summary Ttions Summary T
tions Summary Ttions Summary T
tions Summary T
abab
abab
ab
lele
lele
le
Connection:Connection:
Connection:Connection:
Connection:
Key PointsKey Points
Key PointsKey Points
Key Points
ConnectionConnection
ConnectionConnection
Connection
SettingsSettings
SettingsSettings
Settings
TransferTransfer
TransferTransfer
Transfer
SpeedSpeed
SpeedSpeed
Speed
Mass Storage ModeMass Storage Mode
Mass Storage ModeMass Storage Mode
Mass Storage Mode
•Micro SD / SDHC Card
required
•Handset appears as an
external drive
•USB lead is connected
USB Mode = Mass Storage
Mode
Fastest transfer of files
BluetoothBluetooth
BluetoothBluetooth
Bluetooth
•Wireless file transfer to
compatible devices.
•Wireless modem
connection
PC Connection =
Bluetooth for wireless
modem connection
Fast transfer of files
Join MeJoin Me
Join MeJoin Me
Join Me
•Transfer files to a
computer using Join
Me software.
•Synchronise Contacts
and Calendar events
and back up your
handset data.
PC Connection = USB
Mode
Slower transfer
79
15 Other Facilities15 Other Facilities
15 Other Facilities15 Other Facilities
15 Other Facilities
15.115.1
15.115.1
15.1
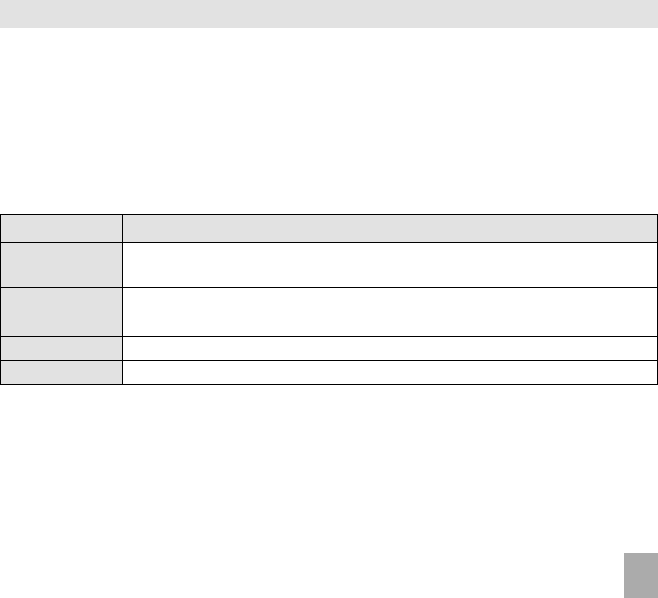
BrowserBrowser
BrowserBrowser
Browser
• From the idle screen, press the
Menu KeyMenu Key
Menu KeyMenu Key
Menu Key to open the main menu.
• Tap
TT
TT
T
oo
oo
o
olsols
olsols
ols >
BrBr
BrBr
Br
oo
oo
o
wserwser
wserwser
wser
Google SearchGoogle Search
Google SearchGoogle Search
Google SearchOpen the Google search page
HomepageHomepage
HomepageHomepage
HomepageThe home page is set by your Service Provider
Enter AddressEnter Address
Enter AddressEnter Address
Enter AddressEnter a web address manually using the keypad
BookmarksBookmarks
BookmarksBookmarks
BookmarksLink to a previously saved page
HistoryHistory
HistoryHistory
HistoryDisplay pages visited
Saved PageSaved Page
Saved PageSaved Page
Saved PageView a local copy of a previously saved page
Browser SettingsBrowser Settings
Browser SettingsBrowser Settings
Browser SettingsDisplay browser settings (see below)
Version InfoVersion Info
Version InfoVersion Info
Version InfoDisplay current browser version
80
ConnectionsConnections
ConnectionsConnections
ConnectionsSets the APN, preset by your service provider
Advanced SettingsAdvanced Settings
Advanced SettingsAdvanced Settings
Advanced SettingsCustomise the browser display modes, sound, cache, cookies etc
Clear CacheClear Cache
Clear CacheClear Cache
Clear CacheClears all cache data
Clear CookiesClear Cookies
Clear CookiesClear Cookies
Clear CookiesDeletes all cookie information
Clear Autofill ListClear Autofill List
Clear Autofill ListClear Autofill List
Clear Autofill ListClears all history data
CertificateCertificate
CertificateCertificate
CertificateList the root, CA and trusted certificates on the handset
Tap
TT
TT
T
oo
oo
o
ols > Brols > Br
ols > Brols > Br
ols > Br
oo
oo
o
wser > Brwser > Br
wser > Brwser > Br
wser > Br
oo
oo
o
wser Setwser Set
wser Setwser Set
wser Set
tingstings
tingstings
tings
15.215.2
15.215.2
15.2
BluetoothBluetooth
BluetoothBluetooth
Bluetooth
You can use Bluetooth to connect your handset to wireless headsets and hands free car kits. You can
also transfer files between your phone and other Bluetooth devices such as another phone or a laptop.
Not all applications or devices can be supported as Bluetooth is an open forum and different manufacturers
adopt different standards and implementation.
• From the idle screen, press the
Menu KeyMenu Key
Menu KeyMenu Key
Menu Key to open the main menu.
• Tap
TT
TT
T
oo
oo
o
ols > Bluetols > Bluet
ols > Bluetols > Bluet
ols > Bluet
oo
oo
o
othoth
othoth
oth >
BluetBluet
BluetBluet
Bluet
oo
oo
o
othoth
othoth
oth
OO
OO
O
nn
nn
n to activate Bluetooth function.
• Tap
Visibility OVisibility O
Visibility OVisibility O
Visibility O
nn
nn
n to make your device to be shown (or not) to another Bluetooth device.
81
Find DeviceFind Device
Find DeviceFind Device
Find Device
Tap
Find DFind D
Find DFind D
Find D
ee
ee
e
vicvic
vicvic
vic
ee
ee
e to search the other Bluetooth devices.
My deviceMy device
My deviceMy device
My device
Tap
My deMy de
My deMy de
My de
vicvic
vicvic
vic
ee
ee
e to list the available Bluetooth devices.
Pairing with another Bluetooth device
Enter the pass code when asked for permission to connect to the device. After the paired device verify the
pass code, the device will be added successfully.
Sending data
Firstly please confirm following two items:
• Enable Bluetooth function.
• The paired device is visible.
1. Select and tap your desired file.
2. Tap
Send via BluetSend via Bluet
Send via BluetSend via Bluet
Send via Bluet
oo
oo
o
othoth
othoth
oth to send the file through Bluetooth.
Receiving data
• Enable Bluetooth function.
1.If the paired device tries to send a file to your phone a popup dialogue will appear
2. Tap
YY
YY
Y
ee
ee
e
ss
ss
s to accept another device request.
3. Tap
YY
YY
Y
ee
ee
e
ss
ss
s again to receive the data.
82
15.315.3
15.315.3
15.3
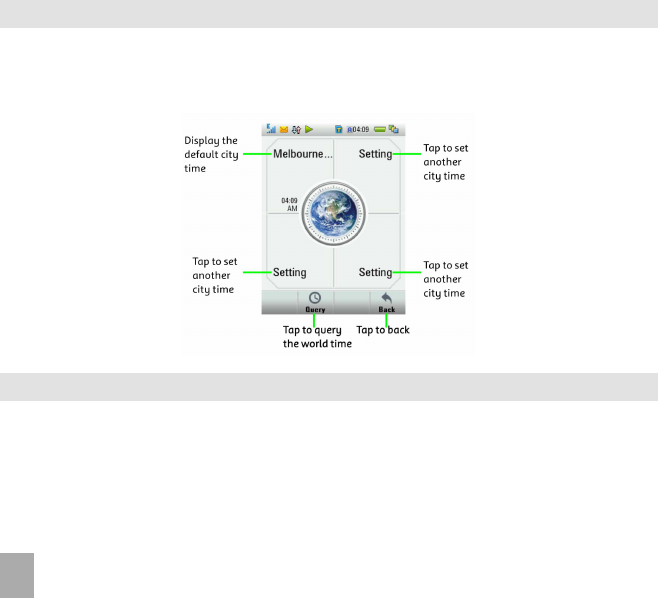
World TimeWorld Time
World TimeWorld Time
World Time
The world time function provides time information on major cities worldwide.
• From the idle screen, press the
Menu KeyMenu Key
Menu KeyMenu Key
Menu Key to open the main menu.
• Tap
TT
TT
T
oo
oo
o
ols > Wols > W
ols > Wols > W
ols > W
orld Timeorld Time
orld Timeorld Time
orld Time.
15.415.4
15.415.4
15.4
CalculatorCalculator
CalculatorCalculator
Calculator
Perform basic arithmetic and calculations, such as addition, subtraction, multiplication, and division.
• From the idle screen, press the
Menu KeyMenu Key
Menu KeyMenu Key
Menu Key to open the main menu.
• Tap
TT
TT
T
oo
oo
o
ols > Cols > C
ols > Cols > C
ols > C
alcalc
alcalc
alc
ulatulat
ulatulat
ulat
oror
oror
or.
83
15.515.5
15.515.5
15.5
NotesNotes
NotesNotes
Notes
MenuMenu
MenuMenu
Menu >
TT
TT
T
oo
oo
o
olsols
olsols
ols >
NotNot
NotNot
Not
ee
ee
e
ss
ss
s allows you to create, edit, and view different kinds of notes, for example,
meeting memos, shopping lists etc.. You can send the notes to other device via Bluetooth.
15.615.6
15.615.6
15.6
ConverterConverter
ConverterConverter
Converter
You can use your handset to convert
CC
CC
C
urur
urur
ur
rr
rr
r
encenc
encenc
enc
yy
yy
y,
ArAr
ArAr
Ar
eaea
eaea
ea,
LL
LL
L
engthength
engthength
ength,
WW
WW
W
eighteight
eighteight
eight and
TT
TT
T
emperemper
emperemper
emper
aturatur
aturatur
atur
ee
ee
e.
• From the idle screen, press the
Menu KeyMenu Key
Menu KeyMenu Key
Menu Key to open the main menu.
•Tap
TT
TT
T
oo
oo
o
ols > Cols > C
ols > Cols > C
ols > C
onvonv
onvonv
onv
erer
erer
er
tt
tt
t
erer
erer
er and select your required application.
15.715.7
15.715.7
15.7
TimerTimer
TimerTimer
Timer
• From the idle screen, press the
Menu KeyMenu Key
Menu KeyMenu Key
Menu Key to open the main menu.
• Tap
TT
TT
T
oo
oo
o
ols > Timerols > Timer
ols > Timerols > Timer
ols > Timer
,,
,,
,
Set to Countdown Timer or Stopwatch mode
15.815.8
15.815.8
15.8
VV
VV
V
oicoic
oicoic
oic
e Re R
e Re R
e R
ecec
ecec
ec
oror
oror
or
derder
derder
der
You can record and save voice memos.
• From the idle screen, press the
Menu KeyMenu Key
Menu KeyMenu Key
Menu Key to open the main menu.
• Slide left twice to
Voice RecorderVoice Recorder
Voice RecorderVoice Recorder
Voice Recorder.
• Tap
StSt
StSt
St
arar
arar
ar
tt
tt
t, tap
PP
PP
P
auseause
auseause
ause if required.
• Tap
CC
CC
C
ontinueontinue
ontinueontinue
ontinue (
CC
CC
C
ontont
ontont
ont
..
..
.) to resume recording.
• Tap
CC
CC
C
ancanc
ancanc
anc
elel
elel
el to stop recording without saving
• Tap
DD
DD
D
oneone
oneone
one to finish recording and save the file.
84
15.915.9
15.915.9
15.9
Games and Applications Games and Applications
Games and Applications Games and Applications
Games and Applications
• From the idle screen, press the
Menu KeyMenu Key
Menu KeyMenu Key
Menu Key to open the main menu.
• Slide left twice and tap
Games &Games &
Games &Games &
Games &
AppsApps
AppsApps
Apps.
• Built in applications are provided by your Service Provider
• Download the latest games from your service provider or other specialist websites
• The handset supports Java Midlet 2.0
• Use Join Me or Mass Storage Mode to copy games from your computer (see Connectivity)
• Games and applications are saved into the Others folder
• Select
OpenOpen
OpenOpen
Open to install the game.
15.10 Connections15.10 Connections
15.10 Connections15.10 Connections
15.10 Connections
• From the idle screen, press the
Menu KeyMenu Key
Menu KeyMenu Key
Menu Key to open the main menu.
• Tap
SetSet
SetSet
Set
tingstings
tingstings
tings.
• Tab right on the top menu bar to get to
CC
CC
C
onneconnec
onneconnec
onnec
tiontion
tiontion
tion
• Tap
CC
CC
C
onneconnec
onneconnec
onnec
tion Settion Set
tion Settion Set
tion Set
tingstings
tingstings
tings.
• Tap
AdAd
AdAd
Ad
dd
dd
d to add a new connection if required
Connections are pre-defined by your service provider and enable the handset to connect to the internet
via WAP and to send multi media messages (MMS). When using an alternate carrier, Add a new Connection
Setting as defined by your service provider.
85
15.11 Access Point Settings15.11 Access Point Settings
15.11 Access Point Settings15.11 Access Point Settings
15.11 Access Point Settings
• From the idle screen, press the
Menu KeyMenu Key
Menu KeyMenu Key
Menu Key to open the main menu.
• Tap
SetSet
SetSet
Set
tingstings
tingstings
tings.
• Flick left to
ConnectionConnection
ConnectionConnection
Connection
• Tap
AcAc
AcAc
Ac
cc
cc
c
ee
ee
e
ss
ss
s
s Ps P
s Ps P
s P
oint Setoint Set
oint Setoint Set
oint Set
tingstings
tingstings
tings.
Access Point Settings (also called APN) are pre-defined by your service provider and enable the handset
to connect to the internet via WAP and to send multi media messages (MMS). When using an alternate
carrier,
AddAdd
AddAdd
Add a new APN setting as defined by your service provider.
Libble takes abuse of its services very seriously. We're committed to dealing with such abuse according to the laws in your country of residence. When you submit a report, we'll investigate it and take the appropriate action. We'll get back to you only if we require additional details or have more information to share.
Product:
Forumrules
To achieve meaningful questions, we apply the following rules:
First, read the manual;
Check if your question has been asked previously;
Try to ask your question as clearly as possible;
Did you already try to solve the problem? Please mention this;
Is your problem solved by a visitor then let him/her know in this forum;
To give a response to a question or answer, do not use this form but click on the button 'reply to this question';
Your question will be posted here and emailed to our subscribers. Therefore, avoid filling in personal details.
Register
Register getting emails for ZTE T-870 at:
new questions and answers
new manuals
You will receive an email to register for one or both of the options.
Get your user manual by e-mail
Enter your email address to receive the manual of ZTE T-870 in the language / languages: English as an attachment in your email.
The manual is 10,28 mb in size.
You will receive the manual in your email within minutes. If you have not received an email, then probably have entered the wrong email address or your mailbox is too full. In addition, it may be that your ISP may have a maximum size for emails to receive.
The manual is sent by email. Check your email
If you have not received an email with the manual within fifteen minutes, it may be that you have a entered a wrong email address or that your ISP has set a maximum size to receive email that is smaller than the size of the manual.
The email address you have provided is not correct.
Please check the email address and correct it.
Your question is posted on this page
Would you like to receive an email when new answers and questions are posted? Please enter your email address.