H4_ERF_DE.fm Seite 100 Donnerstag, 9. November 2006 9:28 09
* Recommended MIC GAIN setting: "L"
* Recommended MIC GAIN setting:
"L - M"
*1 A new file is created at the point when you press the [REC] key.
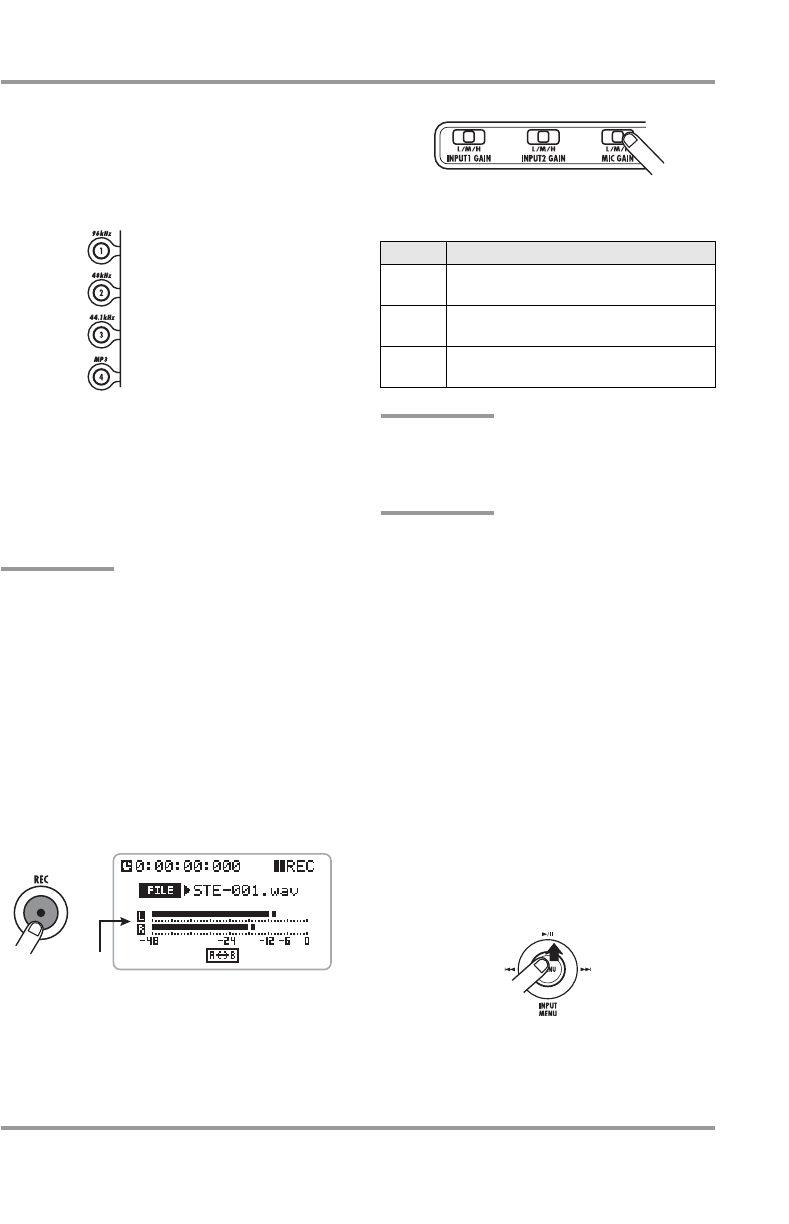
*2-1 This sets the input sensitivity. To record loud sounds, choose the "L"
(low sensitivity) position. For lower-level sounds, the "H" (high
sensitivity) position may be preferable. (For details, see page 31 of the
Operation Manual.)
*2-2 Pressing the [REC] key also allows you to monitor the input level.
Make the setting so that the meter indication does not exceed "0".
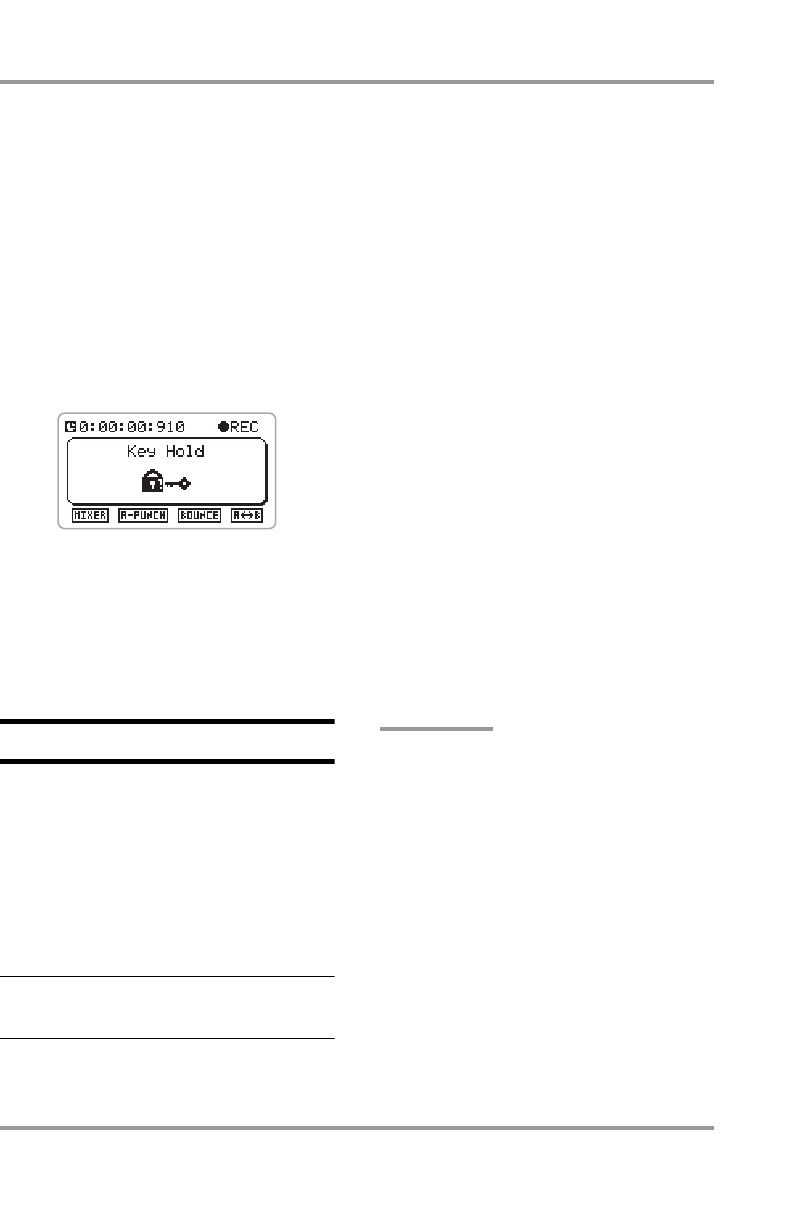
*3-1 While you are recording, you can use the key-hold function to lock the
operation keys of the unit. This will prevent accidental operation.
(For information on this function, see page 79 of the Operation Manual.)
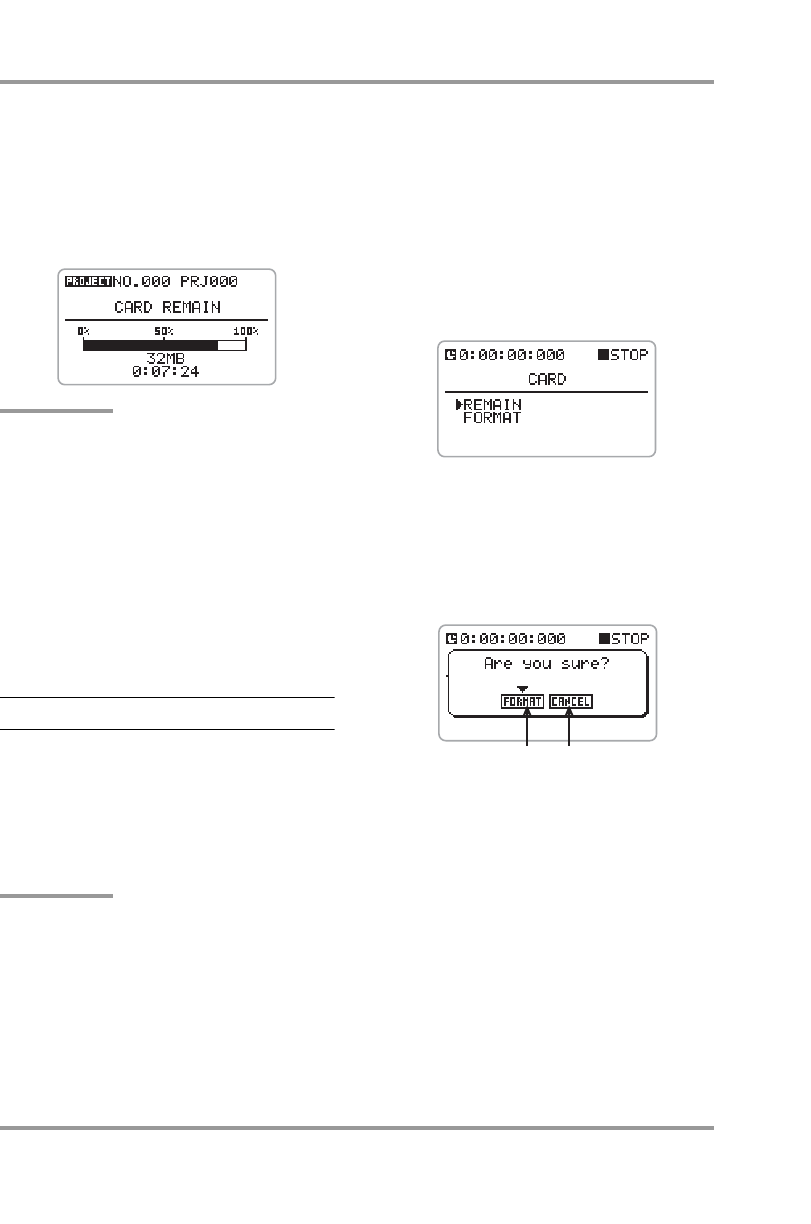
*3-2 Recording times with supplied SD card
Non-compressed 44.1 kHz/16 bit ........... approx. 12 minutes
MP3 44.1 kHz/128 kbps ..... approx. 133 minutes
(For details on recording times, see page 86 of the Operation Manual.)
*4 Pressing the [MENU] key ( ) also stops recording.
The and sections of the [MENU] key operate as shown below.
(For details on key operation, see page 15 of the Operation Manual.)
Simple Recording Guide [Stereo Mode]
Tips for better recording
(1) Recording a band
(3) Outdoor recording
(2) Recording acoustic instruments
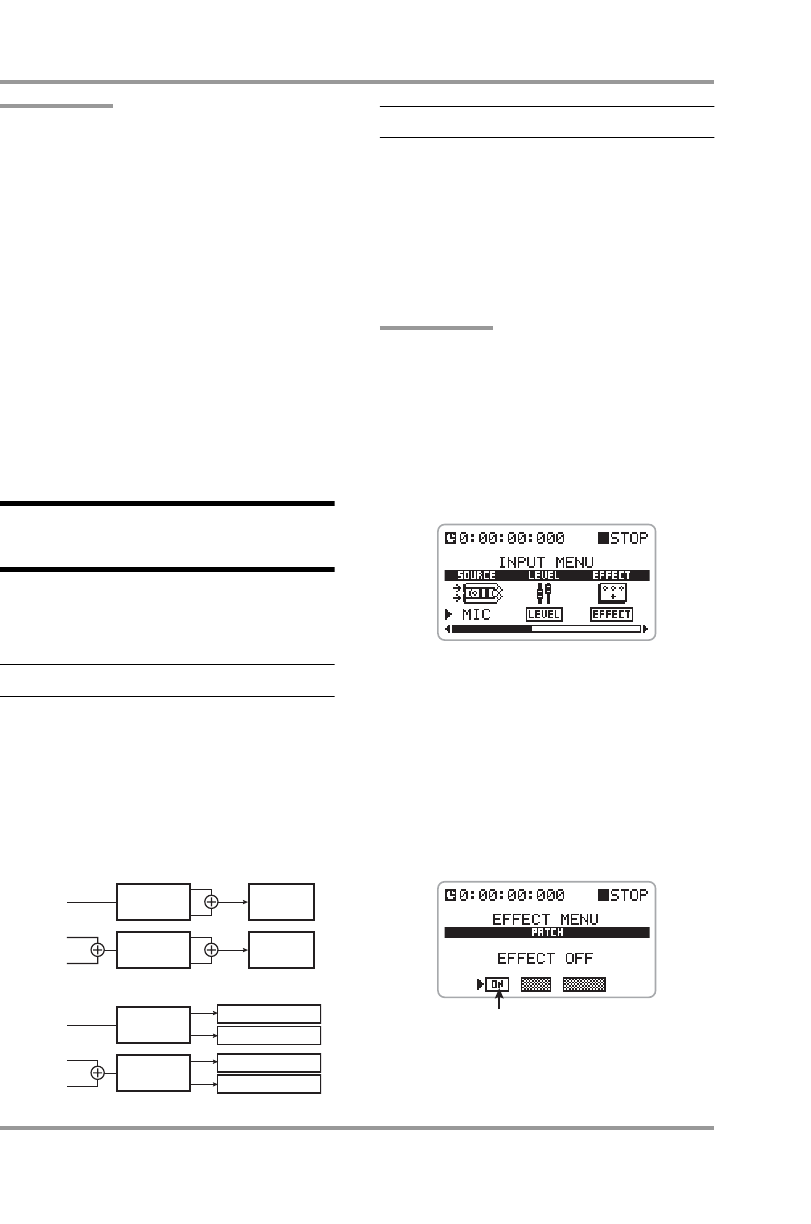
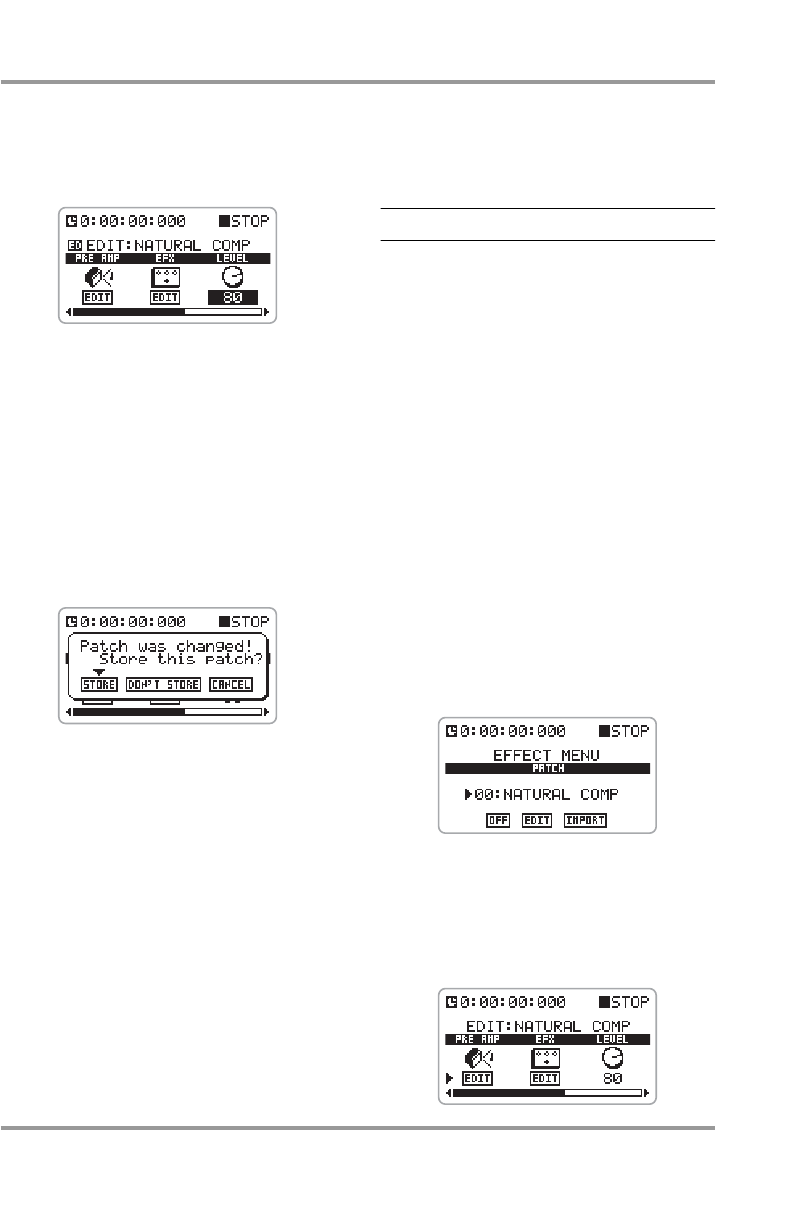
■ COMP/LIMIT effect
The COMP/LIMIT module can be used to compensate for volume differences
between instruments and for variations of touch.
Effect description
COMP
Produces vibrant sound by compressing the dynamic range to suit
different instruments.
LIMIT
Compresses peaks in the input to prevent overload.
(For details, see page 62 of the Operation Manual.)
■ Battery powered operation
When the H4 is operated on batteries, continuous recording for about 4 hours
is possible.
Be sure to check the battery condition before taking the H4 with you for a
recording session.
Recording is played back. Check
whether the results are suitable.
You can monitor the input level.
HINTS *2-1, *2-2
Use windscreen on mic of H4
Turn power to H4 on
1
2
5
6
3
4
Press [REC] key to set H4 to recording mode
Adjust sensitivity with [MIC GAIN] switch
Press [REC] key once more to start recording
* Recommended MIC GAIN setting: "H"
[MIC GAIN]
switch
[REC] key now
stays constantly lit.
Press top ( ) of
[MENU] key.
HINT *4
Tap
[MENU] key operation
• Jump to start of selected file
• Select file if at time point 0
Select next file
Hold
Reverse in 1-second steps
Advance in 1-second
steps
* You can also stop
recording using the
[MENU] key.
Press [REC] key to stop recording
Play the recorded file
HINTS
Unit returns to the start of
the recorded file.
Recording display
HINTS *3-1, *3-2
Recording standby display
HINT *1
[REC] key flashes.
Set [POWER] switch to ON.
Application
For on-mic recording of an instrument (H4 close to sound source)
or single-session recording of a band performance.
For recording of acoustic guitar and other instruments with low volume.
For off-mic recording (H4 further away from sound source).
Mostly for use in the field.
L
M
H
Setting
Place the H4 so that the
sound source is within the
range of two intersecting
lines from the two built-in
mics. To prevent picking
up vibrations from the
floor, place the H4 on a
tripod, using the supplied
tripod adapter.
When recording a piano,
focusing on the hammer
area usually will result in
good stereo image and
preserve the crispness
of transients. When
wishing to capture the
ambience, aiming the
H4 at a point slightly
above the piano can be
effective.
For acoustic guitar,
stroke playing is best
recorded by aiming at
the fret end. For
arpeggio play, aiming at
the guitar body from
slightly above will make
it easier to capture body
resonances.
If wind hitting the microphone is
causing noise, attach the
windscreen.
For recording animal sounds, the
MIC GAIN "H" setting usually
works best, while vehicle or city
sounds may require "M".
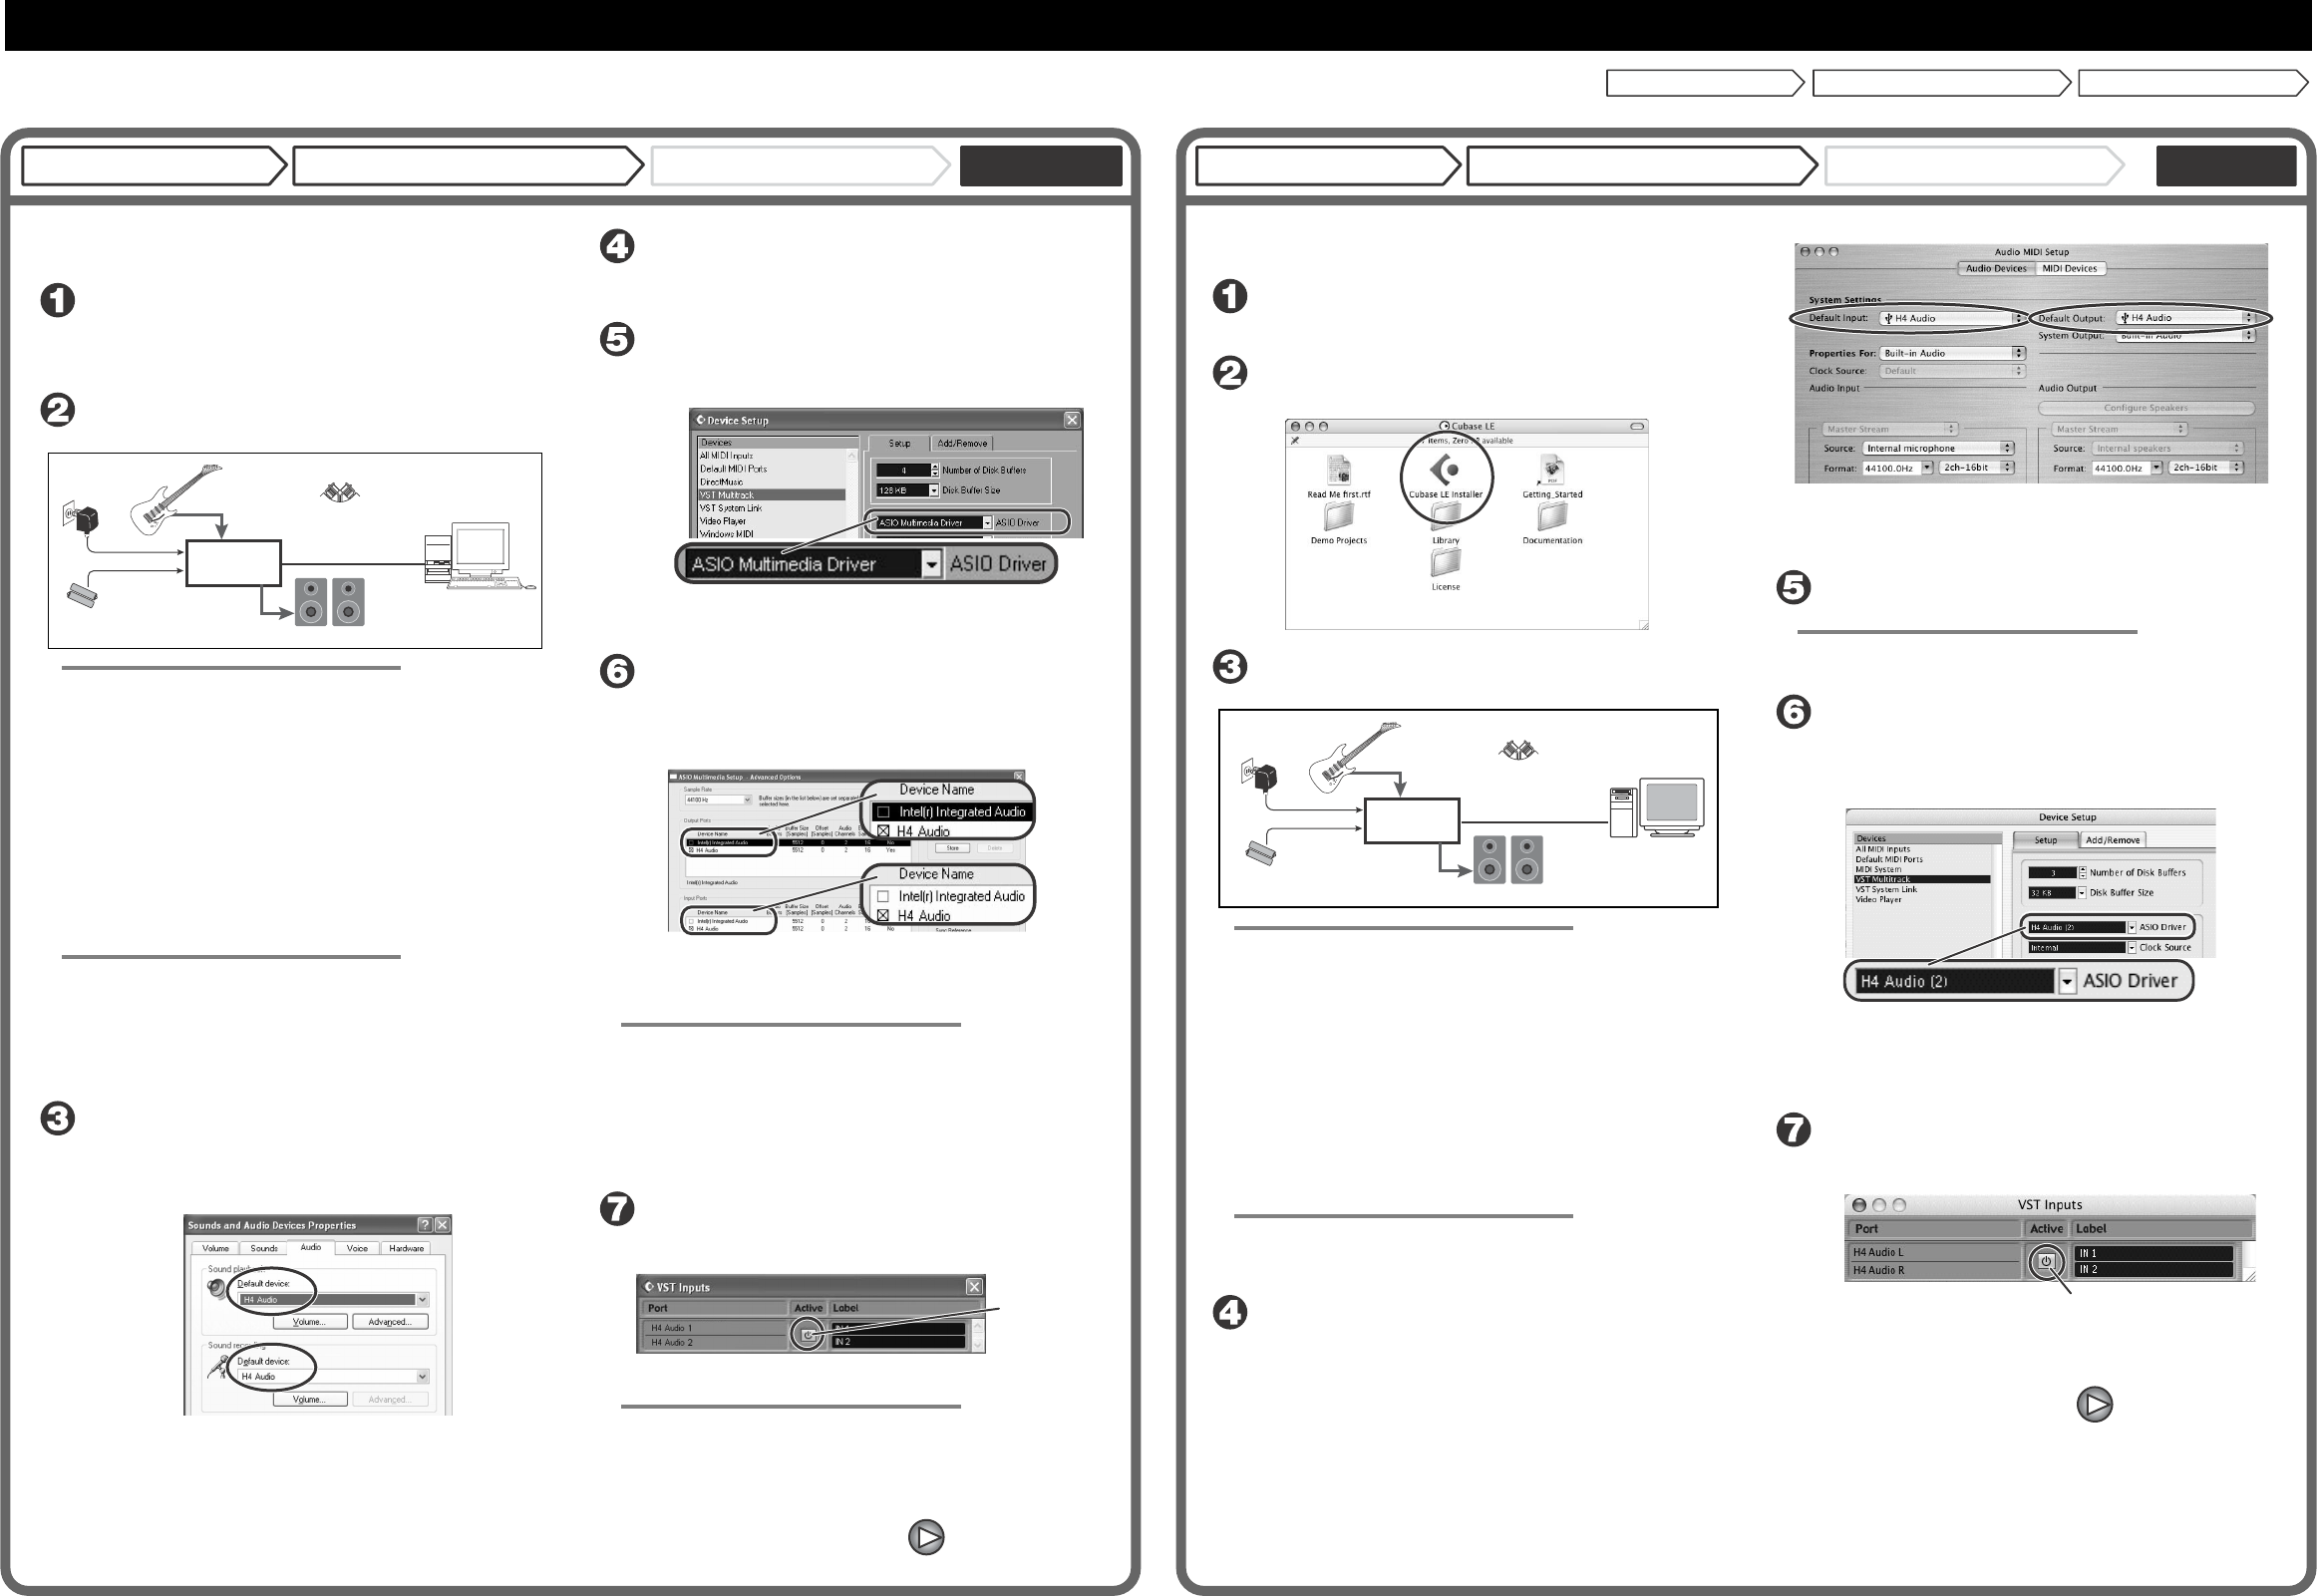
To connect this unit to a computer running Windows XP and to
enable audio input/output, proceed as follows.
Install Cubase LE on the computer.
When you insert the CD-ROM supplied with this product into the CD-
ROM drive of the computer, the installer will start up automatically.
Follow the on-screen instructions to install Cubase LE.
Connect this unit to the computer using a USB cable.
NOTE
•If you monitor the signal at the audio output of the computer during
recording, a delay will occur. Be sure to use the [LINE OUTPUT]
jack of the H4 for monitoring.
•When a device designed to use USB power is powered via the USB
cable, insufficient power may result in unstable operation or error
indications appearing on the display. In such a case, power the
device from an AC adapter or batteries.
•Use a high-quality USB cable and keep the connection as short as
possible. If power is supplied to a device designed to use USB
power via a USB cable that is more than 3 meters in length, the low
voltage warning indication may appear.
•The built-in stereo mic L/R or the signal from the [INPUT 1]/[INPUT
2] jack can be selected as input source. Same effects as in 4-track
mode (sampling rate 44.1 kHz only) can also be used.
HINT
No special steps are necessary for canceling the USB connection.
Simply disconnect the USB cable from the computer.
When you connect this unit for the first time to a computer running
Windows XP, a message saying "New Hardware Found" will appear.
Before proceeding, wait a while until this message disappears.
From the "Start" menu, select "Control Panel" and
double-click "Sounds and Audio Devices".
The sounds and audio devices properties screen appears. Click the
"Audio" tab and check whether "H4 Audio" is selected as default
device for audio playback and recording.
If another device is selected, use the "Default Device" pull-down
menu to change the selection to "H4 Audio".
When the setting has been made, click the OK button to close the
sounds and audio devices properties screen.
Start Cubase LE.
A window asking whether to check the audio input/output port
appears. Click OK to perform the check.
After Cubase LE has started up, access the "Devices"
menu, select "Device Setup..." and click "VST
Multitrack" in the list of devices.
Check whether "ASIO Multimedia Driver" is selected as ASIO driver
in the right part of the device setup window.
Click the "Control Panel" button in the device setup
window. In the window that appears, click the
"Advanced Options" button.
In the advanced options window, check whether "H4 Audio" is
selected as input port and output port.
If not selected, click the respective box to place a check mark in it.
When the setting has been made, click the OK buttons to close the
windows and return to the normal post-startup Cubase LE screen.
HINT
•By clicking the Move up/Move down button in the advanced
options window, you can change the priority sequence setting of
the currently selected port. If you move "H4 Audio" to the top of the
list, it will also be at the top in the following VST input window.
•When you edit any of the settings in the advanced settings window,
a window asking whether to check the audio input/output port
appears. Click OK to perform the check.
Access the "Devices" menu and select "VST Inputs".
The VST inputs window appears. Check whether the
input port is active.
If the Active button is Off (grayed out), click the button to set it to On.
HINT
When multiple input ports are available for selection, you should scroll
or enlarge the window and check the enable/disable settings for all
ports.
[INPUT 1]/[INPUT 2] jack
Computer
Guitar or
other instrument
or built-in
stereo mic
A
C adapter
Batteries
or
USB cable
H4
[LINE OUTPUT] jack
Audio system or
other hi-fi playback
equipment
Active button
USB/Cubase LE Startup GuideUSB/Cubase LE Startup Guide
This USB/Cubase LE Startup Guide explains how to install Cubase LE on a computer, how to make the connection and settings of this unit, and how to record your instrument play.
To connect this unit to a computer running MacOS X and enable
audio input/output, proceed as follows.
Insert the CD-ROM supplied with this product into the
CD-ROM drive of the Macintosh computer.
The "Cubase LE" icon appears on the desktop.
Double-click the icon to open it, and use the "Cubase
LE Installer" to install Cubase LE.
Connect this unit to the computer using a USB cable.
NOTE
•If you monitor the signal at the audio output of the computer during
recording, a delay will occur. Be sure to use the [LINE OUTPUT]
jack of the H4 for monitoring.
•When a device designed to use USB power is powered via the USB
cable, insufficient power may result in unstable operation or error
indications appearing on the display. In such a case, power the
device from an AC adapter or batteries.
•Use a high-quality USB cable and keep the connection as short as
possible. If power is supplied to a device designed to use USB
power via a USB cable that is more than 3 meters in length, the low
voltage warning indication may appear.
•The built-in stereo mic L/R or the signal from the [INPUT 1]/[INPUT
2] jack can be selected as input source. Same effects as in 4-track
mode (sampling rate 44.1 kHz only) can also be used.
HINT
No special steps are necessary for canceling the USB connection.
Simply disconnect the USB cable from the computer.
Open the "Applications" folder and then the "Utilities"
folder, and double-click "Audio MIDI Setup".
The Audio MIDI Setup screen appears.
Click "Audio Devices" and check whether "H4 Audio" is selected as
default input/default output.
If another device is selected, use the pull-down menu to change the
selection to "H4 Audio".
When the setting has been made, close Audio MIDI Setup.
Start Cubase LE.
HINT
The Cubase LE program is installed in the "Applications" folder.
When Cubase LE has started up, access the
"Devices" menu, select "Device Setup...", and click
"VST Multitrack" in the list of devices.
Check whether "H4 Audio(2)" is selected as ASIO driver in the right
part of the device setup window.
If another item is selected, use the pull-down menu to change
the selection.
When the setting has been made, click the OK button to close
the window.
Access the "Devices" menu and select "VST Inputs".
The VST inputs window appears. Check whether the
input port is active.
If the Active button is Off (grayed out), click the button to set it to On.
Macintosh
[INPUT 1]/[INPUT 2] jack
Guitar or
other instrument
or built-in
stereo mic
A
C adapter
Batteries
or
USB cable
H4
[LINE OUTPUT] jack
Audio system or
other hi-fi playback
equipment
Active button
Continued overleaf
Continued overleaf
Cubase LE InstallationConnections and PreparationsRecording with Cubase LE
Cubase LE Installation
Windows XP
Connections and PreparationsRecording with Cubase LE
Cubase LE Installation
MacOS X
Connections and PreparationsRecording with Cubase LE
Access the "File" menu and select "New Project".
The new project window appears. Here you can select a project
template.
Make sure that the "Empty" template is selected, and
click the OK button.
A window for selecting the project file save location appears.
After specifying the project file save location (such as
the desktop), click the OK button (Choose button in
MacOS 10.4).
A new project is created, and the project window for controlling most
of the Cubase LE operations appears.
To create a new audio track, access the "Project"
menu and select "Add track". In the submenu that
appears, select "Audio".
A new audio track is added to the project window.
HINT
You can add several tracks at once by accessing the "Project" menu,
selecting "Add track" and then selecting "Multiple..." in the submenu.
Make the following settings for the new audio track.
Access the "Devices" menu and select "VST Inputs".
The VST inputs window appears.
This window shows the available input ports and their active/inactive
status.
You can perform the following steps here.
Connect the guitar or other instrument to the [INPUT]
jack of this unit and select the desired patch.
The sound selected here will be recorded on the computer via the
[USB] port.
Access the "Devices" menu and select "Mixer".
The mixer window appears.
This window shows the channels assigned to created tracks.
You can perform the following steps here.
Project window
Drag the audio track boundary to the right
to display all buttons.
Verify that the Monitoring On button is
Off (grayed out). If the button is On,
click the button to turn it Off.
Click the Stereo/Mono button to set the audio track to
Stereo. When the button is not grayed out and has changed
from [ ] to [ ], the track is active as a stereo track.
1.
2.
3.
V
ST input window
Verify that the Active button for H4 Audio 1/2
(H4 Audio L/R on MacOS X) is enabled (not
grayed out). If the button is grayed out, click
the button to enable it.
2.
When there are multiple input ports,
drag here to enlarge the window.
1.
HINT
When the Record Standby button is enabled, the level meter next to
the fader shows the input level for the audio track. When the button is
disabled, the output level for the audio track is shown.
While playing your instrument, adjust the output level
of this unit to achieve a suitable recording level for
Cubase LE.
Verify that the transport panel is shown.
If the transport panel is not shown, access the "Transport" menu and
select "Transport Panel".
To start recording, click the Record button in the
transport panel.
As you play your instrument, the waveform appears in real time in the
project window.
To stop recording, click the Stop button in the
transport panel.
Recording stops.
Check the recorded content.
To play the recording, perform the following steps.
HINT
If no sound is heard when you click the Play button after recording,
check the settings in the VST input window (step 13) and the master
channel output port setting (step 15) once more.
For optimum enjoyment
While using Cubase LE, other applications may slow down drastically
or the message "Cannot synchronize with USB audio interface" may
appear. If this happens frequently, consider taking the following steps
to optimize the operation conditions for Cubase LE.
(1) Shut down other applications besides Cubase LE.
In particular, check for resident software and utilities.
(2) Reduce plug-ins (effects, instruments) used by Cubase LE.
When there is a high number of plug-ins, the computer's
processing power may not be able to keep up. Reducing
the number of tracks for simultaneous playback can also be
helpful.
(3) Power the unit from an AC adapter
When a device designed to use USB power is powered via
the USB port, the current supply may sometimes fluctuate,
leading to problems. See if using an AC adapter improves
operation.
If applications still run very slowly or the computer itself does not
function properly, disconnect this unit from the computer and shut
down Cubase LE. Then reconnect the USB cable and start Cubase LE
again.
Channel assigned to audio track
Mixer window
Master channel
Verify that the Record Standby button is shown in red. (If
the button is grayed out, click the button to enable it. This
will set the audio track to the recording standby condition.)
3.
Click here to select the port for the H4 Audio 1/2
(H4 Audio L/R on MacOS X) assigned as audio
input port to the channel (see step 13).
2.
To adjust the playback level after
recording, click this button to bring
up the master channel of the mixer.
1.
Click here to set the
audio output port of
the master channel
to "H4 Audio".
4.
Level meter
When the audio track is in recording standby mode,
its recording level is shown by the level meter for the
assigned channel. The level should be set in such a
way that the meter registers to a fairly high value but
remains below the maximum point.
NOTE
•The level meter shows the signal level after
internal processing by Cubase LE. Therefore
a slight time lag may occur between playing a
guitar or other instrument and the meter
registering the change in level. This is normal
and not a defect.
•The audio tracks of Cubase LE will be
recorded with correct timing exactly matched
to your instrument play. There will be no lag
between already recorded tracks and newly
added tracks.
Transport panel
Record button
Go to beginning of project Play button
Move the fader
of the master
channel (as
displayed in step
15) fully down.
1.
Raise the fader of
the master channel
to obtain a suitable
volume.
4.
Use the controls on the
transport panel to move to
the beginning of the project.
2.
Click the Play button in
the transport panel to
start playback.
3.
Continued from front
Cubase LE Installation
Windows XPMacOS X
Connections and PreparationsRecording with Cubase LE
Libble takes abuse of its services very seriously. We're committed to dealing with such abuse according to the laws in your country of residence. When you submit a report, we'll investigate it and take the appropriate action. We'll get back to you only if we require additional details or have more information to share.
Product:
Forumrules
To achieve meaningful questions, we apply the following rules:
First, read the manual;
Check if your question has been asked previously;
Try to ask your question as clearly as possible;
Did you already try to solve the problem? Please mention this;
Is your problem solved by a visitor then let him/her know in this forum;
To give a response to a question or answer, do not use this form but click on the button 'reply to this question';
Your question will be posted here and emailed to our subscribers. Therefore, avoid filling in personal details.
Register
Register getting emails for Zoom H4 at:
new questions and answers
new manuals
You will receive an email to register for one or both of the options.
Get your user manual by e-mail
Enter your email address to receive the manual of Zoom H4 in the language / languages: German as an attachment in your email.
The manual is 3,85 mb in size.
You will receive the manual in your email within minutes. If you have not received an email, then probably have entered the wrong email address or your mailbox is too full. In addition, it may be that your ISP may have a maximum size for emails to receive.
If you have not received an email with the manual within fifteen minutes, it may be that you have a entered a wrong email address or that your ISP has set a maximum size to receive email that is smaller than the size of the manual.
The email address you have provided is not correct.
Please check the email address and correct it.
Your question is posted on this page
Would you like to receive an email when new answers and questions are posted? Please enter your email address.