4
Reinigung der Innenteile
Bevor Sie das GerŠt in Betrieb nehmen, beseitigen
Sie den typischen ÇNeugeruchÈ am besten durch
Auswaschen der Innenteile mit lauwarmem Wasser
und einem neutralen Reinigungsmittel SorgfŠltig
nachtrocknen.
Bitte keine Reinigungs- bzw. Scheuermittel
verwenden, die das GerŠt beschŠdigen kšnnten.
Temperaturregelung
Die Temperatur wird automatisch geregelt und kann
erhšht werden (wŠrmer) durch Drehen des Thermo-
statknopfes auf niedrigere Einstellungen oder verring-
ert (kŠlter) durch das Drehen auf hšhere Zahlen.
Die richtige Einstellung erhŠlt man, unter
BerŸcksichtigung folgender, die Innentemperatur
beeinflussender Faktoren:
¥ Raumtemperatur,
¥ HŠufigkeit des TŸršffnens,
¥ Menge der eingelagerten Lebensmittel,
¥ Aufstellung des GerŠtes.
Die mittlere Einstellung ist meistens die
geeignetste.
GEBRAUCH
INHALT
Warnungen und wichtige Hinweise . . . . . . . . . . . . . . . . . . . . . . . . . . . . . . . . . . . . . . . . . . . . . . . . . . . . . . . .2
Hinweise zur Verpackungsentsorgung . . . . . . . . . . . . . . . . . . . . . . . . . . . . . . . . . . . . . . . . . . . . . . . . . . . . .3
Gebrauch / Reinigung der Innenteile - Inbetriebnahme - Temperaturregelung - Hinweise zum richtigen . . .
KŸhlen - Einfrieren von frischen Lebensmitteln . . . . . . . . . . . . . . . . . . . . . . . . . . . . . . . . . . . . . . . . . . . . . . . .4
Gebrauch /Aufbewahrung der TiefkŸhlkost - EiswŸrfelbereitung - Auftauen - Hšhenverstellbare . . . . . . . . . .
Abstellregale - Hšhenverstellung der TŸrablage . . . . . . . . . . . . . . . . . . . . . . . . . . . . . . . . . . . . . . . . . . . . . . . .5
Gefrierkalender / Tips / Tips fŸr dasKŸhlen - Tips fŸr das Einfrieren - Tips fŸr TiefkŸhlkost . . . . . . . . . . . . . .6
Wartung / RegelmŠ§ige Reinigung - Stillstandzeiten - Innenbeleuchtung . . . . . . . . . . . . . . . . . . . . . . . . . . . .7
Wartung / Abtauen - Stšrungen . . . . . . . . . . . . . . . . . . . . . . . . . . . . . . . . . . . . . . . . . . . . . . . . . . . . . . . . . . . .8
Installation / Aufstellung - Elektrischer Anschlu§ - Hintere AbstandstŸcke . . . . . . . . . . . . . . . . . . . . . . . . . . .9
Installation / TŸranschlagwechsel . . . . . . . . . . . . . . . . . . . . . . . . . . . . . . . . . . . . . . . . . . . . . . . . . . . . . . . . . .10
Garantiebedingungen . . . . . . . . . . . . . . . . . . . . . . . . . . . . . . . . . . . . . . . . . . . . . . . . . . . . . . . . . . . . . . . . . . .11
Inbetriebnahme
Netzstecker in die Steckdose einstecken.
KŸhlschranktŸr šffnen und Thermostatknopf von der
Stellung Ò0Ó (STOP) aus im Uhrzeigesinn drehen.
Den Stillstand erhŠlt man durch Drehen des
Thermostatknopfes auf Stellung ÇOÈ.
Hinweise zum richtigen KŸhlen
von Lebensmitteln und GetrŠnken
Um die besten Leistungen des KŸhlschrankes zu
erreichen, beachten Sie bitte folgendes:
¥ Keine warmen Speisen oder dampfenden
FlŸssigkeiten in den KŸhlschrank einstellen.
¥ Geruchverbreitende Lebensmittel mŸssen
abgedeckt oder eingewickelt werden.
¥ Die Lebensmittel mŸssen so eingelagert werden,
da§ die KŠlte um sie frei zirkulieren kann.
Einfrieren von frischen Lebensmitteln
FŸr das Einfrieren von Lebensmitteln ist es nicht
nštig, die Thermostateinstellung zu Šndern. WŸnscht
man aber ein rasches Einfrieren, so mu§ der
Thermostatknopf auf die hšchste Stellung gedreht
werden. Sollte jedoch bei dieser Einstellung die
Temperatur im KŸhlraum unter 0¡C sinken, so mu§
eine niedrigere Reglerstellung gewŠhlt werden.
Die einzufrierenden Lebensmittel in das oberste Fach
des GerŠtes legen, weil dies die kŠlteste Stelle ist.
Wichtig
Hšchste KŠlteeinstellung bei hoher Raumtempe-
ratur und erheblicher Lebensmittelmenge kann
fortdauernden KŸhlschrank-Betrieb verursach-
en, dabei kann sich eine Reif- oder Eisschicht an
der hinteren Innenwand bilden. In diesem Falle
den Thermostatknopf auf wŠrmere Temperaturen
stellen, damit das automatische Abtauen, mit
folglich geringerem Stromverbrauch,
gewŠhrleistet werden kann.
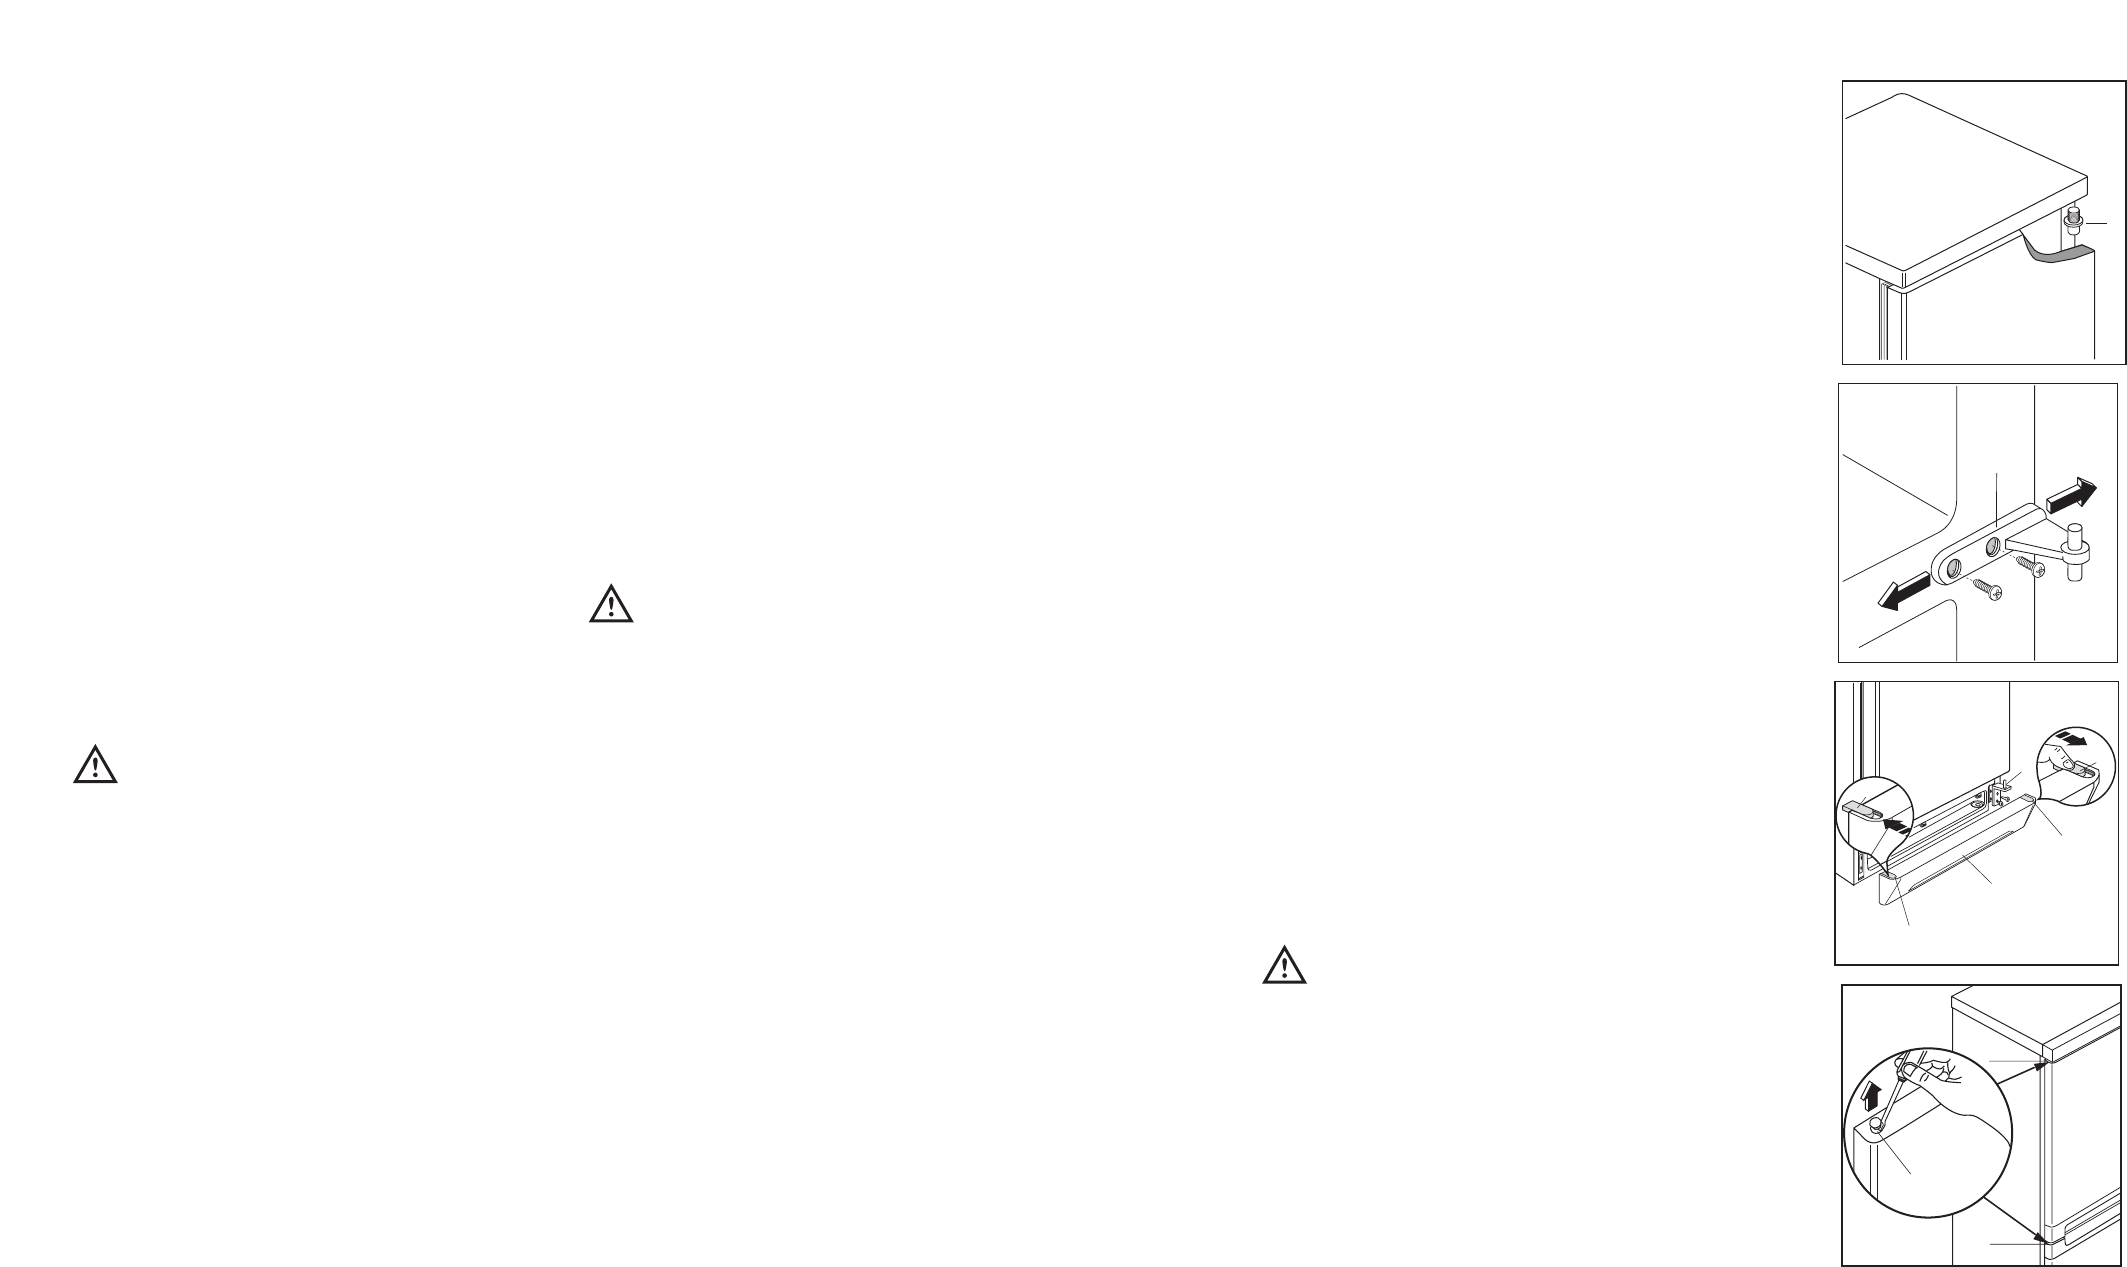
Door reversibility
1. Unplug the appliance from the power supply
before carrying out the below-mentioned
operations.
2. pull off the ventilation grille (D) which is clipped
into place;
3. remove the bottom hinge (E) by unscrewing its
fixing screws;
4. remove the lower door, sliding it out of the middle
hinge;
5. unscrew the middle hinge (H);
4. Remove the upper door by releasing it from the
top hinge pin (G).
5. Remove the pin (G) from the top hinge , then
mount these on the opposite side, after having
removed the plugs (I) which must be refitted on
the other side.
6. Replace the upper door.
7 Refit the middle hinge on the opposite side and
replace the bottom door.
8. reassemble the lower hinge (E) on the opposite
side, using the screws previously removed; slide
the hole cover (F) out of the ventilation grille (D)
by pushing it in the direction of the arrow and
reassemble it on the opposite side;
9. refit the ventilation grille (D), clipping it into
place.
To line up the doors, it is possible to adjust the
middle hinge (H) horizontally by means of a tool,
after slackening the two screws (see figure).
Warning:
After having reversed the opening direction of
the doors check that all the screws are properly
tightened and that the magnetic seal adheres to
the cabinet. If the ambient temperature is cold
(i.e. in Winter), the gasket may not fit perfectly to
the cabinet. In that case, wait for the natural
fitting of the gasket or accelerate this process by
heating up the part involved with a normal
hairdrier.