Thank you for choosing Yealink T4 series IP phones, which deliver the industry’s leading HD
audio quality and a wide range of business telephony features, such as Call Hold, Call Transfer,
Busy Lamp Field, Call Recording, Multicast Paging and Conference over an IP network.
Meanwhile, it features a compact appearance, robust performance and cost efficiency for daily
desktop voice communications.
This guide provides everything you need to quickly use your new phone. First, verify with your
system administrator that the IP network is ready for phone configuration. Also be sure to read
the Quick Start Guide in your phone package before you set up and use the IP phone. As you
read this guide, keep in mind that some features are configurable by your system administrator
or determined by your phone environment. As a result, some features may not be enabled or
may operate differently on your phone. Additionally, the examples and graphics in this guide
may not directly reflect what is displayed or is available on your phone screen.
This user guide contains information for the following Yealink products:
SIP-T48S IP phones
SIP-T48G IP phones
SIP-T46S IP phones
SIP-T46G IP phones
SIP-T42S IP phones
SIP-T42G IP phones
SIP-T41S IP phones
SIP-T41P IP phones
SIP-T40G IP phones
SIP-T40P IP phones
Read the
Yealink Products Regulatory Notices guide
for all regulatory and safety guidance.
Related Documentation
You can obtain additional information on the following phone's support pages:
Ultra-elegant Gigabit IP Phone SIP-T48S
Ultra-elegant Gigabit IP Phone SIP-T48G
Ultra-elegant Gigabit IP Phone SIP-T46S
Ultra-elegant Gigabit IP Phone SIP-T46G
Ultra-elegant Gigabit IP Phone SIP-T42S
User Guide for T4 Series IP Phones
vi
Ultra-elegant Gigabit IP Phone SIP-T42G
Ultra-elegant IP Phone SIP-T41S
Ultra-elegant IP Phone SIP-T41P
Enterprise IP Phone SIP-T40G
Enterprise IP Phone SIP-T40P
The following types of related documents are available on each support page:
Release Notes, which details bug fixes and feature enhancements when an update is
released.
Quick Start Guide, which describes how to assemble your phone and configure the basic
phone features.
Wall Mount Installation Guide, which provides detailed instructions for how to use an
optional wall mount bracket to mount your phone on the wall.
Administrator Guide, which provides the detailed information on how to configure phone
features for system administrator.
Regulatory Notice, which provides information for all regulatory and safety guidance.
In This Guide
This guide mainly takes the SIP-T46S IP phone asan example. Chapters in this guide include:
Chapter 1 Overview
Chapter 2 Getting Started
Chapter 3Customizing Your Phone
Chapter 4Basic Call Features
Chapter 5Advanced Phone Features
Chapter 6Using Optional Accessories
Chapter 7 Maintaining Your Phone
Table of Contents
vii
Table of Contents
About This Guide ........................................................................... v
Related Documentation ........................................................................................................................................ v
In This Guide .............................................................................................................................................................vi
Table of Contents ......................................................................... vii
For the SIP-T48S/T48G IP Phone ................................................................................................................... 1
For the SIP-T46S/T46G/T42S/T42G/T41S/T41P/T40G/T40P IP Phone ........................................... 3
Icons and Status Indicators Instructions ......................................................................................................... 5
Status Indicators ................................................................................................................................................... 5
Line Key Icons ........................................................................................................................................................ 7
Other Icons ..........................................................................................................................................................12
LED Instructions .....................................................................................................................................................13
Power LED Indicator ........................................................................................................................................13
Line Key LED........................................................................................................................................................14
User Interfaces .......................................................................................................................................................16
Phone User Interface .......................................................................................................................................16
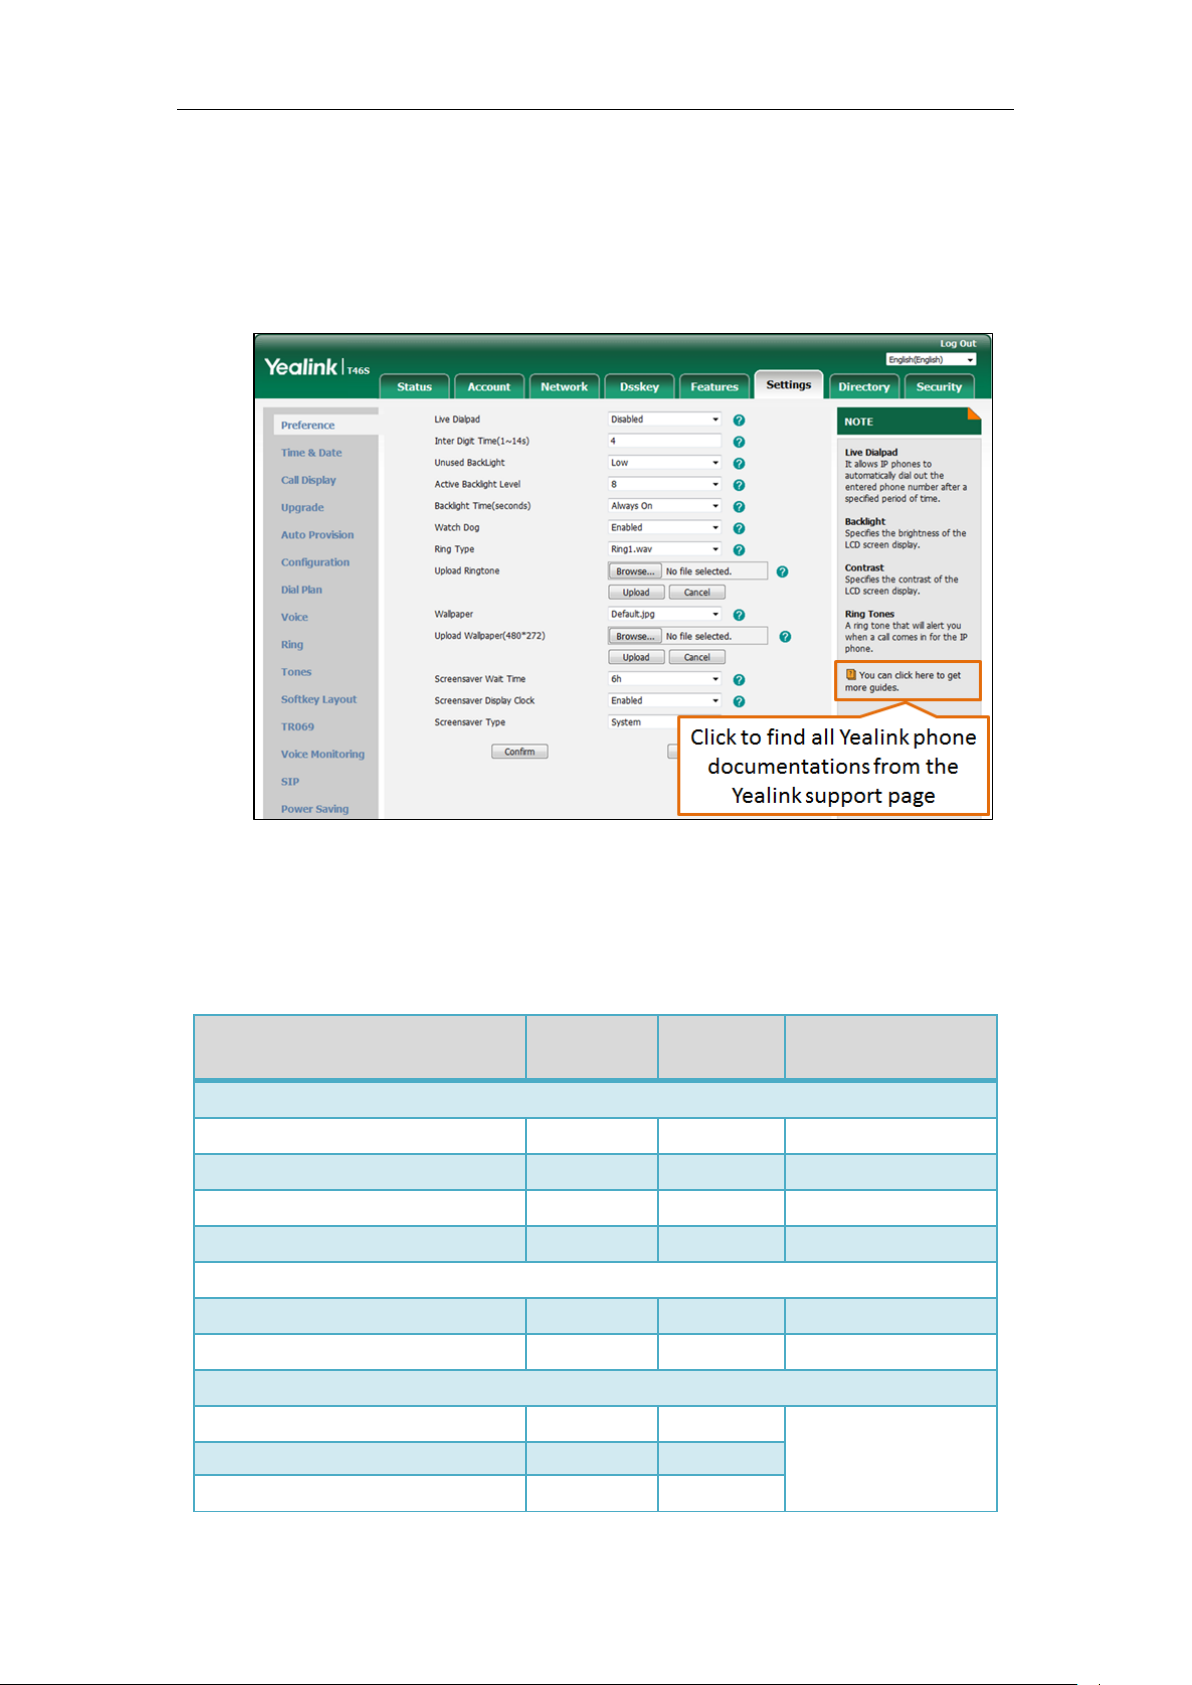
Web User Interface...........................................................................................................................................29
Features Configurable via Phone/Web User Interface .......................................................................30
Getting Started .............................................................................37
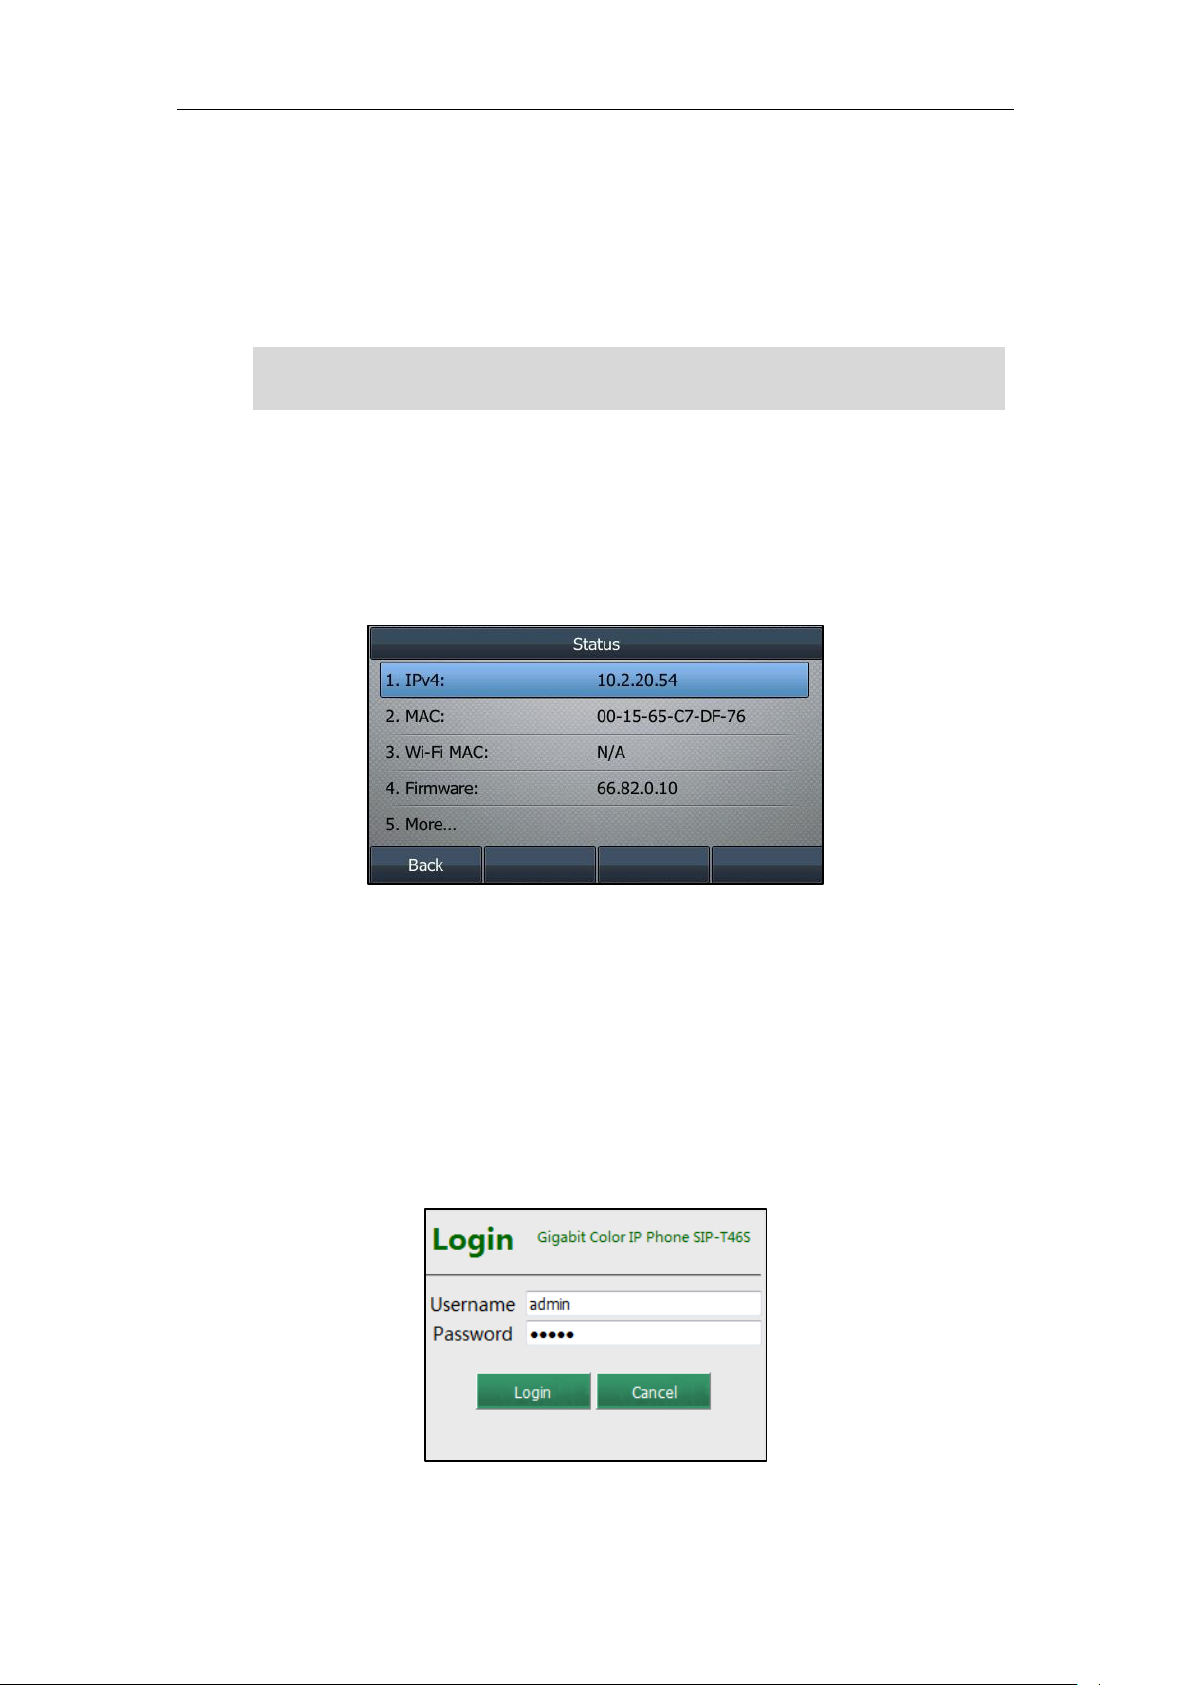
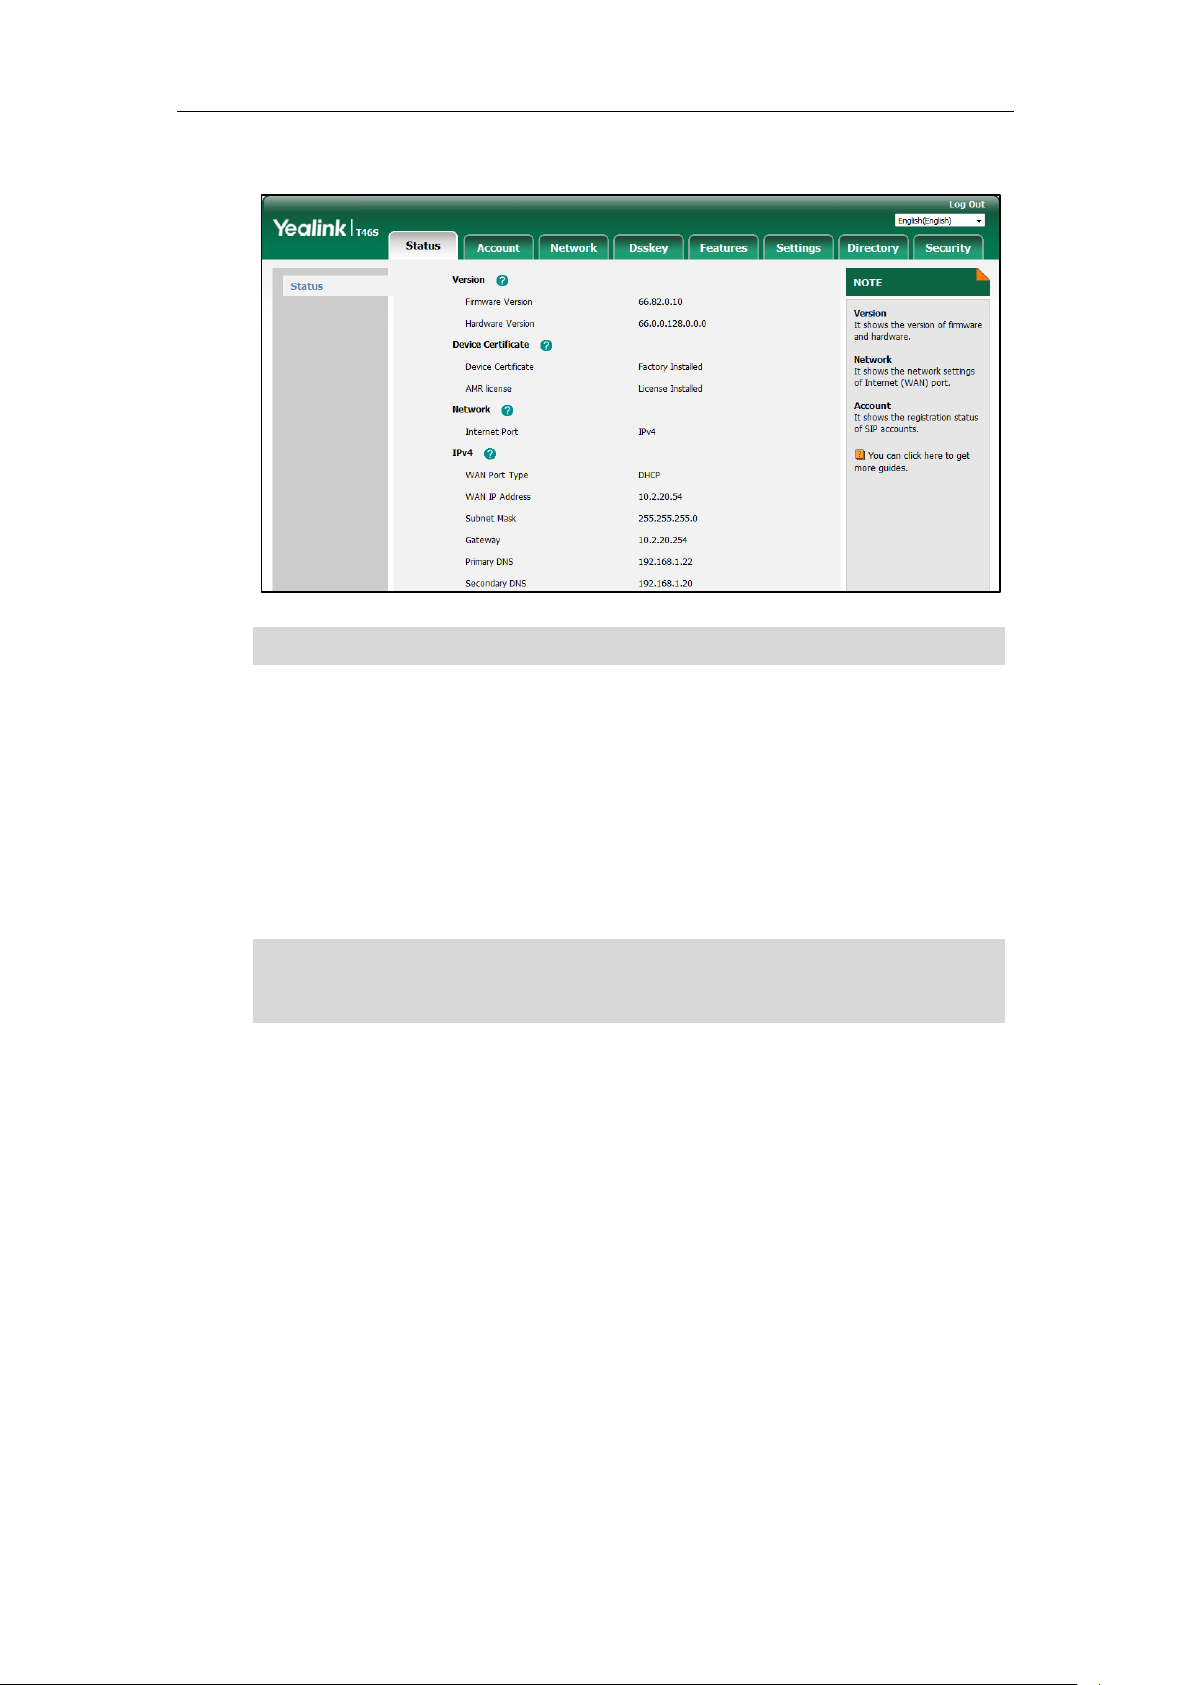
Phone Status ...........................................................................................................................................................37
Viewing the Phone Status .............................................................................................................................38
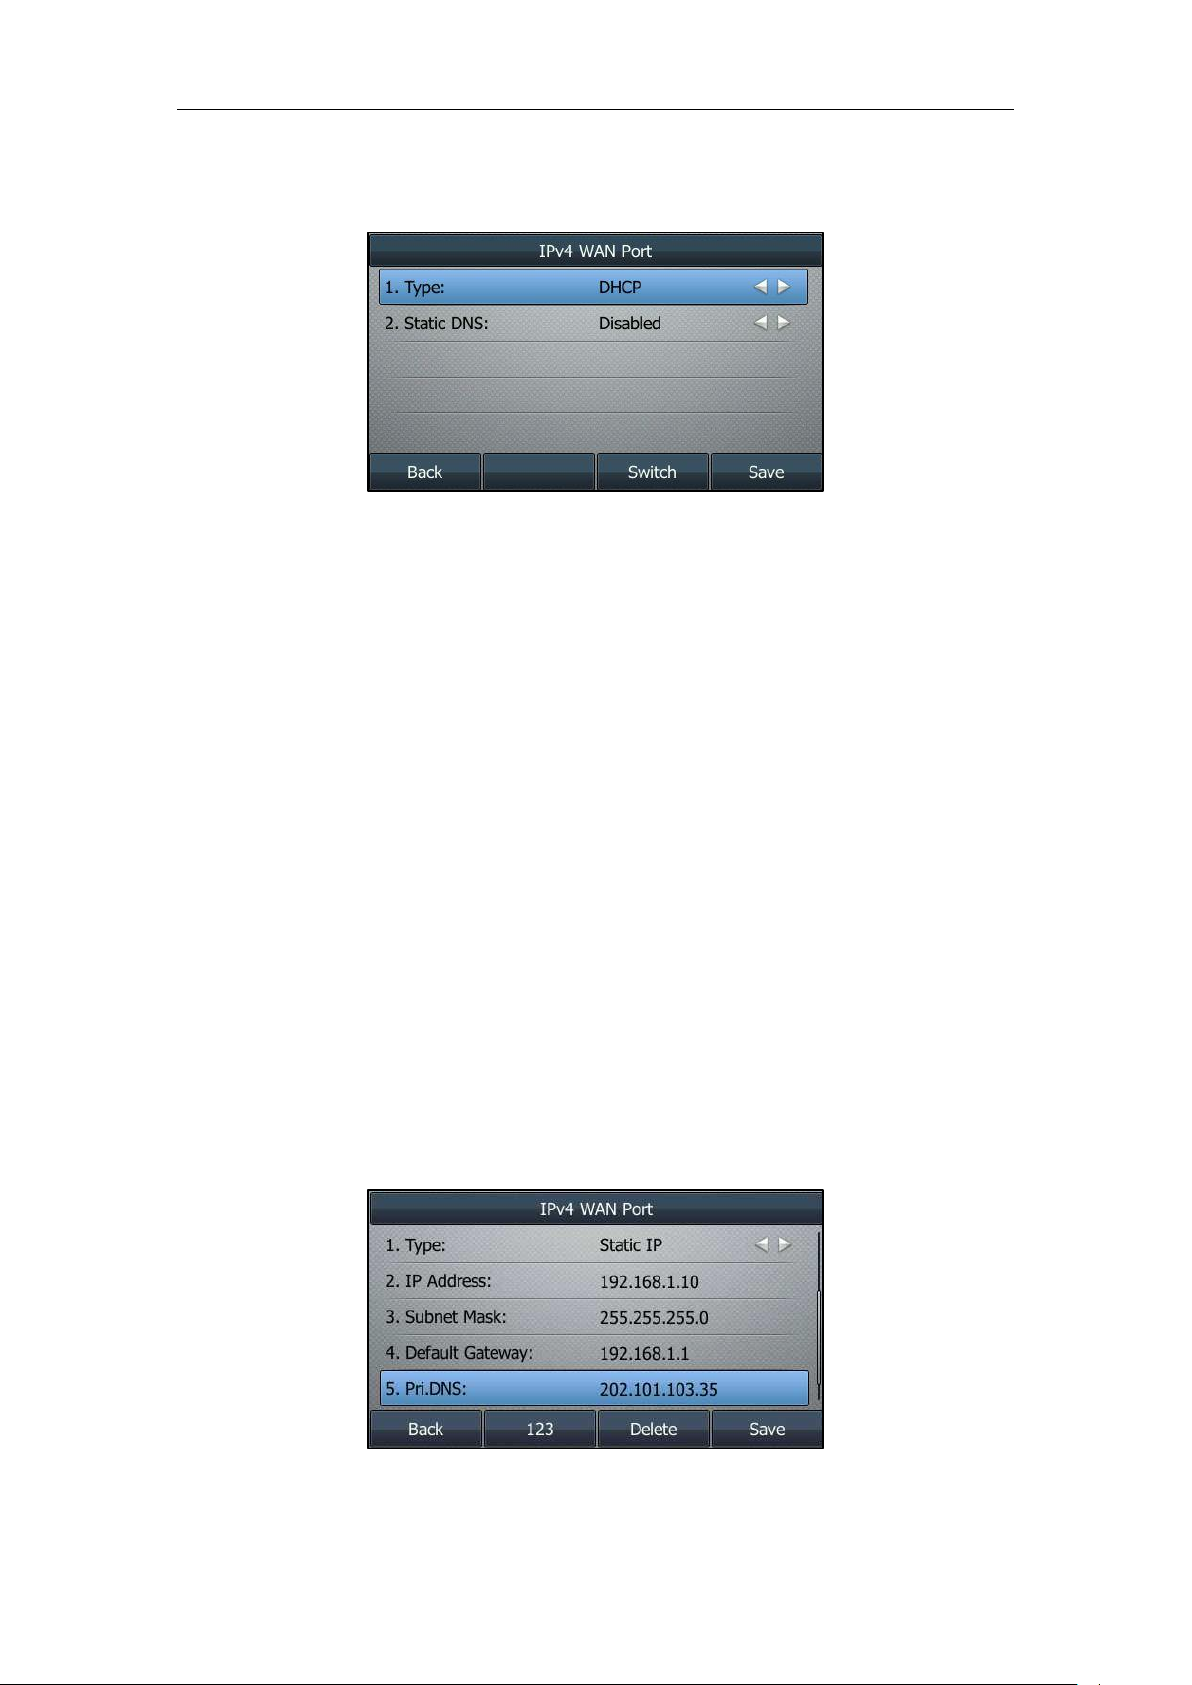
Configuring the DHCP ....................................................................................................................................39
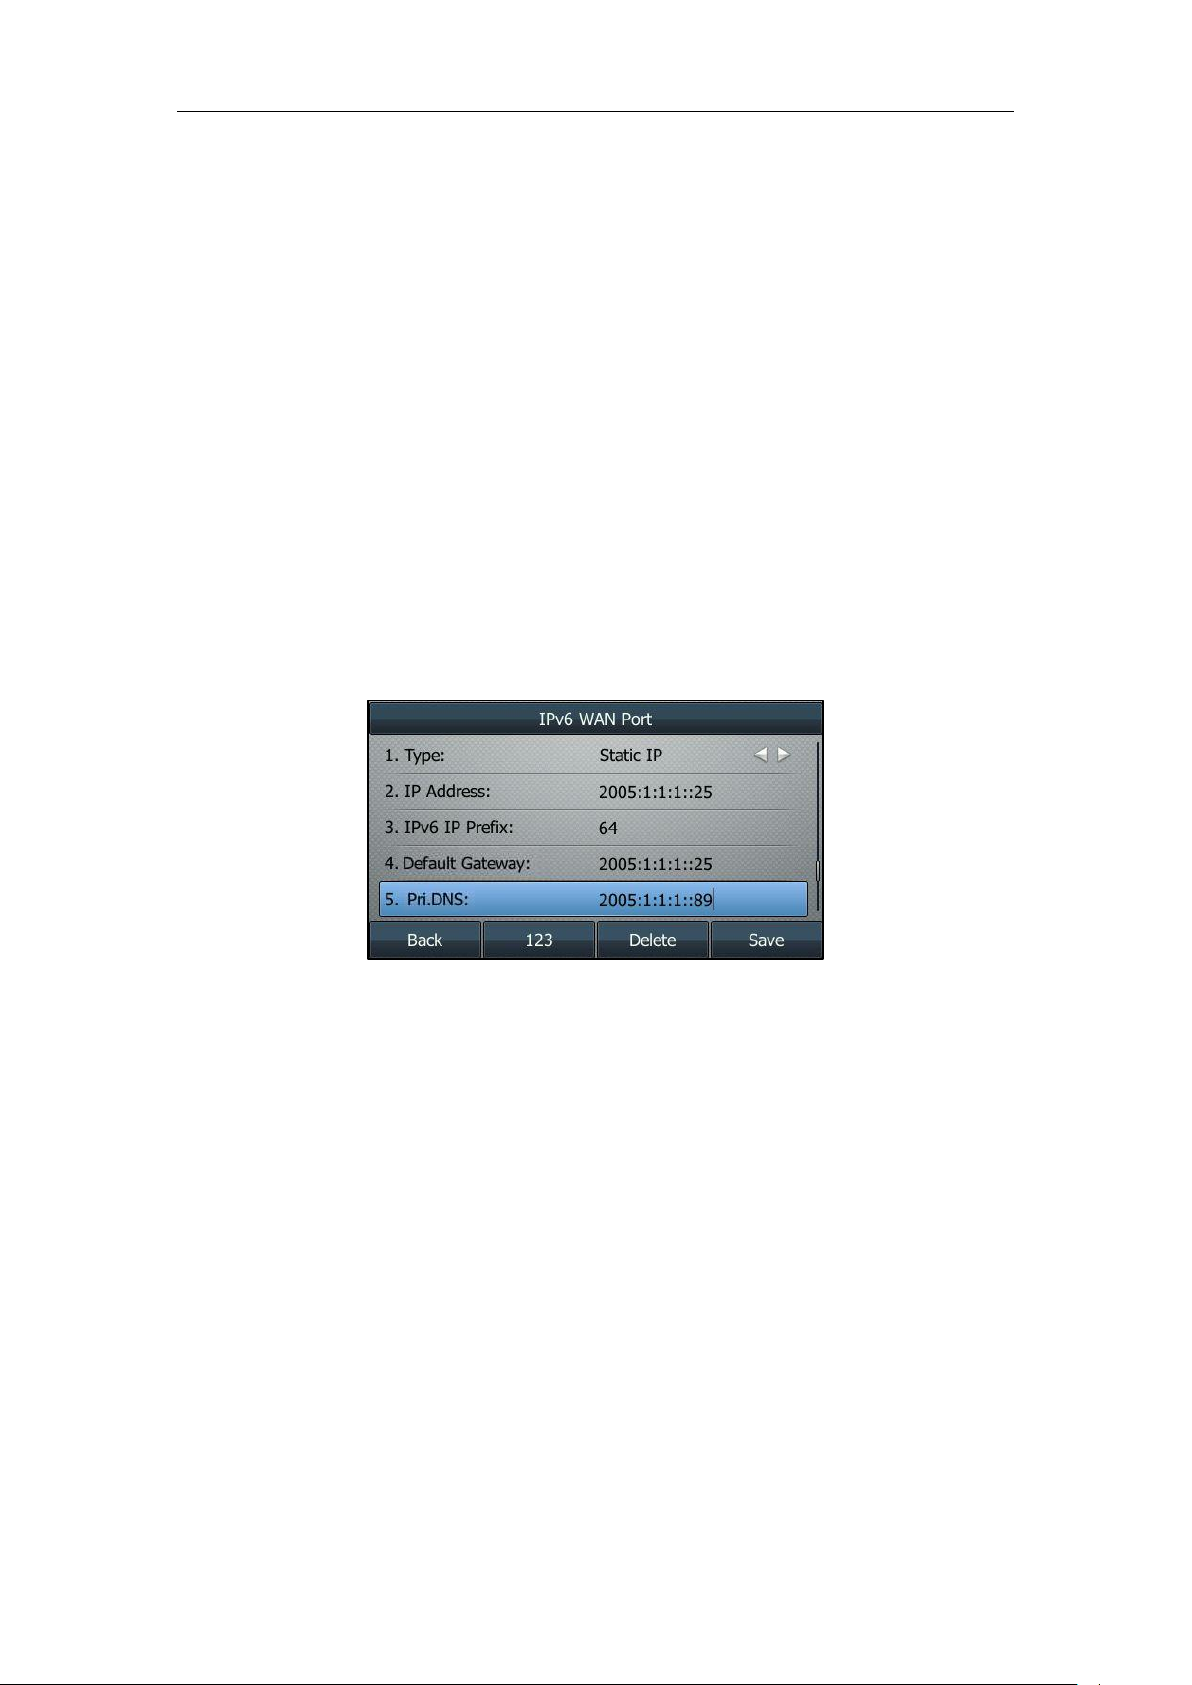
Configuring the Static IPv4 Address..........................................................................................................40
Configuring the Static IPv6 Address..........................................................................................................41
Registering an Account ..................................................................................................................................42
Disabling an Account ......................................................................................................................................43
Configuring the Default Account ...............................................................................................................43
Customizing Your Phone .............................................................45
User Guide for T4 Series IP Phones
viii
General Settings ....................................................................................................................................................45
Power Saving ......................................................................................................................................................53
Logo Customization .........................................................................................................................................56
Configuring the Backlight ..............................................................................................................................57
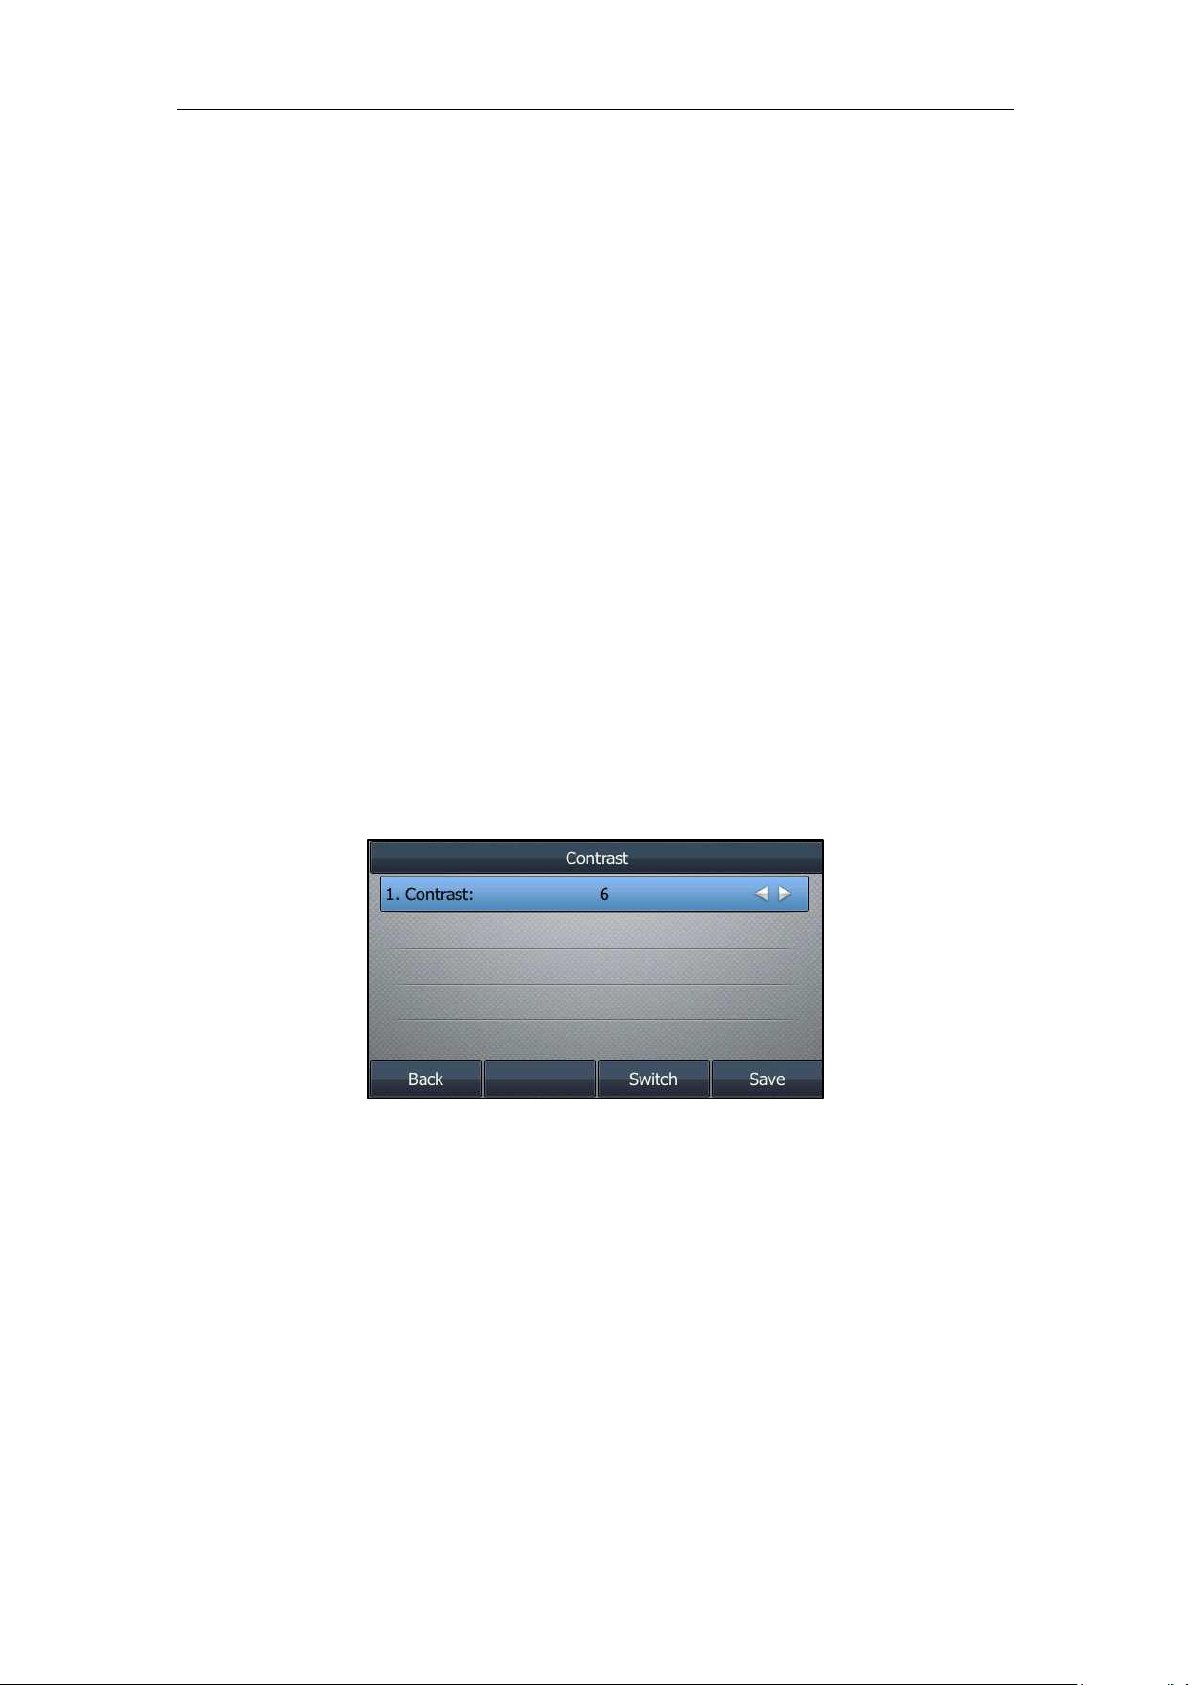
Configuring the Contrast ...............................................................................................................................58
Changing the Language ................................................................................................................................. 58
Time & Date ........................................................................................................................................................59
Changing the Administrator Password ....................................................................................................62
Configuring Key As Send ...............................................................................................................................63
Adjusting the Volume .....................................................................................................................................67
Ring Tones ...........................................................................................................................................................68
Configuring the Key Tone .............................................................................................................................70
Configuring List(s) for the Directory (Dir) Soft Key .............................................................................71
Local Directory ...................................................................................................................................................72
Mobile Contacts ................................................................................................................................................84
Remote Phone Book ........................................................................................................................................86
Call History Management ..................................................................................................................................87
Viewing History Records ................................................................................................................................88
Placing a Call from History Records ..........................................................................................................88
Adding a Contact to the Local Directory/Blacklist ...............................................................................88
Deleting History Records ...............................................................................................................................89
Disabling History Record ...............................................................................................................................90
Line Keys ...............................................................................................................................................................91
Dial Plan ..................................................................................................................................................................104
Configuring the Replace Rule .................................................................................................................... 105
Configuring the Dial Now............................................................................................................................106
Configuring the Area Code .........................................................................................................................108
Configuring the Block Out ..........................................................................................................................109
Basic Call Features ......................................................................111
Switching among the Handset, Speakerphone and Headset Modes ............................................111
Placing a Call ....................................................................................................................................................112
Auto Redial ............................................................................................................................................................120
Enabling the Auto Redial .............................................................................................................................121
Redialing a Call Automatically ...................................................................................................................121
Using Call Completion ..................................................................................................................................123
Holding a Call ...................................................................................................................................................125
Resuming a Held Call ....................................................................................................................................125
Do Not Disturb (DND) .......................................................................................................................................126
Configuring the DND Modes .....................................................................................................................127
Configuring Transfer Mode via Dsskey ..................................................................................................136
Enabling Allow Trans Exist Call ..................................................................................................................137
Performing a Blind Transfer ........................................................................................................................138
Performing a Semi-attended/Attended Transfer ...............................................................................139
Local Conference ............................................................................................................................................140
FAC Mode ..........................................................................................................................................................145
Transfer Mode ..................................................................................................................................................148
Group Call Pickup ...........................................................................................................................................151
Configuring the Anonymous Call Rejection .........................................................................................155
Placing a Call to Anonymous Rejected User ........................................................................................156
Advanced Phone Features .........................................................157
Busy Lamp Field (BLF) ........................................................................................................................................157
Configuring a BLF Key ...................................................................................................................................157
Configuring Visual and Audio Alert for BLF Pickup ..........................................................................158
Placing a Call to the Monitored User ......................................................................................................160
Transferring a Call to the Monitored User ............................................................................................160
Picking up an Incoming Call of the Monitored User ........................................................................161
Parking a Call/Retrieving a Parked Call to the Monitored User ...................................................162
BLF List ....................................................................................................................................................................162
Configuring BLF List Settings .....................................................................................................................163
Recording Using a USB Flash Drive .........................................................................................................165
Recording Using a Record Key ..................................................................................................................172
Hot Desking ..........................................................................................................................................................173
Configuring a Hot Desking Key .................................................................................................................174
Using a Hot Desking Key .............................................................................................................................174
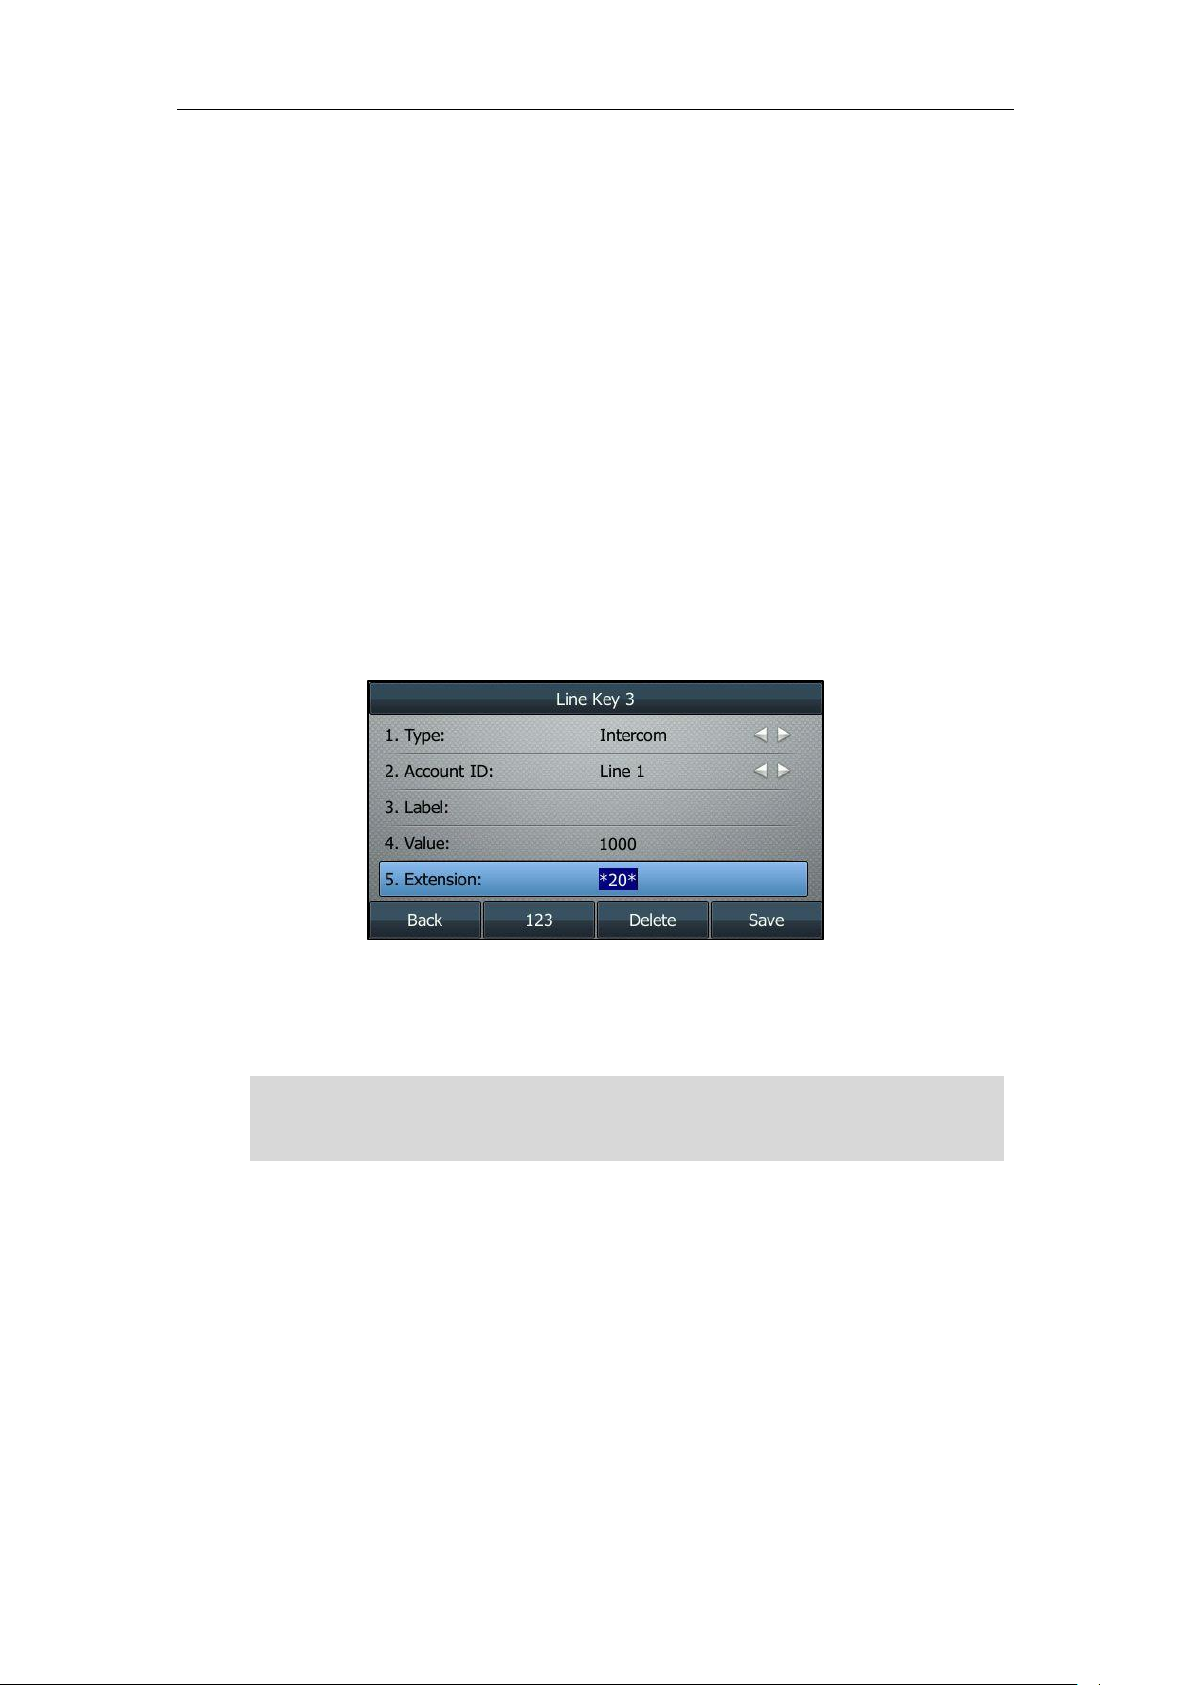
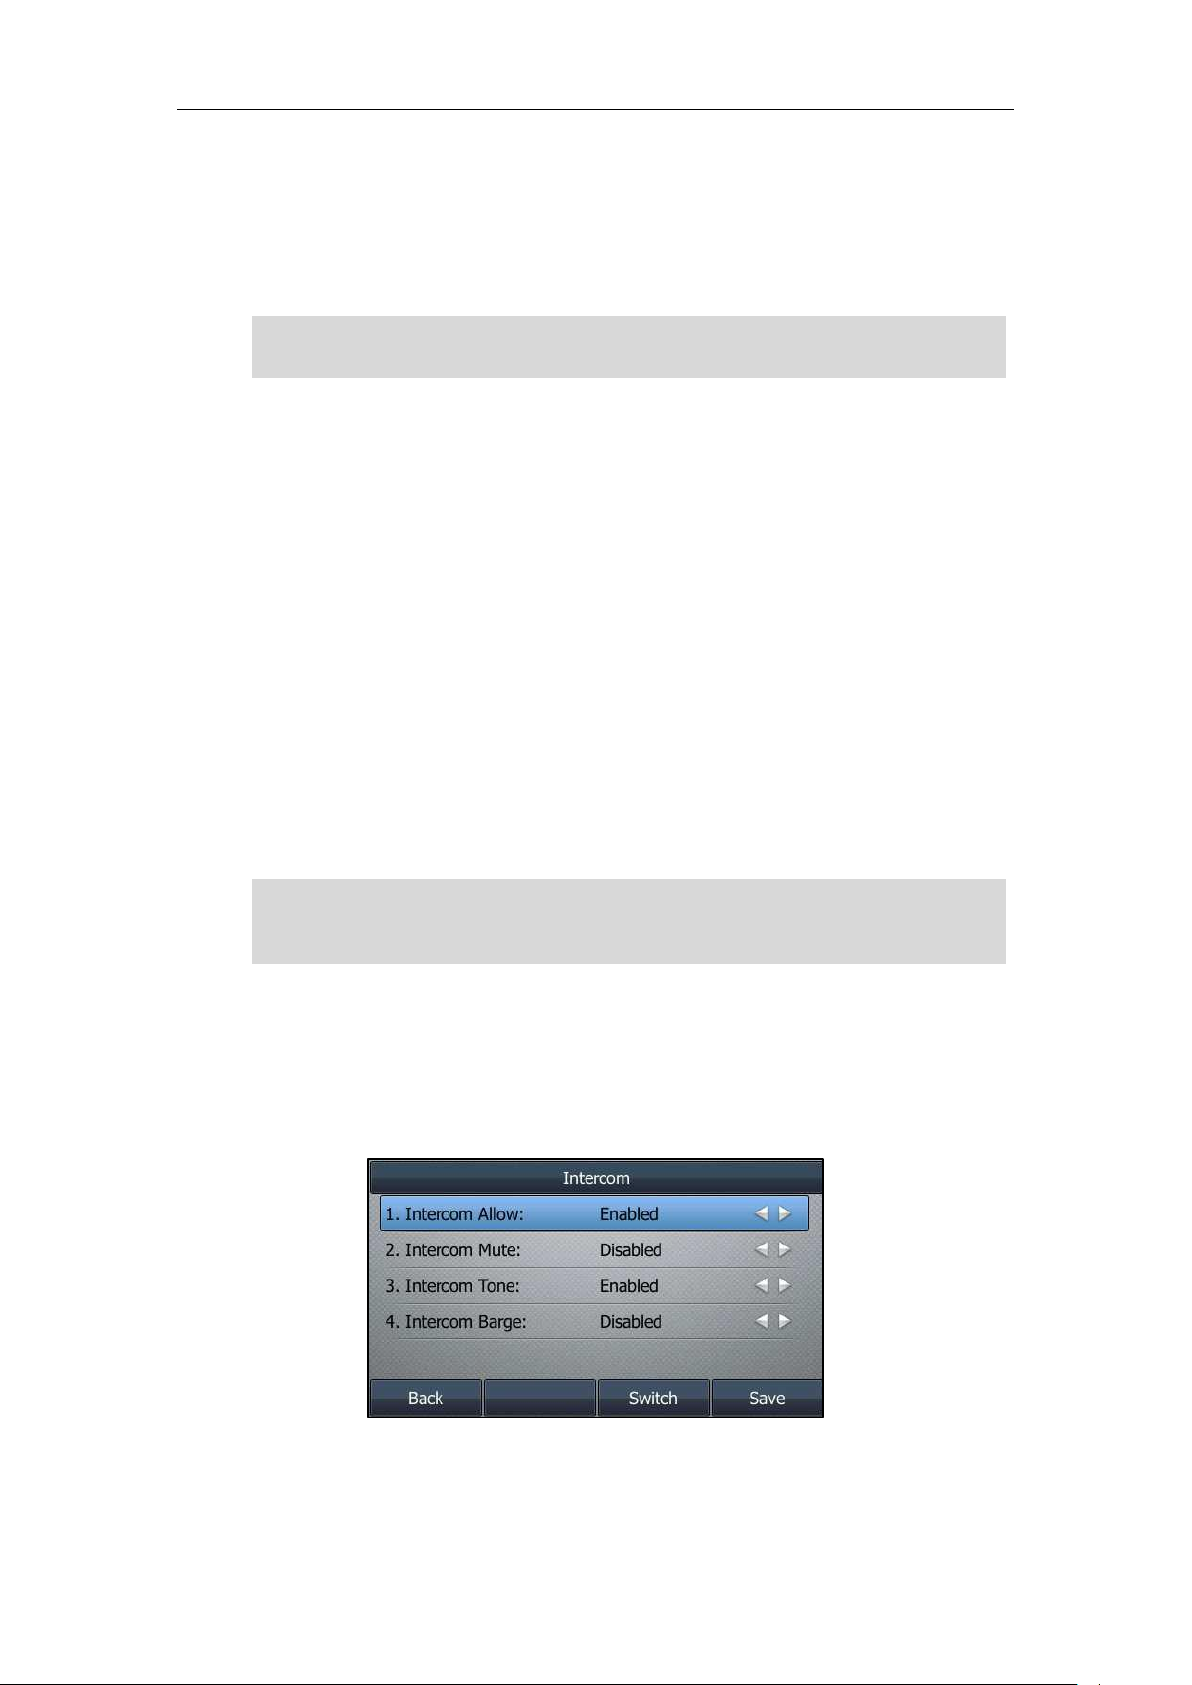
Configuring the Intercom Feature on the IP Phone..........................................................................176
Using Intercom ................................................................................................................................................178
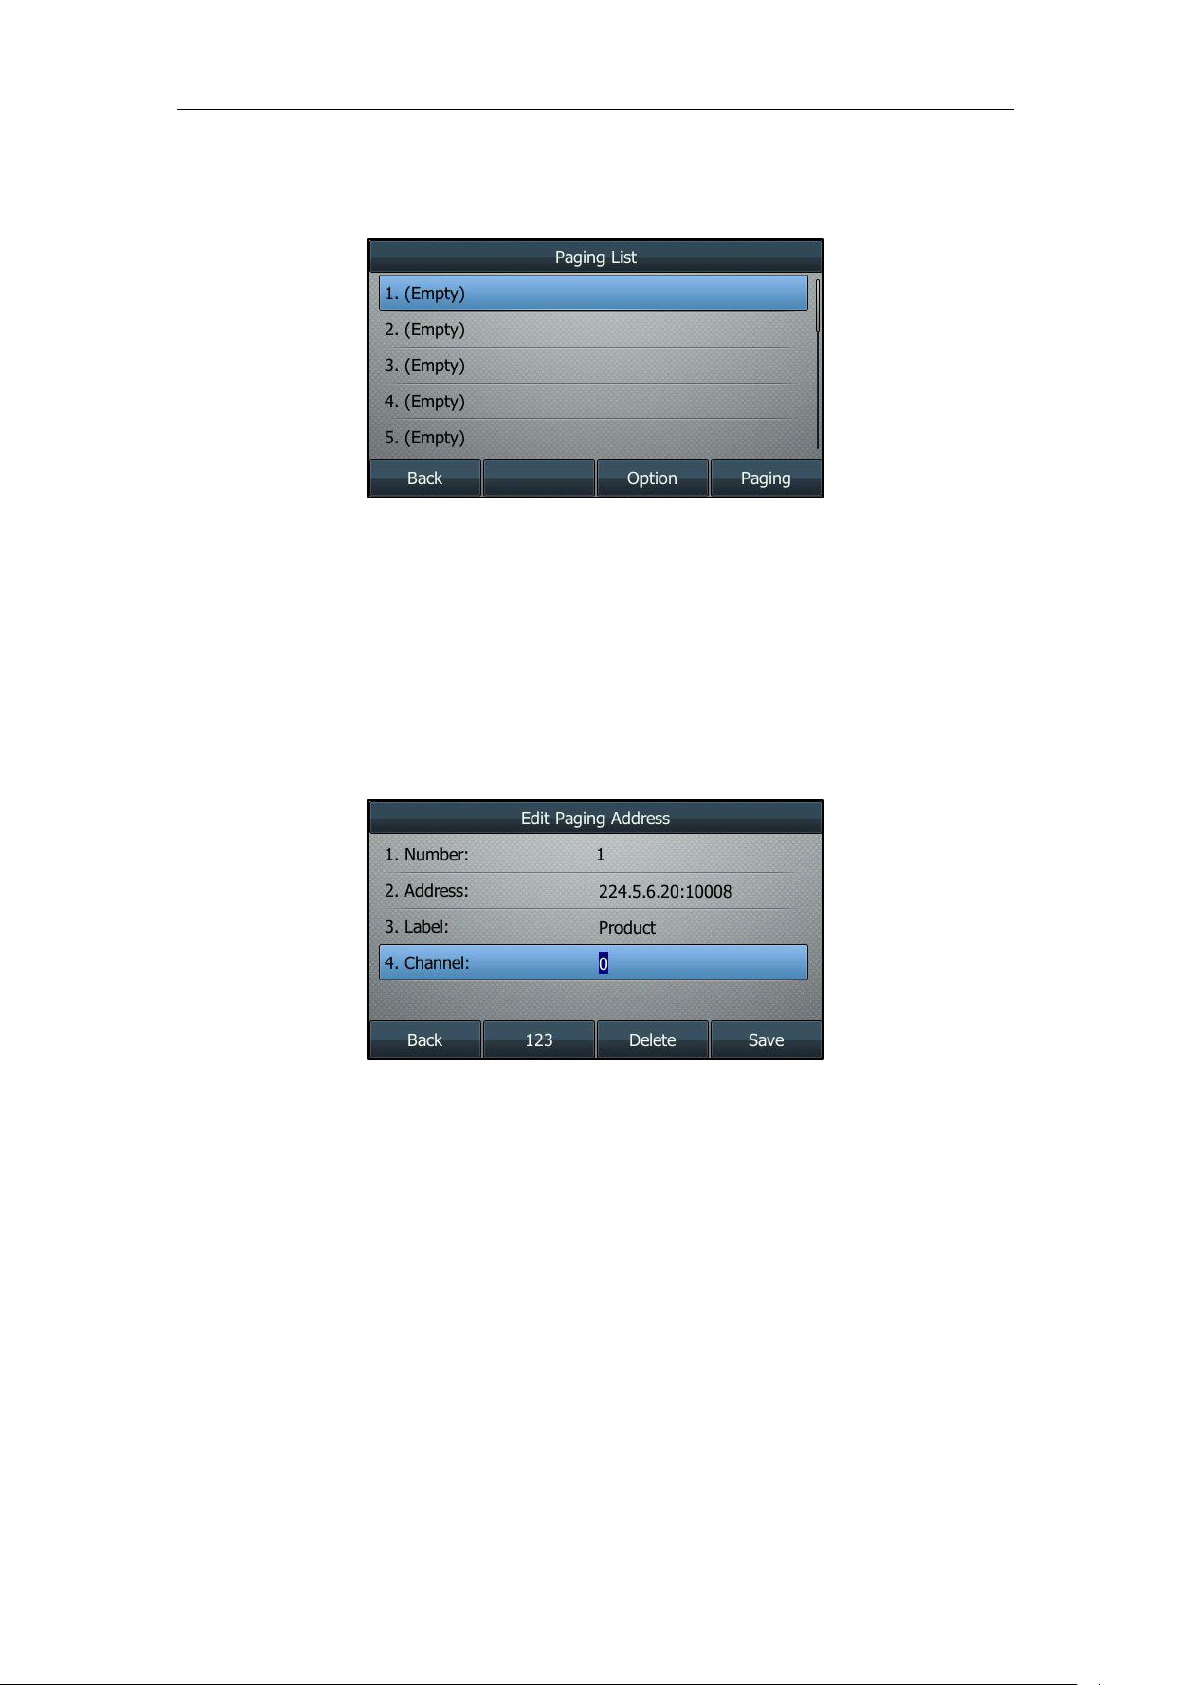
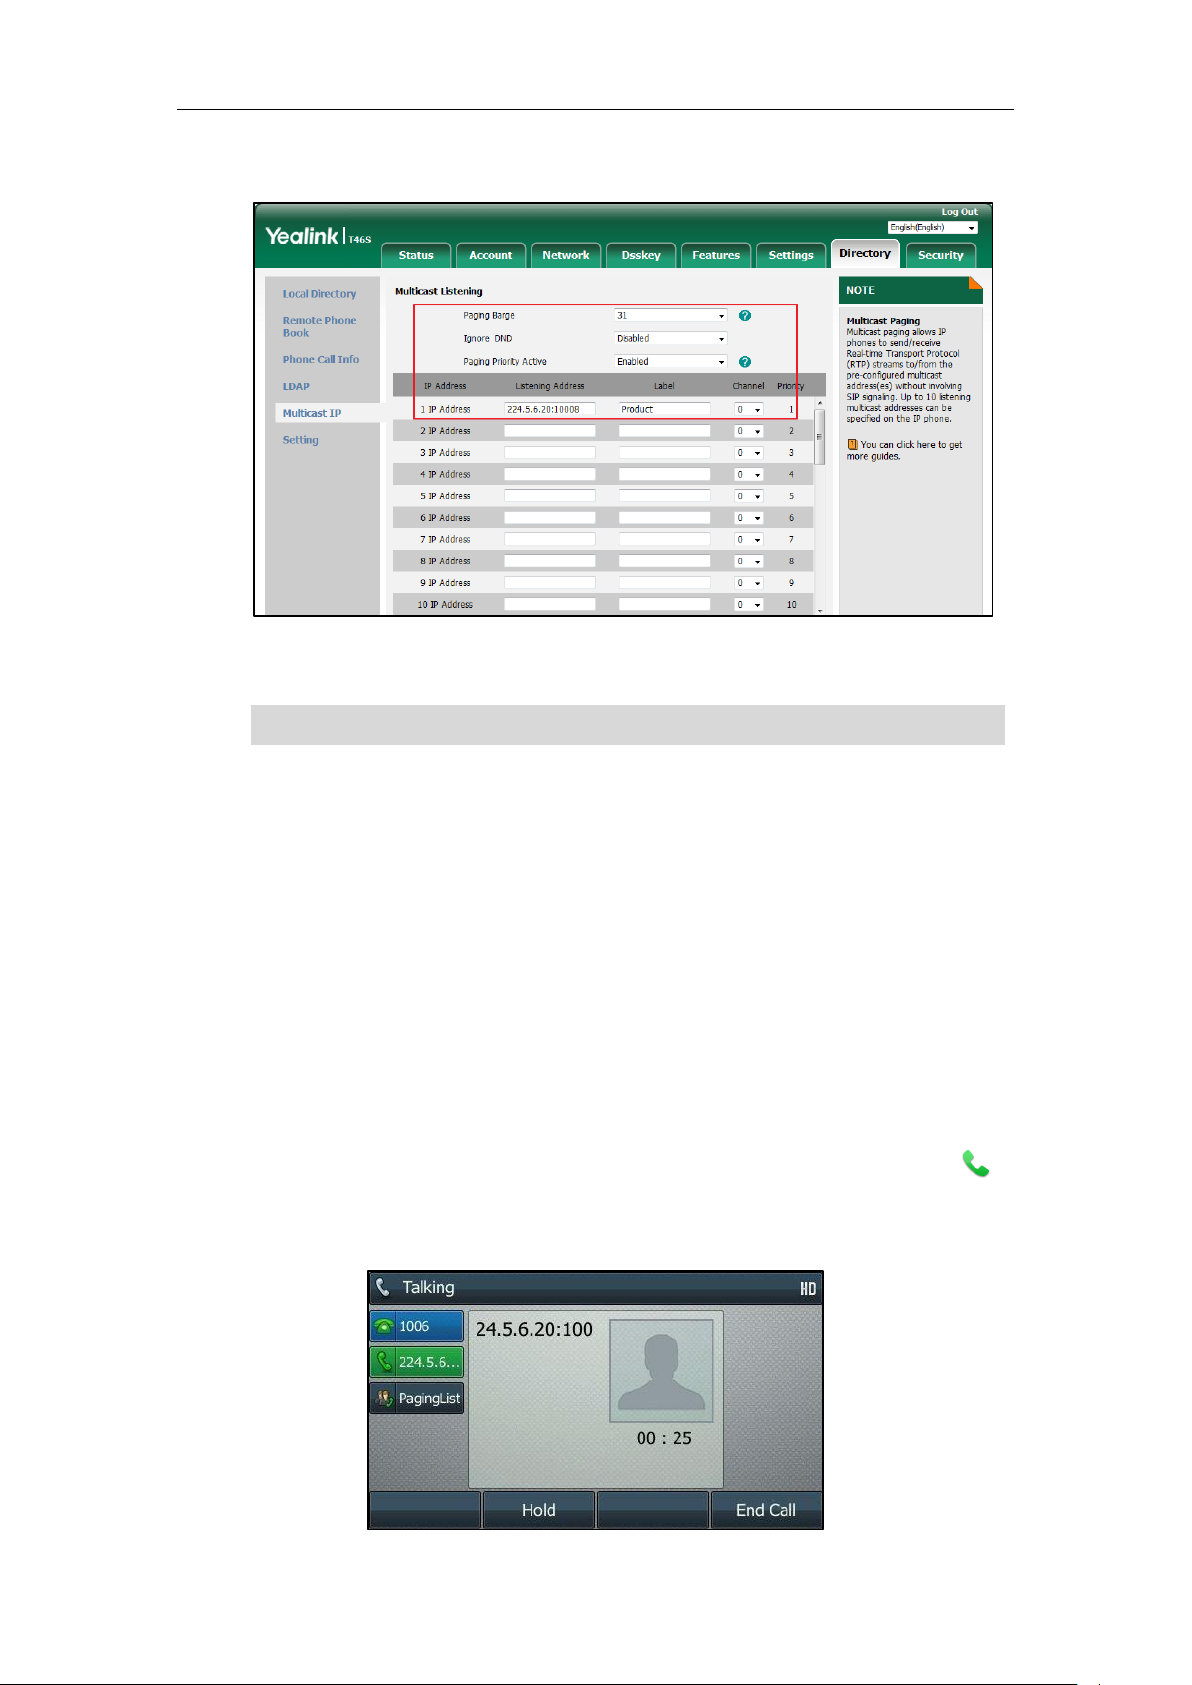
Using Multicast Paging ................................................................................................................................. 184
Automatic Call Distribution (ACD) ...............................................................................................................185
Configuring an ACD Key ..............................................................................................................................186
Logging into the ACD System ...................................................................................................................186
Short Message Service (SMS).....................................................................................................................206
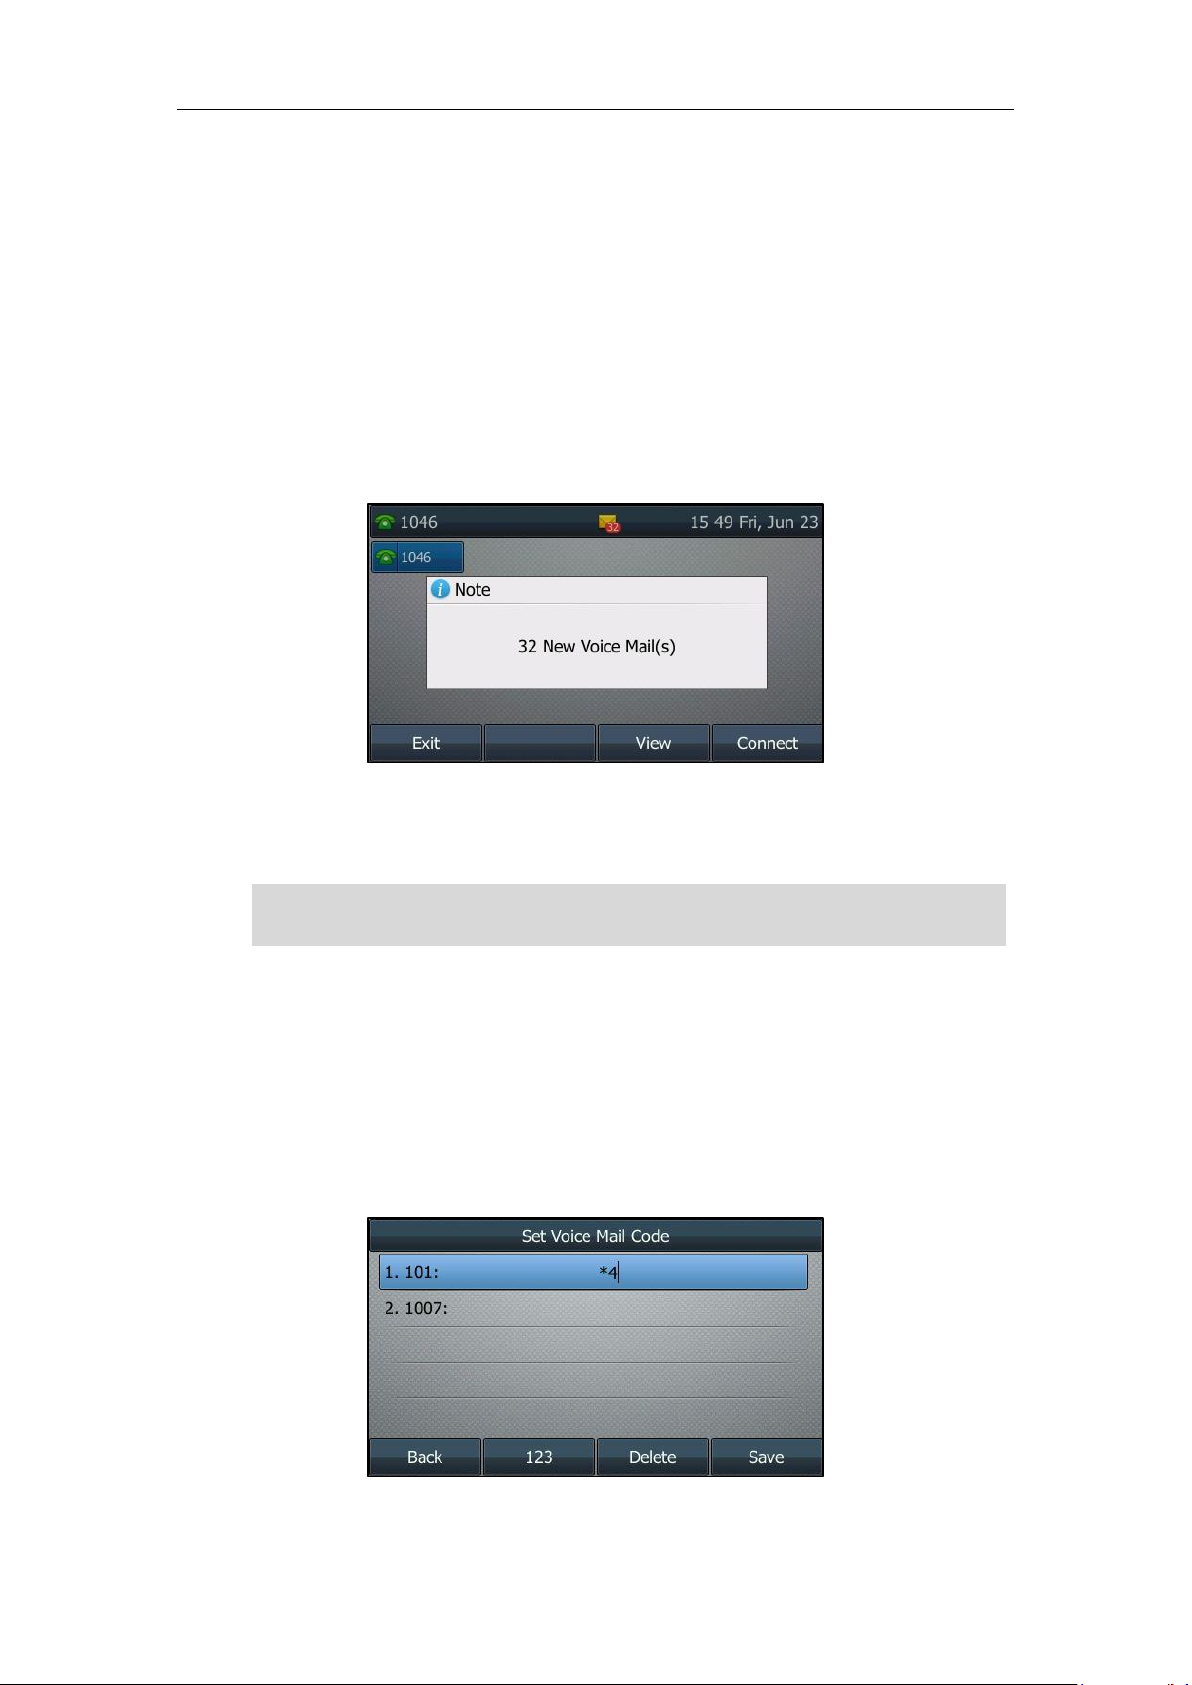
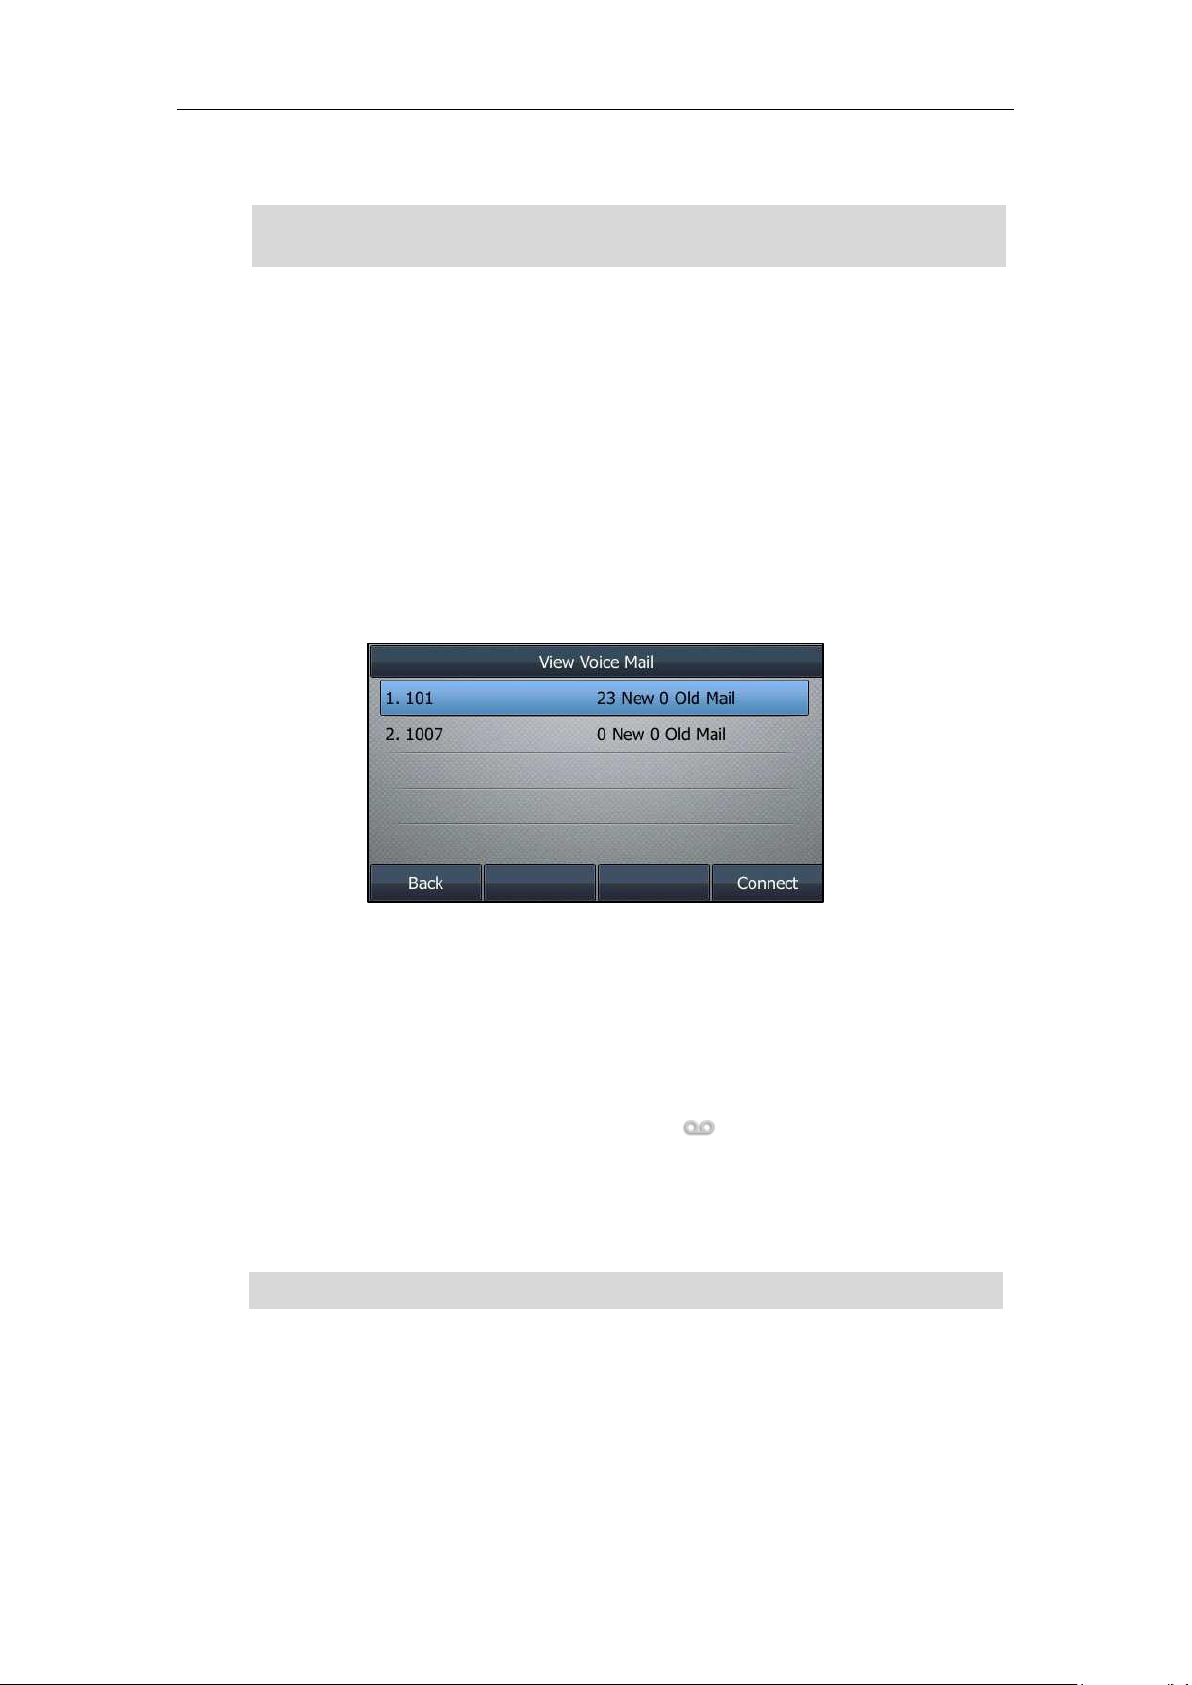
Voice Mail ..........................................................................................................................................................209
Using Optional Accessories with Your Phone .........................211
Table of Contents
xi
Using a Headset ..............................................................................................................................................211
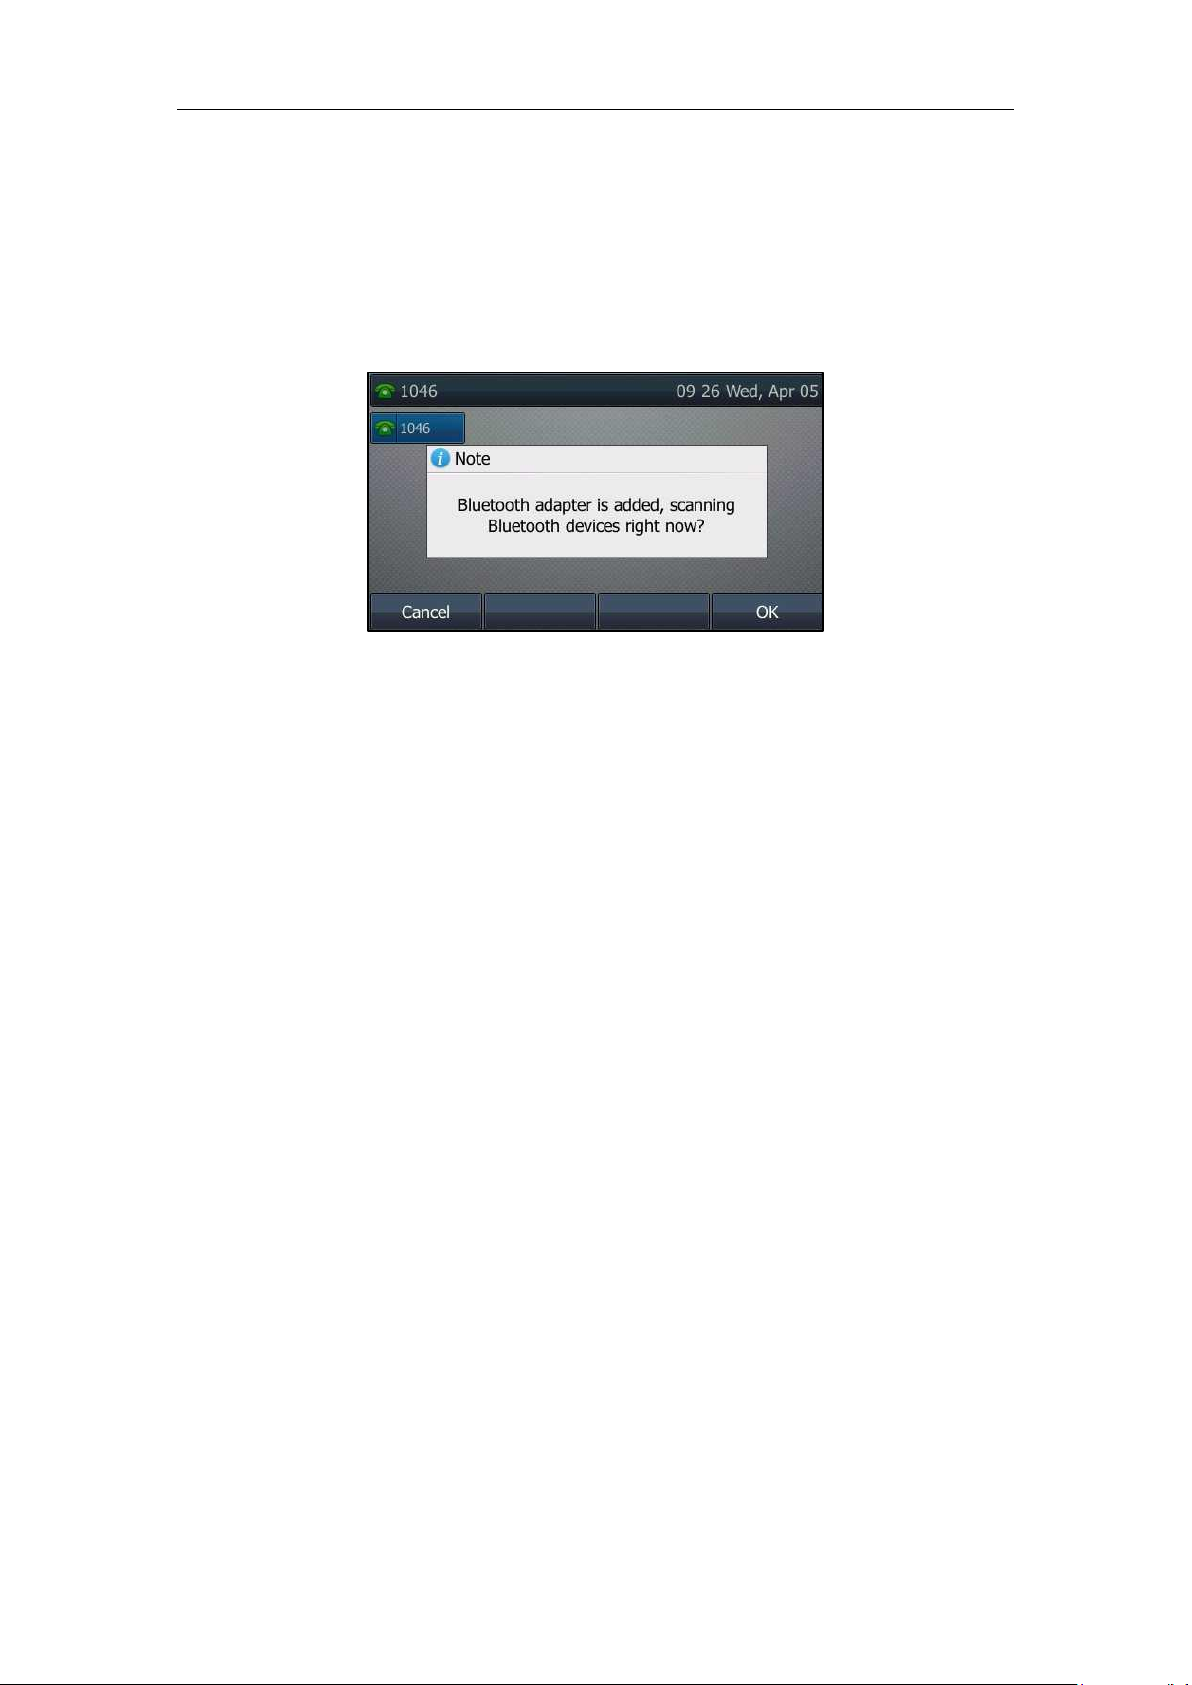
Using Bluetooth Feature ..............................................................................................................................214
Connecting to the Wireless Network ......................................................................................................222
Using an Expansion Module .......................................................................................................................228
Maintaining Your Phone ...........................................................231
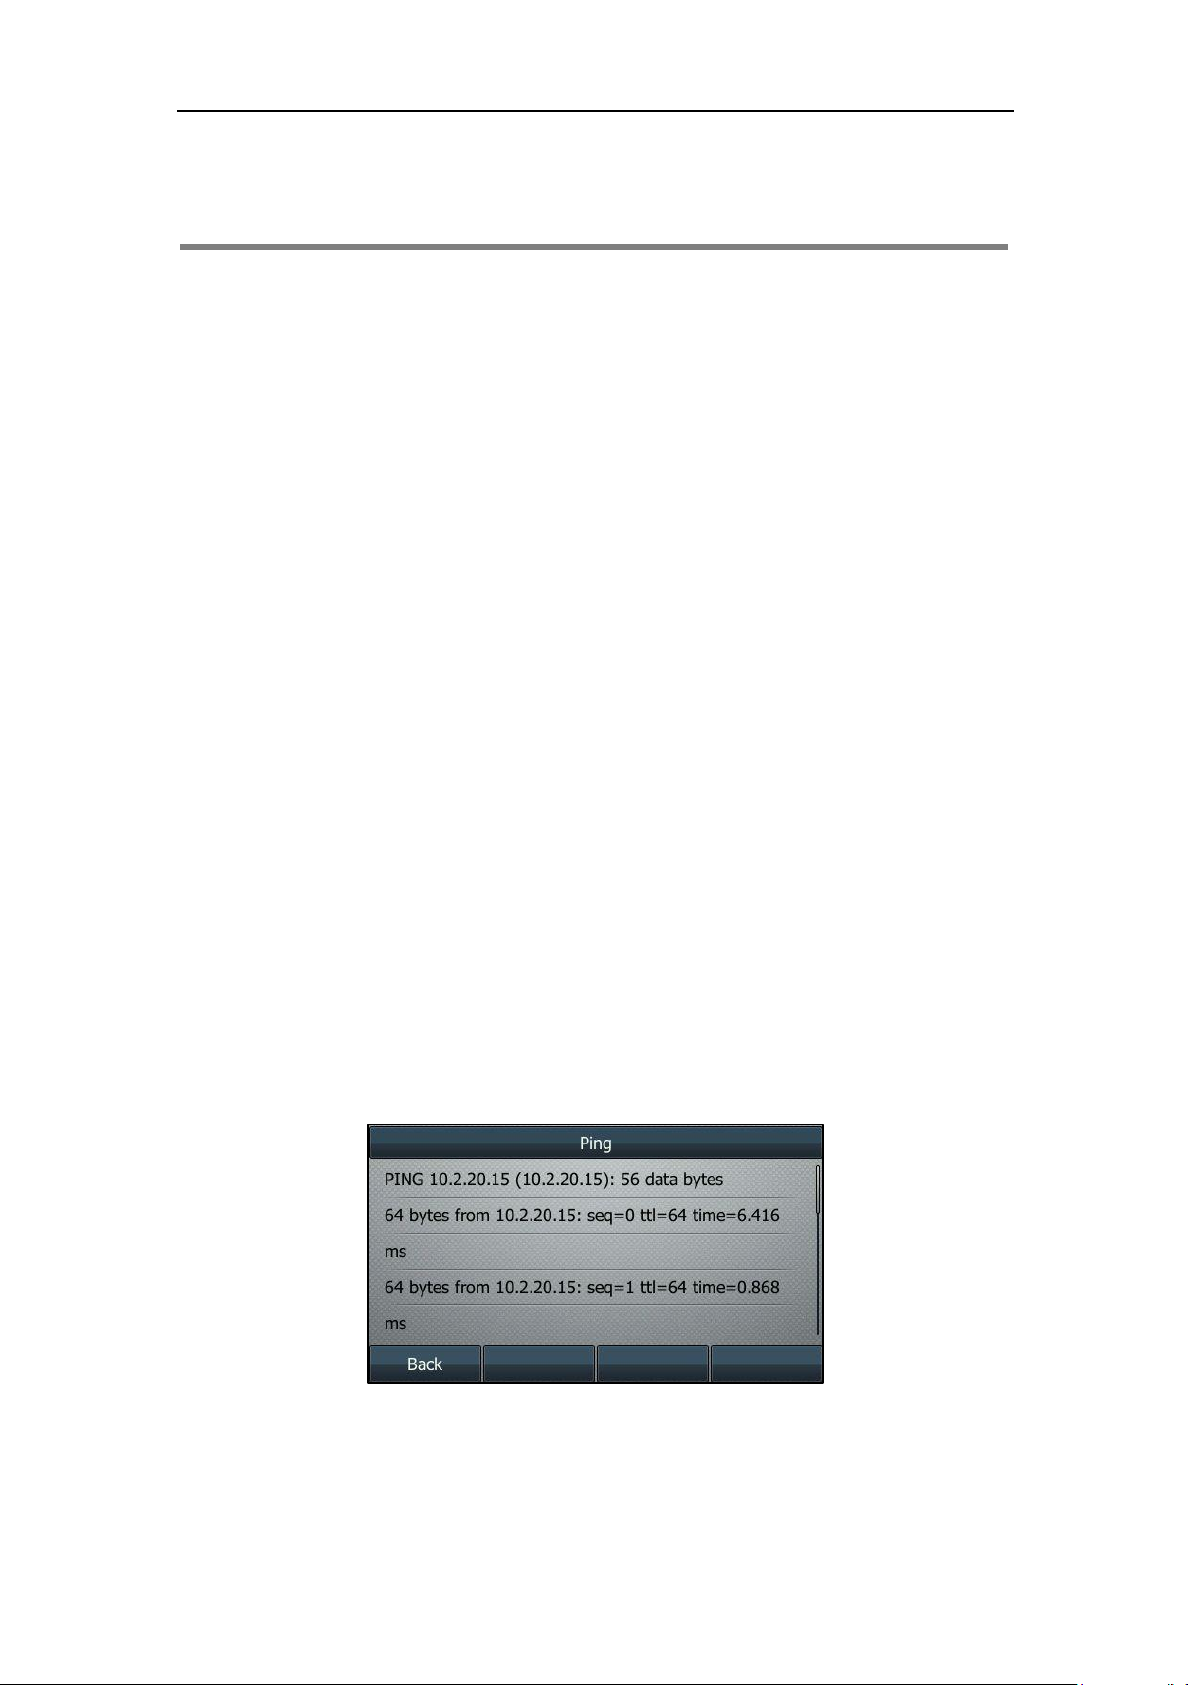
Diagnosing the Network ..................................................................................................................................231
Checking the Network Using “Ping” Method......................................................................................231
Checking the Network Using “Trace Route” Method.......................................................................232
Rebooting Your Phone .....................................................................................................................................232
Resetting to Factory Settings .........................................................................................................................233
Updating the Phone Configuration .............................................................................................................234
Export All Diagnostic Files ...............................................................................................................................235
Appendix A – Time Zones ................................................................................................................................237
Appendix B – Menu Structure ........................................................................................................................239
For the SIP-T48S/T48G IP phone ..............................................................................................................239
For the SIP-T46S/T46G IP phone ..............................................................................................................240
For the SIP-T42S/T42G/T41S/T41P/T40G/T40P ..................................................................................241
Overview
1
Overview
Before using your phone, you’d better get familiar with its features and user interface. This
chapter details your phone’s component, the icon and LED instructions, the screen layout of
your phone, and how to navigate the phone/web user interfaces. Topics include:
Hardware
Icons and Status Indicators Instructions
LED Instructions
User Interfaces
Contact your system administrator for assistance or more information.
Hardware
The main hardware of IP phones are the phone screen and the keypad.
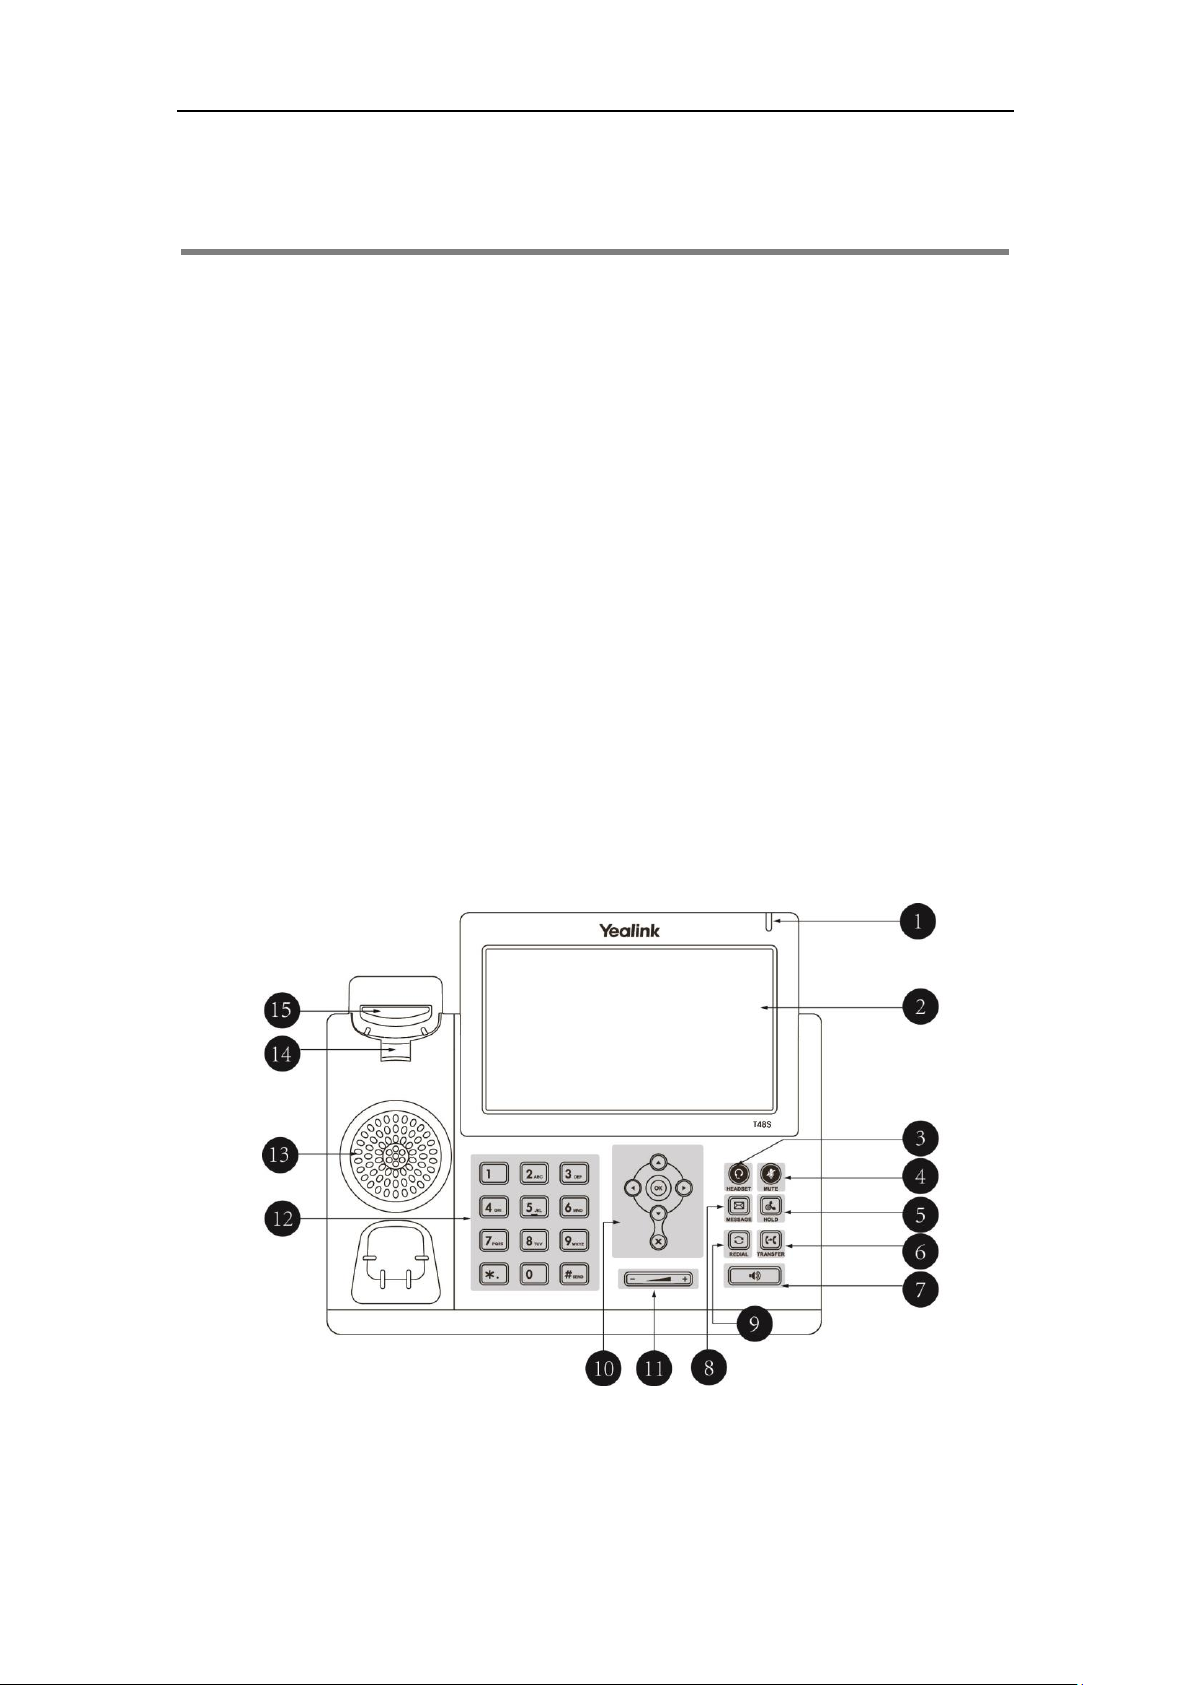
For the SIP-T48S/T48G IP Phone
The following figure displays the hardware features on the SIP-T48S/T48G IP phone:
User Guide for T4 Series IP Phones
2
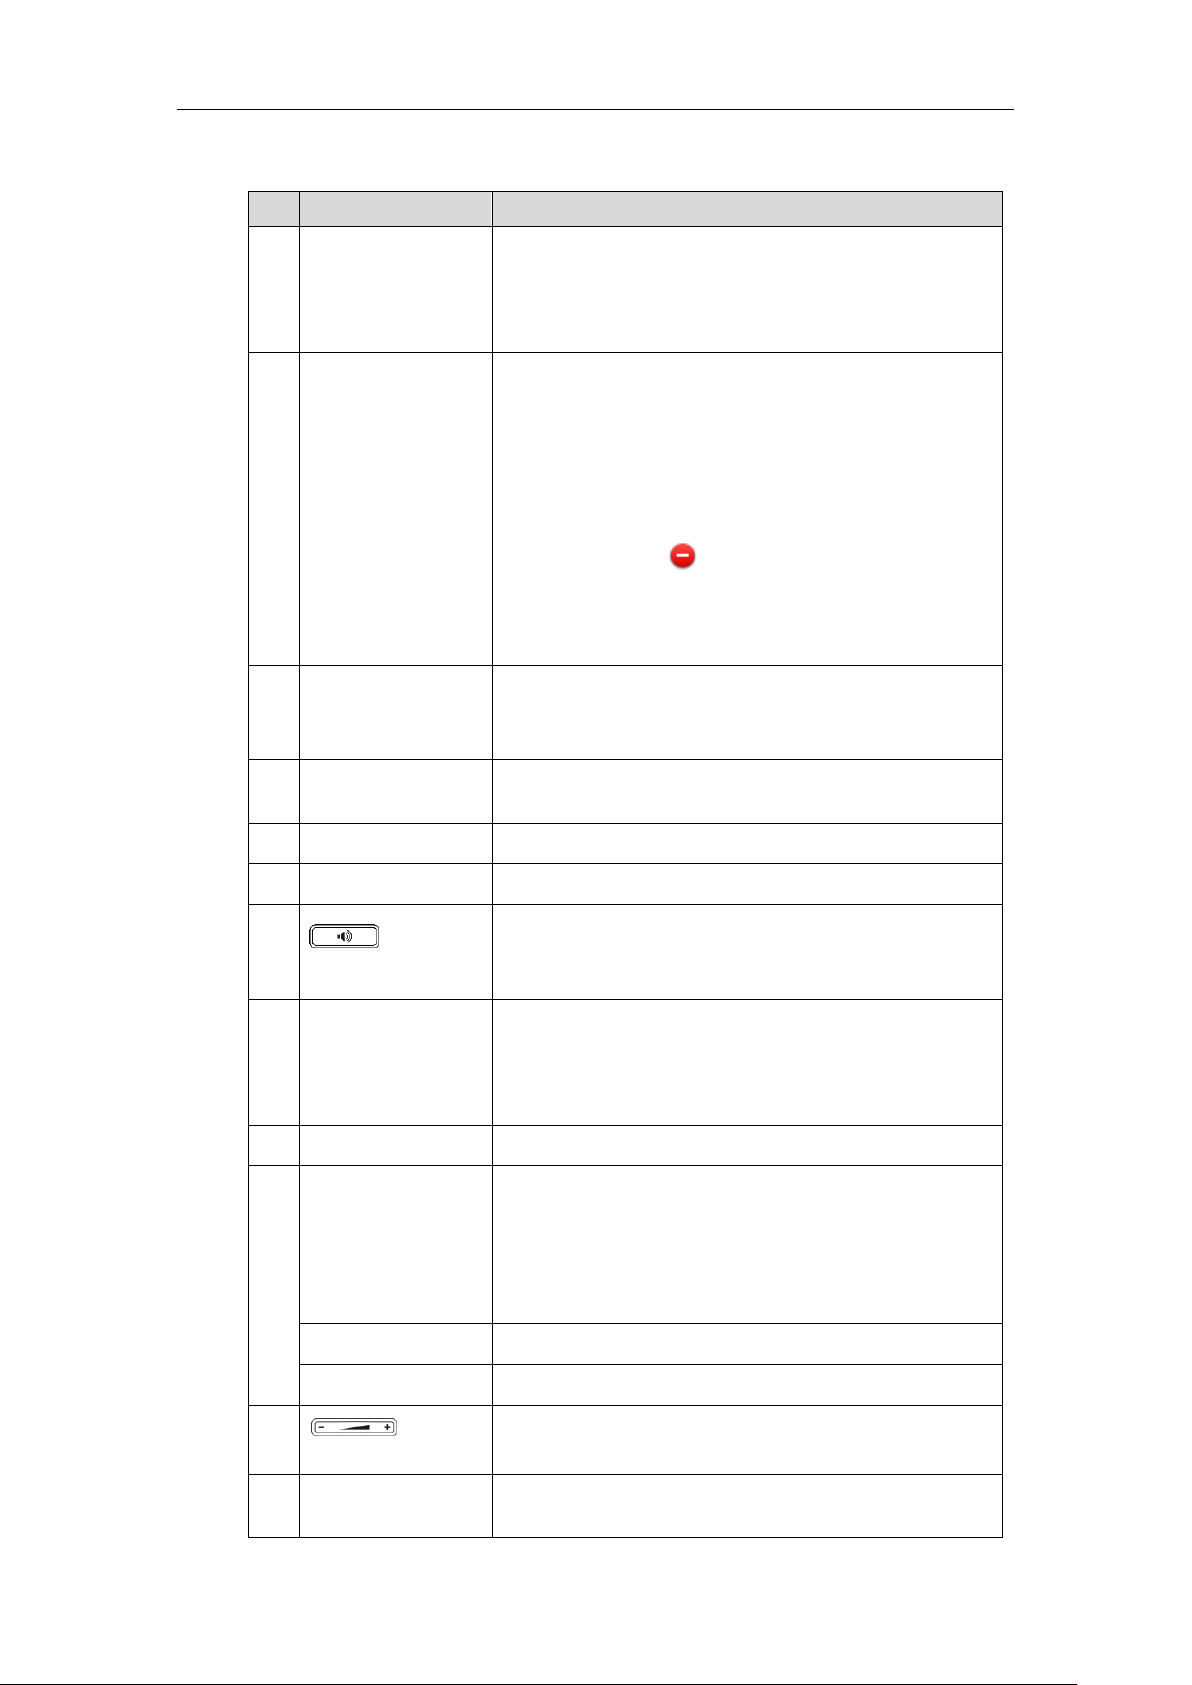
Hardware features description:
Item
Description
①
Power Indicator LED
Indicates call status, message status and phone’s system
status.
• Receives an incoming call—Fast-flashing
• Receives a voice mail or text message—Slow-flashing
②
Touch Screen
The screen is touch-sensitive. Tap to select and highlight
screen items.
Shows information about your phone, such as calls, messages,
soft keys, time and date:
• Default account
• Call information—caller ID, call duration
• Icons (for example, )
• Missed call or second incoming caller information
• Message (for example, "Saving config file!")
• Time and date
③
HEADSET Key
Toggles the headset mode on or off.
The LED indicator glows green when headset mode is
activated.
④
MUTE Key
Mutes or un-mutes your audio during calls.
The LED indicator glows red when the microphone is muted.
⑤
HOLD Key
Hold an active call or resumes a held call.
⑥
TRANSFER Key
Transfers a call to another party.
⑦
Speakerphone Key
Togglesthe hands-free (speakerphone) mode on or off.
The LED indicator glows green when hands-free
(speakerphone) mode is activated.
⑧
MESSAGE Key
• Accesses voice messages when the voice mail code is
configured.
• Configures the voice mail code when the voice mail code is
not configured.
⑨
REDIAL Key
Dials the most recently dialed number.
⑩
Navigation Keys
• Position the cursor within text you’re updating.
• Enable or disable fields.
• Turn pages or scroll through values for a field.
• Scroll through items.
• Access History and Directory respectively.
OK Key
Confirms actions or answers incoming calls.
Cancel Key
Cancels actions or rejects incoming calls.
⑪
Volume Key
Adjusts the volume of the handset, headset, speaker, ringer or
media.
⑫
Dialpad
Allows you to enter numbers, letters and special characters as
well as select menu items which are with index numbers.
Overview
3
Item
Description
⑬
Speaker
Provides hands-free (speakerphone) audio output.
⑭
Reversible Tab
Secures the handset in the handset cradle when the IP phone
is mounted vertically. For more information on how to adjust
the reversible tab, refer to
Yealink Wall Mount Quick
Installation Guide for Yealink IP Phones
.
⑮
Hookswitch
• Lifts the handset from the handset cradle, then the
hookswitch bounces and the phone connects to the line.
• Rests the handset on the handset cradle, then the phone
disconnects from the line automatically.
For the SIP-T46S/T46G/T42S/T42G/T41S/T41P/T40G/T40P IP
Phone
The following figure displays the hardware features here takes SIP-T46S IP phone as an example:
User Guide for T4 Series IP Phones
4
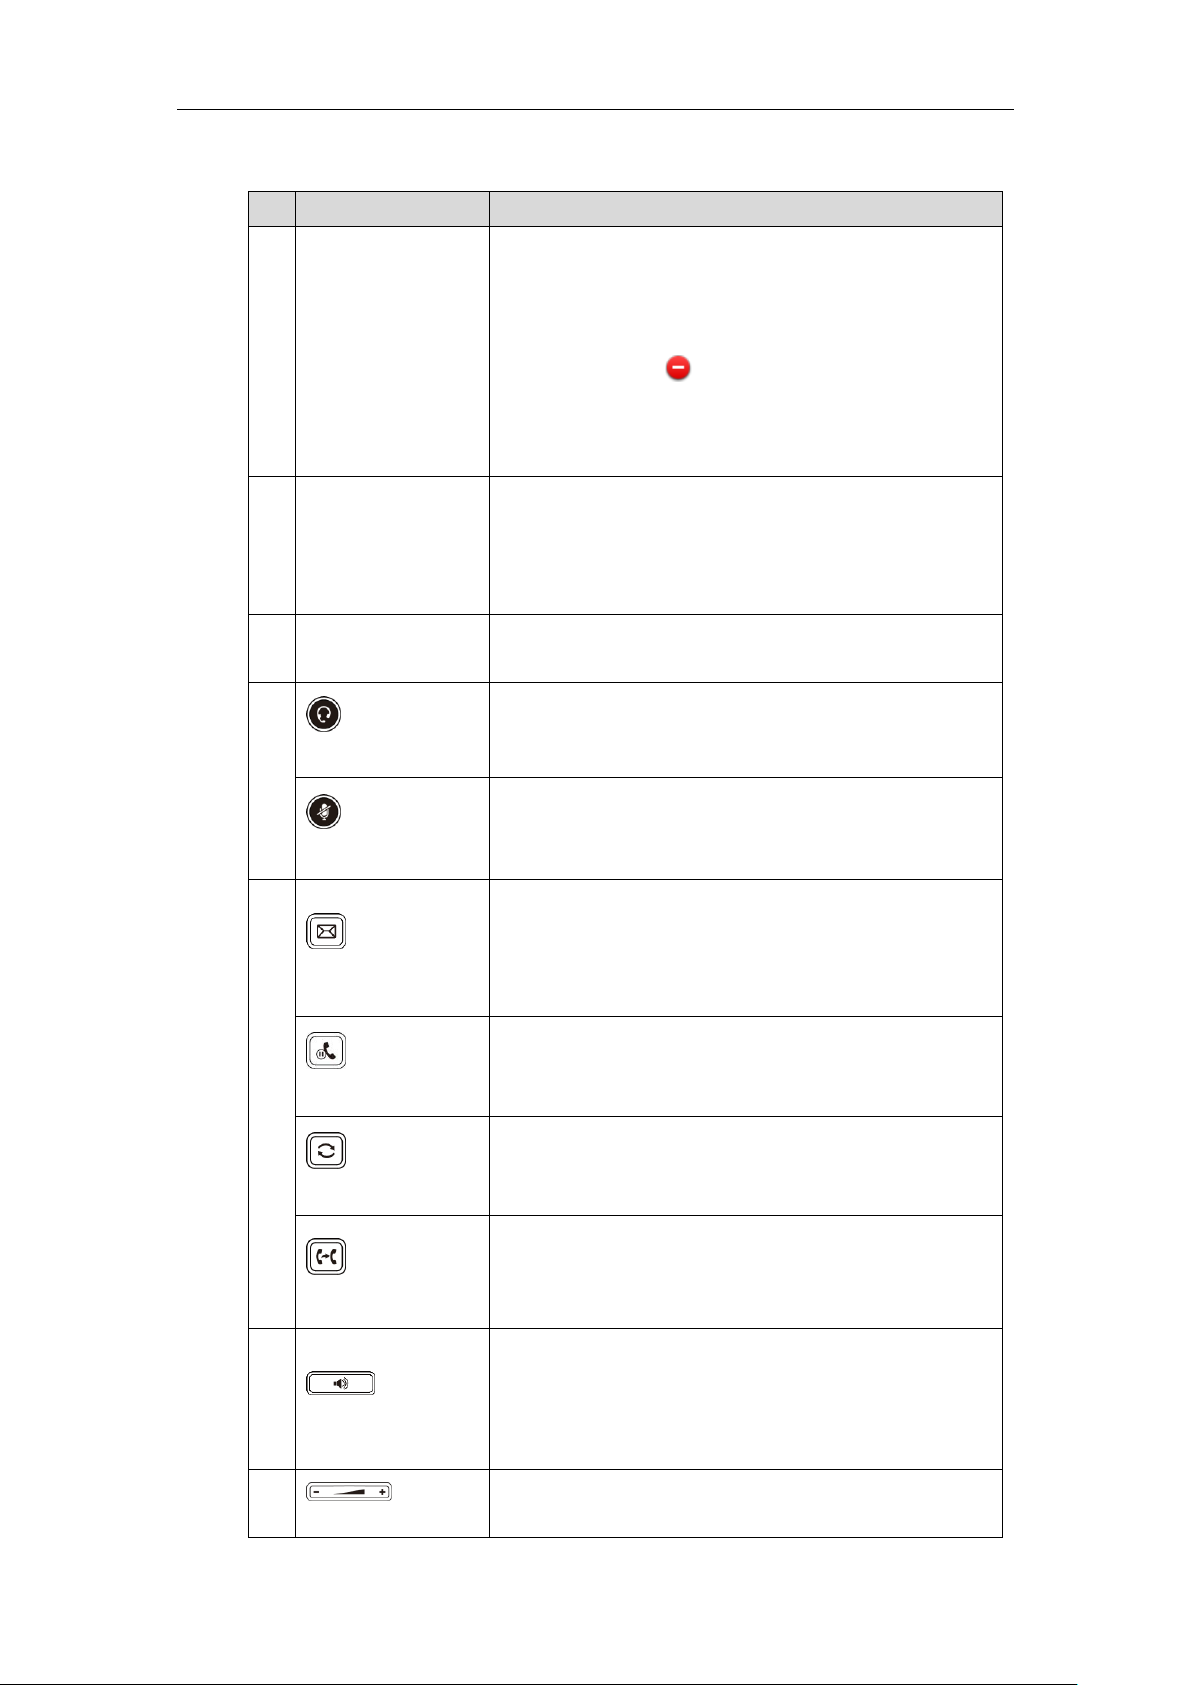
Hardware features description:
Item
Description
①
LCD Screen
Shows information about your phone, such as calls, messages,
soft keys, time and date:
• Default account
• Call information—caller ID, call duration
• Icons (for example, )
• Missed call or second incoming caller information
• Message (for example, "Saving config file!")
• Time and date
②
Power Indicator LED
Indicates call status, message status and phone’s system
status.
• Receives an incoming call—Fast-flashing
• Receives a voice mail or text message—Slow-flashing
③
Line Keys
• Activates accounts
• Assigns function or feature to the line key.
④
HEADSET Key
Toggles the headset mode on or off.
On the SIP-T46S/T46G/T42S/T42G/T41S/T41P IP phone, the
LED indicator glows green when headset mode is activated.
MUTE Key
Mutes or un-mutes your audio during calls.
On the SIP-T46S/T46G/T42S/T42G/T41S/T41P IP phone, the
LED indicator glows red when the microphone is muted.
⑤
MESSAGE Key
• Accesses voice messages when the voice mail code is
configured.
• Configures the voice mail code when the voice mail code is
not configured.
HOLD Key
Hold an active call or resumes a held call.
Note: There is no HOLD Key on
SIP-T42G/T42S/T41P/T41S/T40G/T40P IP phone.
REDIAL Key
Dials the most recently dialed number.
TRANSFER Key
Transfers a call to another party.
It is only available on the SIP-T46S/T46G IP phone.
⑥
Speakerphone Key
Togglesthe hands-free (speakerphone) mode on or off.
On the SIP-T46S/T46G/T42S/T42G/T41S/T41P IP phones, the
LED indicator glows green when the hands-free
(speakerphone) mode is activated.
⑦
Volume Key
Adjusts the volume of the handset, headset, speaker, ringer or
media.
Overview
5
Item
Description
⑧
Dialpad
Allows you to enter numbers, letters and special characters as
well as select menu items which are with index numbers.
⑨
Navigation Keys
Scrolls through menus, information or options displayed on
the phone’s screen.
OK Key
Confirms actions or answers incoming calls.
Cancel Key
Cancels actions or rejects incoming calls.
⑩
Soft Keys
Enable you to select context sensitive keys that display along
the bottom of the screen.
⑪
Speaker
Provides hands-free (speakerphone) audio output.
⑫
Reversible Tab
Secures the handset in the handset cradle when the IP phone
is mounted vertically. For more information on how to adjust
the reversible tab, refer to
Yealink Wall Mount Quick
Installation Guide for Yealink IP Phones
.
⑬
Hookswitch
• Lifts the handset from the handset cradle, then the
hookswitch bounces and the phone connects to the line.
• Rests the handset on the handset cradle, then the phone
disconnects from the line automatically.
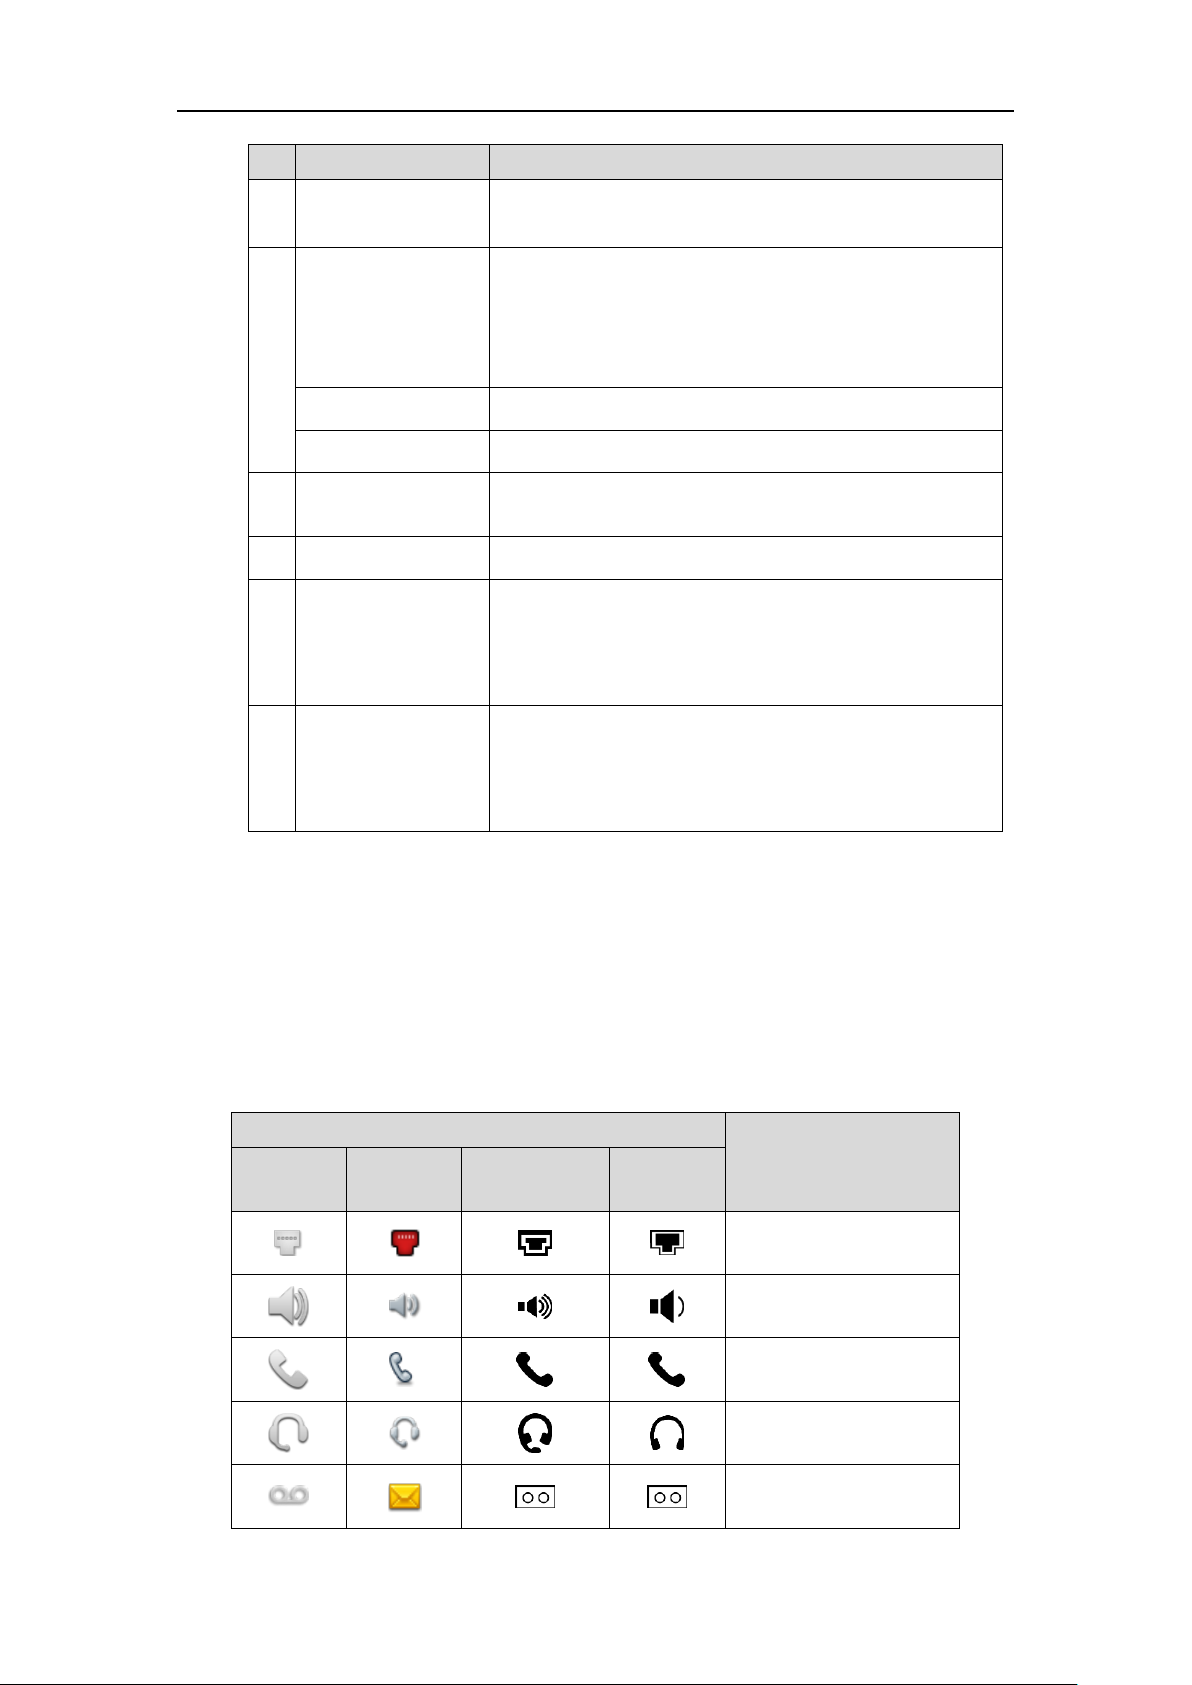
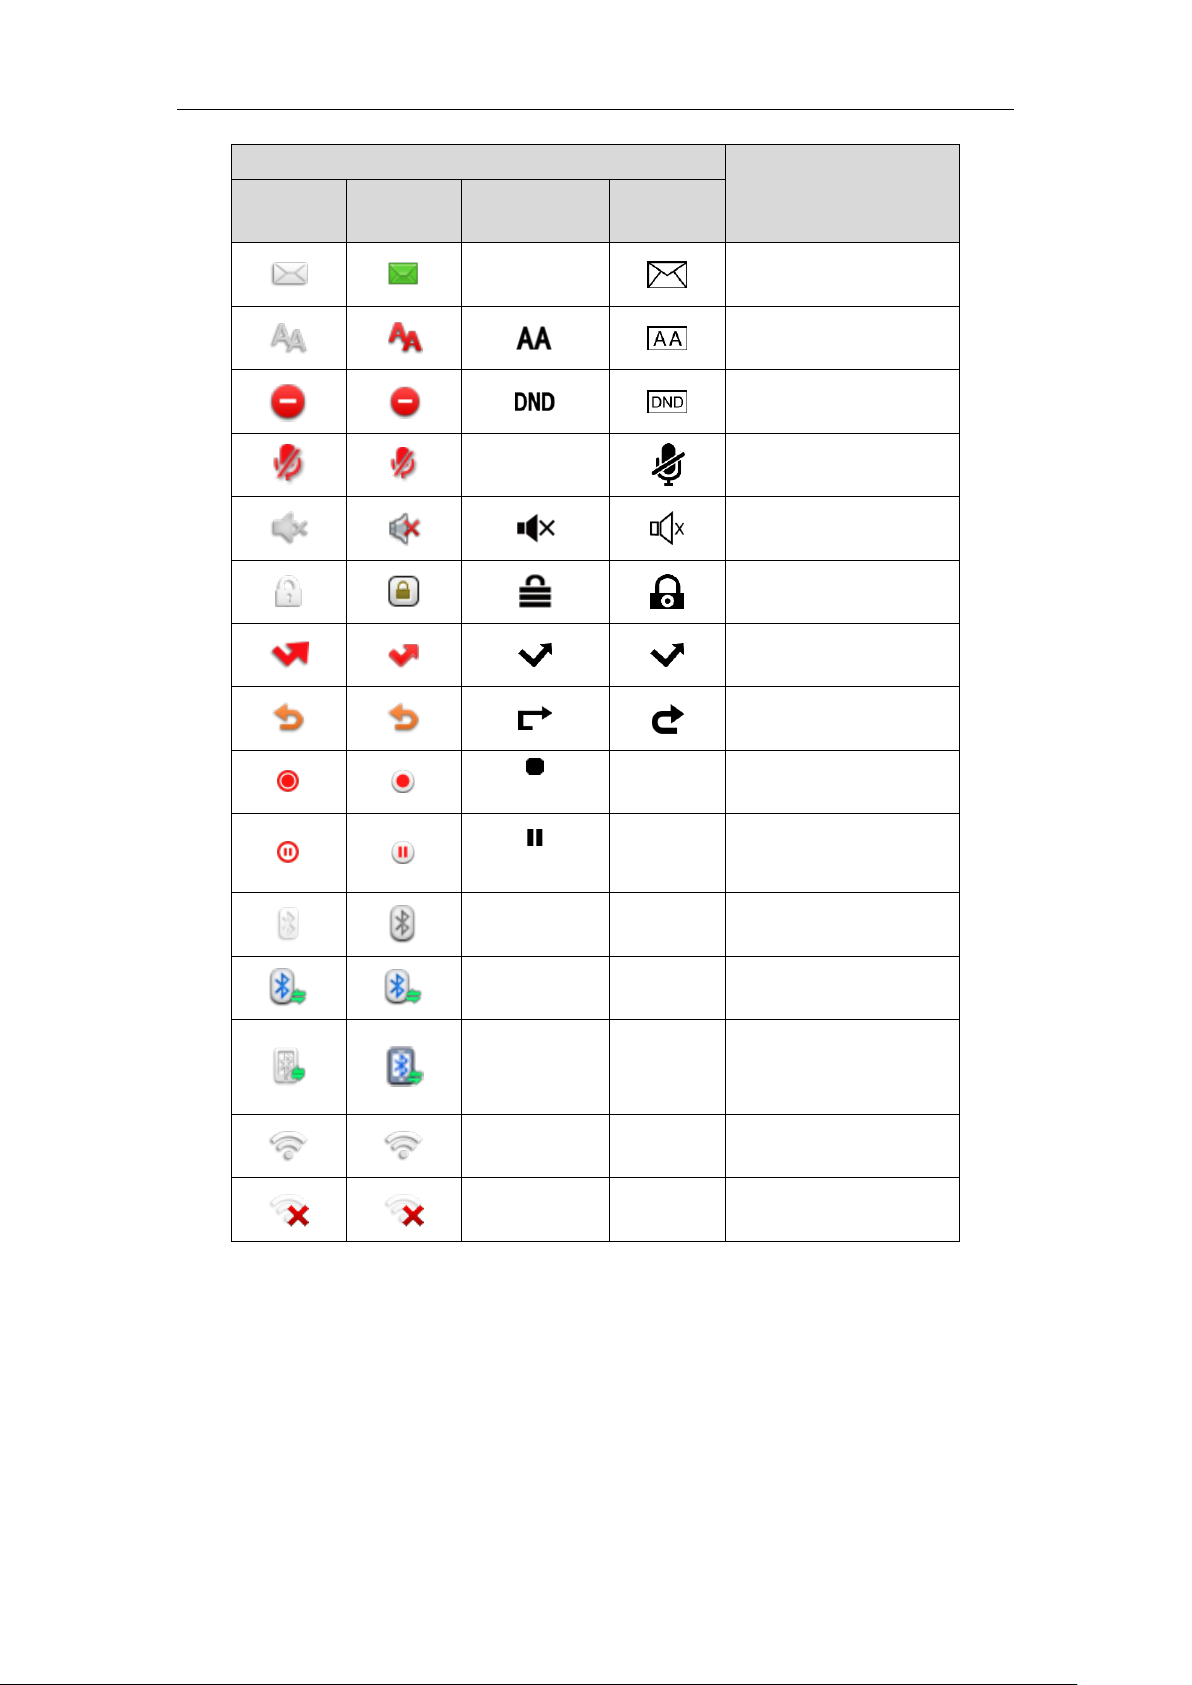
Icons and Status Indicators Instructions
Status Indicators
Phone icons and status indicators displaying on the status bar are described in the following
table:
Icons
Description
T48S/T48G
T46S/T46G
T42S/T42G/
T41S/T41P
T40G/T40P
Wired network unavailable
Hands-free
(speakerphone) mode
Handset mode
Headset mode
Voice Mail
User Guide for T4 Series IP Phones
6
Icons
Description
T48S/T48G
T46S/T46G
T42S/T42G/
T41S/T41P
T40G/T40P
/
Text Message
Auto Answer
Do Not Disturb (DND)
/
Keep Mute
Silent Mode
Phone Lock
Missed Calls
Call Forward
(SIP-T42S/T41S)
/
Recording in progress
(Using a USB flash drive)
(SIP-T42S/T41S)
/
Recording paused (Using a
USB flash drive)
/
/
Bluetooth Mode
/
/
Bluetooth headset paired
and connected
/
/
Bluetooth-Enabled mobile
phone paired and
connected
/
/
Wi-Fi connection
successful
/
/
Wi-Fi connection failed
Overview
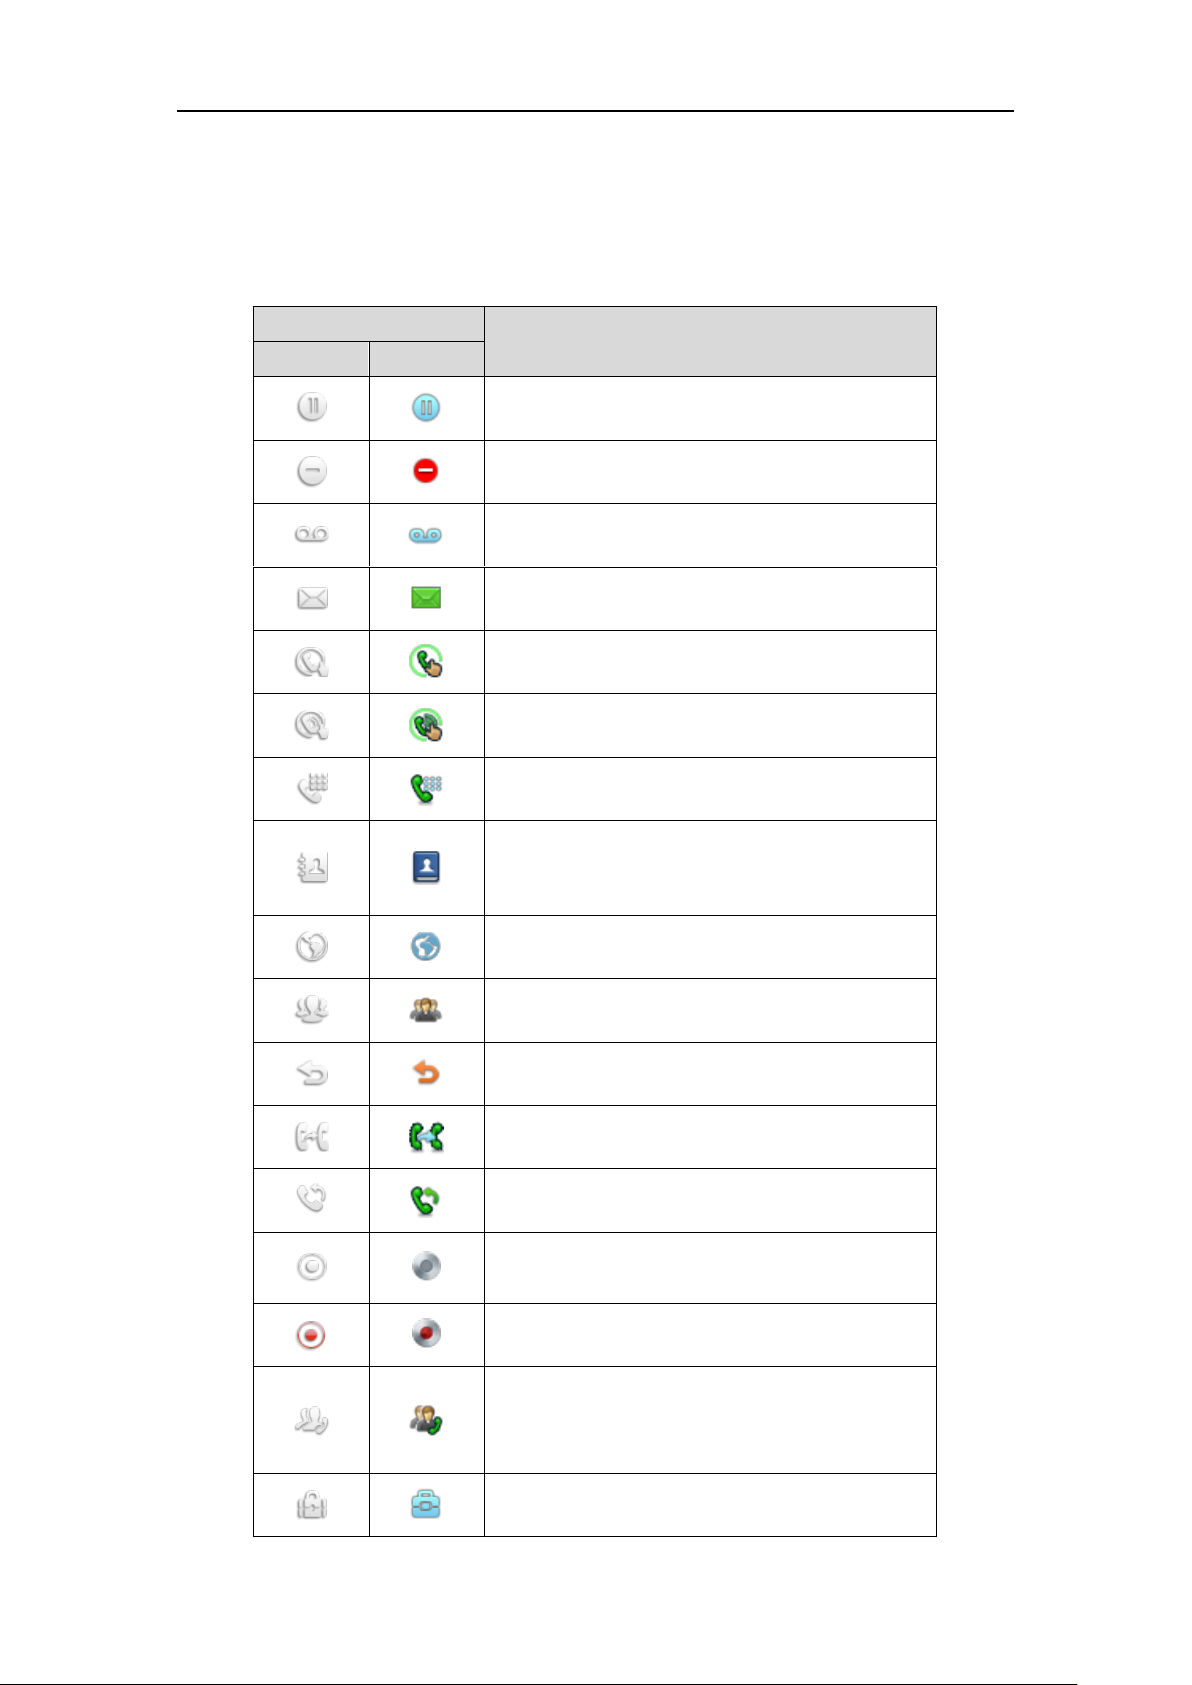
7
Line Key Icons
Icons for line key are described in the following tables:
Icon indicators (associated with line key features):
Icons
Description
T48S/T48G
T46S/T46G
Hold/Public Hold
Private Hold
DND
Voice Mail
SMS
Direct Pickup
Group Pickup
DTMF
Prefix
Local Group
XML Group
LDAP
XML Browser
Conference
Forward
Transfer
ReCall
Record
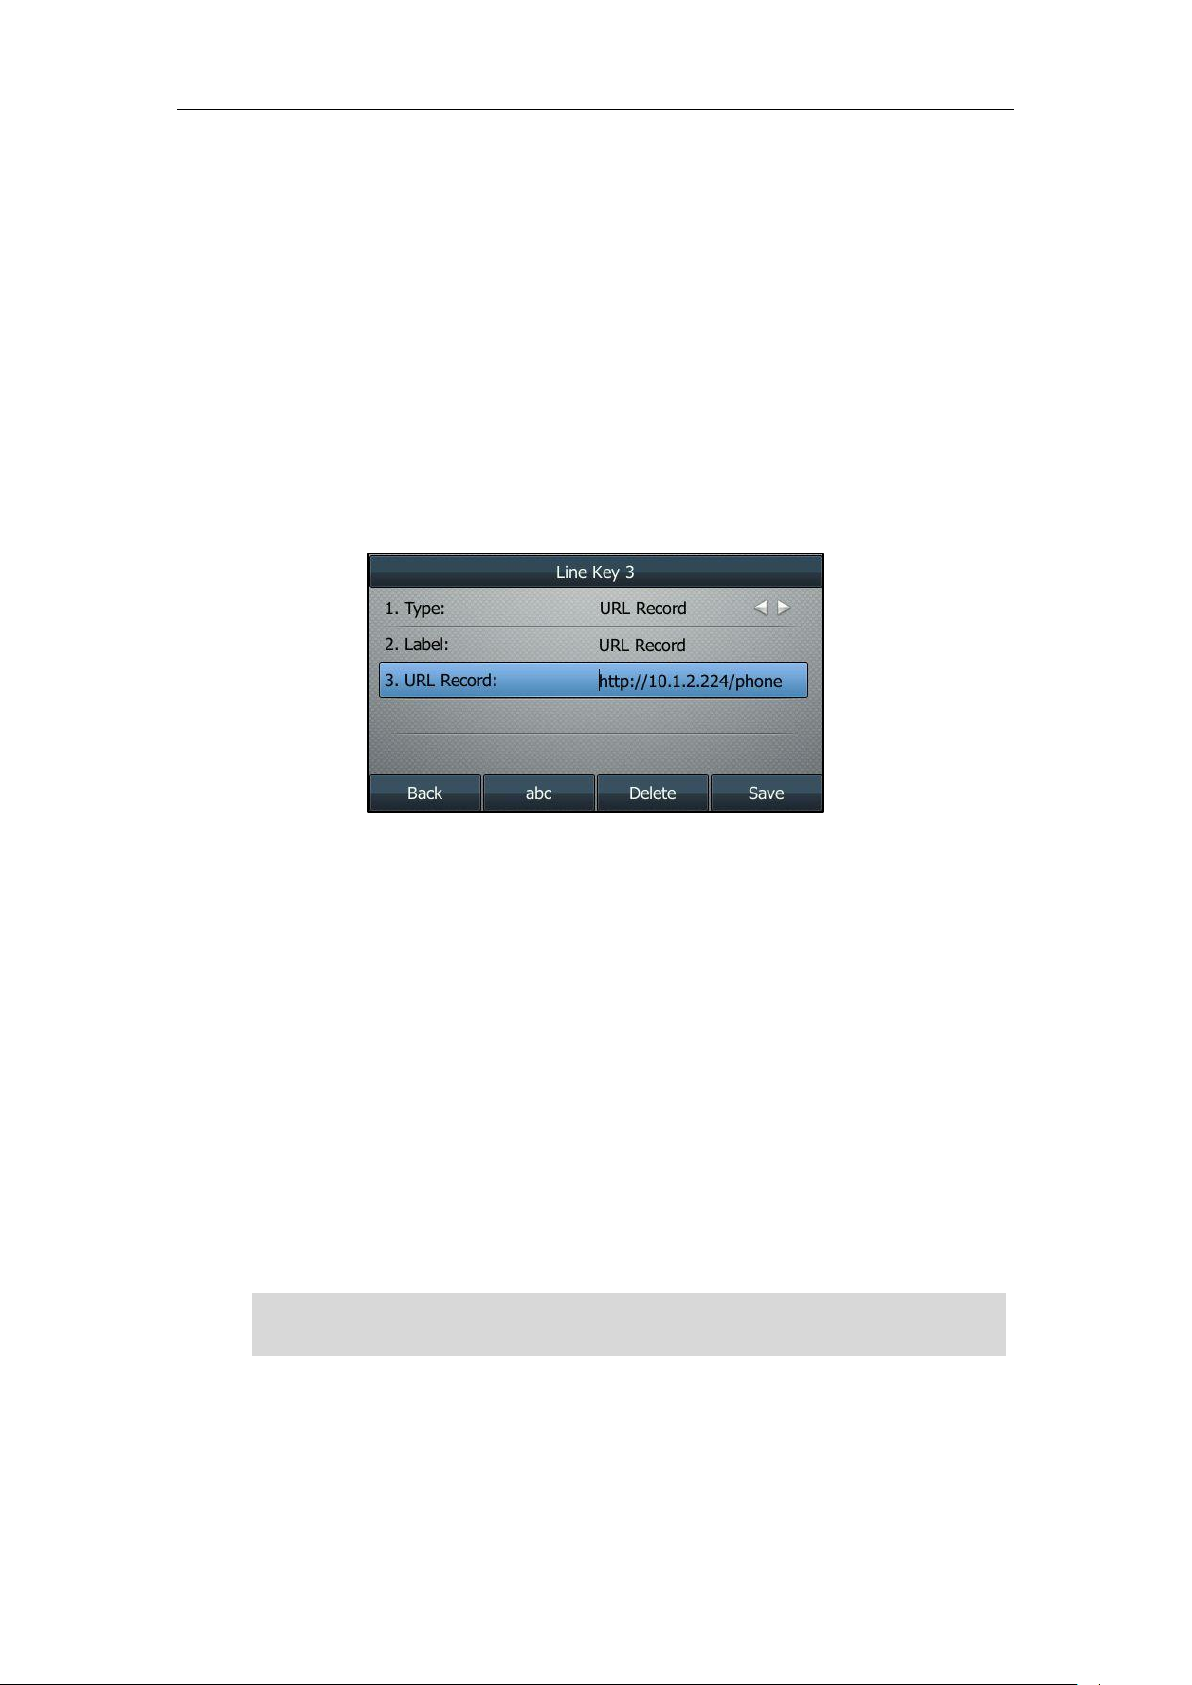
URL Record
Recording in process (Record/URL Record)
Multicast Paging
Group Listening
Paging List
Hot Desking
User Guide for T4 Series IP Phones
8
Icons
Description
T48S/T48G
T46S/T46G
Zero Touch
URL
Phone Lock
Directory
Speed Dial
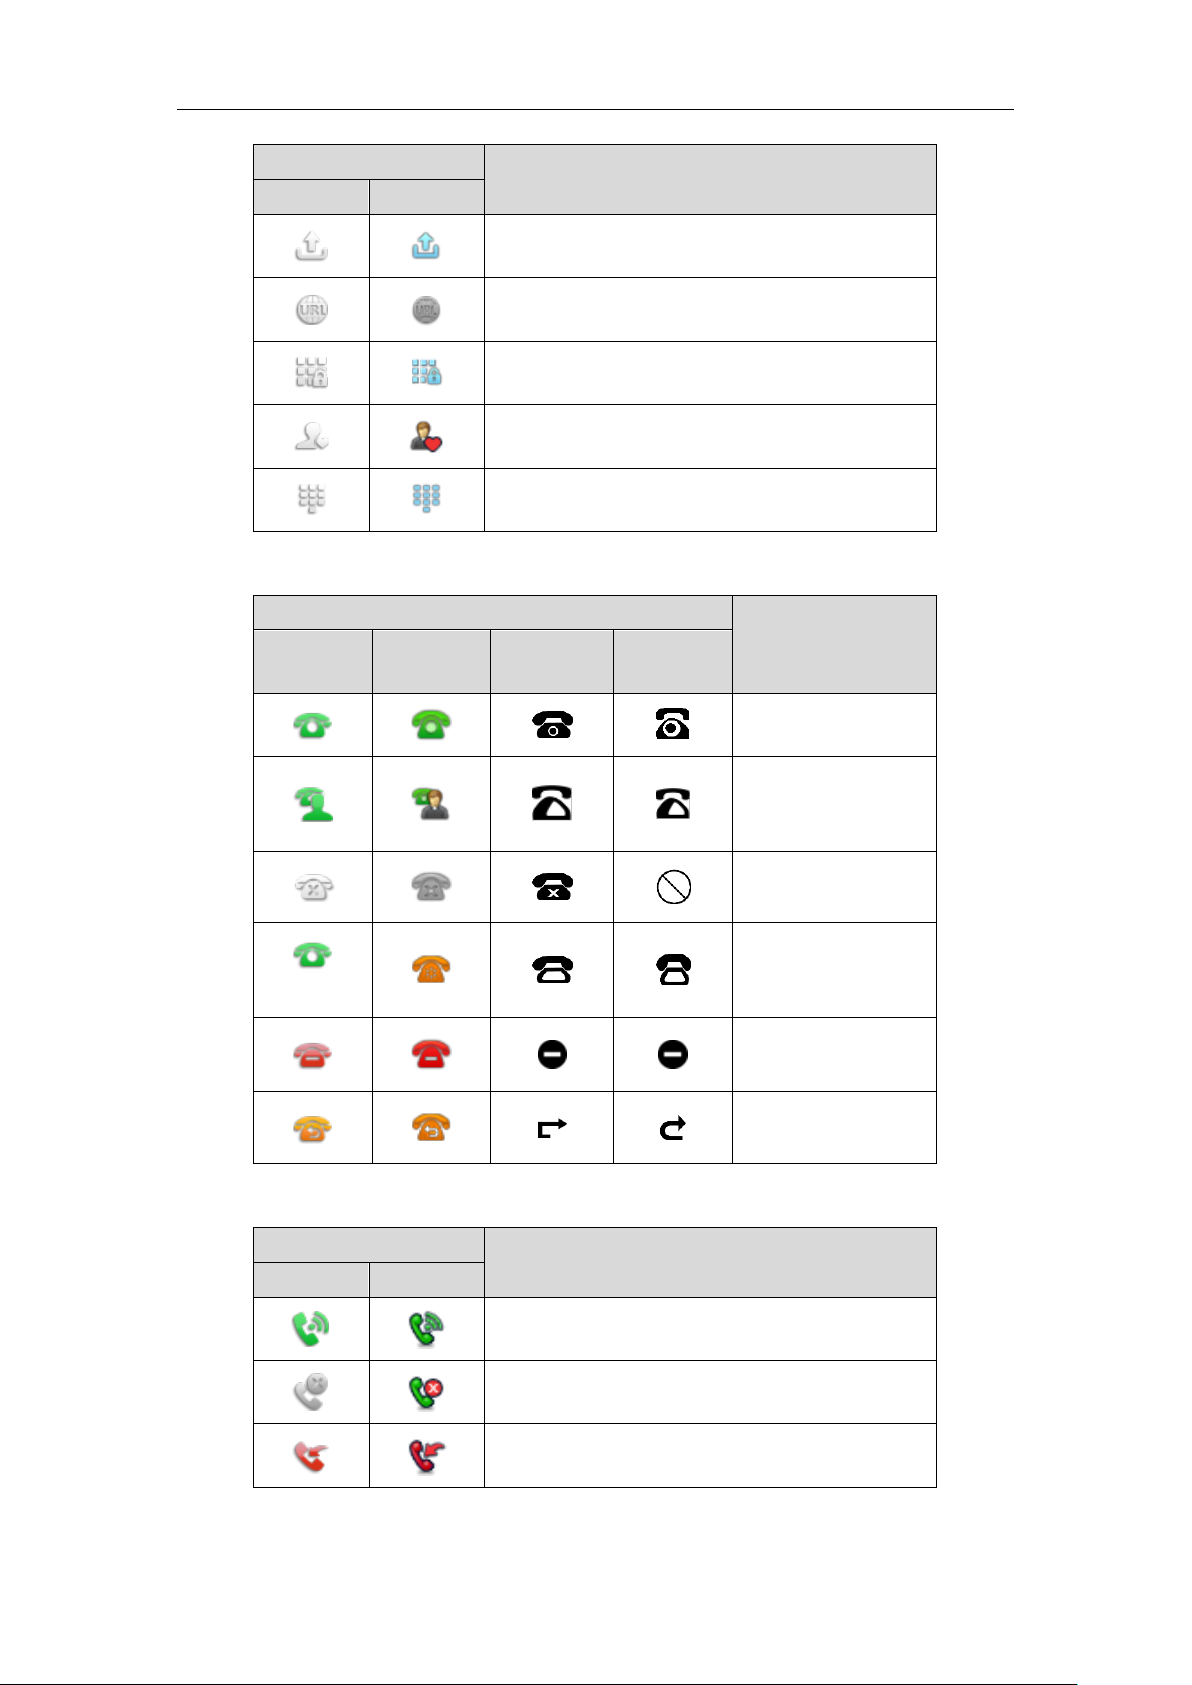
Icon indicators (associated with line)
Icons
Description
T48S/T48G
T46S/T46G
T42S/T42G/
T41S/T41P
T40G/T40P
The private line
registers successfully
The shared/bridged
line registers
successfully
Register failed
(Flashing)
Registering
DND is enabled on this
line
Call forward is enabled
on this line
Icon indicators (associated with call park/retrieve park)
Icons
Description
T48S/T48G
T46S/T46G
Park successfully/Idle state
Park failed
Ringing state
Overview
9
Icons
Description
T48S/T48G
T46S/T46G
Retrieve parked call
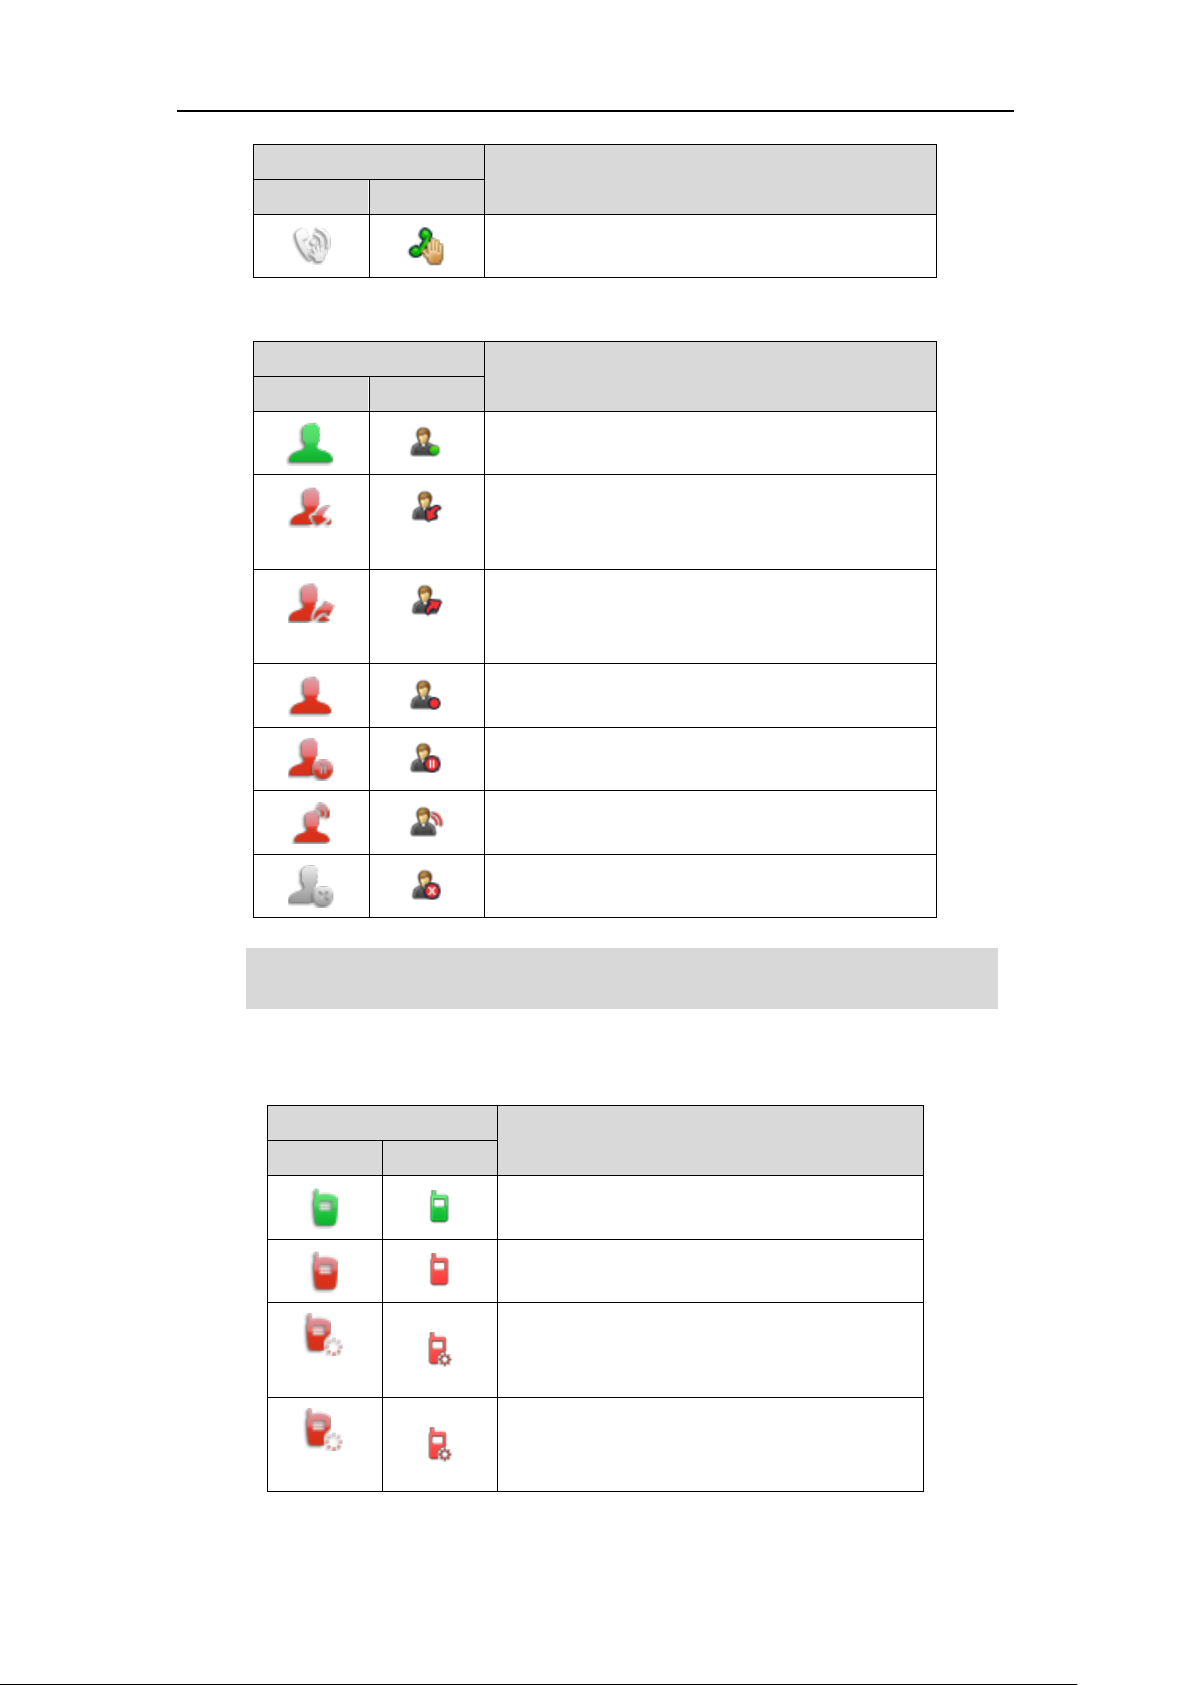
Icon indicators (associated with BLF/BLF List)
Icons
Description
T48S/T48G
T46S/T46G
Monitored line is available.
(Flashing)
(Flashing)
Monitored line is ringing.
(Flashing)
(Flashing)
Monitored line is dialing.
Monitored line is busy or in a call.
Monitored line is placed on hold.
Monitored line is parked.
BLF/BLF List registers failed.
Note
Icon indicators (associated with intercom)
Icons
Description
T48S/T48G
T46S/T46G
Target extension is available.
Target extension is ringing.
Callout
Target extension is dialing.
Talking
Target extension is busy or is in a call.
Your system administrator can customize the BLF key LED status and BLF key behavior for the
phone.
User Guide for T4 Series IP Phones
10
Icons
Description
T48S/T48G
T46S/T46G
Target extension registers failed.
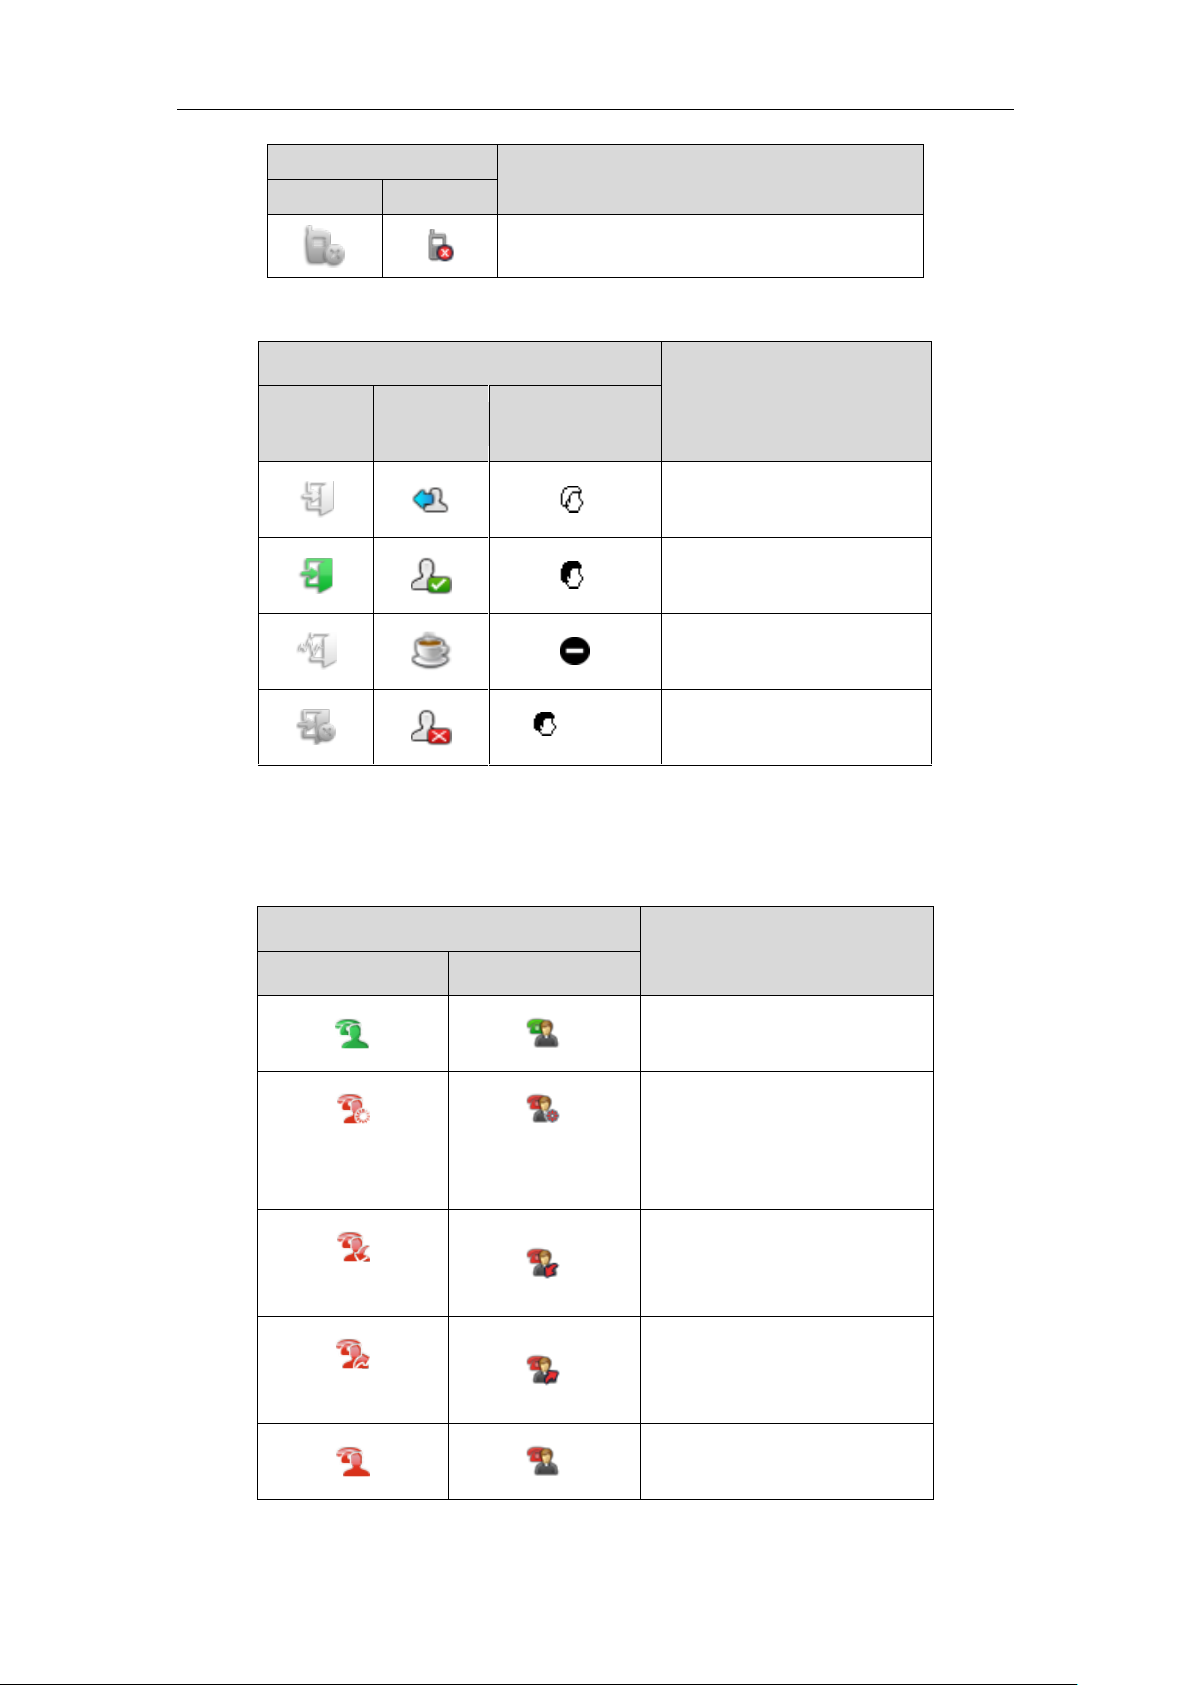
Icon indicators (associated with ACD)
Icon
Description
T48S/T48G
T46S/T46G
T42S/T42G/T41S/
T41P/T40G/T40P
Log in
Available
Wrap up
and x
Unavailable
Icon indicators (associated with a shared line)
The Local SCA Phone is involved in an SCA call, while the Monitoring SCA Phone is not involved
in the SCA call and used for monitoring shared line.
Icon
Description
T48S/T48G
T46S/T46G
The shared line is idle.
(Monitoring SCA
Phone)
(Monitoring SCA
Phone)
The shared line is seized.
(Flashing)
The shared line receives an
incoming call.
(Flashing)
The shared line is dialing.
The shared line is busy or is in a
call.
Overview
11
Icon
Description
T48S/T48G
T46S/T46G
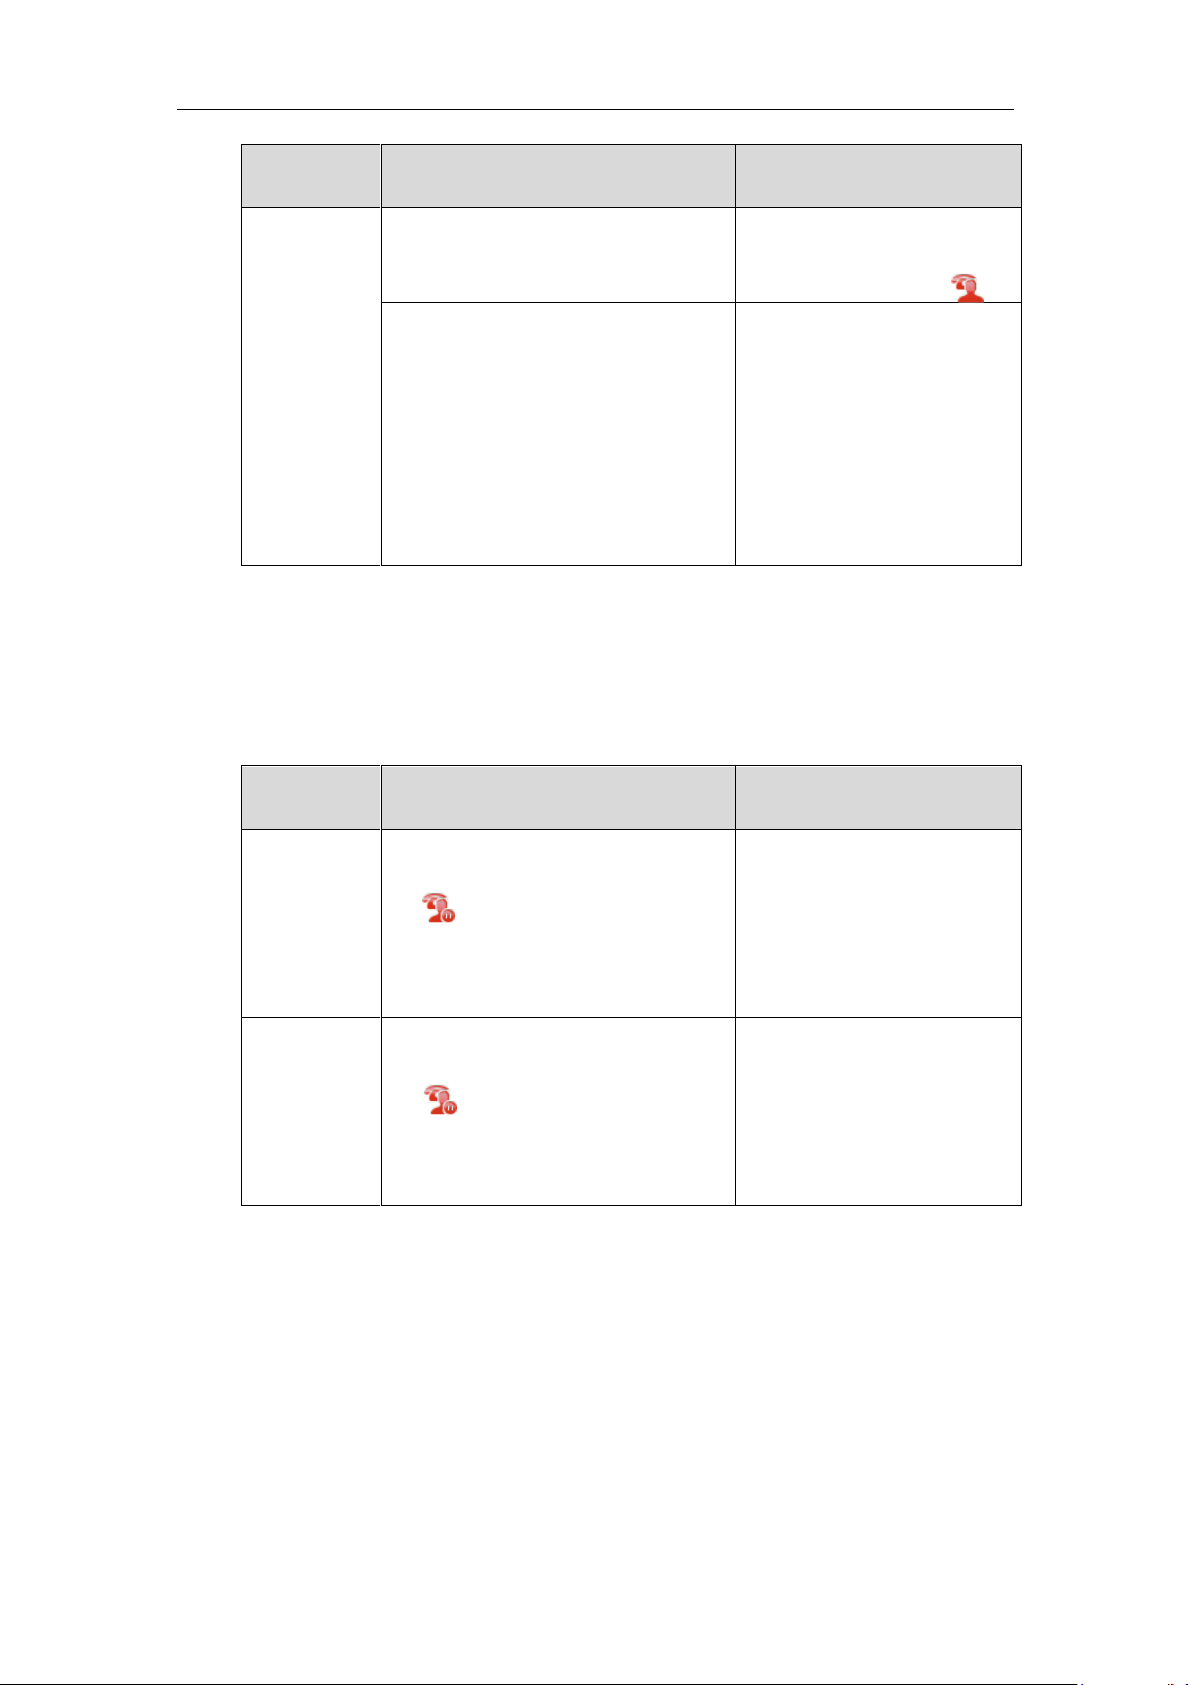
The call on shared line is placed
on public hold.
(Local SCA Phone)
(Monitoring SCA
Phone)
(Local SCA Phone)
(Monitoring SCA
Phone)
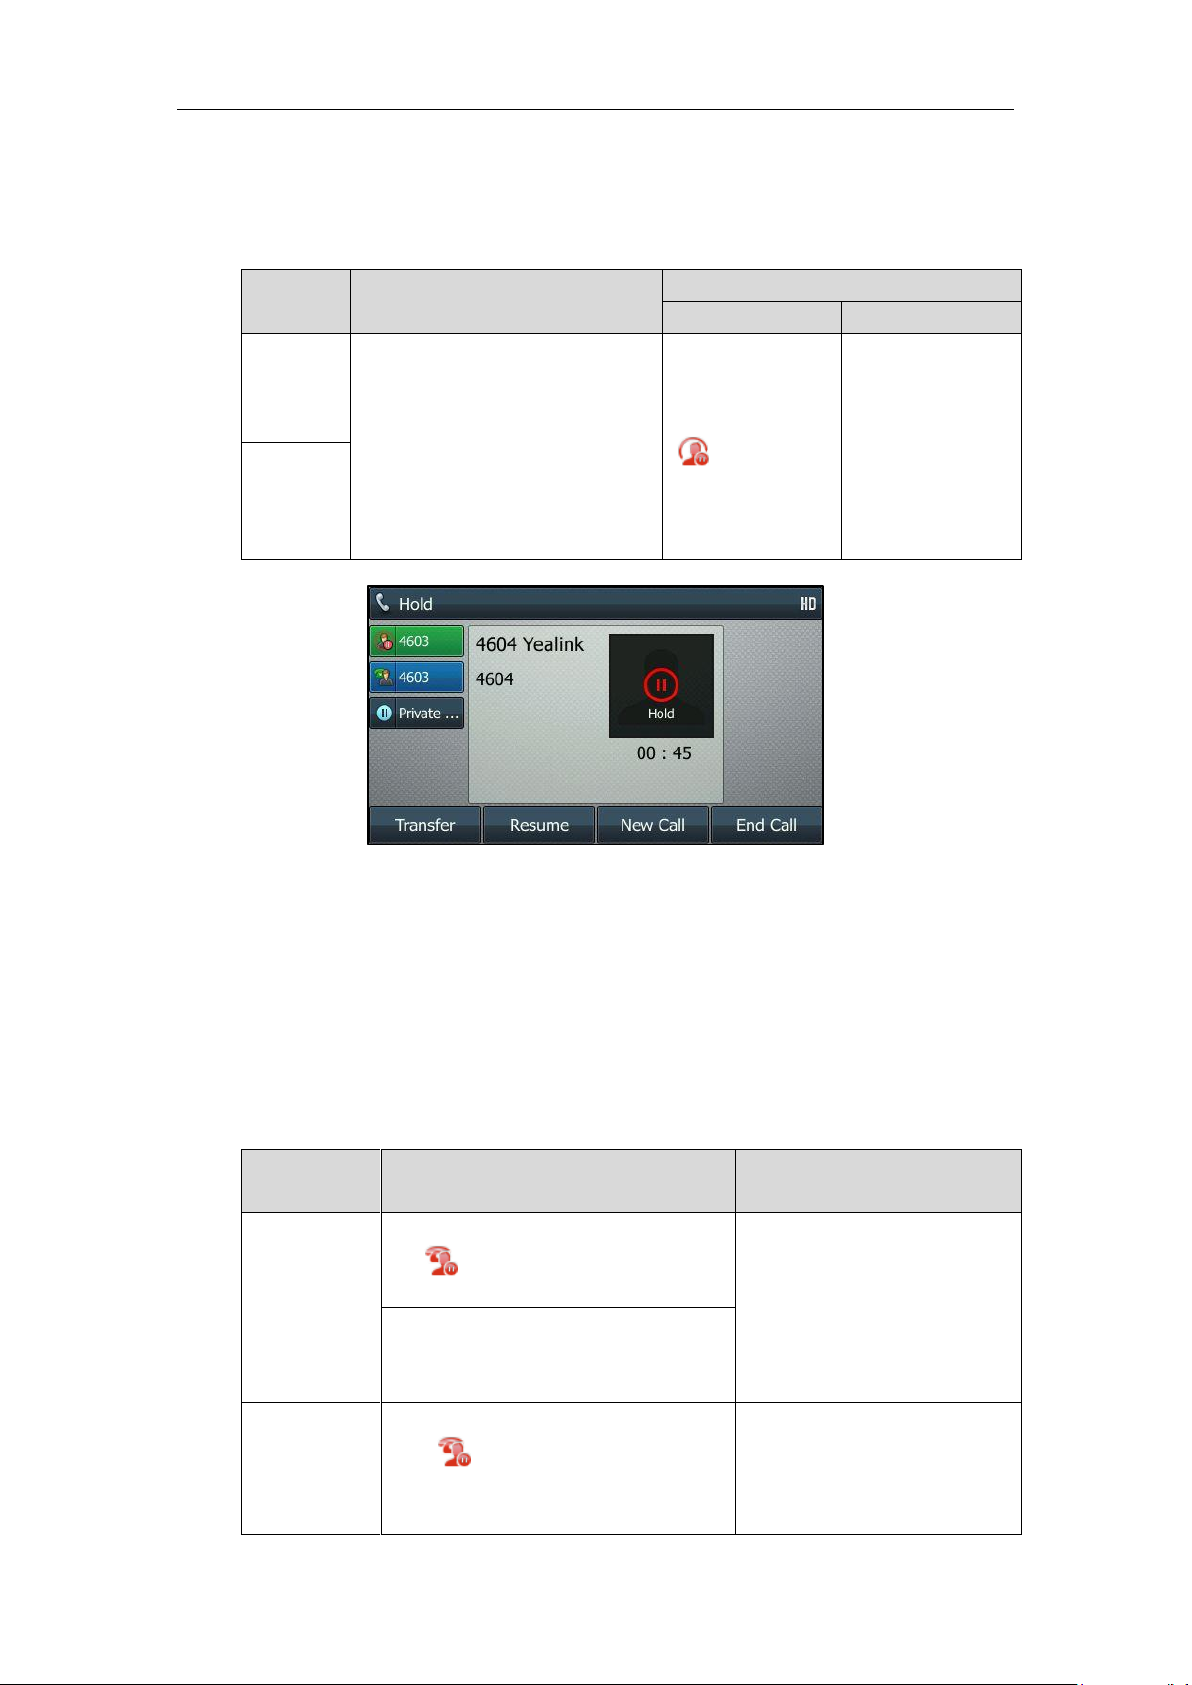
The call on shared line is placed
on private hold.
The call on shared line is barged
in by the other shared line party.
In a multi-party call, all the
participants place the call on hold.
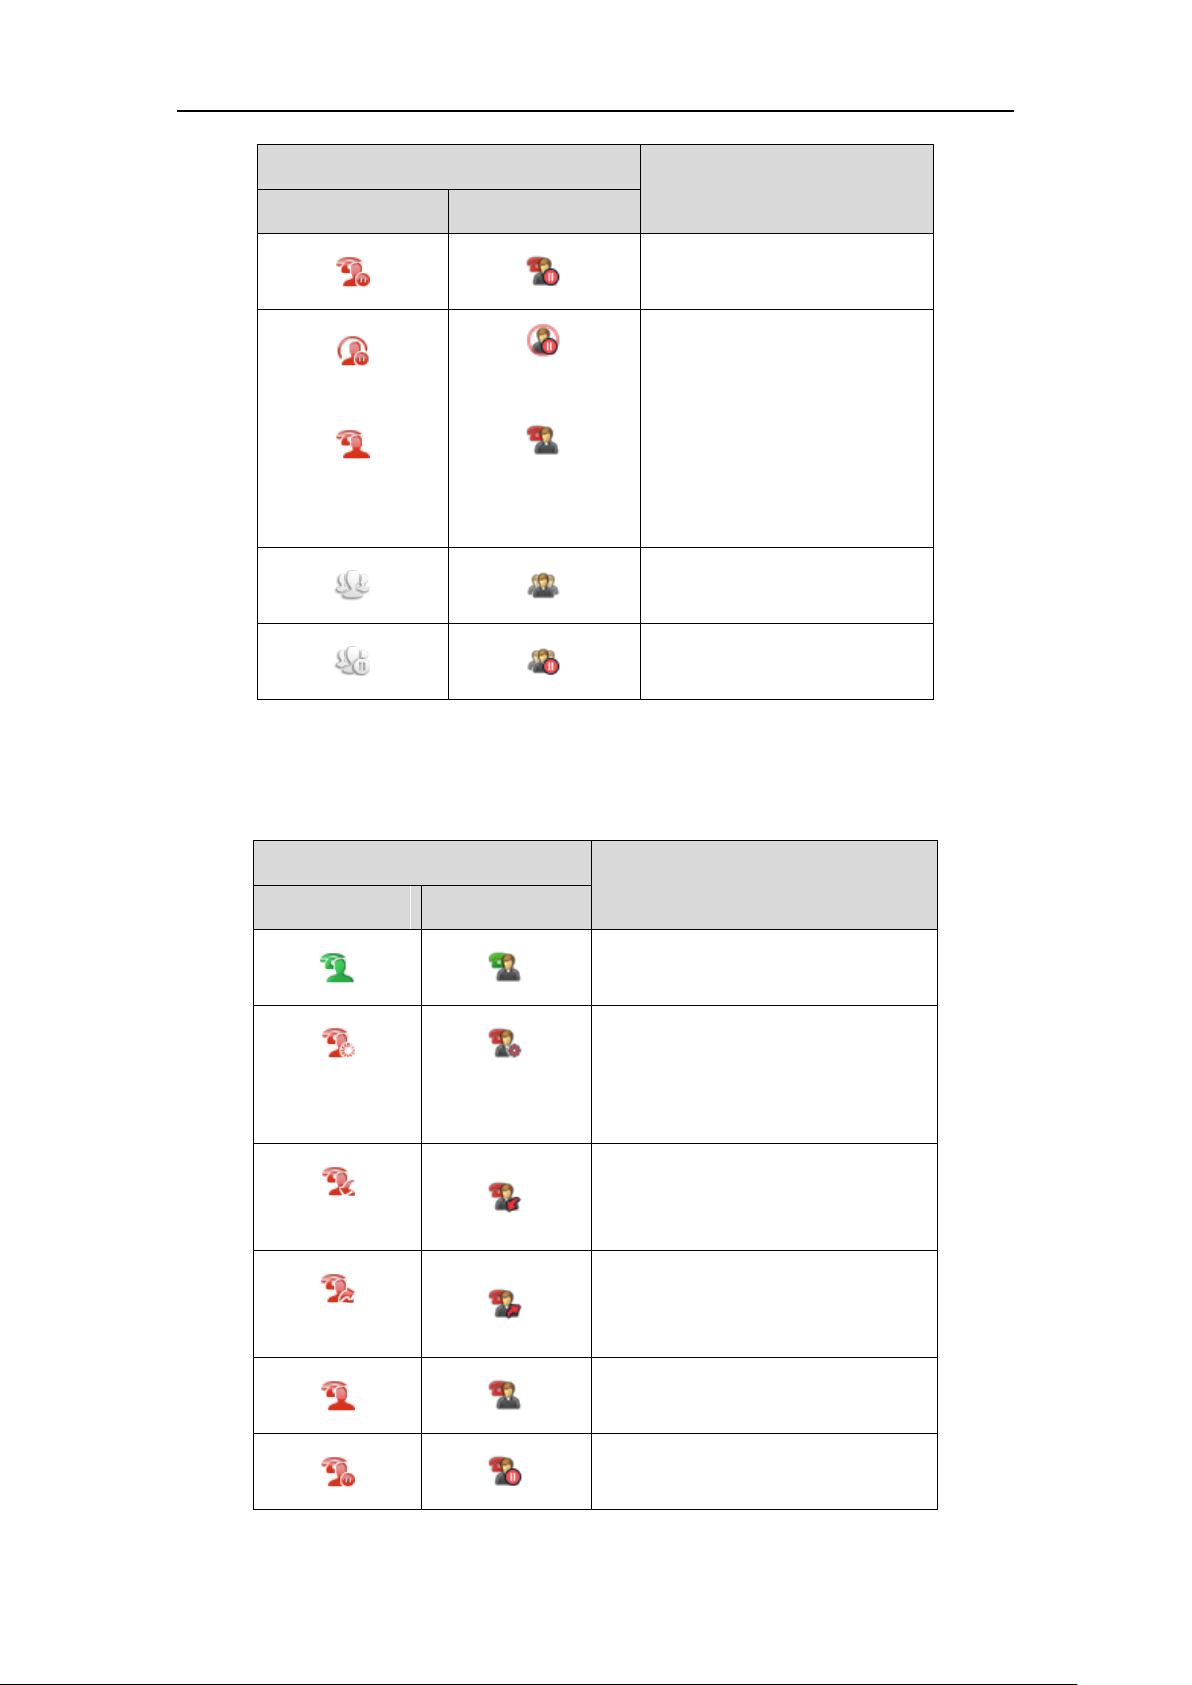
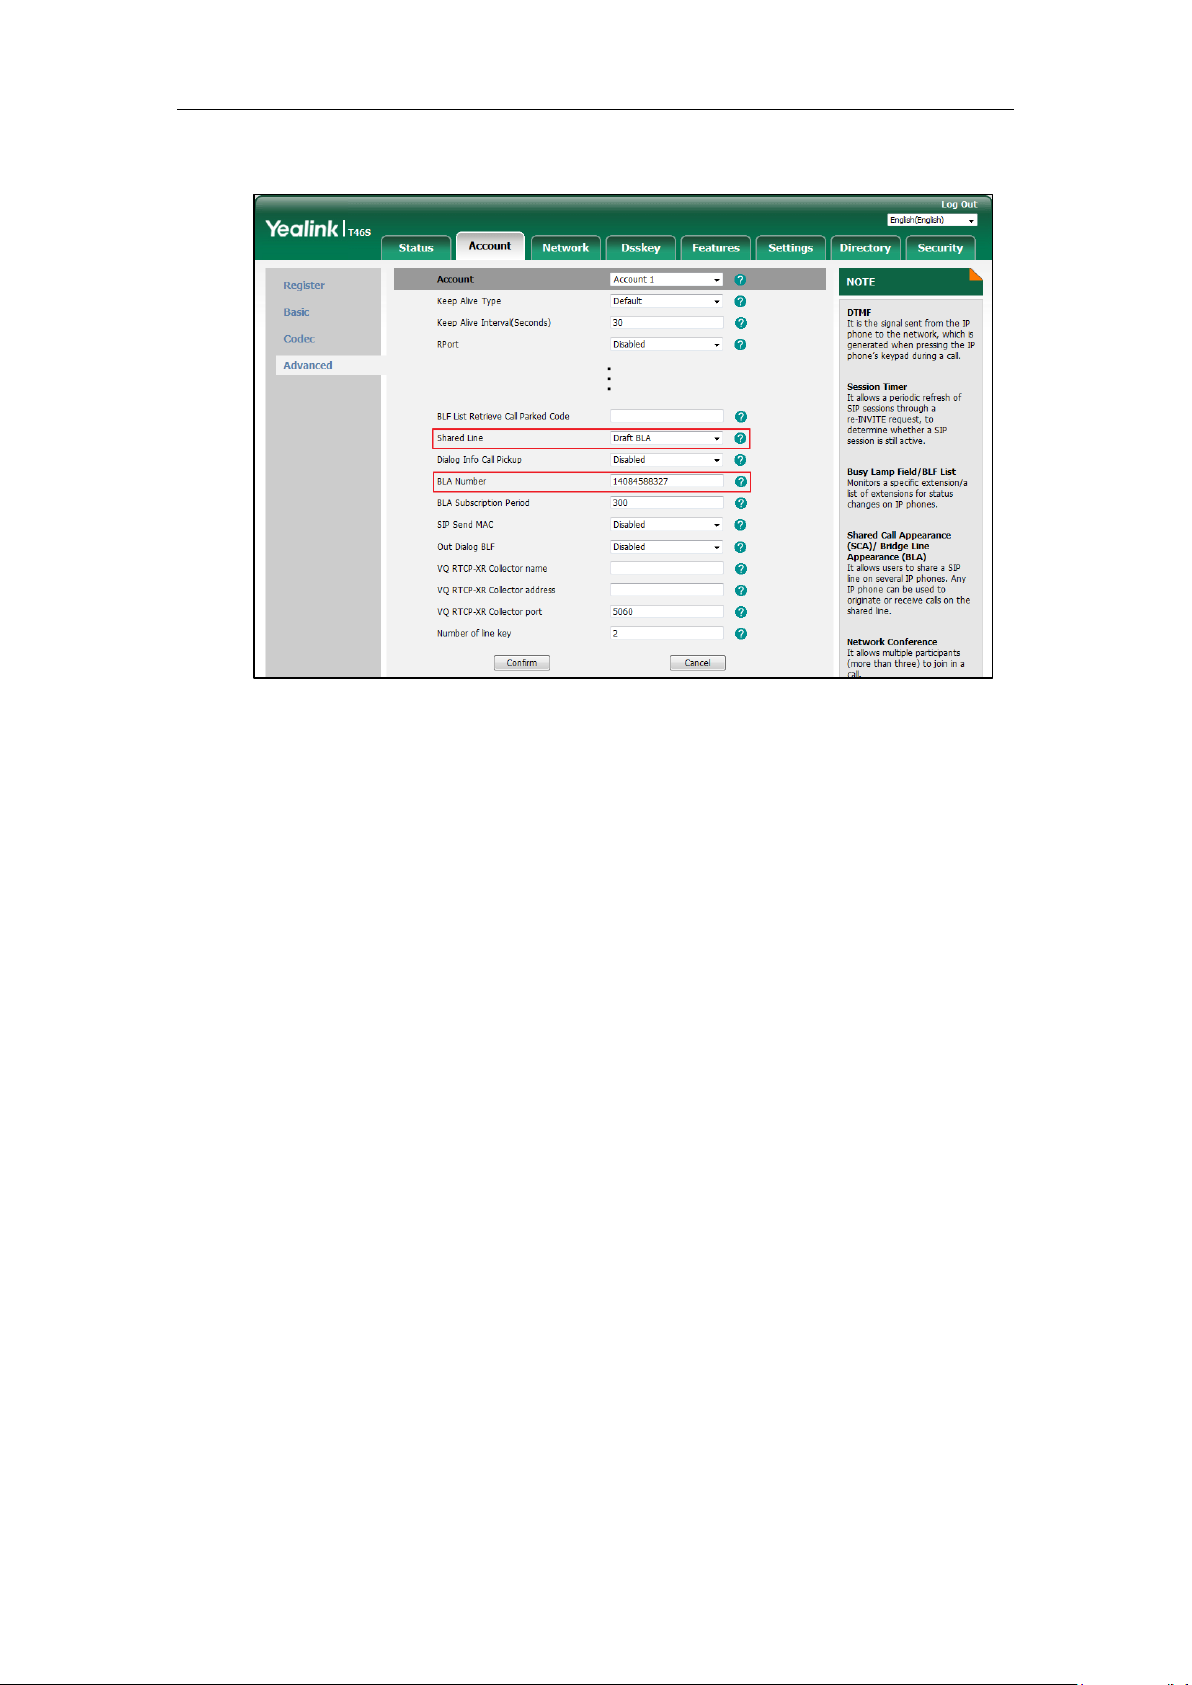
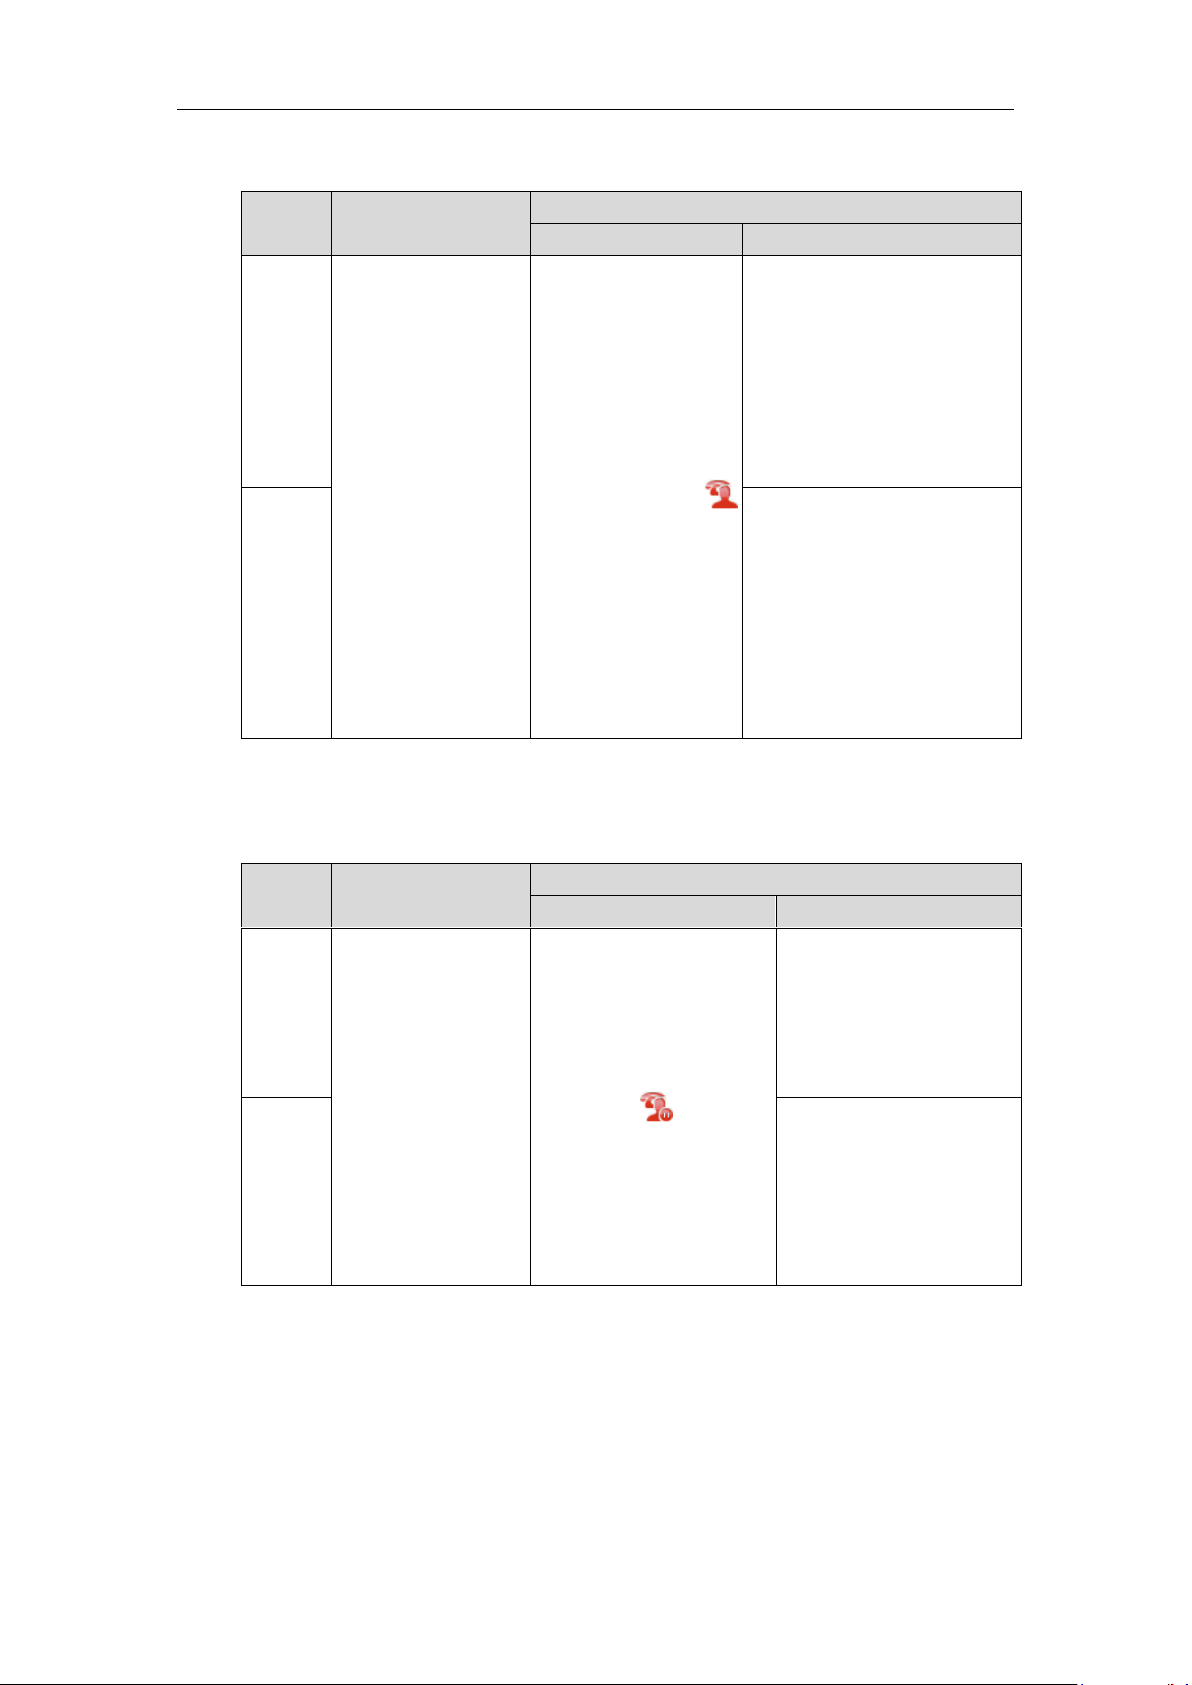
Icon indicators (associated with a bridged line)
The Local BLA Phone is involved in a BLA call, while the Monitoring BLA Phone is not involved in
a BLA call and used for monitoring bridged line.
Icon
Description
T48S/T48G
T46S/T46G
The bridged line is idle.
(Monitoring BLA
Phone)
(Monitoring BLA
Phone)
The bridged line is seized.
(Flashing)
The bridged line receives an incoming
call.
(Flashing)
The bridged line is dialing.
The bridged line is busy or is in a call.
The call on bridged line is placed on
hold.
User Guide for T4 Series IP Phones
12
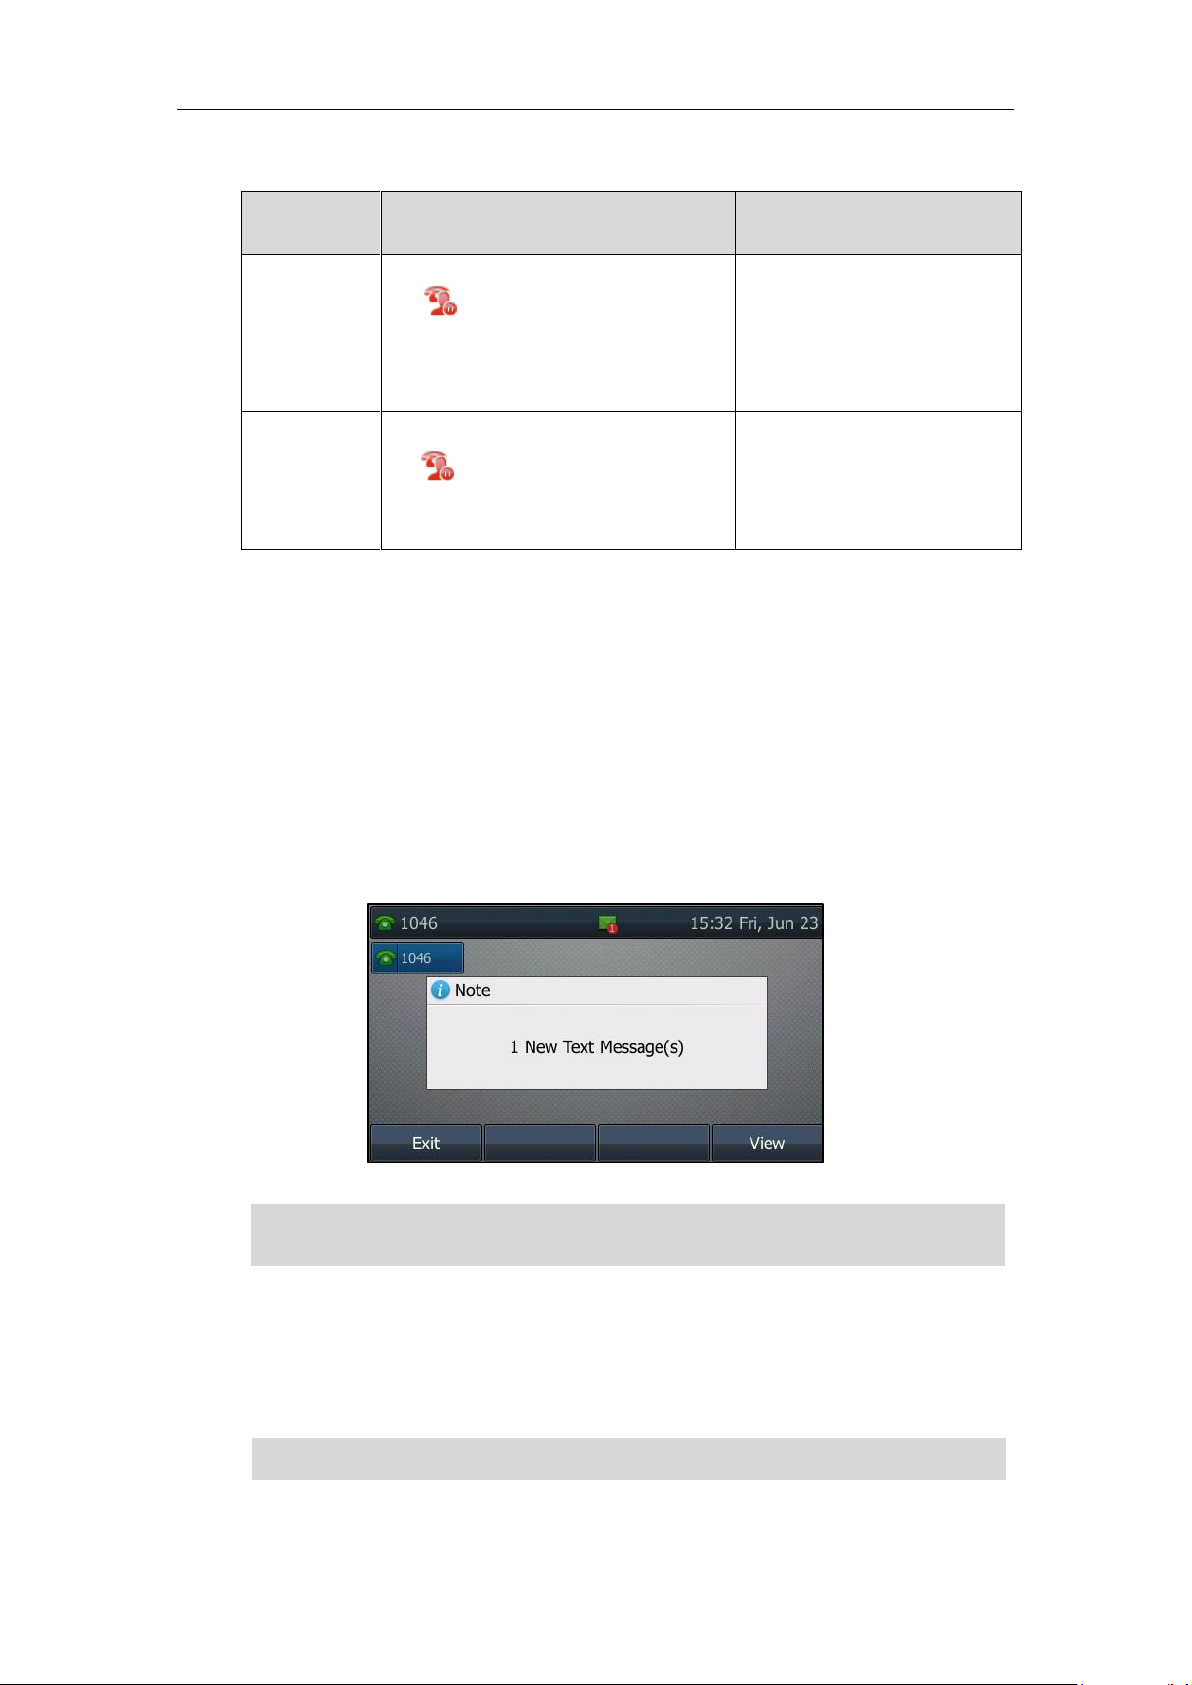
Other Icons
Icons for specific features are described in the following tables:
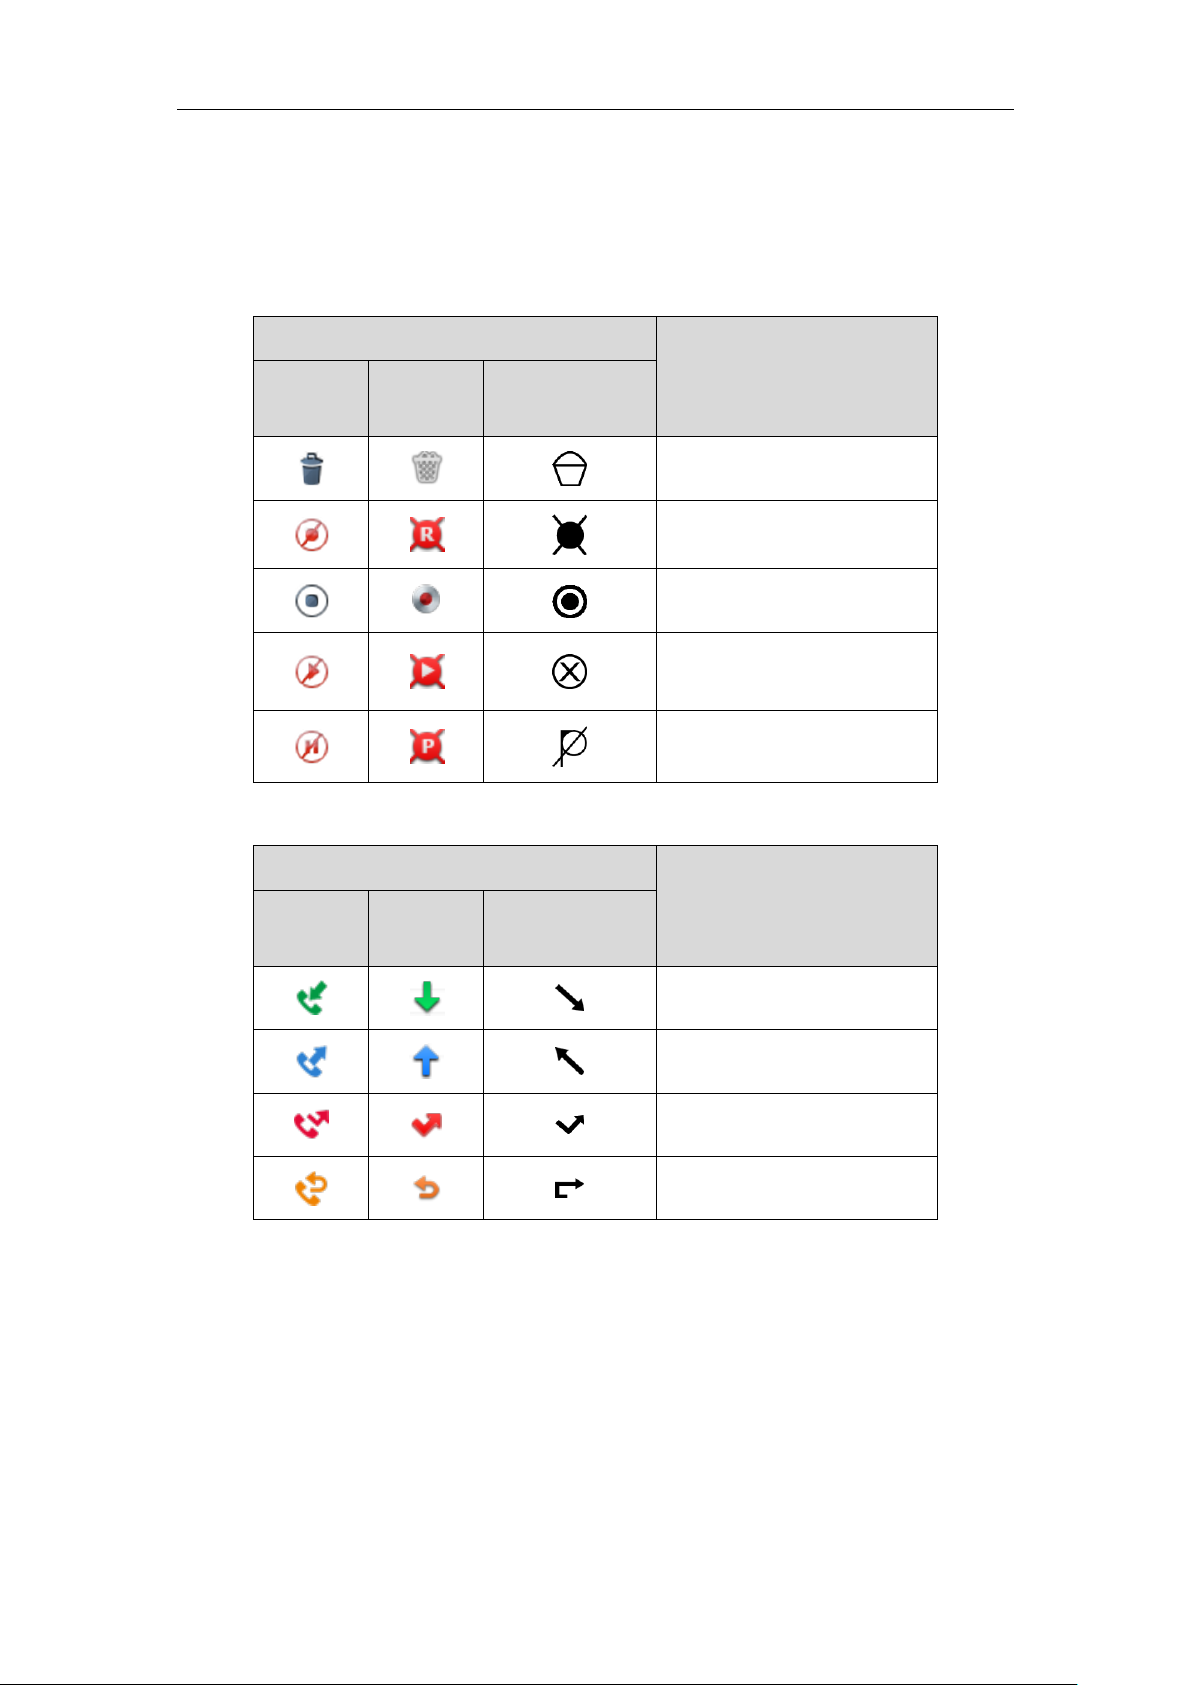
Icon indicators (associated with call recording while using a record key)
Icon
Description
T48S/T48G
T46S/T46G
T42S/T42G/T41S/
T41P/T40G/T40P
Recording box full
Record failed
Recording
Start recording failed
Stop recording failed
Icon indicators (associated with call history)
Icon
Description
T48S/T48G
T46S/T46G
T42S/T42G/T41S/
T41P/T40G/T40P
Received Calls
Placed Calls
Missed Calls
Forwarded Calls
Overview
13
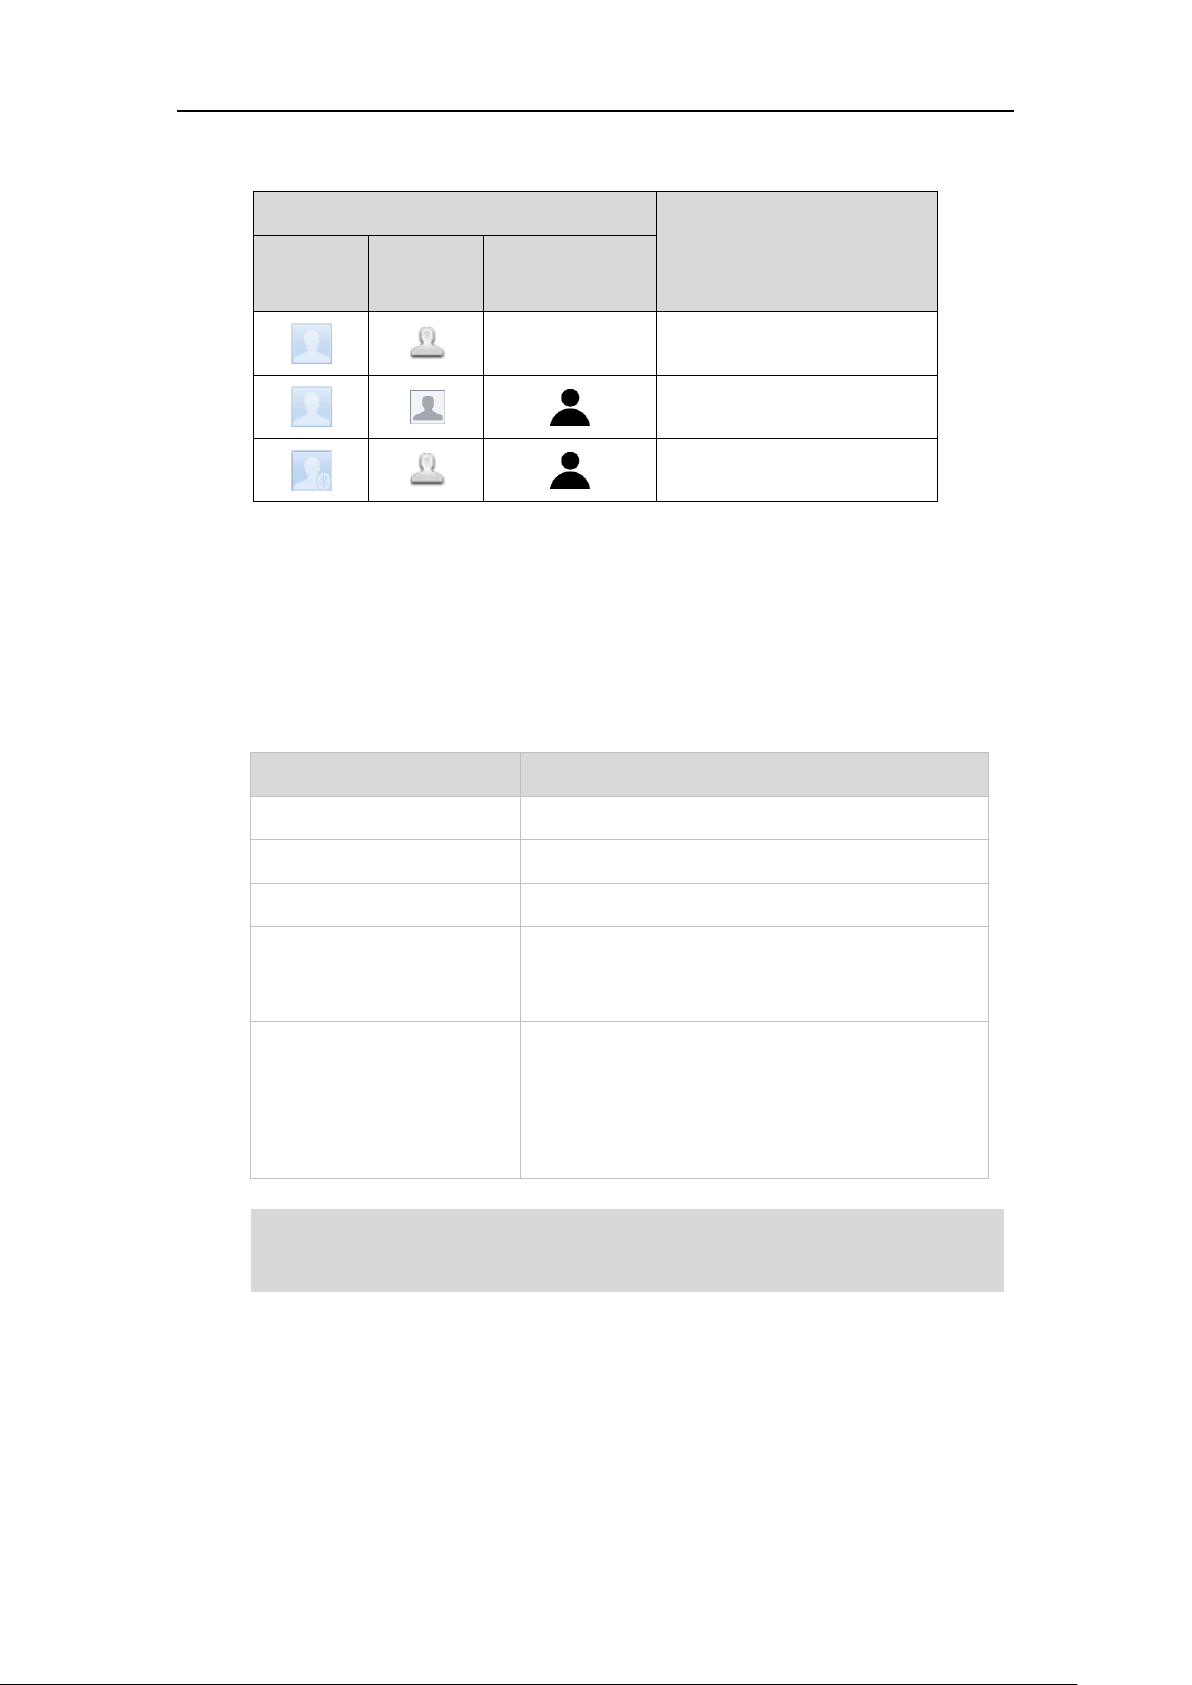
Icon indicators (associated with contact)
Icon
Description
T48S/T48G
T46S/T46G
T42S/T42G/T41S/
T41P/T40G/T40P
/
The default contact icon
The default contact photo
The default Bluetooth contact
icon
LED Instructions
Power LED Indicator
Power LED Indicator
LED Status
Description
Solid red
The phone is initializing.
Fast-flashing red (300ms)
The phone is ringing.
Slow-flashing red (1s)
The phone receives a voice mail or text message.
Solid red for 500ms and off for
3000ms alternately
The phone enters power-saving mode.
It is only available on the SIP-T48S/T48G/T46S/T46G IP
phone.
Off
The phone is powered off.
The phone is idle.
The phone is busy.
The call is placed on hold by you or by the remote party.
The call is muted.
Note
The above is the default LED status, since the status of the power LED indicators may be
configured by your system administrator. For more information, please contact your system
administrator.
User Guide for T4 Series IP Phones
14
Line Key LED
Line key led is not available on the SIP-T48S/T48G IP phone.
Line key LED
LED Status
Description
Solid green
The line is seized.
The line is in busy or is in a call.
Fast-flashing green
The line receives an incoming call.
Slow-flashing green
The call is placed on hold.
Off
The line is inactive.
Line key LED (configured as a Forward key with a value (destination number))
LED Status
Description
Solid green
The always forward feature is activated.
Off
The always forward feature is deactivated.
Note
Line key LED (configured as a BLF key or BLF List key)
LED Status
Description
Solid green
The monitored user is idle.
Fast-flashing red (200ms)
The monitored user receives an incoming call.
Solid red
The monitored user is busy.
The monitored user’s conversation is placed on hold
(This LED status requires server support).
Slow-flashing red (1s)
The call is parked on the monitored user.
Off
The monitored user does not exist.
Line key LED (used as a page switch key)
LED Status
Description
Solid red
There is a call parked on the line whose line key is not on
the current page.
If the value (the destination number) is not configured for a Forward key, the key LED solids
green when the always/busy/no answer forward feature is activated. It is off when the
always/busy/no answer forward feature is deactivated.
Overview
15
Fast-flashing green
The line receives an incoming call on the line key of the
non-current page.
Fast-flashing red
The monitored user receives an incoming call line whose
line key is not on the current page.
Off
The line keys are idle.
Line key LED (associated with a shared line)
The Local SCA Phone is involved in an SCA call, while the Monitoring SCA Phone is not involved
in the SCA call and used for monitoring shared line.
LED Status
Description
Off
The shared line is idle.
Fast-flashing green
The shared line receives an incoming call.
Solid green (Local SCA Phone)
Solid red (Monitoring SCA
Phone)
The shared line is busy or is in a call.
The shared line is dialing.
The shared line is seized.
The call on shared line is barged in by the other shared
line party.
Slow-flashing green (Local SCA
Phone)
Slow-flashing red (Monitoring
SCA Phone)
The call on shared line is placed on public hold.
Slow-flashing green (Local SCA
Phone)
Solid red (Monitoring SCA
Phone)
The call on shared line is placed on private hold.
In a multi-party call, all the participants place the call on
hold.
Line key LED (associated with a bridged line)
The Local BLA Phone is involved in a BLA call, while the Monitoring BLA Phone is not involved in
a BLA call and used for monitoring bridged line.
LED Status
Description
Off
The bridged line is idle.
Fast-flashing green
The bridged line receives an incoming call.
Solid green (Local BLA Phone)
Solid red (Monitoring BLA
Phone)
The bridged line is is busy or is in a call..
The bridged line is dialing.
The bridged line is seized.
User Guide for T4 Series IP Phones
16
LED Status
Description
Slow-flashing green (Local BLA
Phone)
Slow-flashing red (Monitoring
BLA Phone)
The call on bridged line is placed on hold.
Note
User Interfaces
There are two ways to configure your IP phone:
Via phone user interface
Via web user interface
The phone user interface, being made up of keypad and LCD screen, allows users to perform all
call operations and change basic configuration settings directly on the phone. But if you want to
access all configuration settings, you should use web user interface instead. In most cases, it is
possible to configure your IP phone via both phone user interface and web user interface. While
in some particular cases, only via phone user interface or via web user interface is available for
you to operate or configure your IP phone. This guide mainly takes phone user interface as an
example.
Phone User Interface
Before you use the phone, you need to understand the phone screen layout, how to navigate
menus and fields, and how to enter and edit data.
Idle Screen
After starting up successfully, the phone enters Idle screen automatically. From the Idle screen,
you can access the Menu screen, History screen, Directory screen and Line Key screen. These
screens are described in the following chapters:
Menu Screen
History Screen
Directory Screen
Line Key Screen
Note
The menu system will automatically exit to the Idle screen after 60 seconds of inactivity.
The above is the default LED status, since the status of the power LED indicators may be
configured by your system administrator. For more information, please contact your system
administrator.
Overview
17
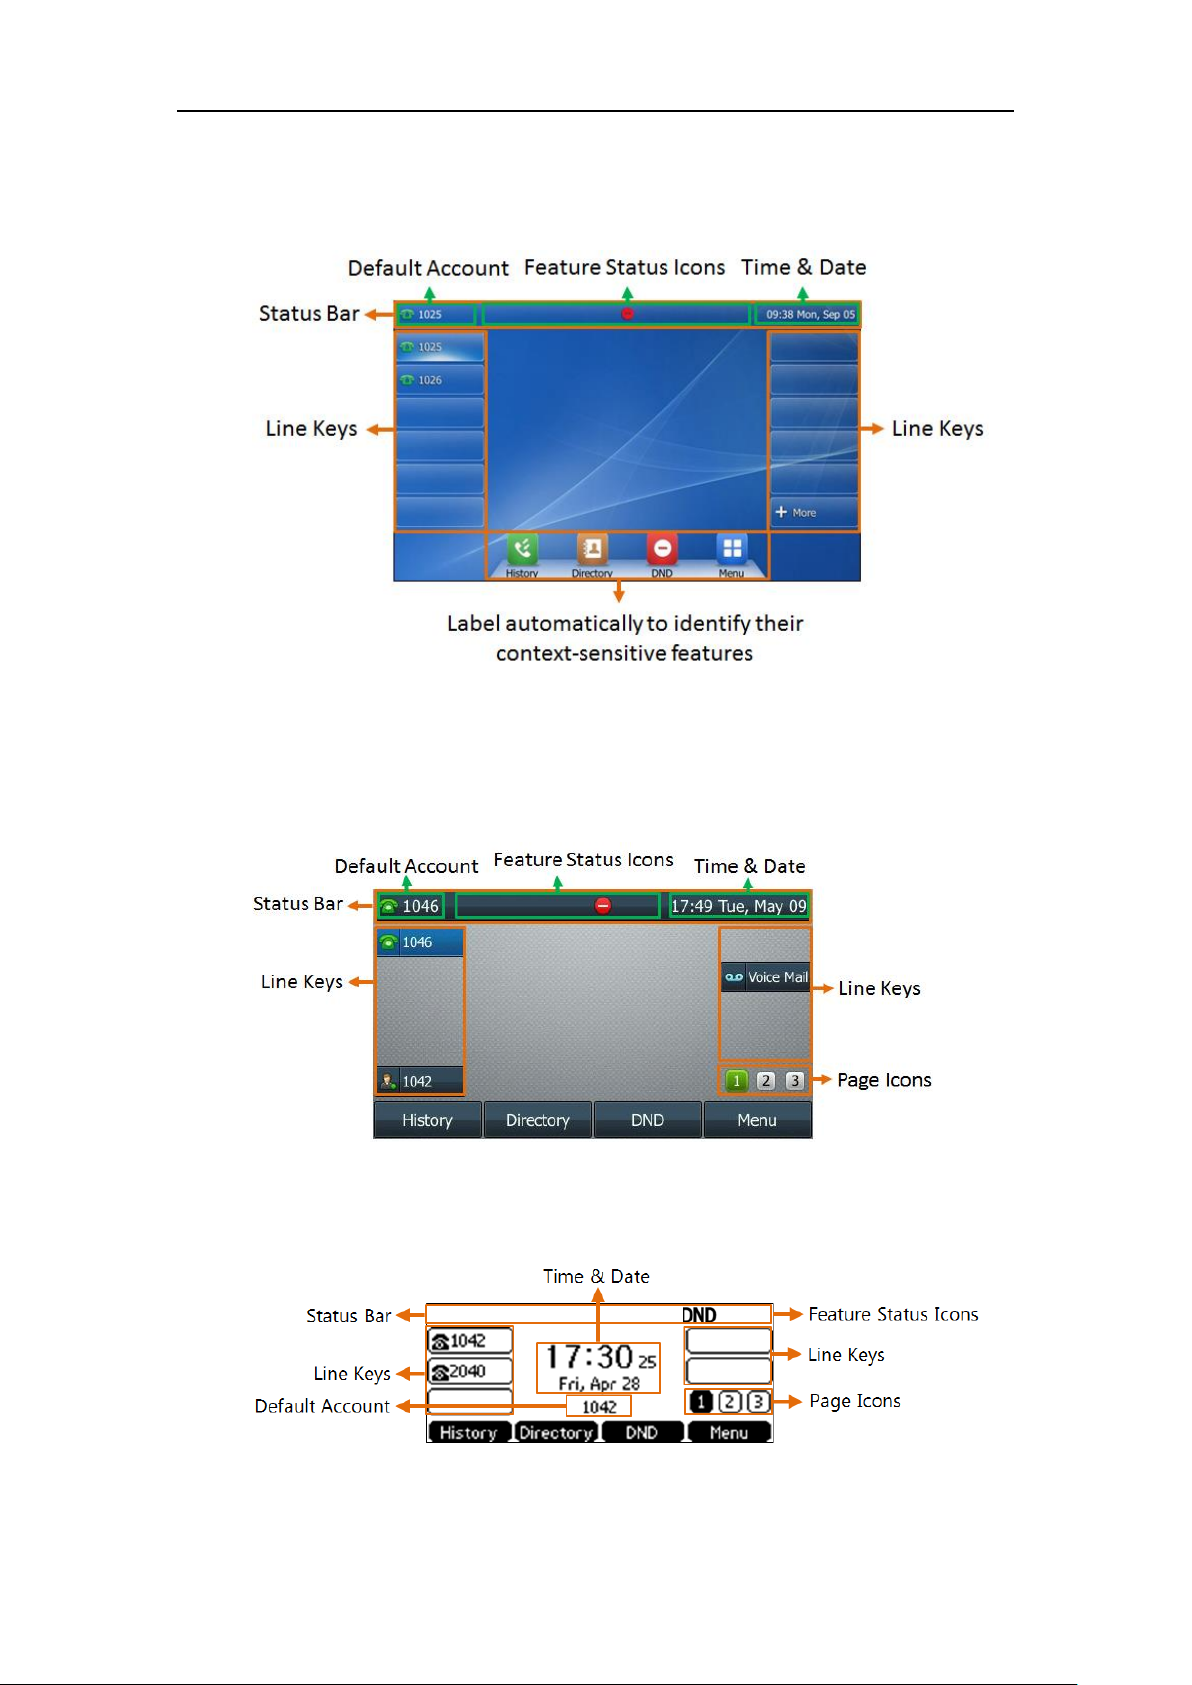
For the SIP-T48S/T48G IP phone, the wallpaper can be customized, refer to Changing Wallpaper
on the Idle Screen for more information. The Idle screen on SIP-T48S/T48G IP phone is shown as
below:
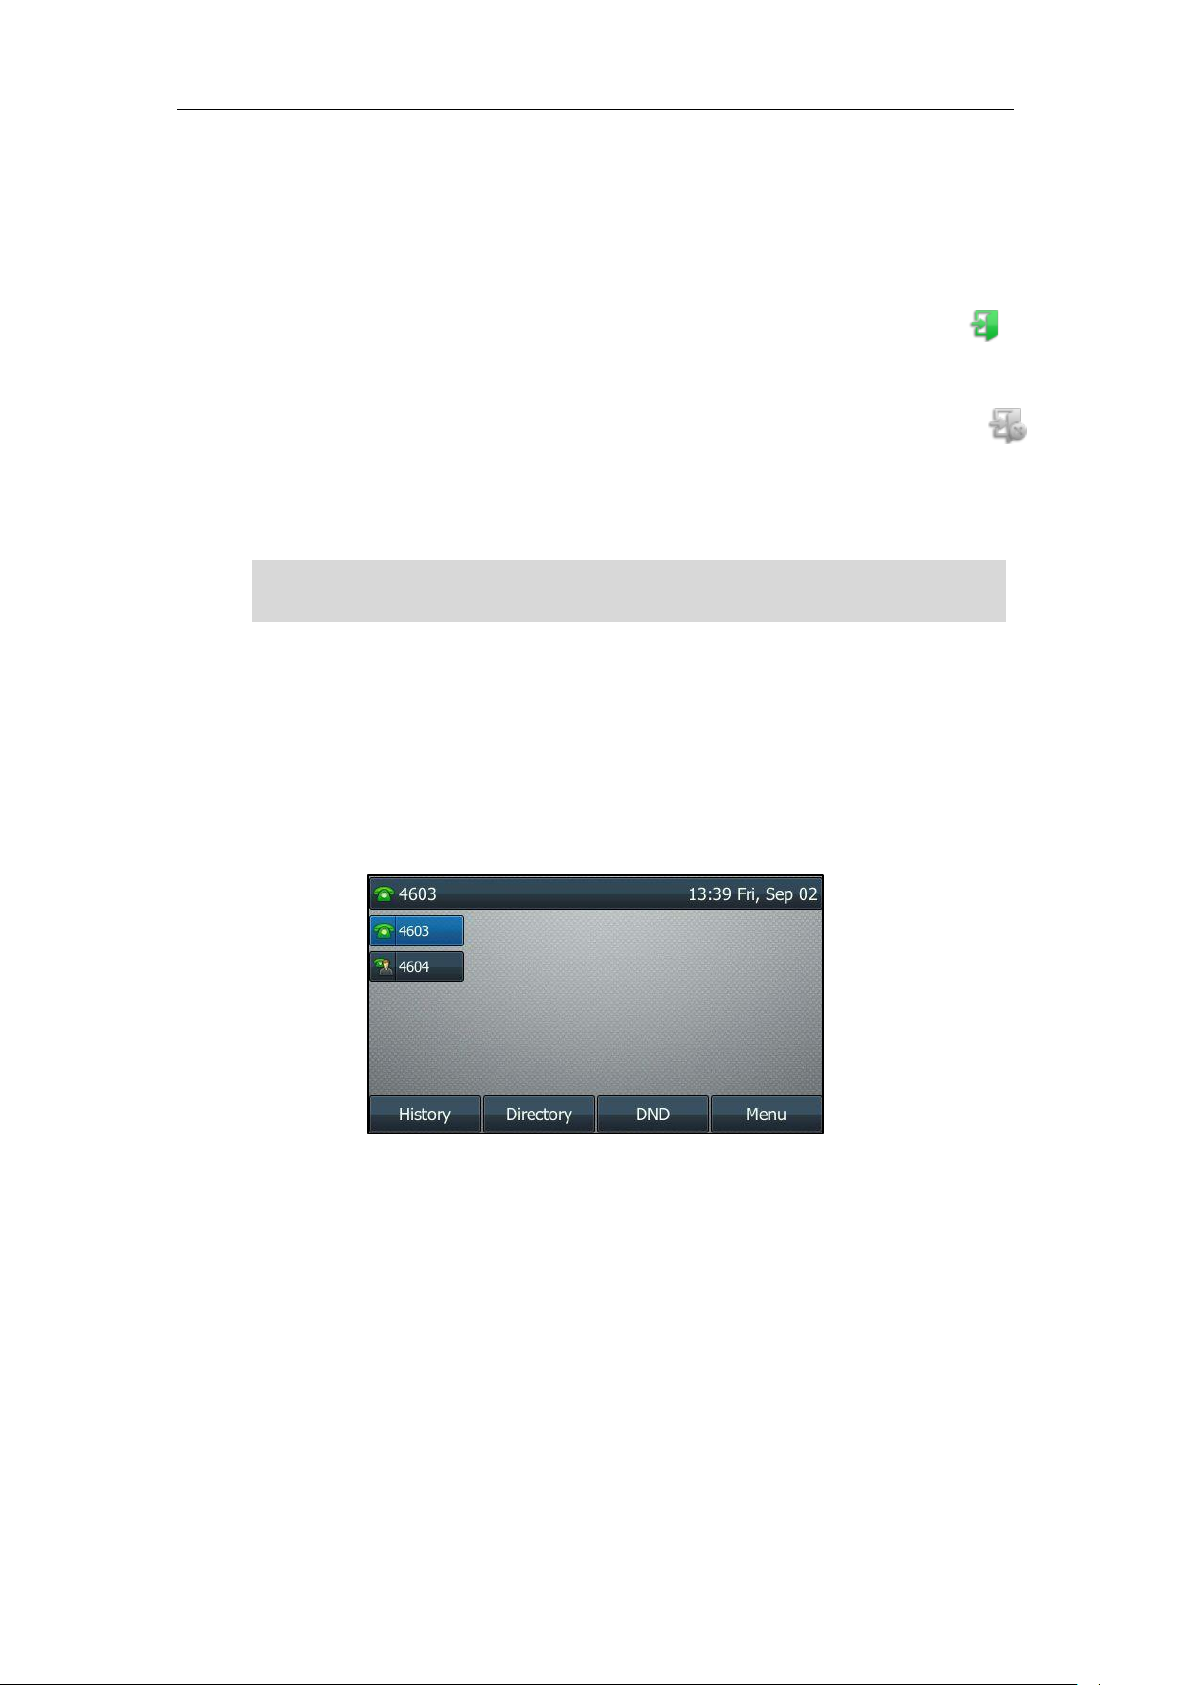
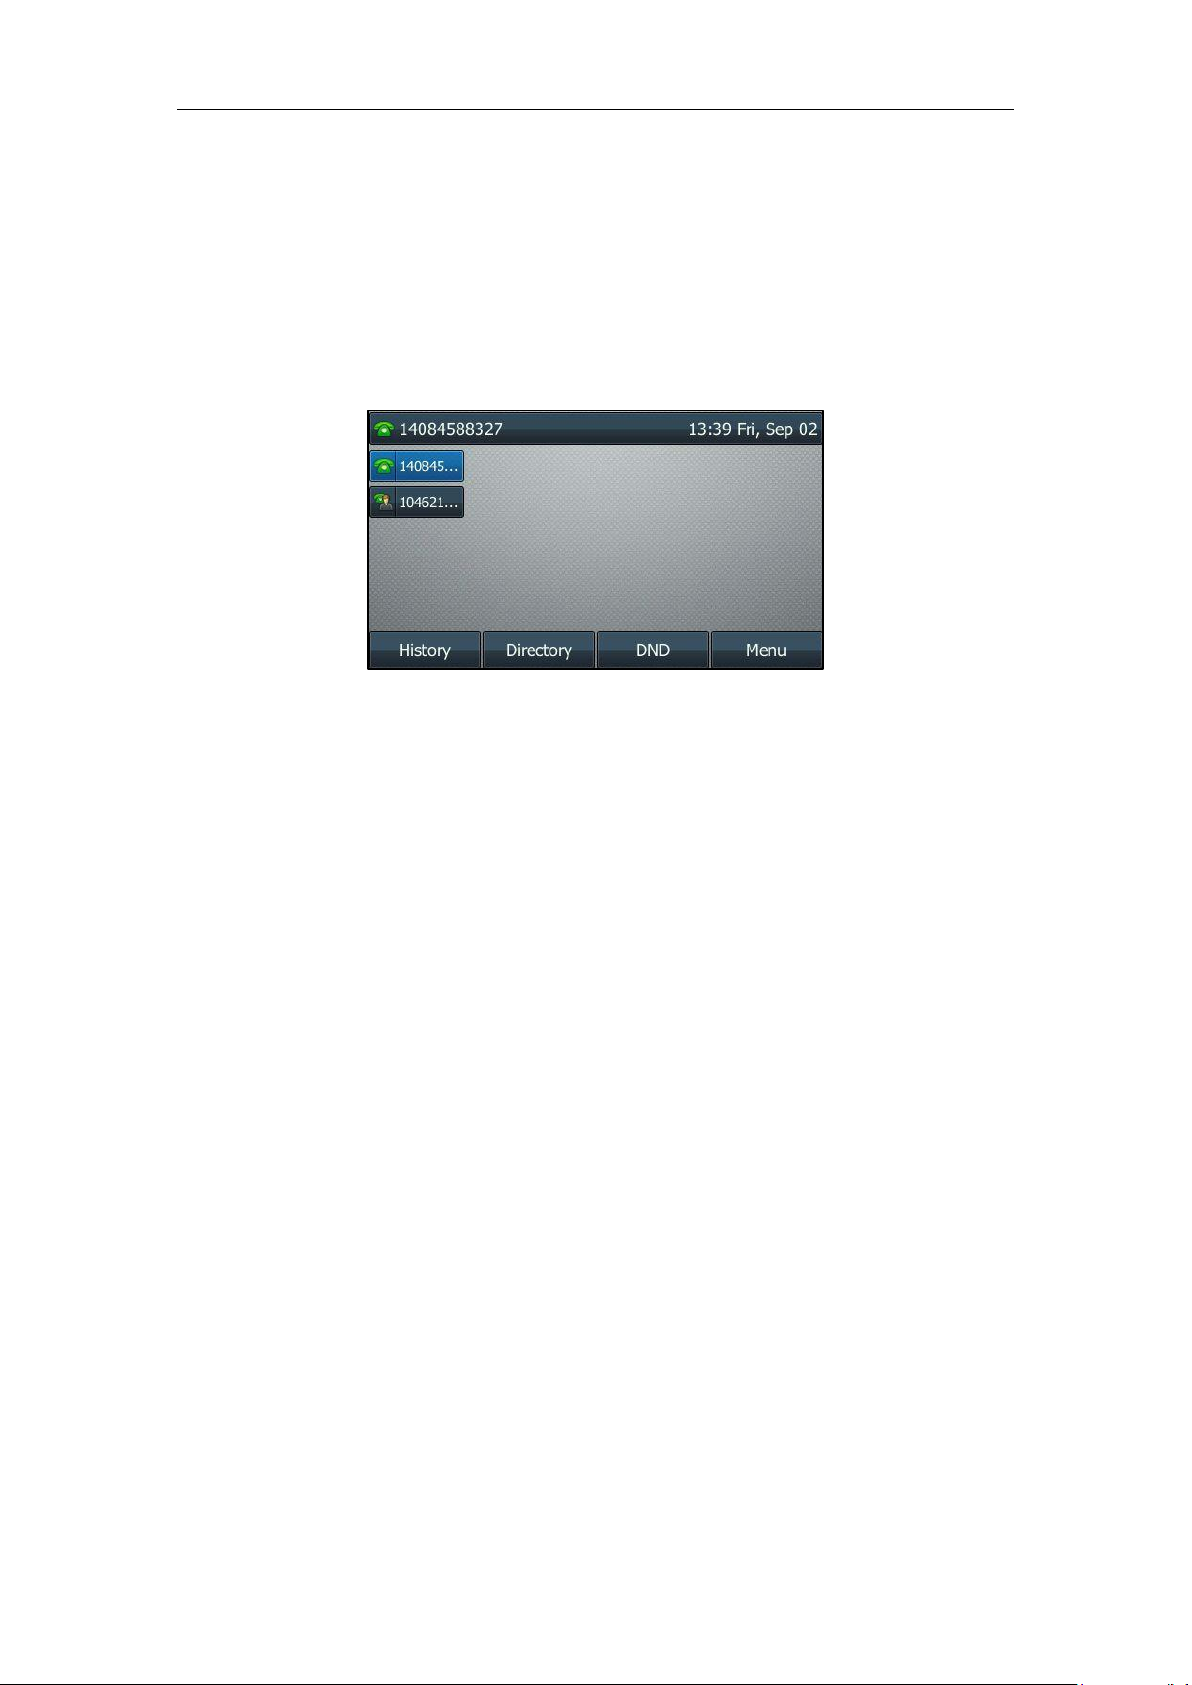
For SIP-T46S/T46G IP phone, the page icons appear only when you assign functionality to line
key located in line key 11-27, refer to DSS Keys for more information. The wallpaper can be
customized, refer to Changing Wallpaper on the Idle Screen for more information. The Idle
screen on SIP-T46S/T46G IP phone is shown as below:
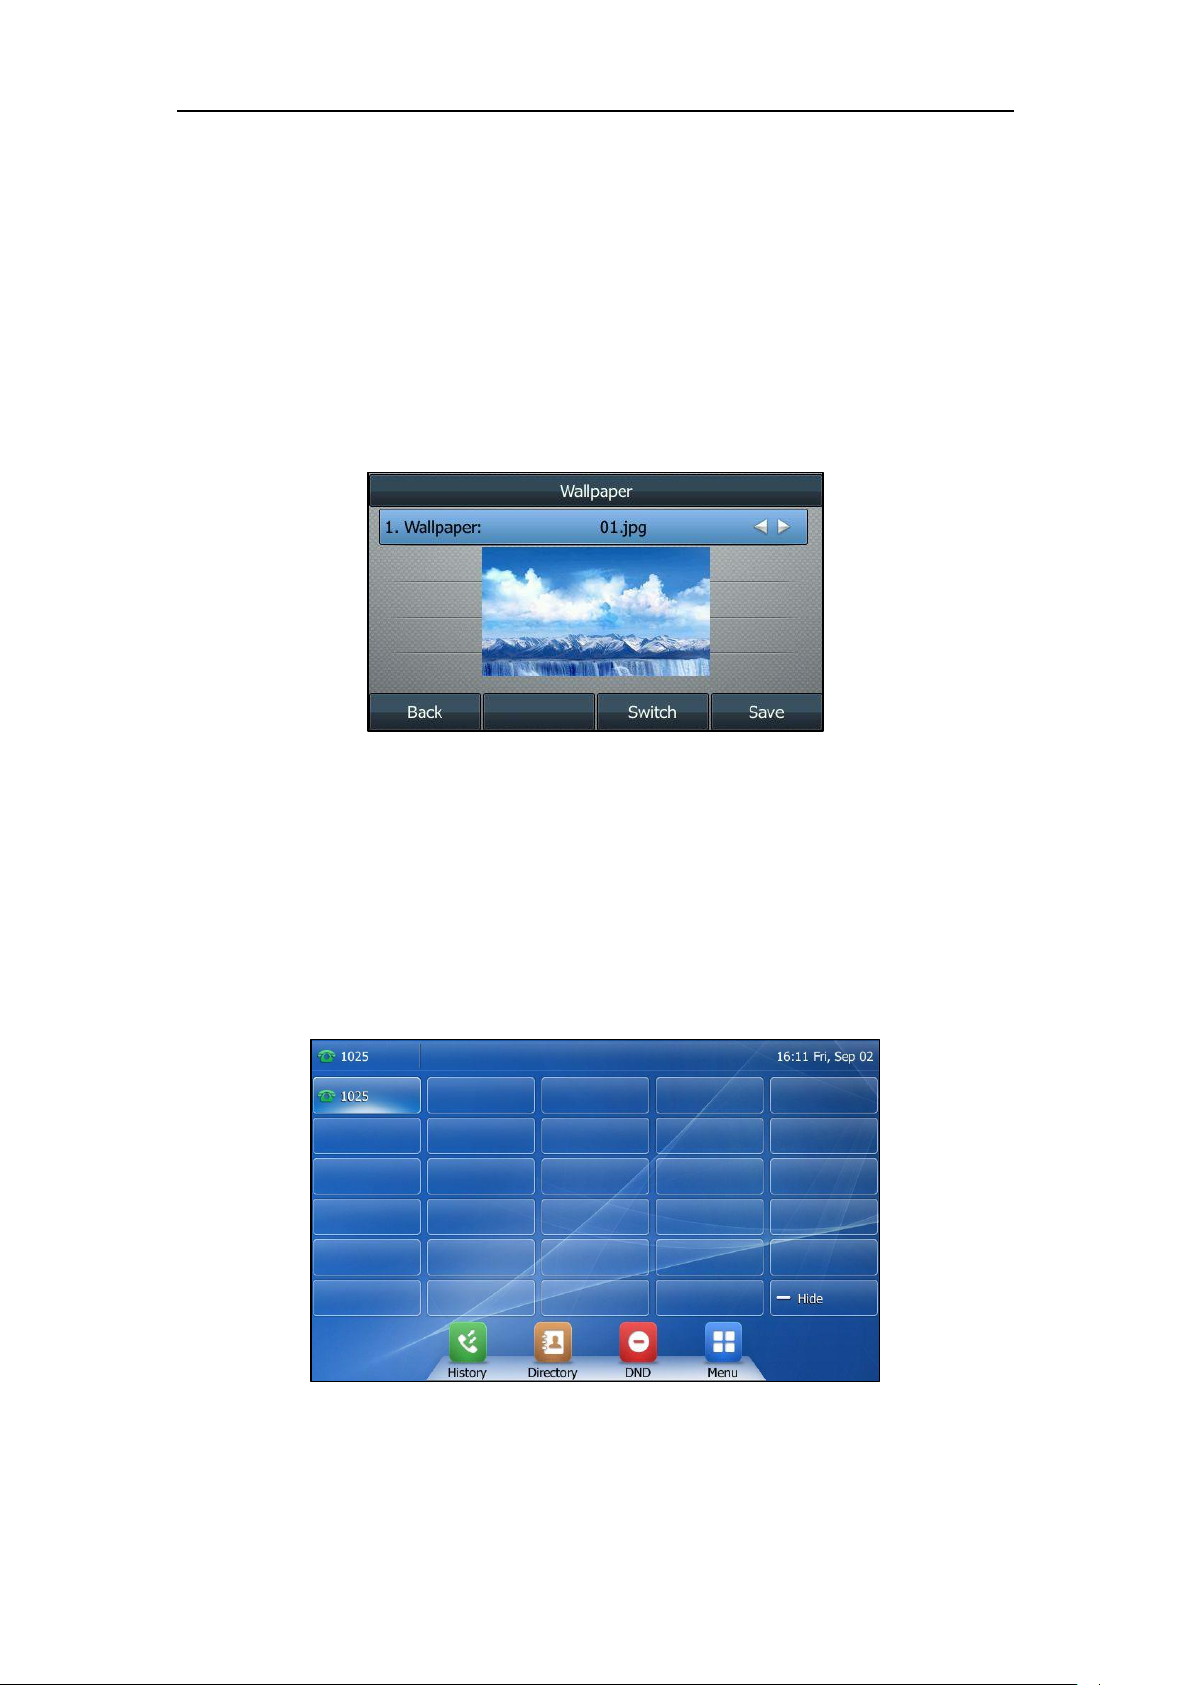
For SIP-T42S/T42G/T41S/T41P IP phone, the page icons appear only when you assign
functionality to line key located in line key 7-15, refer to DSS Keys for more information. The Idle
screen on SIP-T42S/T42G/T41S/T41P IP phone is shown as below:
User Guide for T4 Series IP Phones
18
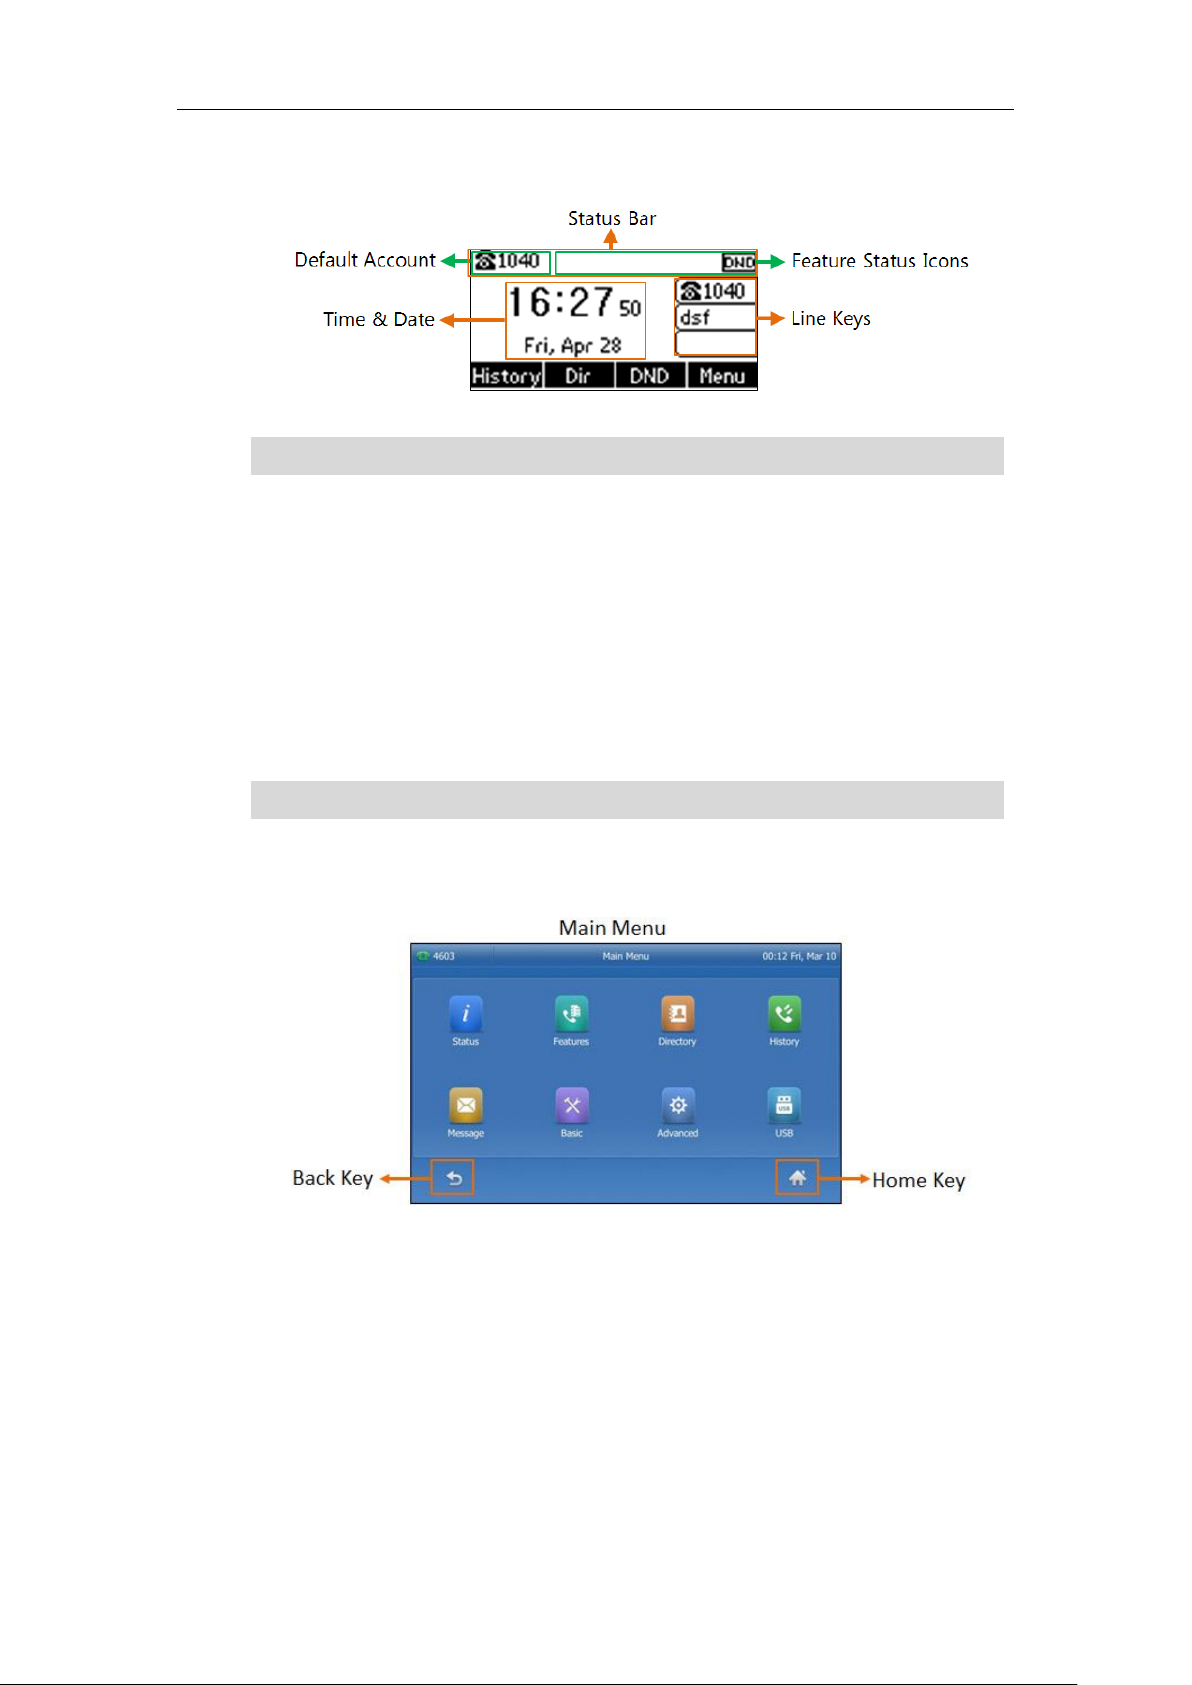
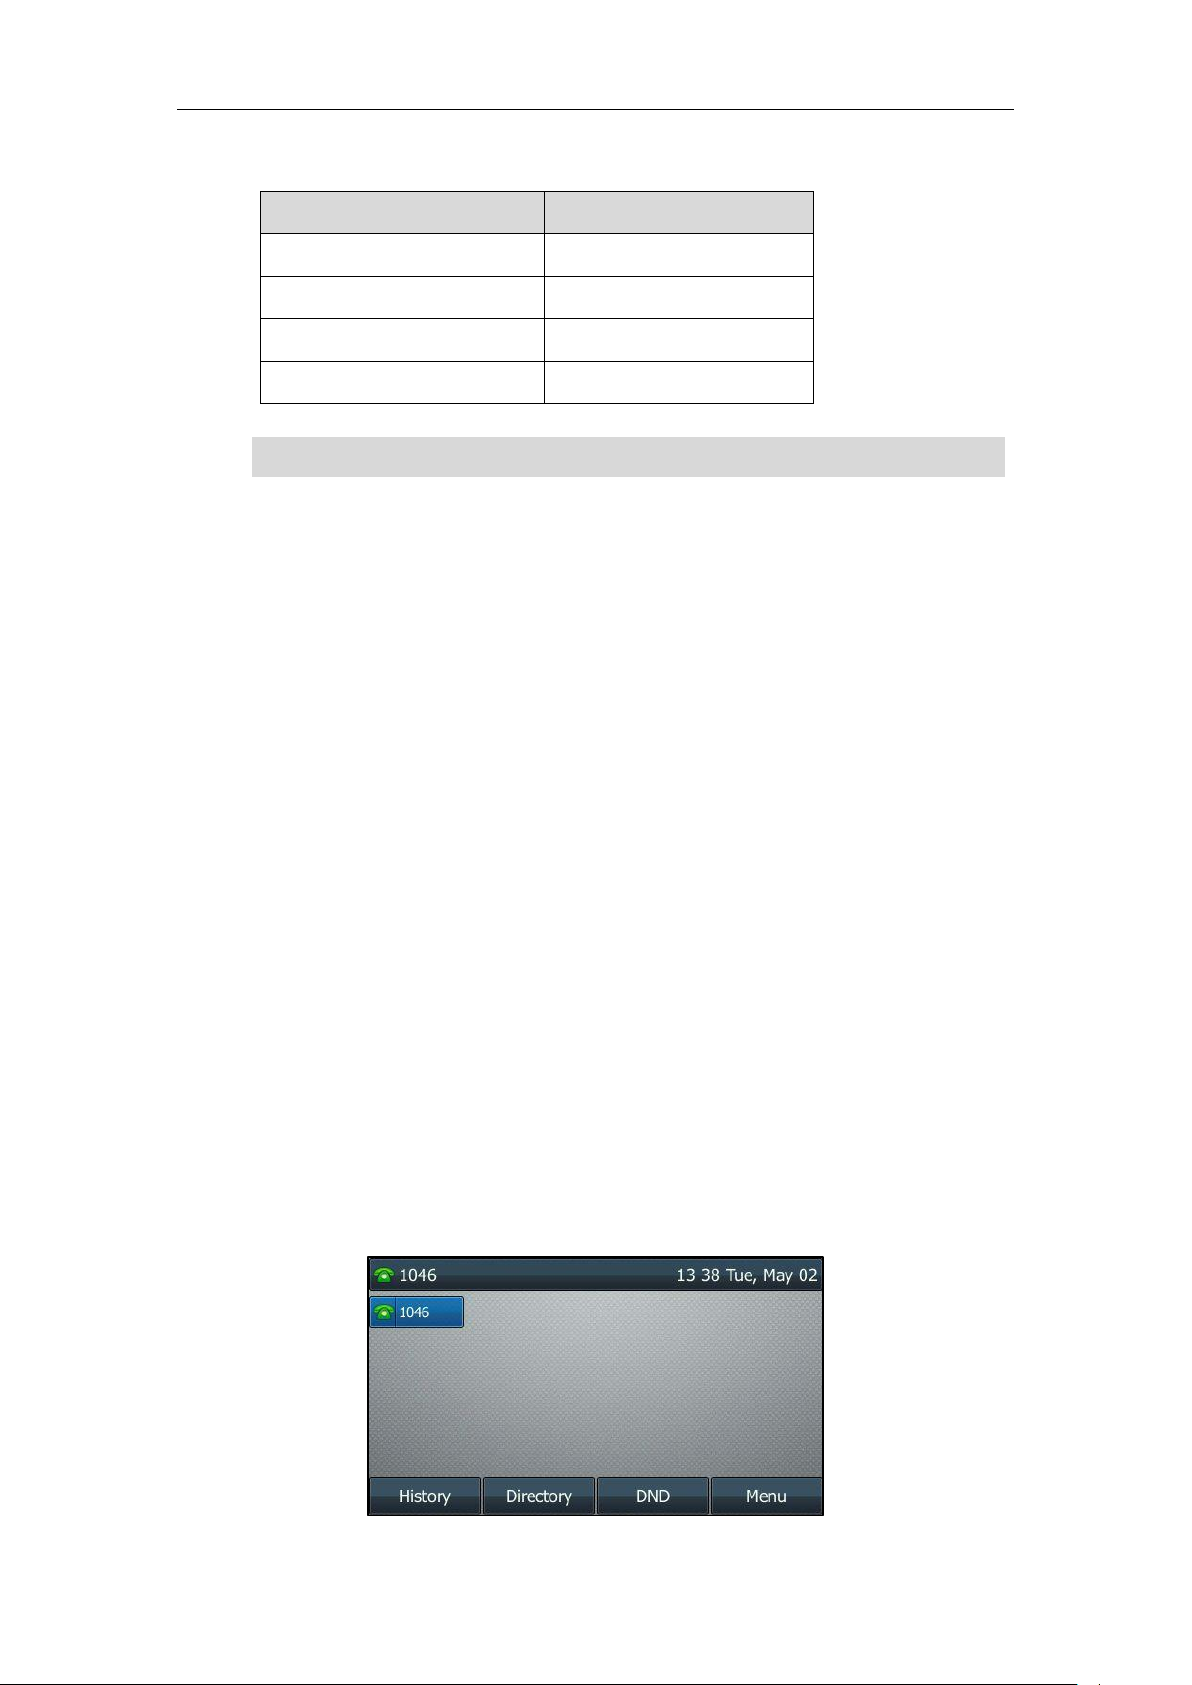
The Idle screen on SIP-T40G/T40P IP phone is shown as below:
Note
Menu Screen
When the phone is idle, you can press/tap the Menu soft key to access the Main Menu screen.
From the Main Menu screen, you can access the desired sub menu, such as Status, Features,
Settings, Message, History, Directory and USB to navigate menus and fields and customize your
phone. Note that the Advanced (Advanced Settings) option is only accessible to the
administrator, and the default administrator password is “admin” (case-sensitive).
Note
The Menu screen on SIP-T48S/T48G IP phone is shown as below:
For a better understanding of the menu structure, please refer to Appendix B – Menu Structure.
If your IP phone does not display the default account, please contact your system administrator.
Overview
19
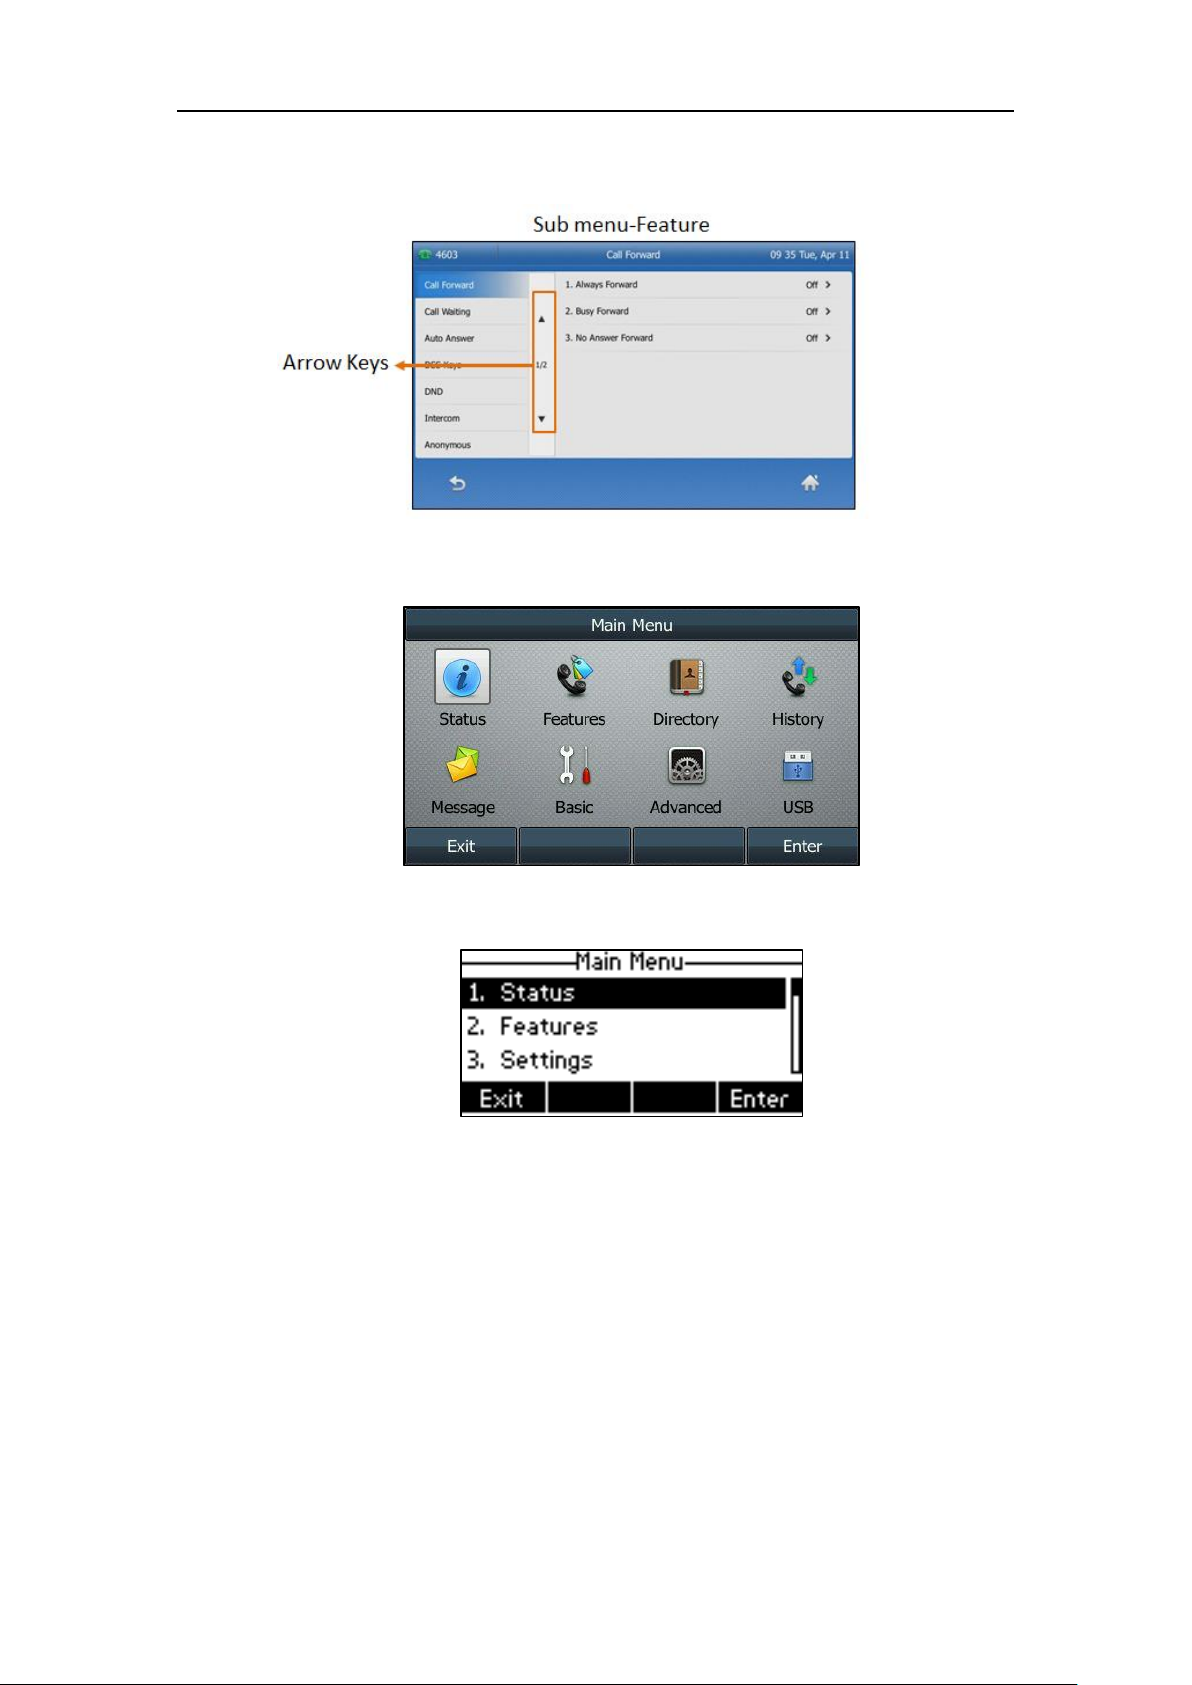
Tap Features to access its sub menus.
The Menu screen on SIP-T46S/T46G IP phone is shown as below:
The Menu screen on SIP-T40G/T40P IP phone is shown as below:
History Screen
When the phone is idle, you can press/tap the History soft key or navigate to Menu->History
to access the History screen for viewing and managing the history records. For more
information, refer to Call History Management.
User Guide for T4 Series IP Phones
20
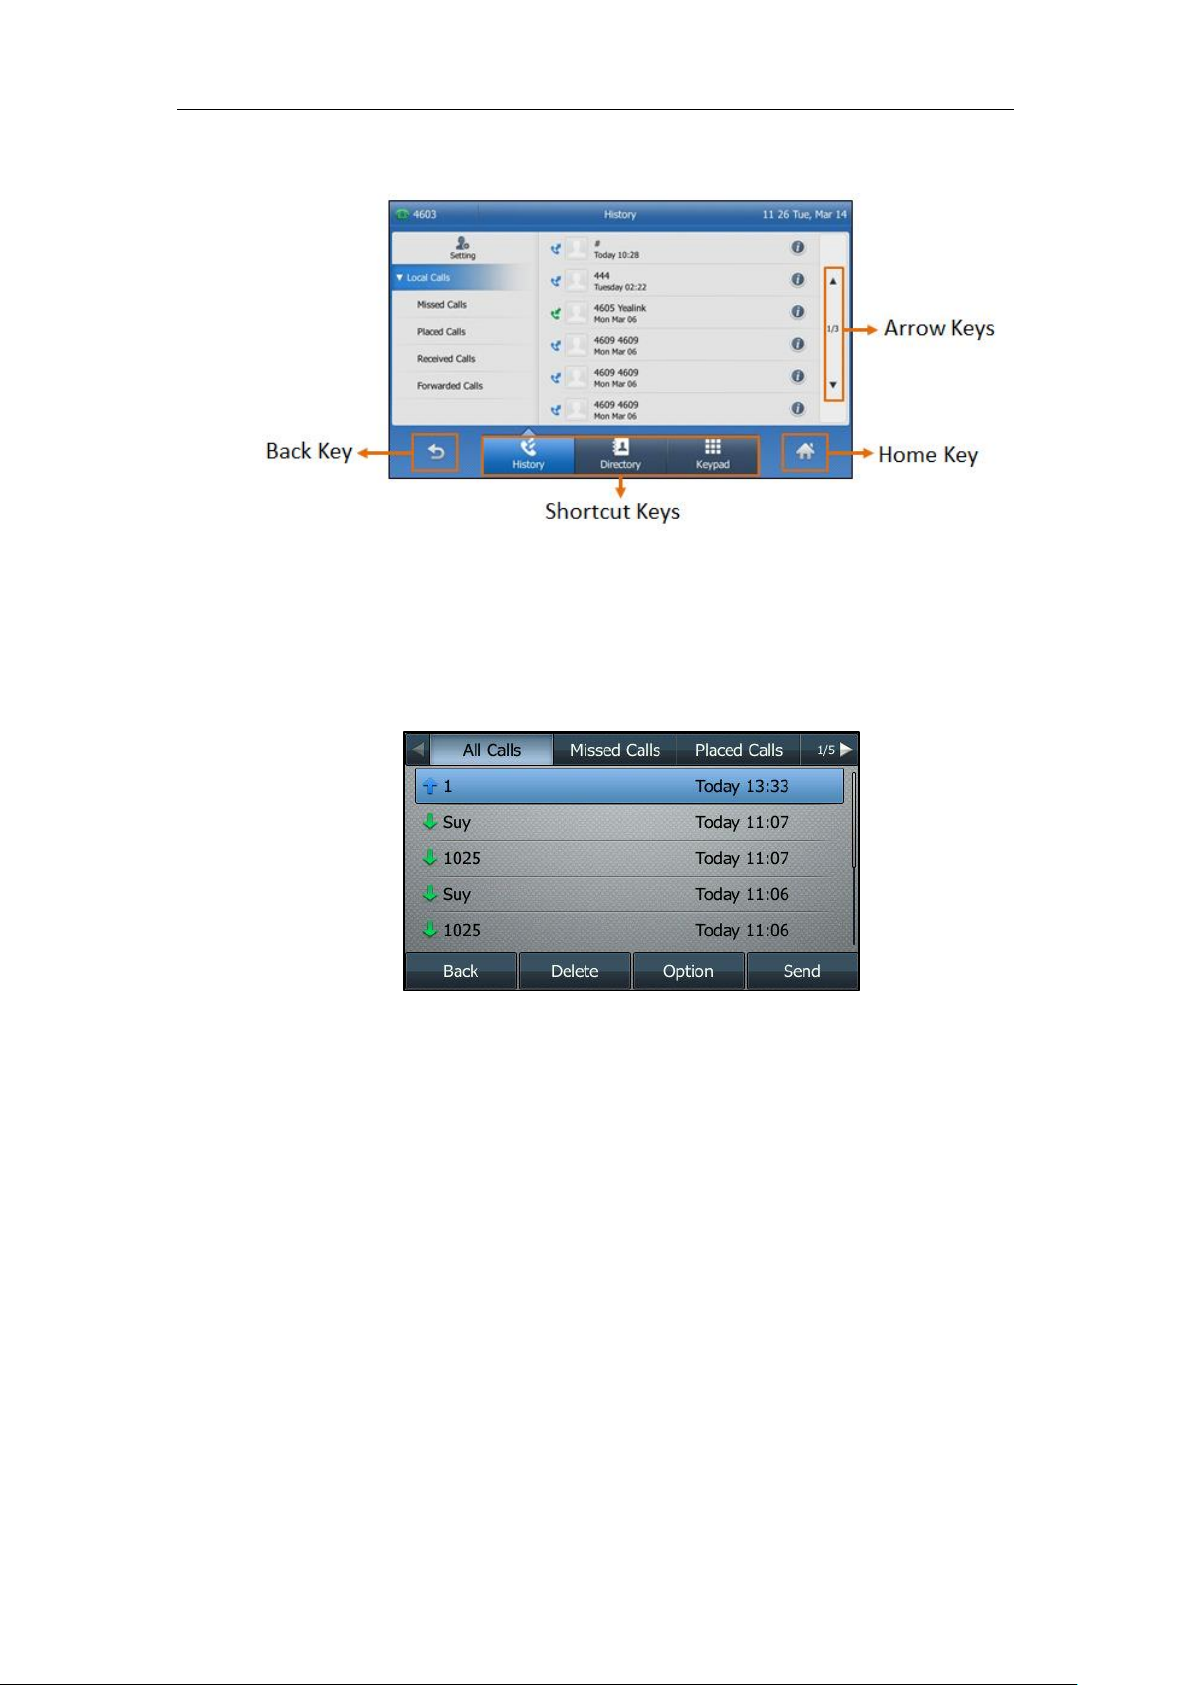
The History screen on the SIP-T48G/T48S IP phone is shown as below:
SIP-T48S/T48G
You can tap the desired history list to view history records. You can also tap Directory or Keypad
to accesss the Directory screen or Dialing screen.
The History screen on the SIP-T46S/T46G IP phone is shown as below:
You can press the left and right navigation key to switch among the history lists.
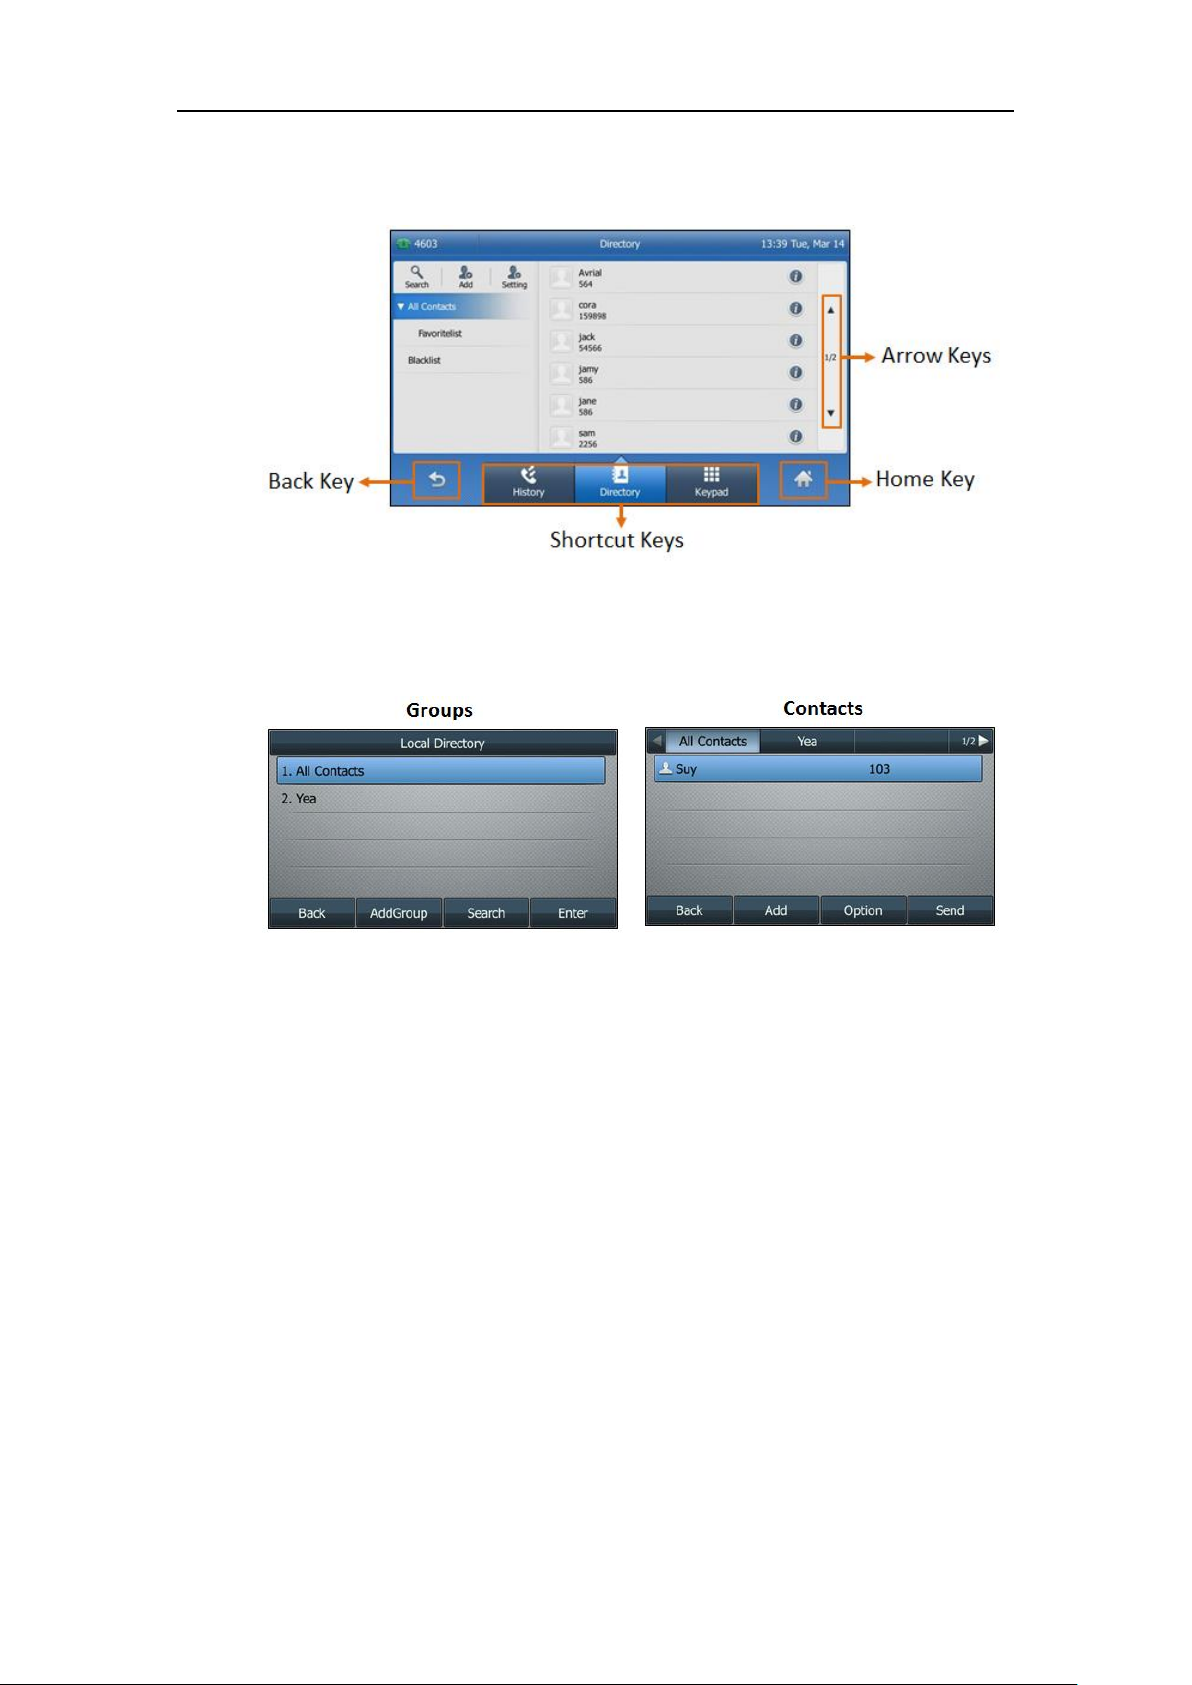
Directory Screen
The Directory screen is made up of Groups screen and Contacts screen. When the phone is idle,
you can press/tap Directory (Dir) soft key or navigate to Menu->Directory to access the
Groups screen. From this screen, you can view and manage groups, or select the desired groups
to view and manage the contacts. For more information, refer to Contact Management.
Overview
21
On SIP-T48S/T48G IP phone, you can tap History or Keypad to accesss the History screen or
Dialing screen. The Directory screen on SIP-T48S/T48G IP phone is shown as below:
On SIP-T46S/T46G/T42S/T42G/T41S/T41P/T40G/T40P IP phone, you can press the navigation
key to switch among the groups. The Directory screen on SIP-T46S/T46G IP phone is shown as
below:
User Guide for T4 Series IP Phones
22
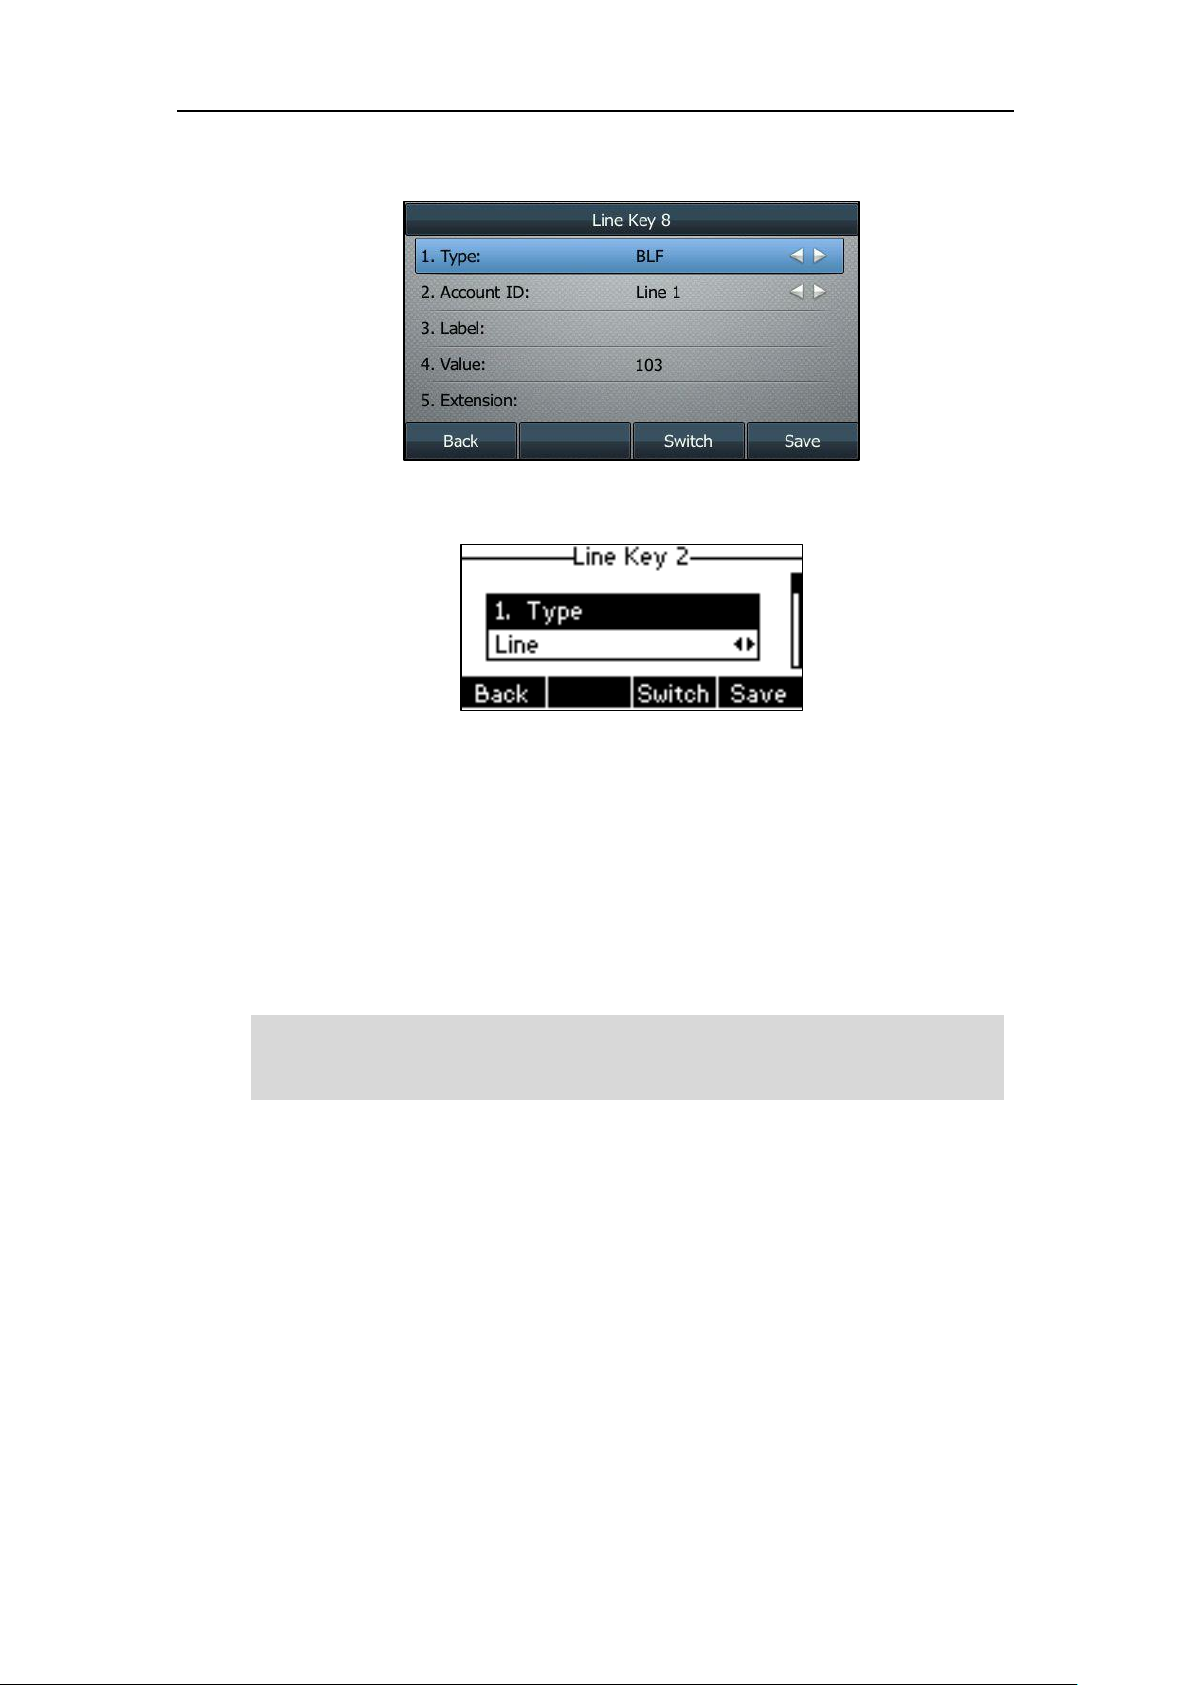
Line Key Screen
When the phone is idle, you can also long press/tap the desired line key or navigate to
Menu->Features->DSSKeys to assign functionality. For more information, refer to Line Keys.
On SIP-T48S/T48G IP phone, you can fold or unfold the line key list on the Idle screen.
The Line Key screen on the SIP-T48S/T48G IP phone is shown as below:
Overview
23
The Line Key screen on the SIP-T46S/T46G IP phone is shown as below:
The Line Key screen on the SIP-T40G/T40P IP phone is shown as below:
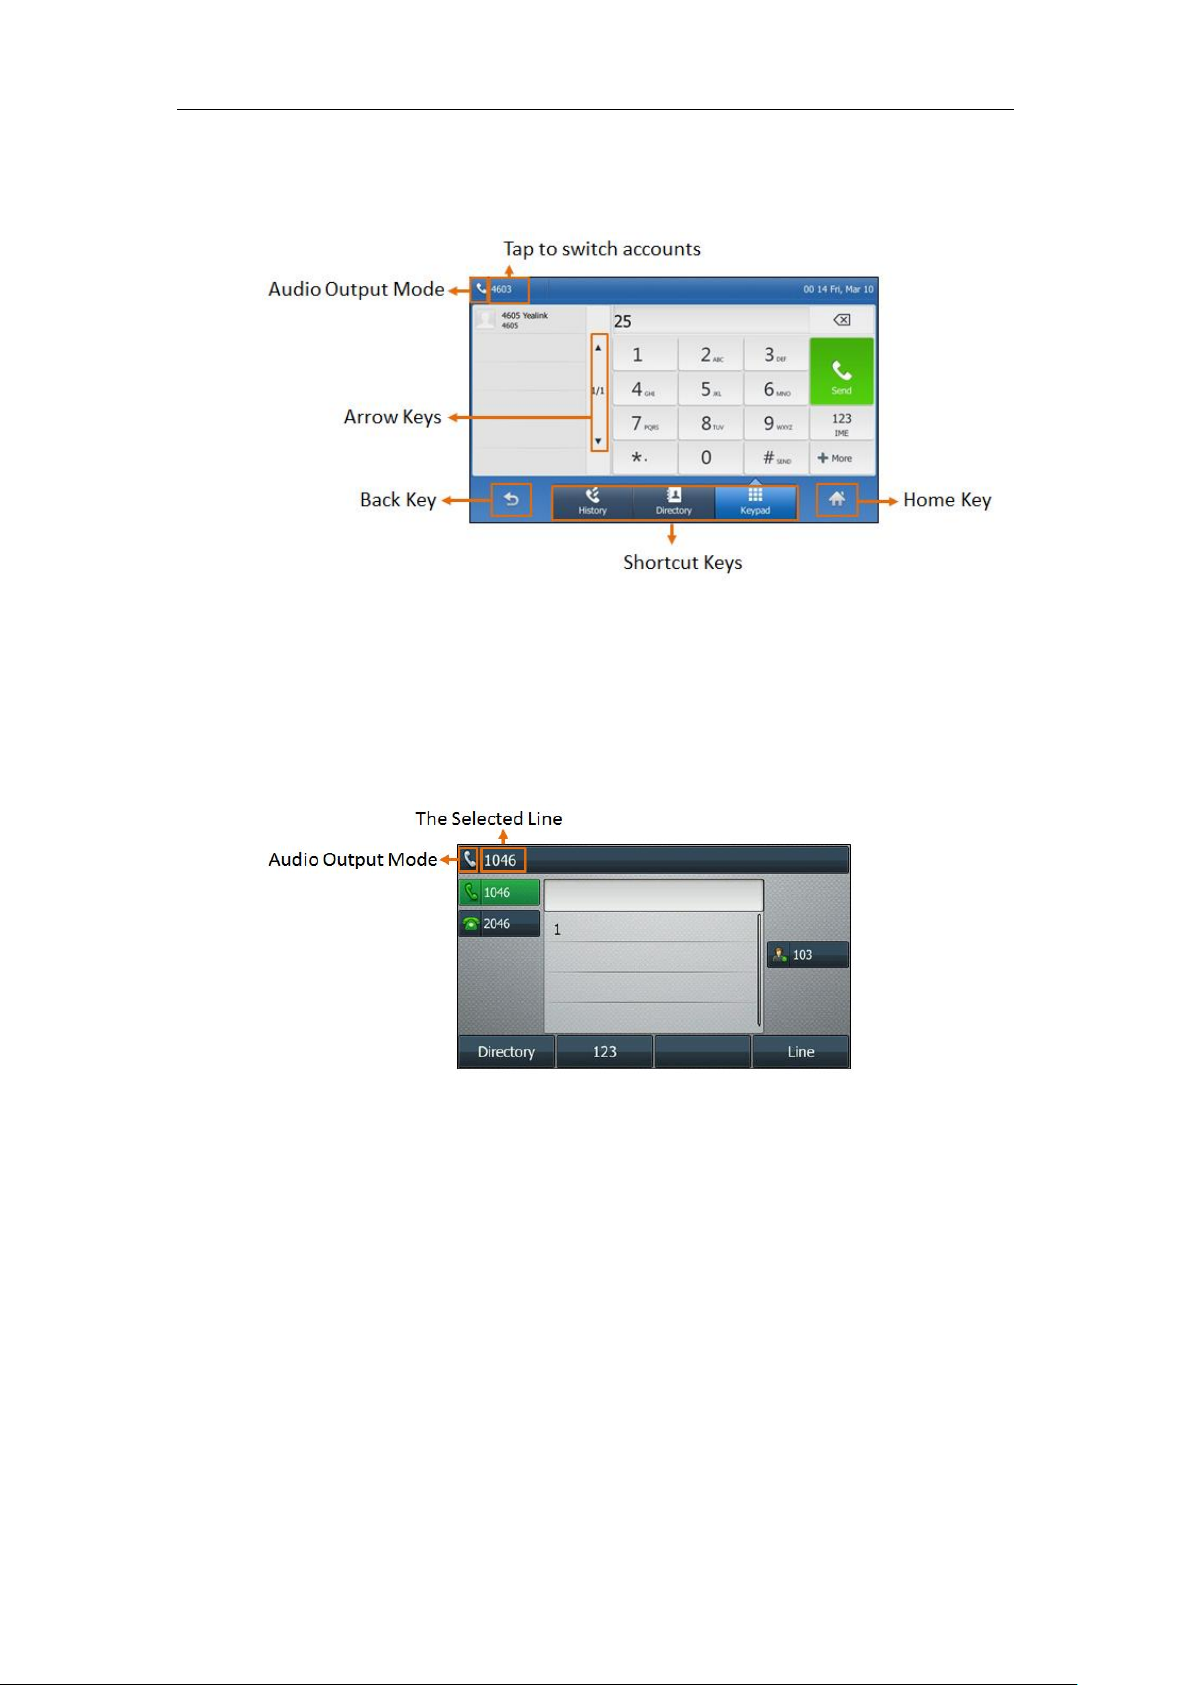
Dialing/Pre-dialing Screen
When the phone is idle, you can pick up the handset, press a line key or Speakerphone key to
access the Dialing screen. Or you can enter a number directly using the dialpad to access the
Pre-dialing screen. The placed call records display on the LCD screen. From Dialing/Pre-dialing
screen, you can use phone dialpad or onscreen dialpad to enter and edit data. The contacts
whose name or phone number matches the entered characters appear on the LCD screen. You
can select the desired contact to place a call directly.
Note
Your system administrator can configure search source list in dialing and disable the phone to
display the placed call records. Check with your system administrator to find out if they are
available on your phone.
User Guide for T4 Series IP Phones
24
On the SIP-T48S/T48G IP phone, you can tap History or Directory to accesss the History screen
or Directory screen. The Dialing screen on the SIP-T48S/T48G IP phone is shown as below:
SIP-T48S/T48G
On the SIP-T46S/T46G/T42S/T42G/T41S/T41P/T40G/T40P IP phone, you can press the
Directory soft key to access the directory lsit. For more information, refer to Configuring List(s)
for the Directory(Dir) Soft Key. The Dialing screen on the SIP-T46S/T46G IP phone is shown as
below:
Overview
25
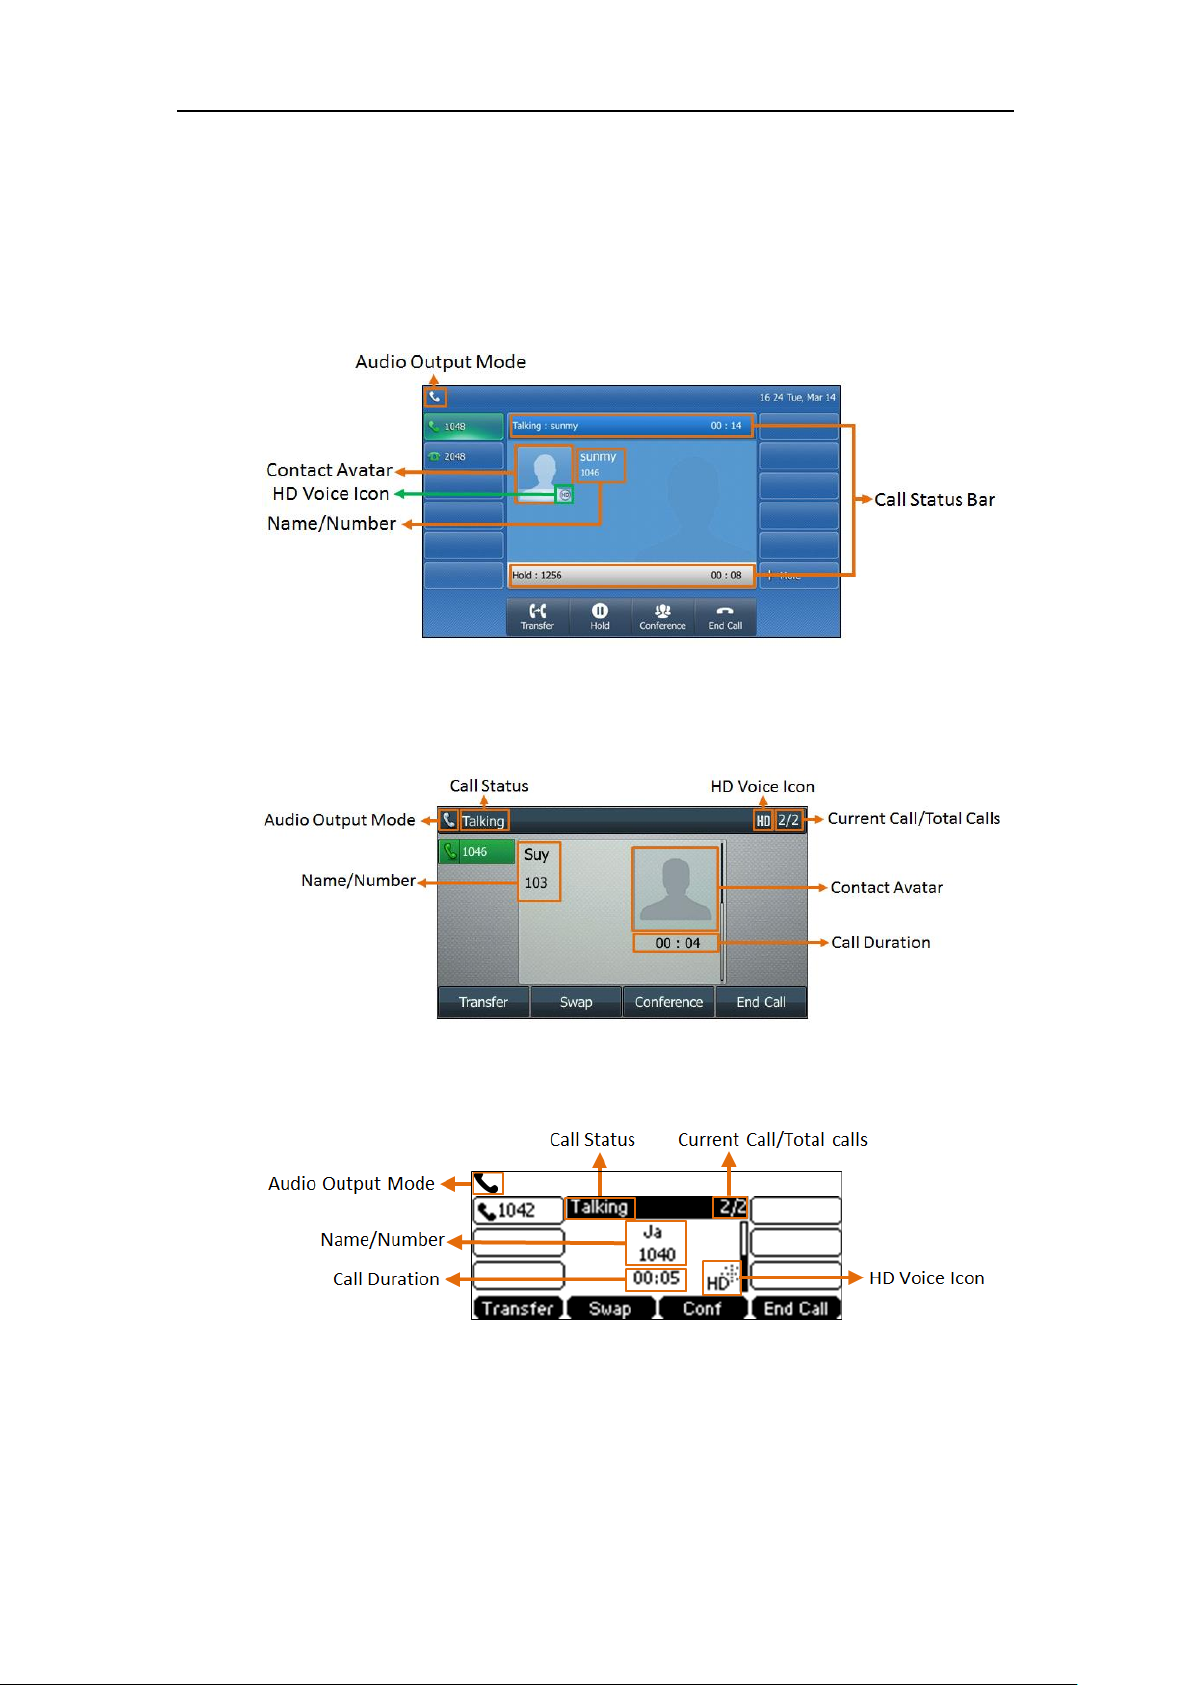
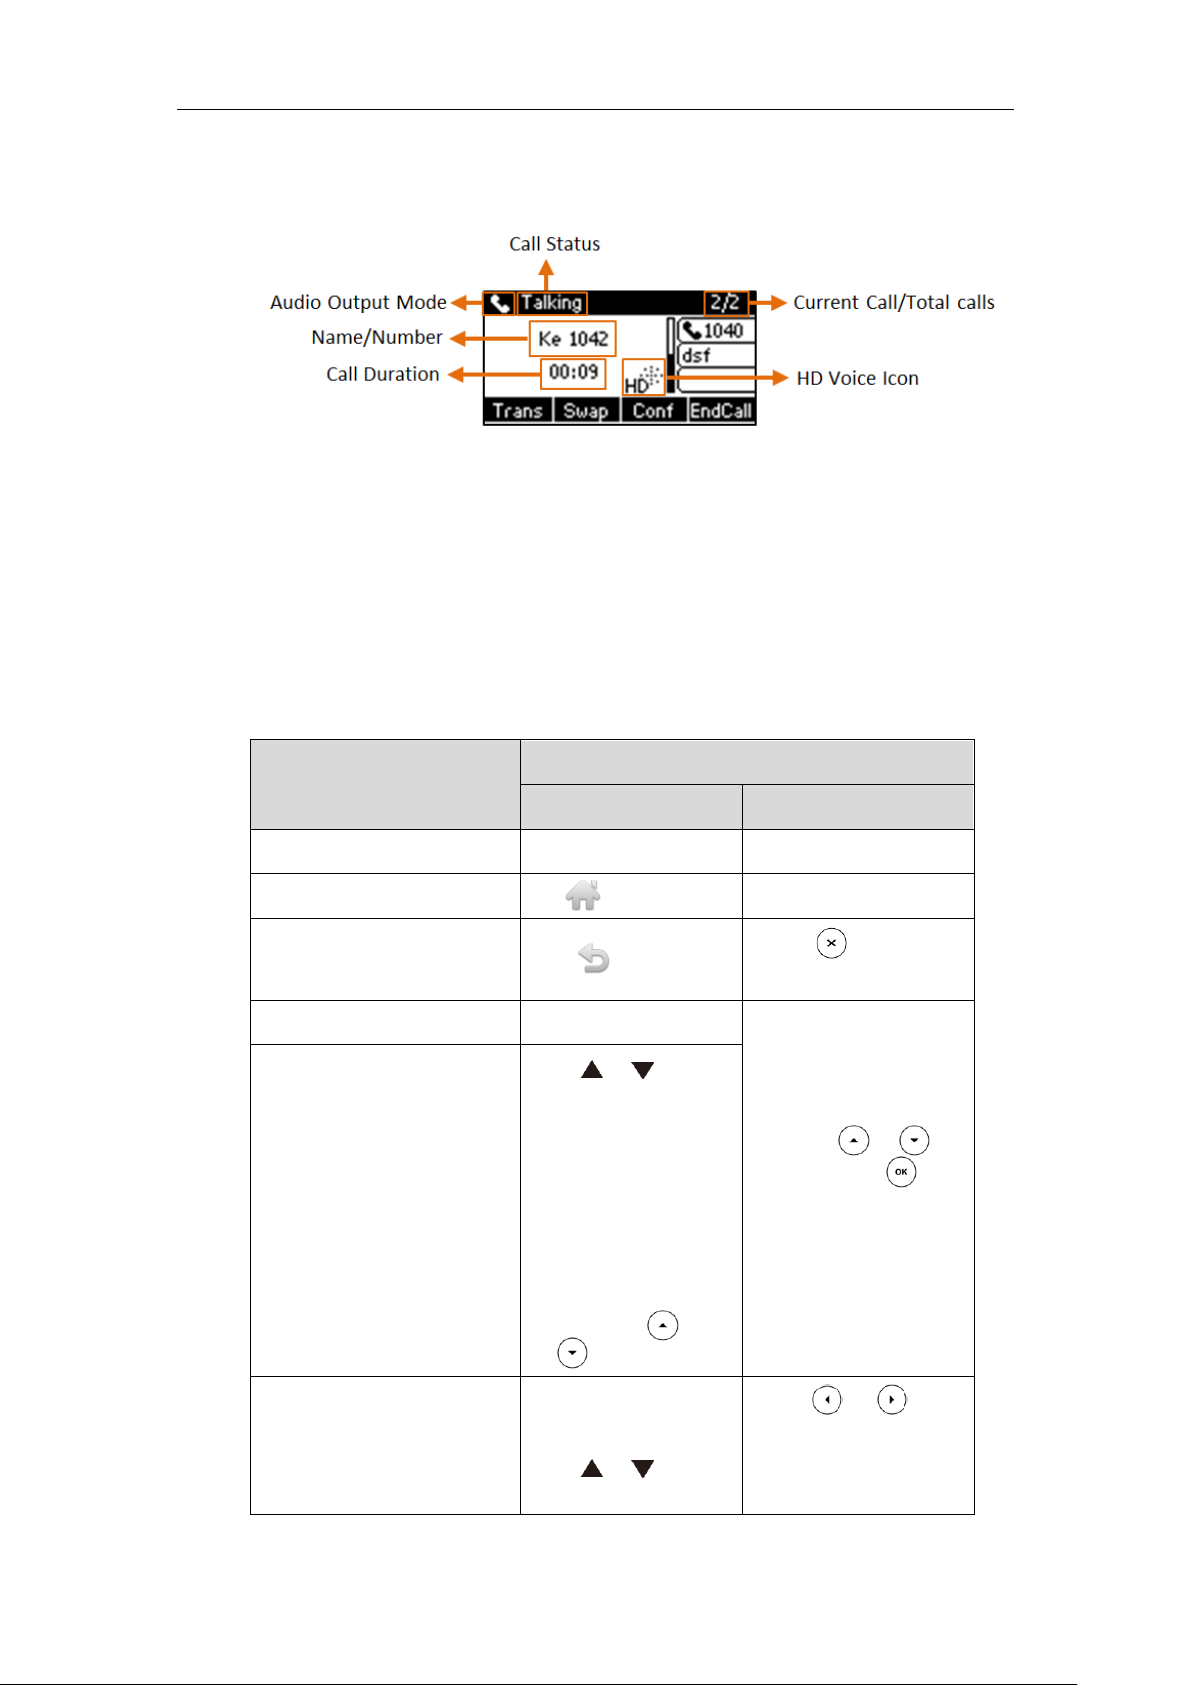
Calls Screen
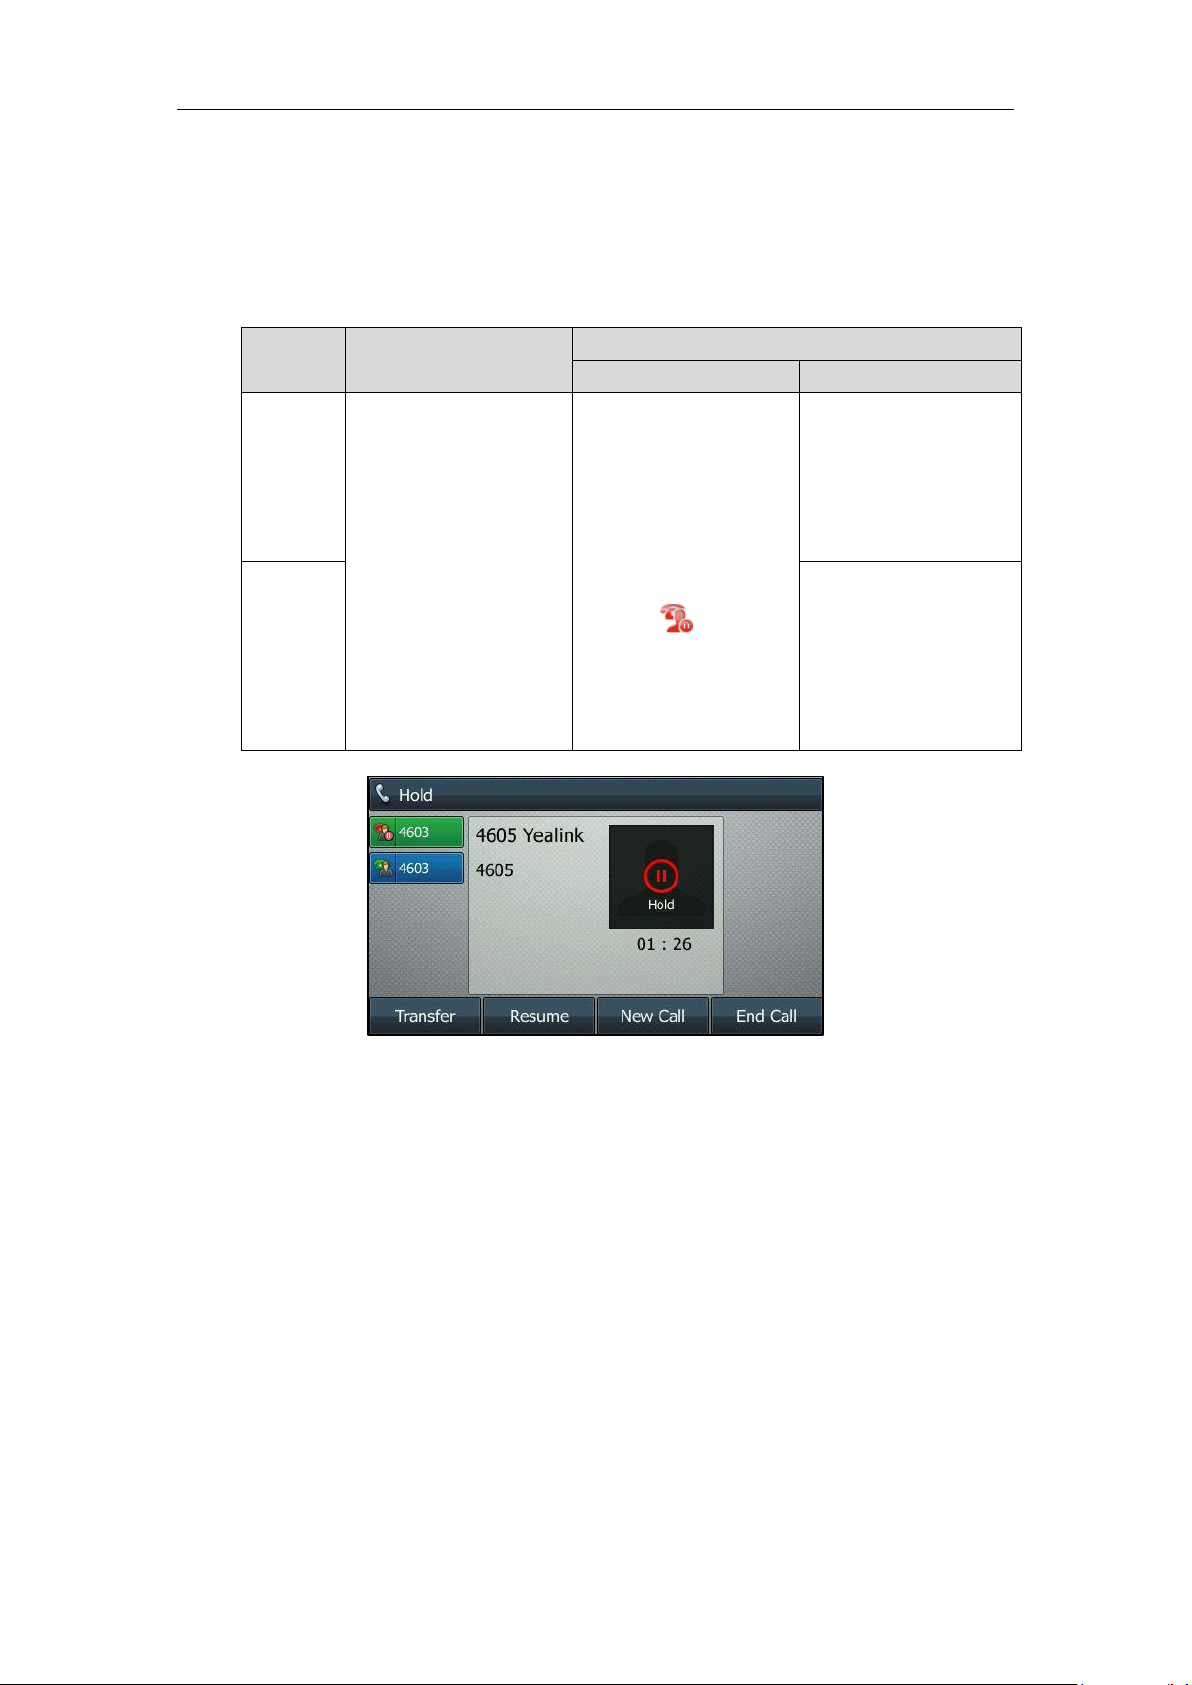
All of your active and held calls display on the Calls screen.
On the SIP-T48S/T48G IP phone, you can tap the call status bar to switch among calls. The call
status bar displays call status, contact name/number and call duration. When there is an active
call and a held call, the Calls screen on SIP-T48S/T48G IP phone is shown as below:
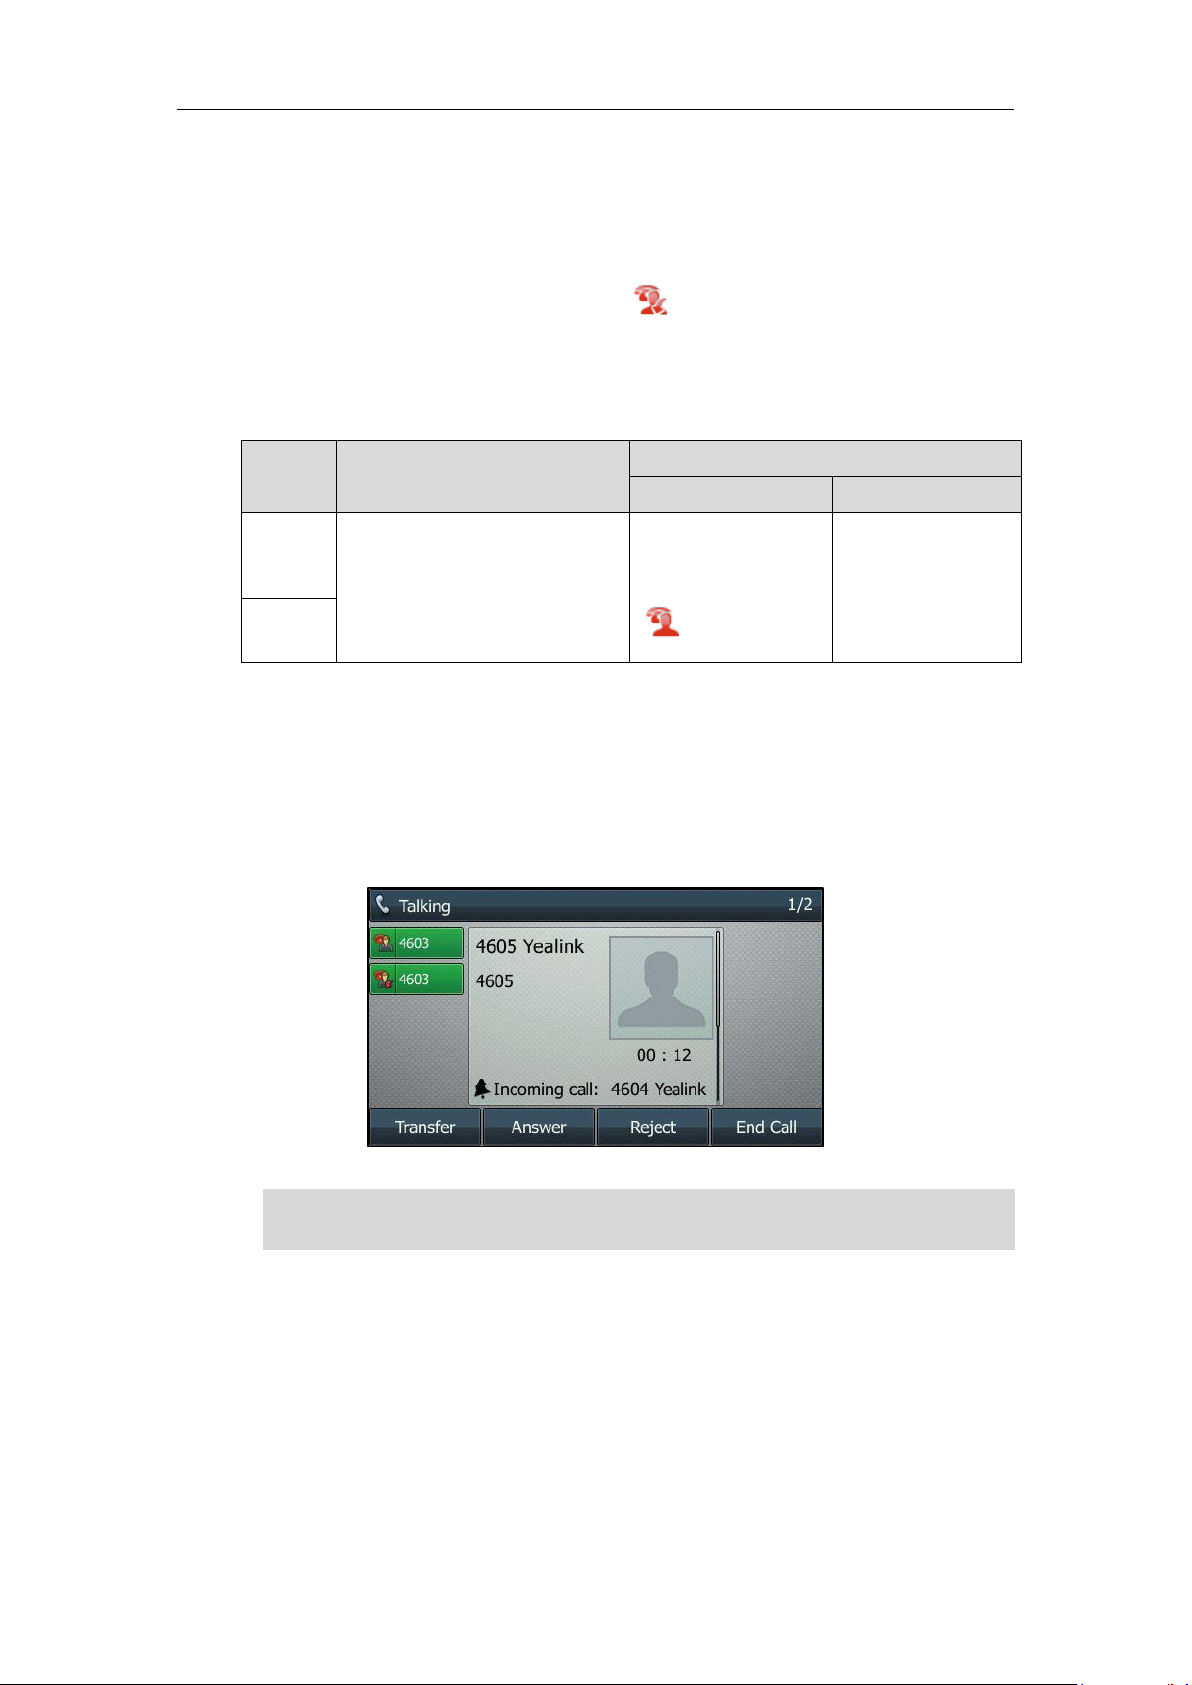
On the SIP-T46S/T46G/T42S/T42G/T41S/T41P/T40G/T40P IP phone you can press up or down
navigation keys to switch among calls. When there is an active call and a held call, the Calls
screen on SIP-T46S/T46G IP phone is shown as below:
When there is an active call and a held call, the Calls screen on SIP-T42S/T42G/T41S/T41P IP
phone is shown as below:
User Guide for T4 Series IP Phones
26
When there is an active call and a held call, the Calls screen on SIP-T40G/T40P IP phone is
shown as below:
Navigating Menus and Fields
To navigate menus and fields, you can:
Tap soft keys on the touch screen (on the SIP-T48S/T48G IP phone)
Tap menu items, fields, and arrows on the touch screen (on the SIP-T48S/T48G IP phone)
Press soft keys, navigation keys or dialpad keys on the phone (on all IP phones)
To operate your phone, follow these tips:
If you want to
Action
SIP-T48S/T48G
Other IP Phones
Enter the main menu.
Tap Menu.
Press Menu soft key.
Return to the Idle screen.
Tap .
/
Go back to the previous menu.
• Tap .
• Press .
• Press theBack soft key.
Select an item.
• Tap the item.
• Scroll to the item by
pressing or ,
and then press .
• Use the dialpad keys to
select items that have
index numbers.
Scroll through items.
• Tap or to
scroll through items
page by page.
(If you are in the call
history, local directory,
language configuration
screen or ring tones
configuration screen, you
can also press
or .)
Scroll through values for a
field.
• Tap the field’s
highlighted gray box.
• Tap or to scroll
through values page by
• Press or , or
the Switch soft key to
switch among available
values one by one.
Overview
27
page.
• Press or to
scroll values one by one.
Select a value for a field.
• From the pull-down list,
tap the value.
• Scroll to the value and
then press .
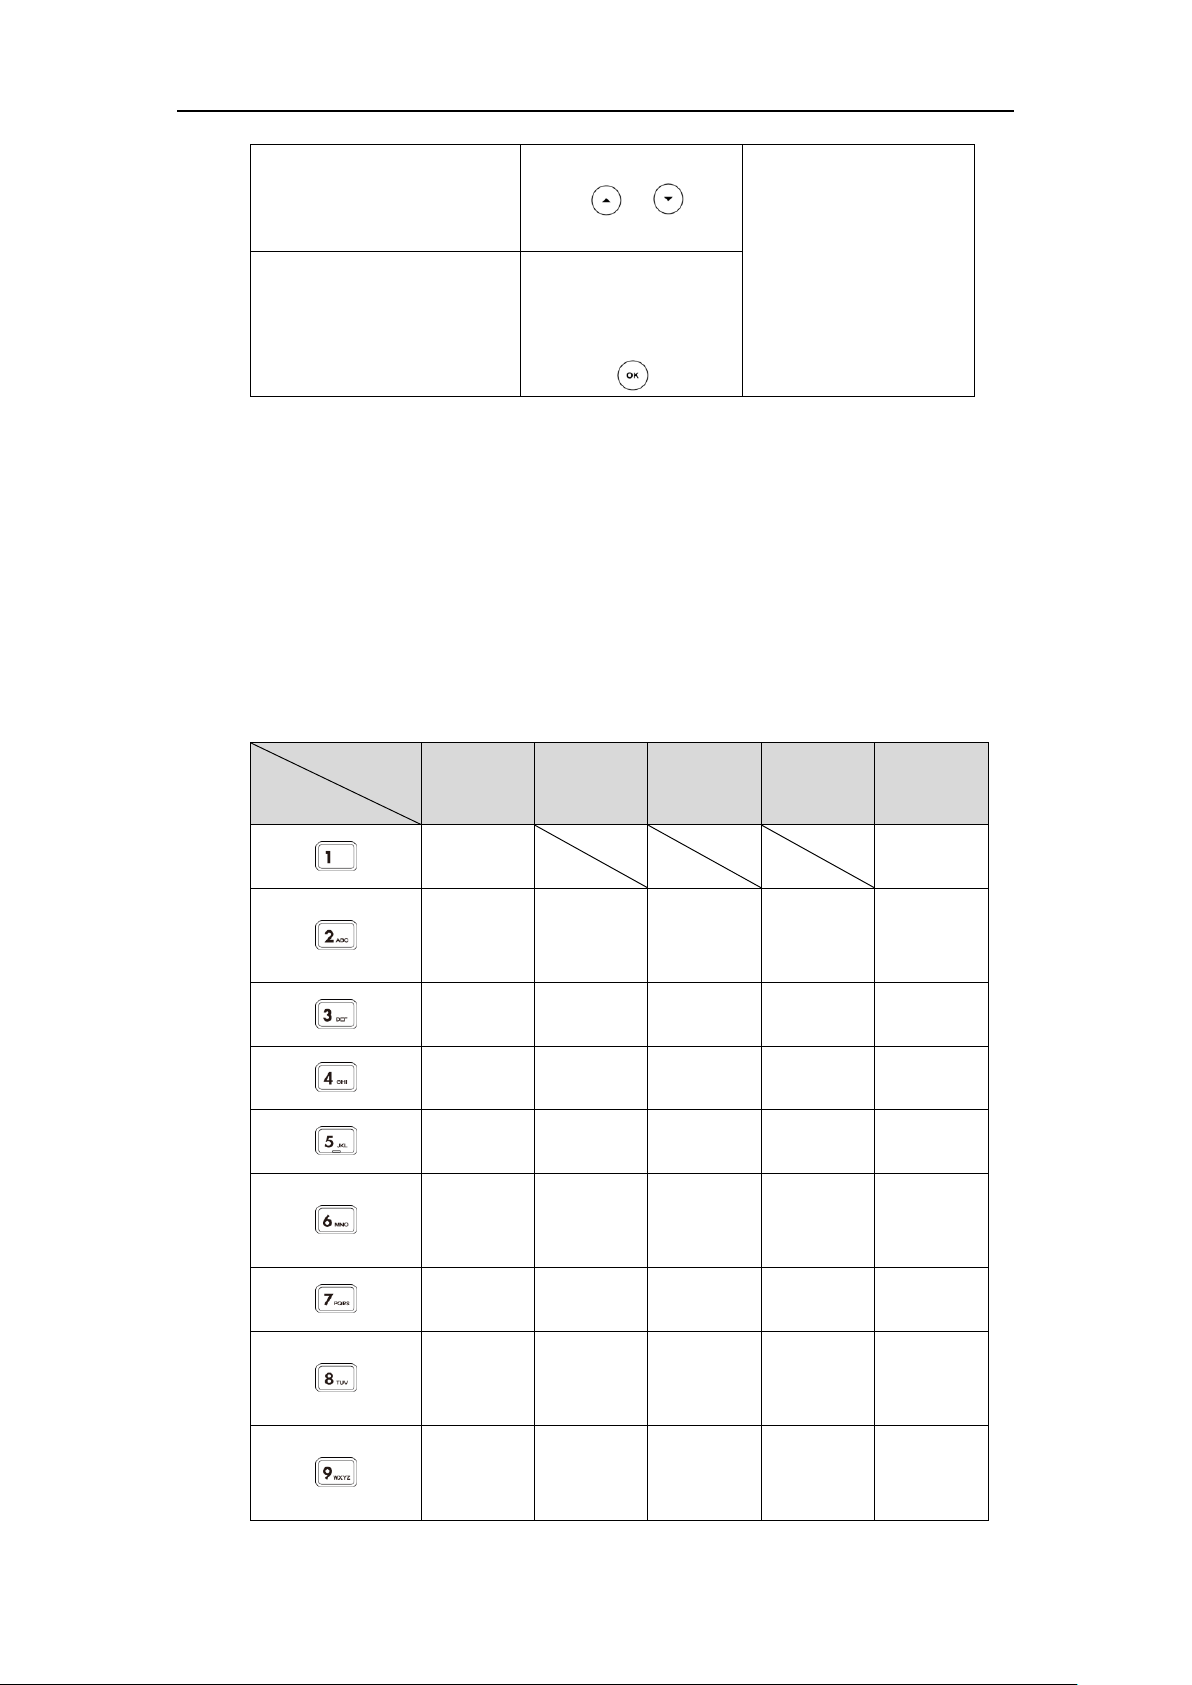
Entering Data and Editing Fields
You can enter data and edit fields using the dialpad keys on the phone console or using the
onscreen dialpad key on the SIP-T48S/T48G IP phone.
The IP phones provide 5 different input methods, including 2aB, abc, Abc, ABC and 123, and
different input methods provide different characters on dialpad for editing and updating field
information. No matter what kind of input method you are using, press the dialpad key one or
more times to view the character (or number) options and stop to select. Wait for one second
after you input a character (or number), then input the next character (or number).
The following table lists character (or number) options on dialpad in different input methods:
Input Modes
Dialpad
2aB
abc
Abc
(title case)
ABC
123
1
1
2abcABC
abc2äæåàá
âãç
abc2äæåàá
âãç
ABC2ÄÆÅ
ÀÁÂÃÇ
2
3defDEF
def3èéêëð
def3èéêëð
DEF3ÈÉÊËÐ
3
4ghiGHI
ghi4ìíîï
ghi4ìíîï
GHI4ÌÍÎÏ
4
5jklJKL
jkl5£
jkl5£
JKL5£
5
6mnoMNO
mno6öøòó
ôõñ
mno6öøòó
ôõñ
MNO6ÖØ
ÒÓÔÕÑ
6
7pqrsPQRS
pqrs7ßЅ
pqrs7ßЅ
PQRS7Ѕ
7
8tuvTUV
tuv8ùúûü
tuv8ùúûü
TUV8ÙÚÛ
Ü
8
9wxyzWXY
Z
wxyz9ýÞ
wxyz9ýÞ
WXYZ9ÝÞ
9
User Guide for T4 Series IP Phones
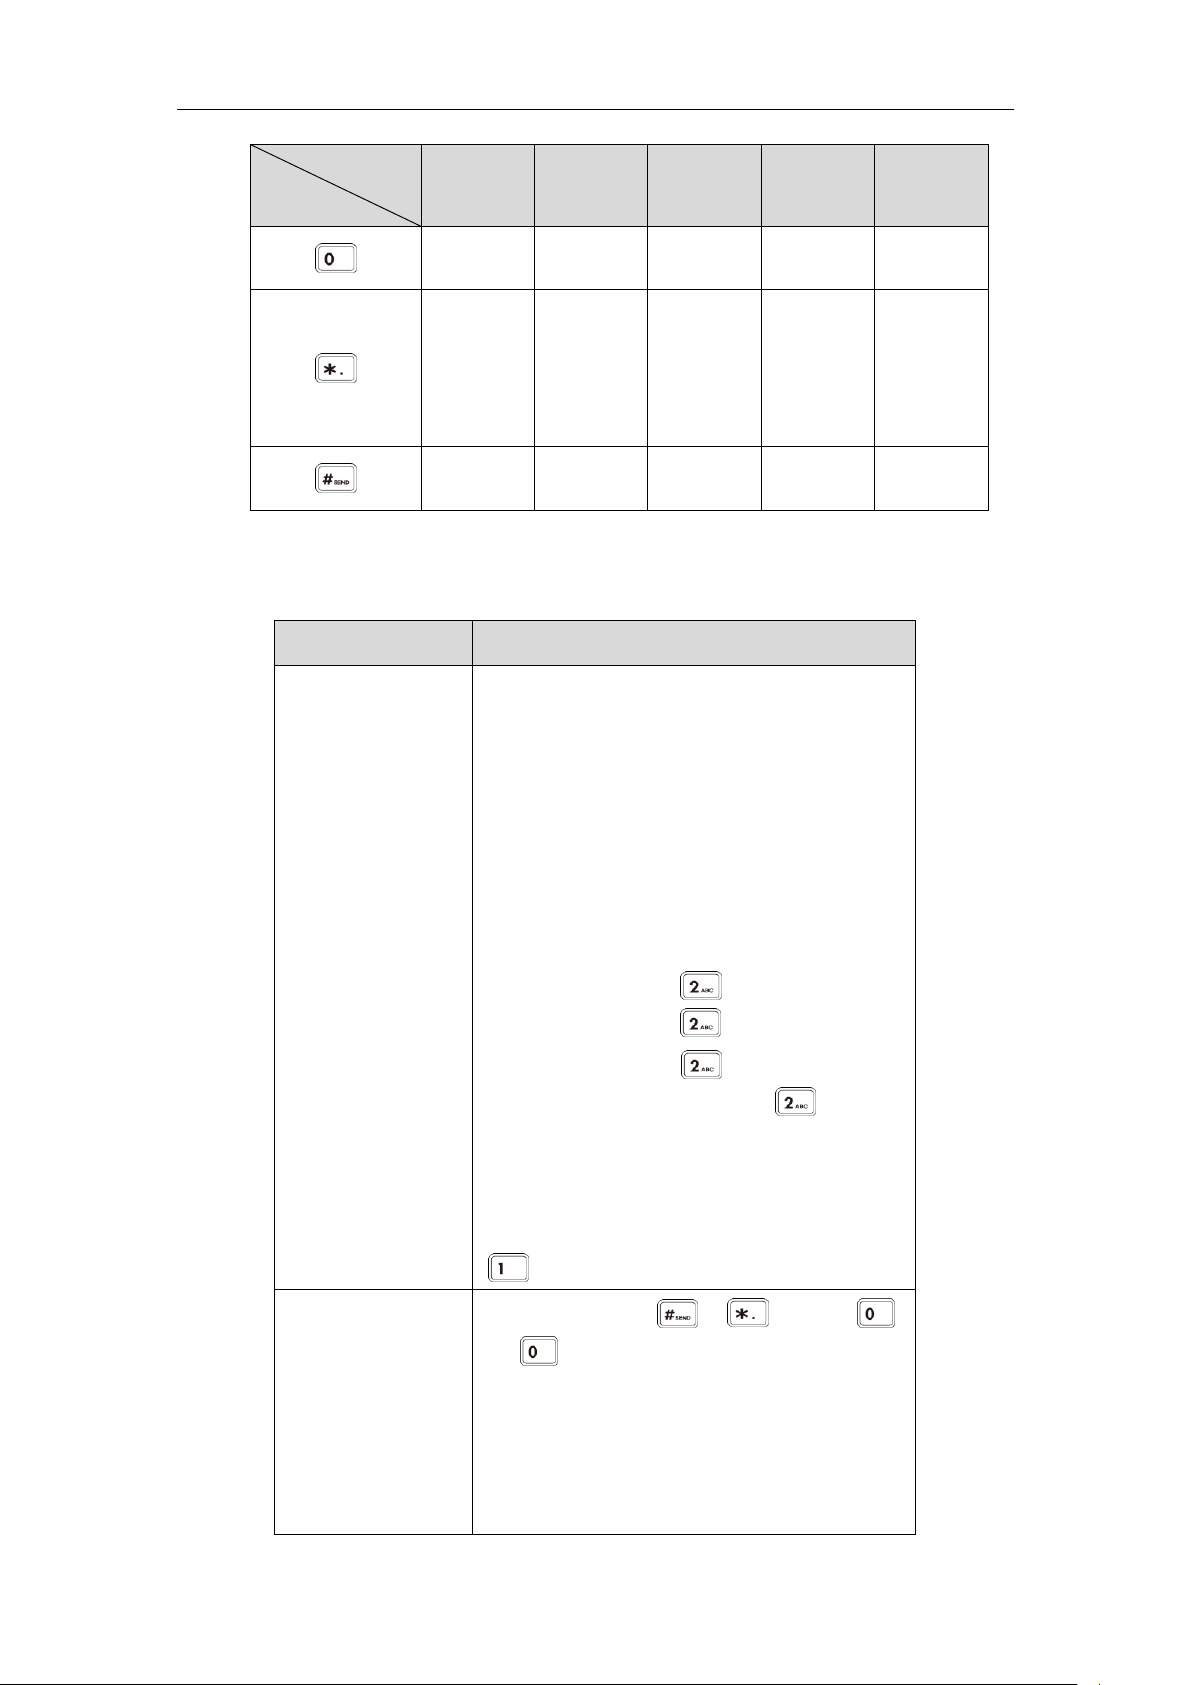
28
Input Modes
Dialpad
2aB
abc
Abc
(title case)
ABC
123
0
space
space
space
0
*.,'?!\-()@/:
_;+&%=<>
£$¥¤[]{}~
^¡¿§#"|
*.,'?!\-()@/:
_;+&%=<>
£$¥¤[]{}~
^¡¿§#"|
*.,'?!\-()@/:
_;+&%=<>
£$¥¤[]{}~
^¡¿§#"|
*.,'?!\-()@/:
_;+&%=<>
£$¥¤[]{}~
^¡¿§#"|
.*:/@[]
#
#
#
#
#
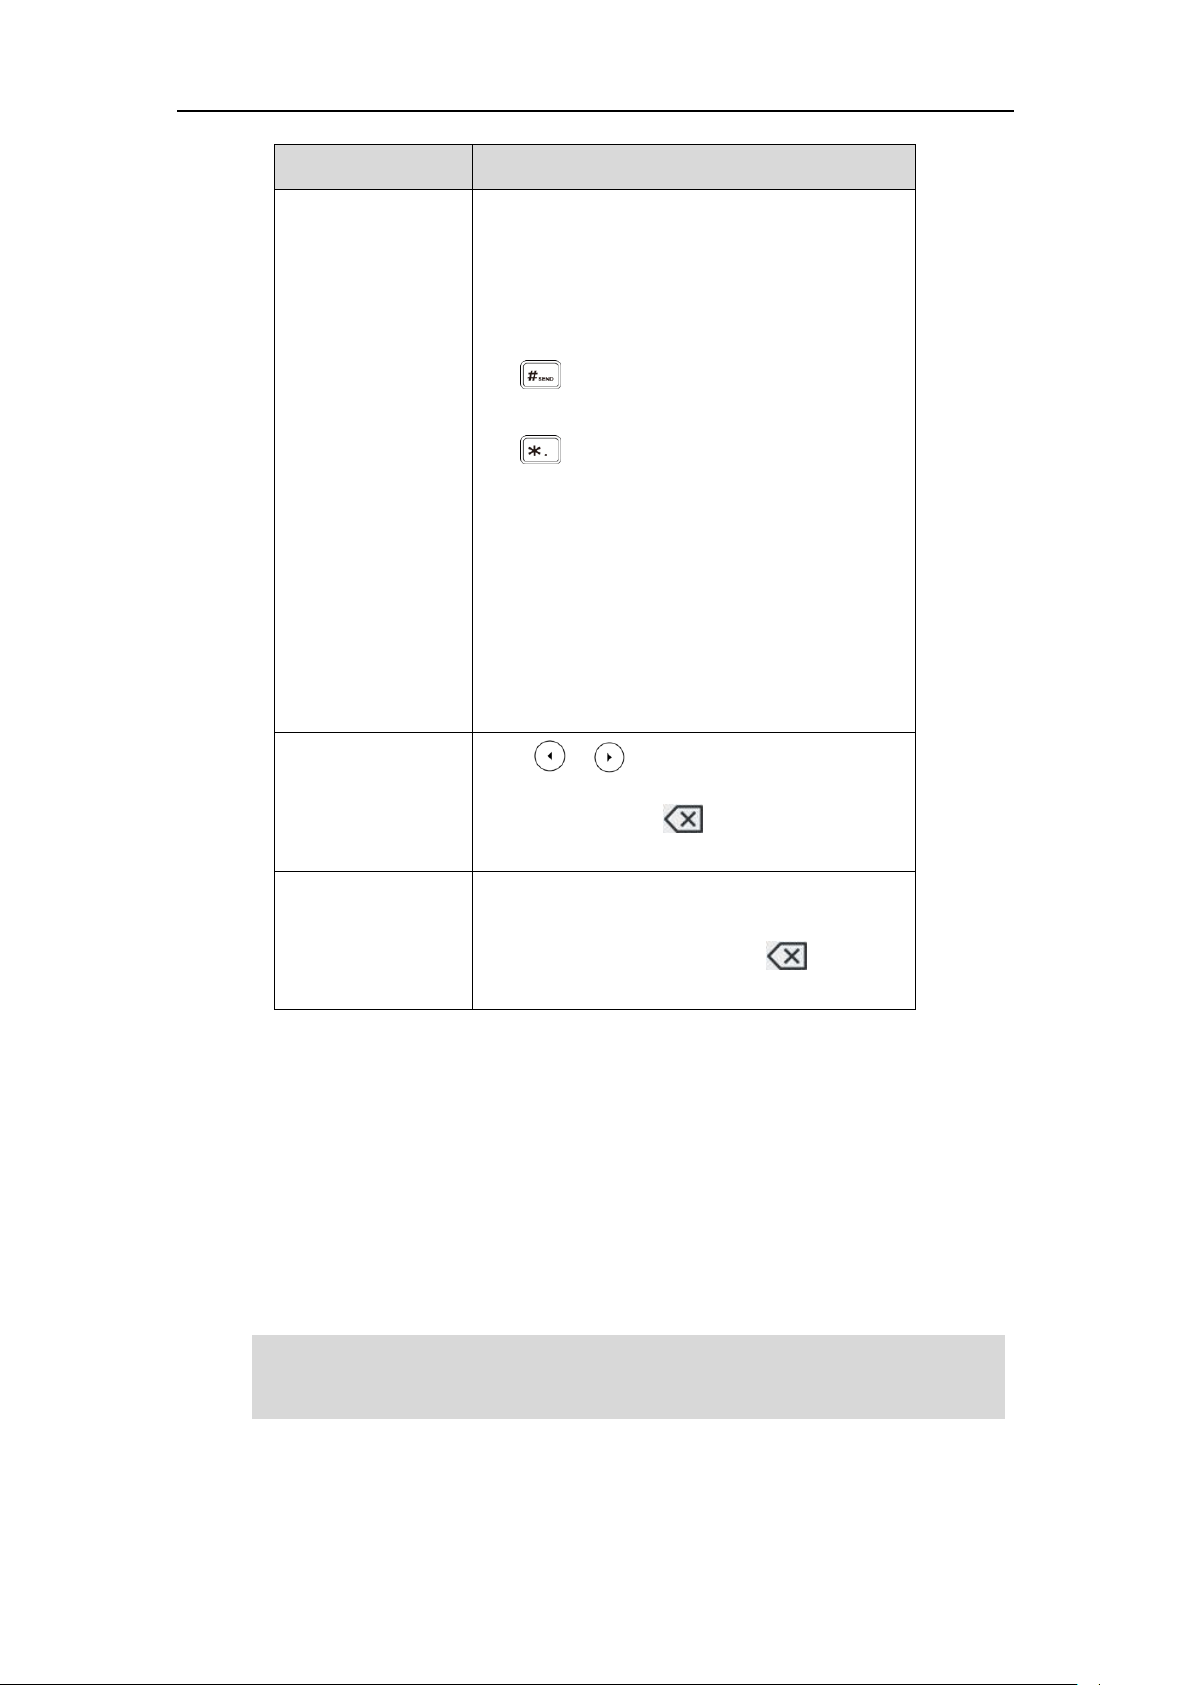
To enter or edit data:
1.Do one of the following:
If you want to
Then you can
Enter only digits (1),
uppercase (A)
characters, lowercase
(a) characters, or
alphanumeric (2aB)
characters.
Press a keypad key one or more times (depending on
what input mode you’re in) to enter the characters
Libble takes abuse of its services very seriously. We're committed to dealing with such abuse according to the laws in your country of residence. When you submit a report, we'll investigate it and take the appropriate action. We'll get back to you only if we require additional details or have more information to share.
Product:
Forumrules
To achieve meaningful questions, we apply the following rules:
First, read the manual;
Check if your question has been asked previously;
Try to ask your question as clearly as possible;
Did you already try to solve the problem? Please mention this;
Is your problem solved by a visitor then let him/her know in this forum;
To give a response to a question or answer, do not use this form but click on the button 'reply to this question';
Your question will be posted here and emailed to our subscribers. Therefore, avoid filling in personal details.
Register
Register getting emails for Yealink SIP-T42G at:
new questions and answers
new manuals
You will receive an email to register for one or both of the options.
Get your user manual by e-mail
Enter your email address to receive the manual of Yealink SIP-T42G in the language / languages: English as an attachment in your email.
The manual is 9.74 mb in size.
You will receive the manual in your email within minutes. If you have not received an email, then probably have entered the wrong email address or your mailbox is too full. In addition, it may be that your ISP may have a maximum size for emails to receive.
If you have not received an email with the manual within fifteen minutes, it may be that you have a entered a wrong email address or that your ISP has set a maximum size to receive email that is smaller than the size of the manual.
The email address you have provided is not correct.
Please check the email address and correct it.
Your question is posted on this page
Would you like to receive an email when new answers and questions are posted? Please enter your email address.