Thank you for choosing the SIP-T19 E2/SIP-T19P E2 (hereinafter referred to as SIP-T19(P) E2) IP
phone, exquisitely designed to provide business telephony features, such as Call Hold, Call
Transfer, Multicast Paging and Conference over an IP network. The difference between the
SIP-T19 E2 and SIP-T19P E2 IP phones is that only SIP-T19P E2 supports PoE.
This guide provides everything you need to quickly use your new phone. First, verify with your
system administrator that the IP network is ready for phone configuration. Also be sure to read
the Packaging Contents and Regulatory Notices sections in this guide before you set up and use
the SIP-T19(P) E2 IP phone.
Note
In This Guide
Topics provided in this guide include:
Chapter 1 Overview
Chapter 2 Getting Started
Chapter 3 Customizing Your Phone
Chapter 4 Basic Call Features
Chapter 5 Advanced Phone Features
Summary of Changes
This section describes the changes to this guide for each release and guide version.
Changes for Release 81, Guide Version 81.70
Major updates have occurred to the following sections:
Entering Data and Editing Fields on page 18
Remote Phone Book on page 43
Auto Answer on page 70
Do Not Disturb (DND) on page 76
Call Forward on page 78
Network Directory and Network Call Log features are hidden for IP phones in neutral firmware,
which are designed for the BroadWorks environment. Please contact your system administrator
for more information.
User Guide for the SIP-T19(P) E2 IP Phone
vi
Call Park/Retrieve on page 88
Multicast Paging on page 103
Changes for Release 81, Guide Version 81.20
None
Changes for Release 81, Guide Version 81.15
The contents in the following section are removed to
Frequently Asked Questions on Yealink IP
Phones
:
Troubleshooting
Major updates have occurred to the following sections:
Intercom on page 101
Multicast Paging on page 103
Changes for Release 81, Guide Version 81.10
The following sections are new:
Key Tone on page 31
CallPark on page 88
Major updates have occurred to the following sections:
Basic Network Settings on page 16
Language on page 22
Phone Lock on page25
Volume on page 28
Programable Keys on page51
Dial Plan on page 57
Call Mute on page73
Do Not Disturb (DND) on page76
Call Transfer on page81
Intercom on page101
Multicast Paging on page 103
About This Guide
vii
Changes for Release 80, Guide Version 80.95
The following section is new:
Entering Data and Editing Fields on page 18
Major updates have occurred to the following sections:
Icon Instructions on page 3
Optional Accessories on page 10
Phone Installation on page11
Appendix on page 129
User Guide for the SIP-T19(P) E2 IP Phone
viii
Table of Contents
About This Guide ........................................................................... v
In This Guide .............................................................................................................................................................. v
Summary of Changes ............................................................................................................................................. v
Changes for Release 81, Guide Version 81.70 .......................................................................................... v
Changes for Release 81, Guide Version 81.20 .........................................................................................vi
Changes for Release 81, Guide Version 81.15 .........................................................................................vi
Changes for Release 81, Guide Version 81.10 .........................................................................................vi
Changes for Release 80, Guide Version 80.95 ........................................................................................ vii
Table of Contents ........................................................................ viii
Feature Status Icons............................................................................................................................................ 3
Other Icons ............................................................................................................................................................. 4
LED Instructions ........................................................................................................................................................ 4
User Interfaces .......................................................................................................................................................... 5
Phone User Interface .......................................................................................................................................... 5
Web User Interface.............................................................................................................................................. 6
Phone Status ...........................................................................................................................................................14
Entering Data and Editing Fields.....................................................................................................................18
Customizing Your Phone .............................................................21
General Settings ....................................................................................................................................................21
Time & Date ........................................................................................................................................................22
Key As Send ........................................................................................................................................................25
Ring Tones ...........................................................................................................................................................29
Key Tone ...............................................................................................................................................................31
Local Directory ...................................................................................................................................................33
Remote Phone Book ........................................................................................................................................43
Call History Management ..................................................................................................................................45
Viewing History Records ................................................................................................................................45
Placing a Call from History Records ..........................................................................................................46
Adding a Contact to the Local Directory/Blacklist ...............................................................................46
Deleting History Records ...............................................................................................................................46
Disabling History Record ...............................................................................................................................47
Search Source List in Dialing ............................................................................................................................47
System Customizations.......................................................................................................................................49
Logo Customization .........................................................................................................................................49
Headset Use ........................................................................................................................................................49
Dial Plan ................................................................................................................................................................57
Emergency Number .........................................................................................................................................62
Live Dialpad .........................................................................................................................................................63
Recent Call In Dialing ..........................................................................................................................................69
Auto Answer ............................................................................................................................................................70
Auto Redial ..............................................................................................................................................................71
Muting a Call ......................................................................................................................................................74
Muting While Dialing ......................................................................................................................................74
Do Not Disturb (DND) .........................................................................................................................................76
Blind Transfer ......................................................................................................................................................82
Attended Transfer .............................................................................................................................................84
Local Conference ..............................................................................................................................................86
FAC Mode ............................................................................................................................................................89
Transfer Mode ....................................................................................................................................................91
Group Call Pickup .............................................................................................................................................94
Advanced Phone Features ...........................................................99
Hot Desking ............................................................................................................................................................99
Configuring the Intercom Feature on the IP Phone..........................................................................101
Using Intercom ................................................................................................................................................103
Using Multicast Paging ................................................................................................................................. 108
Music on Hold (MoH) ........................................................................................................................................109
Short Message Service (SMS).....................................................................................................................120
Voice Mail ..........................................................................................................................................................122
Service Agreements ...........................................................................................................................................127
Limitations of Liability .......................................................................................................................................127
Appendix A - Time Zones ................................................................................................................................129
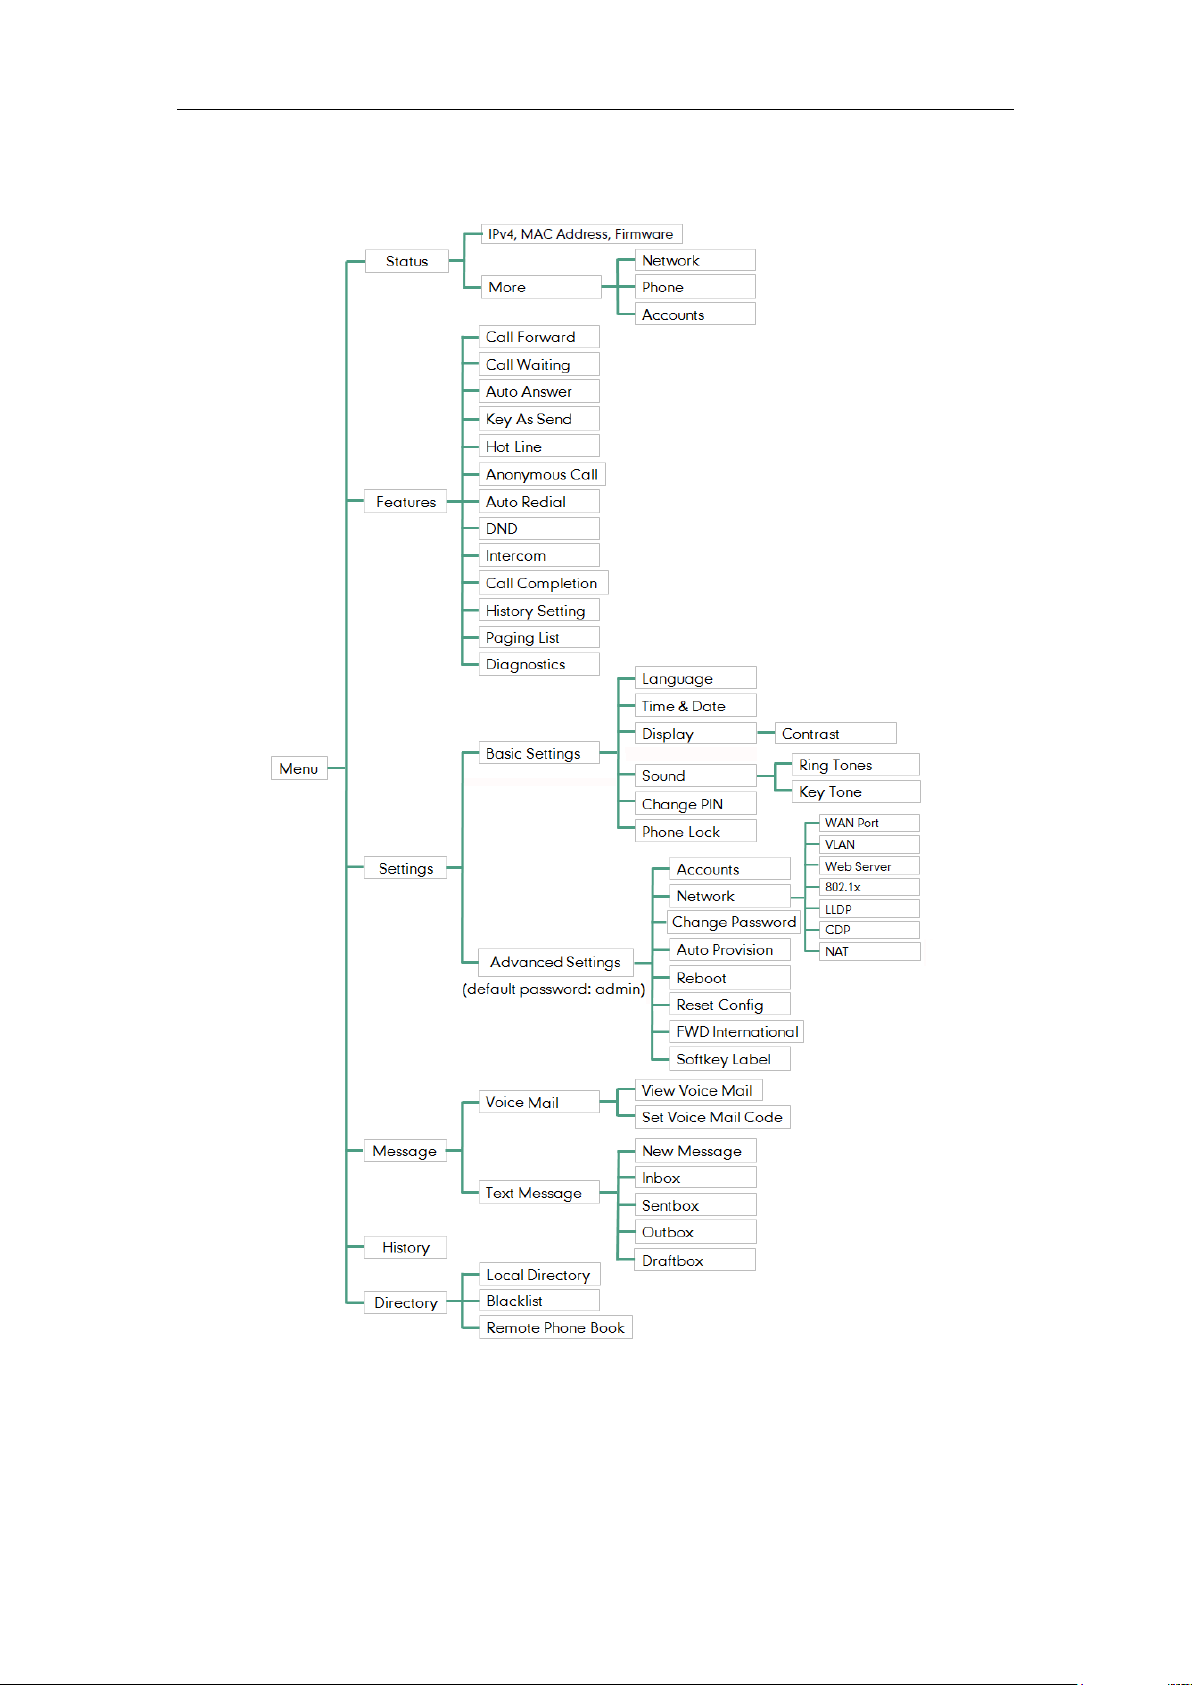
Appendix B – Menu Structure ........................................................................................................................131
Index ...........................................................................................133
Overview
1
Overview
This chapter provides the overview of the SIP-T19(P) E2 IP phone. Topics include:
Hardware Component Instructions
Icon Instructions
LED Instructions
User Interfaces
Documentations
If you require additional information or assistance with your new phone, contact your system
administrator.
Hardware Component Instructions
The main hardware components of the SIP-T19(P) E2 IP phone are the LCD screen and the
keypad.
User Guide for the SIP-T19(P) E2 IP Phone
2
Hardware component instructions of the SIP-T19(P) E2 IP phone are:
Item
Description
①
LCD Screen
Shows information about calls, messages, soft keys, time, date
and other relevant data:
• Default account
• Call information—caller ID, call duration
• Icons (for example,)
• Missed call text or second incoming caller information
• Prompt text (for example, "Saving config file!")
• Time and date
②
Power Indicator LED
Indicates call status, message status and phone’s system
status:
• Receives an incoming call—Fast-flashing
• Receives a voice mail or text message—Slow-flashing
③
Soft Keys
Label automatically to identify their context-sensitive features.
④
Scroll through the displayed information.
Confirms actions or answers incoming calls.
⑤
(Message Key)
Accesses voice mails.
⑥
(Headset Key)
Toggles the headset mode.
⑦
(Mute Key)
Mutes or un-mutes an active call.
⑧
(Transfer Key)
Transfers a call to another party.
⑨
Speakerphone Key
Toggles the hands-free (speakerphone) mode.
⑩
RD Key
Redials a previously dialed number.
⑪
Volume Key
Adjusts the volume of the handset, headset, speaker or ringer.
⑫
Keypad
Provides the digits, letters and special characters in
context-sensitive applications.
⑬
Speaker
Provides hands-free (speakerphone) audio output.
⑭
Hookswitch Tab
Secures the handset in the handset cradle when the IP phone
is mounted vertically. For more information on how to adjust
the hookswitch tab, refer to
Yealink Wall Mount Quick
Installation Guide for Yealink IP Phones
.
⑮
Hookswitch
• Picking up the handset from the handset cradle, the
hookswitch bounces and the phone connects to the line.
• Laying the handset down on the handset cradle, the phone
disconnects from the line.
Overview
3
Icon Instructions
Feature Status Icons
Icons appearing on the status bar are described in the following table:
Icons
Description
Network is unavailable
The private line registers successfully
Register failed
Registering
The shared/bridged line registers successfully
Hands-free (speakerphone) mode
Handset mode
Headset mode
Voice Mail
Text Message
Auto Answer
Do Not Disturb (DND)
Ringer volume is 0
Phone Lock
Keep Mute
Missed Calls
User Guide for the SIP-T19(P) E2 IP Phone
4
Icons
Description
Call Forward
The ACD state is available
and x
The ACD state is unavailable
The ACD state is Wrap up
Log out of the ACD system
Other Icons
Icon indicator (associated with call history)
Icons
Description
Missed Calls
Placed Calls
Received Calls
Forwarded Calls
Icon indicator (associated with contact)
Icons
Description
The contact icon
LED Instructions
Power Indicator LED
LED Status
Description
Solid yellow
The phone is initializing.
Fast-flashing yellow (300ms)
The phone is ringing.
Overview
5
LED Status
Description
Slow-flashing yellow (1s)
The phone receives a voice mail or text message.
Off
The phone is powered off.
The phone is idle.
The phone is busy.
The call is placed on hold or is held.
The call is muted.
Note
User Interfaces
Two ways to customize configurations of your SIP-T19(P) E2 IP phone:
The user interface on the IP phone.
The user interface in a web browser on your PC.
The hardware components keypad and LCD screen constitute the phone user interface, which
allows the user to execute all call operation tasks and basic configuration changes directly on
the phone. In addition, you can use the web user interface to access all configuration settings. In
many cases, either the phone user interface and/or the web user interface interchangeably.
However, in some cases, it is only possible to use one or the other interface to operate the
phone and change settings.
Phone User Interface
You can customize your phone by pressing the Menu soft key to access the phone user
interface. The Advanced Settings option is only accessible tothe administrator, and the default
administrator password is “admin” (case-sensitive). For more information on customizing your
phone with the available options from the phone user interface, refer toCustomizing Your
Phone on page21.
Note
The above introduces the default LED status. The status of the power indicator LED is
configurable via web user interface. For more information, contact your system administrator.
For a better understanding of the menu structure, please refer to Appendix B – Menu Structure
on page 131.
User Guide for the SIP-T19(P) E2 IP Phone
6
Web User Interface
In addition to the phone user interface, you can also customize your phone via web user
interface. In order to access the web user interface, you need to know the IP address of your
new phone. To obtain the IP address, press thekey on the phone when the phone is idle.
Enter the IP address (e.g., http://192.168.0.10 or 192.168.0.10 for IPv4;
http://[2005:1:1:1:215:65ff:fe64:6e0a] or [2005:1:1:1:215:65ff:fe64:6e0a] for IPv6) in the address
bar of a web browser on your PC. The default administrator user name and password are both
“admin”(case-sensitive).
Note
The options you can use to customize the IP phone via phone user interface and/or via web user
interface are listed in the following table:
Options
Phone User Interface
Web User Interface
Status
√
√
--IPv4
--MAC Address
--Firmware
--Network
--Phone
--Accounts
Basic Phone Settings
√
--Contrast
√
--Language
√
--Time & Date
√
--Administrator Password
√
--Key As Send
√
--Phone Lock
√
--Ring Tones
√
--Key Tone
√
--Contact Management
--Directory
x
--Local Directory
√
--Blacklist
√
--Remote Phone Book
x
--Call History Management
√
--Search Source List in Dialing
x
--Logo Customization
x
The access to the Advanced settings of the Account or Network via web user interface may be
blocked by the web browser (e.g., Chrome, Firebox) if you have installed “Adblock Plus plugin”.
Overview
7
Options
Phone User Interface
Web User Interface
--Headset Use
√
--Programable Keys
x
--Account Registration
√
--Dial Plan
x
--Emergency Number
x
--Live Dialpad
x
--Hotline
√
Basic Call Features
√
--Recent Call In Dialing
x
--Auto Answer
√
--Auto Redial
√
--Call Completion
√
--ReCall
x
--Do Not Disturb (DND)
√
--Call Forward
√
--Call Transfer
√
--Call Waiting
√
--Conference
x
--Call Park
--Call Pickup
√
--Anonymous Call
√
--Anonymous Call Rejection
√
Advanced Phone Features
√
--Hot Desking
√
--Intercom
√
--Multicast Paging
x
--Shared Call Appearance (SCA)
x
--Bridged Line Appearance (BLA)
x
--Music on Hold
x
--Messages
√
SIP Account
√
--User Options
--Activation
√
--Label
√
--Display Name
√
--Register Name
√
--User Name
√
--Password
√
--Server Option
--SIP Server 1/2
√
User Guide for the SIP-T19(P) E2 IP Phone
8
Options
Phone User Interface
Web User Interface
--Register Port
x
--Outbound Status
√
--Outbound Proxy1/2
√
--Fallback Interval
√
--NAT Status
√
Note
Documentations
The following table shows documentations available for the SIP-T19(P) E2 IP phone.
Name
Contents
Where found
Language
Quick Start Guide
Basic call features and
phone customizations
In the package
English
On the website
English/Chinese
User Guide
Phone/Web user
interface settings
Basic call features and
advanced phone
features
On the website
English/Chinese
Note
The table above lists most of the feature options. Please refer to the relevant sections for more
information.
You can also download the latest documentations online:
Libble takes abuse of its services very seriously. We're committed to dealing with such abuse according to the laws in your country of residence. When you submit a report, we'll investigate it and take the appropriate action. We'll get back to you only if we require additional details or have more information to share.
Product:
Forumrules
To achieve meaningful questions, we apply the following rules:
First, read the manual;
Check if your question has been asked previously;
Try to ask your question as clearly as possible;
Did you already try to solve the problem? Please mention this;
Is your problem solved by a visitor then let him/her know in this forum;
To give a response to a question or answer, do not use this form but click on the button 'reply to this question';
Your question will be posted here and emailed to our subscribers. Therefore, avoid filling in personal details.
Register
Register getting emails for Yealink SIP-T19 E2 at:
new questions and answers
new manuals
You will receive an email to register for one or both of the options.
Get your user manual by e-mail
Enter your email address to receive the manual of Yealink SIP-T19 E2 in the language / languages: English as an attachment in your email.
The manual is 3.84 mb in size.
You will receive the manual in your email within minutes. If you have not received an email, then probably have entered the wrong email address or your mailbox is too full. In addition, it may be that your ISP may have a maximum size for emails to receive.
If you have not received an email with the manual within fifteen minutes, it may be that you have a entered a wrong email address or that your ISP has set a maximum size to receive email that is smaller than the size of the manual.
The email address you have provided is not correct.
Please check the email address and correct it.
Your question is posted on this page
Would you like to receive an email when new answers and questions are posted? Please enter your email address.