587008
185
Zoom out
Zoom in
Previous page
1/198
Next page
185
Manual de usuario
Instalación de hardware opcional
Apéndice
Plug-in SLOT
GREEN
YELLOW
ORANGE
Plug-in SLOT
GREEN
YELLOW
ORANGE
Ranura Verde
Amarillo
Naranja
Ranura 3
Ranura 2
Ranura 1
3
2
1
Ranura Verde
Amarillo
Naranja
Naranja
Amarillo
Verde
Cable para
ranura 3
(verde)
Cable para
ranura 2
(amarillo)
Cable para
ranura 1
(naranja)
Ranura 3
Ranura 2
Ranura 1
3
2
1
Ranura Verde
Amarillo
Naranja
3
2
1
Inserte firmemente la tarjeta en la ranura apropiada y
procure que la tarjeta no se enganche entre las
ranuras.
Instalación de tarjetas "Plug-in"
opcionales
Las distintas tarjetas opcionales "Plug-in" que se venden
por separado permiten ampliar la biblioteca de voces del
instrumento. El S90 ES dispone, en el panel posterior, de
tres ranuras para las tarjetas "Plug-in", lo que le permite
instalar hasta tres tarjetas para usarlas simultáneamente.
Para más detalles sobre la línea de tarjetas que pueden
utilizarse con el S90 ES, ver página 99.
La tarjeta "Plug-in" de armonía vocal (PLG100-VH) sólo puede
instalarse en la ranura 1.
La tarjeta "Plug-in" multiparte (PLG100-XG) sólo puede instalarse
en la ranura 3.
La tarjeta "Plug-in" de parte simple puede instalarse en cualquiera
de las tres ranuras.
1Apague el S90 ES y desconecte el cable de
alimentación. Desconecte también todos los
dispositivos externos conectados al S90 ES.
2Retire el tornillo largo de la tapa de la bahía de
ampliación del panel posterior con un
destornillador Phillips.
Coloque el tornillo en un sitio seguro. Tenga cuidado de no
perder ningún tornillo, ya que todos son necesarios.
IMPORTANTE
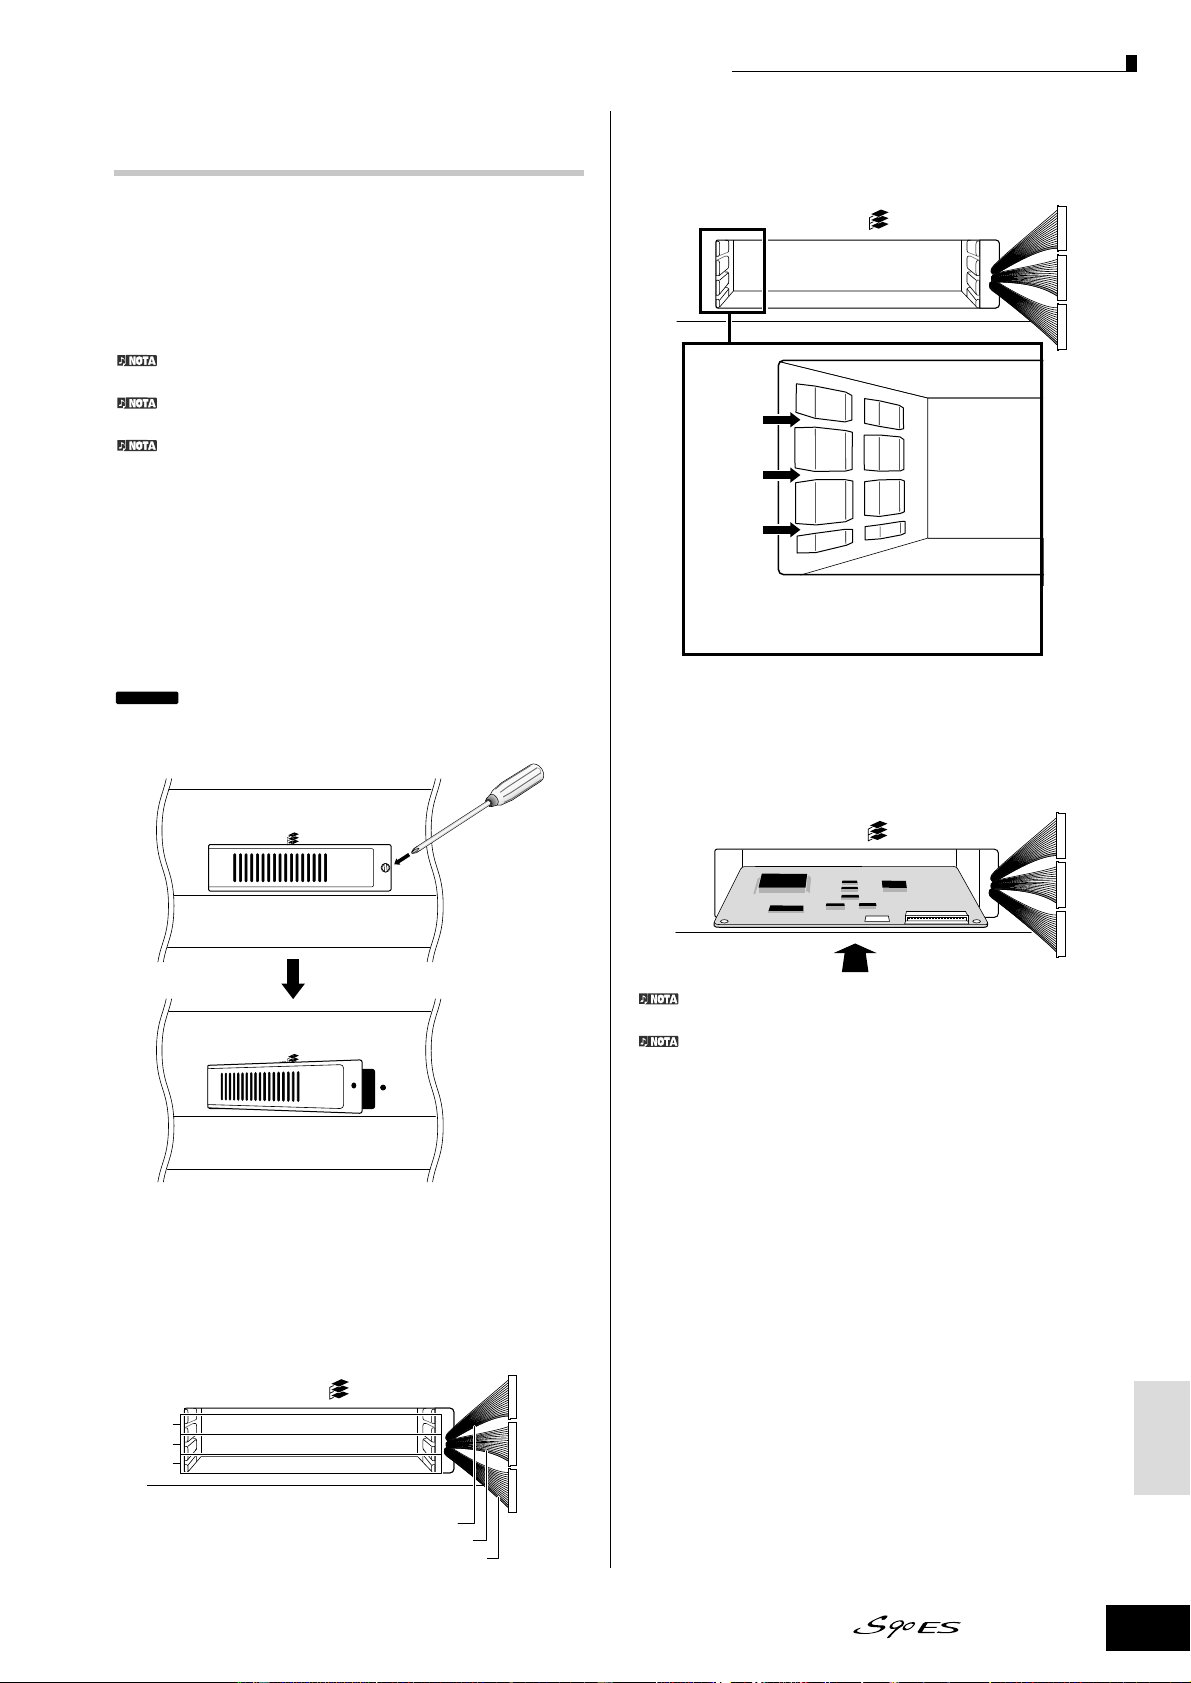
3Retire los cables planos que se van a conectar a la
tarjeta "Plug-in" en el interior del S90 ES.
Las ranuras están asignadas a los cables con un
código de color: Ranura 1 – naranja, Ranura 2 –
amarillo, Ranura 3 – verde.
4Inserte la tarjeta en los carriles de guía en el
interior del S90 ES unos dos tercios, con el lado
del conector hacia arriba y hacia adelante.
5Introduzca la parte restante de la tarjeta "Plug-in"
en la bahía de expansión.
La tarjeta "Plug-in" de armonía vocal (PLG100-VH) solo puede ser
instalada en la ranura 1. No puede ser instalada en la ranura 2 ó 3.
La tarjeta "Plug-in" multiparte (PLG100-VH) solo puede ser instalada
en la ranura 3. No puede ser instalada en la ranura 1 ó 2.
185


Need help? Post your question in this forum.

Forumrules


Report abuse

Libble takes abuse of its services very seriously. We're committed to dealing with such abuse according to the laws in your country of residence. When you submit a report, we'll investigate it and take the appropriate action. We'll get back to you only if we require additional details or have more information to share.

Product:

For example, Anti-Semitic content, racist content, or material that could result in a violent physical act.

For example, a credit card number, a personal identification number, or an unlisted home address. Note that email addresses and full names are not considered private information.

Forumrules

To achieve meaningful questions, we apply the following rules:

Register

Register getting emails for Yamaha S90ES at:


You will receive an email to register for one or both of the options.


Get your user manual by e-mail

Enter your email address to receive the manual of Yamaha S90ES in the language / languages: Spanish as an attachment in your email.

The manual is 5,36 mb in size.


You will receive the manual in your email within minutes. If you have not received an email, then probably have entered the wrong email address or your mailbox is too full. In addition, it may be that your ISP may have a maximum size for emails to receive.

Others manual(s) of Yamaha S90ES

Yamaha S90ES User Manual - English - 204 pages

Yamaha S90ES User Manual - German - 204 pages

Yamaha S90ES User Manual - Dutch - 204 pages

Yamaha S90ES User Manual - French - 204 pages

Yamaha S90ES User Manual - Portuguese - 204 pages


The manual is sent by email. Check your email

If you have not received an email with the manual within fifteen minutes, it may be that you have a entered a wrong email address or that your ISP has set a maximum size to receive email that is smaller than the size of the manual.

The email address you have provided is not correct.

Please check the email address and correct it.

Your question is posted on this page

Would you like to receive an email when new answers and questions are posted? Please enter your email address.


Info