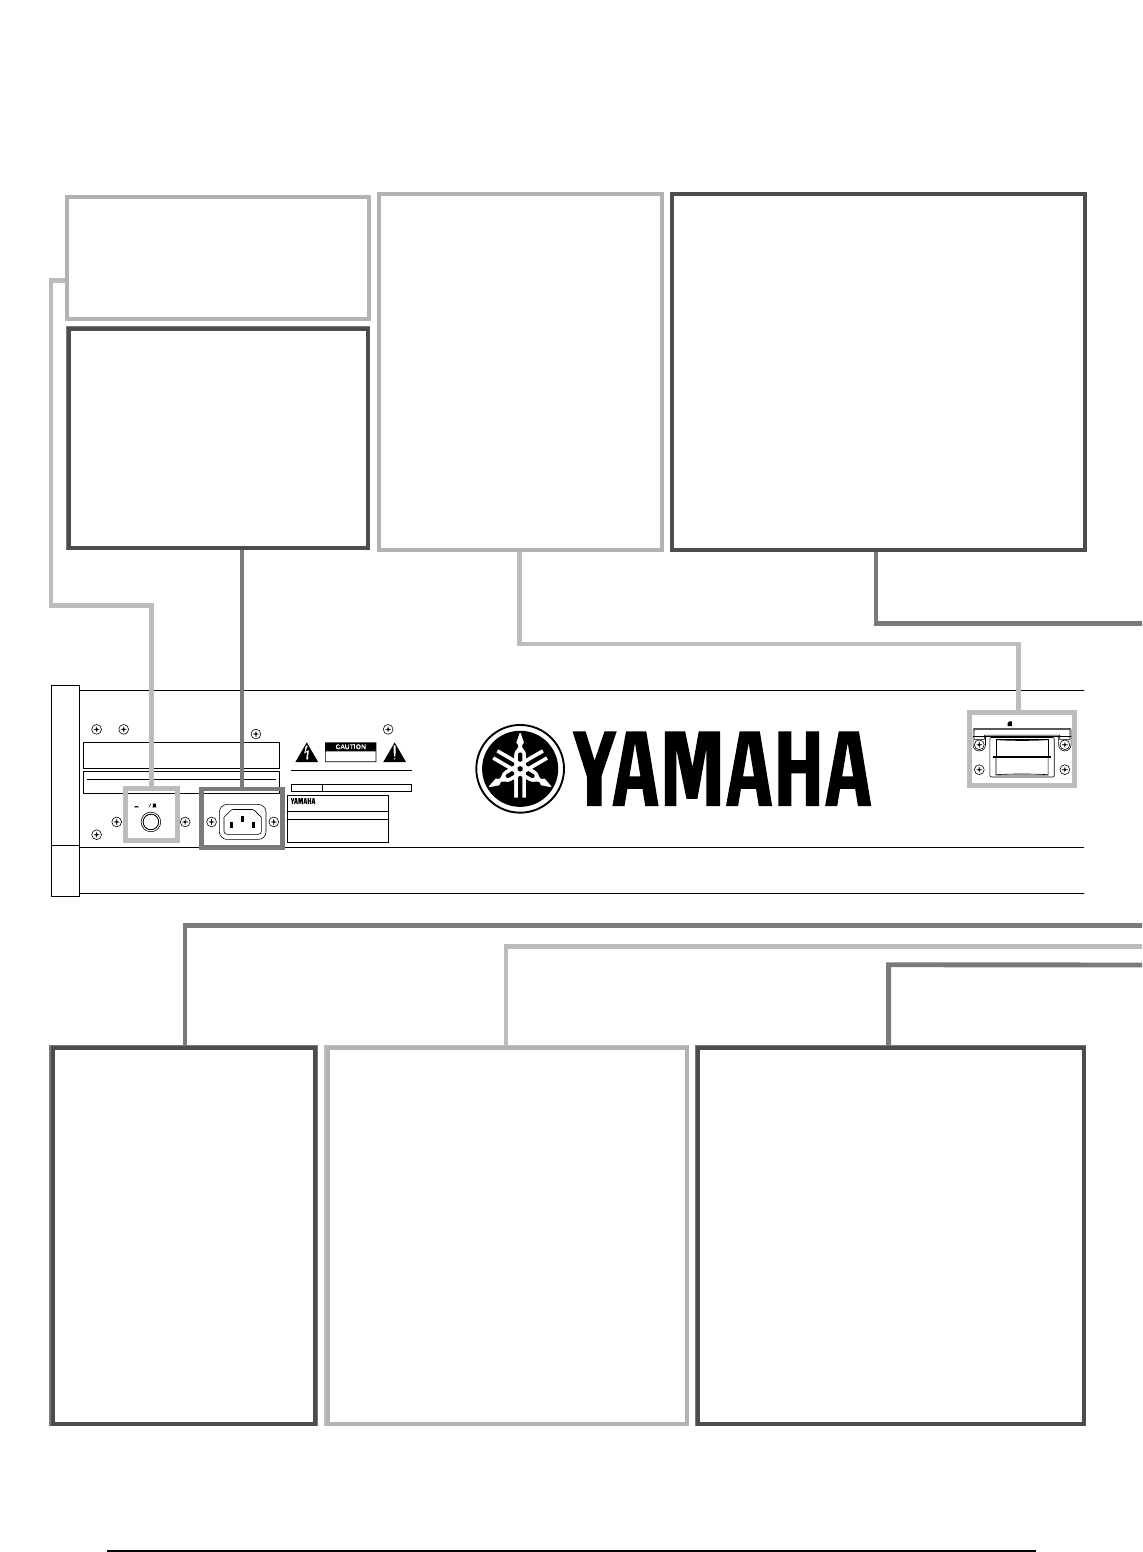
POWER AC INLET
ON OFF
CARD
3.3V
POWER switch (Page 19)
Use this to switch the
synthesizer on or off.
FOOT CONTROLLER jack
(Pages 18, 44)
An optional foot controller
(FC7, etc.) can be
connected here. Using the
foot controller, you can
control tones, pitches,
volumes or the like by foot.
FOOT VOLUME jack (Pages 18, 44)
An optional foot controller (FC7, etc.)
can be connected here. You can
control the output level from the
instrument by foot. In Utility Mode, you
can select Volume or Expression for
this controller.
INDIVIDUAL OUTPUT 1 and 2 jacks
(Page 13)
Line level audio signals are output from
the synthesizer via these phone jacks (1/4"
mono phone plug). The output is
separated from that at the OUTPUT
L/MONO and R jacks. In Performance
Mode, you can specify which Parts can be
output from these separate outputs.
AC INLET terminal (Page 12)
Plug the female end of the
supplied AC power cord in here
before plugging it into an AC
wall outlet.
CARD slot (Page 142)
Insert a Memory Card here to
transfer various data to/from
the instrument. Read
carefully the precautions on
use of a Memory Card (Page
142) before using a card.
MIDI IN, OUT, and THRU connectors (Page 15)
MIDI IN receives MIDI messages from an
external MIDI device. Use this connector to
control the synthesizer from an external MIDI
device. MIDI OUT sends out MIDI messages
generated by the synthesizer, such as notes
played on the keyboard or panel control/knob
variations, to an external MIDI sound module
or device. MIDI THRU just reflects the MIDI
messages received at MIDI IN. Connect
other MIDI devices here.
Panel Posterior
Interruptor de encendido
POWER (página 19)
Utilice este interruptor para
encender o apagar el sintetiza-
dor.
Ranura CARD (página 142)
Aquí deberá insertar la tarjeta
de memoria para transferir
datos. Observe atentamente
las precauciones sobre el uso
de la tarjeta de memoria (pági-
na 142) antes de proceder a su
utilización.
Terminal AC INLET (página 12)
Conecte aquí el extremo hembra
del cable de alimentación (c.a.)
suministrado, y después conecte
el otro extremo a la toma mural.
Conector FOOT VOLUME
(páginas 18, 44)
Aquí podrá conectar un pedal controla-
dor opcional (FC7, etc.) para controlar
el nivel de salida del instrumento con el
pie. La selección de Volume o Expres-
sion para este controlador se realiza en
el modo de Utilidades.
Terminal FOOT CONTRO-
LLER (páginas 18, 44)
Aquí puede conectar un
pedal controlador opcional
(FC7, etc.), con el que
podrá controlar tonos, tim-
bres, volúmenes y simila-
res.
Terminales INDIVIDUAL OUTPUT 1 y 2
(página 13)
Por estos terminales se envían las señales
de audio de nivel de línea del sintetizador
(jack monofónico de 1/4”). La salida no es
la misma que la de los conectores OUTPUT
L/MONO y R. En el modo de Actuación
podrá especificar las Partes que se pueden
enviar desde estas salidas independientes.
Conectores MIDI IN, OUT y THRU
(página 15)
El terminal MIDI IN recibe mensajes MIDI
provenientes de un dispositivo MIDI externo.
Utilice este conector para controlar el sintetiza-
dor desde un dispositivo MIDI externo. El ter-
minal MIDI OUT envía mensajes MIDI gene-
rados por el sintetizador, como las notas toca-
das en el teclado o las variaciones de controles
o mandos del panel, a un módulo de sonido o
dispositivo MIDI externo. El terminal MIDI
THRU retransmite los mensajes MIDI recibi-
dos en la entrada MIDI IN. Conecte aquí otros
dispositivos MIDI.