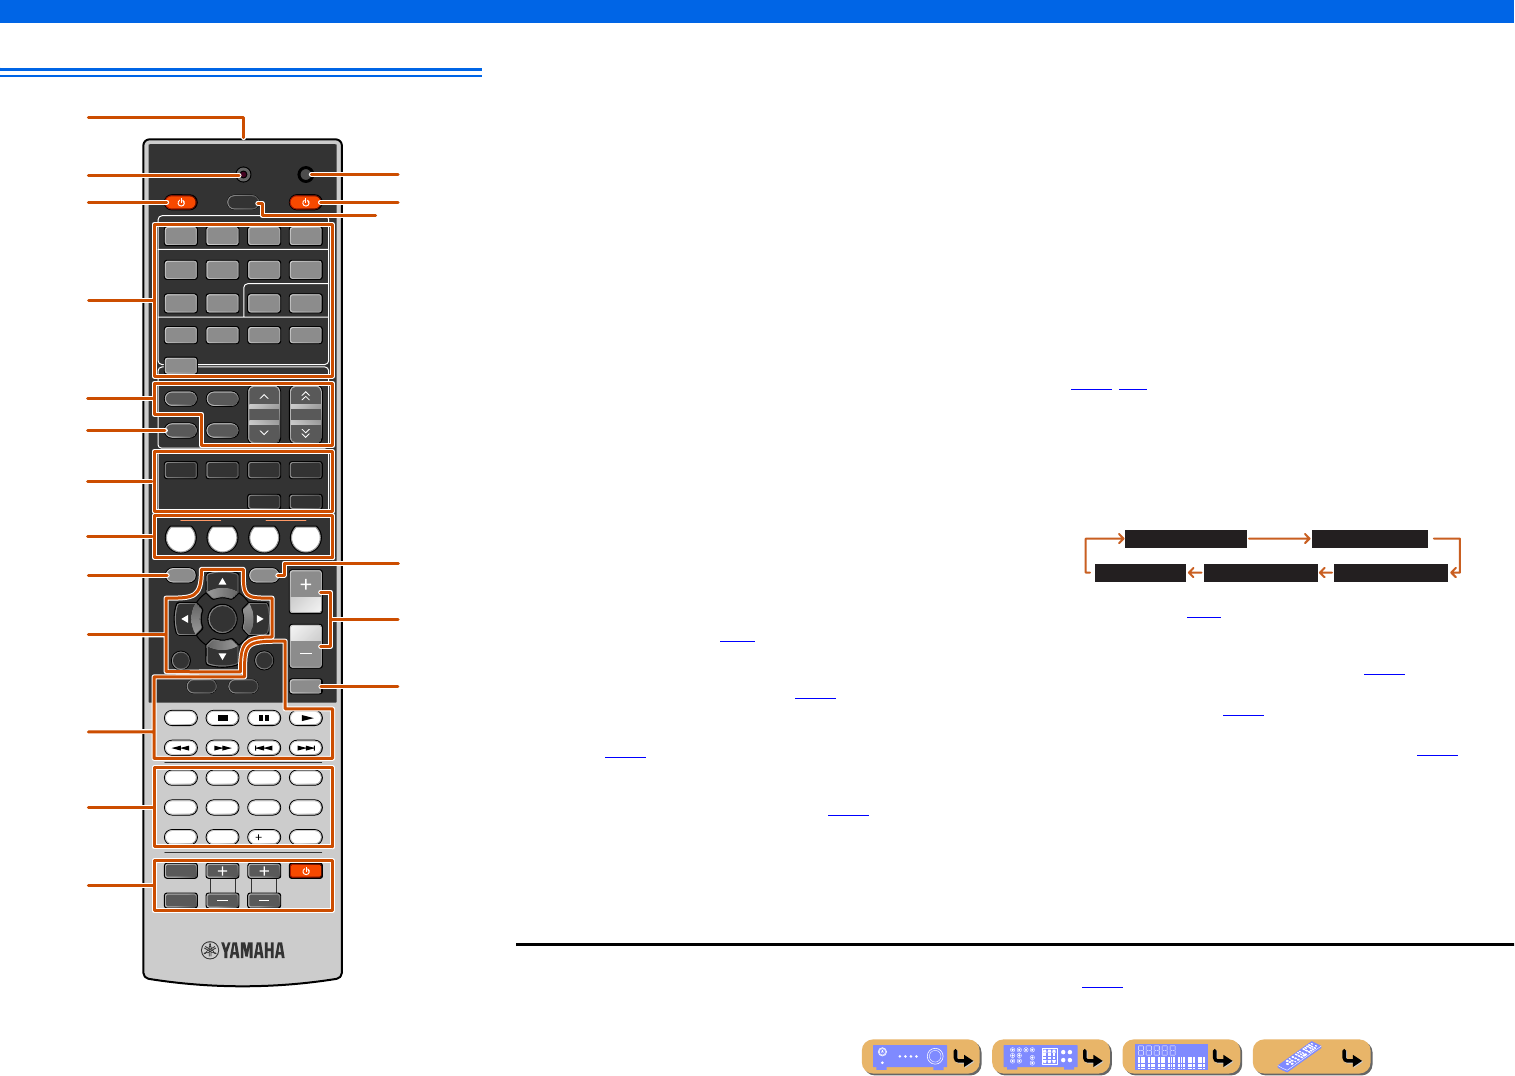
Si illumina quando il telecomando emette un segnale.
cSOURCE A (alimentazione SOURCE)
Accende/spegne un componente esterno.
dSelettore di ingresso
Seleziona una sorgente di ingresso sull’unità da cui riprodurre.
eTasti del sintonizzatore
Serve per far funzionare il sintonizzatore FM/AM. Si tratta di tasti usati quando
si utilizza l’ingresso del sintonizzatore.
fINFO
Serve per visualizzare nell’ordine le informazioni sul display del pannello
anteriore (il nome della sorgente d’ingresso attualmente selezionata, il
programma del campo sonoro, il decodificatore surround, la frequenza del
sintonizzatore FM/AM, ecc.) (☞
p. 7).
gTasti di selezione audio
Modifica l’effetto di campo sonoro (programma campo sonoro) in uso e il
decodificatore del decodificatore surround (☞
p. 29).
hSCENE
Modifica la sorgente d’ingresso e il programma di campo sonoro con un solo
pulsante (☞
p. 29). Se l’unità si trova in modalità standby, premere questo tasto
per accenderlo.
iSETUP
Visualizza un menu dettagliato Setup per l’unità (☞
p. 48).
jCursore B / C / D / E, ENTER, RETURN
kTasti operativi per i componenti esterni
Per attivare la registrazione, la riproduzione e la visualizzazione del menu ecc.
per componenti esterni. J1
lTasti numerici
Per immettere i numeri.
mTasti di controllo TV
Permettono il funzionamento di un monitor, ad esempio il televisore.
nCODE SET
Imposta i codici di telecomando per il funzionamento dei componenti esterni
(☞
p. 62, p. 66).
oRECEIVER A (alimentazione RECEIVER)
Commuta lo stato dell’unità da acceso a standby e viceversa.
pSLEEP
Serve per impostare l’unità in modalità standby automaticamente dopo un
periodo di tempo specificato (spegnimento automatico tramite timer). Premere
questo tasto ripetutamente per impostare l’ora della funzione di spegnimento.
L’indicatore SLEEP (☞
p. 7) si accende quando lo spegnimento automatico via
timer è attivo.
qOPTION
Mostra il menu Option per ogni sorgente d’ingresso (☞
p. 44).
rVOLUME +/-
Regola il livello di volume (☞
p. 28).
sMUTE
Attiva/disattiva la funzione di silenziamento dell’uscita audio (☞
p. 28).
RECEIVER
SCENE
OPTION
SETUP
RETURN
VOLUME
ENHANCER
SUR. DECODE
STRAIGHTDIRECT
HDMI
AV
AUDIO
TRANSMIT
SLEEP
1234
1234
1256
V-AUX
TUNER
FM
INFO
MEMORY
AM
PRESET
TUNING
MOVIEMUSIC
STEREO
BD
DVD
TV
CD
RADIO
MUTE
ENTER
7856
90
10
1234
REC
ENT
TV
TV VOLTV CH
TOP
MENU
POP-UP
MENU
DISPLAY
SOURCE
CODE SET
INPUT
MUTE
DOCK[ A ][ B ]
a
c
b
p
o
d
e
g
h
i
q
r
s
l
m
n
j
f
k
HDMI1-4Prese HDMI1-4
AV1-6Prese AV1-6
AUDIO1-2Prese AUDIO1-2
V-AUXPrese pannello anteriore VIDEO AUX
[A]/[B]Modifica il componente esterno da utilizzare con i
kTasti operativi per i componenti esterni
senza cambiare ingressi.
J1
DOCKUn dock universale Yamaha per iPod o ricevitore
audio wireless Bluetooth collegato alla presa DOCK.
TUNERSintonizzatore FM/AM
FMImposta la banda del sintonizzatore FM/AM su FM.
AMImposta la banda del sintonizzatore FM/AM su AM.
MEMORYPreimposta le stazioni radio.
PRESET F / GSeleziona una stazione radio preimpostata.
TUNING H / ICambia le frequenze di sintonizzazione.
Cursore
B / C / D / ESelezionare le opzioni del menu e modificare le
opzioni quando sono visualizzati i menu di
configurazione, ecc.
ENTERConferma l’opzione selezionata.
RETURNRitorna alla schermata precedente quando sono
visualizzati i menu di configurazione o termina la
visualizzazione del menu.
Sleep 120min.Sleep 90min.
Sleep 60min.Sleep 30min.Sleep Off
JJ
1 :Si può utilizzare kTasti operativi per i componenti esterni per ciascuna sorgente d’ingresso per utilizzare componenti registrati. I codici del telecomando devono
essere registrati per ciascuna sorgente in anticipo se si desidera utilizzare componenti esterni (☞
Libble takes abuse of its services very seriously. We're committed to dealing with such abuse according to the laws in your country of residence. When you submit a report, we'll investigate it and take the appropriate action. We'll get back to you only if we require additional details or have more information to share.
Product:
Forumrules
To achieve meaningful questions, we apply the following rules:
First, read the manual;
Check if your question has been asked previously;
Try to ask your question as clearly as possible;
Did you already try to solve the problem? Please mention this;
Is your problem solved by a visitor then let him/her know in this forum;
To give a response to a question or answer, do not use this form but click on the button 'reply to this question';
Your question will be posted here and emailed to our subscribers. Therefore, avoid filling in personal details.
Register
Register getting emails for Yamaha RX-V467 at:
new questions and answers
new manuals
You will receive an email to register for one or both of the options.
Get your user manual by e-mail
Enter your email address to receive the manual of Yamaha RX-V467 in the language / languages: Italian as an attachment in your email.
The manual is 7,5 mb in size.
You will receive the manual in your email within minutes. If you have not received an email, then probably have entered the wrong email address or your mailbox is too full. In addition, it may be that your ISP may have a maximum size for emails to receive.
If you have not received an email with the manual within fifteen minutes, it may be that you have a entered a wrong email address or that your ISP has set a maximum size to receive email that is smaller than the size of the manual.
The email address you have provided is not correct.
Please check the email address and correct it.
Your question is posted on this page
Would you like to receive an email when new answers and questions are posted? Please enter your email address.