L’unità dispone di una funzione SCENE che consente di accendere l’unità e cambiare le sorgenti di ingresso, le impostazioni di Audio Select, HDMI Output, Sound Program, Pure Direct Mode, Tone Control, Adaptive DRC,
e della modalità Compressed Music Enhancer con un solo tasto.
Selezione di una SCENE indicata per un componente esterno
Nelle impostazioni di fabbrica iniziali, le funzioni SCENE sono configurate per i seguenti componenti.
Selezionare una scena secondo il componente che verrà utilizzato per la riproduzione.
SCENE 1
Le impostazioni sono configurate per visualizzare contenuto da dischi DVD o Blu-ray. Premere questo tasto e
riprodurre il contenuto dal lettore DVD o Blu-ray collegato alla presa AV1 sull’unità.
SCENE 2
Le impostazioni sono configurate per visualizzare contenuto TV. Premere questo tasto e accendere il TV collegato
alla presa AUDIO1 sull’unità.
SCENE 3
Le impostazioni sono configurate per l’ascolto di contenuto da CD. Premere questo tasto e riprodurre il contenuto
dal lettore CD collegato alla presa AUDIO2 sull’unità.
SCENE 4
Le impostazioni sono configurate per l’ascolto di una stazione radio. Premere questo tasto e sintonizzare una
stazione radio.
SCENE 5-12
Alle impostazioni predefinite di fabbrica non viene registrato niente sulla scena. Le impostazioni preferite possono
essere memorizzate sulle scene e ricaricate utilizzando “Save” e “Load” nel menu Scene. Per maggiori dettagli,
fare riferimento a “Menu Scene” (
☞
p. 86).
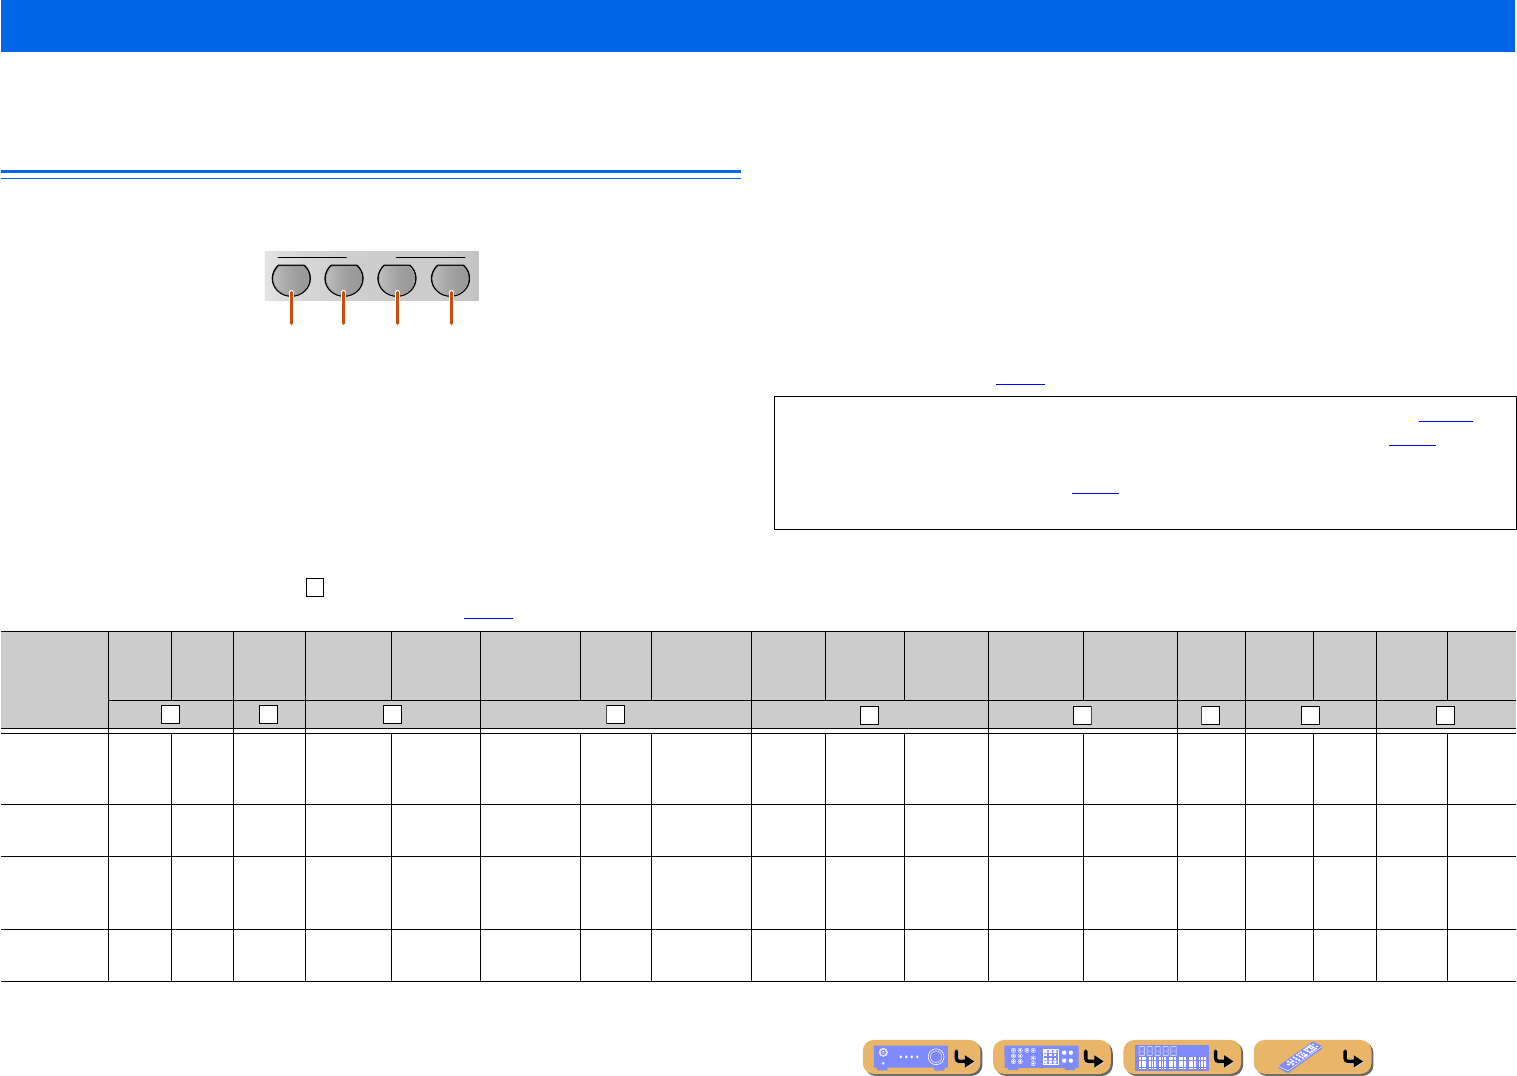
Sono disponibili quattro scene da utilizzare quando si riproducono film o brani musicali. Le seguenti impostazioni, quali le sorgenti di ingresso, i programmi sonori e HDMI Output sono impostati sui valori predefiniti.
Le impostazioni che non sono contrassegnate () non sono abilitate quando si preme un tasto scena. Utilizzare “Load” nel menu Scene per controllare che le impostazioni siano abilitate. Fare riferimento a “Configurazione delle
impostazioni registrate con la funzione SCENE” per maggiori dettagli (
☞
p. 86).
Modifica configurazioni d’ingresso utilizzando un solo tasto (funzione SCENE)
2
3
SCENE
1
4
BD/DVDTVCDRADIO
•
Quando si cambia scena, modificare anche il componente esterno che si utilizza con il telecomando (
☞
p. 112).
•
Si consiglia di svolgere la selezione di una scena e e la modifica della SCENE nel menu Scene (
☞
p. 85).
•
Questa unità è dotata di otto funzioni di scena aggiuntive. Dopo aver selezionato una delle scene si può anche
selezionare una delle otto scene aggiuntive (
☞
p. 86).
•
Premere e tenere premuto il tasto
e
SCENE
per circa tre secondi per registrare le impostazioni correnti sulla scena.
Libble takes abuse of its services very seriously. We're committed to dealing with such abuse according to the laws in your country of residence. When you submit a report, we'll investigate it and take the appropriate action. We'll get back to you only if we require additional details or have more information to share.
Product:
Forumrules
To achieve meaningful questions, we apply the following rules:
First, read the manual;
Check if your question has been asked previously;
Try to ask your question as clearly as possible;
Did you already try to solve the problem? Please mention this;
Is your problem solved by a visitor then let him/her know in this forum;
To give a response to a question or answer, do not use this form but click on the button 'reply to this question';
Your question will be posted here and emailed to our subscribers. Therefore, avoid filling in personal details.
Register
Register getting emails for Yamaha RX-V2067 at:
new questions and answers
new manuals
You will receive an email to register for one or both of the options.
Get your user manual by e-mail
Enter your email address to receive the manual of Yamaha RX-V2067 in the language / languages: Italian as an attachment in your email.
The manual is 20,75 mb in size.
You will receive the manual in your email within minutes. If you have not received an email, then probably have entered the wrong email address or your mailbox is too full. In addition, it may be that your ISP may have a maximum size for emails to receive.
If you have not received an email with the manual within fifteen minutes, it may be that you have a entered a wrong email address or that your ISP has set a maximum size to receive email that is smaller than the size of the manual.
The email address you have provided is not correct.
Please check the email address and correct it.
Your question is posted on this page
Would you like to receive an email when new answers and questions are posted? Please enter your email address.